Automator is a program that lets you automate the things you frequently like to do on your Mac. You don’t need to be a programmer to create automations. With Automator, all you need to do is assemble a series of actions into a workflow to complete a task. Each action performs an individual step, such as opening a file, creating an event in iCal, or importing photos in Image Capture. You can create your own actions or use one of the many pre-built ones available in Automator library.
When you start Automator, a dialog box appears asking you to choose from a group of templates, also known as starting points, that help you create the first part of your workflow. There are several templates you can use to help you get started (New!): Workflow, Application, Service, Folder Action, Print Plugin, iCal Alarm, and Image Capture Plugin. After you choose a template, you see an untitled workflow with a blank workflow action in the Workflow pane you can fill in. You create a workflow by dragging additional actions or variables into the Workflow pane, arranging them into the order you want from top to bottom, and specifying the settings you want for each action or variable.
When you have more than one action in a workflow, Automator frequently passes information from one action to another starting from the top. When you run a workflow, each action receives information from the previous action (input) and passes information to the following action (output). If an action needs to receive a certain type of information, it needs to be placed in the workflow following an action that outputs that type of information.
In addition to Automator, you can also use AppleScript, an English-like scripting language, to run prebuilt or custom-made scripts to automate actions performed by the computer. AppleScript lets you write your own mini applications to help with repetitious tasks.
Anyone can create a workflow in Automator. All it requires is the Automator application available in the Applications folder, and a little knowledge about the process.
When you start Automator, a dialog box appears asking you to choose from a group of templates that help you create the first part of your workflow. There are several templates you can use to help you get started (New!) : Workflow, Application, Service, Folder Action, Print Plugin, iCal Alarm, and Image Capture Plugin. If you already have an existing workflow, you can open it from the dialog box.
After you choose a template, you see an untitled workflow with a blank workflow action (except for Custom) in the Workflow pane you can fill in. You create a workflow by displaying Actions or Variables in the Library pane, selecting the name of the application or category you want to use from the Library list, specifying what you want it to do with it in the Action or Variable list, and dragging it into the Workflow pane to assemble the steps you want to automate.
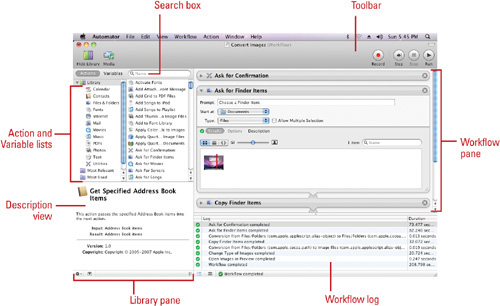
The Automator window consists of different parts, including Toolbar buttons, Library pane, Library list, Action or Variable list, Search box, Description view, and Workflow pane.
The top part of the Automator window displays a toolbar with buttons you can use to make it easier to work with Automator. On the left side of the toolbar, Automator provides two default buttons: Hide/Show Library and Media. The Hide/Show Library button) hides or shows the Library pane, while the Media button makes it easy to add media to your workflows. On the right-side of the toolbar, Automator provides three default buttons, known as Workflow control buttons: Record, Stop, and Run. The Record button creates a workflow by recording of your mouse movements, while the Stop and Run buttons stop and play back the current workflow. These are not the only toolbar buttons available in Automator. You can use the Customize Toolbar command on the View menu to add and remove the buttons you want and change the button size and display.
The left side of the Automator window is the Library pane, which displays the available actions and variables you can use to create Automator workflows.
When you click the Actions button at the top of the Library pane, a Library list and Action list appear. The Library list displays every program, including some OS utilities, on your Mac that you can use to create Automator workflows. When you select a program, the Action list changes to show the actions related to the program. Snow Leopard provides improved and new actions, for Preview, the Internet, RSS, and the Finder. At the bottom of the Library list, you can use Smart Groups, including Most Relevant, Most Used, and Recently Added, or create your own to make it easier to displays the actions you want to use.
When you click the Variables button at the top of the Library pane, a Library list and Variable list appear. The Library list displays OS utilities categories on your Mac that you can use to create Automator workflows. When you select a program, the Variable list changes to show the available variables you can use to store values and create more flexible workflows.
The Search box at the top of the Library pane is similar to the one you find in other parts of Mac OS X. In Automator, the Search box makes it easier to find the actions or variables you want to use. Before you start a search, select a category from the Library list. As you type in the Search box, Automator displays the actions or variables that match your criteria from the selected category. If you want to search through more than one category, you can press ![]() to select the ones you want. If you want to search all the categories, click Library at the top of the Library list. The results of your search appear in the Action or Variable list in order of relevance to your search criteria. When you’re done, you can click the small gray X button in the Search box to return to the complete list of actions.
to select the ones you want. If you want to search all the categories, click Library at the top of the Library list. The results of your search appear in the Action or Variable list in order of relevance to your search criteria. When you’re done, you can click the small gray X button in the Search box to return to the complete list of actions.
The Description view at the bottom of the Library pane displays a description of the selected action or variable. The description provides information about what the action or variable does, what requirements it needs to get started, what kind of data it needs as input, what options are available, and what kind of action it performs as a result. If you need more room to display the Action or Variable list, you can click the Show Or Hide The Description View button at the bottom of the Library pane.
The Workflow pane is where you place the actions and variables you want to use to create a workflow. The Workflow pane displays and tracks a flow of information from one action or variable to the next creating the results you want. In the Workflow pane, you can change the order of items, set item specific settings and options, display item descriptions, and show the results for specific ones.
The Show Or Hide The Workflow Log button at the bottom of the Workflow pane shows or hides the workflow log, which allows you to track what your workflow is doing.
Developers are always creating new actions for you to use. Check out the Apple Web site at www.apple.com/downloads/macosx/automator for more information and details, or visit www.automatorworld.com/category/actions. After you download them to your computer, you can use the Import Actions command on the File menu to add them to your Library list in Automator. Writing your own actions is out of the scope of this book. For details, see the Apple Developer Web site at www.apple.com/macosx/features/automator.
When you start Automator, a dialog box appears asking you to choose from a group of templates, also known as starting points, that help you create the first part of your workflow. You can use any of the following templates (New!) to help you get started: Workflow, Application, Service (New!), Folder Action, Print Plugin, iCal Alarm, and Image Capture Plugin. After you choose a template, you see an untitled workflow with an action in the Workflow pane you can fill in.
 Click the Applications folder in the Dock, and then click the Automator icon.
Automator opens, displaying the Templates dialog.
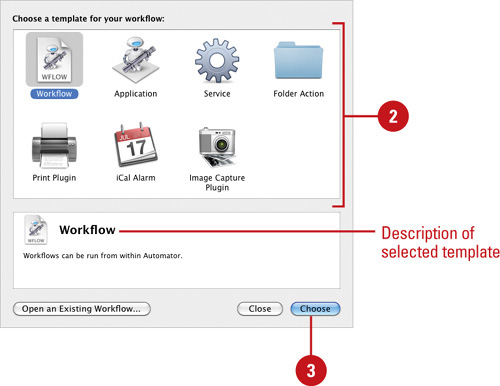
 Click a template icon:
Workflow. Use to creates a workflow document.
Application. Use to create an executable workflow application.
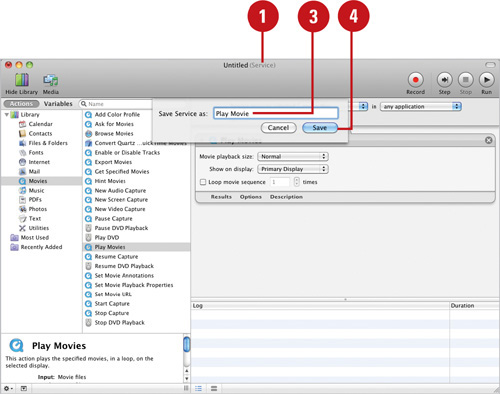
Service. Use to create a service (New!) for use in another application or the Finder; a plug-in workflow.
Folder Actions. Use to perform batch folder operations, such as opening or adding files; a plug-in workflow.
Print Plugin. Use to run a workflow when you print a file. An item appears on the PDF menu in the Print dialog box; a plug-in workflow.
iCal Alarm. Use to open iCal and create a new event; a plug-in workflow.
Image Capture Plugin. Use to import photos from a camera or scanner with Image Capture; a plug-in workflow.
 Click Choose. If prompted, select your content, and then click Add.
Click Close to exit the dialog without taking any action.
After you save a workflow as a Workflow (.workflow) or Application (.app) file, you can open either one at any time to modify or run it. You can open a workflow by using the standard Open dialog box in Automator. You can access the Open dialog box from the New dialog box when you start Automator from the Finder or from the Open command on the File menu in Automator.
- Use one of the following methods:
In Finder. Click the Applications folder in the Dock, click the Automator icon, and then click Open an Existing Workflow.
In Automator. Click the File menu, and then click Open.
- Click the Type pop-up, and then select All or a workflow type.
- Select the place from which you want to open the file.
 Click the document you want to open.
 Click Open.
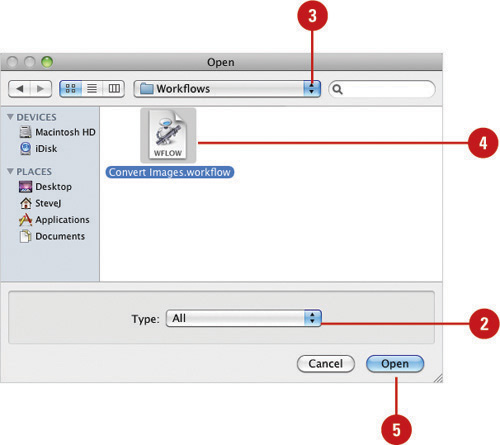
 To close a workflow, click the File menu, and then click Close.
Automator comes with four example workflows you can open to see what a completed one looks like. The examples show you how to a workflow can copy new unread mail into your iPod’s text-notes folder, display movie trailers in Safari (New!), import photos from a Photo Album posted on your MobileMe site into iPhoto, and process images with the Quartz composition filter. The process images workflow may not be a real useful workflow at first glance. However, it’s a good example of batch processing.
- Start Automator, click the Workflow icon, and then click Choose to open Automator with a blank workflow.
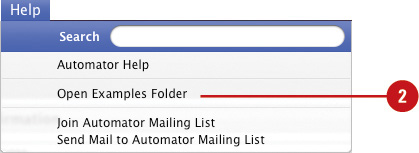
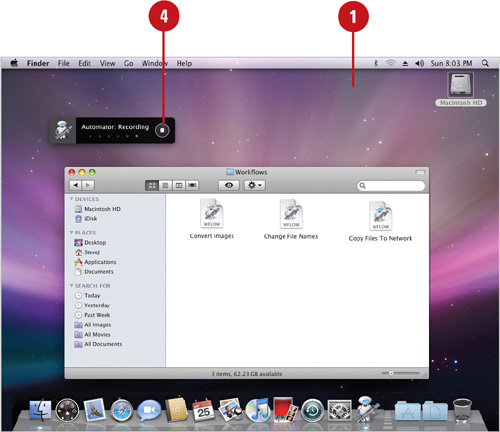
- Click the Help menu, and then click Open Examples Folder.
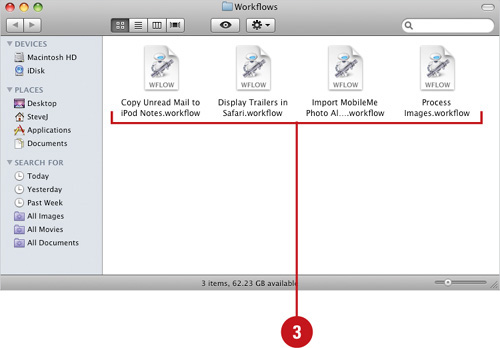
The Workflows folder opens, displaying four example workflows.
Copy Unread Mail to iPod Notes. Copies new unread mail into your iPod’s text-notes folder.
Display Trailers in Safari. Displays movie trailers from www.apple.com in Safari (New!).
Import MobileMe Photo Album into iPhoto. Imports photos from a Photo Album posted on your MobileMe site into iPhoto.
Process Images. Batch process images with the Quartz composition filter.
- Double-click the workflow file you want to open.
The workflow file opens, displaying actions in the Workflow pane.
- To close a workflow, click the File menu, and then click Close.
The best way to learn how to create a workflow is to go through an example. Automator comes with three example workflows you can open to see what a completed one looks like. The process images workflow is a good example of batch processing images. The example processes images with the Quartz composition filter. However, you can easily change the workflow to modify the image size or convert it to another format.
- Start Automator, click the Workflow icon, and then click Choose to open Automator with a blank workflow.
- Click the Help menu, and then click Open Example Folder.
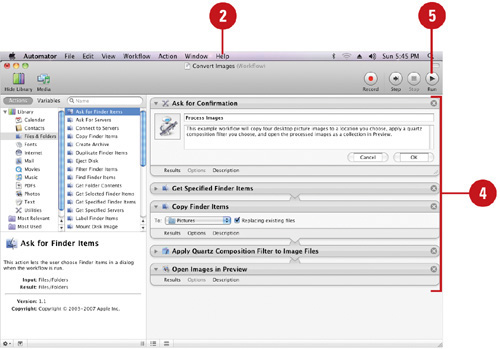
- Double-click the Process Images .workflow icon.
- Examine the following actions in the Workflow pane:
Ask for Confirmation. Displays a dialog box with information you provide for the user’s benefit. You can change the button names and click the Robot icon to change it.
Get Specified Finder Items. Lets you specify the files you want to process. You can use the Add or Remove buttons or drag files directly from the Finder.
Copy Finder Items. Makes copies of the files to protect the originals.
Apply Quartz Composition Filter to Image Files. Applies the filter to the selected image files.
Open Images in Preview. Opens the specified image file in Preview.
- To execute the workflow, click the Run button on the toolbar.
- Start Automator, click the Workflow icon, and then click Choose to open Automator with a blank workflow.
- Click the Help menu, and then click Open Example Folder.
- Double-click the Process Images .workflow icon.
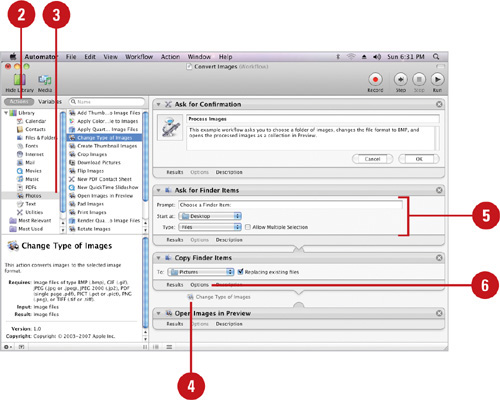
- Instead of working from a specified folder, let’s have the Finder ask you where to get the image files.
Get Specified Finder Items. Click the Delete button (X) on the Get Specified Finder Items title bar, click Files & Folders in the Library list, and then drag the Ask for Finder Items action to the same place as the deleted action.
- Instead of applying the Quartz filter, let’s change the image type.
Change Type of Images. Click the Delete button (X) on the Apply Quartz Composition Filter to Image Files title bar, click Photos in the Library list, and then drag the Change Type of Images action to the same place as the deleted action.
- Click the File menu, click Save As, specify a new name, and then click Save.
 To execute the workflow, click the Run button on the toolbar.
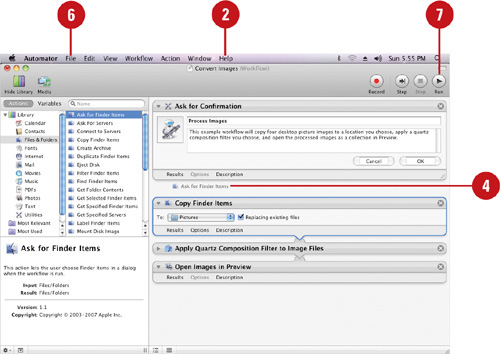

You can add one or more actions to create the workflow you want. When you have more than one action in a workflow, Automator frequently passes information from one action to another starting from the top. When you run a workflow, each action receives information from the previous action (input) and passes information to the following action (output). If an action needs to receive a certain type of information, it needs to be placed in the workflow following an action that outputs that type of information. The type of input an action needs appears in the title bar. If the input and output don’t match or it’s not being received from the previous action, the information appears in red to indicate a problem.
- Start Automator and use a template or open the workflow you want.
- Click the Actions button in the Library pane.
- Click the category or application from the Library list to display the actions you want.
- Drag the action you want to the Workflow pane.
- Enter information and specify the settings you want for the action; the information and settings vary depending on the action.
- To show and set additional options, click the Options button, and then specify the ones you want to set. To hide the options, click the Options button again.
To allow a user to select action settings, select the Show Action When Run check box.
The availability of the Options button varies depending on the action.
A variable stores a value that you can use in a workflow. For example, you can use variables to get the current time or today’s date, unique text and data, or even a script. You can add variables directly to a workflow or to a compatible editable field or pop-up of an action. If you need a variable, yet you’re not ready to use it, you can declare it in the Variables log for later use. In some cases, you can declare or create a a variable directly in an action.
- Start Automator and use a template or open the workflow you want to add variables to an action.
- Click the Variables button in the Library pane.
- Click the category from the Library list to display the actions you want.
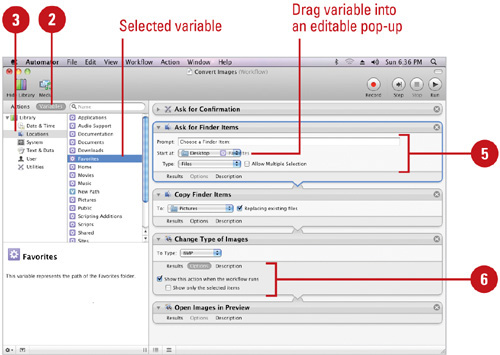
- Use any of the following methods to add a variable to an action:
Add to Workflow. Drag variable into the Workflow pane. The “Get Value of Variable” action appears.
Add to Action. Drag variable into an editable field or pop-up menu of an action. The variable is added to the Variables log.
Declare in Log. Drag the variable to the Variables log. You can declare it without using it immediately.
- Enter information and specify the settings you want for the variable; the information and settings vary depending on the variable.
- To show and set additional options, click the Options button, and then specify the ones you want to set. To hide the options, click the Options button again.
If you can’t find a pre-built action that meets your needs, you can record your own. Automator records your keyboard and mouse event to create a custom action, known as the “Watch Me Do” action. After you record the “Watch Me Do” action, you can adjust the playback speed and timeout settings, as well as delete any events you don’t want. Before you can record an action, you need to select the “Enable access for assistive devices” check box in the Universal Access preferences.
- Set up your environment the way you expect it to be before you start to record.
- Start Automator and create or open the workflow you want to add a recorded action.
If a dialog appears, click the Open Universal Access button, select the Enable access for assistive device check box, and then click the Close button.
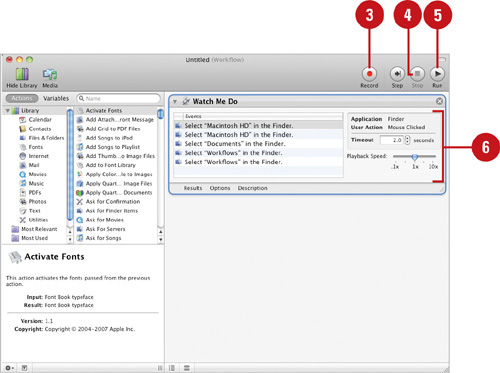
- Click the Record button on the toolbar.
The Automator Recording message appears with the Stop button.
- Perform the steps you want to record, and then click the Stop button.
- To test your recording, click the Run button on the toolbar.
- Adjust the settings you want for the recorded action.
Delete Event. Select the event, and then type Delete.
Rearrange Event. Drag an event to change the order.
Adjust Timeout. Click the Timeout up and down arrows.
Adjust Speed. Drag the Playback speed slider.
After you add actions to your workflow, you can work with them to create the results you want. In the Workflow pane you can arrange actions in a different order; remember the input and output needs to match. If you need the same action in another place, you can copy and paste it. If you don’t always need an action, you can disable it for now and then enable later. If you want to add media to a workflow, you can use the Media browser. If you can’t locate a certain action, you can use the Search box to try and find it. If you still can’t find it, you can import actions developed by others.
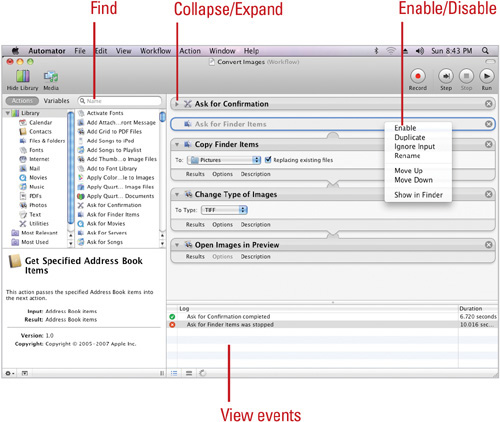
Collapse/Expand. Click the triangle to the left of the action title.
Arrange. Drag the action title bar in the Workflow pane to a new place.
Copy. Select the action in the Workflow pane, click the Edit menu, click Copy, click in the workflow where you want to insert the action, click the Edit menu, and then click Paste.
Disable. Control-click the action title bar, then click Disable.
Enable. Control-click the action title bar, then click Enable.
Delete. Click the Delete button (X) on the title bar of the action in the Workflow pane.
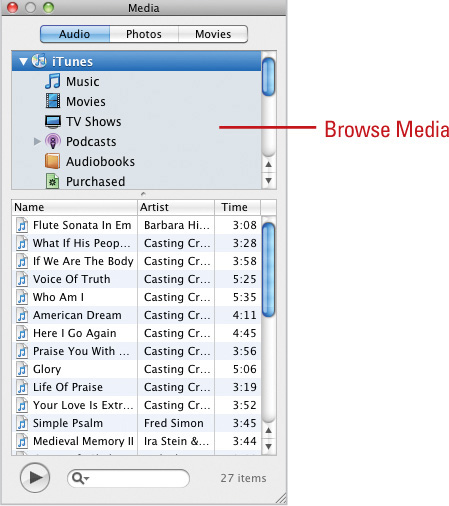
Browse Media. Click the Media button on the toolbar. Displays the media browser where you can select and use audio, photos, and movies.
Import. Click the File menu, click Import Actions, navigate to and select the actions you want, and then click Import.
Find. Enter a word or phrase in the Search box, and then press Return. To clear the search, click the Delete button (X) in the Search box.
View Events. Click the View menu, and then click Show Log. You can also use the View Results action in a workflow.
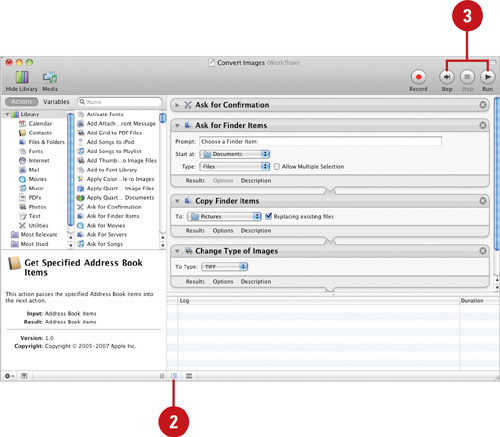
When you finishing creating a workflow, it’s important to test (run) it to make sure it works the way you want it to. When you run a workflow (all at once with the Run button or one step at a time with the Step button(New!)), Automator executes each action from top to bottom, displaying status messages at the bottom of the window. As each action completes, a green checkmark appears in the bottom left-corner of the action indicating the action worked correctly. If a problem occurred, such as the input and output not matching, a red x appears.
- Start Automator and create or open the workflow you want to run.
- To view the values stored in variables as a debugging tool, click the Show or hide the workflow log button to display the log.
- Click the Run button on the toolbar to play the entire workflow or click the Step button to play the workflow one step at a time.
Automator executes each action from top to bottom, displaying status messages at the bottom of the window.
- If a dialog box appears, requesting information or files, fulfill the request.
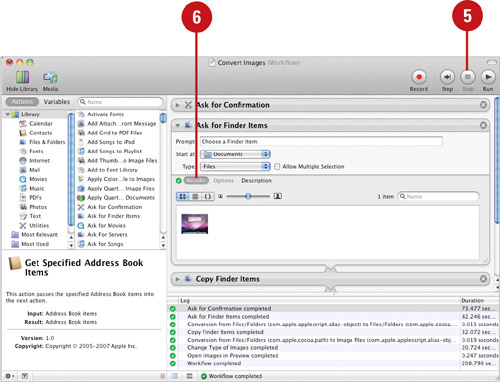
As each action completes, a green checkmark appears in the bottom left-corner of the action indicating the action worked correctly. If a problem occurred, such as the input and output not matching, a red x appears.
- To stop the workflow, click the Stop button on the toolbar.
- To show the results of a specific action, click the Results button at the bottom of the action. To hide the results, click the Results button again.
After you finish creating a workflow, you can save it for use at any time or share it with others as you would any file. When you create a workflow with the template type Workflow or Application (New!), you can save it as a Workflow (.workflow) or Application (.app) file. A Workflow file is one you open, modify, and run in Automator. An Application file is one you can double-click from anywhere on your Mac, drag it to the Dock, and assign a keyboard shortcut to make it easier to launch. When you save a workflow as an Application file, the size of the file gets larger, as much as 20 times larger.
- Start Automator and create (Workflow or Application) or open the workflow you want to save.
- Click the File menu, and then click Save As.
- Type the name you want for the workflow file.
- Click the Where pop-up, and then select the location where you want to save the file.
- Click the File Format pop-up, and then click Workflow or Application.
- Click Save.

Did You Know?
You can revert to the previously saved workflow. Click the File menu, click Revert, and then click Revert to confirm the operation.
You can customize the toolbar. Click the View menu, click Customize Toolbar, drag toolbar items to the toolbar, specify the options to display toolbar items as text, icons, or both, and to use the small size or not, and then click Done.
You can print a workflow. Click the File menu, click Print, select the print options you want, and then click Print.
When you create a workflow with the template type Folder Actions, Print Plugin, iCal Alarm, or Image Capture Plugin, Automator saves it as a plug-in type (New!). Saving your workflows as a plug-in allows you to automate tasks in different places and situations on your Mac. For example, you can run a workflow from the Finder’s shortcut menu, an event in iCal, the import feature in Image Capture, or a print dialog box.
- Start Automator and create or open the workflow with the following type:
Service. Use to create a service for use in another application or the Finder.
Folder Actions. Use to perform batch folder operations, such as opening or adding files.
Print Plugin. Use to run a workflow when you print a file. An item appears on the PDF menu in the Print dialog box.
iCal Alarm. Use to open iCal and create a new event named after plug-in.
Image Capture Plugin. Use to import photos from a camera or scanner with Image Capture.
- Click the File menu, and then click Save As.
- Type the name you want for the plug-in.
- Click Save.
The AppleScript language is your way of communicating with your operating system; instructing it to perform specific tasks. Who wants to do the same tasks over and over again... no one. For example, adding the .jpg extension to 150 graphic files that have to move to a system that requires extensions. There is an easier way to perform repetitive tasks, and that’s with AppleScript. AppleScript is an English-like scripting language that is used to write script files, and those files automate actions performed by the computer (like adding an extension 150 times).
ActionScripting is more than a language that repeats recorded actions; AppleScript can make decisions based on user-interaction or by analyzing data, documents, or situations. And with Mac OS X Snow Leopard and the AppleScript Studio, you can create powerful Mac OS X applications with the Aqua look-and-feel written entirely in AppleScript. AppleScript is an automation language that helps us get through the mundane tasks of working on a computer and that’s more than worth the time and effort spent in learning AppleScript.
AppleScript provides shortcuts for complex tasks such as naming files, resetting preferences, or connecting to the Internet, and the AppleScript Studio comes bundled with dozens of pre-written scripts that can immediately help you with your daily computer tasks. In addition, the automated workflow gives consistency, and speed to any Macintosh project. Since more can be accomplished in the same amount of time, you become more efficient—all through the power of AppleScript. To create your own AppleScripts, open the AppleScript editor, and type the script using precise language limitations.
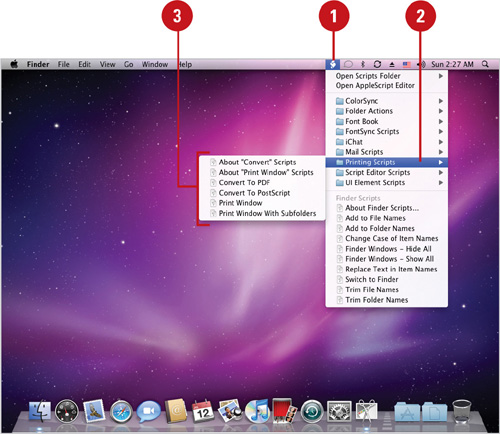
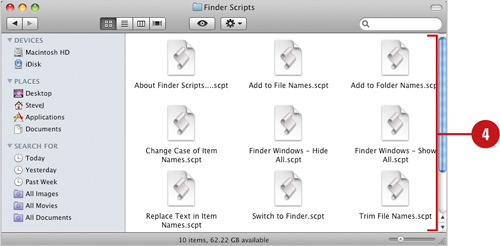
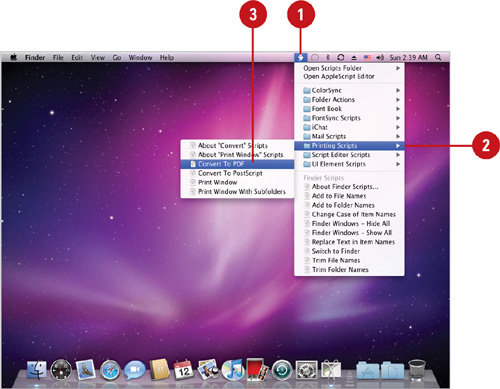
You can use AppleScript right away, by working with AppleScripts created by the friendly folks at Apple. To gain access to the ready-made scripts, open the Applications folder, select the AppleScript folder, and then select Example Scripts, or do it the easy way by activating the built-in Script menu. When you activate (display) the Script menu, the Script icon appears on the right side of the menu bar and is available in the Finder and whenever you open an application. For example, you can click the Scripts icon, point to Printing Scripts, and then click Convert To PDF.
- Click the Applications folder in the Dock, click the Utilities folder, and then click the AppleScript Editor icon.
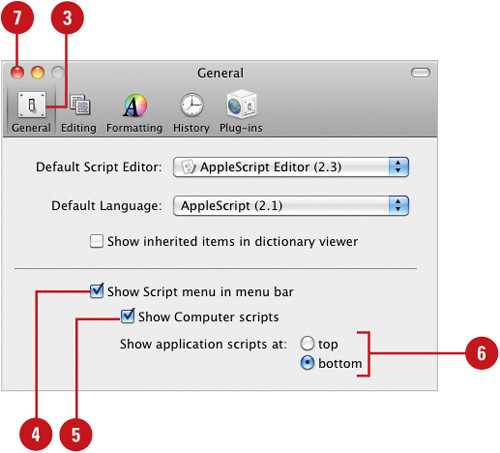
- Click the AppleScript Editor menu, and then click Preferences.
- Click General.
- Select the Show Script menu in menu bar check box.
- Select or clear the Show Computer scripts check box to show or hide library scripts.
- Click the top or bottom option to specify where to show application scripts on the menu.
- Click the Close button.
- Point to a script category, if necessary.
- Select a script option. Some of the useful scripts include:
Add to File Names and Add to Folder Names. Add text to the beginning or end of every file or folder in the active Finder window.
Replace Text in Item Names. Replaces text in file and folder names.
Trim File Names and Trim Folder Names. Removes file extensions or text from the beginning or end of every file or folder in the active Finder window.
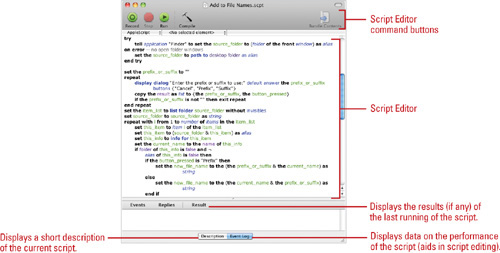
Anyone can write AppleScripts. All it requires is the Script Editor application available with Snow Leopard, and knowledge of the AppleScript language. The AppleScript editor lets you type script directly into the editor window, or you can click the Record button, and then perform some Mac operation, as the editor records each step as you work. There are many places where you can go to increase your AppleScript understanding; however, point your browser to http://www.apple.com/applescript/, and then click the Resources link to access current resources dealing the creative techniques for AppleScript.
- Click the Applications folder in the Dock, click the Utilities folder, and then click the AppleScript Editor icon.
- Type the Script directly into the Script Editor window.
- Click the Record button to record within the active script.
- Click the Run button to run the active script.
- Click the Stop button to stop the running of the active script.
- Click the Compile button to create a version of the active script.
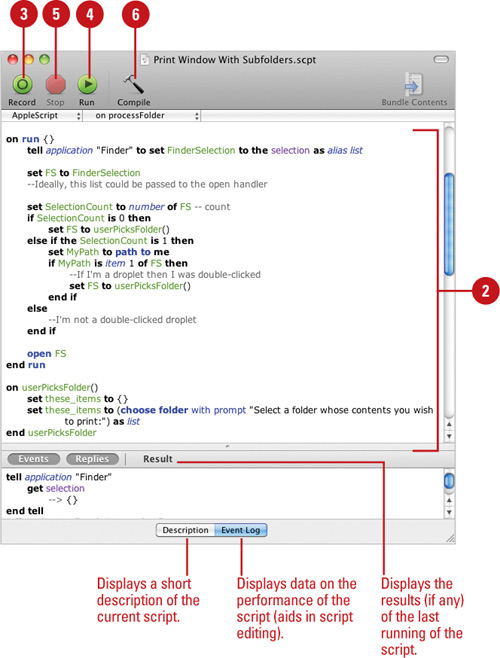
- Click the File menu, and then click Save, or Save As to save the script using a unique name and location.
Did You Know?
You can create AppleScript beyond the capabilities of the Script Editor Application. The AppleScript Studio is a solution for creating total applications, using the Aqua interface and all the other elements associated with the Macintosh operating system. Point your browser to http://www.apple.com/applescript/, and then click the AppleScript Studio link for more information.
- Point to a script category, if necessary.
- Option-click the script you want to open.
The Script Editor opens, displaying the selected script.
- Modify the script as you want.
- Click the Run button to run the active script.
- Click the Stop button to stop the running of the active script.
- Click the Compile button to create a version of the active script.
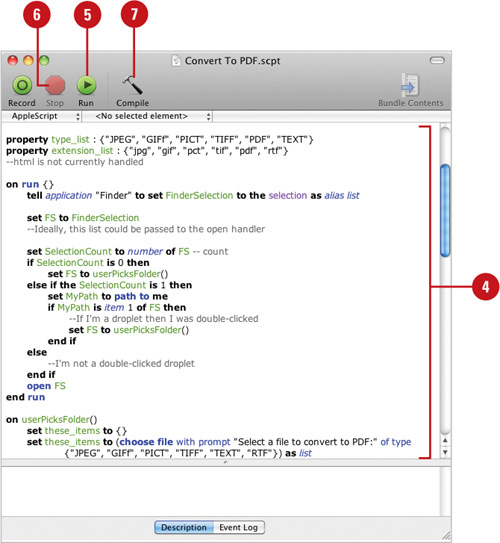
 Click the File menu, and then click Save As to save the script using a unique name and location.
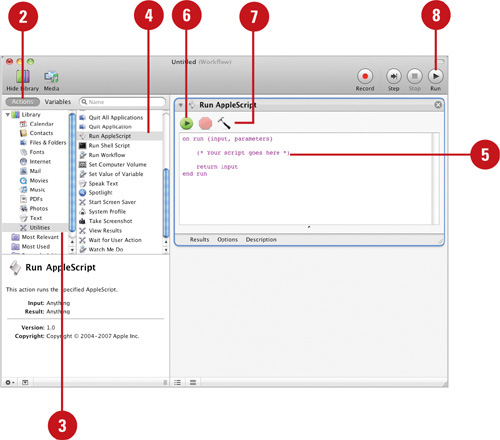
You can add an AppleScript script to a workflow. Simply, drag the Run AppleScript action into your workflow, and then enter your script into the small script editor within the action. Automator is a scriptable application. You can use AppleScript in the Script Editor to develop and execute workflows. To help you write the scripts, you can view the Automator’s AppleScript dictionary. Open the Utilities folder window, open another window with the Applications window. Drag the Automator icon (located in the Applications folder) onto the Script Editor icon (located in the Utilities folder).
- Start Automator and use a template or open the workflow you want.
- Click the Actions button in the Library pane.
- Click the Utilities category from the Library list.
- Drag the Run AppleScript action you want to the Workflow pane.
- Type the script you want in the action.
- To run the script, click the Run button in the action below the title bar.
- To compile the script, click the Compile button to create a version of the active script.
- To run the workflow, click the Run button on the toolbar.