
Mac OS X Snow Leopard is an operating system (OS), a computer program that controls the basic operation of your Macintosh computer and the programs you run. A program, also known as an application, is task-oriented software you use to accomplish a specific task, such as word processing, managing files on your computer, or performing calculations.
The Finder is part of the Mac OS and starts when you turn on your computer. The Finder displays a menu bar and desktop on your screen that you can use to work with windows, icons, and files. A window can contain the contents of a file and the application in which it was created, icons (picture representations of an application or a file), or other usable data. This use of windows and icons is called a graphical user interface (GUI, pronounced “gooey”), meaning that you (“user”) interact (“interface”) with the computer through the use of graphics: icons and other meaningful words, symbols, and windows. A file is a collection of information (such as a letter or list of addresses) that has a unique name, distinguishing it from other files. You can use the Finder to open, copy, delete, list, and organize your computer files.
When you turn on your Macintosh computer, the Finder might ask you to log in. Your Macintosh is built to share with other people and work with other computers. If you are sharing your computer with others or accessing other computers over a network, you need to log in (type a user name and password) and log out to switch users or access information. When you’re done working on your computer, you should put it to sleep for short periods or shut it down for longer stints.
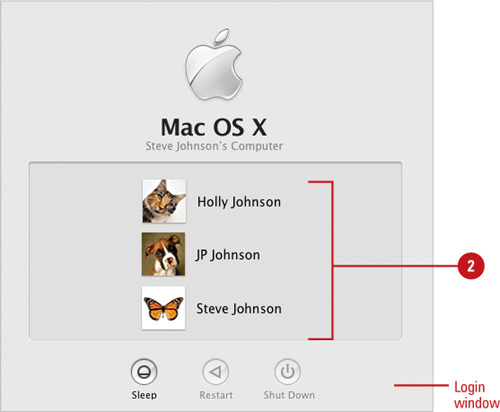
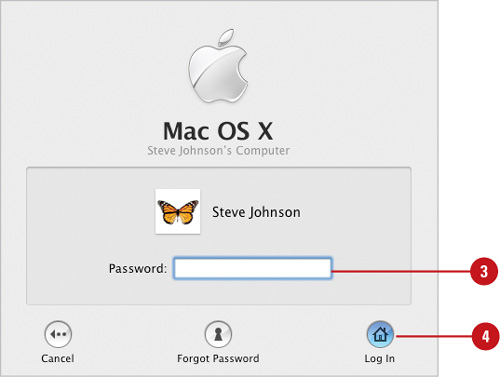
Mac OS X automatically starts when you turn on your computer. When you first start Mac OS X, you see the desktop screen, or a Login window depending on your installation. The Mac OS X desktop screen indicates you are using a stand-alone computer (you’re the only person using the computer), while the Login window identifies you’re on a shared computer. After you click or type your user name in the Login window, and then possibly type a password, you’ll see the Mac OS X desktop.
 Turn on your computer, and then wait while Mac OS X loads.
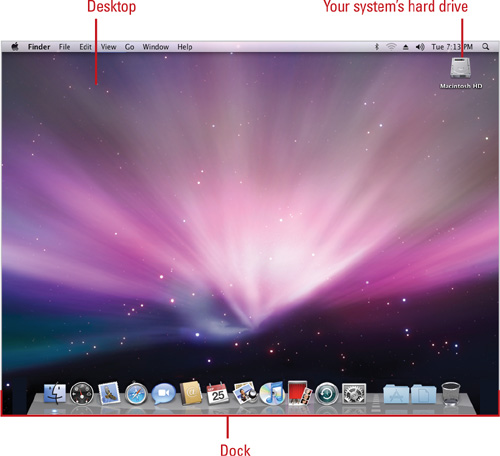
The Mac OS X Snow Leopard desktop screen appears.
Did You Know?
The Login window doesn’t always appear. If Mac OS X is set up to log in automatically, you don’t normally see the Login window. However, if you select the Log Out command from the Apple menu, you do see the Login window. If you see the Login window, click Restart to log in again automatically.
See Also
See “Adding a User Account” on page 388 for information on creating a user account.
See “Activating the Login Window” on page 387 for information on changing log in options.
Trouble?
If you forget your password, your third attempt to type the password correctly displays your password hint, and a Reset button, where you can use the administrator’s master password to create a new password.
Did You Know?
The password is case-sensitive. Macintosh makes a distinction between uppercase and lowercase letters. Your password should be at least seven characters long, the optimal length for encryption, which is the process of logically scrambling data to keep a password secure.
You can set up your computer to automatically log in (by pass the Login window). Click the Apple menu, click System Preferences, click Accounts, and then select the administrator account. Next, click Login Options, select the Automatically Login pop-up, and then click an account. Type a password, and then click OK.
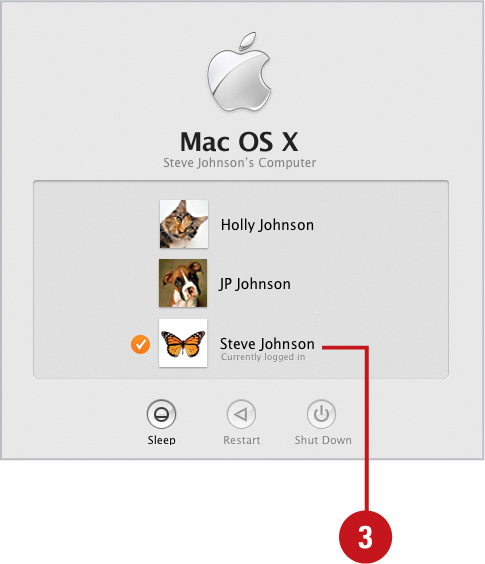
You can sleep, restart, and shut down from the Login window. In the Login window, click Sleep, Restart, or Shut Down, and then click the appropriate button or wait 60 seconds.
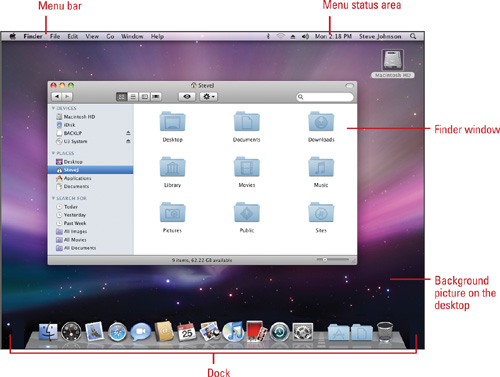
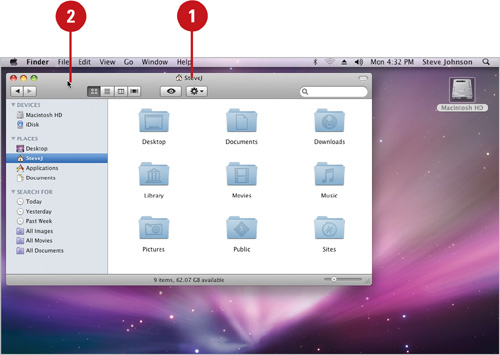
When you first start Mac OS X Snow Leopard, you see the Finder desktop with a new transparent look and feel, or a log in screen (a way to identify yourself on the computer), depending on your installation. The desktop is an on-screen version of an actual desk, containing windows, icons, files, and applications. You can use the desktop to access, store, organize, modify, share, and explore information (such as a letter or a list of addresses), whether it resides on your computer, a network, or the Internet. The desktop contains icons that represent volumes (such as your Hard Disk to store data), applications, documents, folders, and the Trash. If you upgraded your computer to Mac OS X from a previous version, your desktop might contain many different icons. These icons can also appear a number of different ways depending on your view. When you open an icon, a window or application appears, displaying its contents or an application work environment. The bar at the bottom of the desktop is called the Dock (if it’s hidden, point to the bottom of the screen to display it); it allows you to start applications and switch among currently running ones. At the top of the screen is a menu bar, which contain commands you use to perform tasks and customize your environment. At the right end of the menu bar is the menu status area, which displays the time, date, current user, and application related icons—including Spotlight, AirPort, Volume, Eject, and Bluetooth to name a few. Your list of icons may differ depending on the applications you have installed. The new Mac OS X Snow Leopard dynamic user interface includes a transparent look and feel with design themes and a reflective floor for the Dock. A design theme is a professionally designed look and feel that coordinates all aspects of the user interface, including the desktop, menus, and windows.

A mouse is a handheld input device you roll across a flat surface (such as a desk or a mouse pad) to position the mouse pointer, the small symbol that indicates the pointer’s relative position on the desktop. When you move the mouse, the mouse pointer on the screen moves in the same direction. The shape of the mouse pointer changes to indicate different activities. However, the pointer usually looks like an arrow pointer in the Finder. Once you move the mouse pointer (the arrow’s tip) to a desired position on the screen, you use the mouse button to tell your computer what you want it to do. Macintosh computers typically come with a mouse that contains a single button. However, you can use a mouse with two buttons (left and right), trackball device, or writing tablet to perform the same function. For a two button mouse, such as the Apple Mighty Mouse, the left button performs the same function as the single button.
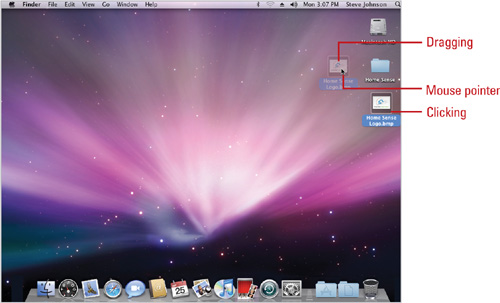
Table . Basic Mouse Techniques
Task | What to do |
|---|---|
Pointing | Move the mouse to position it over an item. |
Clicking | Press and release the mouse button. |
Double-clicking | Press and release the mouse button twice quickly. |
Dragging | Point to an item, press and hold the mouse button, move the mouse to a new location, and then release the mouse button. |
Pressing | Press and hold the mouse button. |
A menu is a list of commands that you use to accomplish certain tasks, such as when you use the View menu to open the Customize Toolbar dialog. A command is a directive that provides access to an application’s features. Each application has its own set of menus, which are on the menu bar along the top of the application window. The menu bar organizes commands into groups of related operations. Each group is listed under the name of the menu, such as File or Help. To access the commands in a menu, you click the name of the menu, and then click the command name. If a menu command is gray, the option is not available at this time; availability depends on what is selected. If a command on a menu includes a keyboard reference, known as a keyboard shortcut, such as ![]() for the As Icons command, you can perform the action by pressing and holding the first key, and then pressing the second key to perform the command quickly. When a menu command is followed by an ellipse (...), a dialog appears when you select it. On a menu, a check mark identifies a currently selected feature, meaning that the feature is enabled, or turned on. To disable, or turn off the feature, you click the command again to remove the check mark, or you can select another command (within the menu section, separated by gray lines) in its place. You can also carry out some of the most frequently used commands on a menu by clicking a button on a toolbar. A toolbar contains buttons that are convenient shortcuts for menu commands and navigation. A pane is a frame within a window, such as a Sidebar, where you can quickly access navigation controls. You can use menus, toolbar buttons, and commands in a pane to change how a window’s contents appear.
for the As Icons command, you can perform the action by pressing and holding the first key, and then pressing the second key to perform the command quickly. When a menu command is followed by an ellipse (...), a dialog appears when you select it. On a menu, a check mark identifies a currently selected feature, meaning that the feature is enabled, or turned on. To disable, or turn off the feature, you click the command again to remove the check mark, or you can select another command (within the menu section, separated by gray lines) in its place. You can also carry out some of the most frequently used commands on a menu by clicking a button on a toolbar. A toolbar contains buttons that are convenient shortcuts for menu commands and navigation. A pane is a frame within a window, such as a Sidebar, where you can quickly access navigation controls. You can use menus, toolbar buttons, and commands in a pane to change how a window’s contents appear.


The Finder uses several different types of menus to help you use the commands you need to get the results you want. The Finder uses four types of menus: pull-down, submenu, pop-up, and contextual. The pull down menu appears on the menu bar when you click a menu name or status icon in the menu status area. A submenu appears when you point to a menu with a triangle. A pop-up menu appears in a window or dialog when you click the double arrow. A contextual menu appears when you hold down the Control key while you click an item, such as an icon, text, or graphic. A contextual menu displays a list of commands related to the selected item, like the Action pop-up menu. When you click a menu name, the menu stays open. If you don’t want to select a menu command, you can click outside the menu or press the Esc key to close it.


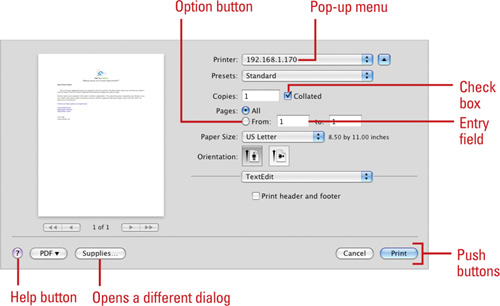
The Finder and Mac OS X applications use dialogs to carry out options, provide alert messages, and gather information. A dialog is a window that opens when the Finder or an application wants to alert you of an event, or you select a menu command or button followed by an ellipsis. In a dialog, you acknowledge an alert message or select various options, and then provide information for completing the command.
All dialogs contain the same types of options, including the following:
Tabs. Click a tab to display its options. Each tab groups a related set of options.
Option buttons. Click an option button to select it. You can usually select only one in a group.
Check box. Click the box to turn on or off the option. A checked box means the option is selected; a cleared box means it’s not.
Pop-up menu. Click the arrow to display a list of commands or options, and then click the one you want.
Entry field. Click in the field, and then type the requested information.
Up and down arrows. Click the up or down arrow to increase or decrease the number, or type a number in the field.
Scroll bar. Drag a slider control to change screen position.
Preview area. Many dialogs show an image that reflects the options you select.
Slider. Drag a slider control to change a screen position.
Push button. Click a button to perform an action or command. A button name followed by an ellipsis (...) opens another dialog.
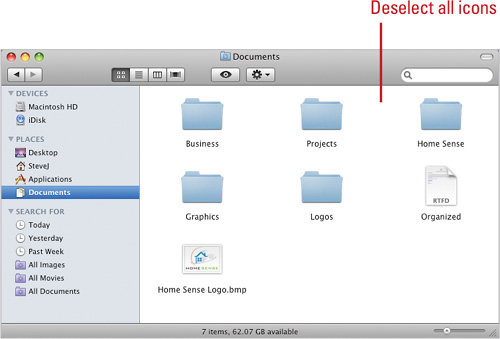
Mac OS X uses various icons to graphically represent different items on the desktop, in the Dock, or in a window. The icons represent applications, documents, folders, volumes, and the Trash. Application icons are programs you use to create documents. Document icons are files you create with applications. Folder icons are a storage area for files. Volume icons are storage devices, such as hard disks, removable disks, network disks, Internet computers, CDs, DVDs, and iPods. The Trash icon (located in the Dock) appears in three different ways: empty, full, and ejecting removable media. On the desktop or within a window, you can select and deselect one or more icons to perform tasks, such as opening, launching, copying, and moving. When you select an icon, the icon graphic and its name become highlighted. Within a Finder window, icons appear in different ways, depending on the window view you select.
Select an icon. Click the icon you want to select.
Select multiple icons by clicking. Click the first icon you want to select, hold down
 , and then click the other icons you want to select within the same window.
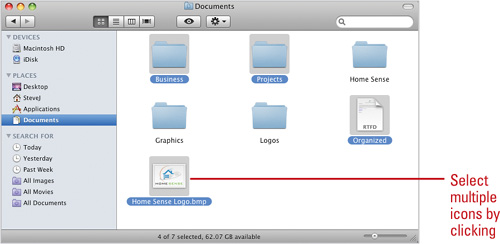
Select multiple icons by dragging. Position the mouse pointer to the left of the first icon you want to select, drag diagonally across the adjacent icons you want to select, and then release the mouse button.

A shaded box appears as you drag to indicate the selection area.
Select all icons. Click the Edit menu, and then click Select All.
Deselect all icons. Click a blank area in the window or on the desktop.
Deselect an icon in a multiple selection. Press and hold down
, and then click the icon you want to deselect, while keeping the others selected.
A window displays icons and other information in the Finder, and documents in an application. One of the powerful things about the Mac OS X is that you can open more than one window or application at once. You can identify a window by its name on the title bar at the top of the window. Before you can work with a window, you need to activate it first. The active window is the one in front with the available buttons (red, yellow, and green) in the upper-left corner. When you’re done using a window, you can quickly close it to reduce the clutter on the desktop.
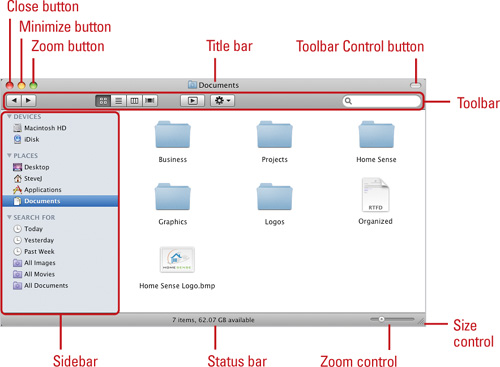
Windows in Mac OS X consist of the following parts:
Close button. Closes the window.
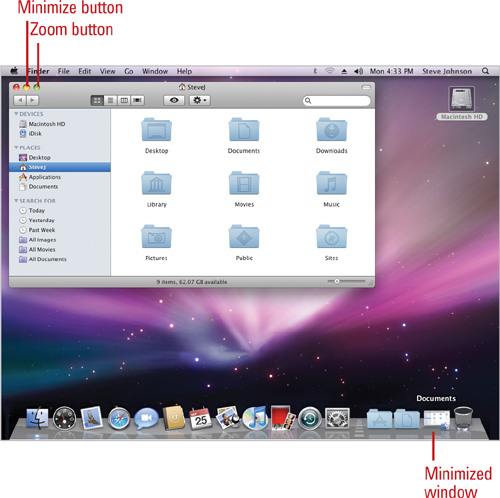
Minimize button. Shrinks the window to an icon in the Dock.
Zoom button. Toggles the window size between full and a custom size.
Title bar. Displays the name of the window.
Toolbar Control button. Toggles the toolbar on and off.
Toolbar. Displays buttons and controls for commonly used window commands.
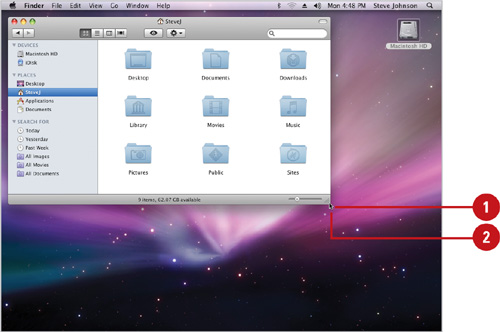
Size control. Allows you to set a custom window size.
Zoom control (New!). Allows you to set a view percentage in as Icons view.
Status bar. Displays information about selected items.
Sidebar. Displays commonly used volumes and folders.
Column heading. Displays the names of columns and sorts them (in list view only).
Search box. Allows you to find files based on the name.
Scroll bar. Displays the content of the window.

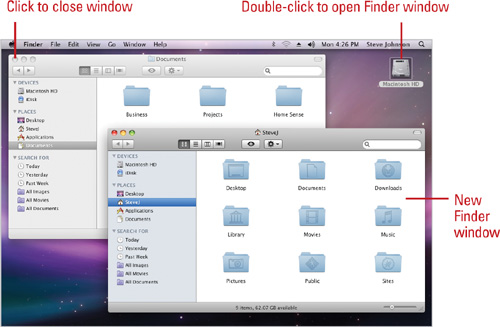
Open a Finder window. Double-click a volume or folder icon.
Open a new Finder window. Click the File menu, and then click New Finder Window.
Close a window. Click the red button to close the window, or hold down the Option key, and then click the red button to close all windows.
Activate a window. Click anywhere on the window, or click the Window menu, and then click the window name.

Activate and bring all Finder windows to front. Click the Window menu, and then click Bring All To Front. All open Finder windows that are not minimized are moved in front of application windows.
Activate and bring a specific application window to the front. Display the Dock, press (click and hold) an application icon to display a menu, and then select the window you want to make active.
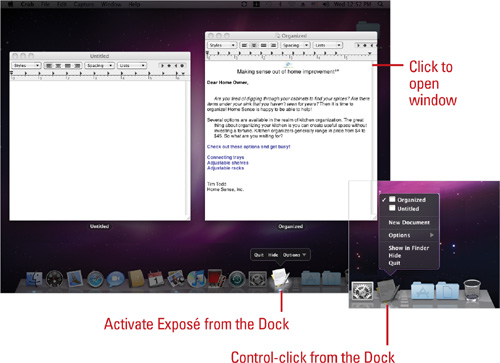
When you open multiple windows, your desktop can get cluttered with many open windows for the various applications you are using. To organize your desktop, you may need to move it to a different location or change the size of a window. Each window has resize buttons in the upper-left corner to minimize or zoom a window, and a size control in the lower right-corner that you can use to resize the window to a custom size. An icon appears in the Dock for each minimized window, which you can use to quickly switch between windows or redisplay it. You can also press and hold the Finder icon to use Exposé (New!) or Control-click it to switch between open windows.
- Display the Dock, if hidden.
 Press (click and hold) activate Exposé or Control-click the Finder or an application icon to display a menu.
 Click the window you want from the menu.
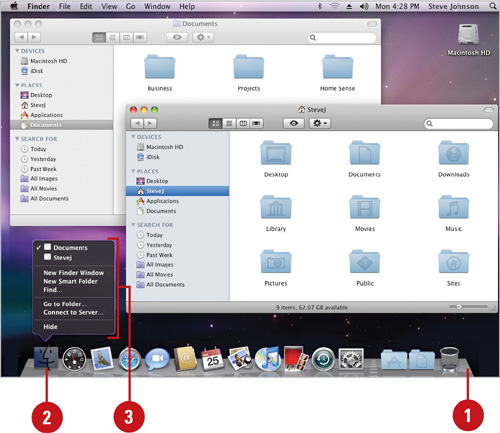
See Also
See “Customizing Exposé” on page 92 for information on temporarily showing and hiding all windows.
All windows contain the same sizing buttons:
Minimize button (active window). Click the yellow button to shrink a window as an icon in the Dock, or double-click the title bar.
Minimize button (all windows). Hold down the Option key, and then click the yellow button or double-click the title bar to minimize all windows.
Redisplay minimized window. Click the window’s icon in the Dock or click the Window menu, and then click the window’s name.
Zoom button. Click the green button to toggle between the smallest possible size that fits on your screen, and the size you set with the size control.
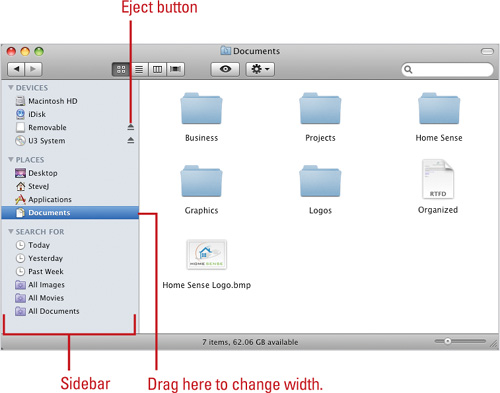
The Sidebar is a panel which appears in the left column of Finder windows, that you can use to quickly access commonly used locations on your computer. The panel appears with multiple sections, including Devices, Shared, Places, and Search For. The Devices section contains items for volumes attached to your computer, including your hard disk. The Shared section contains shared and networked computers. The Places section contains items for folders, including your home folder (labeled with your name), Desktop, Applications, and Documents. The Search For section contains items for Smart folders. You can use the Sidebar to move and copy documents to disks and folders on or connected to your computer, eject removable disks, and burn a CD or DVD.
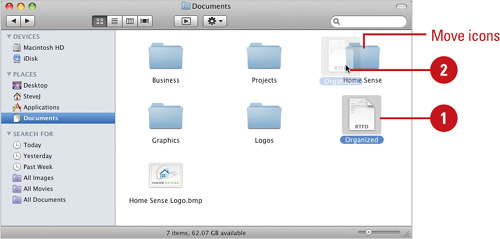
Display icons. Click icons in the Sidebar to display contents.
Move or copy icons. Drag the folder or document icons from the Contents pane to the Sidebar icon in order to move or copy them.
Add a file, folder or application. Drag its icon to the Places area.
Remove icon. Drag its icon out of the Sidebar.
Change column width. Position the mouse pointer over the divider, and then drag to change the width.
Hide or show sidebar and toolbar. Click the oval button in the upper-right corner of the window.
Hide or show sidebar. Click the View menu, then click Hide Sidebar or Show Sidebar (New!).
Eject a disk. Click the Eject button next to any removable disk.
Burn a CD. Insert a blank CD or DVD, drag files and folders to it, and then click the Burn button (looks like a beach ball).
See Also
See “Customizing the Sidebar” on page 86 for information on using Finder preferences to customize the Sidebar.
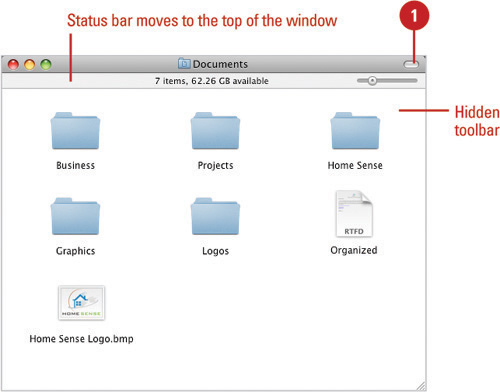
The toolbar, in a Finder window, provides easy access to commonly used window commands. You can use the Toolbar Control button three different ways: to hide the toolbar and sidebar, to display more information in the window, or to show the toolbar to display tools and navigational controls. When you hide the toolbar, the Finder also hides the Sidebar panel and window borders, and moves the status bar to display under the title bar.
Toolbars in the Finder consist of the following parts:
Back and Forward buttons. Displays the content from the previous or next window.
View buttons. Displays the window in different views.
Quick Look button. Displays an expanded slide show view for selected items.
Action pop-up menu. Displays commands for working with a window or selected items.
Search box. Allows you to search for a file by name.

Timesaver
Hold down the ![]() key while you repeatedly click the Toolbar Control button to display various toolbar styles.
key while you repeatedly click the Toolbar Control button to display various toolbar styles.
If a double arrow appears at the right side of the toolbar, the window is too small to show all the icons. You can either resize the window, or click the double arrow, and then select a toolbar item.
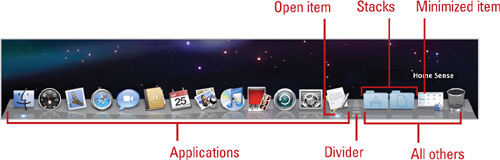
The Dock is a bar at the bottom of the screen that you can use to open frequently used applications and utilities, system preferences, Web sites and the Trash, as well as redisplay minimized applications and Finder windows. If you don’t see the Dock at the bottom of your screen, then its automatically hidden. You can change an option in the Dock pane of System Preferences to always display the Dock. The Dock has two sides with a divider line separating the two. The left side is for applications and the right side is for everything else: stacks, files, documents, folders, and disks. When you point to an icon, its name appears above it. Document and folder icons in the Dock actually display an image of the contents to make it a little easier to distinguish between them. When you click an icon, it launches or opens it. When you launch an application, it’s icon appears in the Dock with a shinny image below it. When you press and hold an icon, a list of commands appears on a menu or in Exposé (New!). When you quit an application or window not permanently placed in the Dock, its icon is removed from the Dock. In addition to the predefined icons in the Dock, you can also quickly and permanently add your own icons in the Dock.
Display a hidden Dock. Move the mouse pointer to the bottom or side of the screen.
Open, launch or redisplay a minimized item. Click its icon.
Choose commands for an item. Press and hold or Control-click the icon in the Dock, and then click a command.
Choose commands for an open item. Press and hold (activates Exposé (New!)) or Control-click the open icon in the Dock, and then click a command.
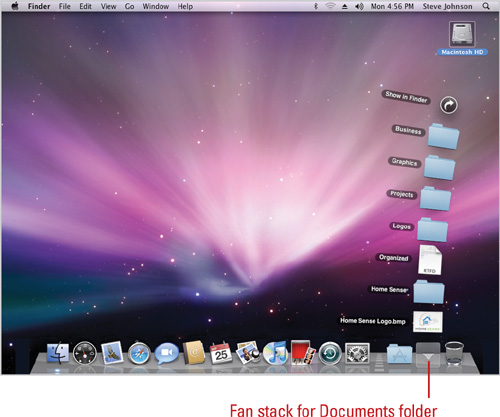
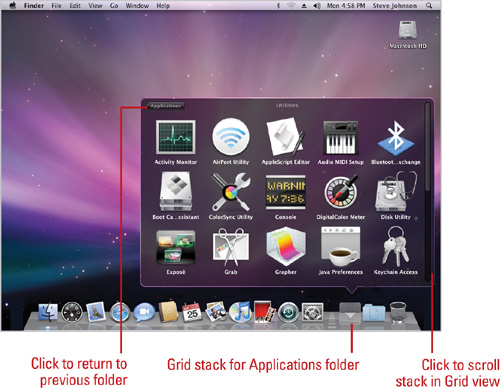
Folders in the Dock are called stacks. You can use stacks to reduce clutter and quickly access folders of documents, applications, and other folders. When you click a stack in the Dock, it springs open to display an arc or a grid of icons for the items in the stack. You can scroll through stacks, open folders, and navigate back (New!). The Dock comes with two stacks, the Applications (New!) and Downloads folders, which stores OS X applications and downloaded items from the Internet. You can create more stacks by dragging the folder you want to the Dock and modify stacks by Control-clicking it in the Dock.
Display a stack. Click a folder in the Dock.
Open the stack folder. Control-click the folder in the Dock, and then click Show in Finder or Open “name”.
Open an item in a stack folder. Click the folder in the Dock, and then click the item. If you click a folder in Grid view, you can click the return path icon in the upper left of the stack to return (New!).
Add a stack to the Dock. Drag the folder to the Dock.
Remove a stack from the Dock. Control-click the folder in the Dock, and then click Remove from Dock.
Change the stack display. Control-click the folder in the Dock, and then click Automatic, List (New!), Grid, or Fan. Automatic displays in a fan or grid depending on available space.
Change stack icon in the Dock. Control-click the folder or stack in the Dock, and then click Folder or Stack (New!).
Sort items in a stack. Control-click the folder in the Dock, and then select the sort type (under Sort by) you want.
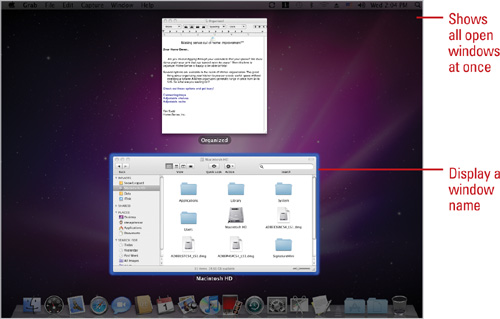
When you have multiple windows and applications open at the same time, the screen can get cluttered and make it difficult to work. Exposé lets you quickly move (temporarily) windows out of the way to make it easier to work with windows to find, move, or copy files. You can quickly hide all the open windows to see your desktop, or show all open windows or all open windows in the current application at the same time. When you press any of the Exposé keys quickly, the windows (hidden or shown) stay active using Exposé until you press the key again. However, if you press and hold the keys to use Exposé, the windows return to normal when you release the keys. When you’re using Exposé, you can point to a window to see its name and hold the pointer over it or click the window to bring it to the front.
Show all open windows at once. Press the F9 key. When you’re done, press the F9 key again.
For temporary use, hold down the F9 key, and then release.
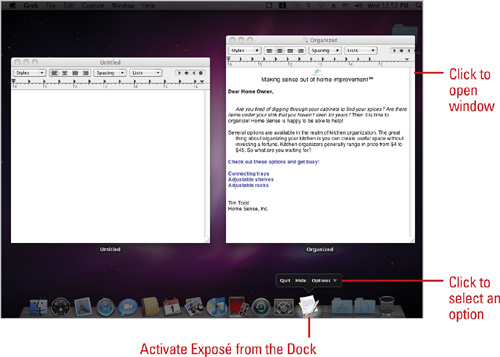
Show all open windows in the current application. Press the F10 key. When you’re done, press the F10 key again.
For temporary use, hold down the F10 key, and then release.
Hide all open windows (show desktop). Press the F11 key. When you’re done, press the F11 key again.
For temporary use, hold down the F11 key, and then release.
Display a window name. Exposé (F9) all open windows, and then point to a window.
Activate a window. Exposé (F9) all open windows, and then click or hold your pointer over a window to bring it to the front and release Exposé.
Activate an application window from the Dock. Press and hold an open application icon in the Dock (New!). Press Tab to move to the next application.
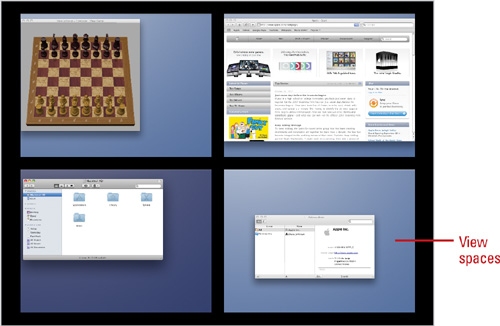
With Spaces, you can group and arrange windows to reduce desktop clutter and organize materials into unique spaces. You can organize home, work, or other projects into different spaces. You can quickly view and select the space you want or toggle between them. Each space displays only the windows for that space. You can spread out your work in different spaces by assigning an application to a space from its icon in the Dock (New!). Spaces also works well with Exposé to make working with different projects easier. The first time you start Spaces, you need to setup your spaces in Exposé & Spaces preferences, where you can also change keyboard shortcuts and display a Spaces menu in the menu bar.
Switch Spaces. Click the Spaces icon in the Dock or press the F8 key, and then click the space you want. If a setup dialog box appears, click Set Up Spaces.
See “Setting Up and Customizing Spaces” on page 93.
View a space. Press the Control key and the number key for the space you want, or press the arrow keys to scroll the spaces.
View all windows in all spaces. Press F8 to view all your spaces, and then press F9 to see all your windows within each space. This uses Spaces and Exposé.
Arrange spaces. Press the F8 key to view all your spaces, and then drag the spaces.
Move a window between spaces. Press the F8 key to view all your spaces, and then drag the window to the new space.

Drag the window to the edge of your screen and pause for a moment, then the window is switched to the new space.
Move the point over the window, and hold down the mouse button while pressing the Control key and an arrow or number key.
Many users can use the same computer. Their individual Mac OS X accounts allow them to keep their files completely private and to customize the operating system with their own preferences. Mac OS X manages these separate accounts by giving each user a unique user name and password. When a user selects an account and types a password (if necessary), Mac OS X starts with that user’s configuration settings and network permissions. When you want to change users, you can logout, which closes all running applications, saves your settings, and signs you off the computer. Or, switch users, which quickly switches between users without having to logout, close applications, and save your current settings. With fast user switching, the name of the current user appears in the status menu area, where you can quickly switch to a new user. If you leave your computer unattended for any period of time, you can set additional security logout options to protect your information.
- Click the user name in the upper-right corner of the menu bar.
- Click the user account to which you want to switch.
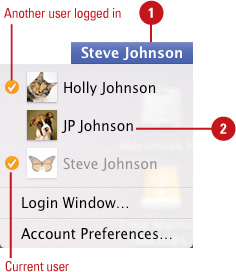
The name grayed out is the current user, and an orange check mark next to a name indicates that another is logged in.
If required, a Login window opens, requesting a password.
- If necessary, type your password.
 Click Log In.
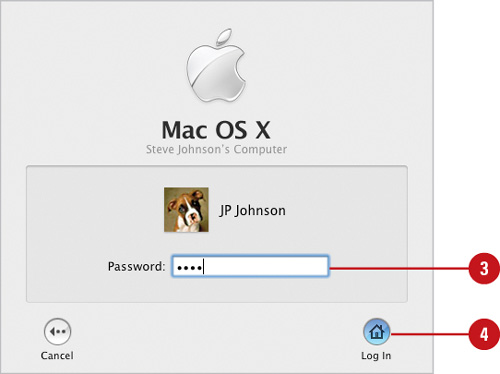
The computer switches to the new user’s desktop (like a box switching sides), which includes the user’s home folder, mail, and personal settings.
See Also
See “Setting Fast User Switching” on page 396 for information on enabling Fast User Switching.

- Click the System Preferences icon in the Dock, and then click the Security icon.
- Click the General tab.
- Select or clear the Require password X after sleep or screen saver begins check box, and then specify a time delay before the password is required (New!).
- Select or clear the Log out after X minutes of inactivity check box, and then enter the number of minutes you want.
 Click the Close button.
When you finish working on your computer, you can put your computer to sleep for a little while or shut it down for longer periods of inactivity. Sleeping causes your computer screen to go blank and halt the spinning of your hard disk. Shutting down your computer causes Mac OS X to properly save and close all open files, close all open windows, quit all running applications, and finally, turn off the Macintosh itself. If you turn off the computer by pushing the power switch while Mac OS X or other applications are running, you could lose important data and cause system problems; shutting down correctly avoids these potential problems. Snow Leopard provides faster shut down and wake-up (New!).
When you’re done working on your computer, do one of the following:
Sleep. Click the Apple menu, and then click Sleep.
Important
When your computer is inactive for 20 minutes (the default), Mac OS X automatically puts your computer to sleep.
To wake up your computer, click the mouse button or press any keyboard key.
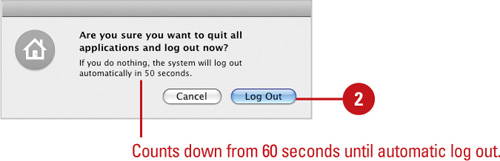
Restart. Click the Apple menu, and then click Restart. Click the Restart button or wait 60 seconds.
Shut Down. Click the Apple menu, and then click Shut Down. Click the Shut Down button or wait 60 seconds.
If other users are logged in, type the administrator name and password, and then click Shut Down.


Important
If you press the Option key while you select the Restart or Shut Down command, Mac OS X skips the dialog.
Important
If your computer has a power key, you can press it to display a dialog with Sleep, Restart, and Shut Down buttons.
Table . Understanding Your Options
Option | When to use it |
|---|---|
Sleep | When you want to stop working for a little while, save computer memory, and conserve power (ideal for saving battery life in a Mac portable computer). |
Shut Down | When you finish working on your Macintosh and you want to turn off the power to the computer. |
Restart | When you have problems and want to reset your computer (clear computer memory and reload system files). |