File management involves organizing and keeping track of files and folders. It helps you stay organized so information is easy to locate and use. A folder is a container for storing applications and files, similar to a folder in a file cabinet. As with a file cabinet, working with poorly managed files is like looking for a needle in a haystack—it’s frustrating and time-consuming to search through irrelevant, misnamed, and out-of-date files to find the one you want.
Finder allows you to organize folders and files in a file hierarchy, imitating the way you store paper documents in real folders. Just as a file cabinet contains several folders, each containing related documents with dividers grouping related folders together, so the Finder file hierarchy allows you to organize your files in folders, and then place folders in other folders. At the top of each hierarchy is the name of the hard drive or main folder. This drive or folder contains several files and folders, and each folder contains related files and folders.
Using the file management tools, you save files in folders with appropriate names for easy identification, quickly and easily create new folders so you can reorganize information, delete files and folders that you no longer need, search for a file when you cannot remember where you stored it, create shortcuts to files and folders for quick and easy access, and compress files and folders to save space.
The desktop is the starting point to access every disk, folder, and file on your computer. When Finder Preferences are appropriately set to display desktop icons, the desktop displays several types of local, removable, and network drives. Drives and folders are represented by icons on the desktop. Each icon graphic represents a different type of disk. Disks are devices that store information used by the computer. The disk with the Mac OS X installed on it is called the startup disk, which is typically the hard disk inside your computer. The files related to Mac OS X are stored in the System folder on your startup disk. You should not move this folder or make any changes to its contents. Additional Mac OS X related files are stored in the Library folder, which stores system and application preference settings and files. Also on your startup disk is an Applications folder that contains the complete collection of Mac OS X programs on your computer. You double-click a disk icon, such as your hard disk or a removable disk, on the desktop to open a Finder window, displaying the contents of the disk. Once you open more than one drive or folder, you can use buttons on the toolbar to help you move quickly between folders.
 If you want to view a disk, insert it in your drive.
The removable disk appears on the desktop along with your other drivers, such as your hard disk or a network disk.
 Double-click the drive icon on the desktop to open it.
 Double-click a folder icon in the Finder window to open it.
 Click the Back or Forward buttons on the toolbar to return or move to a previously visited window.
 When you’re done, click the Close button.
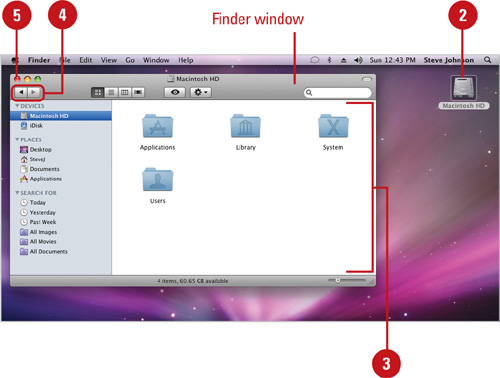
Did You Know?
You can display disk icons on the desktop. Click the Finder menu, click Preferences, click General, select the check boxes for the disk icons you want to show, and then click the Close button.
You can display icons in the Sidebar. Click the Finder menu, click Preferences, click Sidebar, select the check boxes for the icons you want to show, and then click the Close button.
You can open a disk or folder in a separate window. Click the Finder menu, click Preferences, click General, select the Always Open New Folders In A New Window check box, and then click the Close button.
An uneven CD or DVD may have trouble loading. If your CD or DVD drive seems to make vibrating noises, the disc’s weight might be uneven. Sometimes with older drives, the CD or DVD won’t load. If it does load, you’re fine.
See Also
See “Changing the Window View” on page 30 for information on changing the display of a folder’s contents.
See “Mounting and Ejecting Disks” on page 54 for information on using disks, CDs, and DVDs.
Table . Typical Disks on a Computer
Icon | Type Description |
|---|---|
 | Local A hard magnetic disk (or hard disk) located inside your computer on which you can store large amounts of data. The disk stores all the files on your computer. |
External A hard magnetic disk (or hard disk) connected to your computer using a FireWire or USB plug. The disk provides extra storage. | |
Network A hard magnetic disk (or hard disk) connected to your computer over a network. The disk provides extra storage and file sharing. | |
iPod A portable hard magnetic disk that plays MP3 music and works with iTunes, which you can also use as a hard disk. The disk provides a compact, bootable hard drive. | |
 | Removable A soft removable magnetic disk on which you can store 1 GB or more of computer data. USB drives are standard on all computers. |
 | Compact Disc-Read-Only Memory (CD-ROM ) An optical disk on which you can read or copy up to 1 GB (typical size is 650, 700, or 740 MB) of data. The disc cannot be erased or burned with new data. |
 | Compact Disc-Recordable (CD-R) A non-reusable disc on which you can burn up to 1 GB (typical size is 650, 700, or 740 MB) of data in multiple sessions. The disc can be burned again with new data until full, but cannot be erased. |
 | Compact Disc-Rewritable (CD-RW) A reusable disc on which you can read, write, and erase data. Discs come in normal and high-speed formats (typical size is 650, 700, or 740 MB). |
 | Digital Video Disc (DVD) A disc that holds a minimum of 4.7 GB, enough for a full-length movie. The disc cannot be erased or burned with additional data. |
 | Digital Video Disc-Recordable (DVD-R) A non-reusable disc on which you can burn up to 4.7 GB of data in multiple sessions. The disc can be burned again with new data until full, but cannot be erased. |
 | Digital Video Disc-Rewritable (DVD-RW) A reusable disc on which you can read, write, and erase data. The disc holds up to 4.7 GB on each side. |
 | Flash A memory card the size of a large stamp that holds 128, 256, 512 MB, or greater. Flash drives connect directly into a USB plug and work on any Mac or Windows PC (no software required). |
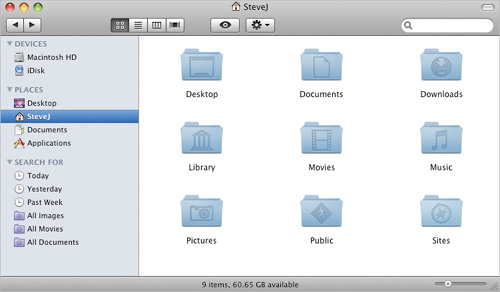
When you open a disk, the Finder window displays the contents of the disk, which includes files and folders containing information and software on your computer. Mac OS X creates a Users folder that contains a set of personal folders, known as the Home folder, for each user on a shared computer. The Home folder makes it easy to manage the personal and business files and folders you work with every day. The Home folder contains these folders: Desktop, Documents, Downloads, Library, Movies, Music, Pictures, Public, and Sites. Depending on your previous installation, devices installed, or other users, your personal folders might differ. You can quickly access your Home folder and many other personal folders from the Sidebar. In the Home folder, you can view file information, organize files and folders, and open files and folders. Once you open more than one folder, you can use buttons on the toolbar to help you move quickly between folders.
- Double-click the Hard Disk icon (the startup disk) on the desktop or in the Computer window.
- In the bottom section of the Sidebar, select from the following:
Desktop
Home (the one with your name)
Applications
Documents
- To open a folder, double-click it.
- If available, drag the scroll box, or click the scroll arrows to view additional documents.
- To open a document, double-click the file to open its associated application and the document.
 When you’re done, click the Close button.
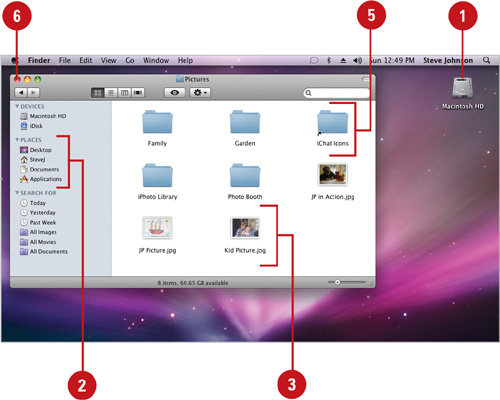
Did You Know?
You can quickly open the Home folder from the desktop. Press Shift+![]() +H. You can also click the desktop background, and then press
+H. You can also click the desktop background, and then press ![]() +Up Arrow, which is the Enclosing Folder command on the Go menu. Since your Desktop folder is actually in your Home folder, using the command takes you back one folder level.
+Up Arrow, which is the Enclosing Folder command on the Go menu. Since your Desktop folder is actually in your Home folder, using the command takes you back one folder level.
Your Favorites folder still exists. The Favorites folder from previous versions of the Mac OS is located in the Library folder of your Home folder. The Favorites folder contained links to your favorites files, folders, and Web sites in Microsoft Internet Explorer. If you want to use it, drag the Favorites folder to the Sidebar for quick and easy access.
See Also
See “Changing the Window View” on page 30 for information on changing the display of a folder’s contents.
Table . Folders in the Home Folder
Folder | Type Description |
|---|---|
Desktop | Each users desktop is mirrored in this folder to keep one separate and maintain the unique custom look and feel. |
Documents | A folder designated to store your personal documents and folders. |
Downloads | A folder designated to store your items downloaded from the Internet. |
Library | Each user maintains a personal Library folder, like the main Library folder for Mac OS X, to store your preferences, which includes fonts, e-mail, Internet bookmarks, keyboard layouts, and so on. |
Movies | A folder designated to store your movie files; programs, iMovie, use this folder. |
Music | A folder designated to store your music files; programs, iTunes, use this folder. |
Pictures | A folder designated to store your picture files; programs, iPhoto, use this folder. |
Public | A folder where you can place documents and folders that you can share with other users on your computer or a network. |
Sites | A folder where you can place Web pages that you can make available on the Internet, known as a Web server. |
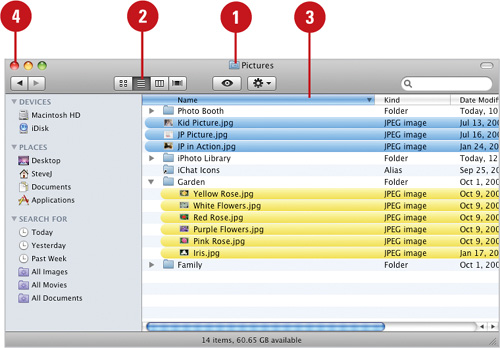
Mac OS X displays the contents of a drive or folder in different ways to help you find the information you’re looking for about a file or folder. The available views include Icon, List, Column, and Cover Flow. You can change the window view from the View menu, or you can click the View buttons on the Finder window toolbar.
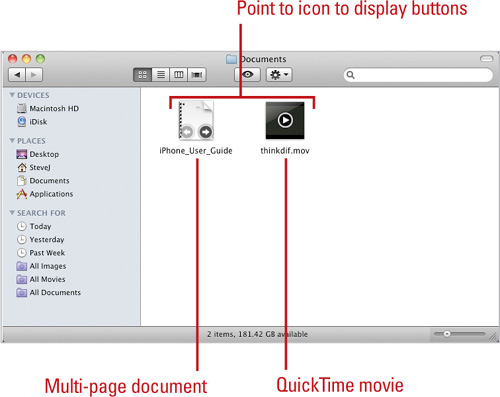
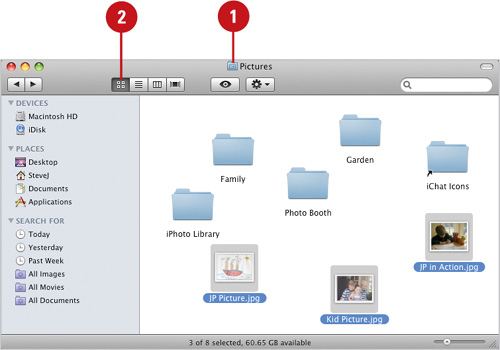
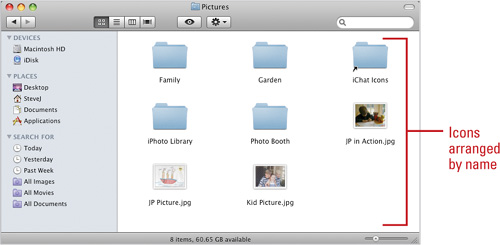
Icon view displays icons, sorted alphabetically in horizontal rows, with the name of the file or folder below each icon. You can also customize the display to include information about the file next to each icon, or a miniature representation of the file or folder. A picture file displays a thumbnail preview of the image. A multi-page document or a QuickTime movie file allows you to thumb through the document or watch the movie (New!). When you point to a multi-page document, such as a PDF, or a QuickTime move (.MOV), the thumbnail displays Previous and Next buttons or Play/Pause button, which you can click to view or play it as a thumbnail preview. The icon preview is also available in the Preview pane in Column and Cover Flow views (New!). In Icon View, you can drag the Zoom control (New!) slider on the Status bar to adjust the view percentage.
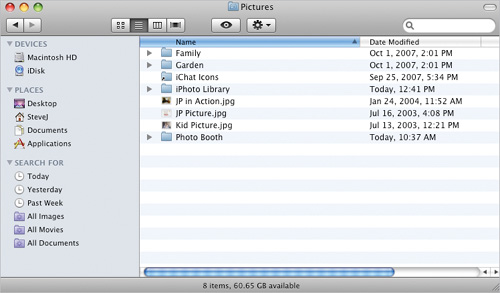
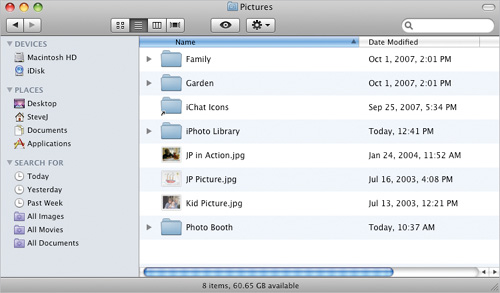
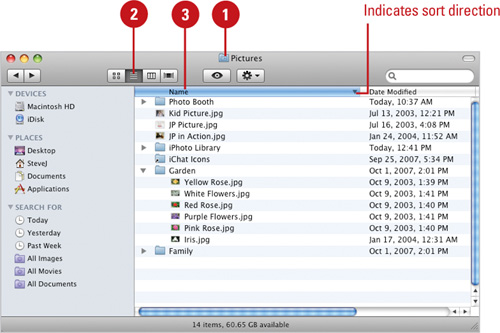
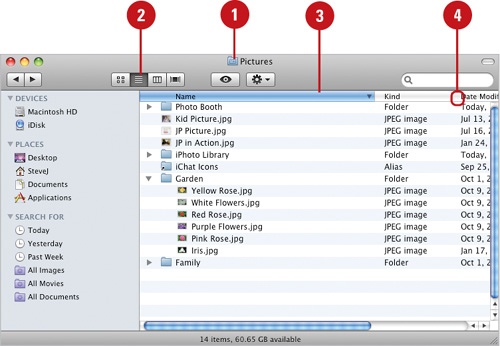
List view displays small icons, sorted alphabetically in a single vertical column with the name of the file or folder and additional information, such as size and date, in columns to the right.
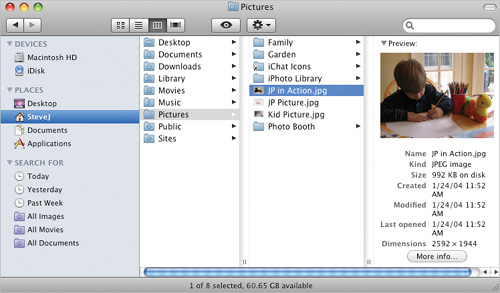
Column view displays icons, sorted alphabetically into vertical panes, or frames, which allows you to view information from two different locations. This arrangement enables you to view the file hierarchy of your computer and the contents of a folder simultaneously, making it easy to copy, move, delete, and rename files and folders.
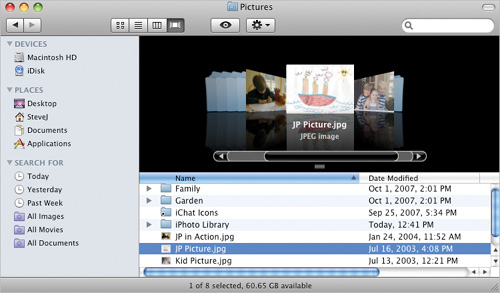
Cover Flow displays a flip through screen with a large preview of a documents first page at the top and displays list view at the bottom. This enables you to page through multipage documents or play movies. You can also display search results in an easy-to-read format.
Icon View
Every window remembers its view settings independently. You might prefer to look at your Documents folder in List view, but your Applications folder in Column view.
However, you can set view specific options to permanently customize the way you view icons in each view. In Icon view, you can change icon size, show item information or icon preview, label position, arrangement, and background. In List and Cover Flow views, you can change file size, date, and status related information. In Column view, you can show icons and the preview column (summary information in the right column). See “Customizing Finder Window Views” on page 82 for more information about the specific options.
List View
Column View
Cover Flow View
When you select List view to display your files and folders, you can change the way individual files and folders are sorted by using the Arrange By menu options on the View menu. You can sort the files by name, date, size, file kind, or color label. You can also have Mac OS X help you clean up your windows by aligning icons to an invisible grid. Each window contains an invisible grid, which icons snap to when called to line up. The Arrange By menu options and the Clean Up command are only temporary until you make changes to the window. If you want Mac OS X to automatically keep icons arranged or cleaned up, you need to select appropriate options using the Show View Options command on the View menu.
- Display the desktop or open the folder you want to arrange.
- Click the Icon View button on the toolbar.
- To arrange icons, click the View menu, point to Arrange By, and then click the view you want to use:
Name
Date Modified
Date Created
Size
Kind
Label
- To clean up icons, select the icons you want or deselect all, click the View menu, and then click Clean Up or Clean Up Selection.
See Also
See “Customizing Finder Window Views” on page 82 for information on setting options in Show View Options.
Did You Know?
You can override the grid settings as you drag. When the Snap To Grid setting is turned on (in Show View Options), pressing ![]() lets you drag the icon freely; when the Snap To Grid setting is turned Off, pressing
lets you drag the icon freely; when the Snap To Grid setting is turned Off, pressing ![]() snaps the icon to the grid. When you perform this operation, begin the drag before you press the
snaps the icon to the grid. When you perform this operation, begin the drag before you press the ![]() key.
key.
Table . Options for Arranging Files and Folders
Option | Arranges Files and Folders |
|---|---|
Name | Alphabetically |
Date Modified | Chronologically by their last modification date, with the latest modification date listed last. |
Date Created | Chronologically by their creation date. |
Size | By size, with the largest folder or file listed first. |
Kind | By type, such as all documents created using the TextEdit program. |
Label | By color label |
Clean Up | Automatically in rows and columns by invisible grid points. |
You can display files and folders in a variety of different ways, depending on what you want to see and do. When you view files and folders in List view, a default list of file and folder information appears, which consists of Name, Date Modified, Size, and Kind. If the default list of file and folder details doesn’t provide you with the information you need, you can add and remove any file and folder information using Show View Options. If you need to change the way Mac OS X sorts your files and folders, you can use the column header buttons. Clicking on one of the column header buttons (such as Name, Date Modified, Size, or Kind) in List view, sorts the files and folders by the type of information listed in the column. If the columns are not organized in the order you want, you can use the mouse to quickly rearrange columns. If you see an ellipsis in a column, it is too small to display all the information in it. You can drag the column divider to change column sizes all at once or individually.
- Open the folder you want to view.
- Click the List View button on the toolbar.
- Click the triangle (pointing right) next to a folder in the list.
The folder expands to display an indented list of folders and files from within the folder.
- Click the triangle (pointing down) next to a folder in the list.

The folder collapses.
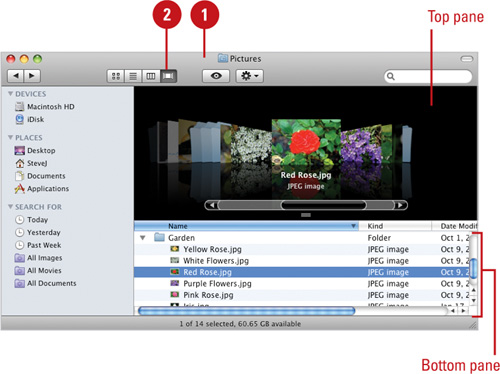
Just as you use Cover Flow to flip through album art in iTunes, now you can use it to flip through your files. Cover Flow displays a flip through screen with a large preview of a documents first page at the top and displays List view at the bottom. Cover Flow enables you to page through multipage documents or play movies. You can also display search results in an easy-to-read format. List view at the bottom of Cover Flow displays a default list of file and folder information, which consists of Name, Date Modified, Size, and Kind.
- Open the folder you want to view.
- Click the Cover Flow button on the toolbar.
- Use either one of the following methods to display a file in Cover Flow.
Top pane. Click the item, right and left arrows, or drag the slider to display the file you want.
Bottom pane. Click the triangle (pointing right) next to a folder in the list to display an indented list of folders and files from within the folder, and then select the file you want to display.
See Also
See “Working with Files and Folders in List View” on page 34 for information on using List view.
Column view makes is easy to display several levels of folders in alphabetical order at the same time within the same window. Column view displays the window in panes, which allows you to view information from different locations making it easy to copy, move, delete, and rename files and folders. When you click a disk or folder in the first pane, the second pane shows a list of all the folders in it. Each time you click a folder in one pane, the pane to its right shows its contents. The other panes slide to the left, in some cases, out of view, which you can scroll back to display them. When you find and click the file you want, the next pane to the right, the Preview column, shows a file icon and information about it. If the file is a picture or PDF, the Finder displays the picture or PDF miniature. If the file is a sound or movie, you can play it in the Finder window.
- Open the folder you want to view.
- Click the Column View button on the toolbar.
- Double-click the folder you want to open in a pane.
The contents of the folder appears in the next pane to the right.
- To resize a column, drag its right-side handle.
- Click the file you want to view in the Preview column.

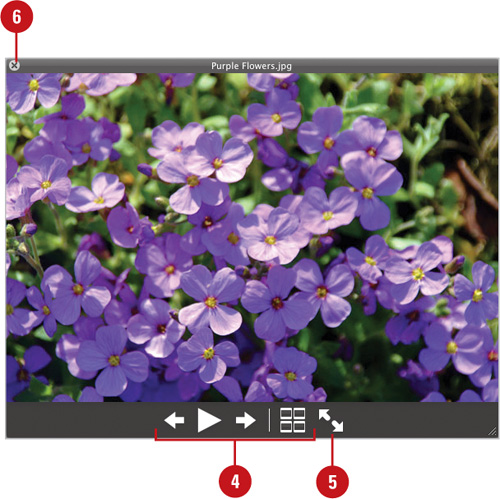
Quick Look allows you to view the contents of a file or folder without opening it or starting an application. The content you see in Quick Look depends on the type of file you select in the Finder. If you select a single or multipage text document, you can read the text and scroll through it; if you select a video, you can play it; or if you select an image, a thumbnail preview appears. When you select more than one image or item, you can display a slide show and use arrow buttons to move from slide to slide.
- Open the folder you want to view.
- Select the one or more files or folder you want to view.
- Click the Quick Look button on the toolbar.
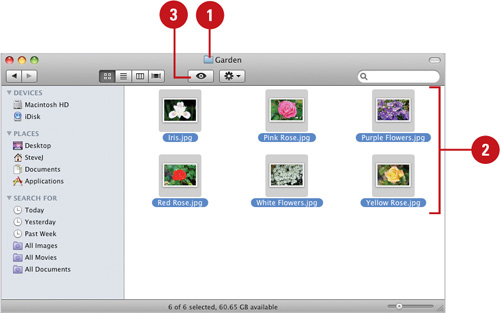
- If you selected more than one item or image, use the follow buttons to navigate through the items.
Previous and Next. Navigate from slide to slide.
Play. Display a slide show of the selected images or items.
Index. Display a pictorial index of the selected images or items. Click an index item to display it.
- To view the selected item in full screen, click the Full Screen button. To return to the previous view, click the Exit Full Screen button.
- When you’re done, click the Close button.
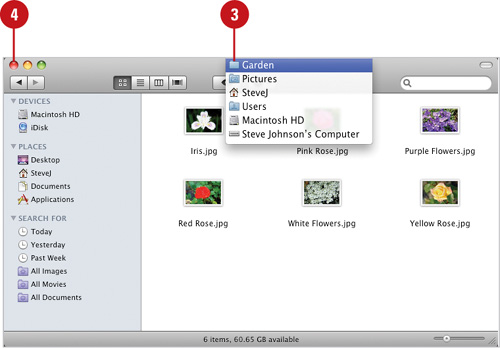
Mac OS X keeps a list of your most recently used files, folders, and network computers. Instead of navigating through a long list of folders to open a recently used file, you can use the Recent Folders list to find it quickly. If you want to go to a common location, such as your computer, network connections, iDisk, Home folder, Applications folder, Documents folder (New!), Utilities folder, or one you specify, the Go menu makes it quick and easy. After you have opened several folders, you can use the secret folder hierarchy menu in a window’s title bar to quickly go backwards through the chain of folders.
- Click the Go menu.
- Select any of the following:
Common locations. Click the name of the place.
Recent folders. Point to Recent Folders, and then click the name of the folder.
Specific folder. Click Go to Folder, type a path location, and then click Go. You can use the tilde (~) to indicate the Home folder, “~/Documents/”.
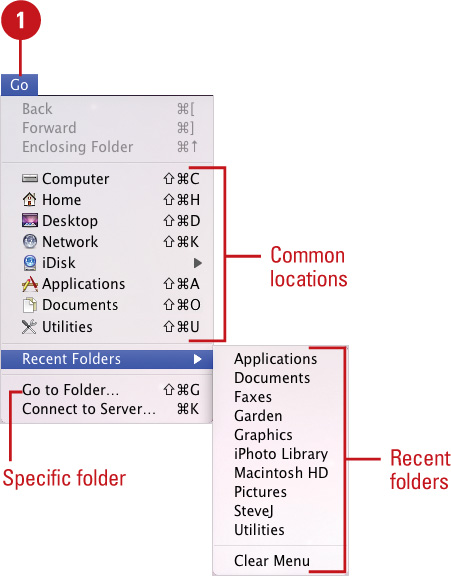
- To go backwards through the folders, hold down
 , click the window’s title bar, and then click a location from the folder hierarchy menu.
 - When you’re done, click the Close button.
Giving an icon or folder a distinctive color can help you organize and find them later. Mac OS X provides seven different colors labels from which to select. The default color label names appear as Red, Orange, Yellow, Green Blue, Purple, and Gray, but you can customize them to suit your own needs and preferences, such as “Final,” “In Progress,” “Work,” “Personal,” and “Backup.” When you change an icon’s color, the icon and name take on the selected color shade. In List or Column view, the entire row takes on the color shade. In List view, you can sort files and folders quickly by color label. Sorting by color label also lets you create alphabetical groups within for color label in a single list. You can also use color labels with the Find command to search for files and folders with a particular color label.
- Open the folder window with the file or folder icons you want to color.
- Select the icons you want to color.
- Click the Action button, and then click the color label you want.

- When you’re done, click the Close button.

Did You Know?
You can quickly take off a color. Control-click the icon, and then click No Color (the x under Color Label).
See Also
See “Searching for Files Using the Find Window” on page 66 for information on searching for files and folders by color label.

The keys to organizing files and folders effectively within a hierarchy are to store related items together and to name folders informatively. Creating a new folder can help you organize and keep track of files and other folders. In order to create a folder, you select the location where you want the new folder, create the folder, and then lastly, name the folder. You should name each folder meaningfully, so that just by reading the folder’s name you know its contents. After you name a folder or file, you can rename it at any time.
- Open the drive or folder where you want to create a folder.
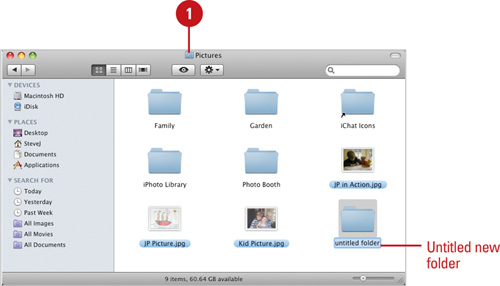
- Click the File menu, and then click New Folder.
- With the new folder name selected, type a new name.
- Press Return.
Did You Know?
File names can be up to 255 characters. You can use spaces and underscores in names, but you can’t use a colon (:). If you are going to use these files on a Windows PC, then don’t use the following characters: * : < > | ? “ or /. It’s probably best to keep the name descriptive, but short. This allows you to view the file name in all view settings.
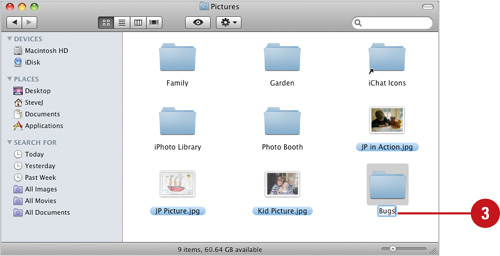
- Open the drive or folder with the file or folder you want to rename.
- Click the file or folder to select it.
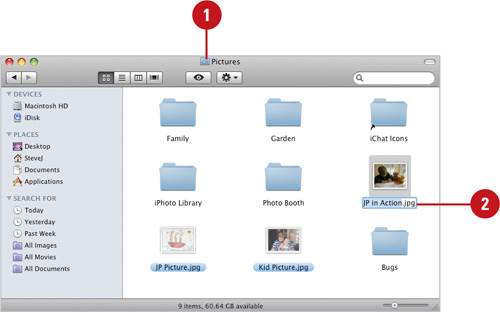
- To erase the entire current name, press Return.
- With the name selected, type a new name, or click to position the insertion point, and then edit the name.

- Press Return.
The file may move to a location based on sort and view.
See Also
See “Showing or Hiding File Extensions” on page 81 for information on file extensions.
Correcting Your Most Recent Action in the Finder
Everyone makes mistakes and changes their mind at some point, especially when you make changes in the Finder. You can instantly correct your most recent action by using the Undo command (![]() +Z) on the Edit menu. If you change your mind about undoing an action, you can just as easily use the Redo command (
+Z) on the Edit menu. If you change your mind about undoing an action, you can just as easily use the Redo command (![]() +Y) to restore the action you reversed.
+Y) to restore the action you reversed.
Sometimes you’ll need to move a file from one folder to another, or copy a file from one folder to another, leaving the file in the first location and placing a copy of it in the second. You can move or copy a file or folder using a variety of methods. If the file or folder and the location where you want to move it are visible in a window or on the desktop, you can simply drag the item from one location to the other. Moving a file or folder on the same disk relocates it, whereas dragging it from one disk to another copies it so that it appears in both locations. When the destination folder or drive is not visible, you can use the Cut (to move), Copy, and Paste commands on the Edit menu to move or copy the items.
- Open the drive or folder containing the file or folder you want to copy or move.
- Select the files or folders you want to copy.
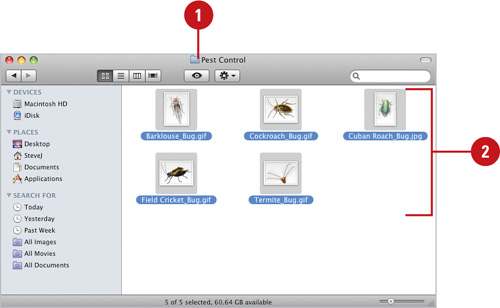
- Click the Edit menu, and then click Cut (to move) or Copy.
- Navigate to the drive or folder containing the folder where you want to copy or move the items.
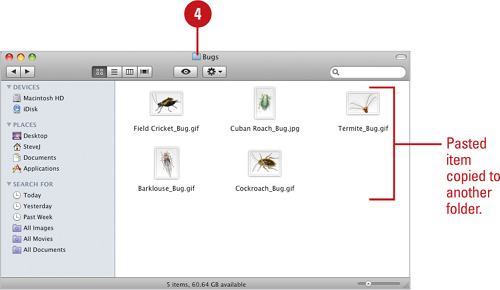
- Click the Edit menu, and then click Paste.
Did You Know?
You need certain permissions to move or copy a file. You need Read Only or Read & Write permissions to the item you want to move or copy. You need Read & Write Only access to the location where you want to place it.
See Also
See “Using Spring-Loaded Folders” on page 46 for information on copying and moving items using spring-loaded folders.
Moving and Copying Items Using Exposé
Exposé can make it easier to move and copy files and folders using drag and drop. To move or copy items between open windows, start to drag the items (hold down the Option key to copy or hold down ![]() +Option to create an alias), press F9 (show all open windows) or F10 (show all open windows in the same application), point to the window where you want to move or copy the item, release F9 or F10, and then drag some more or release the items. A similar process works moving or copying items to the desktop using F11. The Exposé shortcut keys can be changed, so check System Preferences if they are not working properly.
+Option to create an alias), press F9 (show all open windows) or F10 (show all open windows in the same application), point to the window where you want to move or copy the item, release F9 or F10, and then drag some more or release the items. A similar process works moving or copying items to the desktop using F11. The Exposé shortcut keys can be changed, so check System Preferences if they are not working properly.
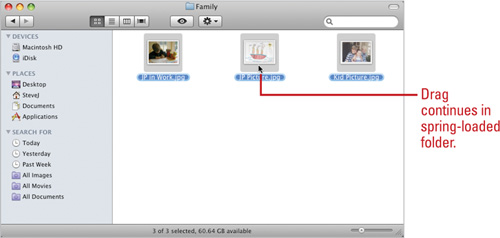
When you are moving or copying files and folders around, it can be tiresome to drag a selection to a folder, open the folder, and then continue to drag it to another folder. Spring-loaded folders allow you to drag a file or folder on top of another folder and it springs open to let you continue dragging the selection to another location in one continuous motion. When you drag a selection onto a folder (or even an icon in the Sidebar) and pause for a moment (with the mouse pressed), the window for the folder opens, so you can continue to drag to another folder as desired. You can use Finder Preferences to turn spring-loaded folders on and off, and set the delay setting for the amount of time you want to pause. If you set a long delay or turn off spring-loaded folders, you can press the Spacebar while you drag a selection to open the window immediately. The Spacebar method is useful because windows don’t automatically open when you don’t want them to, yet you still have the option to use spring-loaded folders when you need it.
- Open the drive or folder containing the files and folders you want to move or copy.
- Drag the selection onto a folder or an icon in the Sidebar.
To copy files and folders, hold down the Option key while you drag.
- Press the Spacebar, or pause for a few moments.
The folder window automatically opens centered on your cursor:
In Icon view, the new window replaces the previous window.
In List view, a new window opens.
In Column view, a new column opens, displaying the new folder’s contents.
Mac OS X maintains a set of personal folders and options for everyone on your computer to make sure the contents remain private, unless you decide to share the contents with others. If you want the other users on your computer, or those connected to your computer over a network to have access to files, you can place those files in the Shared folder that each user can access. The Shared folder is located in the Users folder. It is set up with Read & Write permissions so that all users can open the files in this folder and copy files to the folder. If you want to share files with a specific user on your computer, you can use their Public folder. A Public folder is set up with Read Only permissions that allow others to see and copy its contents, but not change it. Each Public folder is located in the users’ Home folder and also contains a Drop Box folder, which is set up with tighter permissions so other people can copy files to a Drop Box, but they cannot see its contents.
- Open the drive or folder containing the files or folders you want to share.
- Select the files or folders you want to share.
- Click the Edit menu, and then click Copy.
- Click the Hard Disk icon in the Sidebar.

- Double-click the Users folder.
- Open the folder you want to use to share files:
Shared folder. Double-click the Shared folder.
Public folder. Double-click the user name, and then double-click the Public folder.
 Click the Edit menu, and then click Paste.
 To use the Drop Box folder in a Public folder, drag the files and folder onto the Drop Box folder.
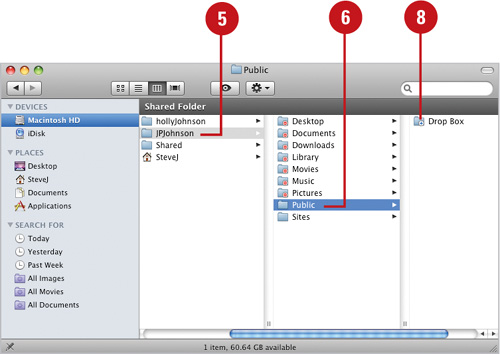
When you organize the contents of a folder, disk, or the desktop, you might find files and folders that you no longer need. You can delete these items or remove them from the disk. If you delete a file or folder from the desktop or from the hard disk, it goes into the Trash. The Trash, located on the right side of the Dock, is a temporary storage area for deleted files. The Trash stores all the items you delete from your hard disk so that if you accidentally delete an item, you can remove it from the Trash to restore it. You can use the Put Back command (New!) to restore a deleted item to it’s original folder. Be aware that if you delete a file from a removable disk, it is permanently deleted, not stored in the Trash. The files in the Trash do occupy room on your computer, so you need to empty it to free up space.


Did You Know?
You can undo a deletion. If you accidentally delete a file, click the Edit menu, and then click Undo Delete. Mac OS X remembers your last three actions.
You can still recover deleted files after you empty the Trash in some cases. If you install special data recovery software, you still may be able to recover deleted files.
You can turn off the empty Trash warning. Click the Finder menu, click Preferences, click Advanced, clear the Show Warning Before Emptying The Trash check box, and then click the Close button.
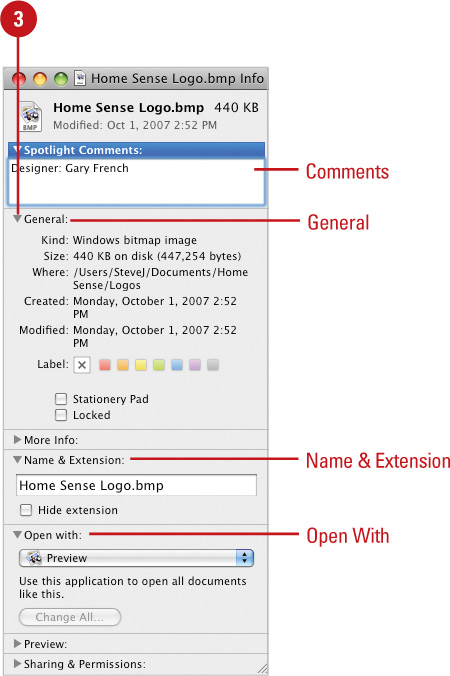
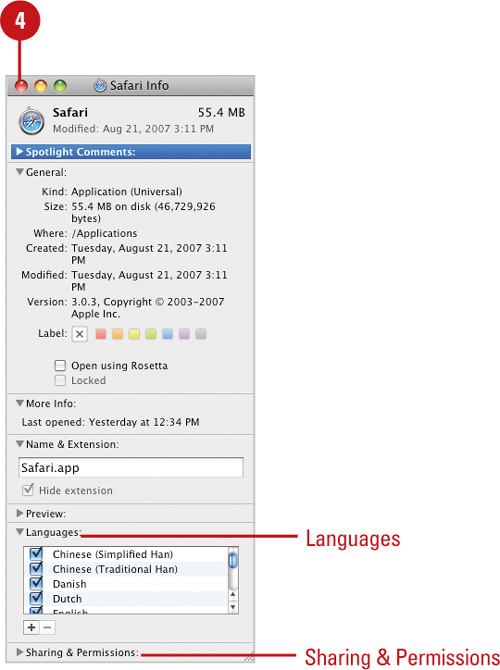
You can get information about a hard disk, removable disk, network disk, application, folder, or file using the Info window. The Info window displays information about the kind, size, location, date created, and date modified. If you select a disk, the Info window also includes information about format, capacity, available space, and used space. In addition to displaying information, you can also use the Info window to add Spotlight text to enhance searches, create a stationery file, lock an item, change a files name and extension, determine which application to open a file with, change its ownership and permissions, and write a comment. When you set a file as stationery, the file opens as an untitled copy of the original, so the original file doesn’t get changed. If you want to see information for different items without having to close the Info window, you can use Show Inspector to keep the Info window open while you select different items.
- Select the files, disks, folders, applications, or alias; don’t select anything to get desktop info.
- Use one of the following methods:
Separate window for each item. Click the File menu, and then click Get Info.
A separate Info window appears for each selected item. This is useful for comparing settings and information.
Single window for all items. Hold down the Option key, click the File menu, and then click Show Inspector.
A single Info window appears, displaying statistics (by type and size) about the selected items and options common to all the selected items. This is useful for setting the same option for a lot of items, such as locking or unlocking files.
- Click the expand button (triangle) to display category options, or the collapse button (down arrow) to hide them.
- When you’re done, click the Close button.


- Select the files, disks, folders, or applications you want to set.
- Click the expand button (triangle) for the category in which you want to change options.
- Change the options you want:
Comments. Add your own comments, which you can display in List view and use in Spotlight searches.
General. View information about the selected items; create a Stationery Pad (a file opens as untitled); and lock or unlock a file.
Name & Extension. Read and edit item name and extension; and hide extensions.
Content Index. Index a disk or folder for better search results.
Memory. Set memory options for Classic applications only.
Open With. Specify which application opens when you double-click an icon.
Preview. Display magnified picture thumbnails or play sounds and movies.
Languages. Add or remove languages for an application.
- When you’re done, click the Close button.
See Also
See “Setting File Access Permissions” on page 390 for information on setting file permissions and ownership.
The low cost and large storage size of CDs or DVDs (getting cheaper), and the popularity of recording hardware make using CDs and DVDs an effective approach to some file management tasks. For example, CDs or DVDs are an effective way to back up information or transfer information to another computer without a network or to a Microsoft Windows computer. Before you can create a CD or DVD, you must have blank CDs or DVDs and a CD-RW or DVD-RW drive (also known as a writer or burner) installed on your computer. You can copy or write files and folders to either CD-Rs or DVD-Rs (recordable) or CD-RWs or DVD-RWs (rewritable). With recordables, you can write files and folders only once and read them many times, but you can’t erase them. With rewritables, you can read, write, and erase files and folders many times, just like a removable disk. When you write to, or burn, a CD or DVD, Mac OS X needs disk space on your hard disk to temporarily store files during the process, so make sure you have free hard disk space available for the size of the CD or DVD. Do not copy more files and folders to the CD or DVD than it will hold; anything beyond the limit will not copy. When the burn is complete, you can use the CD or DVD on a Macintosh or Windows PC appropriately equipped. You can also use other Mac OS X applications with disc burning features, such as iTunes, iPhoto, iDVD, or Disk Utility, to create specialized CDs or DVDs.
- Insert a blank CD-R, CD-RW, DVD-R, or DVD-RW disc into your drive.
If you insert a CD-RW disc that you previously recorded, the dialog doesn’t appear; you need to erase the disc with Disk Utility before you can burn data on it again.
- Click the Action pop-up, and then click Open Finder.
- Select or clear the Make this action the default check box.
- Click OK.
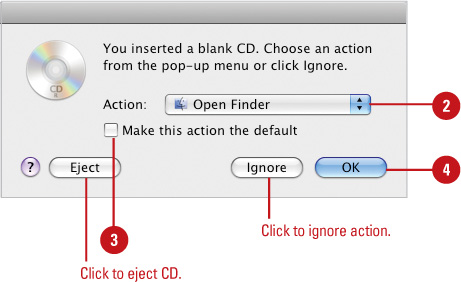
The blank disc appears on the desktop, where you can add and remove files and folders.
- Navigate to the files and folders you want to add to the CD or DVD disc.
- Drag the files and folders to the CD or DVD disc in the Sidebar, and then organize them.
- To remove files and folders, click the CD or DVD disc in the Sidebar, or double-click the disc on the desktop, and then drag out the items you don’t want.
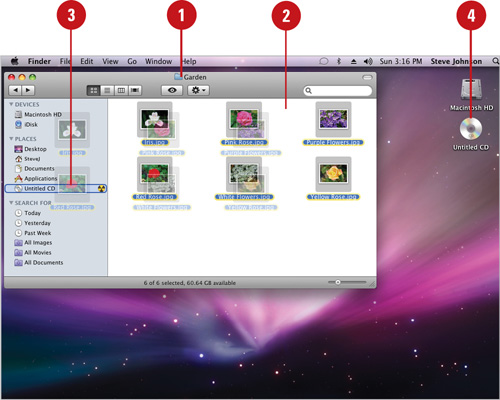
- If you want, rename the CD or DVD disc just like any other file.
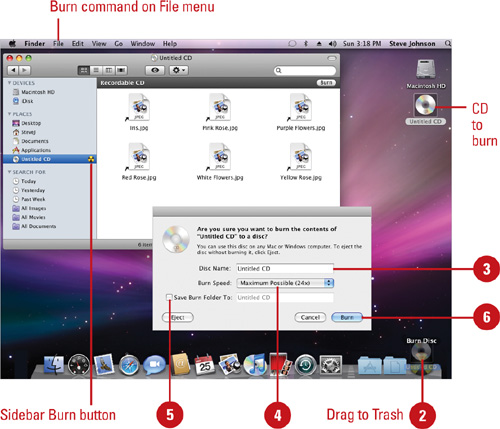
- Use any of the following methods to create a CD or DVD:
Drag to Trash. When you drag a disk icon onto the Trash icon, it changes to a Burn icon.
Burn command. Select the disk icon, click the File menu, and then click Burn.
Sidebar Burn button. Click the Burn button in the Sidebar.
- Type a name for the disc.
- Click the Burn Speed pop-up, and then select a speed.
- Select the Save Burn Folder To check box, and then type a name to create a burn folder.
- Click Burn.
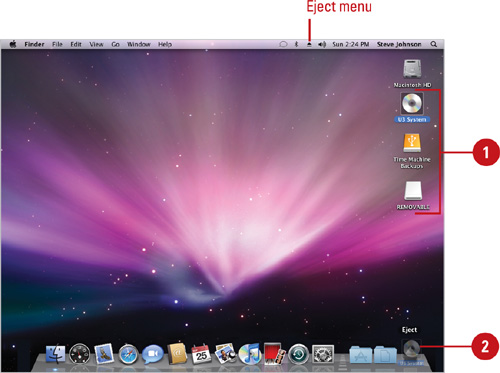
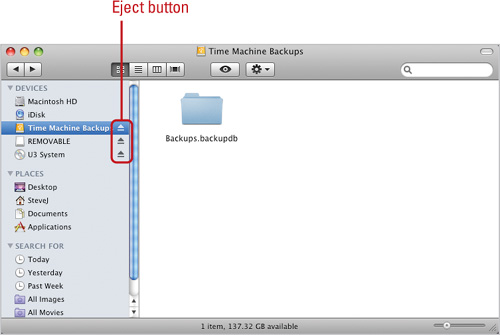
When you insert a disk (such as a removable, CD, or DVD), its icon appears, or mounts, in the Computer window, in the Sidebar, and on the desktop (unless you’ve changed Finder Preferences) for you to open and use. When you no longer need a disk, you eject, or dismount, it from the drive. Mac OS X provides several different ways to eject a disk: drag the disk icon to the Trash (only happens for disks; a little strange, but its old time Mac functionality), use the Eject menu, select the Eject command, use the Sidebar, or hold down the Eject key. You can also use these methods to remove, or unmount, a network or FireWire drive, an iPod, or a disk image from your desktop.
- Insert the disk into the appropriate drive to mount the disk.
- Use any of the following methods to eject a disk:
Drag to Trash. When you drag a disk icon onto the Trash icon in the Dock, it changes to an Eject icon.
Eject command. Select the disk icon, click the File menu, and then click Eject. You can also Control-click the disk icon, and then click Eject.
Eject menu. Click the Eject menu, and then click Eject “disc name” or press F12.
Sidebar Eject button. Click the Eject button in the Sidebar.
Eject key. Press and hold down the Media Eject key in the upper-right corner of your keyboard (if available) for a moment, or press F12.