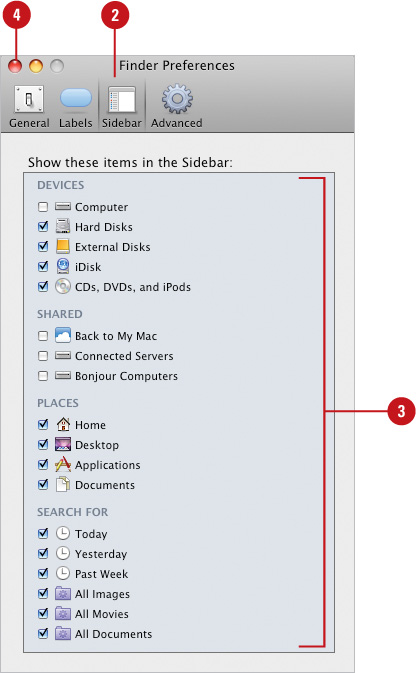
Finder Preferences allow you to control how you interact with your desktop, windows, and icons. You can access Finder Preferences from the Finder menu. Finder Preferences are grouped into four main areas: General, Labels, Sidebar, and Advanced. The Finder Preferences window is a central location to set Finder related options. However, you can customize the Finder and the desktop in other places too.
In each of the Finder window views (Icon, List, and Column), you can set view specific options to customize the way you view icons. In addition to the predefined items in the Sidebar (the left pane in a Finder window), you can add your own items, including folders, documents, Web Internet Location files, to name a few. The Finder toolbar comes with a few standard buttons, and you can customize to add more. You can use the Customize Toolbar dialog to quickly drag button icons on and off the toolbar. You can set Dock preferences to adjust the Dock size and icon magnification (when you point to one), change the Dock position on the screen, apply a bounce effect to an icon when you launch an application, select a minimization special effect, and make it disappear when not in use.
To save some time, you can create shortcuts to the files, folders, or disks you use frequently, known as Aliases. An alias allows you to access the original folder or file from several different places. Exposé lets you quickly move windows out of the way temporarily to make it easier to work with windows in order to find, move, or copy files. If you have novice users who want to use your computer, you can set up a shared user account with Simple Finder, which is a simplified version of the Mac OS X Finder with fewer menus and icons. It’s a great way for them to explore, yet keep your data safe.
Finder Preferences allow you to control how you interact with your desktop, windows, and icons. Finder Preferences are grouped into four main areas: General, Labels, Sidebar, and Advanced. You can open Finder Preferences by selecting Preferences from the Finder menu.
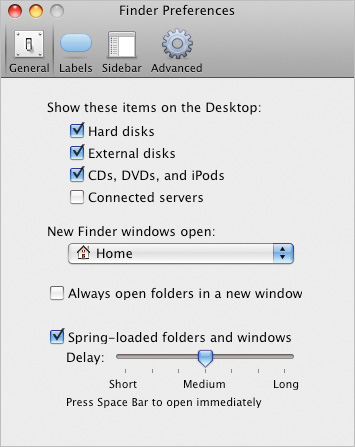
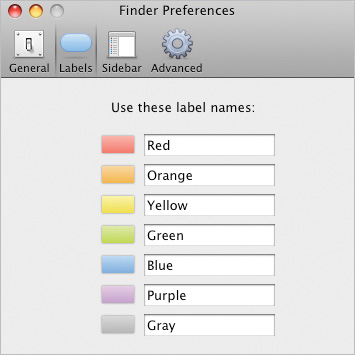
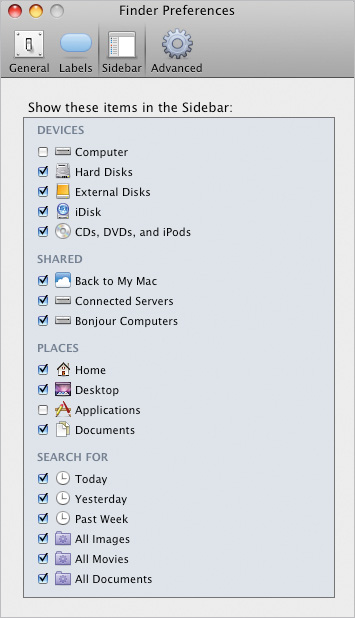
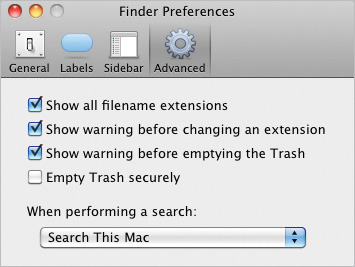
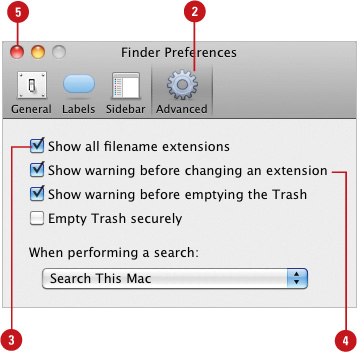
The General preferences pane allows you to display icons for local and network disks on the desktop, select options for opening new Finder windows, and enable spring-loaded folders and windows. The Labels preferences pane allows you to change the name of color labels for Finder items to more meaningful ones, such as work or project, which you can use as search criteria in the Find window. If you accidentally remove a Sidebar icon, you can use the Sidebar preferences pane to redisplay Finder specific icons, such as computer, hard disks, iDisk, network, desktop, and applications. The Advanced preferences pane provides options to show file extensions, a change file extension warning, an empty the Trash warning, empty the Trash securely, and where to perform a Spotlight search (New!).
General
Labels
Sidebar
Advanced
When you insert a removable disk, a CD, or DVD, or connect to a network server, an icon for the disk automatically appears on the desktop. Depending on your work style, you may or may not want icons to simply appear. You can use Finder Preferences to specify whether icons for hard and external disks, CDs, and network servers appear on your desktop. Having the icons on the desktop makes dragging them to the Eject icon in the Dock quick and easy, but the icons also add clutter to the desktop.
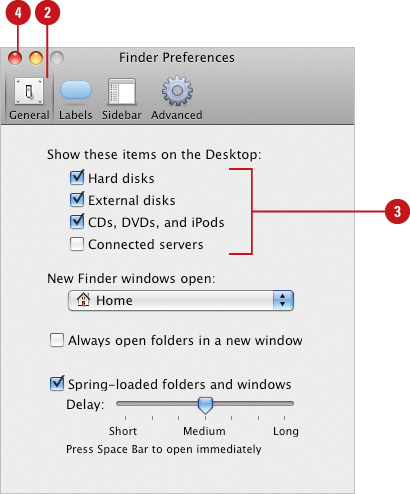
When you create a new Finder window, you can specify options to always open folders in a new window or use spring-loaded folders and windows. Spring-loaded folders allows you to drag a file or folder on top of another folder, and it springs open to let you continue dragging the selection to another location. Instead of starting and stopping when you move or copy items from one folder to another, you can drag items continuously from folder to folder.
 Click the Finder menu, and then click Preferences.
 Click General.
 Click the New Finder windows open pop-up, and then select the window you want to open when you open a new Finder window.
 Select or clear the Always open folders in a new window check box.
 Select or clear the Spring-loaded folders and windows check box. If you select it, drag the slider to adjust the delay.
 Click the Close button.
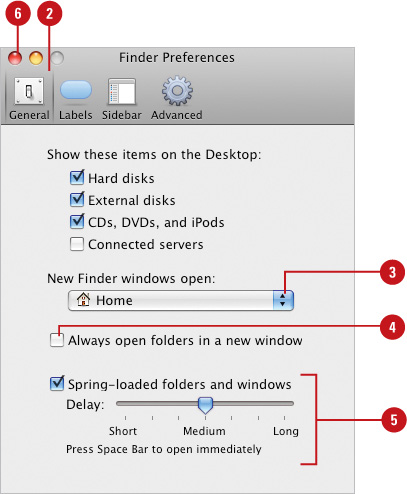
A file extension is a three-letter suffix at the end of a document’s file name that identifies the file type. For Windows operating system users, a file extension determines which application can open a file; the Mac doesn’t use it. You might never have seen a document’s file extension because your system might be set up to hide it. The file extension for simple text files is “.txt” (pronounced “dot t-x-t”), and many graphic files have the extension “.bmp” or “.jpg”. This means that the full name for a text file named Memo is Memo.txt. If you double-click a document whose file name ends with the three-letter extension “.txt,” Finder automatically opens the document with TextEdit, a word processing application. If you plan to exchange files with the Windows operating system, then show the file extensions, so Windows recognizes them. As a precaution, you can also set an option to display a warning before allowing an file extension change.
- Click the Finder menu, and then click Preferences.
- Click Advanced.
- Select or clear the Show all file extensions check box.
- Select or clear the Show warning before changing an extension check box.
- Click the Close button.
Did You Know?
You can hide or show extensions one icon at a time. Select the icons you want to show or hide, click the File menu, click Get Info, select or clear the Hide Extension check box, and then click the Close button.
You can set an option to show a warning before emptying the Trash. Click the Finder menu, click Preferences, click Advanced, select the Show Warning Before Emptying The Trash check box, and then click the Close button.
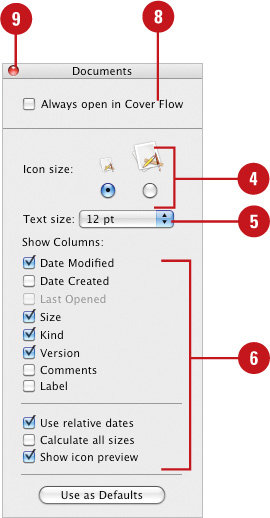
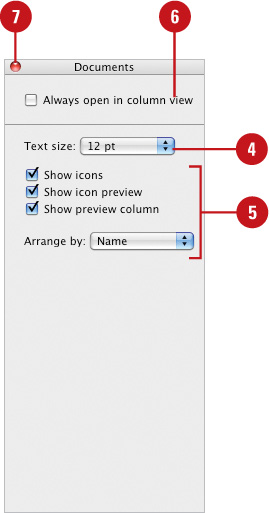
In each of the Finder window views (as Icons, as List, as Columns, and as Cover Flow, you can set view specific options to customize the way you view icons. For Icon, List, and Cover Flow views, you can select to apply your changes to the current window or to all Finder windows (a personal default). In Icon view, you can change icon size, label position, arrangement, and background. In List and Cover Flow views, you can change file size, date, and status related information. To make the display easier to view, you can display relative dates, such as “Today” and “Yesterday.” In Column view, you can show icons and the preview column (summary information in the right column).
- Open a Finder window.
- Click the View menu, and then click As Icons.
- Click the View menu, and then click Show View Options.
- Drag the slider left or right to To change the icon size or the grid spacing.
- To change the icon text size, click the pop-up, and then select a size.
- Click the label position option (Bottom or Right) you want.
 Select or clear the following check boxes:
Show item info. Check to show item info under the icon name.
Show icon preview. Check to show a preview in the icon.
Arranged by. Select an arrange option from the pop-up.
 Click the Background option you want, and any related settings.
 Click Use as Defaults to apply view changes to all windows.
 Select the Always open in icon view check box to apply view changes to the selected window.
 Click the Close button.
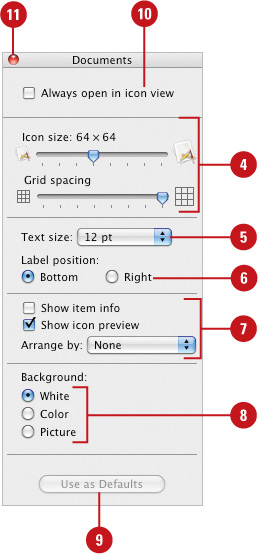
- Open a Finder window.
- Click the View menu, and then click As List or Cover Flow.
- Click the View menu, and then click Show View Options.
- Click an Icon size option.
- To change the icon text size, click the pop-up, and then select a size.
- Select or clear the check boxes with the information you want to display in list form.
- Click Use as Defaults to apply view changes to all windows.
- Select the Always open in lists view or Always open in Cover Flow check box to apply view changes to the selected window.
- Click the Close button.
- Open a Finder window.
- Click the View menu, and then click As Columns.
- Click the View menu, and then click Show View Options.
- Click the Text size pop-up, and then select a point size.
- Select or clear the check boxes for Show icons, Show icon preview, and Show preview column, and select an Arrange by option.
- Select the Always open in column view check box to apply view changes to the selected window.
- Click the Close button.
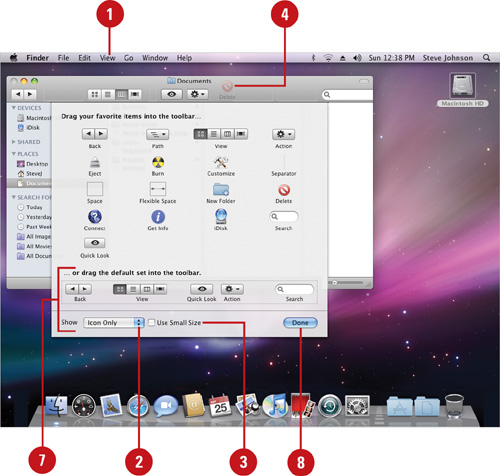
The Finder toolbar comes with a few standard buttons, but you can add more. You can use the Customize Toolbar dialog to quickly drag button icons on and off. The buttons include Path (navigation pop-up), Eject, Burn, Customize, Separator (designates groups), Space (adds a gap), Flexible Space (adds a gap that expands), New Folder, Delete, Connect, Get Info, iDisk, Search, and Quick Look. If you want the simple look again, you can drag the Default Set of buttons onto the toolbar to reset it. In addition to the button icons in the dialog, you can also drag icons, such as favorite folders, disks, or applications, from the desktop or any Finder folder onto the toolbar. You can also use the A key to cycle through size combinations of large and small icons and text labels.
- Click the View menu, and then click Customize Toolbar.
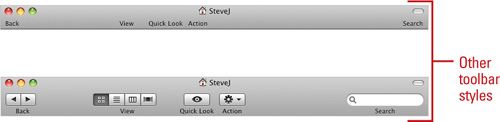
- Click the Show pop-up, and then select a display option of Icon Only, Icon & Text, or Text Only.
- Select or clear the Use Small Size check box.
- To add icons to the toolbar, drag them into place from the gallery.
- To remove icons, drag them up or down off the toolbar.
- To rearrange icons, drag them horizontally on the toolbar.
- To reset the toolbar, drag the default set of items onto the toolbar.
- When you’re finished, click Done.
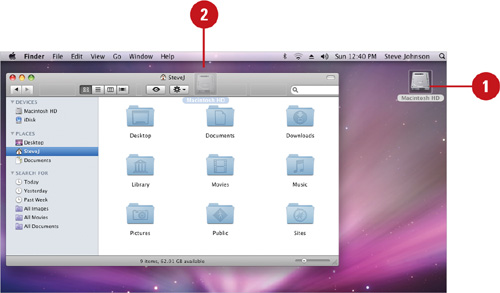
- Display the icons you want to add to the Finder toolbar in the desktop or any folder window.
- Drag icons from the desktop, or any folder window, directly onto the toolbar, and then pause before releasing the icon.
- To remove an icon from the toolbar, hold down
 , and then drag the icon off the toolbar.
 - To rearrange an icon on the toolbar, hold down , and then drag the icon horizontally on the toolbar.


In addition to the predefined items in the Sidebar, you can add your own items, including folders, documents, and Web Internet Location files, to name a few. When you click a volume or folder in the Sidebar, the Finder displays its contents in the window. When you click an application, document, or Web Internet Location file, the item opens in its own application window. If you accidentally remove a Sidebar icon, you can’t undo it, but you can redisplay Mac OS X specific items using Finder Preferences. Unfortunately, you have to recreate the ones you added.
Add items. Drag the items to the lower section of the Sidebar.
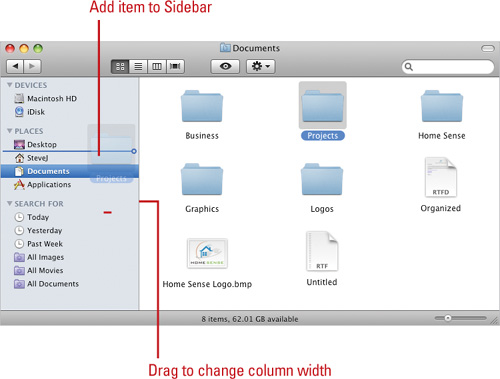
Remove items. Drag the items outside of the Sidebar to detach them.
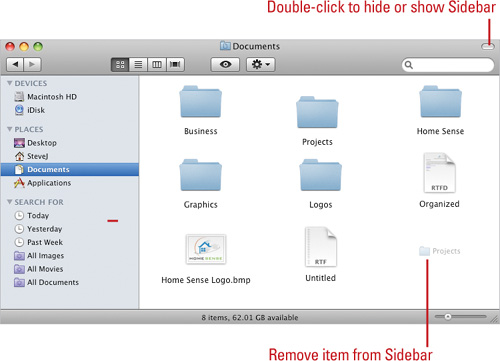
Rearrange items. Drag the items up or down in the list.
Change the column width. Position the mouse pointer over the divider between the Sidebar and the window contents, and then drag to change the width.
Hide and show the Sidebar. Click the Toolbar Control button to hide and show the toolbar and Sidebar, or click the View menu, and then click Hide Sidebar or Show Sidebar (New!).
After you have worked with the Dock for a while, you probably want to customize it to better suit your needs. You can set Dock Preferences to adjust the Dock size and icon magnification when you point to one, change the Dock position on the screen, apply a bounce effect to an icon when you launch an application, select a minimization special effect, and even make it disappear when not in use.
- Click the Apple menu, point to Dock, and then click Dock Preferences.
- Select the Dock options you want:
Dock Size. Drag slider to change the Dock size.
Magnification. Check to enable it, and then drag the slider to magnify the icons when you point to them in the Dock.
Position on screen. Click the Left, Bottom, or Right option.
Minimize using. Click the popup, and then select an animation effect.
Minimize windows into application icon (New!). Select to minimize windows into the application icon on the dock.
Animate opening applications. Select to have the application icon bounce when you launch an application.
Automatically hide and show the Dock. This changes when you select the Turn Hiding On menu command.
- Click the Close button.

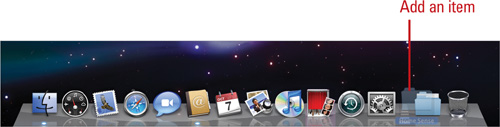
Add an item. Drag an icon from a Finder window to the Dock, and then position application icons to the left of the divider line and all other icons to the right.
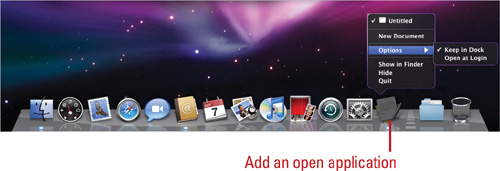
Add an open application item. Open the application to display the icon in the Dock, press and hold (activates Exposé) or Control-click the application icon, point to Options, and then click Keep In Dock.
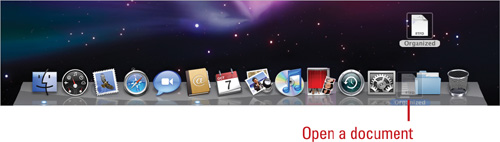
Open a document using an application item. Drag the document icon to the application icon in the Dock.
Move an item. Drag the icon to the position you want in the Dock.
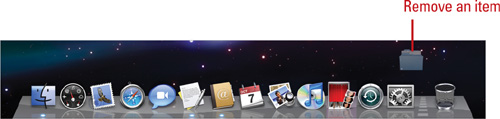
Remove an item. Drag an icon out of the Dock.
Open a folder stack. Click a folder icon to display the stack list, and then click an item.
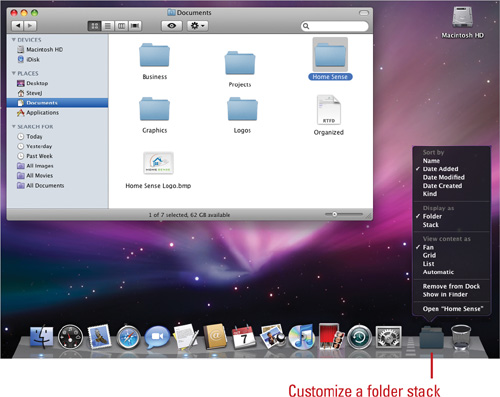
Customize a folder stack. Control-click a folder icon to display a shortcut menu, and then click an option.
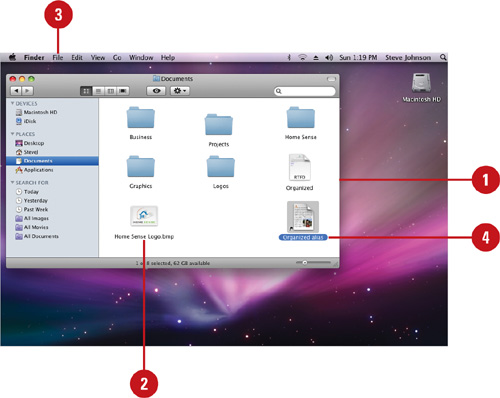
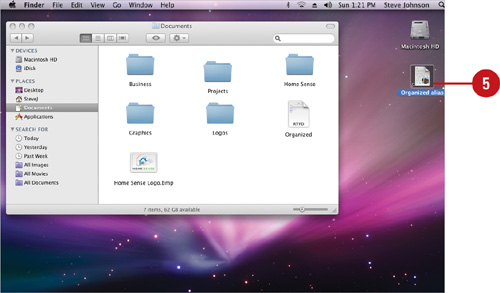
It can take you a while to access a file or folder buried several levels down in a folder. To save some time, you can create shortcuts to the items you use frequently. Aliases are shortcuts that point to a folder or file. An alias allows you to access the original folder or file from several different places. When you create an alias to a folder or file, the icon includes a little arrow in the lower-left corner. You can’t make an alias for an application. However, you can add an application into the Dock, which acts like an alias. When you double-click an alias icon, a folder opens with the contents of the original folder or a document opens using its associated application. If you delete an alias of a folder or file, the original folder or file is not deleted, just the alias.
Did You Know?
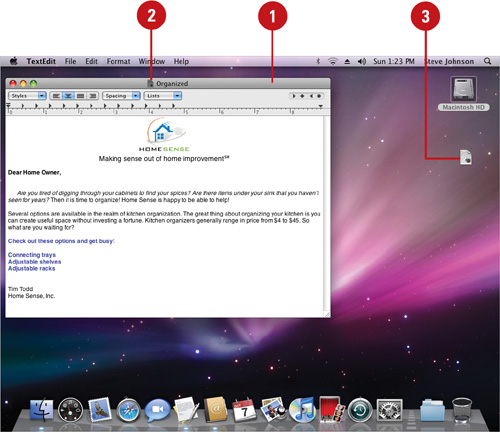
You can drag the Title bar icon onto an application Dock icon. If you want to open a document created in one program (say TextEdit), and you want to open it up in another program (say Microsoft Word), you can drag the Title bar icon of a document in TextEdit to the Microsoft Word icon in the Dock to open it.
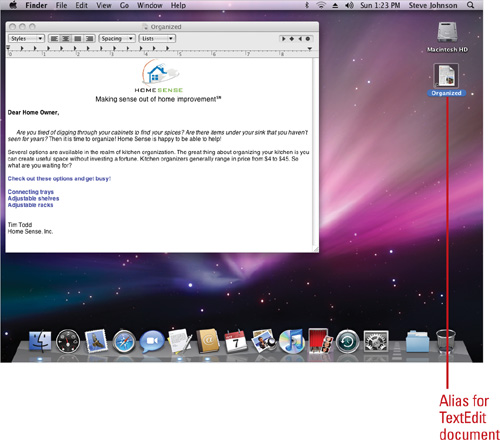
You can drag an alias icon into the Dock. Drag the alias icon into the Dock on the right side. When you release the mouse, the icon appears in the Dock.
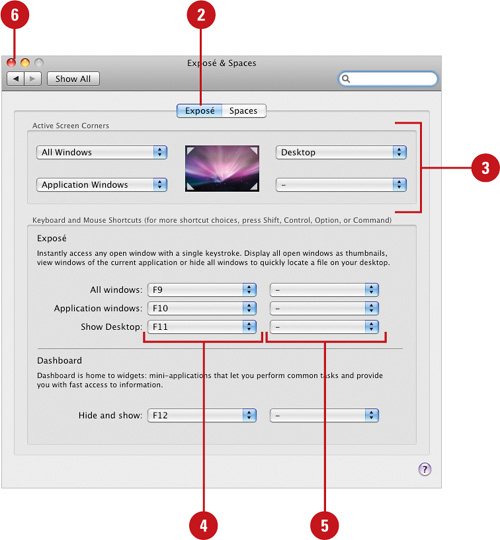
Exposé lets you quickly move windows out of the way temporarily to make it easier to work with windows to find, move, or copy files. The default way to move windows with Exposé is to use keyboard function keys. However, these function keys might already be taken by other applications, or your computer. You can customize Exposé to move windows in three ways: screen corners, keyboard, and mouse. Using screen corners, you can trigger Exposé when you point to one of the screen corners, which you can customize to display different windows. Using the keyboard pop-ups, you can change the Exposé keyboard shortcuts. When you display the pop-ups, you can press other modifier keys, such as Shift, Option, Control, or ![]() to create a new shortcut. If you have a mouse with two buttons, you can change options to trigger Exposé with your mouse.
to create a new shortcut. If you have a mouse with two buttons, you can change options to trigger Exposé with your mouse.
- Click the System Preferences icon in the Dock, and then click the Exposé & Spaces icon.
- Click the Exposé tab.
- In the Active Screen Corners area, click the pop-ups for the corner you want to use, and then select an option:
All Windows. Select to show all open windows at once.
Application Windows. Select to show all open windows in the current application.
Desktop. Select to hide all open windows and show desktop.
- In the Keyboard area, click the pop-ups for each Exposé operation, press a keyboard modifier (Shift, Control, Option, or ) if you want, and then select a shortcut key.
- In the Mouse area, click the popups for each Exposé operation, and then select a mouse button.
- Click the Close button.
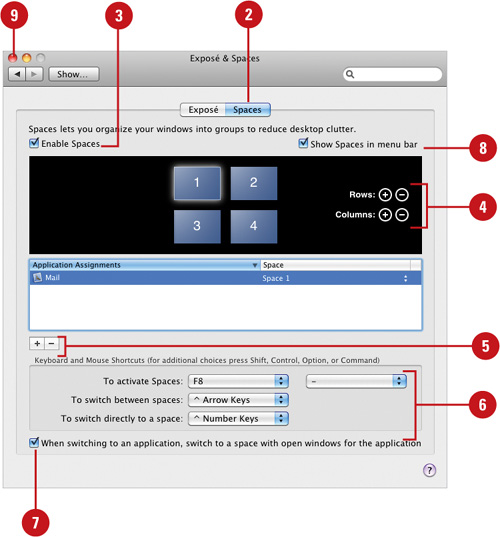
The first time you start Spaces, you need to setup your spaces in the Exposé & Spaces pane of System Preferences. With Spaces, you can group and arrange windows to reduce desktop clutter and organize materials into unique spaces. In the Exposé & Spaces preferences dialog box, you can enable Spaces, assign applications to every space or a specific one, change keyboard shortcuts to select and toggle between spaces, and display a Spaces menu in the menu bar.
- Click the System Preferences icon in the Dock, and then click the Exposé & Spaces icon.
- Click the Spaces tab.
- Select the Enable Spaces check box.
- Click the Rows and Columns Plus (+) or Minus (-) buttons to create the number of spaces you want.
- To assign an application to a space, click the Add (+) button, select an application, and then click Add. Click the pop-up menu to the right, and then click Every space or Space 1, Space 2, etc.
To remove an application, select the application, and then click the Minus (-) button.
- In the Keyboard and Mouse Shortcuts area, click the pop-ups for each operation, and then select a keyboard key or option.
- To switch between Spaces using a menu, select the Show Spaces in menu bar check box.
- Select or clear the When switching to an application, switch to a space with open windows for the application check box (New!).
- Click the Close button.
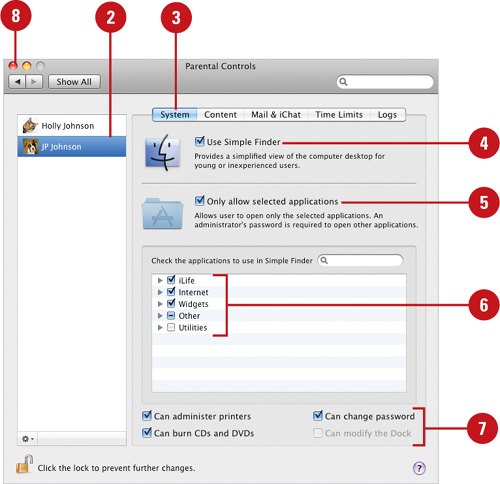
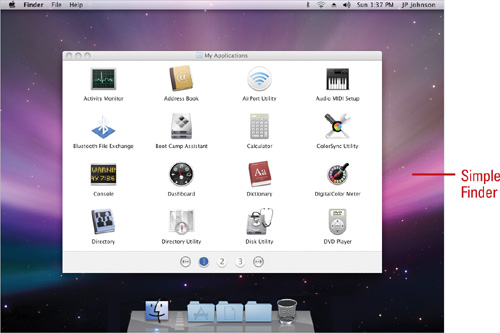
If you have novice users who want to use your computer, you should set up a user account with the Simple Finder in Parental Controls preferences. Simple Finder is a simplified version of the Mac OS X Finder with fewer menus and icons, and allows limited access to the items on your hard disk. The Dock contains only three folders: Documents, My Applications, and Shared. The Documents folder provides a place for users to save their documents, while the My Applications folder provides access to the applications you select for them in Parental Control preferences. If you want to share documents with them, they can access the items in the Shared folder.
- Click the System Preferences icon in the Dock, and then click the Parental Controls icon.
- Click the user account for the person you want to set up the Simple Finder. If necessary, click the Lock icon and enter user name and password, first.
- Click the System tab.
- Select the Use Simple Finder check box.
- Select or clear the Only allow selected applications check box.
- Select or clear the applications you want to enable or disable for the account.
- Select or clear the options you want to enable or disable for the account.
- Click the Close button.