
Some hosting companies will install Magento for you, or have a one-click installation for Magento. However, most users will find themselves installing Magento. The process is not any more difficult than most installations of php-based software. However, there are a few points that you must pay close attention to.
This chapter is written especially for you, if you are:
Installing Magento on your own
Using a low-cost, commonly available hosting service
Familiar with putting files up on a web server, but that is the limit of your technical knowledge
Willing to ask your hosting service's technical support some simple and specific "Yes/No" questions about their setup
Eager to get your store up and running as fast as possible
Even if you own a server, or are very technical, this chapter is still worth reading. It can save you time by helping you to avoid problems while installing Magento.
You must install Magento on a web server. There are many kinds of web servers, but Magento is designed to run best in a LAMP environment: Linux, Apache, MySQL, and PHP. It will run on Windows instead of Linux, but with some known issues that the official Magento site discusses. There are many low-cost hosting services that offer all the requirements for a successful Magento installation. Therefore, there is almost no excuse to settle for a service that is missing any of the requirements.
Here is a short list of what your hosting service must provide. We'll discuss each of these items later.
|
Requirement |
Notes |
|---|---|
|
Linux |
Your web server should run Linux. Other Unix-operating systems will also work, as will Windows. However, Linux is so popular among hosting services that you shouldn't settle for anything less than your exact requirement. |
|
Apache web server |
As of this writing, the Apache web server is up to version 2.2. However, many hosting services still use the proven, reliable version 1.3. Either will work with Magento. |
|
PHP 5.2.0 or newer |
PHP is a scripting language (a type of programming language). PHP is especially suited for web development. PHP code can be embedded into HTML pages to transform a static web page into something dynamic. Magento is written in PHP. It is built on the Zend Framework, which means it uses Zend's library. If you want to customize Magento code, you should know not only PHP, but also something about Zend. You can take special steps to install Magento on a web server that has only PHP version 4. However, so many hosting services have moved to PHP 5+ that you should not settle for less. |
|
PHP should have the following extensions and add-ons: PDO/MySQL mcrypt hash simplexml GD DOM iconv |
PHP's abilities can be increased with extensions and add-ons. The ones listed here are used by Magento, so your hosting service needs to have them installed like almost all hosting services do. The easiest way to find out if your hosting service has the version and extensions you need is to ask their technical support department. However, if you want to obtain this information yourself, and you can upload a page to your host (maybe you're already a customer, or are on a trial period), see the next section. If you are setting up a localhost to try Magento, you might be using WAMP from the Apache Friends project. If so, you will also need to install the CURL library. |
|
MySQL 4.1.20 or newer |
MySQL is the world's most popular open source database. As of this writing, MySQL is up to version 5.1. Most likely any hosting service you are considering will offer a recent enough version for Magento. |
|
An SMTP server |
SMTP stands for Simple Mail Transfer Protocol. Most email systems use SMTP to send messages from one server to another. When Magento needs to send an email (such as an order confirmation), it connects to your host's SMTP server and the server sends the email on Magento's behalf. Magento can also use a program called Sendmail to send emails. However, only a few hosts offer Sendmail. As almost all hosts offer SMTP, this chapter will deal with SMTP. |
Many hosting services advertise LAMP, which covers four of the previous six requirements. Also, a list of their features will show you that they offer SMTP. That covers five of the six requirements. What about the PHP extensions? As stated in the table, the easiest way to find out if your hosting service offers the PHP extensions is to ask the technical support department. However, if you'd like to see for yourself, use the technique covered in the next section.
You can see your server's PHP information by uploading and displaying a web page that has the phpinfo function.
Create a web page that has just these lines in it, and nothing else:
<?php
phpinfo();
?>
Save the file using any name you want, as long as it ends with .php, for example phpinfo.php.
Point your browser to the page you just created. For example, I pointed my browser to http://www.brew-me-a-cup.com/phpinfo.php. The page will look like the following screenshot:
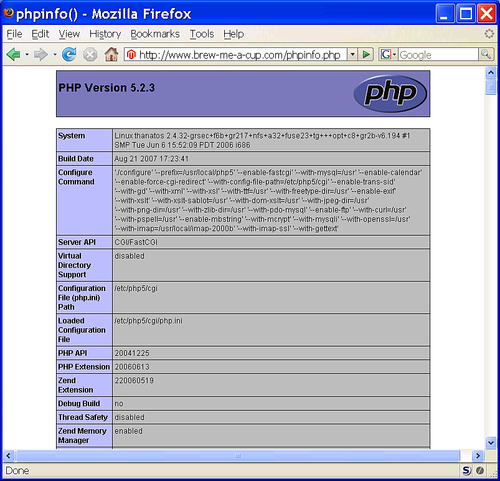
As you scroll down the page, you will see the names of the PHP extensions that have been installed. For example, as you scroll down you will see a section for the DOM extension, which confirms that this extension is installed and working.
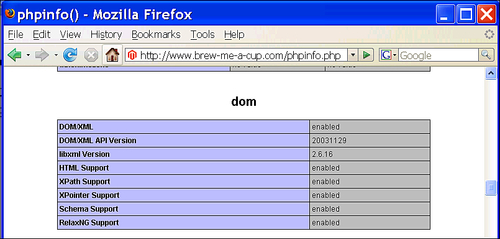
Keep scrolling until you find all the extensions listed in the table of the previous screenshot. Conversely, you can also scroll down to verify that an extension has not been installed on the server. To make it easier to find the extensions, you can search the page for their names. In Firefox, you can use Edit | Find, and in Internet Explorer you can use Edit | Find on This Page.
Before proceeding with the installation, or even before choosing a hosting service, check with the hosting service to see if they have mod_rewrite installed and what it costs to obtain an SSL certificate. Both are explained in the sections that follow.
http://williamrice.com/node/267393?article=123&abc
http://williamrice.com/magazine/how-to-sell-more-coffee
They could both point to the same page. However, the second URL is easier for the user to understand and remember. It enables the user to see where (s)he is on your site (reading and article from the magazine section). Also, this link is easier to send in an email, and doesn't break in the Favorites or Bookmarks function of your browser. Lastly, search engines usually give better ranking to URLs that do not contain special characters, such as ? and&, and keywords that describe the content of the page.
Magento tends to create URLs like the first one. However, if your hosting service has an Apache module called mod_rewrite installed, then you can tell Magento to create friendly URLs like the second one. Check with your hosting service before you begin the Magento installation.
SSL is the standard for secure transactions on the Web. SSL encrypts data—such as credit card numbers—as it travels between your browser and the site you are using. This prevents thieves from stealing that data. When you're on a page protected by SSL, its URL begins with https://.
Your browser alone cannot secure the transaction. The web site needs an SSL certificate. The SSL certificate does two things. First, it encrypts the data traveling between the site and your browser. Second, it helps to prove that the site actually belongs to the person who claims to own it.
Obtaining an SSL certificate is beyond the scope of this manual. However, many hosting services will add it to your account for a fee. This means you can just "upgrade" your service to an SSL certificate.
You don't need to decide on using SSL before installing Magento. You can install and configure your online store, and then add SSL later. Also, if you are using a third party such as PayPal, Authorize.net, or Google Checkout to process your payments, then payments will happen on their web site and not yours. They will use their SSL certificate, and you do not need it to protect your customer's credit card accounts.
Give this some serious consideration. Using SSL makes your site more secure. It also might make some people more comfortable about buying from your online store. Sometimes an increase in trust leads to an increase in business. Do your research, and decide if the extra expense is worth the potential increase in business.
After you confirm that your web host meets the requirements for Magento, you are ready to install the software. The major steps for installing Magento are listed as follows:
Download Magento from http://www.magentocommerce.com.
Upload Magento to your web host.
Set rights for some of Magento's directories and files.
Create a MySQL database and database user for Magento.
Point your browser to the Magento directory and step through the installation wizard.
Test the frontend and backend of your Magento site.
After that, you're ready to start with creating your online store! Each of these major steps is covered in the subsections that follow.
In this section we will download and decompress the Magento files.
Getting the Magento files
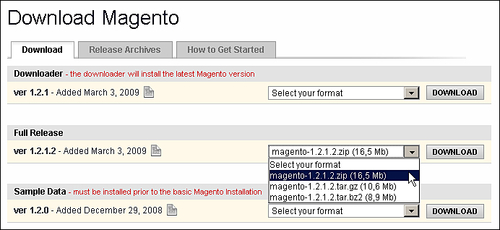
Point your browser to http://www.magentocommerce.com/download. You will see a page like this:
The Magento team provides sample data that we can use if we want to play with Magento. This sample data includes product images and information that will appear on your site. Note that if we want to use this sample data, we must download and install it before we install the Magento software. In the next chapter, we will add our own products to Magento. Therefore, we will not need the sample data; we will create our store with our own data.
You can download Magento in several different formats. All of these formats—
.zip, .gz,and.bz2—are just different ways of compressing files so that they occupy less space.
I chose to download the
.zipfile and save it to my local hard drive. Notice that I did not choose to decompress (that is, to unzip) the file. Choosing that option would decompress the file while it's getting downloaded. Instead, I saved the.zipfile intact to my computer: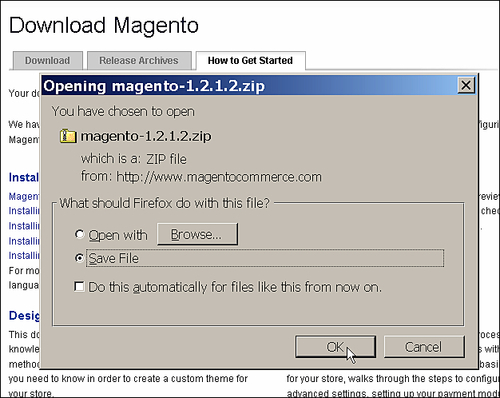
I'll decompress the file later. However, I want the original ZIP file on my local hard drive, just in case I need it again. And, I have found that compressed files usually download faster and more reliably when you save them intact and decompress them after downloading, instead of decompressing them while they download.
Decompressing the Magento archive
I chose to download the .zip file because Mac OS X and Windows XP/Vista have built-in support for opening compressed .zip archives. Also, many Linux distributions, such as Ubuntu, have built-in support for .zip archives.
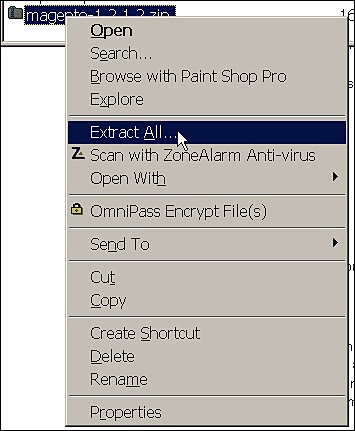
The next step is to decompress the .zip archive. In Windows, you can right-click on the file and select Extract All, as shown in the following screenshot:
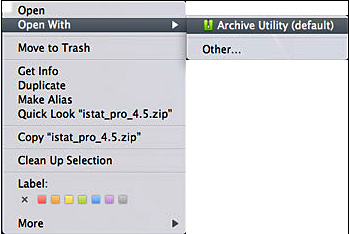
On Mac OS X, you can right-click or Control-click on the file and select Open With | Archive Utility like this:
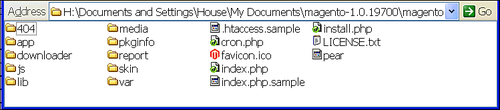
The result should be a folder on your local hard drive called magento, with subfolders that you will upload:
In the next step you will upload these folders to your site. But before you do that, let me explain why you decompressed the Magento archive on your local hard drive.
Many web hosts enable you to decompress a ZIP file that you upload to the host. For example, using the popular Control Panel software, I uploaded the Magento ZIP file to a web host.
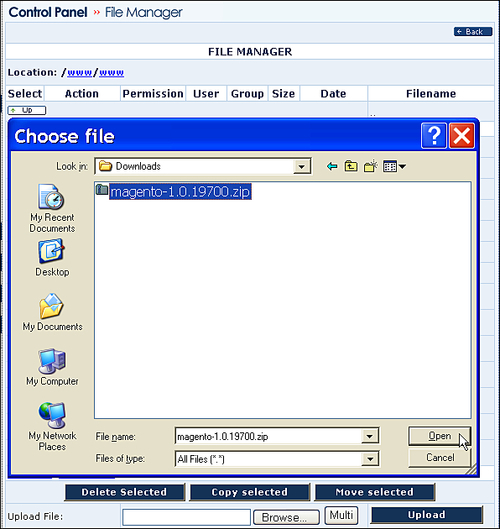
I then selected the .zip file.
The host then offered to unzip the file for me. This capability is a part of most web hosting services.

The result is a subdirectory on my web site called magento, with all of the Magento files placed inside.

Again, it unzipped the files into a subdirectory, not the root directory of my web site. That meant when customers access my storefront, they would go to http://williamrice.com/magento. However, I want my customers to simply go to http://williamrice.com.
To do this, I would need to unzip the files on my local computer and upload them, so that I can control which directory they appear in. I don't want the ZIP file to create a subdirectory for Magento. Instead, I want to place the Magento files in the root directory of my site. That's why I unzip the file on my local computer and upload the individual files to my site.
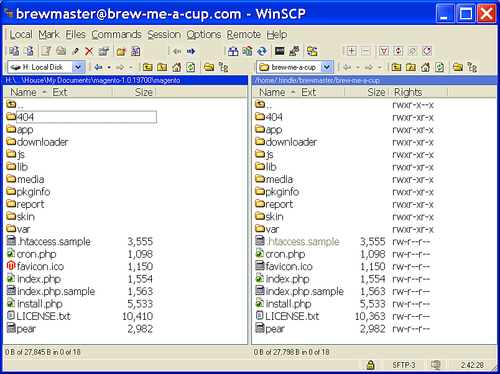
Upload the unzipped files from the
magentofolder to your web host. I used a freeware FTP client called WinSCP, which you can get from http://winscp.net.Notice that I uploaded the files to the root directory of http://brew-me-a-cup.com, so that visitors see my storefront as soon as they come to the site.

If you're installing Magento on a localhost, then the root directory will be the
htdocsfolder. On my localhost, I used XAMPP from Apache Friends to run Apache, MySQL, and PHP. In thexamppfolder, the folderhtdocsholds my web files: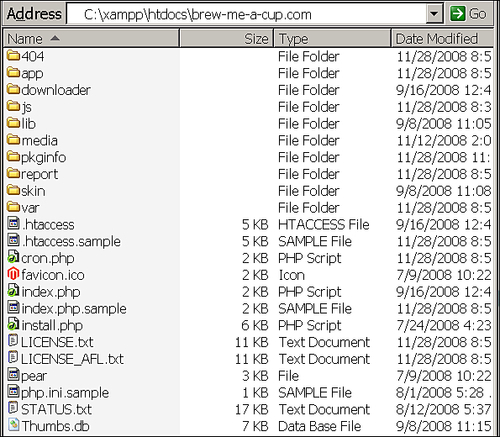
When I run Magento on my localhost, I will point my web browser to http://localhost/brew-me-a-cup.com.
I am assuming that you are installing Magento on a Linux host because that is the recommended method. On a Linux host, every directory and file has a set of permissions. In the next three subsections, let's go over the basics of file permissions in Linux. Then, we will set the correct file permissions for our Magento files.
A Linux web host almost always has multiple users. This is called a shared host because users share the computer's resources.
Every user will belong to one or more group(s). A group enables the administrator of that computer to manage a group of users at once. For example, suppose all customers using the computer as a web server are in a group called Webusers. Also, suppose the company that owns the server decides to increase the amount of space they give to each of their customers. Then, the administrator of the computer can increase the space for all the customers at once, just by increasing the space for the group Webusers. As a customer of a shared hosting service, you will be in a user group.
On a Linux host, every file and directory has an owner. The owner is one of the users on that computer. For example, you are the owner of the files that you upload to the host. Every file also belongs to a group. In the following screenshot, you can see that brewmaster is the owner of all files and directories that were uploaded to the store's directory. You can also see that all of the files and directories belong to a group called pg1404808. The name of that group doesn't mean anything to you as a user. It was assigned by the hosting service.
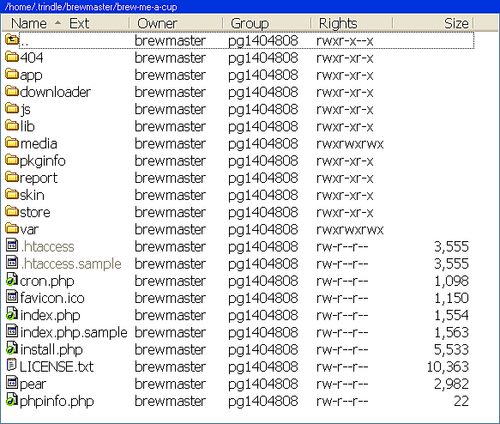
In the previous screenshot, you may have noticed the column labeled Rights. This column tells you what the user, group, and other users on the server are allowed to do with a file. For example, look at the directory 404. Notice that there are nine characters in the Rights column for that directory: rwxr-xr-x. The first three characters tell you what the owner is allowed to do with this directory or file. The next three tell you what the group is allowed to do. The last three tell you what other users on this server are allowed to do with the directory or file. So, the rights can be broken down like this:
owner: rwx, group: r-x, and other users: r-x
The rwx tells you that the owner of this directory, brewmaster, is allowed to read, write, and execute this directory. After that, the r-x tells you that the group to which this file belongs, pg1404808, is allowed to read and execute this directory. However, the group cannot write this directory, which means it cannot edit, rename, or delete it. Lastly, the second r-x tells you that other users on this computer can also read and execute the directory.
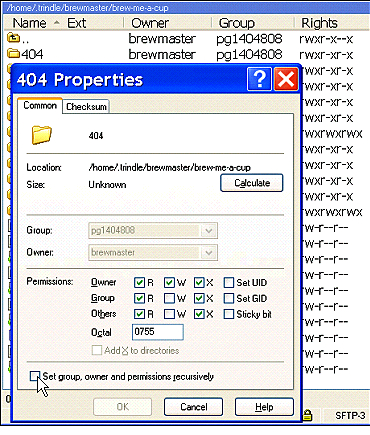
As you saw, you can use a series of nine letters to express the rights that a directory or file has. The example we used was the directory 404, which has the rights rwxr-xr-x. You can also express the rights for a file or directory using a three-digit number. In the following screenshot, look at the field labelled Octal and note the number 755 in that field:

When you set permissions for a file, you will use your FTP application or web host's control panel to specify those permissions. In this case, you can see that the FTP application I use, WinSCP, enables me to state the file permissions as either letters (rwxr-xr-x), or as a number (755). Not every application gives you both options. Some applications force you to specify file permissions using letters, while others force you to use a number. Therefore, you should know how to express file permissions using both.
Let's look at this example again. We can see that the file permissions rwxr-xr-x are equivalent to the file permissions 755. So, we can deduce the following:
rwx = 7
r-x = 5
Here is the complete list of permissions expressed in both letters and numbers. Remember that the permissions for a file or directory will consist of three sets of these rights—one for the owner, one for the group, and one for all other users:
|
Letters |
Number |
Meaning |
|---|---|---|
|
- - x |
1 |
The user can execute the file, but cannot read or write it |
|
- w - |
2 |
The user can write (change, rename, and delete) the file, but cannot read or execute it |
|
- w x |
3 |
The user can write and execute the file, but cannot read it |
|
r - - |
4 |
The user can only read the file |
|
r x |
5 |
The user can read and execute the file, but cannot write (change, rename, and delete) it |
|
r w - |
6 |
The user can read and write the file, but cannot execute it |
|
r w x |
7 |
The user can do anything with the file |
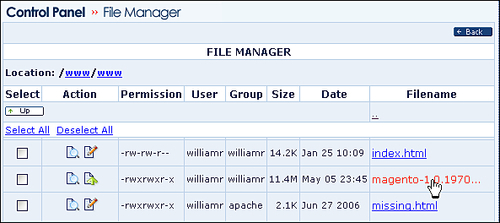
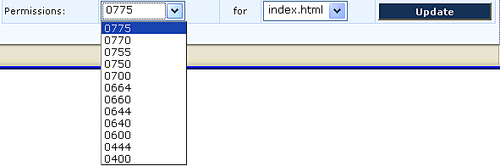
In the following screenshot, I am setting the permissions for the file index.html on my web site. I am using the web-based control panel provided by my hosting service. Notice that I must specify the permissions using numbers. Also, notice that this control panel allows me to choose only some permissions. For example, they do not allow the permission 777, which would allow anyone who gains access to the host complete control of that file.
Now that you have learned a little about file permissions on a Linux server, you know that:
A Linux host usually has many users
Every file and directory has an owner and belongs to a group
For every file and directory, there is a set of permissions that specify what the owner, group, and all other users of that server can do with the file or directory
You are concerned mostly with what an owner and all others can do with a file
The permissions for a file or directory can be expressed as nine letters (three groups of three), or as three digits
You will use your FTP application, or the web-based control panel provided by your hosting service, to set file and directory permissions
Let's move on and set the proper permissions for Magento's files and directories.
Using your FTP program, or your hosting service's web-based control panel, set the permissions for the following files and directories to rwxrwxrwx, or 777:
/var/.htaccess (file)
/app/etc (directory)
/var (another directory)
All the directories under /media
Notice that you are changing the permissions for the directories and all of the files under those directories. This is called making the permissions recursive. You might see that option in the FTP application when you set these permissions.
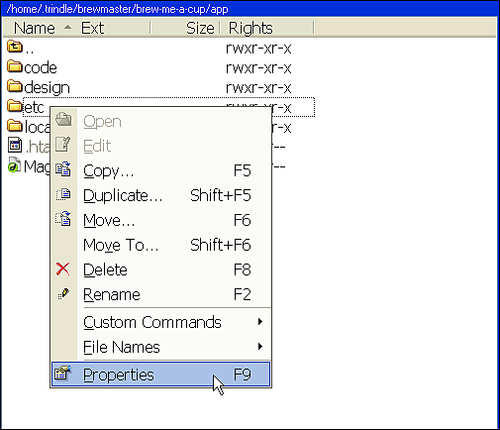
With my FTP application, I set permissions by right-clicking on the file or folder and selecting Properties from the pop-up menu, as shown in the following screenshot:
In this step, we will create a MySQL database where Magento will store the information that you add about your products, transactions, and customer information. We will also create a username and password for that database. Later, we will enter the database's name, location, username, and password into Magento. This will enable Magento to connect to that database.
The process for creating a database and user varies by the hosting service. I will show a method that is common to many hosting services. However, you should always check with your hosting service before proceeding with this step.
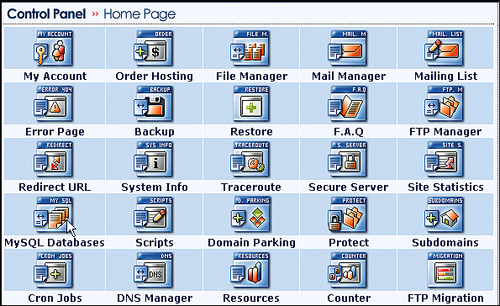
Like many hosting services, the one I use for this demonstration offers the cPanel control panel. cPanel is web-based, so you don't need to install anything on your computer to use it. Using your web browser, you just log into your hosting service using the username and password they provide to you.
From the cPanel Home Page, I select MySQL Databases.
Then, I enter the name of the database and click on the Create button.
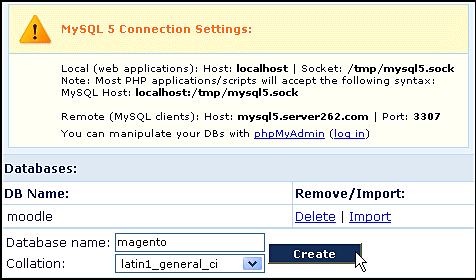
The previous screenshot contains some very important information that I will need later.
For Magento to connect to this database, it must know:
Where to find the MySQL host
The name of the database
The username and password of a user who has access to that database
Notice the name of the MySQL host, localhost:/tmp/mysql5.sock. This is where an application that is located on the same server will find the MySQL host. It is one of the parameters that I will enter into Magento. I will also need the name of the database—in this case, magento.
Now, I will create a user for this database. I've selected magento as the username, and I will give that user all privileges on that database:
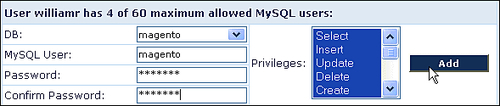
Using cPanel, this is all I need to create a database and a database user for Magento.
I will also demonstrate creating a database and a database user on a hosting service that does not use cPanel. This demonstration is done on http://www.dreamhost.com/. This is not an endorsement of their hosting service. I chose them for this demonstration because their process is different from most, and thus offers a different perspective on this task. You will see that even though the keystrokes and clicks are very different, the basic principles are the same.
On the previous hosting service, the MySQL host name was assigned by the hosting service. On DreamHost, I create a MySQL host name. See the field New Hostname in the following screenshot:
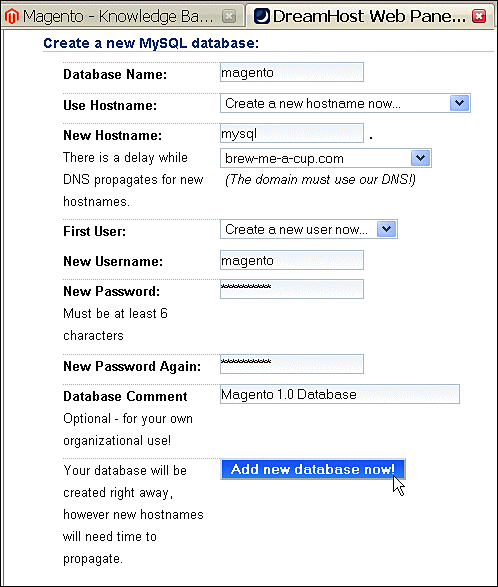
In this case, I called the MySQL host mysql. I must create the MySQL host on a domain that I own, and so I used brew-me-a-cup.com. The result is that when I enter the database host name into Magento, I will enter mysql.brew-me-a-cup.com.
I also specify the database name, user, and password in this screen. That part is the same as the previous hosting service.
Here is the confirmation message for creating this database:

From the examples that we discussed, you can see that creating a database on your hosting service will always involve a few steps:
Choose a name for the database.
Create a user with full rights to the database.
Give the user a secure password.
Create or determine a host name for the MySQL host.
Most good hosting services offer detailed directions that will help you to accomplish these steps quickly and easily.
You now have a database for Magento to use. That database resides on your hosting service, or on your localhost. A username has been created for that database. In the next section, you will tell Magento which username and database to use.
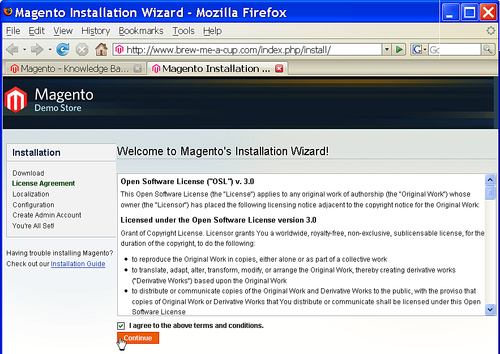
Point your browser to Magento's install directory. For example, I installed Magento at brew-me-a-cup.com. So I point my browser to brew-me-a-cup.com/install. If you installed in the root directory of a localhost, you would point your browser to http://localhost/magento/index.php/install/. This begins an installation routine. The first step is to confirm the software license.
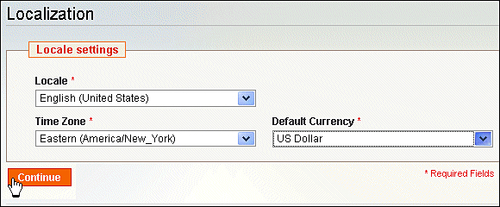
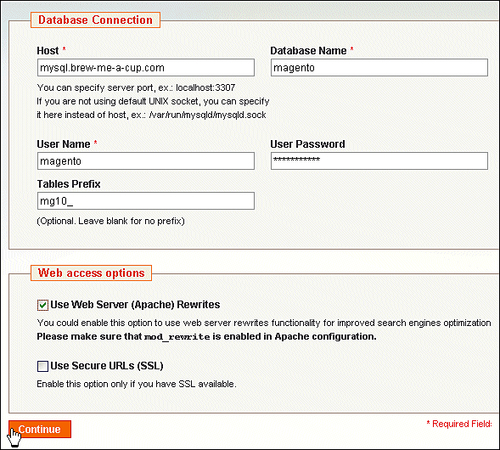
Notice that I've select the checkbox for Use Web Server (Apache) Rewrites. This will create more user-friendly URLs for the web pages in my store, and might make them rank better in search engines.
Next, you will need to create an administrator account for your Magento system. You should save all of the information from this screen in a safe place. I put mine into an email that I sent myself, in an encrypted document on my Smart Phone, and also stored a hard copy in a safe place.
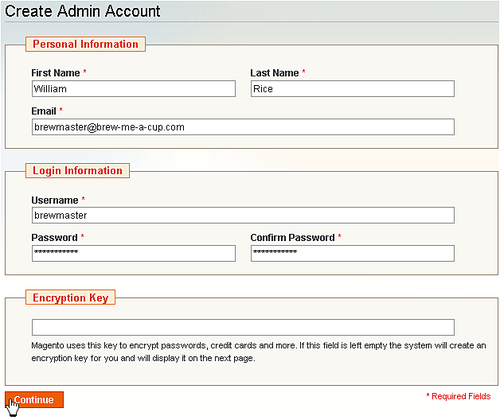
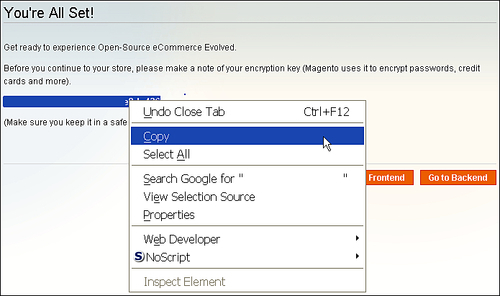
You can leave the Encryption Key field blank. Just remember to record the key that is displayed in the following screenshot:

This is one of the most common errors with a Magento installation. It is not unique to Magento. Many PHP applications experience this error. There are several solutions that will clear this up. In the given order, try these:
Make sure that your hosting service uses PHP version 5.
In your root directory, there might be a file called
php.ini. If so, rename it tophp5.ini. If you see files with names such as.alias, .bash_profile, .cshrc, .screenrc, you are looking at the root directory. If you're unsure, ask your hosting service.If that doesn't work, add the line
cgi.fix_pathinfo = 1to the end ofphp5.ini.If that doesn't work, add the line
Options -MultiViewsto the top of the file named.htaccess.If that doesn't work, search the knowledge base and forums at http://magentocommerce.com for help.
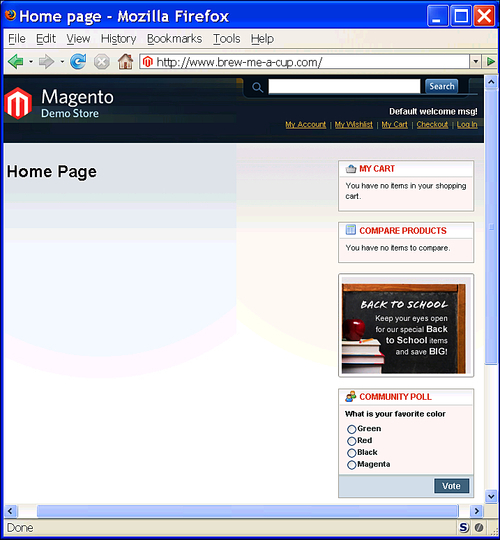
If your site's frontend works properly, you should see something like this:
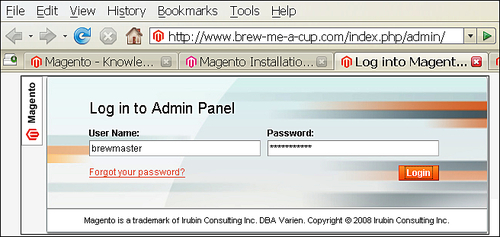
To visit your site's backend, go to your Magento home page and add
/admin, as done in the following screenshot:
Installing Magento is very similar to installing most PHP-based applications. You first set up your Apache-MySQL-PHP environment, or confirm that your hosting service has the right environment. Then you download, unzip, and upload Magento. You set permissions, and create a database and a database user. Finally, you step through the installation wizard. The result is a fully functional Magento system that is ready to be customized into your storefront.
Configuring a store without having some products in place is like formatting an empty word processing document. You just can't see the effect of your choices unless you have some products in place. However, Magento does offer some sample data that you can load directly into its database. There are directions for that on the official Magento web site. Keep in mind, using their products will not teach you how to add your own products. Also, you will need to start adding your own products eventually. In the next chapter, we will start adding some products to your store.
Perform the following check before proceeding to the next chapter:
Does your hosting service have all of the prerequisites listed in this chapter?
Have you emailed your hosting service's technical support department and confirmed this?
Have others successfully installed Magento on the hosting service that you are considering to use? Get onto the Magneto discussion boards and check.
Do you have an FTP client for uploading your files? Also, do you have a good text editor?
If all of your answers are "Yes," then you're ready to install.
The hosting requirements for Magento can be met by many hosting services. Be choosy. Pick one that offers all of the requirements, is reliable, and gives you the ability to set the file permissions that you need. The Magento message board is a good place to ask other users about their experiences with hosting services.
In this chapter, we examined the process for installing Magento. We prepared our hosting environment, uploaded Magento, and stepped through the installer. You might want to try this on your local computer (localhost) before trying it on a hosting service. Doing this enables you to experiment with your store, and learn Magento without the fear of ruining your store.