
5
Creating Sound Effects
Sound and music are ancient and incredible art forms in their own right. I’m sure you have a favorite song! People have been making music and noise for thousands of years, and in this chapter, you’ll learn how to do some amazing things with music and sound in your games. So how do games use sound?
Sound effects provide information. How does a player know that they’ve collected a treasure or gotten chomped by a monster? In Weird Bug Chowdown in Chapter 2, whenever the bug touches something, good or bad, the game plays a sound effect. Sound lets the player know something important has taken place. It also shapes how they feel about what’s happened. That’s why eating a berry produces a hearty “chomp” sound and touching a bad berry or a poop produces an “eww.”
Music helps to set the tone. Think of an exciting scene in your favorite movie. What was the music like? Was it fast and energetic? Did it make you feel excited? What about the music in a sad scene? Was it slow and moody? Music affects how we feel about what happens while we’re listening to it, and the same is true in games. Many of the games you play probably have light, boppy music that creates a playful mood. Would you feel differently about what was happening in these games if the music was heavy and sad?
Maybe you play an instrument, or maybe you have absolutely no idea how to make music. Well, it’s much easier than you’d think to make audio for your games!
Sound Design Tools
In this chapter, you’ll learn about a few different programs that you can use to make music and sound. Like all the other tools we’ve worked with in this book, you can find all of these programs on the internet for free. First, you’ll record and edit sounds using a program called Audacity. Second, you’ll generate sound effects with sfxr. Third, you’ll learn how to compose short music loops using Drum Circle.
You probably won’t need to use all of these tools. Most likely, one of them will feel easiest and most appropriate for your particular games. Everyone has their own practice, or personal process of making stuff. There’s no such thing as the right process.
Recording and Editing Sounds with Audacity
You already have the means to make great game sound effects. I’m talking about your voice as well as pretty much every object around you! In the finished Hatlight game, I made the jumping sound effect by saying “Hup!” into my computer’s mic. The crunching sound the ground makes as you walk around is me shaking a bunch of dice in front of the mic.
Scratch has a built-in microphone button in the Sounds tab that lets you record your own sounds, but Audacity lets you do more with your recording. For example, you can make sounds fade in and fade out, add special effects, and even cut out the bits you don’t like.
Naturally, these tools only work if your computer has a microphone. Most laptops and tablets come with a built-in microphone. If your computer doesn’t have one, you can either buy one at your local electronics store (a cheap one is fine!) or start with “Generating Sounds with sfxr” on page 137, where we’ll use other tools that don’t require a mic. You can find Audacity at https://sourceforge.net/projects/audacity/. Download the version appropriate for your computer system, and we’ll get started!

Recording a Deadly Plummet
Open Audacity, and you’ll see this screen.

Audacity interface
There’s a lot on the screen, but you don’t need to worry about most of it. Find the microphone near the bottom of the huge toolbar at the top. The Recording Device menu next to the mic lists every sound device connected to your computer. If you’re having trouble recording, try choosing different devices from this list. Audacity might not be using the right one.
The most important buttons on the screen are the big Pause, Play, and Record buttons at the top. Let’s record our first sound!
Imagine a game about a cave explorer, like the one in Chapter 4. The explorer is under the earth, walking on a narrow stone bridge over an underground river. With every step she takes, she hears the sound of gravel cracking and shifting. She is stepping slowly and carefully. Finally, she steps on a part of the bridge that is too old and thin, and the bridge breaks underneath her! As she plummets out of sight, her yell trails off: “AAAAAAAAAAaaaaaaaaaaa...” (Don’t worry—the river is full of Subterranean Pillowfish. She’ll be fine!)
Let’s try to re-create that yelling sound. Click the Record button and yell “AAAAAAAAAA” into the microphone. Make it a long sound, because it’s a long way to the bottom of the cave! Don’t worry about making your voice trail off. We’ll do that using special effects. Click the Stop button when you’re done recording. Your screen should look something like this.

The lumpy blue shape is your recording’s waveform. A waveform is a picture of what the sound looks like. The highest parts are the loudest sounds. Shorter parts are quieter sounds. You should also see two flat parts at the beginning and end. These are the quiet parts before and after you started making noise.
Before we make changes to the waveform, let’s go over a couple sliders (circled in the preceding image).
The top one goes from – to + and controls the volume. If your sound is too quiet or loud, you can adjust it by moving this slider. Below that is a slider that goes from L to R. That controls the balance of the sound, whether the sound plays from the left speaker (or headphone) or the right. The slider starts exactly in the middle, which is where you’ll usually want it to be.
Sound Selections
When you click Play, you’ll hear the whole waveform, including the quiet parts at the beginning and end. Depending on when you started and stopped recording, these quiet parts could be long or very short. Before using a sound in a game, you should get rid of any empty spaces. After all, you want the game sound to play exactly when the explorer falls off the bridge, not after a second of silence.
We can edit our sound by selecting different parts of the waveform. When you move the mouse over the waveform, the cursor changes into an “I” shape. You can click and drag to select different parts of the sound. Select just the part with the “aaaaaaaa” sound, none of the flat (silent) parts.

Selecting a part of the sound you want
Try clicking Play again. You should hear just the “aaaaaaaa” part. Notice that when you move the cursor to either end of the selection, it becomes a pointing finger. You can click either end of the selection and drag it to change where the selection begins or ends. Try selecting just a part of the waveform, somewhere in the middle. Now when you click Play, just the part that’s selected will play.
Any edit we make will happen to the part of the waveform we select. So, to get rid of the gap at the beginning of our recording, we first need to select it. Adjust the end of the selection until the entire gap, and nothing else, is selected.
NOTE: If you’re worried about whether your selection is in the right place, you can always use the magnifying glass icons to zoom in on the waveform.
Near the top of the window, click Edit ▸ Delete. The selected part of the sound should be gone.
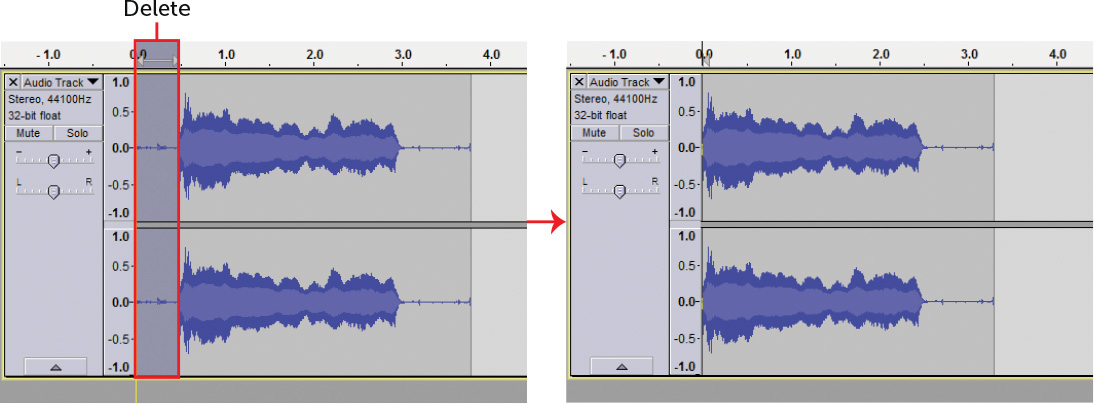
Deleting the sound you don’t want
Try selecting and deleting the flat part at the end of the sound too! The part of the sound where you’re making noise into the mic should be all that’s left. Now, let’s use selections to change what our sound effect sounds like.
Using Effects Tools
We want our falling sound to be nice and long. How long is yours? Probably not long enough! Remember that it’s a very long drop to the bottom of the cave. Fortunately, there’s a way to stretch a sound to make it longer.
When you click the Effects menu at the top of the screen, you’ll see a ridiculous number of different options. Here’s a summary of those handiest:
Change Pitch: Pitch is how high or low something sounds. Think of pitch in terms of mythological creatures. If you lower your pitch, you’ll start to sound like a troll. If you raise your pitch, you’ll start to sound like a fairy.
Change Speed: This option lets you change the length of your sound, which is one way to make it longer. But when you change speed, you also affect the pitch. If you slow down your sound, the pitch gets lower. If you speed it up, the pitch rises.
Change Tempo: Tempo is a music term for the speed of a piece of music. Change Tempo lets you make your sound longer or shorter without changing the pitch of your voice.
Let’s use Change Tempo to make our recording longer. Click Effects ▸ Change Tempo.

Before tempo change

After tempo change
A Change Tempo window should pop up with a bunch of different options, but they’re all different ways of doing the same thing. The easiest option to use is the slider. The exact center of the slider is the speed of your sound right now. Move the slider to the right to speed it up. Move it to the left to slow it down. You can move the slider and click Preview to test what your sound will sound like.
Lower the tempo and click OK. Your waveform should get longer. Now when you play your sound, your voice should sound a little slower!
Now let’s make our sound slowly fade out as we plummet out of sight. Use the cursor to select about three-quarters of your sound. We want a bit at the beginning to stay the same.

Making your sound fade out
Now click Effects ▸ Fade Out.

Post fade out
Your waveform has changed shape. It starts wide and then gets smaller and smaller until it reaches a single point at the end. Fade out is a very handy effect that matches itself to the size of your selection. When you fade out a long selection, you’ll get a slow, gradual fade. When you fade out a short selection, you’ll get a much quicker fade. There’s also a Fade In effect that does the same thing but in reverse. The selection starts silent and then gets louder until it reaches normal volume.
Play your new sound! Keep in mind that the Play button will play only what you’ve selected. To get out of your selection, click the Rewind (|<<) button.
Exporting Sounds
One important detail to know about Audacity is that saving doesn’t mean what it does in other programs. When you click File ▸ Save Project in Audacity, you’ll save a specific kind of file called a project file. Only Audacity can open a project file. It’s useful when you’re doing complicated sounds, like working with multiple channels of audio. But you can’t import an Audacity project file into your Scratch game.
Instead, you’ll have to export the audio into a format that Scratch can use by clicking File ▸ Export Audio.
You can also highlight a part of the waveform and click Export Selected Audio to export just a selection of a recording.
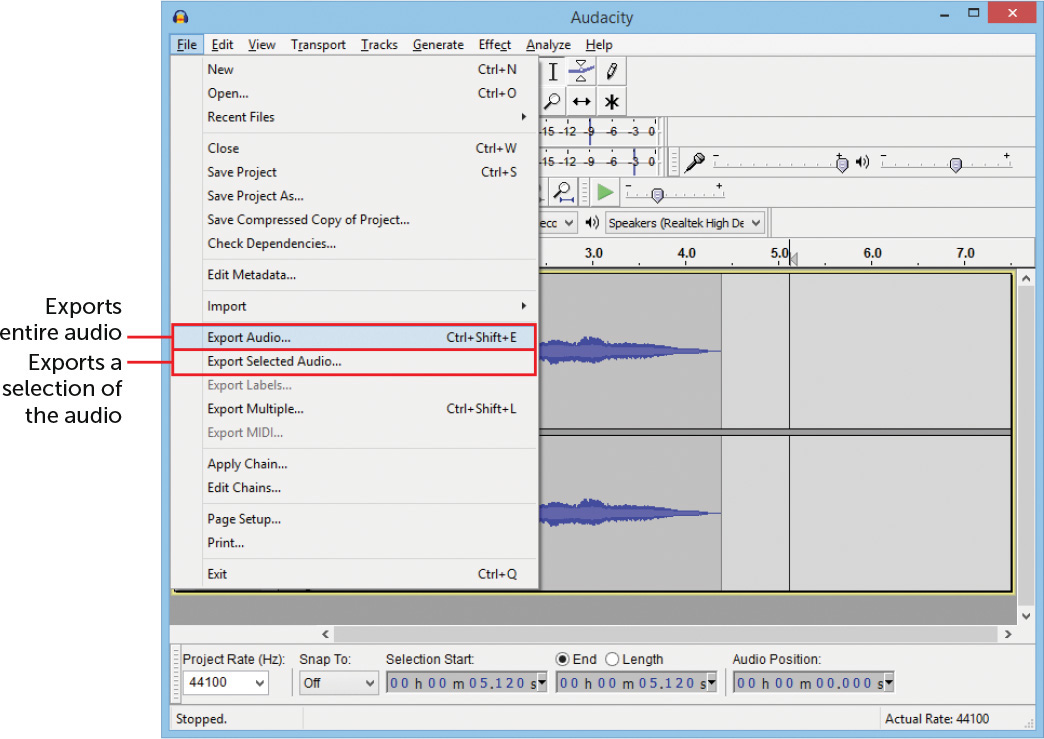
Exporting audio
Audacity can export audio in many different file formats. Usually, you’ll want to use WAV, which is a sound format that most programs use, Scratch included.
When you export your sound effect, an Edit Metadata window should pop up. If you were working on a podcast or a track from your new EP, you might want to fill out the metadata. But for a video game sound effect, you don’t need to worry about metadata. Just click OK to export your sound.
Now you can import your sound into your Scratch game. From the Sounds tab, hover over the Choose a Sound icon until the menu comes up. Click the Choose a New Sound icon.

Importing my amazing screams
Using Sounds from the Internet
You can make lots of different sound effects by making noises with your mouth or by knocking objects together in front of your microphone. But sometimes you need a very specific sound, like a bird tweeting, that you can’t make using the stuff in your house. In these situations, you can use sounds at https://freesound.org/.

The freesound.org homepage
On the Freesound site, you’ll find lots of unique sounds recorded by different people. These sounds are released under the Creative Commons license. You can use them for free as long as you include the name of the sound’s creator.
NOTE: There are a few different kinds of Creative Commons licenses, and the Creative Commons Help page explains the differences. But most of the sounds on the page are Creative Commons – Attribution.
Scratch has a Notes and Credits space on each of your game’s pages. That’s the perfect place to give a shout-out to those who contributed to your finished game. Just enter something like “Bird call sound recorded by ErgoBirdo on https://freesound.org/.” That’s called attribution!
Some sounds will list several different sounds. For example, you might want to use a single bird tweet from a list of 10. Or you might want the sound to be faster or slower, or to fade in or out. That’s when you would use Audacity. You can load any sound you download from Freesound, edit it, and export a version to use in your game. Just make sure you always credit the person who recorded the original sound!
Generating Sounds with sfxr
The sfxr tool quickly generates simple video game sound effects. If you’ve played an older video game, commonly known as “8-bit,” you know what sfxr sound effects sound like: “bleeps” and “bloops” and “HHSSHHSSHSSes.” You don’t need a mic to use sfxr: you just click buttons and slide sliders.
Created by Tomas Pettersson, sfxr can be found on his website at http://tinyurl.com/getsfxr/. The sfxr tool is made for Windows computers, but if you have a Mac, a link on that site leads to cfxr, a Mac version of the program.
Run sfxr, and you’ll see this.
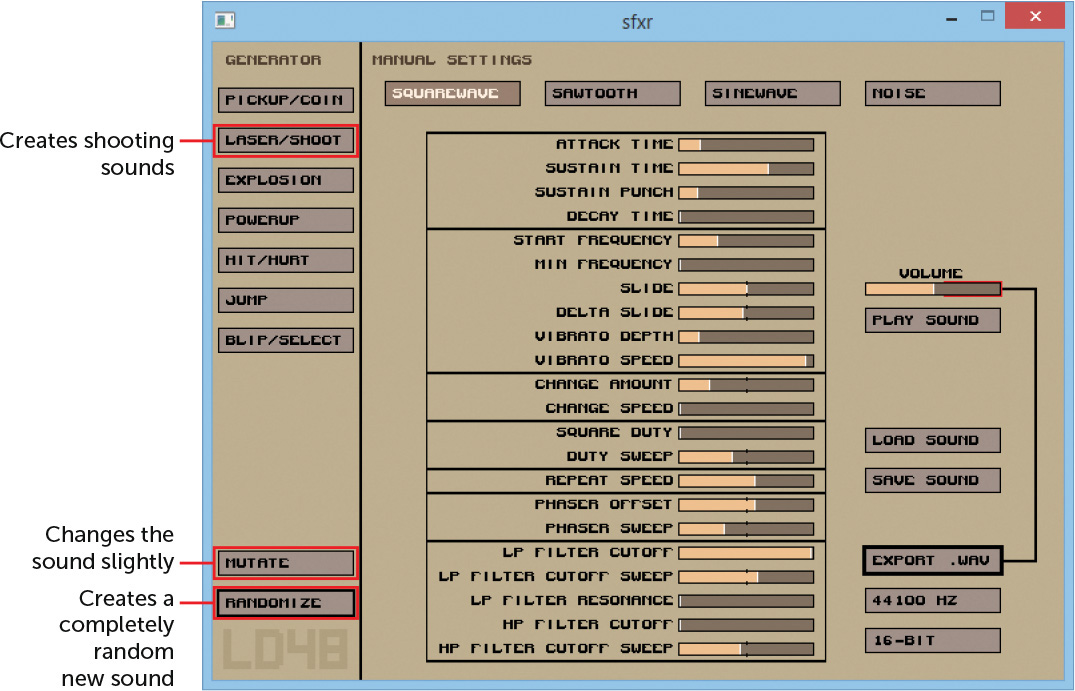
The sfxr interface
Don’t worry about the sliders for now! We’ll look at the buttons first. On the left is a bunch of Generator buttons, such as Laser/Shoot, Explosion, Powerup, and so on. Click the Laser/Shoot button a few times, and sfxr creates a number of different shooty sounds for you.
Experiment with the generators until you find a sound you like. Click the Play Sound button to hear your sound again. Then try clicking the Mutate button (at the bottom left) to change the sound. Each time you click Mutate, the sound changes a little. Notice how the sliders change as the sound changes.
The sfxr program only remembers the last sound it generated. So if you find one you really love, be sure to save it before you make a new one! We’ll talk more about saving and exporting sounds in a moment.
Waveforms
Four buttons are across the top of the sfxr window: Squarewave, Sawtooth, Sinewave, and Noise. One of them should be highlighted right now. You can use these four different kinds of waveforms to create sound effects. Try switching between the buttons and clicking Play Sound to hear how a sound differs in each waveform. Here is what each waveform looks like.
Squarewave gets its name from its blocky waveform when you look at it up close. Squarewaves are clear and chunky. Most of the sounds you make in sfxr will probably be squarewaves.

Squarewave
Sawtooth is pointy when looked at up close, like the teeth of a saw. This waveform sounds tinnier and grittier than squarewaves, which is ideal when you want to use a more metallic sound effect.

Sawtooth
Sinewave is a smooth up-and-down curve that sounds spacey and bubbly. When you want sound effects for space crystals bouncing around on an ice planet, sinewaves will work well.

Sinewave
Noise looks like a scribble you might draw in your notebook. It’s all over the place, so it sounds crashy and, well, noisy. Noise is perfect for explosions and the sound of ocean waves.

Noise
Other generator buttons produce different waveforms. Pickup/Coin produces a squarewave, and Explosion produces noise. When you find a sound you like, listen to how it sounds using each waveform.
Changing Sounds Using Sliders
What if you want your sound to be longer or weirder? By playing with sfxr’s many sliders, you can make all sorts of changes to your sound.
The best way to get a sense of what each slider does is to generate a sound and then play with the sliders to hear how the sound changes. Here are some of the most useful sliders.

Using sliders
Attack, Sustain, and Decay
Sometimes you’ll want your sound to be a different length or to slowly fade out. The Attack, Sustain, and Decay tools affect your sound’s timing. Sound nerds refer to this as the sound’s envelope, because it’s how your sound will be delivered. Here are the effects of each tool:
Attack Time is the amount of time it takes your sound to fade in. Set it low for an instant sound or high for a long buildup.
Sustain Time is the middle of the sound, which is after it has faded all the way in and before it starts to fade out. When you just want your sound to be longer, give it a higher Sustain Time.
Decay Time is the fade-out. A high Decay Time slowly fades to silence. A low Decay Time just cuts out the sound.
Slide, Vibrato, and Change
Slide, Vibrato, and Change give your sound more depth. If you can’t hear the change, lengthen your sound’s Sustain Time. Here are the effects of each tool:
Slide makes your sound slide up or down, depending on whether it’s higher or lower than the center. The Slide Delta slider specifies how fast it raises or lowers, either quickly or slowly.
Vibrato adds a cool oscillating effect to your sound. It’s kind of wiggly. The Vibrato Depth slider specifies how wiggly the vibrato gets, and the Vibrato Speed specifies how fast it goes. At a low speed, you can easily hear it move up and down. At a high speed, the oscillations blend together into a buzzier sound.
Change lets you change how high or low the middle of your sound is. Slide changes the sound gradually, but Change does it instantly. You can use Change to make your sound seem like it has multiple notes. Change Amount specifies how high or low the sound should become: to the right is higher, and to the left is lower. Change Speed specifies where in the sound the change happens. A higher Change Speed happens almost immediately, and a lower Change Speed happens later in the sound.
Exporting Sounds
As with Audacity, saving a sound and exporting it in sfxr are two different processes. Clicking Save Sound produces a file that only works with sfxr. The file keeps track of all your slider settings, so if you want to make changes later, you must save your sound.
Clicking Export .Wav produces a WAV file that most game-making tools (like Scratch) can read. But sfxr can’t read WAV files. So if you don’t save your sound before you export it and want to make changes to your sound later, tough noogies.
Obviously, the best practice is to save your sound and export a WAV file for your game. That way, if you decide to make it shorter, longer, or weirder, you can reload your sound file in sfxr. Then you can export a WAV file of your new sound.

The bfxr Tool
If you’re comfortable using sfxr, you might want to try the more complicated bfxr.

The bxfr interface
Created by Stephen Lavelle, bfxr is somewhat of a sequel to sfxr. It has more waveforms, more options, and more features in general. One useful bfxr feature is that it keeps track of all the new sounds you create using the Generator and Randomize buttons. So if you want to go back to a sound you generated earlier, you can. You probably won’t need most of the new options in bfxr unless sfxr doesn’t provide enough features for the sounds you want to create. You can download the tool at https://www.bfxr.net/.
Creating Music Loops with Drumcircle
Most music you listen to has a beginning and an end, and your favorite summer jam is probably only a couple of minutes long. In games, it’s often impossible to tell how long a song needs to play. Each player takes a different amount of time to finish the game. Some will finish very quickly, and others will spend a long time exploring.
That’s why most game music is written to be looped. It doesn’t have an end. Instead, it wraps back around to the beginning and keeps going. That way, the song can fit however long the player ends up playing the game.
We’ll use the Drumcircle program to make short music loops. Created by Andi McClure, Drumcircle is simple and fun to use. You can download it at http://tinyurl.com/getdrumcircle/.

When you run it, you’ll see a very simple menu. Click the Play button to get started. You’ll see a screen that looks like this.

Drumcircle
Your screen won’t look exactly the same as the one you see here. When you start Drumcircle, it’ll create a loop from random notes. Drumcircle works similar to an old submarine radar screen. (Maybe you’ve seen one in a movie.) As the line (or sweep in radar parlance) moves around the circle, it plays the notes that it touches. By placing notes in the circle, you decide which notes are played.
Play with the program a bit to get a feel for it! You can drag notes around to move them, or drag new notes from the bottom to add them. Click a note to hear what it sounds like. When you click the arrow at the bottom right, you can cycle through even more notes, drum sounds, and effects. Also, you can start and stop the sweep by clicking the center of the circle.
Making a Drum Loop
All right, let’s make a simple drum loop. Click the Reset button at the top to clear all the notes. You should be left with a bunch of dots.

A blank slate
Around the outside of the circle are 16 dots, which make Drumcircle a 16-step sequencer. A sequencer makes music by putting notes in a sequence, and 16 step refers to the 16 notes the sequencer uses. Electronic music-making tools use 16 step as a common format.
The second circle inside the biggest circle has 8 spots (half of 16), and the innermost circle has 4 spots (a quarter of 16 and half of 8). These inner spots are guidelines that will help us make our loop. If we play a note 16 times in the outer circle, it produces a very fast beat. If we play a note 8 times in the second circle, it’ll be slower, playing it half as often. Playing a note 4 times in the inner circle is slowest of all.
Adding Some Drums
Let’s make a simple loop. We’ll start by adding some drums to create a rhythm. A drum rhythm is often the backbone of a music piece. It gives the rest of the instruments a structure to build from. This simple drum line will be our structure.
When you click the colored circles at the bottom of the screen, they get higher in pitch from left to right. These are musical notes and are usually lettered A to G. We’ll come back to this later. To start, we want a drum line, so click the arrow until you see the drum icons.

Creating a drum line
Try clicking some of the drums to hear what they sound like. There are lots of different drum sounds, including a hand clap. For our drum line, we’ll use the snare drum, which looks like a hammer with legs and is immediately to the left of the hand clap. Because we want a beat that’s not too fast or too slow, let’s add our snare to the middle circle, the one with 8 dots. Drag a snare icon to each of the 8 dots.
Now we have our basic beat. Dum, dum, dum, dum, dum, dum, dum, dum. It provides a simple rhythm for us to build on. But this beat alone is pretty boring. Let’s add a little swing to make it more cheerful. We don’t have to put sounds on the dots. Try adding a snare right before one of the snares we already have.

Adding more snare drums
That gives the piece a cool little kick. You can see in the figure that I added two of the snare drums at opposite sides of the circle. Now they’ll come in twice per loop, every 8 steps (or every 4 drum beats). Dum, dum, dum, dah-dum, dum, dum, dum, dah-dum. That divides our loop into two halves, which gives us a good starting place to add more sounds.
Adding More Sounds
Our loop has two parts, each with its own dah-dum. Now we can start to set the two halves apart from each other. Let’s add a couple more sounds.
You can play multiple sounds at the same time. We still haven’t put anything in the outer ring. If we put two notes next to each other in the outer ring, they’ll play faster than the drumbeat in the inner ring. Pick two different sounds and add them to the loop. After the dah-dum is a good place. We use the hand clap and the cymbals here.

Adding even more sounds
These help to build up the percussive sound of our loop. Percussion refers to instruments like drums, cymbals, and cowbells, or things you play by hitting them to create rhythm. Now let’s add some other instruments on top of them.
Click the arrow to see more of Drumcircle’s banks of sounds. You’ll find piano notes (in a rainbow of colors representing different scales), guitar notes, and other sounds effects. Some of my favorites include the trash can, computer, and electric guitar.
Each instrument has a different characteristic. Click the acoustic guitar, rock guitar, and metal guitar (they’re on the fifth page after the rainbow circles, the one with the dog) and listen to how they sound. The acoustic guitar sounds warm and open, the rock guitar sounds harsh and fast, and the metal guitar (the one with the little skull) sounds low and nasty, almost like a wolf snarling.
Let’s add some warmer instruments to our loop.

Adding harps and a guitar
Here, we added two harp sounds leading into one of the dah-dums, and then a rock guitar sound following the hand claps. Always think about how your sounds will relate to other sounds around it.
Adding a Melody
Now, let’s add a melody! We have three different instruments that can be played at multiple scales: the empty rainbow circles sound chippy and bright, the piano keys sound warm and light, and the guitar strums sound bouncy and fun.
We’ll use the piano keys because the lower keys are warm and lingering. You can hear the sounds trail off slowly and blend into each other well. We’ll also add three notes in a row, rising in scale, which is called a progression in music.

Adding a melody
Because each note is higher than the last, it sounds like the melody is rising. If you’re not sure what kind of melody to write, progressions are always a good place to start because they usually sound nice. But you can experiment with playing notes in different sequences. Can you make a loop that sounds sad? Or tense? Or silly?
Saving and Exporting Loops
Click the Save button at the top of the window, and you’ll see eight different slots to save loops to. As in Audacity and sfxr, saving your work and exporting your work are different processes. By saving a loop, you can load it and edit it more later. The Export Wav button is also in the Save menu. As mentioned earlier, Export Wav creates a file that you can use in your games. (The file be named output1.wav or output2.wav, and so on.) When you’re exporting a WAV file, keep in mind that the first note is always the one at the top (where 12 would be on a clock).

Saving your drum loop
Now open your loop’s WAV file in Audacity. What does the waveform look like? (Hold down SHIFT before you click Play to make your sound loop.)

What your drum loop looks like in waveform
You could create a song just by stringing together a bunch of different Drumcircle WAV files in Audacity.
Bosca Ceoil
If you really like and feel comfortable with music sequencing, you might want to try Bosca Ceoil. Named after an Irish word for “music box,” Bosca Ceoil is a simple, free, music-making tool created by Terry Cavanagh.

Bosca Ceoil interface
Bosca Ceoil is a bit more complicated than Drumcircle, but it has many more features if you really want to make songs. There are lots of different instruments to work with, and you can make multiple 16-step patterns and chain them together to create a longer song. Bosca Ceoil has an excellent built-in tutorial that will teach you the basics. You can download Bosca Ceoil at https://boscaceoil.net/.
Adding a Music Loop to a Scratch Game
A basic music loop in Scratch looks like this.

Programming a music loop in Scratch
If you use a plain old play sound block inside a forever loop, it would just keep starting the sound over again. It would be just like the bug’s leaf-munching sound that didn’t wait to play the entire sound before looping. Terrible!
If you don’t want the same song to loop endlessly during your entire game, use a repeat until loop instead.

Turning off the music after the song ends
It’s also handy to know that Scratch’s Sound Library comes with a whole bunch of premade loops that you can use. Check out these loops in the Music Loops category!

Premade music loops in Scratch
NOTE: The loops used in the beginning and ending of Hatlight are “Dance Slow Mo” and “Dance Chill Out,” respectively.
Keep in mind that you can also edit a sound directly in Scratch. You can’t make as many changes as you can in Audacity, but you can adjust the volume and make a sound fade in or out. Fade in and fade out work the same in Scratch as they do in Audacity.
Extra Challenges
If you’re ready to take on some challenges, the following sections provide some extra ideas for you to try.
Compose a Score for a Game Using Only Mouth Sounds
There is a huge range of sounds you can make if you experiment: humming noises, farting noises, explosion noises, tongue-clicking noises, or just saying made-up words. Recall that the sound effect for jumping in Hatlight was me saying “Hup!” into a mic. If you’re feeling ambitious, try to make music for your game entirely with your mouth.
Use Music to Create a Contrasting Mood
Dissonance is a word for the unsettling feeling you get when what you’re seeing tells you one thing but what you’re hearing tells you another. How would you feel while playing a game in which you run and jump through a bright, happy forest while sinister, scary music plays? How would you feel during a game where your character moves slowly and sadly while happy, poppy music plays? What kinds of weird feelings can you create in your game?
Create a Procedural Music Game
Go to https://freesound.org/ and find a recording of someone playing lots of notes on an instrument. Use Audacity to cut out four different notes. Play one of those notes when the player moves up, another when they move right, another when they move left, and another when they move down. When the player moves around your game, they will be involuntarily creating music!
What other ways can you come up with to use sound and music in your games?
What You Learned
In this chapter, you learned how to add cool sound effects to convey information to your players and set the right tone for your games. You used Audacity to record and edit your own sound effects, generated sounds using sfxr, and created drum loops using Drumcircle.
In the next and last chapter, I’ll share some advice on how to use what you learned in this book to bring your ideas to life.