

2
Weird Bug Chowdown: Collecting Items and Avoiding Obstacles
Let’s take the little leaf game we’ve made and turn it into Weird Bug Chowdown, which has more of a story arc. Instead of making a game about a bug just munching a leaf forever, this game will start easy, get harder, and eventually reach an ending. We’ll talk about some of the most common elements in video games—collecting and avoiding things! We’ll also explore time pressure, one of the most fundamental features of real-time games.
You’ll also learn a few more Scratch features, such as the following:
- Using clones to create more sprites
- Creating and keeping track of your own variables
- Creating your own events and using them to send messages between different sprites
- Using a little bit of animation
You can play Weird Bug Chowdown at https://scratch.mit.edu/projects/117389078/.

Preview of Weird Bug Chowdown
This weird bug wants to get as big as possible by eating all the berries! But berries go bad if the bug doesn’t eat them fast enough. Also, every time the bug eats a berry, it leaves something stinky behind that you probably want to avoid. Can you reach the end of the game? (It’s kind of hard, so if you can’t get to the end, try making your version easier.)
When you’ve played enough, let’s dive in and start making the game!
Copying a Project and Changing It
This time, let’s not start from . . . scratch (you know what I mean). Instead, let’s build on our previous project by copying it to a new project. Open Leaf Me Alone by clicking See inside either on the My Stuff page or on the game’s Project Page.
If you haven’t created your own version of Leaf Me Alone yet, find the game at https://scratch.mit.edu/projects/117199134/, and then click the Remix button in the upper right to get your own copy to work with.

Creating a copy of Leaf Me Alone
Once you have a version of Leaf Me Alone saved as a remix, click File ▸ Save as a copy to create a copy of the game to work on. Its new name should look something like “Leaf Me Alone copy.” Click the name to change it to Weird Bug Chowdown (or an even better name).

Saving a copy of Leaf Me Alone
Because we’re starting with an existing project, we already have a loop that moves our bug forward and events that let the player turn left and right. We’ll tweak these for the new game we’ll make.
Weird Bug Chowdown requires some bug maneuvering skills where the player chases tiny berries while avoiding hazards at the same time. To make the bug a little easier to maneuver initially, let’s change its move speed to 3. Now it should move 3 steps during its loop instead of 5.
Tidying Up Your Code
Because we don’t need the leaf-crunch noises, we’ll remove that whole stack from the Scripts area. Click the when green flag clicked block at the very top to select all the other blocks in that stack, and then drag it out of the Scripts area. (Make sure you get rid of the shorter stack that makes chomping noises, not the one that moves the bug!)
We’ll also take the left and right turning branches out and make them their own when green flag clicked stack, as shown on the next page.
Making two stacks of code is an optional step to prevent the stack with our main loop from getting so long that it won’t fit on the screen. Don’t forget to give the new stack its own forever loop, too. Sometimes, this kind of tidying up can help you keep track of your code. Now you’ll know whether each stack of code is for the setup and main game loop or for pressing buttons and turning.

Reorganizing our existing stack
Before we start working on our new game, let’s make one more small change to the code that we have.
Leaving a Rainbow Trail
For this game, let’s use the pen for a neat rainbow effect instead of leaf eating. Then our bug will leave a rainbow trail behind it wherever it goes. Because this game is all about wiggly bug movement, it would be cool to see exactly where your bug has been while playing it.
Let’s modify the main loop so the bug draws a little differently.
First, we delete the set pen color to block. Because we’ll cycle through all of the colors of the rainbow, it doesn’t matter what color we start with.
Then we add a set pen saturation to 50 block to make the colors more saturated because we want the rainbow super light and pastel. If you set the saturation to 100 instead, you would get a super dark rainbow. Setting it to 0 makes it all white.
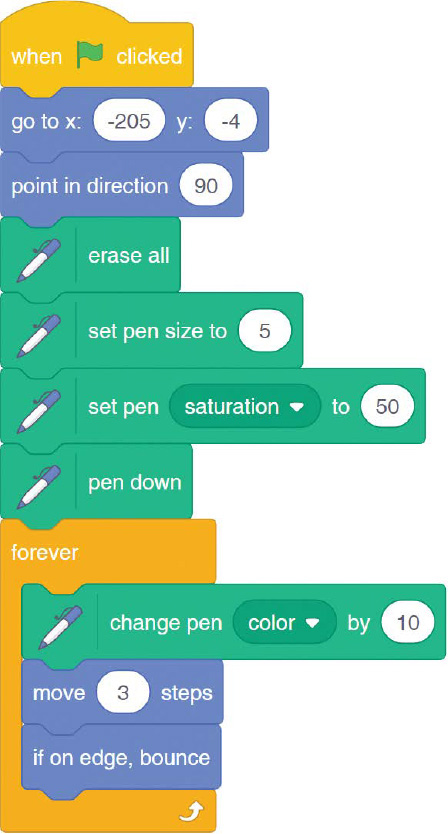
Code to leave a rainbow trail
The final and most important change is getting rid of the set pen size block inside the loop (the one that creates the random hole bite effect) and replacing it with a change pen color by 10 block. This block produces the rainbow effect.
In Scratch, the pen color, like the x- or y-coordinates, is just a number. By adding to or subtracting from this number, we can change the color the bug is drawing with. By using a bigger or smaller number, we can change how quickly the rainbow cycles through the colors. We use 10 here, but experiment to find the one you like best.

We also got rid of the leaf in the background by creating a new backdrop image and deleting the old one. (You can do this from the Backdrops tab after clicking on the Stage.) Use a solid background color for the rainbow to show up against. If you’re feeling ambitious, you could draw a whole new background. But the rainbow effect will make the background interesting to look at on its own so it doesn’t really need anything extra. Everyone loves rainbows! What could be better?

Testing the rainbow trail
Making Bug Food
Now let’s make some berries for our bug to eat. Click the Paint button that looks like a paintbrush on the sprite menu.
Draw a berry and make it a little red circle right on top of the + that’s not much bigger than the bug. You can add a little leaf on top and a little white spot to show where the light is shining on it.
When you’re done, click the Sprite box in the bottom-right corner (it’ll be called Empty) and change its value to Berry. Change the value of the costume name (in the upper-left corner, by the undo buttons) to costume1. Now what do we want our berry to do?

Drawing a berry
Let’s think for a moment about the role of objects like this in games. Many games have coins, rings, gems, or other things the player is supposed to collect in tricky-to-reach places. But what do they actually do in those games?
In Weird Bug Chowdown, the berries give the player something to do with the ability to control the bug’s movement. Objects like berries can motivate players to understand how the bug moves and challenge them to get better at controlling it.
We’ll have the berries pop up at random places on the screen so the player can try to move the bug to them. How do we make multiple berries? The most obvious way is to make multiple berry sprites. But even if we made, say, five of them, and they were all identical, we’d still only have five of them. Plus, if we ever wanted to change the code in one of them, we’d have to change it in all five of them. That’s way too much work. Instead, we’ll make just one berry sprite that can clone itself.
Making a Sprite Clone Itself
A clone is just a copy of a sprite that the sprite produces while the game is running. Any sprite can make a clone of itself at any time if it’s programmed to do so. Clones are not individual objects with their own code. We code them by coding the original sprite, and then telling it what to do when it’s cloned using a few special blocks made just for clones. Note that clones disappear when the game is over.
First, we’ll program the berry sprite to teleport to a random position on the screen and then clone itself. The cloned berry will sit and wait for the player to try to eat it. Then the original berry will wait a few seconds, teleport again, and make another clone, and so on. The original berry will just teleport around and produce clones, and the clones will be the berries the player eats. Let’s see what this looks like in code.

Code for making self-cloning berries

First, the berry hides because this original berry is only here to make clones. The player should only be able to see the clone berries. (The hide block is under Looks.) When it becomes invisible, it starts its loop. It moves to a random position on the screen, plays pop (the sound effect every sprite starts with), and clones itself. It pauses three seconds between each cloning and then starts the loop again, producing a new clone at a random position. (All of the clone-related blocks are under Control.)
Using Negative Numbers
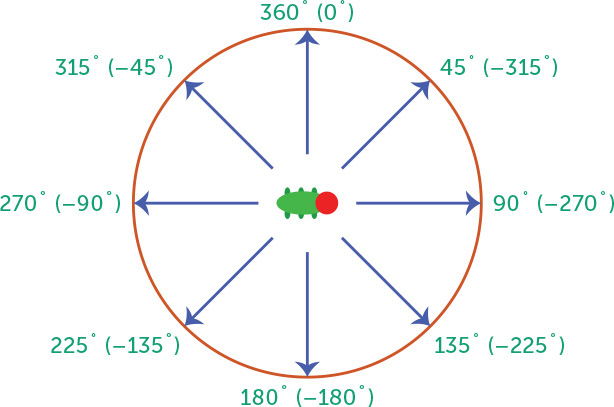
The go to x: y: block sets x to a random number between –220 and 220 and y to a random number between –160 and 160. These numbers come from the coordinate system talked about in Chapter 1.
When you move your mouse around the game area and watch the x- and y-coordinates in the corner, the numbers get smaller toward the middle. The center point of the screen is point 0, 0. If you move to the right, the x number gets bigger up to 240. If you move to the left, the numbers get lower. Numbers less than 0 are negative numbers.
Negative numbers are like a mirror image of the regular numbers, so if you subtract 1 from 0, you get –1, and if you subtract 100 from 0, you get –100. Like normal numbers, the further they get from 0, the bigger the number gets. The furthest left x position is at –240, which is the mirror of 240 on the right. The y position goes from 180 at the top of the screen to –180 at the bottom.
Creating a Berry-Free Zone
If we set x to pick random -240 to 240 and y to pick random -180 to 180, we’d cover every possible position on the screen. So why use –220 to 220 and –160 to 160 instead? Because the bug bounces off the edges of the screen, we don’t want the berries to appear too close to an edge, making them unfairly difficult to collect. To avoid that, we create a comfy buffer of 20 berry-free coordinates around the edge of the screen by subtracting 20 from 240 and 180 to get 220 and 160.
Try running the game now. You probably won’t see anything, but you should hear a popping sound every three seconds. This is because the clones are all invisible right now. Because the original berry hides before it clones itself, the clones also start as invisible berries!
Because the berry’s clones are created after you click the green flag to start the game, they don’t have the when green flag clicked event. That’s a good thing because otherwise they would be teleporting around and cloning themselves like the original berry, and soon the screen would be covered with berries. When you’re working with clones, it’s best to use the when green flag clicked event for only stuff you want the original sprite (not the clones) to do. We’ll use a special event to write code for things we want only clones to do.
NOTE: Remember that clones disappear when the game stops running, so don’t worry about invisible berries clogging your game.
It’s time to give those clones something to do. They can begin by making themselves visible again.
Telling a Cloned Berry What to Do
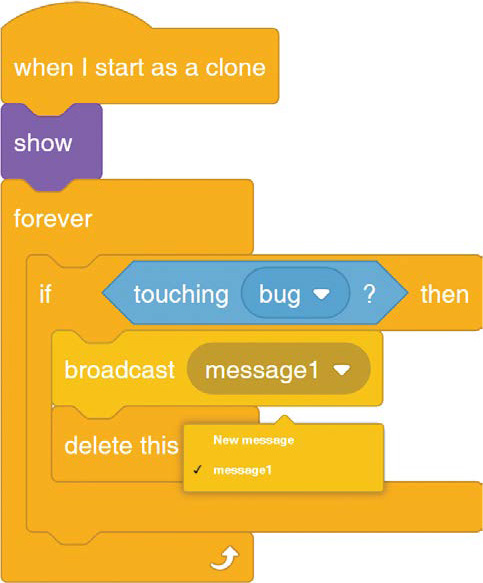
We’ll use the when I start as a clone event to tell the clones what to do. Even though it’s an event, you’ll find it under Control with all the other clone-related blocks. The event when I start as a clone lets you write code exclusively for clones. The original sprite will never see this event. Whatever comes first inside the when I start as a clone block will be the first action the clone takes after it’s created.
The first thing our berry clone does should be to make itself visible with the show block, which is in the Looks category.

Telling clones what to do as soon as they’re created
Because we can create as many clones as we want, we can also get rid of them. This ability is useful; otherwise, clones could get out of hand! To get rid of clone berries after a bug has eaten them, we use a conditional to first check whether the berry is touching the bug. If it’s touching the bug, we delete it to show that the bug has eaten the berry. Make sure this check happens inside a forever loop so the berry can keep checking for the condition.

Testing whether berries pop up
Try running the program! Every three seconds, a new berry should appear on the screen and disappear when the bug touches it. How quickly can you eat the berries?
Broadcasting Messages
Having the berries just disappear when the bug eats them is a little anticlimactic. Instead, let’s make the bug grow a little bigger every time it eats one. To do that, we’ll need a way for the berry to send a message to the bug, telling it that the bug has eaten the berry. When the bug gets the message, it’ll run a special event that tells it to grow bigger.
In Scratch, this is called broadcasting and receiving messages. When a sprite broadcasts a message, that message is sent to every other sprite in the game simultaneously. Any sprite with a when I receive event for that message will run whatever code is attached to that event after receiving the message. Sprites without an event for that message will ignore it. It’s like when you post a picture on Instagram. You’re sending it out to the entire world, but only the people who are following you on Instagram will see it.
You can find all the blocks related to broadcasting and receiving messages under Events, as shown here.
Broadcast drop-down menu
Drag the broadcast message1 block into your if touching bug branch, right above delete this clone. We want the berry to check whether it’s touching the bug, send the bug a message, and then disappear. The default message is message1, but you can change which message the berry sends by clicking the triangle on the broadcast block. Click New message to create a new message called yum.
Now click the bug and give it a new stack that starts with the when I receive yum event. You might have to click the triangle on the when I receive yum block and change the message to yum.

Creating the when I receive yum block
Now when the bug gets the yum message, it can play its chomp sound effect and grow a little bigger. Let’s also make the pen size bigger, so the bug’s rainbow trail gets larger as the bug gets larger.
Make sure you also add a set size to 100% block to the bug’s setup code (in the when green flag clicked stack) so it resets its size when you restart the game! Otherwise, the bug will keep getting bigger and bigger forever (100% is a sprite’s original size).
Now try eating some berries and watch your bug and its rainbow trail grow! Nom nom nom.

Watch your bug grow!
Adding Time Pressure
From the moment the player clicks the green flag, time is ticking in our game. As game designers, we should think about how we make use of time. For example, we can decide how much time the player should spend in a level, how much time should pass before the monster starts chasing the player, or how much time the player has to grab a winged ball before it flutters out of reach. Time is an amazing tool when we use it deliberately.
When the timing is too slow, players could get bored because they don’t feel much urgency. When the game moves too fast, players feel like they can’t possibly keep up. In either case, they disengage because nothing they do feels like it has consequence.
But if we use time thoughtfully, we can keep the energy of the game moving by keeping up the momentum. For example, in Weird Bug Chowdown, berries appear every three seconds. Players need to use the right timing to turn the bug at just the right moment to gobble up a berry. But they have as much time as they want to collect a berry, and the berries stick around forever.

Right now, players have all the time in the world to collect berries, so there’s not much forward momentum in this game. But what if we added time pressure by making berries turn bad if the bug didn’t get them in time, like a fruit going bad after being left on the counter for a week? Then the player would have a reason to try to grab them as soon as they appear.
We could also make the bad berries reverse the player’s progress, turning the bad berries into obstacles the bug would have to avoid. This would create pressure to eat the berries quickly and consequences when the player isn’t able to do so.
Let’s talk about how to make a good berry go bad.
Using Animation to Make Bad Berries
To make the player understand the berries are going bad, we need a way to show it to them. We also need to show how close a berry is to going bad to give players time to react. Visuals are a great way to communicate information about the state of the game.
We’ll make different costumes for the berry so the player can watch it change color as it gets closer to becoming a bad berry. Then we’ll flip through the different stages of berry ripeness, creating a little animation.
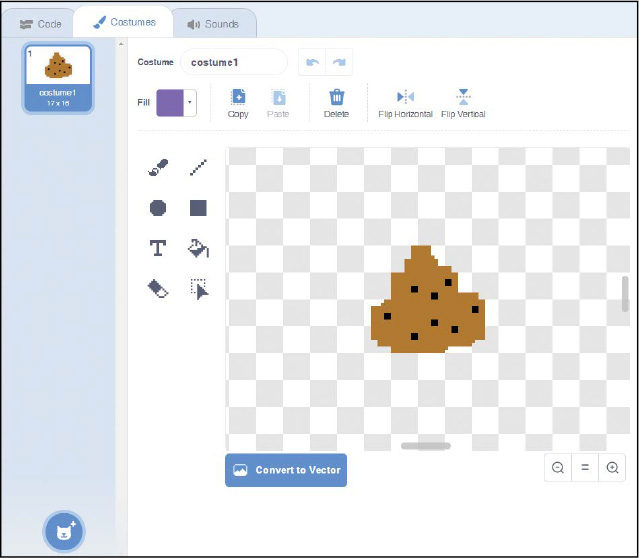
Drawing Costumes
Open the berry’s Costumes tab. Right now, the berry has a single costume (give it the name costume1 by typing the name into the box next to the undo arrows). Right-click that costume and choose duplicate to make a copy of that costume called costume2. Don’t change costume1. We’ll draw some big purple spots on costume2, making it look like it’s halfway through the process of turning from red to rotten purple.
Right-click costume2 to make another duplicate, which is costume3. Use the paint bucket tool to add more purple spots in the remaining red on costume3. Now the berry is completely purple.
Duplicate costume3 to make costume4, and draw some blue spots on it for a blueish purple berry. Then make costume5 completely blue to make a berry that is going bad.

Drawing costumes for your berry
We want a visible transition from color to color as the berry grows closer and closer to its final, rotten form. Here, we drew seven costumes, starting at solid red before turning purple, then blue, and eventually blue with big gross green splotches in costume7, which shows the kind of berry you wouldn’t want to eat.
By looking at the color of the berry’s costume at each stage, the player should know how close the berry is to being inedible. Red is perfect, purple is halfway to going bad, and blue is getting nasty. Green and splotchy is rotten.
Coding the Animation
Let’s look at how we tell the berry clones to cycle through all the costumes.
We need two separate events using when I start as a clone for each. One checks for contact with the bug. The other event handles all the visuals, like making the berry visible, resetting its appearance to costume1, and then animating it.
Because these stacks involve different timing (one uses a forever loop, and the other uses wait and repeat), they can’t be in the same stack. Whenever two pieces of code have different timing like this, we must put them in separate events, even when both events start at the same time. Then they won’t get in each other’s way.

Animating how your berry goes bad
In the visual stack, we use a repeat 6 loop to advance through the costumes with one second between each costume change. The repeat block is like the forever block, except instead of repeating the branch inside it forever, it just repeats it the number of times you specify. We use repeat 6 here because there are only six frames until the final frame that shows the gross splotchy berry (costume7).
After the repeat block runs the specified number of times, Scratch exits the branch and moves on to whatever code is below it. In this case, that code waits another five seconds and then deletes the clone. That way, rotted berries stick around long enough to be an obstacle, but don’t hang around forever. Otherwise, the game would get too hard.
Run the game and watch your berries go bad.

Testing to see how the berries go bad
When a berry pops up, the player has six seconds to eat it before it goes bad. That’s just enough time to reach a berry from anywhere on the screen. Then it stays bad for another five seconds until it finally vanishes. But right now, you can still eat berries after they go bad with no consequences. We haven’t made them do anything different when they go bad. Let’s do that next.
Branching with if and else
We used if () then blocks to check whether the bug was touching the leaf or a berry. Now we’ll use if / else blocks to decide whether the berry is good or bad when the bug touches it. The if / else block (under Control) has two branches: one for the if and one for the else. If the condition is true, the code in the first branch runs, and if it’s not true, the code in the second (else) branch runs.

Checking whether a berry is good for eating
Let’s unpack this stack to understand it. The first outermost block is a forever loop, because we want this berry to continually check whether the bug is touching the berry. Nestled inside the forever loop is the if touching bug block that performs the check. First, we check that the bug is actually touching the berry, and only then check what kind of berry it is.
The next level down is the if / else block: if costume number < 7 then broadcast yum, else broadcast yuck. The costume number (under Looks) just shows the costume number the sprite currently appears as. The < symbol means “is less than,” which checks whether the costume number is less than 7. You can find the < block under Operators. The bad berry costume is costume7. We want the bug to take one action if the berry’s costume number is 7 and another action if it’s less than 7.
If the costume number is between 1 and 6, the berry is still good to eat, and we broadcast the yum message. Or else if the costume number is 7 and the berry is bad, we transmit the yuck message by clicking the triangle and then New message.
Regardless of whether the berry is good or bad, we need to delete this clone. Removing the berry is not part of the if / else block and happens after that block is evaluated. We want the berry to disappear whether it’s healthy or not.
That’s it for the berry.
Recording the yuck Message
To make the bug receive the yuck message and react accordingly, we’ll record a new sound by saying “eww” into the microphone. When the bug receives the yuck message, the game plays that sound and then the bug gets smaller.
When the bug eats a good berry, it gets bigger by 10, so we’ll shrink the bug by 10 as well. We can shrink the bug by telling it to get bigger by –10, which is the same as saying it gets smaller by 10. We also make the pen smaller, to match the bug’s new size.

Making the bug say “eww” when it receives the yuck message
We add the conditional if size > 100% before the size change to make sure the bug can’t get any smaller than its starting size. (Keep in mind that 100% is a sprite’s starting size.) If we don’t set this conditional, the bug could shrink out of existence just by eating too many bad berries!
Let’s test our game. Try to make the bug get bigger, and then shrink it back to its original size. Check that the bug can’t get any smaller than its starting size.
Poop Obstacles
Now our game has obstacles for our bug to avoid. More importantly, the bug knows what to do when it collides with an obstacle. When it receives the yuck message, it follows the code in its yuck stack. We can use the yuck stack to add other obstacles, too. All we have to do is make new obstacle objects broadcast yuck messages when the bug touches them.
I have the perfect object in mind for a new obstacle: poop! Hear me out: bugs poop when they eat, right? My professional background is not in insect digestive systems, but bugs most likely poop sometimes. Using poop would be a fun way to tie all of the existing game elements together: the bug, the berries, and the consumption of said berries.
When the bug eats a berry, it’ll digest the snack for a second, and then a little poop will appear behind it. This poop works just like a bad berry does. If the bug touches its poop, it broadcasts a yuck message and the bug gets smaller. Avoid the poops!

Why Poop Obstacles Work
The poop obstacle will never appear in front of the bug. The berries pop up at random positions and sometimes appear right in front of the bug where the player can’t possibly avoid them. But the player wants to collect berries, so that’s like a free bonus. If poop obstacles appear in front of the bug, that would be unfair.
Because the bug’s poop always appears behind the bug, it helps the game’s forward momentum. The bug is continuously moving forward, so the poops give the player a reason to avoid retracing their path, pushing them to always explore other parts of the screen.
Another selling point for creating poop as an obstacle is that everyone playing your game already understands how it works. Everybody poops and instinctively knows to avoid it.
Making Poop by Having Sprites Clone Other Sprites
To create our poop obstacle, hover over the Choose a Sprite menu, click the Paint button, draw something gross, and rename the sprite poop. If poop grosses you out, you can make your bug lay weird bug eggs instead or leave chewed-up little berries behind it, like tiny apple cores. No one wants to touch those!
Drawing bug poop
Here are some tips for drawing good poop: click the little rainbow-looking box next to the palette below the drawing zone to get more colors to choose from. The slider to the right of this new rainbow palette lets you make colors brighter or darker. If you darken the palette a little, you should be able to pick a nice poopy brown. To make it look even grosser, set your drawing size to very small and draw some tiny black specks on the poop. There. Magnificent!
Coding the Poop Obstacles
Unlike with the berry, we won’t have the poop clone itself. Poops don’t appear on their own; they appear from the bug after it eats a berry. So we’ll tell the bug to make the poop clones using the create clone of myself block. Click the triangle next to myself and change it to poop.

Cloning poop
The bug makes a clone of the poop as part of the when I receive yum event. Add a wait 1 secs block and a play sound block and then set the sound to fart. Now, when the bug eats a berry, it’ll change its size as instructed, digest for one second, play a farting sound, and produce a poop clone. (You can record the farting sound by blowing a raspberry into the microphone.)
NOTE: If the bug eats another berry while waiting a second to clone a poop, the when I receive yum event starts over from the beginning, as does the wait. This means only one poop might appear when a bug eats multiple berries very quickly.
Now let’s use when I start as a clone events to tell the poop clones what to do after they appear.

Code that tells poop clones what to do
The poop code is split into three stacks. The reason is that the timing of the forever loop and the wait 10 seconds block need to run in their own stacks. Also, the when green flag clicked, hide stack should only run when a new game is started. Here is what each stack does:
Hides original poop The first stack makes the original poop sprite disappear, because we only want poop to show up in clone form.
Makes poop appear behind the bug The when I start as a clone stack in the lower left makes the poop start at the same x and y position, just like the bug. (You can find the x position block under Sensing.) Without this teleportation block, the new poop would appear wherever the original poop sprite was hidden instead of appearing in the bug’s trail. Then we tell the poop clone to show itself, wait 10 seconds, and then delete itself. Poop, like all things in life, is temporary. If it wasn’t, the game would get way too hard.
Checks for poop contact The when I start as a clone stack on the right checks for a poop clone’s contact with the bug. When the bug touches the poop, the poop broadcasts yuck and deletes itself. This is pretty much the same as with a bad berry. But notice that it waits one second before it starts checking for contact with the bug. That’s because each poop starts at the same position as the bug. If it didn’t wait a second before checking, the bug would smash into it as soon as it appears. Gross.
Run your game. Check that the poops appear, that they go away, and that they work as obstacles when the bug bumps into them. Poops galore.

Testing the game with poop
Raising the Stakes
Now our game is full of exciting objects. The bug has items to collect and obstacles to avoid, like bad berries and poop. But maybe our game would seem more complete if it had more of a story and if there was escalating tension as it went on? For example, what if the better the player did, the harder the game became? Right now, the bug gets bigger as it eats, which makes it a little bit harder to avoid obstacles as the game progresses. But it doesn’t make the game that much different to play. What if the bigger the bug was, the faster it moved?
That way, the better the player is doing, the trickier the game gets. If it gets too hard and the bug hits some obstacles, it’ll shrink and the game will get slower and easier again. Adding this game play allows the game to meet the player’s skill level.
Creating Our Own Variables
To keep track of the bug’s speed while it’s moving, we’ll need to use a variable. We’ve already used variables: when we tell a sprite to go to x 100, we’re changing its x variable. When we change the color of a sprite’s pen, we’re changing a color variable. We can also create our own variables and use them to keep track of whatever we want, like the bug’s speed.
Click the Variables category in the Code tab, and then click Make a Variable.

Creating a new variable for speed
Name your variable speed and set it to For this sprite only. That just makes it easier to keep track of, because only the bug needs to know what speed it’s going.
After you name and create your variable, Scratch generates some new blocks to help you work with it.
The first new block is a round value block, which you can put into any slot in a block that wants a value. In this case, we’ll use the bug’s current speed as the value. There are blocks to set a variable to a specific number or change it by adding a number as you would for any other sprite property, like direction or costume number. Then there are blocks that show and hide the variable. What do those do exactly?

Blocks for your new variable
You should see a check mark box next to the speed value block. If that’s checked, you should see a little display in the corner of your game that shows the value of the speed variable while you play.

Showing a speed display
This display can be useful while testing your game. You can see your variable’s value at any given time, so you can make sure it’s working as expected. When you uncheck the box, this display goes away. You’ll probably want to uncheck the variable before sharing the game. But sometimes you might want to leave a variable visible in a finished game. For example, if the display shows information you want the player to know, like their current score or the number of cupcakes they’ve collected, you’ll keep it visible.
Let’s use the speed variable blocks to change the bug’s speed as the game goes on.
Changing Speed
Using the speed variable is pretty simple. First, make sure the bug’s speed is set to 0 in its setup phase, before the main loop starts.

Changing your bug’s speed
Then let’s change how far the bug moves after every run through the loop. To move our bug by 3 + speed steps, you’ll need to grab the addition block, +, from Operators and drag the speed value block into the second slot of the + block. The minimum speed will be 3, which is the bug’s current speed. The speed variable, which starts at 0, keeps track of how much speed the bug gains on top of its starting speed.
Now we have a starting point from which to increase the bug’s speed every time it eats a berry and decrease when it hits an obstacle. We’ll do that using the change speed by block.

Using the change speed by block
A good increment is 0.5 seconds, which is half of 1, or five-tenths of a second. If the increment was 1, the bug would speed up too quickly. Try different numbers. Check the speed display in the corner to make sure that eating berries makes the bug faster and hitting obstacles slows it back down again.
Ending the Game
The bug in Weird Bug Chowdown gets bigger and faster the more berries it eats. But right now, there’s no real limit to how big it can grow or how fast it can go. The bug would just keep growing and growing. We can pick a point in the bug’s growth and say, that’s enough! We can make something happen when the bug gets to a certain size or is moving at a certain speed. For example, when the bug is really huge, instead of getting any bigger, it could turn into a butterfly.
How do you decide what the endpoint is? How fast is too fast? Turn on the speed display and play the game for a bit. Try to find the point where it’s fast, difficult, and intense, but not too fast, difficult, and intense. Find the point right before the game would get too hard, and remember the speed variable number. For me, 7.5 feels like a good top speed.
We want the game ending to be big and splashy. When the player reaches the game’s end, they should know it and feel rewarded. But before we code it, let’s pick a new costume to represent the bug’s evolved form and add a little music to play during its transformation.
Choosing the Butterfly Costume
Go to the bug’s Costumes tab. You can draw your own new costume for the bug if you want, such as a multicolored butterfly that is way bigger than the original bug (but still facing to the right!). For this example, I’ll pick a butterfly costume from Scratch’s built-in library.
Hover over the costume menu and click the Choose a Costume button to bring up a menu of pictures. This should look similar to the Sound Library we picked the chomp effect from. Again, you can click the Animals category to make it easier to find the butterflies. I like Butterfly2-b because it’s the most colorful yet still weird looking. A weird bug would grow up into a weird butterfly, wouldn’t it?

Choosing a butterfly costume
Let’s pick some music to accompany the transformation. Again, we’ll dig up something from the Sound Library. Check out the Loops category to find a bunch of short music pieces. We’ll use the one called dance magic. It sounds like music you might hear while transforming into a butterfly.
Coding the Metamorphosis
Using simple branching, we’ll code the transformation. When the bug eats a berry, we use a conditional to check whether the bug is fast and big enough to transform. If the bug hasn’t reached its size and speed limit yet, the game continues and the bug just gets bigger and faster. (We’ll use speed 7.5 to check whether it’s moving at that speed.) If it’s fast enough, we’ll broadcast the new message evolve.

Turning your bug into a butterfly
As you can see, we made a when I receive evolve event to handle the actual transformation. Yes, this means that sprites can receive messages that they can also broadcast! We can use a broadcast to make a sprite run an event in the middle of another event. This evolve event changes the bug to the butterfly costume and sets its size back to 100%. Otherwise, it would be super huge, because the bug is over double its starting size at this point!
Then the event sends the butterfly to the front. “Sending it to the front” means bringing it closer to the screen than the other objects. Think of a pile of photos sitting on your kitchen table. We want the butterfly to be in front of all the other sprites so it can soar over them on its majestic wings. If we don’t send it to the front, the clone berries and poops would look like they were in front of the butterfly, which would be odd.

Then the event changes the bug’s speed back to 0 (so it drifts gracefully instead of zooming superfast), sets a new variable called evolved to 1, and plays the dance magic tune.
The variable evolved keeps track of whether the game has been won. When you create the evolved variable, be sure it’s a For all sprites variable. We want every sprite in the game to be able to tell whether the game is over.

Creating the evolved variable
We can also use the evolved variable to give the butterfly a cool color-changing effect. Under Looks, the change color effect by block changes how the sprite looks. You can set this block to do a bunch of different effects, like whirl, pixelate, and ghost, which makes a sprite see-through.
To create a colorful butterfly, we’ll use the color option. This option changes all the colors of the sprite to other colors, similar to how we created the rainbow effect by cycling through the pen’s color.

Changing the butterfly’s color
In the bug’s main loop, use a conditional to check whether the evolved variable is equal to 1. If it is, run the color effect. Normal movement, drawing, and bouncing off the edge of the screen should still happen, so we don’t want to change that.
It’s important to make sure your bug changes its costume back to its original, weird bug form during its setup phase. Add the switch costume to costume1 block and the set evolved to 0 block to the when flag clicked event. Both blocks will reset the variables that are changed in the butterfly ending. Otherwise, you could start the game as a butterfly when you restart the game!
All right, try your game to see if it works. Can you get to your game’s ending and turn the bug into a butterfly?

Transformation complete!
Changing the Butterfly’s Behavior
If you’re able to turn your bug into a butterfly, you’ll notice that the butterfly can still eat berries, poop, and get bigger or smaller. The butterfly is supposed to be the bug’s final form that transcends a bug’s mortal limitations. It’s also supposed to be flying in the air where it should no longer have to worry about poop or bad berries.
Because we made evolve a universal variable, which is a variable that all objects can see, we can just add conditionals to berries and poop to prevent them from checking for collision with the bug after it has evolved. Here’s what the conditional looks like for the poop sprite.
We check whether the evolved variable is equal to 0, which means that the bug has not yet evolved into a butterfly. Only then do we check for contact with the bug.

Checking whether the bug has turned into a butterfly
You can use the same conditional on the berry: use one conditional to keep the original berry from making clones after the player has won. Use another conditional to keep clones from checking for contact with the bug after it has turned into a butterfly. Just make sure your blocks are nested correctly.
Most importantly, be sure that everything that should only happen before the bug has evolved is inside the branch instead of outside it.
Adding a Starting Message
Now our game has an ending. But to really make it complete, let’s put something at the beginning, too. We’ll add a little message to let the player know what they should be doing, which is chowing down on those berries!
Under Looks, you’ll find blocks that let our sprites say things in tiny word bubbles. Use one to give the player an introductory message when the flag is first clicked.

Adding a starting message
Again, because of timing, we’ll put this message in its own stack. If it was in the same stack as the main loop, the main loop wouldn’t start until the word bubble disappeared. The bug would just freeze until the message was gone instead of talking and moving at the same time, like a real hungry bug would.

What the starting message looks like
Optional Things to Try
Here are some ideas for additional modifications to Weird Bug Chowdown if you want a challenge. All of them can be done using the skills you’ve learned so far. If you need a hint, open my version of the game in your web browser and click See inside to see the game’s inner workings. Click Remix to create and save your own copy that you can tinker with.
Exercise 1: Animate the berries, and poops’ appearances and disappearances.
Instead of suddenly appearing and disappearing, objects can appear gradually, shrink out of sight, or fade away. Instead of using costumes, try graphical effects, like the ghost effect or size changing. You could make a berry look like it’s warping in by having it start a few sizes larger than usual and then using a repeat block to make it smaller until it’s the normal size. (Recall that a sprite’s original size is always 100 percent.) A poop could disappear by shrinking until it’s gone. Be creative!
Exercise 2: Show a message the first time the bug eats a bad berry, warning the player about them.
Add a message like “Yuck! Green berries have gone bad!” The trick is to have the message appear only the first time the bug eats a bad berry. Make sure the warning only happens on a bad berry, not on a poop! For style, you want the word balloon to come from the bug, not from the berry. You’ll probably want to use a variable to track whether the message has appeared yet and a broadcast message to tell the bug to produce the word balloon.
What You Learned
In this chapter, we covered some more advanced ideas. You learned how to make your own variables to keep track of stuff. You programmed your sprites to clone themselves so you could have multiple copies of the same sprite. By broadcasting messages, you gave sprites a way to communicate with each other. You also learned about time pressure and how to use it to make a game more exciting.
In the next chapter, we’ll talk about how to make larger games in Scratch, games with multiple levels and scenes. We’ll explore what those levels could look like.
Scratch is a great way to learn how to program. The more you learn about Scratch, the more prepared you’ll be for a “Serious Adult” programming language. But the basic ideas are the same. If you’re just interested in making cool games, Scratch is an excellent choice for doing that. Now let’s make some more neat Scratch games. See you in Chapter 3!