

3
Hatlight: A Cave Exploring Platform Game
In this chapter, you’ll combine everything you learned about programming, character design and animation, and level design to make your own platform game in Scratch. A platform game is a fancy name for games like Super Mario Bros., where the player has a cutaway view of the game world and gets around mostly by jumping on platforms suspended in midair, as you can see here.

The platform game we’ll create
If you don’t want to worry about the programming, go to http://tinyurl.com/hatlightempty/ to find a version of the game with the platform engine code already written. All it needs is your level design.
About Hatlight
Let’s preview a finished version of the Hatlight game to give you an idea of what we’re making. In this game, you’ll be an explorer who uses a hatlight (a flashlight mounted on a hat) to investigate a big, winding cave. Because it’s dark underground, you’ll need to use your trusty hatlight to find your way around, as shown in the following figure. If you can find some batteries, you can make your light stronger.
Play the game at the following link: https://scratch.mit.edu/projects/122190314/. You can use the left and right arrow keys to move around, and the up arrow key to jump. (You can also use the spacebar to jump or even the Z key—whichever feels more natural for you!)
There are seven batteries in all! How many can you find?

Using the hatlight to explore!
Coding Platform Movement
When you’re making a game like Hatlight, you want to think about how the player will move. The player interacts with your game world by moving, so we want to make moving around the platform feel natural.
Platform movement is a big project, so let’s break it down into smaller parts. Breaking down a large task into smaller parts is called decomposition. We’ll program four types of movement:
- Walking side to side.
- Jumping around (of course!).
- Falling when there’s nothing to stand on.
- Climbing sloped or uneven surfaces. (This means we can draw our own levels and not worry about having flat and straight floors. Our game will take place in a cave, so we want a lot of bumpy floors.)
If we work on one part at a time, it will be easier to create the game.
Creating a Hitbox Sprite
Let’s start by creating a sprite that contains code for all of the player’s platforming action.
Create a new project in Scratch and open the Paint Editor. Use the Rectangle tool to make a smooth, perfect rectangle, like this.

Drawing a hitbox rectangle
Don’t make the hitbox too big! We need to leave enough room on the screen so that the player can jump around and explore. When the player is running, jumping, and bouncing around from one platform to another, we’ll need to check for collisions. A collision lets us know whether the player runs into a wall. If that happens, we can say, “Hey! You and the wall shouldn’t be in the same place.” Then we can move the player outside the wall.
NOTE: In the next chapter, we’ll create another sprite that handles the player’s animation. This sprite will move with the hitbox and change costumes depending on the status of the hitbox. For now, the hitbox looks perfectly flat and rectangular for the purpose of making collision easier.
When Scratch checks whether two sprites are touching, the exact shape of the sprite matters. For example, if the player sprite has a very long nose, they could hang from a platform by the tip of their nose!
To prevent such situations, we’ll make sure Scratch always checks for collisions by making our sprite look like a neat, flat rectangle. This shape is sometimes called a hitbox or bounding box. In the finished game, it will be invisible. We’ll add better animation for the main character later.
Make sure your hitbox is centered on the +. Name the sprite Hitbox.
Drawing a Test Area
Before we code our Hitbox sprite, let’s create a test area where we can try out our movement and make sure it works the way we want it to.
Create a sprite named Walls that will contain all the solid objects in our game: the walls, the floor, and the ceilings. The following figure shows all the objects we want the player to collide with.

Creating Walls
The full size of the sprite drawing window is the same size as Scratch’s game window, so you can draw objects all the way to the edges. As you can see, this example shows the test level. We use the Rectangle tool to draw straight lines for all the floors. Later in this chapter, when we add code to make the player climb over bumpy floors, we’ll make the floors look less regular. For now, it’s okay to keep them simple.
Make sure your Walls sprite is positioned exactly within the game screen. Here’s a handy trick for doing this: give the Walls sprite the code block go to x: 0 y: 0. Then double-click the code block to snap the sprite into position in the middle of the screen. (You can delete the code block afterward.)
We’ll put all our levels into the Walls sprite as different costumes later on. But for now, all we need are some walls and platforms for our player to run around in.
Organizing Our Code with Events
Our platform game will involve quite a bit of code. We’ve already identified four different types of movement we need to code. If we don’t decide how to organize the code before we write it, it will get very confusing to keep track of.
Fortunately, we already identified different parts of the code that we need: walking, jumping, falling, and climbing. So instead of creating one long stack, we’ll create small stacks for each part.
Creating a Chain of Events
Every stack needs to begin with an event, so we’ll make a different event for each stack we want. Recall that in Scratch a sprite can receive the messages it broadcasts. This means that we can end each stack by broadcasting the next message in the sequence, creating the equivalent of a forever loop. The last event will call back to the first one, and the code will keep repeating.
Create these events in the Hitbox sprite.
NOTE: The wrap event is for moving from screen to screen. We’ll come back to that later!

Creating a sequence of events
Now we have a series of events that play out in order, broadcasting the next one in sequence and eventually looping back to the start. None of the events have code in them yet, but we have a basic, working structure to build our game.
Let’s explore each event in more detail.
Creating Variables
We’ll begin by defining some variables using the Variables tab. We’ll put our variables in the when green flag clicked event, before our actual loop starts, as shown next. We only want them to be set once at the beginning of the game.

Creating variables for when green flag clicked event
The grounded variable is a special type of variable called a Boolean variable, which has one of two values, like true or false, on or off, and so on. In this case, grounded is always either 0 or 1. If it’s 0, the player is in midair. If it’s 1, the player is on the ground. We can use this value to make sure the player is on the ground before they can jump.
Similar to the way we define variables in programming, we’ll set these four variables to the values we want them to start the game at. Each time the game starts, the program will reset all four of these variables.
Coding Player Movement
Now that we’ve defined our variables and set their default values, we can start programming each stack.
Moving Left and Right
The first stack we’ll code is the move left/right stack. The full stack should look something like this.

The move code
Now let’s look at how this stack works step by step. Note that a positive value means the player moves to the right, and a negative value means the player moves to the left, like in a number line.
Climbing Slopes and Steps
So far we’ve programmed how the player should move on a flat surface. But we haven’t yet programmed how they should deal with sloping floors or steps.
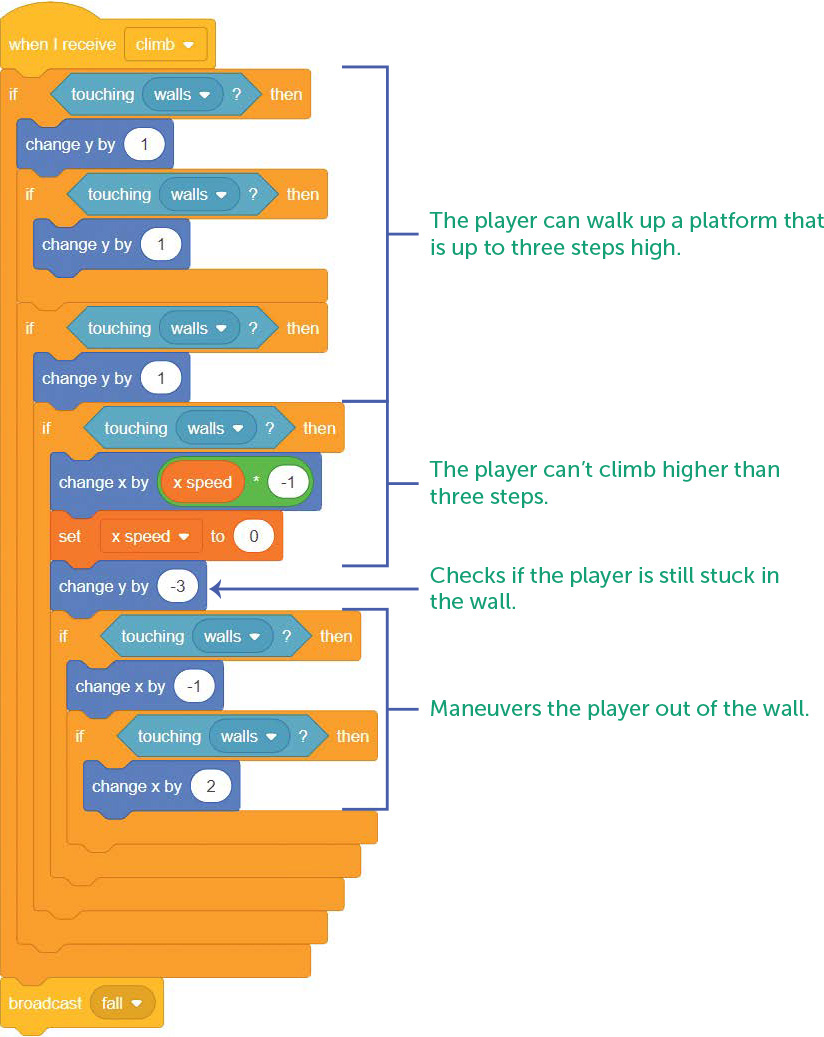
The climb code
Let’s program players to climb slopes and steps as long as they’re not too steep or high. The player can only walk up bumps or slopes that are less than three steps high. If the player takes more than three steps, it will mean the slope is too steep or they’ve bumped into a wall. So if the player walks into a slope or step that is too high to climb, we’ll make it impossible for the player to climb over it. Here’s the complete climb code.
This last if () then block to shake the player loose is an emergency measure just to make sure they can never get stuck in the wall!
Falling
Here’s the fall code that determines how the player should fall when they’re not touching the ground.

The fall code
Remember that negative numbers mean down and positive numbers mean up. Because of the player’s y speed, they won’t line up with the floor exactly but might overlap it a bit. If so, we undo their last move by multiplying y speed by –1, causing the player to move in reverse.
If y speed is negative, it means the player bumped into the floor while falling. If it’s positive, they’ve hit the ceiling while jumping. Either way, we set their y speed to 0 because they stop falling.
Jumping
Next, we’ll look at how to program the player’s jumping motion. Here’s the code for jump.

The jump code
Creating Natural Movement with Variables
Why do we use x speed and y speed variables instead of just changing x and y? For example, to set the player’s speed to 10, we could just increase the player’s x by 10 whenever the player presses the right arrow key.

Increasing speed without using variables
In this example, the player has either stopped (speed 0) or is moving (speed 10). The program doesn’t allow for any speed in between. This results in a binary movement that looks unnatural.
Binary movement
But if we gradually increase the player’s speed over a series of moves, we create a more natural-feeling movement that allows the player to start slow and accelerate to full speed.

Gradual acceleration
Similarly, we can also have the player decelerate instead of stopping instantly.

Deceleration
If you haven’t yet, try out your code in your test level. Make sure you change the broadcast wrap block to broadcast climb because we haven’t written the wrap part yet. Make changes to the test level by adding a sloped floor. If the player can’t jump high enough to reach a platform, make the platform lower. Or change the initial speed of the player’s jump. (It’s set to 12, as you can see in the jump code.)
You can change how the game feels by experimenting with the numbers in your code blocks. For example, try changing the gravity value or the player’s jump speed, the player’s maximum walking speed, or the speed of acceleration. Can you make it feel like the player is on the moon? Can you make the player’s movement feel really heavy? If you’re feeling very confident, try coding a double jump!
Creating a World that’s Fun to Explore
Platform games are neat because they give us an interesting way to think about space. In real life, down is always below, and up is always above. Because of gravity, it’s usually easier to move downward than upward. That means that getting to higher places can be tricky and require more effort.
But in our exploration platform game, the player can explore the world however they want, with fewer restrictions. It does mean we have to think about space a little differently. We have to consider how different parts of the platform connect with each other.
To really let the player feel like they’re exploring, we’ll need to create a world that’s larger than a single screen, but it will be consistent. For example, if the player walks off the right side of one screen, they should be able to return to where they started by walking left back into the screen. That way, the player can develop a feel for where all the different parts of the world are and how they connect.
Have you ever felt excited to discover a new way to get to a place that you didn’t know before? In that moment, you understand your neighborhood a little better: things start to connect like pieces in a puzzle! We can create this feeling in our players by making an interesting world to explore.
Using a Variable to Create a Grid Map
Just like blocks in your neighborhood, we’ll arrange our screens into a grid. We’ll start with a grid of 4 rooms by 4 rooms, 16 total! Not too big but not too small. We’ll number each room to keep track of them, like this.
1 |
2 |
3 |
4 |
5 |
6 |
7 |
8 |
9 |
10 |
11 |
12 |
13 |
14 |
15 |
16 |
Think of the grid like panels on a comic book page. Looking at this grid, we can easily figure out how to get from one screen to another. To move right one screen, we just add 1 to the number. Room 1 + 1 = room 2. To move left, we subtract 1. To move up or down, we have to get to a different row. For example, if we were trying to move down from room 2 to room 6, we would need to add 4. To go back up, we would subtract 4.
Moving up or down a row requires adding or subtracting 4 because each row has 4 spaces. But in a 5 × 5 grid, we’d need to add 5 to drop down a row!
This kind of movement is sometimes called flickscreen because instead of scrolling gradually, the screen flicks to a new image, like turning a page in a book.
We’ll use a variable to keep track of which screen the player is on.
Moving from Screen to Screen
We’ll use our Walls sprite to store all our screens. It has a costume for each room and changes costumes whenever the player walks off one screen to another. First, let’s code moving from one screen to another using the following code.

Code for screen swapping
You can see we use a new variable, screen, and a new event, new screen. When the game starts, the Walls sprite sets the screen variable to 1 and then broadcasts the new screen event, changing its costume to match the screen the player is on. From now on, it’s mostly the player sprite that will change the screen.
Testing Screen Switching
Now add 15 new costumes to the Walls sprite for a total of 16. It’s okay to leave these blank for now, and it’s fine if you just name them costume2, costume3, and so on. In fact, it’s better to use numbers in their names. Just make sure the numbers are accurate and in the correct order!
The one costume we should fill out is costume2 so we can test whether screen switching works. It doesn’t matter what this screen looks like, but try to get platforms along the edge to line up with platforms in the first screen. The easiest way to do this is to use the Select tool to highlight just the edge of the previous screen before copying and pasting it into the new screen.

Copy and paste the edge of the previous screen to costume2.
Coding Screen Change
We added a wrap section to our code between the move left/right stack and the climb stack, but we left it blank. Now let’s fill it in!

The wrap code
We want the player to be able to walk off the side of the screen and then appear in the next one. For example, if they leave the right side of screen 1, they should appear at the left side of screen 2. We’ll write code for all four directions the player can move in: up, down, left, and right.
For each direction, we need to do the following:
- Check whether the player is outside the edge of the screen: Remember that x runs from –240 on the left to 240 on the right, and y runs from 180 at the top to –180 at the bottom.
- Move the player to enter the opposite edge of the screen: When the player exits the bottom of one screen, they should move to the top of the next screen.
- Adjust the screen variable: When moving up and down, the player needs to go –4 or 4 screens at a time.
- Broadcast the new screen event: This lets all the other sprites know the screen has changed, so the Walls sprite will change to the costume that matches the current screen number.
You might need to adjust the values of the x and y positions depending on the size of your Hitbox sprite. Scratch stops sprites before they can get too far off-screen, which means a larger sprite might not be able to reach an x position of –240. In that case, you might try –239 instead. Keep adjusting values until the code works the way you want.
Using Light and Darkness
To make the feeling of exploration stronger, we’ll limit what the player can see to the circle of light coming from their hatlight. This is a very simple effect. All the walls and platforms are black. When we put a black background behind them, we can’t see where the walls are. By putting a small field of light between the black background and the black walls, we create an area around the player where they can see the walls.
Of course, this only works if all the walls and the background are the same color. If the walls were a different color than the background, the player would see everything, and there would be less mystery and not much to explore in the game. You can use other colors to draw walls if you want them to show up, such as glowing moss on cave walls, or lava cracks.

Creating a field of light between the background and wall
Create a new sprite to represent the beam of light using the Ellipse tool. You can call the sprite Flashlight. An ellipse is a roundish shape that can be wider in one direction than the other, like a football. To draw a perfect circle, hold down the SHIFT key while you draw it.

Drawing a circle of light
The circle can be any size for now. Later, we’ll add code to make it bigger or smaller depending on the strength of the hatlight’s battery life! Just make sure the center of the circle is over the +. Here, we made it a bit yellow, like the color of a flashlight.
Make sure the Flashlight sprite is between the black background and the walls. An easy way to adjust where sprites are is to drag a go backward 1 layer block into the Flashlight Scripts tab. You don’t have to connect it to an event. When you double-click on a code block, it will run instantly. Just double-click the go backward 1 layer block until the sprite is in the right place. Then you can delete the block.
Coding the Flashlight
Now it’s time to code the Flashlight. The following is the entire code that programs how the light will appear.

The Flashlight code
Creating Objects to Collect
In Chapter 2, we talked about how collecting berries encouraged the player to think and pay attention to the way the bug moved. In this game, collecting objects can encourage the player to explore and find new paths and secrets in the game environment.
Let’s create a sprite for a collectible battery that the player uses to make their hatlight stronger. (That’s not how flashlights work in real life, but let’s imagine that’s how it works!)

Creating the battery sprite
The batteries should be visible even if they’re not in the player’s field of light, as long as they’re on the same screen. That way, the player can see a battery somewhere onscreen and try to find a way to reach it.
The finished game will have seven batteries the player can collect. To create multiple batteries, we’ll use cloning, just like we did to create multiple berries in Chapter 2.
When the game starts, the battery sprite visits every spot a battery should appear, sets its location variable to the correct screen, and clones itself. At the start of a game, the battery creates seven clones, each with a different x and y position and screen number. Each clone uses the location variable to keep track of which screen it should appear on.
After it’s finished making clones, the original battery sprite sets its own location to 0, so it doesn’t appear on any of the 16 screens. If we don’t do this, the parent battery will show up onscreen even though the player can never collect it.
To make sure batteries only appear when the player’s on their screens, we use the global screen variable to check whether it matches its local location variable. If it is, it’s the correct screen and the clone appears! Otherwise, it disappears.

The Battery code
If a player makes contact with a battery, we add a value to the global batteries found variable, which was set to 0 at the start of the game, and makes the flashlight’s glow variable a little bigger. The more batteries the player collects, the more they can see, helping them track down even more batteries!
What You Learned
In this chapter, we tackled a lot of complex ideas. You learned how to program platform movement and create a character who can walk, climb, jump, and fall. You created a flashlight that the player uses to see in the darkness. By using flickscreen movement, you also created a larger world for your character to explore.
In the next chapter, we’ll continue designing Hatlight by filling it with secrets, challenges, and more interesting places for the player to discover. We’ll also create and animate a player character to replace that hitbox. Take a break, eat a snack, pet a cat, and meet me in Chapter 4 when you’re ready!