
To many, image editing, or more specifically, the word Photoshop, conjures up ideas of fantastical landscapes, or of portraits of impossibly beautiful people retouched to the brink of plausibility, and beyond.
But if you are not interested in taking your creativity into the realm of photo illustration, or image composites, you'll use photo editing to make your digital files look exactly like they appeared when the shutter button was first pressed.
But why would we need this sort of artificial aid in the first place? It's a frequently asked question, and the simple answer is that what we see is not always what our camera records. This is because we have a brain that can be very flexible when it comes to processing the visual information it receives from any scene, whereas a camera simply responds to the light it is pointed at – with essentially a rather limited ability to translate that information into a faithful, realistic reproduction of any scene.
I'm always reminded of a quote by 1960s fashion photographer, David Bailey, who said the following:
"It takes a lot of imagination to be a good photographer. You need less imagination to be a painter because you can invent things. But in photography, everything is so ordinary; it takes a lot of looking before you learn to see the extraordinary."
These are wise words, spoken a long time before retouching software came into being.
One of the biggest drawbacks to image editing is its apparent complexity. No one wants to spend hours slaving over a keyboard with little to show for their toils. In this chapter, you'll discover the basics for making your RAW (and JPEG) files look just as they were when you first pressed the shutter button.
But you'll also learn how to generate some very cool effects and creative looks, all with very little time and effort. That might leave you with extra time to go out and shoot more great pictures!
In this chapter, we'll look at the following topics:
- The editing workflow and best practices
- 10 ways to open an image in Elements
- How to edit RAW files, including all the camera's RAW features, sharpening, and noise reduction
- Understanding picture resolution
- Cropping for better composition
- Making pictures larger or smaller using resampling
- Instant photo fixes using only the Organizer
- Using the automatic tone-correction tools
- Mastering contrast, color, sharpness, and clarity using Levels
- Adjusting color using hue and saturation
- Creating high impact black and white images
- Perfecting skin tones
- Simple retouching using the spot removal tool
- Modifying facial expressions
- Opening closed eyes—how to copy and paste eyes from one picture to another, easily!
- Plus, more additional resources
Nearly all digital camera images need some form of adjustment to make them appear as the scene did when the image was captured. What many might not immediately appreciate is that there will always be a visual difference between a RAW file and a JPEG file once they are downloaded to the computer.
This is because the former is neither compressed nor processed in-camera, while JPEG files are compressed and processed in-camera. However, they are also 8-bit files, which contain considerably less picture information than a 14-bit RAW file.
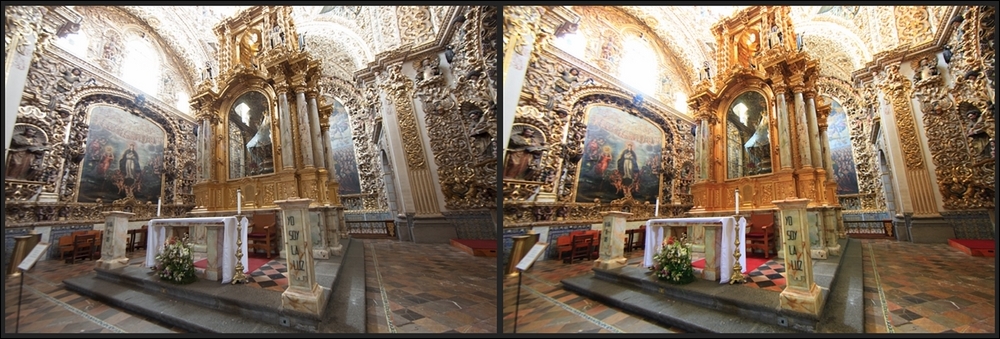
The following photos are from Puebla, Mexico. This is a good example of how in-camera JPEG processing initially produces a significantly better-looking version of the same shot compared to the 14-bit RAW file on the left. That said, because this was shot inside a poorly lit church, there's some underexposure, but worse, a lot of overexposure in the highlights, most of which could be recovered from the RAW file in Elements. This most probably can't be recovered from the JPEG file, because it already discarded that detail in-camera when the file was reduced from 14 to 8 bits:
Best practices for editing files are as follows:
- Download your images to the computer, if this is your default storage place. If not, download them to an external drive.
- Back up the files on the computer to a hard drive, a second drive, and/or the cloud.
- Open a file (see the 10 ways to open a photo for editing opposite).
- Crop the image to the desired shape or format (be aware that cropping removes pixels, which in turn reduces the printable size of the file—see the Cropping for better composition section coming up in this chapter).
- Check and adjust the White Balance. For RAW files, do this in the special Camera RAW editing window. It's possible to reset any camera's white balance setting (that is, from as shot to Shade, Cloudy, Indoors, Fluorescent—to whichever setting you have in your camera). However, if the color is wrong in a JPEG file, you can also force it to open in the Camera RAW window (File | Open in Camera RAW), or just use one of Elements' seven color adjustment tools (Enhance | Adjust Color…) to make things appear better.
- Check and adjust Brightness and Contrast.
- Adjust color intensity using Saturation and/or Vibrance tools.
- Fine-tune the color using tools such as the Adjust Color for Skin Tone tool.
- Apply Retouching where needed.
- Add special effects, text, images, and so on.
- Adjust the Sharpness, fine-tuning it to the file's ultimate usage: web or print.
The following are 10 ways to open a photo for editing:
- Right-click any thumbnail in Organizer and choose Edit with Photoshop Elements Editor (highlighted in red in the following screenshot).
- Select a thumbnail in Organizer, then select the Photo Editor tab from the Editor button pop-up at the base of the page.
- Click/select a thumbnail in Organizer, then drag it directly into the edit window (into Quick and Expert modes).
- Click the Open tab, on the top left-hand side of the Expert edit window, and navigate to the folder containing the image files. Then, open the folder and double-click the name of the file or the icon (depending on how your Windows/Mac Explorer/Finder is set up).
- Choose File | Open recently edited file in the Quick, Guided, and Expert edit modes.
- Drag an image (icon) from a Windows/Mac Finder window into the Quick or Expert edit window.
- Use the File | Open menu command.
- Use the Ctrl/Cmd + O keyboard shortcut.
- Click/select a thumbnail in Organizer, then press Ctrl/Cmd + I (opens in Expert mode).
- Using Alt/Opt + Ctrl/Cmd + O (Quick or Expert modes), navigate to the appropriate RAW, JPEG, or Tiff file and click Open to bring it into the Camera RAW window.
Right-clicking any thumbnail in the Organizer pops out a contextual menu, as shown in the following screenshot—choose Edit with Photoshop Elements Editor to take that thumbnail into the edit workspace. Watch that you don't accidentally hit the one beneath this—that's for the video editor.
