
Photoshop Elements comes packed with vector clip art for use in your various projects. Actually, these assets are not in Elements when it's first downloaded, but every time you click on an item in the Graphics panel, it will automatically download from Adobe. Since these are vector graphics, their size is tiny, and so they take no time to download. Vectors are made from a mathematical formula and not pixels. Images are made up from individual pixels, which is why they take up a lot more space.
As an example, I am going to show you how make a custom greeting card using vector clip art. Let's get started:

To make your own custom greeting card, first create a new document (File | New | Blank Document). Before you start the design process, I recommend that you search for envelopes to match your cards. It's annoying if you design a card and then can't find envelopes to match the size of the card (yes, it's happened to me a couple of times). Find an envelope, measure its proportions, then create a new document that's twice its width or height, depending on whether you want the fold line at the top or on the left-hand edge of the card.

You can add some nice preset text effects using the Text submenu in the Graphics panel. Double-clicking the text style from the listing on the right-hand side immediately adds it to the document open in the page as Your Text Here. Click in this text to type in your own greeting.
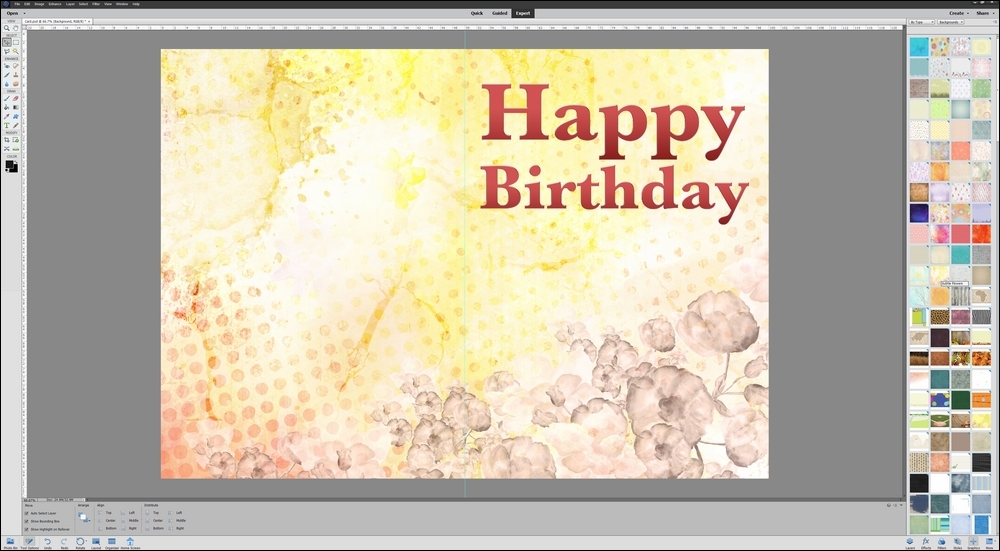
As an example, I chose Backgrounds from the drop-down menu, which is at the top-right in the Graphics panel, and clicked one of the thumbnails to automatically download and install it into my document. My only problem with this otherwise great design feature is that it's hard to see exactly what that design actually looks like. But then, because it's only a small file, you can try one, and if it's no good, undo your action and try more.

If Backgrounds are not your thing, you can also drag entire designs and picture windows into your custom card artwork. Again, this is a hit-and-miss process because some of the designs look quite different once they are in place. Simply undo your actions and try another style before saving and printing on your local inkjet or laser device.

Surprisingly, Photoshop Elements has an impressive range of vector tools—shapes, text, and more. The beauty of these forms is that, since they are essentially made up of nothing more than mathematical formulas, they occupy very little space and can be resized to any size with no loss of quality.
In this example, I am making a design for a book on Japanese food, experimenting with a custom font (Paper Cuts, downloaded for the project), as well as vector shapes as text boxes, plus a range of special effects, such as Drop Shadows. Let's get started.

In this example, I used scalable vectors to create a simple page design for a book on Japanese food. I had the main image open and chose a rounded edge panel as a starting point. I then chose Custom Shapes from the Tool Bar, selected the Rounded Rectangle Tool (Ctrl + U), then clicked, held the mouse button down, and dragged the shape into the image to add this vector shape to the document, automatically on its own layer. Bear in mind that it doesn't matter if it appears in the right proportion because it can be resized at any time.

I added the first of my text layers. You can see that there are now three layers in this file: the background foodie shot, the vector shape layer, and the type layer on the top. At this stage, the font is just the default font.

I changed the default font to one I had downloaded a while ago called Paper Cuts (from a free site called www.dafont.com), which kind of suits the Japanese theme. Note that the Rounded Rectangle acts like a text box, into which text can be typed. This can be rather restrictive, especially if you're using a nonstandard font, like I was here. In this instance, I created the new type layer away from the Rectangular panel, then dragged it on top, ensuring that it was independent from the vector panel beneath it.

In this step, I duplicated the text and the vector layers. This is a handy shortcut that can be used in a lot of projects. By duplicating these layers, I didn't have to go back to the Tool Bar, select the Custom Shape tool, choose the Rounded Rectangle tool, and draw another shape (or create another text layer, for that matter). It's always far quicker to duplicate what you already have, and then adapt the duplicate.
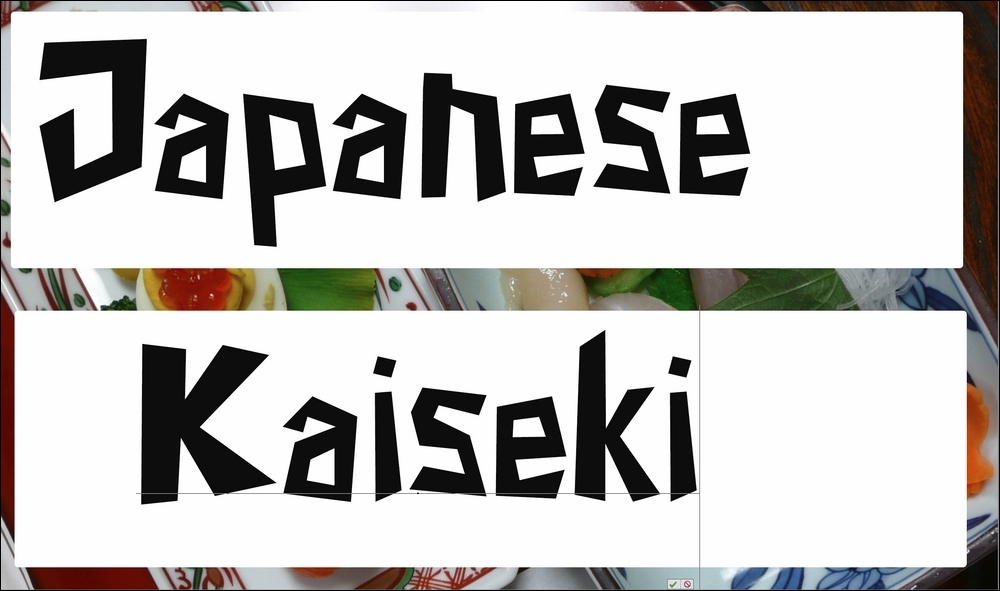
I dragged both newly duplicated layers to the bottom of the page using the Move tool, and with the Type tool, I edited the copied text layer to read Kaiseki (an exquisitely presented traditional Japanese multicourse lunch or dinner). This process is much faster than trying to create a new type layer.

To add a little more irregularity to the shapes I've already created—I wanted it to look a little more retro—I transformed its shape. Since these are vector shapes, you can resize them in any direction and to any magnification with no loss of sharpness. Using Ctrl/Cmd + T puts the vector layer into transformation mode (confirmed by the appearance of corner handles around the shape). Grab any corner handle to stretch it larger or push it in to make the shape smaller. Right-click inside the transform box to access the menu to change from Scale to Distort, Skew, or Perspective. I used Distort because it allows you to drag only one corner, which I did to reshape the rectangular proportions, as you can see here.

I duplicated the vector and text layer one more time to add the third component into the design: the word modern.

Now, the text box needs coloring. Double-clicking the vector layer thumbnail brings up the Color Picker, allowing you to add any color you like to that panel.

Adding color to the text is a slightly lengthier process. Select the text first, then choose a color from the Type Options panel. Alternatively, you can click in the Color Picker and add a color from there.

In the final stage, I added a small, black drop shadow to the three text elements, just to lift them off the background color slightly. Drop Shadows are located in the Styles panel.
