Chapter 9: Security Best Practices
In this book, we have already covered the most important topics regarding Azure security, from governance and monitoring to identity, network, and data protection, to specific tools such as Azure Security Center and Azure Sentinel. In this final chapter, you will find some tips and tricks the authors are using regularly in their projects.
The topics we will cover in the following sections include the following:
- Log Analytics design considerations
- Understanding Azure SQL Database security features
- Security in Azure App Service
Log Analytics design considerations
You've already learned that Azure Security Center and Azure Sentinel rely heavily on Azure Log Analytics. But there are some important considerations to make before you start your security monitoring journey in the cloud.
The two most important paradigms in this context are these:
- Using as few Log Analytics workspaces as possible
- Using regional workspaces to avoid Azure bandwidth costs
From a technical point of view, it's the best idea to only use a single, central workspace so all the data resides in one place. Having a single workspace, you can easily, efficiently, and quickly correlate your data to get the respective insights. You also only need to take care of a single role-based access control (RBAC) model for this workspace. However, fine-grained RBAC models demand more effort.
From a monetary point of view, however, you should plan for regional workspaces instead of a central workspace if you are using Azure resources in different Azure regions. For on-premises servers, it does not make a big difference what layout you are planning for because all incoming network traffic (ingress) to an Azure region is free. The Microsoft Monitoring Agent will send data to Azure, but there is no regular data transfer from Azure to your on-premises servers. The problem is that you must pay for outgoing traffic (egress) out of an Azure region. Now, if you use a single, central Log Analytics workspace and have Azure Virtual Machines (VMs) deployed in different Azure regions, outgoing data transfers from these VMs to your workspace would generate traffic costs.
In order to bring both paradigms together, the idea is to create one single workspace in every Azure region you are using, not only to avoid regular traffic costs but also to still stick to the idea of having as few workspaces as possible.
If you use several workspaces, you can no longer use auto-provisioning in Azure Security Center. Because of the automation process, you can only configure one workspace per subscription. Since an Azure subscription can contain resources from all, or at least several, Azure regions, depending on your policies, you need another way to automatically deploy the Microsoft Monitoring Agent to your Azure VM. This is where Infrastructure as Code (IaC) comes into play. With Azure Resource Manager (ARM) templates, Terraform, or PowerShell, you can deploy Azure VM and install the Log Analytics VM extension at the same time. The Log Analytics VM extension is deployed and managed through the ARM and fully supports CI/CD pipelines in your DevOps scenario. That said, when you use IaC deployments for your VM in your DevOps scenario, you can also update, manage, and configure the agent through your pipeline. If you then also have configured policies, blueprints, and all the other governance features you have learned about in Chapter 2, Governance and Security, you can easily adhere to your corporate security policy and leverage automation at the same time.
Next, we are going to look at other Azure services' security features and how they can help us increase security.
Understanding Azure SQL Database security features
Some security features related to Azure SQL Database were mentioned in Chapter 6, Data Security, where we discussed data security. But there are additional features we can use to increase security.
The first feature and line of defense when it comes to Azure SQL Database is a firewall. This built-in tool, by default, blocks access to the database from any IP address that is not preauthorized (whitelisted). It's important to mention that firewall settings are on the Azure SQL Server level and will be inherited to all databases on the server. If we need to allow access to one IP address to a single database, we may want to reconsider our resource strategy. Allowing an IP address to access a single database will enable access to all databases on the same server. Because of this, we need to consider putting only databases used by the same applications or the same group of users on a single server.
Allowing a new IP address to connect to Azure SQL Server can be done from the Azure SQL Server firewall settings. We have the option to add a single IP address (the start and end IP will be the same), or add a range of IP addresses (from the start IP to the end IP). If we want to allow our current IP address, there is a convenient Add client IP button. This will automatically detect the IP address we are coming from and add a new rule to allow that IP address. After any rule is added, we need to save changes in order for them to become effective.
An example of firewall settings is shown in the following figure:

Figure 9.1 – Azure SQL Server firewall settings
Under Firewall settings, there are two additional options we can use:
- Allow Azure services and resources to access this server
- Connections from the VNET/Subnet
The option to allow Azure services sounds compelling, but we need to be very careful. At first look, this option looks helpful and most people will probably think they should allow Azure services to connect. It makes our life so much easier when we don't have to worry about how our web app connects to a database. But this option does not allow only your Azure service to connect, it allows any Azure service to connect. Allowing Azure services and resources to connect will only check if the connection is coming from an Azure data center, it will not limit connection to your subscription or tenant. Allowing this option will make Azure SQL Database more vulnerable, and I would recommend you keep this option off.
Important Note
Allow Azure services and resources to access this server is set to OFF by default, but it wasn't always the case. Previously, this setting was enabled by default. If you have Azure SQL Database already created, make sure this setting is disabled.
Connection from VNET/Subnet allows us to create VNET integration by allowing certain VNET (or limiting this only to subnets) to connect to Azure SQL Database. This approach is more secure as the database does not need to be exposed over the internet and all communication is done on a secure private network.
But Azure SQL Database is just one example of built-in security features on a service level. Almost every service has some service-specific security features. Azure App Service is another excellent example with many security options available, which we will be covering next.
Security in Azure App Service
Azure App Service is an HTTP-based service for hosting web applications and APIs, with support for multiple programming languages. It's also another great example of an Azure service with multiple security features built-in. We can control access, protocols, certificates, and many other things.
One of the early problems we need to solve for any application is authentication. App Service allows us to set up authentication based on a few different providers: Azure Active Directory (Azure AD), Microsoft (or Live) account, Facebook, Google, and Twitter. Naturally, the best integration method is using Azure AD, as it is native and also allows you further control through Azure AD tools and features.
In order to set up Azure AD authentication for App Service, we need to do the following:
- In the App Service Authentication blade, we need to select Azure Active Directory, as in the following figure:
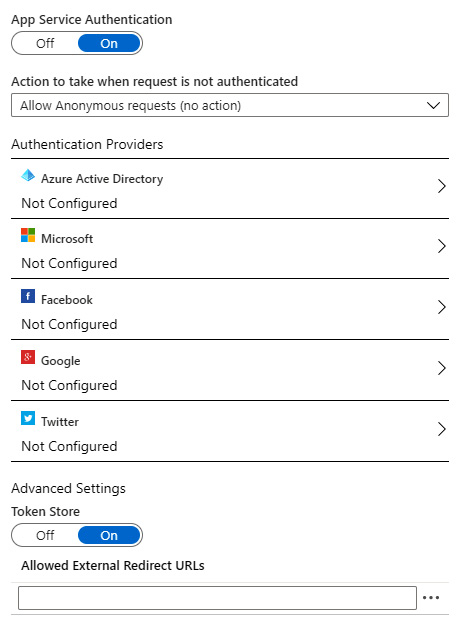
Figure 9.2 – Azure App Service authentication
- We have two options in authentication settings. If we choose Express, this will create a service principal and all required permissions for us automatically. If we choose Advanced settings, we will need to provide a service principal and create permissions ourselves. The following figure shows an example of Express settings:
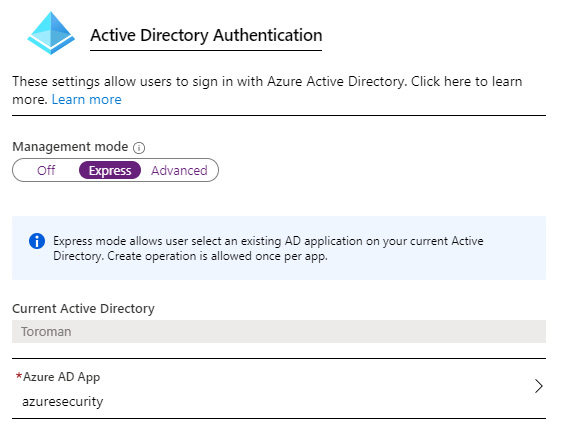
Figure 9.3 – App Service Azure AD authentication
- After everything is configured, we need to ensure that the user is required to log in with Azure Active Directory in order to access the application, as in the following figure:
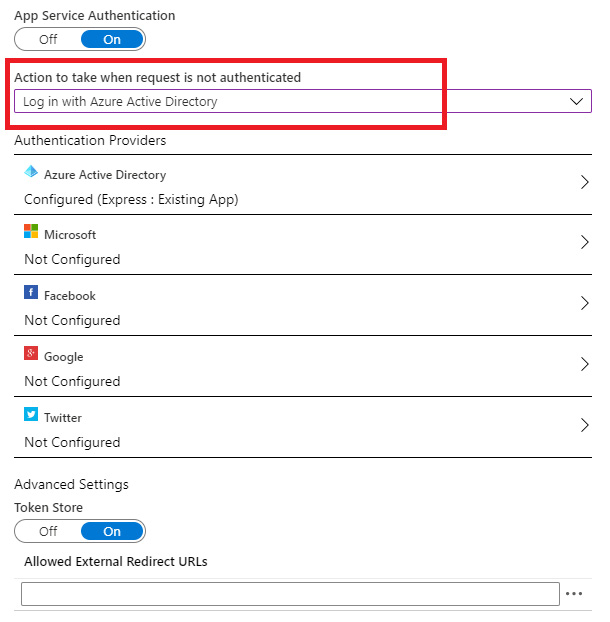
Figure 9.4 – Enforcing Azure AD login
- When accessing the application, the user will be prompted to Sign in with their Azure AD account in order to proceed, as in the following figure:

Figure 9.5 – User is required to sign in in order to access the application
Another set of security features in Azure App Service is Protocol Settings. Here, we can force the application to use only HTTPS, control the minimal TLS version, or if an incoming client certificate is required. We can also configure TLS/SSL bindings to specify the certificate that will be used when responding to a request to a specific hostname. Both public and private certificates can be used:
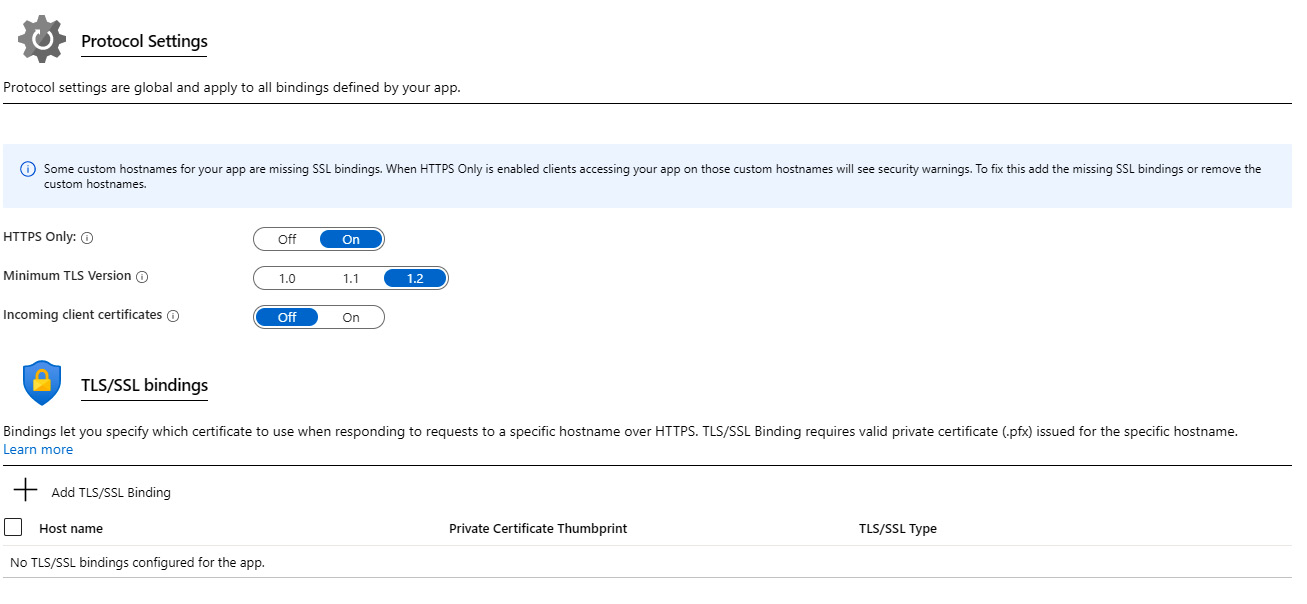
Figure 9.6 – App Service protocol settings
Private certificates can be imported from App Service (to a specific web app), uploaded, imported from Azure Key Vault, or we can create a new App Service Managed Certificate.
Note
App Service Managed Certificate is available to all web apps on App Service, not just on the web app where it's created.
In the following figure, we can see the Private Key Certificate settings:

Figure 9.7 – App Service private key certificate
Public Key Certificate requires a certificate issued by a recognized Certificate Authority (CA). This certificate is usually used by publicly accessible web applications, and serves as proof that the website is trustworthy:
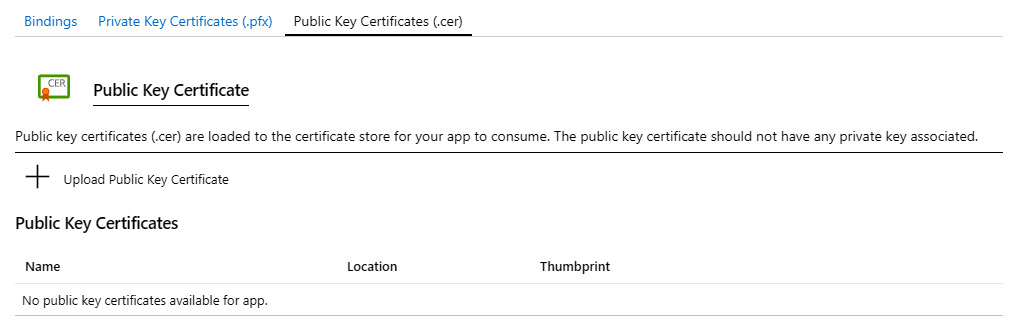
Figure 9.8 – Public key certificate
Under networking settings in App Service, we have multiple options. Most of the options are related to secure connections and the integration of a web app with private networks. This was already mentioned in Chapter 4, Azure Network Security, when we discussed network security. We can achieve this with both VNET integration and hybrid connections. Also, this section includes options to enable services such as Azure Front Door (as the web application firewall for globally distributed applications) and Content Delivery Network (CDN). The last option under network settings is access restrictions. All network settings associated with Azure App Service are shown in the following figure:
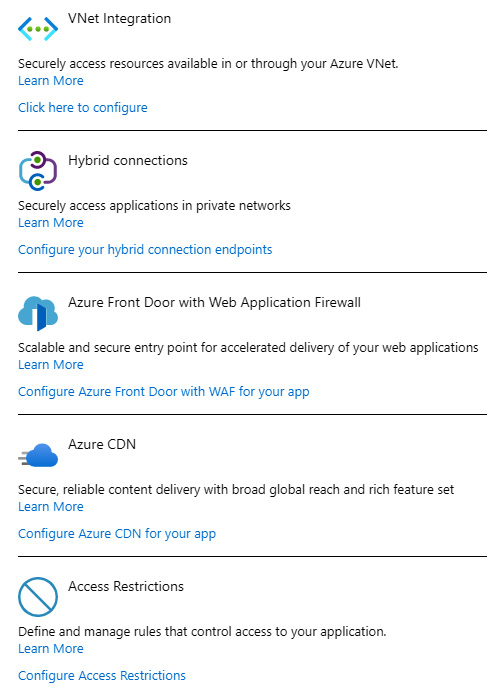
Figure 9.9 – Azure App Service network settings
Access Restrictions is a very useful feature in Azure App Service settings. Using Access Restrictions, we can block access from specific IP addresses or allow access only from whitelisted IP addresses. Essentially, Access Restrictions works very similarly to Network Security Groups (NSGs), by creating rules and assigning priority to them. However, Access Restrictions focuses on public access where NSGs control broader networks with both public and private network rules. In the following figure, we can see an example of creating a block rule:
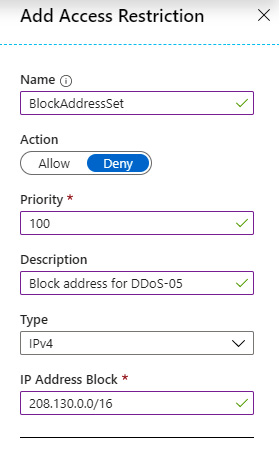
Figure 9.10 – App Service Access restriction
To create a block rule, we need to provide the following information:
- Name
- Action (allow or deny access)
- Priority
- Description
- Type (IPv4 or IPv6)
- IP Address Block
In the preceding example, a rule is created to block access from IP address block 208.130.0.0/16. If anyone tries to access the application from any IP address in the specified IP address range, the request will be blocked and the user will be prevented from reaching the web app.
As we are able to use priorities, we can also approach things differently, and allow access only from whitelisted IP addresses. In this case, we would create a block rule that would prevent anyone from accessing the application and assign Priority 200. Another rule would be created to allow access from a specific IP address range with Priority 100 (this can be any value under 200). Allowing a rule for specified IP addresses would override the rule to block, because of its higher priority. But it would still prevent anyone else from accessing the application.
Another challenge we face with the cloud is secrets management. We need to be careful how secrets, connections strings, and other sensitive information are used and make sure that none of these are exposed. As in many cases we have already discussed in this book, Azure Key Vault comes to the rescue. Similar to passing secrets when using IaC (as discussed in Chapter 5, Azure Key Vault), or managing keys and certificates (discussed in Chapter 6, Data Security), Azure Key Vault can be used to secure any sensitive information needed by Azure App Service. Instead of storing sensitive information in web config files or in App Service Configuration (where information is hidden, but visible if the user has enough permissions), we can use a managed identity that will allow access to Azure Key Vault, where sensitive information is stored in a secure way. An example of identity settings in App Service is shown in the following figure:
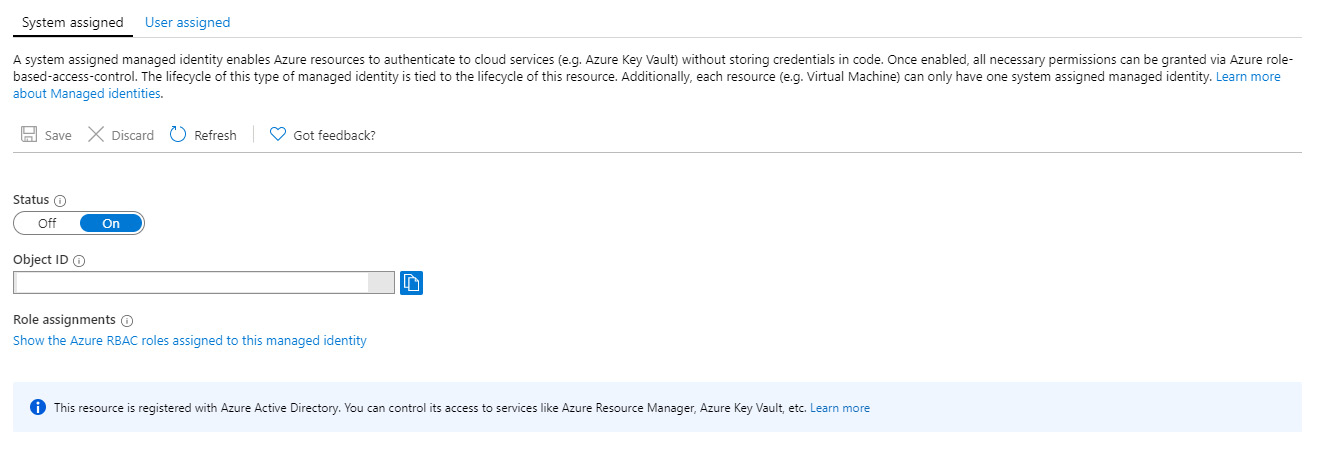
Figure 9.11 – Managed identity in Azure App Service
As we can see, there are two types of managed identity that we can set: System assigned and User assigned. System assigned will generate a managed identity and set up necessary options. In User assigned, we need to create a managed identity ourselves, and create any necessary permissions and settings. If we require using more than one managed identity for a service, we need to use a User assigned managed identity, because a service can have only one system-assigned managed identity.
A System assigned managed identity is tied to a resource life cycle, and once a resource is removed, the managed identity is removed as well. The managed identity is generated in order to be used for that service and is not used by any other service. This is not the case with a User assigned identity, as more resources can use the same managed identity.
Summary
At the very end of this book, we have covered all aspects of Microsoft Azure security. From the shared responsibility model to advanced security features, we have come to an end. It's important to remember that the cloud changes all the time, and more and more services are available that can help us to increase security.
Let's focus on the most important takeaways from this book:
- Keep your identity and secrets secure with all the means available.
- When it comes to access, take two approaches: Just Enough Administration (JEA) and Just-in-Time Administration (JIT Administration).
- Nothing should be exposed to public access if it's not necessary, especially management and security access.
- Data should be encrypted at all times.
- All communication and traffic should be encrypted (over HTTPS) and on a secure (private) network, if possible.
- Azure Security Center and Azure Sentinel can help you with analytics, detection, and recommendations to stay on top of cloud security and keep Azure resources safe.
- Besides services focused on security, all Azure services have security features of their own. Use these features to increase security.
Microsoft Azure changes all the times; new features are added, and existing features are updated almost daily. So, in the future, options might change, but these options are there to present an idea of how to approach cloud security. These seven key points are what we need to focus on; how we complete these tasks is insignificant.
Questions
- What is Log Analytics best practice?
A. Use a single workspace
B. Use regional workspaces
C. Use multiple workspaces for each region and each service
- We can control access to Azure SQL Database with…
A. An access list
B. A firewall
C. Conditional access
- Which type of certificate is supported in Azure App Service?
A. Private
B. Public
C. Wildcard
D. All of the above
E. Only 1 and 2
F. Only 2 and 3
- We can control access to Azure App Service with…
A. Access restriction
B. A firewall
C. Conditional access
- What is used to enable App Service communication with other Azure services?
A. Service Principal
B. Managed identity
C. Azure Key Vault
- Azure App Service supports authentication with…
A. Azure Active Directory (Azure AD)
B. Microsoft account
C. Twitter
D. All of the above
E. Only 1 and 2
F. Only 2 and 3
- Security in Azure can be set up from…
A. Azure Security Center
B. Azure Sentinel
C. Different services and features
D. Azure AD
Further reading
- Hands-On Cloud Administration in Azure by Mustafa Toroman: https://www.packtpub.com/virtualization-and-cloud/hands-cloud-administration-azure.
- Azure Administration Cookbook by Kamil Mrzyglod: https://www.packtpub.com/cloud-networking/azure-administration-cookbook.
- Active Directory Administration Cookbook by Sander Berkouwer: https://www.packtpub.com/virtualization-and-cloud/active-directory-administration-cookbook.
- Azure Networking Cookbook by Mustafa Toroman: https://www.packtpub.com/virtualization-and-cloud/azure-networking-cookbook.
- Hands-On Azure for Developers by Kamil Mrzyglod: https://www.packtpub.com/virtualization-and-cloud/hands-azure-developers.