In this chapter, I'm using SQL Server 2014 Express Edition, which is free to install and includes an optional installation of SQL Server Management Studio (SSMS), the visual tool that allows the user to manage all objects inside the DBMS, but you can also use the 2016 version, which holds identical (an extended) features.
You can find them at https://www.microsoft.com/en-us/download/details.aspx?id=42299, and once they're installed, you'll see a new entry in your system's menu, including several tools related to this product. With SSMS ready, you should download and install some sample databases. I recommend Adventure Works 2014, which includes enough data to go ahead with the majority of typical situations you need to test in everyday programming.
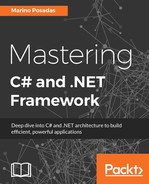
There's a version available at http://msftdbprodsamples.codeplex.com/Releases. Once it's installed, simply open SQL Server Management Studio, and you should end up with an available copy of this database, as shown in the following screenshot:
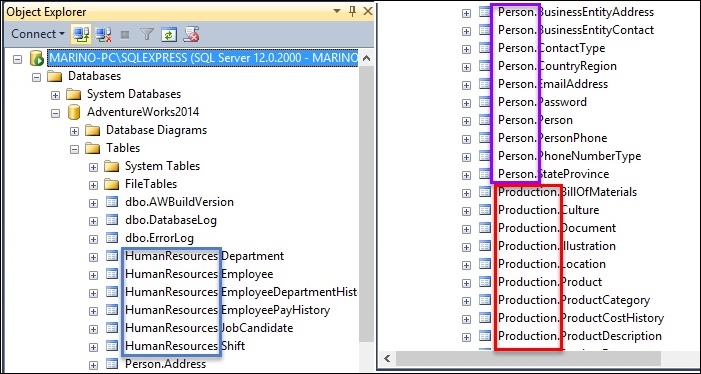
You will find a bunch of tables organized in schemas (prefixes that denote a common area of data management, such as HumanResources, Person, or Production). If you're not new to SQL Server or you already know other DBMSes, you won't find the usual utilities to create and edit queries or other SQL-related commands strange. They are available via contextual menus when selecting any member of the list presented in SQL Server Explorer. Refer to the following screenshot:
All actions required for standard database management are available from SSMS, so we can always check for results, SQL commands, test execution plans, creating and designing existing or new databases, establishing security requirements, and creating any other object that your backend business logic needs, with the ability to test it immediately, as you can infer from the previous screenshot.
Other helpful possibilities are also found in the editors, since—just like happens with Visual Studio—they offer Intellisense on the objects available at any time, editing SQL Server commands, code hints, syntax error suggestions, and much more.
The programmer's experience is also enhanced with advanced debugging capabilities, which enable debugging within SSMS or even from Visual Studio itself, so you are allowed to enable the Remote Debugging options and use breakpoints and all the usual artifacts, as if you were in a C# code debugging session:

Furthermore, you can switch on the Activity Monitor window, which will show you a dashboard with different usage-related statistics for any SQL command launched from the SSMS:

Fortunately, the well-established foundations of the Relational Model converged on the creation of a standard, first published by American National Standards Institute (ANSI) in 1986, and followed by International Organization for Standardization (ISO) in 1987.
Since then, the standard has been revised periodically to enhance the language with new features. Thus, a revision in 2003 included the XML data types and auto generated values (including identity columns), and this XML support was extended in 2006 in order to cover the import/export of XML data and XQuery features.
However, as Wikipedia reminds us:
Despite the existence of such standards, most SQL code is not completely portable among different database systems without adjustments.
At least we have a common background that allows us—via these adjustments—to write portable code that executes in diverse RDBMS.
The version of SQL implemented in SQL Server is named T-SQL (Transact-SQL). As Wikipedia reminds:
T-SQL expands on the SQL standard to include procedural programming, local variables, various support functions for string processing, date processing, mathematics, and so on.
Moreover, you can find changes in the DELETE and UPDATE statements.
With all these additional features Transact-SQL becomes a Turing complete language.
Tip
Note that in computability theory, a system of data-manipulation rules (such as a computer's instruction set, a programming language, or a cellular automaton) is said to be Turing complete or computationally universal if it can be used to simulate any single-taped Turing machine. Most of the widely accepted programming languages today, such as .NET languages, Java, C, among others, are said to be Turing complete. (Wikipedia: https://en.wikipedia.org/wiki/Turing_completeness).
As we said, T-SQL is a very powerful language, allowing variable declarations, flow control, improvements to DELETE and UPDATE statements and TRY/CATCH exception handling, among many others. For a complete reference of the T-SQL language, go to Transact-SQL Reference (Database Engine) at https://msdn.microsoft.com/en-us/library/bb510741.aspx, since the details of this languages deserve a book of its own.
SQL Server is available in different forms for a Visual Studio programmer. First, we have a type of project, named SQL Server Database Project, which you can choose as if it were another common programmable template.
Just select New Project and scroll down to SQL Server. Usually (it might depend on other templates already installed on your machine), you'll find this type of project, and once it's selected, a solution structure will be created.
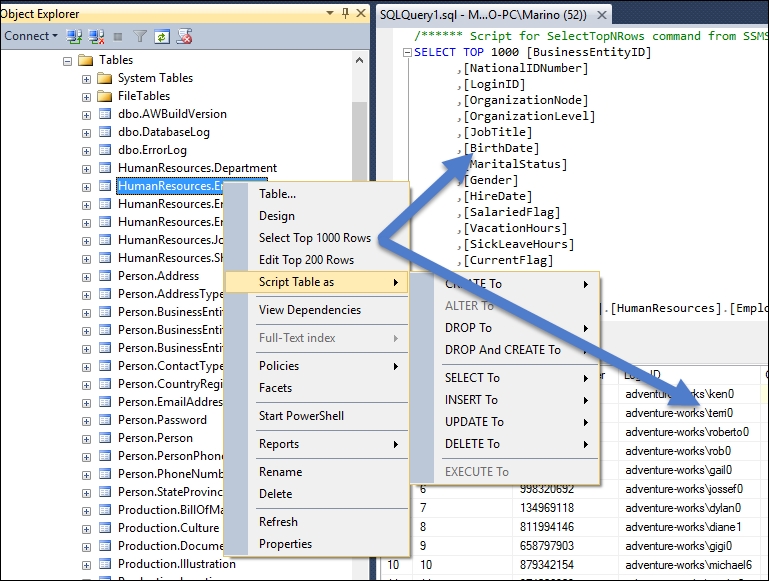
Initially, you will find the Solution Explorer pretty empty, and a look at the Add New menu will show you the large amount of options that this type of project offers for database manipulation (refer to the following screenshot):
As we can see, a large amount of different database objects are available in this manner, including most of the internal objects managed by SQL Server, external files, security aspects, CLR integration, and much more.
The first step would be to select the Tools/Connect to Database option in the menu in order to link our project to our already installed AdventureWorks database. You'll be offered the usual Add Connection dialog box, where you can select a database. At this point, a look at the Server Explorer will allow you to query data and other options.
Note that although Visual Studio doesn't offer as many options as if you were inside SSMS, the most useful selections for data management appear, including data visualization, so we don't have to open SSMS in many usual scenarios of development.
You should find a user interface like the one shown in the next capture, when you open AdventureWorks2014 database in this manner (observe that the most important functionality for programmers is provided):

If you enable Show all files in the Solution Explorer, you'll discover that after compiling the applications, a number of files appear in the bin and obj directories, one of them with the .dacpac extension.
These files allow us a bunch of possibilities, as Jamie Thomson points out in the article Dacpac braindump - What is a dacpac?, available at the official SQL Blog (http://sqlblog.com/blogs/jamie_thomson/archive/2014/01/18/dacpac-braindump.aspx):
In that single file are a collection of definitions of objects that one could find in a SQL Server database such as tables, stored procedures, views plus some instance level objects such as logins too (the complete list of supported objects for SQL Server 2012 can be found at DAC Support For SQL Server Objects and Versions). The fact that a dacpac is a file means you can do anything you could do with any other file, store it, email it, share it on a file server etc… and this means that they are a great way of distributing the definition of many objects (perhaps even an entire database) in a single file. Or, as Microsoft puts it, a self-contained unit of SQL Server database deployment that enables data-tier developers and database administrators to package SQL Server objects into a portable artifact called a DAC package, also known as a DACPAC.
Another interesting feature of these projects can be discovered by navigating to Import | Database in the project's menu. If you choose this, you'll be offered a dialog box in which you can select three different types of data origins: local, network, and Azure.
In our case, if we select the local option, we'll be shown a list of all the database instances available (it will depend on our machine's configuration):

Once you're finished with this option, the process of importing data will take place—it might take some time depending on the size, the network speed (for network connections), or the Internet bandwidth (for Azure connections).
When the process ends, you'll find a whole set of elements in your project, each of them representing the objects available in the database you connected with: tables, schemas, functions, stored procedures, users, logins, and so on.
In other words, you'll have a representation, element by element, of the whole database in your project. A look at the files shows you that their content depends on its nature: for stored procedure, you'll be shown the SQL statements required to create and define it, but for a table, you'll be shown the design editor and other editing options to change it from Visual Studio, as shown in the next screenshot:

Any modification you might make in the design or the definitions of any object in this project will be stored when compiling the project into the .dacpac file and can be easily restored or created in a destination DBMS of your choice.
Note that a .dacpac file is just a ZIP file, so you can add that extension to the file and inspect its contents, expressed in the XML syntax, which are nothing but the contents of the project you have created. They're only packaged in a special manner: they convey the Open Packaging Convention, a standard format created by Microsoft, to rally these files together in a much lighter fashion.
This format is now used by a number of applications inside and outside the Microsoft world: AutoDesk, AutoCad, Siemens PLM, MathWorks, and so on.
So, these types of projects are the perfect complement to a solution that manages databases, and you can include them as part of your deployment process. If you're done with your modifications, you can build the project like you would with any executable.
Once you have your project built, you can publish the results in an existing DBMS. To do this, you'll select the Publish option, and you'll be required to get the initial data from the Publish Configuration dialog box, such as the connection string, database name, and so on.
Also, this publishing configuration can be saved and stored for later use. The three buttons related to profiles allow you to load already existing profiles, creating a profile from the current configuration and saving the profile with a different name.
Other interesting options appear, such as editing the database connection string (for example, to replicate it in a different SQL Server instance), and even more detailed information can be established with the Advanced button:

The Advanced button deserves a look, since every aspect of the final creation in the target will be covered in there. Many of the options relate to the way we want to convert our data in the target DBMS.
Observe that you have three tabs, allowing the configuration of general aspects of the process, and this includes elements you would like to delete (Drop) and that you would like to disregard (Ignore). The next screenshot shows this dialog box:

When everything is fine, the process will start and you'll be able to see the destination of the objects created right from Visual Studio; or, you can open SSMS as usual and inspect the result directly.