
Chapter 5. Working with Virtual Machines
Our two Automate examples so far have been slightly abstract, but in this chapter we’ll work with a real virtual machine. Our script will find and use the Automation Engine object representing the virtual machine, and we’ll call one of the object’s methods. Rather than running our script from Simulation as we have up to now, we’ll customize the WebUI display for our virtual machine and add a new toolbar button to run our script.
Custom Attributes
CloudForms naturally collects a large amount of data about each virtual machine or instance that it manages and displays this in the WebUI. We can examine such attributes as IP address, operating system, CPU count, or disk configuration, for example, but sometimes it is useful to be able to add our own comments or notes to the virtual machine. CloudForms allows us to do this in the form of custom attributes, which have two parts: a name (sometimes called the key) and a text string value (see Figure 5-1).

Figure 5-1. Example custom attributes
Tip
Custom attributes are a useful way to store any related free-text information with an object, particularly a virtual machine. We might store a CMDB configuration item ID, for example, or perhaps some text describing the configuration status. Virtual machine custom attributes are visible in the WebUI and readable from an automation script.
In this example we’ll create an Automate method that adds a custom attribute to a virtual machine. The attribute will be visible to any user who clicks on the virtual machine details in the WebUI.
We’ll launch the Automate instance from a custom button that we’ll add to the toolbar in the virtual machine details web frame, and we’ll include a dialog to prompt for the text to add to the custom attribute.
Creating the Service Dialog
The first thing we must do is create the service dialog to be displayed when our custom button is clicked. Creating a service dialog is a multistage process, involving the addition of tabs, boxes, and dialog elements such as text boxes, radio buttons, or drop-down lists.
Navigate to Automate → Customization, and select Service Dialogs in the accordion. Highlight All Dialogs, then select Configuration → Add a new Dialog (don’t click the Add button yet). See Figure 5-2.

Figure 5-2. Adding a new service dialog
Enter Button for the dialog information label and description, select the Submit and Cancel options, and click + → Add a new Tab to this Dialog (don’t click the Add button yet). See Figure 5-3.
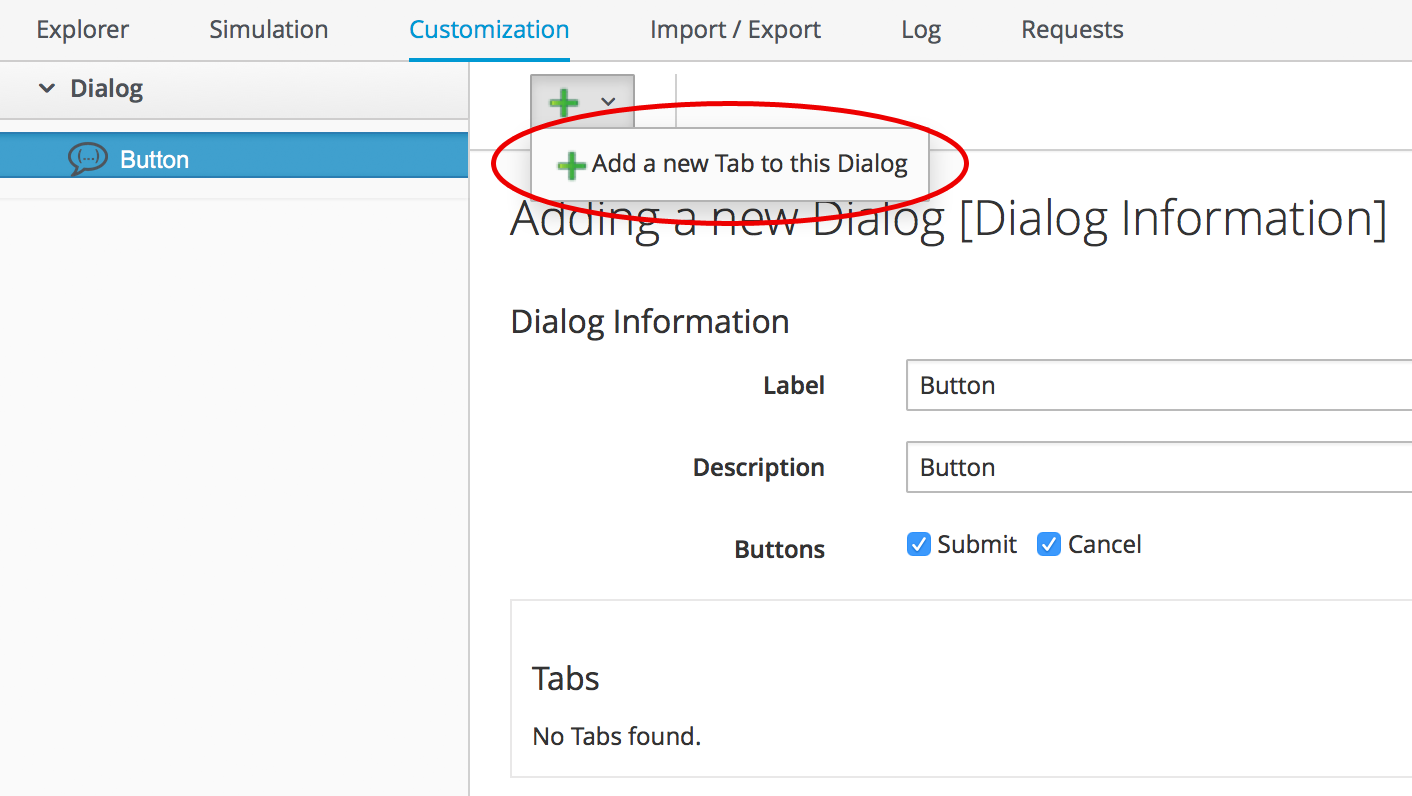
Figure 5-3. Adding a new tab to the dialog
Enter Main for the tab information label and description, and click + → Add a new Box to this Tab (don’t click the Add button yet). Notice how the shape of the dialog dynamically builds in the lefthand accordion pane (see Figure 5-4).

Figure 5-4. Adding a new box to the tab
Enter Custom Attribute for the box information label and description, and click + → Add a new Element to this Box (don’t click the Add button yet). The dialog continues to take shape in the accordion (see Figure 5-5).
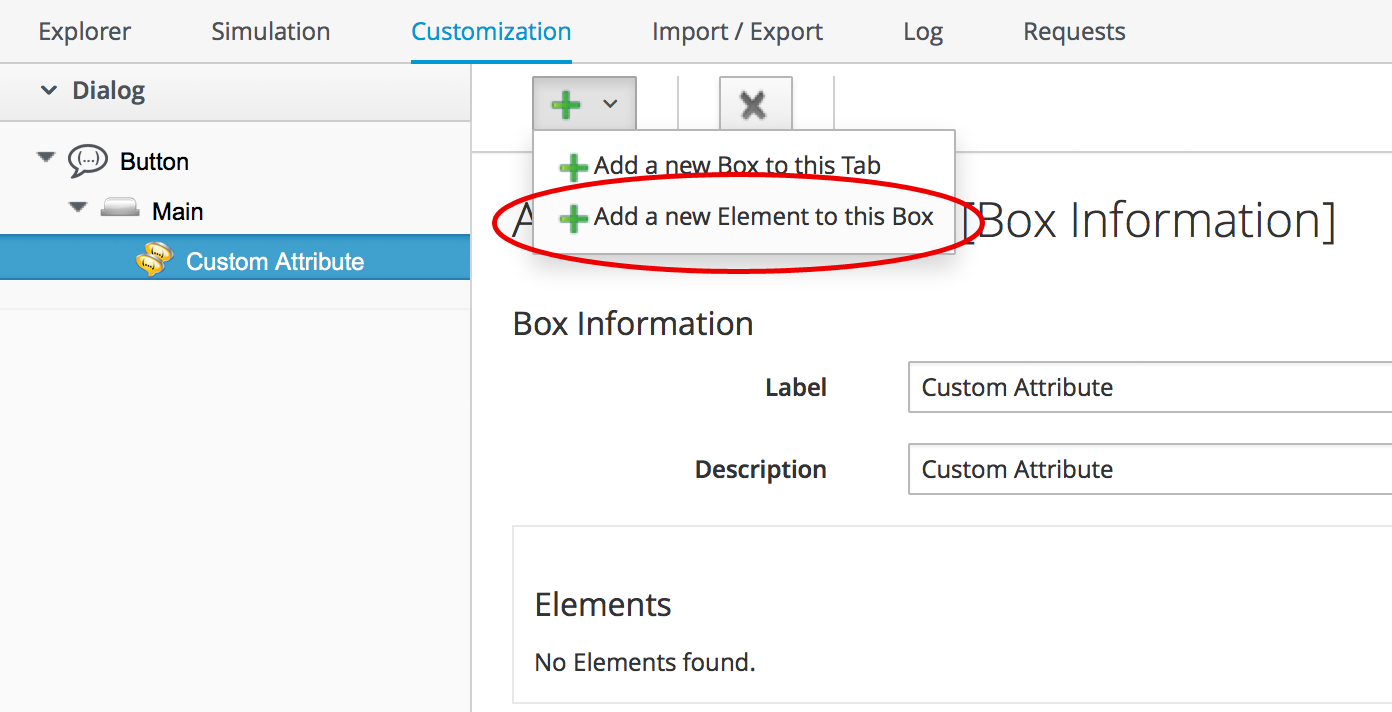
Figure 5-5. Adding a new element to the box
We’ll give the first element the label of Key, the name of key, and a type of Text Box. Leave the other values as the default (don’t click the Add button yet). The Key attribute appears in the accordion as soon as we add the element name (see Figure 5-6).

Figure 5-6. Entering the element information
Click + → Add a new Element to this Box to create a second element. We’ll give the second element the label of Value, the name of value, and a type of Text Box. Leave the other values as the default, and now, finally, click the Add button. The completed dialog is saved and displayed (see Figure 5-7).

Figure 5-7. The completed dialog
Creating the Instance and Method
We create a new instance in our Methods class just as we did before, called AddCustomAttribute. We leave the password, servername, and username schema fields blank but add the value add_custom_attribute in the execute field.
Tip
As we see here, defining attributes in our class schema doesn’t mean that we have to use them in every instance created from the class. We can create generic class schemas that contain a number of attributes that the instances may need to use.
The Code
Values entered into a dialog box are available to our method through $evm.root. The Automation Engine prefixes the dialog element names with dialog_, so the values that we want to read are $evm.root['dialog_key'] and $evm.root['dialog_value'].
Our code for this example will be as follows:
$evm.log(:info,"add_custom_attribute started")## Get the VM object#vm=$evm.root['vm']## Get the dialog values#key=$evm.root['dialog_key']value=$evm.root['dialog_value']## Set the custom attribute#vm.custom_set(key,value)exitMIQ_OK
We create a new method in our Methods class as we did before and call it add_custom_attribute. We paste the code into the Data box, click Validate, and then click Save.
Creating the /System Entry Point
To illustrate an alternative way of calling an instance, we’re going to be creating our own entry point directly in the /System/ namespace, rather than redirecting through Call_Instance as before.1
First we must copy the ManageIQ/System/Request class into our own domain (see Figure 5-8).

Figure 5-8. Copying the /System/Request class
Copy the class into the ACME domain, and ensure that “Copy to same path” is selected.
Now we have to create a new instance of the class (see Figure 5-9).

Figure 5-9. Adding a new instance to the copied /System/Request class
For the new instance, enter the name AddCustomAttribute, and then enter /General/Methods/AddCustomAttribute into the rel1 field (see Figure 5-10).

Figure 5-10. Setting the new instance name and rel1 field
Running Automation Scripts from a Button
CloudForms allows us to extend the WebUI functionality by adding our own custom buttons to selected object types in the user interface. Rather than using the Simulation feature of Automate as we did before, though, we’re going to be launching this automation script from a custom button that we’ll add to the virtual machine display object.
Creating the Button Group
Buttons are always displayed from a Button Group drop-down list, so first we must create a new button group.
Navigate to Automate → Customization, and select Buttons in the accordion. Now highlight Object Types → VM and Instance, then select Configuration → Add a new Button Group (see Figure 5-11).

Figure 5-11. Adding a new button group
Set the Button Group Text and Button Group Hover Text to be VM Operations. Select a suitable Button Group Image from the available drop-down list, and click the Add button to create the button group.
Creating the Button
Now that we have our button group, we can add a button to it to call our script.
Highlight the new VM Operations button group in the accordion, and select Configuration → Add a new Button (see Figure 5-12).

Figure 5-12. Adding a new button to the button group
Set the Button Text and Button Hover Text to Add Custom Attribute. Select a suitable Button Image from the available drop-down list, and pick our new Button dialog from the Dialog drop-down list. In the Object Details section we’ll select the new /System/Request instance that we created called AddCustomAttribute (see Figure 5-13).

Figure 5-13. Completing the button details
Running the Instance
If we navigate to a virtual machine in the WebUI and examine its details, we should see our new VM Operations button group displayed in the toolbar. If we click the Button Group icon, we should see the button displayed as a drop-down (see Figure 5-14).

Figure 5-14. The new button group and button added to the toolbar
If we click on the Add Custom Attribute button, we should be presented with our dialog (see Figure 5-15).

Figure 5-15. Completing the service dialog
Enter some text, click Submit, and wait a few seconds. We should see the new custom attribute displayed at the botton of the VM details pane (see Figure 5-16).

Figure 5-16. The newly added custom attribute
Summary
In this chapter we’ve learned several new useful skills. In our automation script we’ve seen how to work with the Automation Engine object representing a virtual machine. We’ve extended the WebUI functionality by creating a custom button, and we’ve added a service dialog to prompt our user for input. To top it off we’ve discovered the utility of custom attributes. Good work!
This has been a useful introduction to “real world” automation. Adding a custom button in this way to run a short automation script is fairly common in production environments. We would typically use a custom button to start a virtual machine backup, add a disk, reconfigure the number of CPUs, or extend memory, for example.
We can add buttons to the WebUI display toolbars for clusters, datastores, hosts, and providers, but we most frequently add them to virtual machines as we have in this chapter, and to services (which we cover in Part III).
Further Reading
1 Most automation operations enter the Automate Datastore at /System/Request. Call_Instance is already there as a “convenience” instance that we can call with arguments to redirect straight to our own instance, which is why we’ve used that up to now. There are occasions, however, when we need to create our own entry point directly in /System/Request, so this example illustrates how we do that.