
We have installed KONG in Docker, now let's use the KONG API and configure your REST API that we are going to expose to consumers. Perform the following steps:
- Configure a service in Kong. After installing and starting Kong, use the Admin API on port 8001 to add a new service. Services represent your upstream servers exposing APIs/microservices; let's see the following command:
$ curl -i -X POST --url http://192.168.99.100:8001/services/ --data 'name=account' --data 'url=http://192.168.99.100:8181/account/'
Let's see this command on the console as following screenshot:

The preceding screenshot rendered the response to the preceding command. Let's see the following output in the browser, at http://192.168.99.100:8001/services:

- Add a route to expose the service. Once you have a service, expose it to the clients by adding one (or many) routes for it. Routes control how client requests are matched and proxied to services; let's see the following command:
curl -i -X POST --url http://192.168.99.100:8001/services/account/routes/ --data 'host=dineshonjava.com'

We have run the preceding command to add a route to expose the service.
After adding a proxy route, let's see this setting in the browser by accessing http://192.168.99.100:8001/services/account/routes/:

The preceding screenshot has information about the added service to KONG.
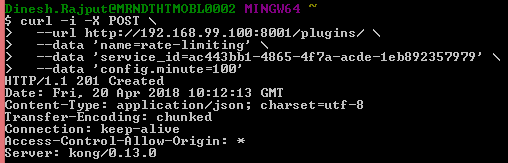
- Configure plugins. Add extra functionality by using KONG plugins. You can also create your own plugins. Let's see the following command:
curl -i -X POST --url http://192.168.99.100:8001/plugins/ --data 'name=rate-limiting' --data 'service_id=ac443bb1-4865-4f7a-acde-1eb892357979' --data 'config.minute=100'
We used service_id as we have generated in the first step of usage of KONG. Let's see the following screenshot:
You can check the settings of the rate-limiting plugin after this command by accessing http://192.168.99.100:8001/plugins/ on the browser:

Rate limiting has been enabled for the API with the service_id: ac443bb1-4865-4f7a-acde-1eb892357979.
- Proxy a request. Clients can now consume your upstream API/microservice through KONG's proxy server, running on port 8000 by default. Let's see the following command:
curl -i -X GET --url http://192.168.99.100:8000/ --header 'Host: dineshonjava.com'
Let's see the following screenshot for this command with a response:

It returns an account service response using the KONG proxy route. Similarly, you can use multiple plugins on the KONG API for this account service; let's add another key authentication plugin, as follows:
curl -i -X POST --url http://192.168.99.100:8001/plugins/ --data 'name=key-auth' --data 'service_id=ac443bb1-4865-4f7a-acde-1eb892357979'
In the following screenshot, we have created authentication key to use for the service:

Now, the key-auth plugin has been added to the KONG API; you can check it in your browser at http://192.168.99.100:8001/plugins/:

Now, let's access the service again using the KONG proxy, it prevents to call service because of authentication key:

Note that we now get a 401 response: HTTP/1.1 401 Unauthorized.
- Adding consumers. Let's add a consumer; in order to use the API now, we will need to create a consumer and add a key:
curl -X POST http://192.168.99.100:8001/consumers --data "username=dineshonjava" --data "custom_id=1234"
Let's see the following screenshot for adding service consumer:
You can check added consumers to this service in the browser by accessing the http://192.168.99.100:8001/consumers URL:

I have added one consumer with the dineshonjava username and its custom ID as 1234. After adding a consumer, let's create an authentication key for this consumer. Let's use service with key-auth:
$ curl -X POST http://192.168.99.100:8001/consumers/dineshonjava/key-auth --data ""
Let's check the authentication key by using http://192.168.99.100:8001/consumers/dineshonjava/key-auth:

The plugin auto-generated a key for us. The value of key will be used in order to call the API. You can pass this key in the body of the request.
Let's access this API again and make sure this consumer is now able to access this API using their API key generated from the preceding screenshot code. We need to pass in a new apikey header with the key, as follows:
curl -i -X GET --url http://192.168.99.100:8000/ --header 'Host: dineshonjava.com' --header 'apikey: yyBFOR5LDfaAb4ksT9IqfHWwLOpVYbtG'
Let's see the following screen shot where we have used apikey to access the secure API:

Now the consumer is able to access the restricted API by using the API key as an authentication Key. So, we have seen that KONG is a great framework for API Management. It provides a lot of extensible functionality for your REST APIs by putting your services behind Kong and adding powerful functionality through Kong plugins, all in one command. Look at the following diagram:

KONG is placed on the bottom to provide API Management functionalities to your REST APIs. Let's see the important features of the KONG API in the next section.