
In the previous chapter, we had a quick look at how a CRM system (Zoho CRM, here) can be, and frankly, should be at the core of your business. We also learned about the very basics of how to understand and map your business processes.
By mapping your processes accurately, you will have a clear idea of how the day-to-day operations of your business improve or impede productivity and efficiency throughout your business. You can then begin to improve them.
Additionally, for our purpose, which is to set up a solid CRM system from ground up, these process maps will help replicate the exact processes in the CRM.
For example, the specific way your sales funnel (pipeline) is designed needs to be reflected in the CRM. These include actions taken by the salespeople from start to finish, the documents created and submitted in the process, approvals, notifications, emails, and workflows.
Imagine a world in which you have eliminated unnecessary paper trails and automated trivial tasks, such as submitting documents for approval. A lot of these inefficient processes can be replicated and automated in the CRM. Just don’t expect CRM to do everything for you. You may still need HR systems, inventory systems, and project management tools; however, CRM will take care of the heart of your business, that is, sales, and communicate with other tools and systems improving productivity even more.
With all the preparation and appreciation of the philosophy of CRM under our belt, you are now ready to start working on Zoho CRM and learn how to build exactly what your business needs.
Getting Started
To start with Zoho CRM, open your favorite browser (Chrome, Safari, Firefox, Edge, etc.) and log onto https://crm.zoho.com/ .
I will assume that this is your first time here, so before we do anything else, we will need to create an account. This account is a universal Zoho account and you can use it to access other Zoho services, such as Mail, Campaigns, Books, etc.
To create a new Zoho account , follow these steps:
On the homepage (Figure 3-1), type in your name, email, and a strong password.

Figure 3-1. Zoho CRM homepage
Note Building strong passwords for all your accounts, especially accounts in which you keep confidential business information, is paramount. You can use tools, such as Keychain Access for Mac OS, lastPass,1 or Zoho Vault2 to create and manage strong passwords for your accounts.
Click on the Create Account button to initiate the sign-up process. Within moments, you will receive a confirmation email from Zoho asking you to confirm your email address.
Click Confirm your account button in the email. Upon successful confirmation, you will be redirected to the login page.
In the login page, enter your email address and the password you chose in step 1 and then click Login.
In the next page, you will be asked to enable Two Factor Authentication (TFA) (Figure 3-2). I strongly suggest you enable this feature as it will dramatically improve the security level of your account against possible attacks (hacking, etc.). Click Set up to Protect Now and follow the onscreen instructions to enable TFA. If you want to do this later, you can click the link below the button that reads Skip Two Factor Authentication.

Figure 3-2. Enabling Two Factor Authentication
What is Two Factor Authentication? Two Factor Authentication adds an extra layer of security to your account. Once enabled, Sign-In will require you to enter a unique verification code generated by an app on your mobile device or sent via text message, in addition to your username and password.
If you opted not to enable this feature during the first setup, you can always enable it at https://accounts.zoho.com/u/h#security/authentication .
In the next page, you will be asked to update your company information. Enter relevant information for the following (Figure 3-3):
Company Name
Phone Number
Mobile Number
Time Zone (of your headquarters)
Language
Currency Locale

Figure 3-3. Updating company information
Click Save to continue. You will be redirected to the CRM homepage (Figure 3-4).

Figure 3-4. Zoho CRM homepage after first login
Quick Tour of the Homepage
On the homepage (Figure 3-4), you’ll be greeted by six big buttons, each helping you get started with the CRM. We will skip these fancy buttons.
On top of the page, there is a menu bar with items such as Home, Feeds, Leads, etc. Each one of these menus items loads a CRM module (more on this later).
On the right-hand side of the menu bar, there are six buttons that allow you to access other features of the CRM, such as set up, messages, and calendar.
Below the menu bar, there is a contextual bar with a welcome message on the left side and three items on the right to switch between different views of the homepage:
Getting Started (the current view,)
Customized View, and
Classic View.
Go ahead and switch between them. There is not much to see now, but after data is entered into CRM and with some cusomiztion, you can view the current state of your business right in your homepage.
Right next to the welcome message is a message in red warning you that you have 14 days until your Enterprise trial expires. By default, all new Zoho CRM accounts come for a limited time with all the features enabled for users to test all aspects of CRM and then choose the edition they need. You can ignore this for now.
Reminder
Zoho CRM comes in four different editions: Free, Standard, Professional, and Enterprise Edition.
Each one of these editions comes with a different set of features and capabilities with the Free edition being the most basic and the Enterprise edition the most advanced one in the mix. As a courtesy (and a way of trying all the features), Zoho gives new users a 14-day trial of the Enterprise edition. After this period your account will revert to the Free edition. The Free edition is quite capable for small operations; however, you may need one of the paid editions as per your business requirements.
Learn more about all the features available to different editions of CRM here: https://www.zoho.com/crm/help/erutaef321.html .
CRM Terminology
The key to effectively managing the sales processes of your organization is to know exactly in what stage of the pipeline (or sales funnel) a potential customer or a deal is. CRM manages the entire pipeline in a central location, automates many mundane processes, and improves the productivity and efficiency of the sales force.
In a typical (sales-focused) business environment, terms such as lead, prospect, customer, opportunity, validation, account etc. is commonplace. Naturally, CRM systems adopt such terms in their terminology and Zoho CRM is no exception.
Below are four of the key terms used in Zoho CRM:
Lead – A lead is an unqualified contact or sales opportunity. For example, the business cards collected in an exhibition, or a cold referral received from a partner is a lead. Leads enter the sales pipeline from early stages and need to be qualified (validated) via follow-ups and other methods.
Contact – Once a lead is qualified it gets converted in the CRM. One output of this conversion is a Contact who is a person with whom you interact during a sales process. For example, suppose you are trying to sell raw material to a company overseas. You have found and contacted the procurement manager who happens to be interested in listening to your offer. This person become a contact.
Deal – When you qualify (convert) a lead, it generates asecond output, which is the potential deal between you and your client. This is called a Deal and goes through various stages in the pipeline.
Account – Finally, the last outcome of converting a lead is an Account, which is a company or a department within a company that you do business with. Each account can have one more Contacts assigned to it.
Note
You can create contacts, deals, or accounts directly without taking them through the lead conversion process. This is particularly useful when you work with exitisng contact, deals, or accounts and just want to import them as they are into the CRM.
There is more to CRM terminologies. We will learn about teach one as we use them in the upcoming chapters. For a list of all terminologies, refer to Zoho Help: https://www.zoho.com/crm/help/understanding-zohocrm.html#Terminologies
CRM Modules
Zoho CRM categorizes data into logical groups based on their type of content. These groups are called modules and each come with a set of unique features relevant to the information they manage.
Here is the complete list of standard Zoho CRM modules grouped by their type of operation:
Sales Force Automation
Leads
Accounts
Contacts
Deals (or Opportunities, formerly known as Potentials)
Forecasts
Marketing Automation
Campaigns
Customer Support
Cases
Solutions
Inventory Management
Products
Vendors
Sales Quotes
Purchase Orders
Sales Orders
Invoices
Price Books
Data Analytics
Reports
Dashboards
Activities
Tasks
Events
Call Logs
The name of each module is quite self-explanatory and each represents a common business process used by majority of the organizations. We will be using most of these modules in various contexts and learn more about inner workings of each one as we go forward.
These modules work together seamlessly addressing almost all requiremnts of a typical business operation. That said, you can customize them as per your business requirements and make them work better for you.
On the other hand, if you have a drastically different set of requirements, you have the option to create custom modules. For example, for a real estate company, you can customize the Products module to maintin your listings, or create a Listings module from scratch and use Products for other purposes.
Setting Up Zoho CRM
CRM has a powerful Setup page in which you can customize its many features. We will be visiting the Setup page often, but for now we simply need to modify some general settings, namely:
Personal Settings
Company Details
Users
Email Settings
Follow these steps to configure the general settings:
On the top right of the page, in the menu bar, click on the tools button and select Setup in the context menu (Figure 3-5). Setup page opens (Figure 3-6).

Figure 3-5. Tools context menu

Figure 3-6. CRM Setup page
In the Setup page, under GENERAL group, click Personal Settings. Personal settings page opens.
Click on the small pen icon next to each field and edit the values (Figure 3-7).

Figure 3-7. Personal Settings page
Next, click on Company Details on the left sidebar. Company Detail will open (Figure 3-8).

Figure 3-8. Company Details page
Click the Upload Your Logo link under the logo placeholder.
In the Upload Your Logo dialog box, click the Browse Local Files button and select your logo image (Figure 3-9).

Figure 3-9. Uploading company logo
Click the pen icon next to company name. The Company Details dialog box will open.
In the Company Details box, enter your company information and click Save when you are done (Figure 3-10).

Figure 3-10. Editing company details
On top of the Company Details page, click the Fiscal Year tab.
In the Fiscal Year tab, change the month in Fiscal year begins drop-down, if January (default value) is not the start of the fiscal year for your organization and click Save to apply the change (Figure 3-11).

Figure 3-11. Setting fiscal year
Next, select the Business Hours tab (Figure 3-12). Here you can set various business hours for different operations based on different time zones. For instance, if your tech support team is available 24/7, but your head office works only Monday-Friday from 9a.m.-6p.m. PST, you will need to create two different sets of business hours.

Figure 3-12. Creating business hours
In the Business Hours page, click the Create New Business Hour button. Business Hours Detail page opens.
Enter a meaningful Name and the applicable Time Zone. Then set the operational hours for each applicable day and leave the unoperational hours unchanged (01:00 AM) (Figure 3-13). Finish by clicking Save.

Figure 3-13. Creating business hours
User Management
You should create new users for every employee who will use the CRM. Sharing accounts is usually not a good idea due to security and accountability reasons. There are cases when you might want more than one person to access the same account, such as the administrator account, but for salespeople it is always a good idea to assign one account per person.
In CRM, you can define as many users as you like, and the Free edition allows a maximum of 10 users to be created. ten free users are often plenty, because if you have 10 or more employees, you should be investing in one of the paid editions and utilizing more advanced features not available in the Free edition.
Although you may not actually need to add new users to CRM at this stage while you are still learning, it is still a good idea to add one or two of your colleagues to test the features of the CRM together.
Follow these steps to add a new user to CRM:
If you are continuing from the previous section, click Users and Controls and then Users on the sidebar; otherwise, open the Setup page and click on Users under USERS AND CONTROL. A list of users will be displayed (Figure 3-14).

Figure 3-14. Users settings page
Click the Add New User button on top of the list. Add New User dialog box will open (Figure 3-15).

Figure 3-15. Adding a new user
Enter First Name, Last Name, and Email for the new user.
Next, click on the Roles button next to the Role field. Roles List dialog box will open (Figure 3-16).

Figure 3-16. Roles List dialog box
In Roles List box, click on Manager. Manager role will be assigned to the new user.
Select Standard from the Profile drop-down list and click Save to add the new user.
At this point the new user will be added to the list of users. CRM wil send an invitation email to the new user, which must be accepted before the user can access your CRM.
Note
Zoho CRM offers versatile user profile and role management to give you complete freedom and flexibility to define reporting rules, as well as to limit users to access the information they don’t need, or are not allowed to access. We will learn about these advanced features later in this book.
Email Settings
Despite all the efforts and newer technologies and modern takes on messaging, such as Slack,3 a majority of business communications still happens via Email. This 50-year-old technology, with all its shortcomings, doesn’t seem to be going anywhere anytime soon, so it is smart to at least use it in a more productive way.
Zoho CRM has a solution for this dilemma. It is called SalesInbox and it allows you to incorpate your email account into CRM for better sales and client management. Instead of going back and forth between your inbox and CRM, you can access all relevant information from one place and improve your efficieny dramatically.
To enable this feature, you need to first integrate your email account with CRM. You can integrate all common email services; however, in this example, we will be connecting a Gmail account to CRM. Connecting other services should be fairly similar and even less complex.
To integrate Gmail with CRM, follow these steps:
If you are continuing from the previous section, click Emails Settings on the sidebar; otherwise, open the Setup page and click on Email Settings under GENERAL. A list of popular email services will be shown (Figure 3-17).

Figure 3-17. Email settings
Click on Gmail button to continue.
In the next page enter your full name, Gmail address, and Gmail password (Figure 3-18). Click Continue to proceed.
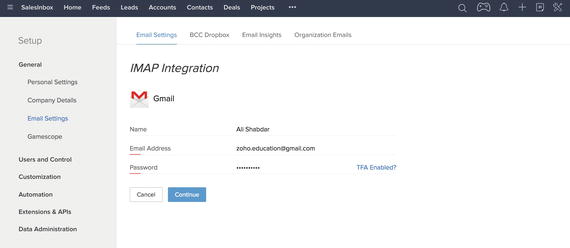
Figure 3-18. Setting up a Gmail account
The page will expand asking for email sharing permissions (Figure 3-19). Leave the default selection, Private – Only Me, as is and click Continue.

Figure 3-19. Setting up a Gmail account, step 2
At this stage, the integration wizard may get stuck, even showing you an error message. This is due to Gmail security measures that stops third-party apps and services from connecting to Gmail in the background. You will receive a warning email from Gmail telling you about the incident (Figure 3-20). Since we know this is caused by Zoho CRM attempting to connect to Gmail, we can ignore the warning. To proceed click on the link in the email reading “allowing access to less secure apps.”

Figure 3-20. Gmail notification email
You will be redirected to the account page of Google where you can allow what Google calls “less secure apps” to access Gmail (Figure 3-21). Go ahead and select Turn on.
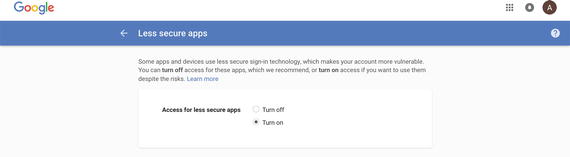
Figure 3-21. Enabling less secure apps for Gmail
Then log into Gmail and open Settings (Figure 3-22).

Figure 3-22. Enabling IMAP for Gmail
In Gmail Settings page, select Enable IMAP and click Save Changes.
Now go back to CRM and click Proceed button again. You may need to reenter your Gmail password from before. Upon successful connection a message will indicate that the sync is in progress (Figure 3-23). You can leave this page now. You will receive an email after a successful sync between Gmail and CRM.

Figure 3-23. Finishing email setup
Note
Inetgrating emails with CRM could prove tricky, especially with email services changing their settings often. Refer to Zoho help at https://www.zoho.com/crm/help/email/configure-imap-account.html for a complete email configuration guide.
Enabling SalesInbox
One last step is to enable SalesInbox, so you can start doing actual work and converting leads into paying customers.
Follow these steps to enable SalesInbox:
Click SalesInbox on the main menu bar. SalesInbox page opens waiting to be enabled (Figure 3-24).

Figure 3-24. SalesInbox page loading for the first time
Click the TRY NOW button. A dialog box will appear asking you if you would like to import the existing email filters in your email account (Figure 3-25).

Figure 3-25. Importing email filters
Click Skip for now. You can import filters (if you have any) later from the SalesInbox settings page. A moment later the SalesInbox page will refresh, showing your emails in a familiar inbox interface, only with more features for CRM (Figure 3-26).

Figure 3-26. SalesInbox page populated with emails
Click on of the emails to see more details about a specific email. All essential features, such as Reply and Forward, are available for you to manage your emails from within CRM (Figure 3-27).

Figure 3-27. Familiar interface , familiar features
There are, however, two curious buttons on the top right of the screen: LEAD and CONTACT. These buttons let you add the sender of the email directly to the CRM process. After that point all interactions between you and the lead (or contact) will be logged and managed in the CRM. Pretty awesome!
Our work is done here. We will use these buttons and other features of SalesInbox in the upcoming chapters.
Summary
In this chapter, you created your very first Zoho CRM and made some essential confirgurations to make it ready for the next steps.
In the next chapter, we will start using SalesInbox, modules and other features of CRM to manage our sales funnel.