03 Photo Shooting Menu

Jolene at the Skyhoundz Qualifier © 2016 Eric Bowles (ericbowles)
The Photo Shooting Menu settings are some of the most-used functions in the camera. Spend time carefully learning about each of these selections because you will use them often. They affect how your camera takes pictures in all sorts of ways.
Here is a list and overview of the 26 items found on the D500 Photo Shooting Menu. Each of these items can be configured in a different way by using one of the four available Photo shooting menu banks. Each bank contains its own separate camera configuration.
- Photo shooting menu bank: Allows configuration of the camera in four separate ways so that it can act like four different cameras as you change banks (A, B, C, and D).
- Extended photo menu banks: You can save not only the internal camera Photo Shooting Menu function configurations but also the exposure mode and shutter speed (when you use S and M exposure modes) and the exposure mode and aperture (when you use A and M exposure modes). Later, when you select a Photo shooting menu bank, the exposure mode and the aperture or shutter speed setting will be recalled along with that bank’s previous configuration.
- Storage folder: Selects the folder (e.g., 100ND500) into which subsequent images will be stored on the camera’s memory card(s).
- File naming: Lets you change three characters of the image’s file name so that it is personalized.
- Primary slot selection: You can select either the XQD or SD memory card slot to be the primary slot that receives images.
- Secondary slot function: Allows you to select either the XQD or SD memory card slot to be the secondary slot that receives image overflow or copies.
- Flash control: Provides a means for your D500 to control wireless flash units (e.g., SB-5000, SB-500), either by optical or radio control.
- Choose Image area: Allows you to choose either the DX (24 × 16) or 1.3x (18 × 12) Image area mode.
- Image quality: You can select from 14 image quality types, such as JPEG fine, NEF (RAW), or TIFF. The camera adds a star symbol next to certain JPEG quality types to signify that it will use high-image-quality priority, which will vary JPEG image size according to complexity (higher complexity = larger size). If there is no star, the camera will use file-size priority, which will compress complex images more than simple images, to provide a similar file size.
- Image size: Allows you to choose whether to shoot Large, Medium, or Small images in both NEF (RAW) and JPEG formats. Yes, the Nikon D500 has three NEF (RAW) image sizes (RAW L, RAW M, and RAW S) along with three JPEG sizes (L, M, and S).
- NEF (RAW) recording: Allows you to choose the image compression type and bit depth for NEF (RAW) files, including RAW L (Large), RAW M (Medium), and RAW S (Small). You can select Lossless compressed, Compressed, or Uncompressed for the RAW compression type and 12-bit or 14-bit for the bit depth (page 114) of each image.
- ISO sensitivity settings: Allows you to manually set the ISO sensitivity between ISO 50 (Lo 1) and ISO 1,640,000 (Hi 5), for normal exposures or flash (separate controls), or let the camera decide for you automatically with Auto ISO sensitivity control. It also lets you control the Minimum shutter speed the camera will normally use with Auto ISO sensitivity control.
- White balance: You can choose from nine different White balance (WB) types, including the ability to measure the ambient light’s color balance (PRE).
- Set Picture Control: You can choose from seven Picture Controls that modify how the pictures look for JPEG images.
- Manage Picture Control: Lets you save, load, rename, or delete custom Picture Controls from your camera’s internal memory or card slots.
- Color space: Your camera can use either the commercial printing standard Adobe RGB or the Internet use and home printing standard sRGB color space.
- Active D-Lighting: Allows you to select from five levels of automatic contrast correction for your images. The camera itself will protect your images from a degree of under- or overexposure.
- Long exposure NR: Uses the “dark-frame subtraction” method to significantly reduce noise (bright spots and fog) in long exposures. A very powerful and useful function if you make long exposures because it is not as damaging to the image as blurring noise reduction.
- High ISO NR: Gives you three levels of a blurring and resharpening method to remove noise from images shot with high ISO sensitivity values.
- Vignette control: This function allows you to automatically remove various amounts of the corner darkness resulting from using certain lenses at maximum aperture. Provides for three levels of vignette control when using a lens of the G, E, or D types. Excludes PC lenses.
- Auto distortion control: With a G, E, or D type lens, the camera can automatically reduce barrel distortion when using a wide-angle lens and pincushion distortion when using a telephoto lens.
- Flicker reduction: Allows the camera to reduce the effects of flicker under fluorescent and mercury vapor lighting. While in use the Viewfinder will display a FLICKER icon.
- Auto bracketing set: Allows you to choose one of five different types of bracketing to use when you are using Auto bracketing (page 163).
- Multiple exposure: Allows you to take more than one exposure in a single frame and then combine the exposures in interesting ways.
- HDR (high dynamic range): You can create a two-exposure HDR image. The camera will automatically combine them. Use for JPEG or TIFF images only.
- Interval timer shooting: You can put your camera on a tripod and set it to make one to several exposures at customizable time intervals.
Now, let’s consider each of these 26 Photo Shooting Menu functions in more detail.
Photo Shooting Menu Bank
(User’s Manual: Page 283, Menu Guide: 34)
The Photo shooting menu banks are unique to professional-level cameras. Most Nikons have a Photo Shooting Menu, but only the best have multiple Photo shooting menu banks. Using the four banks, your D500 can change from a pro camera to a point-and-shoot, and anything in between, with just a few button presses. Let me give you a couple of examples of what I mean.
It can shoot RAW files using ISO 100 in Adobe RGB Color space with the Fn1 button assigned to Spot metering for serious professional shooting, and very quickly change to Normal quality JPEGs at ISO 400 in sRGB Color space with high image sharpening for that party where you don’t want to think about anything but having a good time. These are only two variations of the many available combinations of bank settings you can design.
The D500 has not only four Photo shooting menu banks, but also four Custom settings banks (covered in the next chapter). No direct relationships exist between the Photo shooting menu banks and the Custom settings banks, although you could create one by naming them in a similar way and configuring them for similar purposes.
You can easily configure the functionality of each bank with different settings, name them accordingly, and use them to quickly change the way your camera behaves. Multiple cameras in one!
There are four default bank names: A, B, C, and D. You can add your own labels to any of these. In this chapter, we’ll assume that your camera banks have not yet been adjusted and that you are not entirely familiar with the process. Let’s learn how to label bank A with a more useful name and set its individual features. When you’ve done this once, you’ll be ready to set up your camera for special uses and switch between banks quickly.
We will fully configure only a single bank in this chapter (bank A). Just repeat the same process for each bank, with different settings.
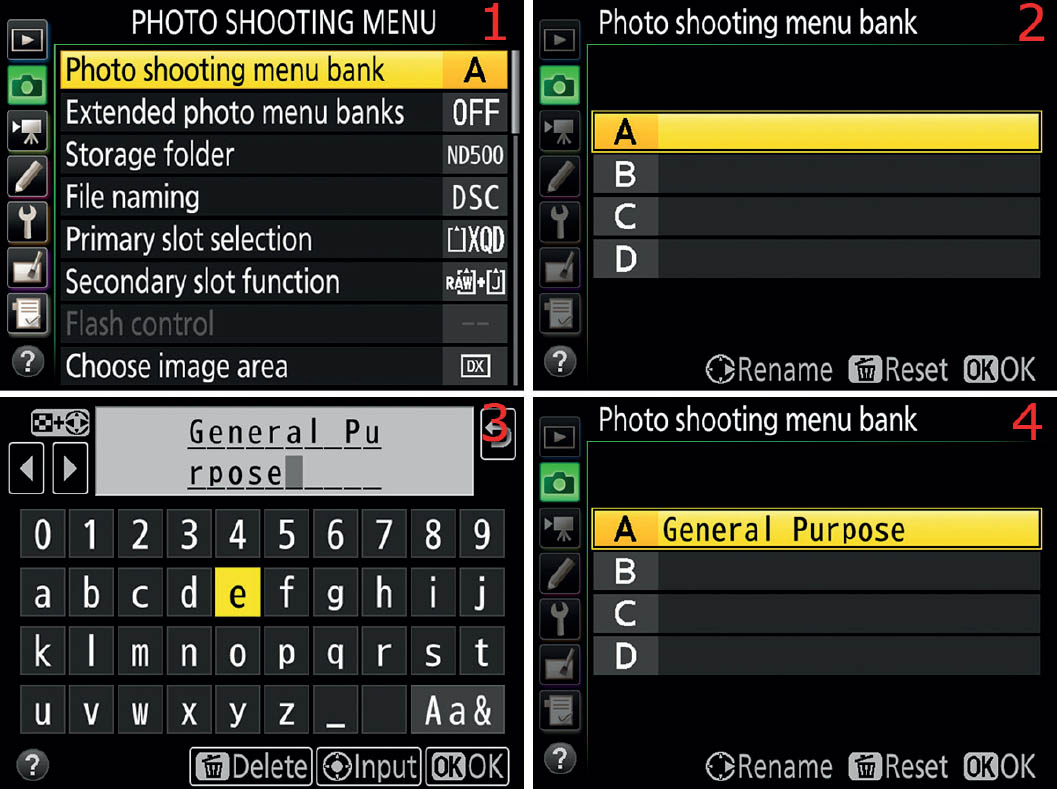
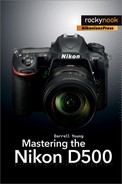
Figure 3.1A – Selecting and changing a Photo shooting menu bank
Following are the steps to create a label for Photo shooting menu bank A. Repeat the steps to label the other three banks (B, C, and D):
- 1. Notice in figure 3.1A, image 1, there’s a selection called Photo shooting menu bank with an A after it. This means the camera is using Photo shooting menu bank A. If any letter other than A is showing, you are using a different Photo shooting menu bank. Let’s give Photo shooting menu bank A a new label so you’ll be able to see at a glance what this particular bank is set up to accomplish. Select Photo shooting menu bank from the Photo Shooting Menu and scroll to the right.
- 2. Assuming you haven’t yet renamed any of your Photo shooting menu banks, you’ll see the four banks called A, B, C, D, with a blank line following each letter (figure 3.1A, image 2). The factory default for an unnamed bank is simply a blank field following the letter. Using the Multi selector pad, scroll to the right on the bank you want to rename (figure 3.1A, image 2). If you press the OK button instead of scrolling to the right, you will simply select the bank. You must scroll right when the bank is highlighted in order to modify its name.
- 3. As shown in figure 3.1A, image 3 (and 4), you can add a personalized label to the bank. I added the words General Purpose there. Please read over the next four substeps before attempting to add a label. Here’s how it’s done:
Add a character: To add the new name for your camera’s bank A, there are two methods. This screen is touch sensitive, so you can select the characters by: (1) touching them on the Monitor, or (2) scrolling around with the Multi selector pad and using the Multi selector center button to select letters, numbers, and symbols with the yellow cursor. You should see each character appear in the gray text field when you select it with the Multi selector center button, or touch it on the Monitor. You can hold down the checkered Thumbnail/playback zoom out/flash button and use the Multi selector pad to move back and forth in the gray text field (hardest method). Or, you can simply touch the Monitor on the text field position where you want to add a character and then touch the character you want to add (easiest method). The small arrows at the top left of the screen in image 3 allow you to move left and right in the text field. There is an underscore and a space character at the end of the alphabet, just before the Aa& button (bottom right of screen).
Delete a character: If you want to delete a character from the gray text field, use one of the following methods: (1) move the darker gray cursor over the top of the letter by holding down the checkered Thumbnail/playback zoom out/flash button while pressing the Multi selector pad left or right. Once you have highlighted the character you want to remove, press the physical Delete button (garbage can). Or, (2) you can simply touch the character you want to delete in the text field and then touch the Delete button at the bottom of the screen (image 3).
Character locations: Uppercase and lowercase letters, numbers, and symbols are available by scrolling up or down with the Multi selector pad. Or, you can touch the Aa& button on the bottom right of the screen multiple times to change out the character set.
Character limits: You are limited to 20 characters in the new bank name.
- 4. Press the OK button to save the new name. When you check the bank’s name under the Photo shooting menu bank A setting, you’ll see the bank’s new label (figure 3.1A, image 4). If you were renaming bank A, it is now also selected.
Settings Recommendation: I generally name my banks as shown in the following list. Each of the label names describes at a glance how I intend to use a bank when shooting. You may want to use different names and settings for each bank, but this list may give you some ideas:
- Bank A – General Purpose: Bank A is my general purpose bank. I use it when I’m just walking around with my camera doing general photography. I will often modify the camera’s settings when using bank A. I know to check before shooting when using this bank. I generally shoot in RAW mode but might switch to JPEG as needed. This is a completely variable bank and the only one I modify regularly.
- Bank B – Best Quality RAW: Bank B is for when I am shooting commercially, with the best quality my camera can muster. I use this on any type of shoot that requires me to post-process the images in-computer. My critical settings for bank B are Image quality at NEF (RAW), with NEF (RAW) recording > Type set to Lossless compressed and NEF (RAW) bit depth at 14-bit, Image size set to Large (RAW L), Image area set to DX, White balance to AUTO, Neutral (NL) Picture Control, Color space to Adobe RGB, Active D-Lighting to Off (or Low), ISO sensitivity to ISO 100, and Aperture-priority mode with the aperture set to f/8. (If Photo Shooting Menu > Extended photo menu banks is set to On, the camera will remember the last exposure mode and aperture or shutter speed, saving it under the current bank with the rest of your settings for that bank. See the section Extended Photo Menu Banks (page 69) for more information. Once it’s set, I rarely modify this bank. If I’m shooting landscapes from a tripod, I may lower the ISO sensitivity to ISO 50 (Lo1 or L1.0) by holding down the ISO button and turning the rear Main command dial.
- Bank C – Best Quality JPEG: Bank C is for when I have no time to post-process the images. I need them as soon as I shoot them but must have maximum quality. My critical settings for bank C are Image quality set to JPEG fine (with the star symbol for optimal quality), Image size set to Large, Image area set to DX, White balance to AUTO, Standard (SD) Picture Control, Color space to Adobe RGB, Active D-Lighting to Low, and ISO sensitivity to ISO 100. Once it’s set, I rarely change this bank. I also use Extended photo menu banks set to On, with Aperture-priority mode selected and aperture set to f/8.
- Bank D – Party JPEG: When I am going to a party with friends, I’ll simply switch to this bank and fire away. I could use bank A, but then I’d have to reset it to higher quality later. Instead, I use this bank to have some fun with my camera and friends. The images must be high enough quality to get good prints, at least 11 × 14 inches (27 × 35 cm) in size. The critical settings for bank D are Image quality set to JPEG fine (with no star symbol for size priority), Image size set to Medium (M), White balance to AUTO, Standard (SD) Picture Control, Color space to sRGB, Active D-Lighting to Normal, and Auto ISO sensitivity control set to On, with a Maximum sensitivity of ISO 1600 and Minimum shutter speed of 1/60s. Even though I turned on Auto ISO, I also set ISO sensitivity to ISO 400. I’ll explain why in the upcoming note. Finally, I set Extended photo menu banks to On, with Programmed auto exposure mode selected for thought-free shooting. My camera is like a heavy Coolpix point-and-shoot for party time while still giving me 11.6-megapixel JPEG images.
Note: Why did I set a manual ISO sensitivity in Photo shooting menu bank D – Party JPEG? I also turned on the Auto ISO sensitivity control. Shouldn’t that automatically handle all my ISO sensitivity needs? Good questions! I set a manual ISO sensitivity because of an undocumented feature in most Nikons. If you set ISO sensitivity to a certain number when you have the Auto ISO sensitivity control enabled, the ISO you set manually becomes a minimum ISO, while the Auto ISO sensitivity control sets the maximum ISO. So, in my case, by setting an ISO of 400, I set a minimum ISO that my camera will not go below. The Auto ISO sensitivity control is set to never exceed ISO 1600 in my bank D setting. I have now created a range of ISO 400 to 1600 that my camera can shoot within, adjusting ISO sensitivity automatically, as needed, in my set range.
Alternate Photo Shooting Menu Bank Access
If you would prefer, you can access the Photo shooting menu banks without pressing the MENU button. Instead, you can access the Photo shooting menu banks from the Quick Menu screen (figure 3.1B).
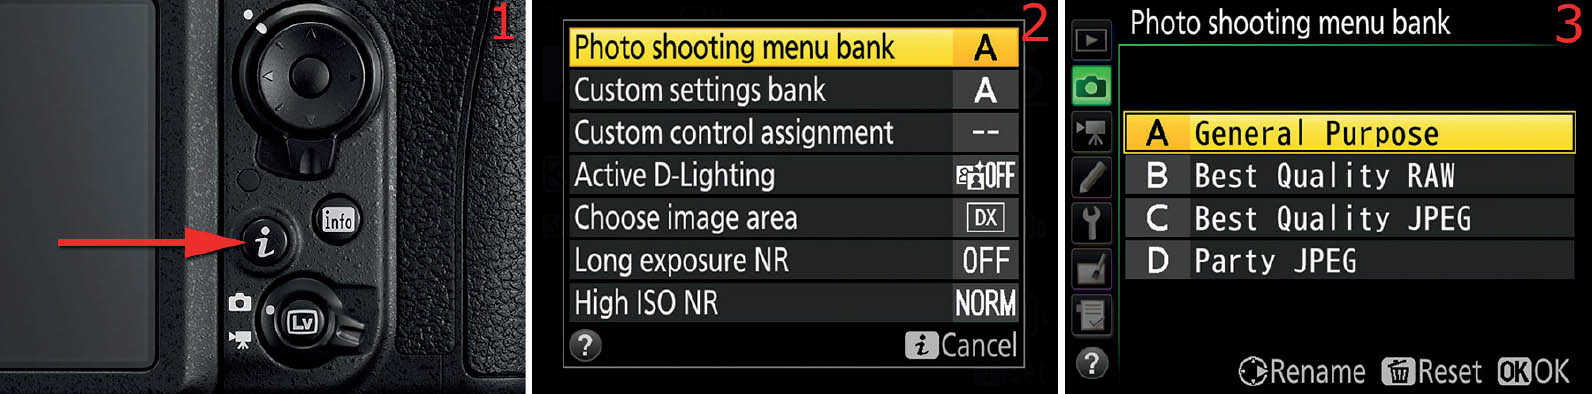
Figure 3.1B – Accessing the Photo shooting menu banks with the i button and Quick Menu
Use these steps to change Photo shooting menu banks quickly:
- 1. Press the i button once (figure 3.1B, image 1). This will cause the Quick Menu screen to appear.
- 2. Scroll to the Photo shooting menu bank position and press the OK button (figure 3.1B, image 2).
- 3. The normal Photo shooting menu bank screen will now appear, allowing you to change quickly to a different bank (figure 3.1B, image 3). Notice the names of my fully configured Photo shooting menu banks.
Resetting a Bank to Factory Default Values
A time may come when you want to set a Photo shooting menu bank back to the default factory values. To do so is fairly simple. Here’s how.

Figure 3.1C – Resetting a Photo shooting menu bank
Use these steps to reset the Photo shooting menu bank back to factory defaults:
- 1. Choose one of the banks by highlighting it (figure 3.1C, image 1).
- 2. Press the Delete button (figure 3.1C, image 2).
- 3. Select Yes on the popup window and press the OK button to reset the bank (figure 3.2C, image 3). Select No to cancel.
Identifying the Current Bank in Use
You can identify which bank your camera is using without going back into the menu system. Two easily accessible screens, the Control Panel and the Information display, both show the current Photo shooting menu bank.

Figure 3.1D – Current Photo shooting menu bank
Notice how the current bank is displayed for you on both screens (figure 3.1D, red arrows). The Control panel in image 1 shows SHOOT A, as does the Information display (press the info button).
Working with Photo Shooting Menu Settings
Each of the settings mentioned in my list of banks are Photo Shooting Menu settings. We will discuss each of them in this chapter. If you don’t know where to find them, do not attempt to set up your own banks until you have read over this chapter. You may have a completely different idea on how to configure your banks. Think about the way you shoot, and then name and configure the banks accordingly.
To select a particular bank, simply go to Photo Shooting Menu > Photo shooting menu bank, highlight a particular bank, and press the OK button. The letter for the bank should appear to the right of the Photo shooting menu bank, as seen in figure 3.1A, image 1.
We are using Photo Shooting Menu bank A as our example and must now set up the camera functionality for this bank; we have 25 functions left to set. Let’s scroll down in the Photo Shooting Menu and configure each individual line item available there. They will each be saved as part of bank A, which we renamed and selected. Changes in one bank do not affect changes in another bank. Each bank is a standalone bank with separately stored function settings, with a few exceptions that affect all four Photo shooting menu banks at once, as follows:
- Extended photo menu banks settings
- Multiple exposure settings
- Interval timer shooting settings
- Changes to White balance preset settings
If you change any of these settings, they will affect all four banks (A–D) simultaneously. Changing other settings affects only the bank your camera is currently using. Since each bank can be configured with most items having different settings, your D500 can act like four different cameras.
Photo Shooting Menu Banks and Custom Settings Banks
Can you see how flexible having these four Photo shooting menu banks will make your D500? You can create your own bank names and apply the underlying settings however you wish.
If you want, you can match these Photo shooting menu banks to similarly named Custom settings banks, which allow you to set things like the Autofocus and Metering/exposure types. When the Photo shooting menu banks and Custom settings banks are combined in this manner, the D500 becomes a very powerful camera with strong flexibility to match different photographic needs and styles.
There are no direct connections between the Photo shooting menu banks and Custom settings banks. I make my own mental connection by giving both similar names and then changing to them at the same time.
Extended Photo Menu Banks
(User’s Manual: Page 283, Menu Guide: Page 36)
Extended photo menu banks is a simple function that sounds complex. All it does is ask your camera to remember the last exposure and flash modes you used in a particular bank (P, S, A, or M) and the aperture if you are using A or M or the shutter speed if you are using S or M. Here is how it works:
- Scenario 1: Let’s say you are using bank A with fill flash and the exposure mode is set to Aperture-priority (A) mode with an aperture setting of f/8. You now switch to bank B where you use Shutter-priority (S) mode for a while. Even if your camera is set to Shutter-priority in bank B, when you switch back to bank A, the camera remembers that you were previously using fill flash in Aperture-priority mode and an aperture setting of f/8 and sets the camera back to those settings automatically.
- Scenario 2: You are using bank C and the exposure mode is set to Manual (M) with an aperture of f/11 and a shutter speed of 1/125s. Now you switch to bank D, which is using Programmed auto (P) mode. You shoot with bank D for a while, then switch back to bank C. The camera, upon entering bank C, remembers that you were using Manual mode with an aperture of f/11 and shutter speed of 1/125s previously and sets the camera back to those settings.
- Scenario 3: You are using bank B with the exposure mode set to Shutter-priority (S) and a shutter speed of 1/2000s because you are shooting an air show with flying airplanes. You decide to take a picture showing the crowd, so you switch quickly to bank A, which is using Aperture-priority mode. When you are done shooting the crowd, you switch back to bank B and the camera remembers that you were using Shutter-priority and a shutter speed of 1/2000s previously and sets the camera back to those settings. You continue shooting the air show.
With Extended photo menu banks enabled, your camera will remember the last exposure mode and related settings used for each bank. The following list shows which settings it remembers for each exposure mode selected:
- Programmed auto (P) mode: The camera will remember that you were using P or P* (flexible program) modes. Since P mode asks the camera to automatically adjust the aperture and shutter speed, it will not remember your previous aperture and shutter speed settings when you switch banks. However, if you have overridden P mode by placing the camera into flexible-program P* mode, the camera will remember that you were in P* mode and the aperture you were using when you switched away from the bank. It also remembers which flash mode you were using.
- Shutter-priority (S) mode: The camera will remember that you were using Shutter-priority mode and the shutter speed you last used before switching away from the bank. It also remembers which flash mode you were using.
- Aperture-priority (A) mode: The camera will remember that you were using Aperture-priority mode and the aperture you last used before switching away from the bank. It also remembers which flash mode you were using.
- Manual (M) mode: The camera will remember that you were using Manual mode and the shutter speed and aperture you last used before switching away from the bank. It also remembers which flash mode you were using.
The camera remembers the information about the mode and settings without you manually saving anything. When you switch away from a bank and then return to the bank, it will remember your previous settings without you doing anything more than having Extended photo menu banks set to On. If you set Extended photo menu banks to Off, the camera will not remember any of your flash, exposure mode, shutter speed, and aperture settings for each bank.

Figure 3.2 – Enabling or disabling Extended photo menu banks
Use these steps to configure the Extended photo menu banks setting:
- 1. Select Extended photo menu banks from the Photo Shooting Menu and scroll to the right (figure 3.2, image 1).
- 2. Choose either On or Off from the menu (figure 3.2, image 2) and press the OK button to save the setting.
Settings Recommendation: I leave this turned on because I find it to be quite convenient. Having the camera remember my last exposure mode setting lets me enter a familiar shooting environment when I return to a particular bank. If I used a certain exposure mode previously with that bank, the odds are very high that I will want to use similar settings in the future. If you do not want the camera to remember your previous exposure mode settings, leave this set to Off. It will not affect how the camera remembers any of the other Photo Shooting Menu settings.
Storage Folder
(User’s Manual: Page 283, Menu Guide: 36)
The D500 automatically creates a folder on its primary memory card named 100ND500. The first three digits in 100ND500 are the folder number, and the last five characters in 100ND500 are the folder name. You can change both of these.
If you want to store images in separate folders on the memory card, you might want to create a new number/folder, such as 101PORTR or 200LANDS. Each folder you create can hold 999 images, and using Storage folder, you can select any folder as the default folder.
This is a good way to isolate certain types of images on a photographic outing. Maybe you’ll put landscapes in folder 100NATUR and people shots in 101PEOPL. You can name the number and folder according to your needs.
Whenever the camera senses that the current folder contains 999 images or when an image reaches a file number of 9999, a new folder is created, with the value of the first three digits of the folder name increased by one. If you are using a folder named 100ND500, the camera will automatically create a new folder called 101ND500 when you exceed 999 images or reach image number 9999 in folder 100ND500.
If you try to create a folder name that already exists, the camera doesn’t give you a warning; it simply switches to the already existing folder. Let’s look at how to create a new folder with a number and name of your choice.
Rename
The Rename function allows you to change the folder name from the default of ND500 to any five-character name you desire. For instance, I am fortunate that my last name is only five characters, so I renamed my folder to YOUNG. Once renamed, my folder number and name will look like this: 100YOUNG. Let’s see how to rename the folder.

Figure 3.3A – Renaming the camera’s default folder name
Use the following steps to rename the default folder:
- 1. Follow the screen flow shown in figure 3.3A, images 1 and 2 (Storage folder > Rename) until you arrive at the third screen in the series.
- 2. Use the touch screen shown in figure 3.3A, image 3, to create a new five-character folder name in the text field at the top of the screen. You should use all five characters. If you do not, the camera will insert an underscore for any character you leave blank. To create the new name, use the left and right arrow touch-buttons in the top-left corner of image 3 to select a character position from the five characters. Press the Delete touch-button at the bottom of image 3 to delete the current character. Touch the characters from the source list to insert them in the text field. There are uppercase characters only in this touch screen, along with numbers. Press the OK button to save your work, or the MENU button to cancel.
Note: If you prefer not to use the touch screen, you can use physical buttons on the camera itself instead. Use the Multi selector pad to move around the character selection area, and the Multi selector center button to insert (Input) characters in the text field. Moving within the text field itself requires holding down the Thumbnail/playback zoom out/flash button while pressing left or right on the Multi selector pad. You can use the physical Delete button to delete characters from the text field.
Restore Original Folder Name

Figure 3.3B – Hold the Delete button to restore the original folder name
Use the following steps to restore the original folder name back to ND500:
- 1. Follow the screen flow Photo Shooting Menu > Storage folder > Rename until you reach the Rename screen with a nondefault folder name (figure 3.3B, image 1).
- 2. Press and hold the physical Delete button for several seconds (figure 3.3B, image 2).
- 3. A window will pop up asking, Restore the default folder name? Choose Yes and press the OK button (figure 3.3B, image 3).
- 4. The factory default name of ND500 will appear, replacing the previous folder name (figure 3.3B, image 4). Press the OK button to save it.
Select Folder by Number
The Select folder by number function allows you to select an existing folder by number or create a new one with a new number. Let’s examine how to do it.
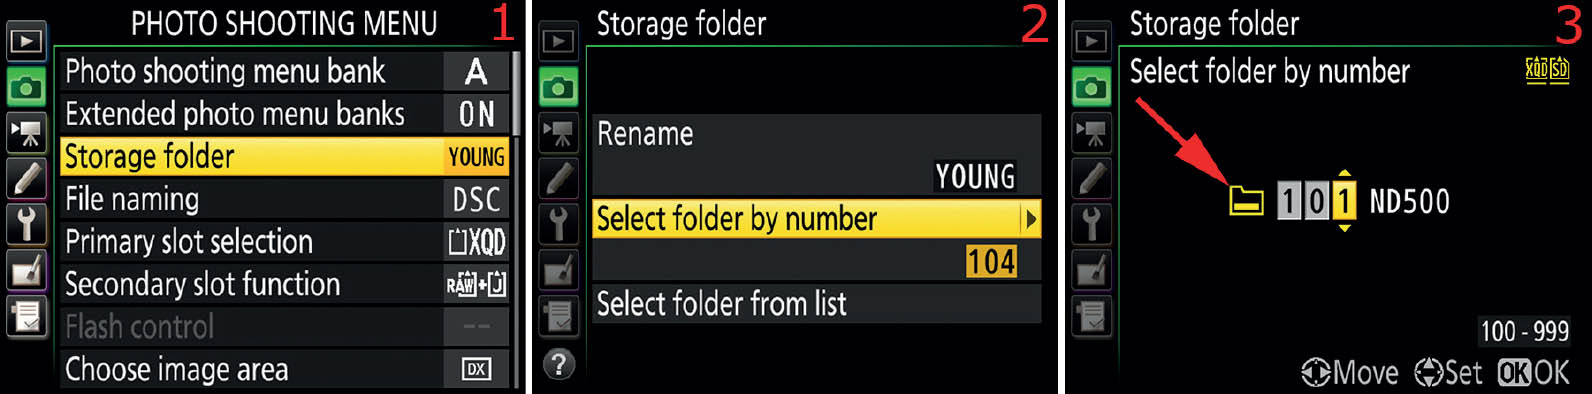
Figure 3.3C – Creating and numbering a new folder
Use these steps to create or select a folder with a number of your choice:
- 1. Follow the screen flow shown in figure 3.3A, images 1 and 2 (Storage folder > Select folder by number) until you arrive at the third screen in the series.
- 2. You will now see a screen that allows you to enter a folder number between 100 and 999 (figure 3.3C, image 3). Create your new number by scrolling up or down in any of the three available number positions. This number will have ND500 appended to it when you are done—unless you have changed the default folder name—and a new folder by that name (or your new name) will appear on the camera’s current primary memory card. Notice the little folder symbol at the point of the red arrow in image 3. This little folder appears only when you have an existing folder with the number shown on the screen. If I were to change the number to 105, the little folder would disappear because my camera does not have a folder named 105ND500. If I actually tried to save the settings from image 3, the camera would not create a new folder named 101ND500 because it clearly already exists. Instead the camera would simply switch to that folder.
- 3. Press the OK button to create the new folder or switch to an existing folder.
When you see a folder next to a folder number, as shown in figure 3.3C, image 3, you should take note of how full the folder is. In image 3, the camera indicates that there are existing files in the folder by showing it with a white filler. There are only three settings: empty (no white fill), partially full (partial white fill as in image 3), and full (all white fill). If the folder contains fewer than 999 images, it is considered partially full. If it has 999 files, or a file numbered 9999, the folder will show as full. You cannot create a folder with any number less than 100. Once you have created a new folder, the camera will automatically switch to it.
What if you want to simply start using an existing folder, choosing it from a list of folders instead of making a new one? Let’s find out.
Select Folder from List
The Select folder from list function allows you to choose an existing folder from a list of folders on your camera’s memory card(s).

Figure 3.3D – Selecting an existing folder from the list of available folders
Use the following steps to choose an existing folder from a list of folders:
- 1. Follow the screen flow shown in figure 3.3A, images 1 and 2 (Storage folder > Select folder by number) until you arrive at the third screen in the series.
- 2. Choose a folder from the list of current folders (figure 3.3D, image 3). My camera happens to have seven folders on it. If yours has only one, that is all you will see in image 3 (most likely 100ND500). Press the OK button and all images will now be saved to this folder until you exceed 999 images in the folder or manually change to another.
Note of caution: If you are using a folder having a number of 999 (e.g., 999ND500) and the camera records the 999th image in that folder, or if it records an image having a number of 9999, the Shutter-release button will be disabled until you change to a different folder. Normally, when those conditions occur, the camera increments the folder number by one and creates a new folder with the incremented number, and the next image simply goes into the new folder. However, if you are using folder number 999 (999ND500), the camera cannot create a new folder because it cannot increment larger than 999 on a folder number. Therefore, it locks the Shutter-release button until you remove the memory card containing folder 999ND500 or create a new folder manually. In my opinion, it is not wise to create a folder numbered 999, especially if you shoot a lot of images and may exceed 999 pictures in the folder.
Additionally, if the current folder is numbered 999 (e.g., 999ND500) and it contains 992 images or a file numbered 9992 or higher, video recording may be disabled.
Settings Recommendation: As memory cards get bigger and bigger, I can see a time when this functionality will become very important. Last year I shot around 200 GB of image files. With the newest memory cards now hitting 512 GB, I can foresee a time when the card(s) in my camera will become a yearlong backup source. At the present time, I do not use the Storage folder functionality all that much, but I guarantee you I will in the near future. This is a good function to learn how to use!
File Naming
(User’s Manual: Page 283, Menu Guide: Page 39)
File naming allows you to control the first three letters of the file name for each of your images. The default is DSC, but you can change it to any three alphanumeric characters provided by the camera. The D500 defaults to using the following file naming convention for your images:
- sRGB color space: DSC_1234
- Adobe RGB color space: _DSC1234
According to the color space you are using, the camera adds an underscore character to the end of the three DSC characters in sRGB or to the beginning in Adobe RGB.
I use this feature on my camera in a special way. Because the camera can count images in a sequence (see Custom setting d7) from 0001 to 9999, I use File naming to help me personalize my images. The camera cannot count images higher than 9999. Instead, it rolls back over to 0001 for the 10,000th image.
When I first got my D500, I changed the three default characters from DSC to 1DY. The 1 tells me how many times my camera has passed 9999 images, and DY are my initials, thereby helping me protect the copyright of my images in case they are ever stolen and misused.
Because the camera’s image File number sequence counter rolls back over to 0001 when you exceed 9999 images, you need a way to keep from accidentally overwriting images from the first set of 9999 images you took. I use this method:
• First 9999 images: |
1DY_0001 through 1DY_9999 |
• Second 9999 images: |
2DY_0001 through 2DY_9999 |
• Third 9999 images: |
3DY_0001 through 3DY_9999 |
• Fourth 9999 images: |
4DY_0001 through 4DY_9999 |
• Fifth 9999 images: |
5DY_0001 through 5DY_9999 |
See how simple that is? The listed numbers show a range of just under 50,000 images. Since the D500’s shutter is tested to the pro level of 200,000 images, you will surely need to use a counting system like this one.
My system works up to only 89991 images (9999 × 9). If you wanted to start your camera at 0 instead (0DY9999), you could count up to 99990 images.
If Nikon would ever give us just one extra digit in our image counter, we could count in sequences of just under 100,000 images instead of 10,000 images. I suppose that many of us will have traded on up to the next Nikon DSLR before we reach enough images that this really becomes a constraint.
This is merely the way I’m using this useful feature in my D500. If my method doesn’t work for you, you could use the three characters to classify your image names in all sorts of creative ways.
Let’s examine how to rename the first three characters of a filename.

Figure 3.4 – Creating a new three-letter file name
Here are the steps to set up your custom file naming characters:
- 1. Follow the screen flow shown in figure 3.4, images 1 and 2 (File naming > File naming) until you arrive at the third screen in the series.
- 2. Use the touch screen shown in figure 3.4, image 3, to create a new three-character file name in the text field at the top of the screen. You must use all three characters. You cannot delete characters; you can only replace them. To create the new name, use the left and right arrow touch-buttons in the top-left corner of image 3 to select a character position from the three characters. Touch the characters from the source list to insert them in the text field. There are uppercase characters only in this touch screen, along with numbers. Press the OK button to save your work, or the MENU button to cancel.
Note: If you prefer not to use the touch screen, you can use physical buttons on the camera itself instead. Use the Multi selector pad to move around the character selection area, and the Multi selector center button to insert (Input) characters in the text field. To move within the text field itself requires holding down the Thumbnail/playback zoom out/flash button while pressing left or right on the Multi selector pad.
Settings Recommendation: We discussed how I use these three custom characters in the beginning of this section. You may want to use all three of your initials or some other numbers or letters. Some will even leave these three letters at their default of DSC. I recommend at least using your initials so that you can easily identify the images as yours. If you use my method, just be sure to watch for the images to roll over to 9999 so that you can rename the first character for the next sequence of 9999 images. With the longevity of a Nikon and your prolific shooting habits, I am sure the numbers will be rolling over often!
File Number Sequence
Custom Setting Menu > d Shooting/display > d7 File number sequence controls the File number sequence. That function works along with File naming to let you control how your image files are named. If File number sequence is set to Off, the D500 will reset the four-digit number—after the first three custom characters in File naming—to 0001 each time you format your camera’s memory card. I made sure File number sequence was set to On as soon as I got my camera so it would remember the sequence all the way up to 9999 images. The factory default is On for File number sequence, but I would check it just in case. I want to know exactly how many pictures I’ve taken over time. We’ll talk more about File number sequence in the chapter titled Custom Setting Menu.
Primary Slot Selection
(User’s Manual: Page 283, Menu Guide: Page 40)
Primary slot selection allows you to select which memory card (XQD or SD) you want to use as the primary card for writing images and recording movies.
This function and the next, Secondary slot function, are concerned with where your camera stores its image files. If you’re using two memory cards, an XQD and SD, you will need to set these two functions to control where files go and what happens when a card fills up.
You’ll need to decide which card type you want to shoot with most often. If you have more of one type than the other, or simply like one card style better, this function will let you choose your favorite.

Figure 3.5 – Choosing the primary card slot
Here are the steps to select the primary card slot:
- 1. Select Primary slot selection from the Photo Shooting Menu and scroll to the right (figure 3.5, image 1).
- 2. Choose your favorite card slot from the Primary slot selection screen. Your choices are XQD card slot and SD card slot (figure 3.5, image 2). Press the OK button to lock in your choice.
Settings Recommendation: I happen to prefer the XQD cards for my D500, because they seem more robust and are significantly faster for those 10 fps bursts. Therefore, I set my primary slot to XQD card slot. If you upgraded from a less costly DX Nikon DSLR, you may want to use the SD card slot as the primary slot because you’ll probably have several SD cards from previous cameras. You don’t have to use both cards slots if you don’t have one of the two types; the camera will work fine with just one card. If you have Primary slot selection set to the SD slot—with an XQD card in the XQD card slot—and then accidentally leave the SD card out of the camera, the camera is smart enough to use whatever card type it can find—in this case the XQD card.
Secondary Slot Function
(User’s Manual: Page 283, Menu Guide: Page 40)
The Secondary slot function is designed to let you do image flow control. You decide where and when images get written to the memory card combo. You can make the camera fill up one card and overflow onto the other when the first is full, write to both cards at the same time, or write a separate NEF (RAW) and JPEG image to each card.
Here is a deeper description of the three different ways you can set the Secondary slot function (figure 3.6):
- Overflow: Have you ever gotten the dreaded “Card full” message? Well, if you select Overflow, it will take a lot longer to get this message. Overflow writes all images to the card you have selected under Primary slot selection. Then when the primary card is full, the rest of the images are sent to the secondary card. The image number shown on the Control panel will go down as you take pictures and they are written to the primary card. When the image count hits zero, the camera will switch to the secondary card and the available image count number on the Control panel will increase to however many images will fit on the secondary card. It is a good idea, although not absolutely necessary, to use cards with a similar capacity when using this function. The camera will gradually fill up all available space on both cards as you take pictures.
- Backup: This function is a backup method for those shooting critical images. Every image you take is written to both the primary and secondary memory cards at the same time. You have an automatic backup system when you use the Backup function. If you are a computer geek (like me), you’ll recognize this as RAID 1, or card mirroring. Because your camera is very much a computer, a function like this is great to have. Be sure that both cards are of equal capacity or that the secondary card is larger than the primary card when you use this function. Otherwise, you’ll have reduced capacity shown for the primary card. The camera is required to write a duplicate image to each card, so the smallest card in the two slots sets the maximum capacity of the camera’s storage.
- RAW primary – JPEG secondary: For those who like to shoot NEF (RAW) files, this function can save some time. You’ll have a JPEG for immediate use and a RAW file for later post-processing. When you take a picture, the camera will write the RAW file to the primary card and a JPEG file to the secondary card. There is no choice in this arrangement—RAW always goes to primary and JPEG to secondary. Also, this function works as described only when you have Photo Shooting Menu > Image quality set to some form of NEF (RAW) + JPEG. If you set Image quality to just NEF (RAW) or JPEG fine alone—instead of NEF (RAW) + JPEG fine—the camera will simply write a duplicate file to both cards instead of a RAW on one and a JPEG on the other. In other words, if Image quality is set to NEF (RAW), the camera will write two NEF files; if set to JPEG, two JPG files; and if set to TIFF (RGB), two TIFF files—one on each card. Basically, unless you set Photo Shooting Menu > Image quality to some form of NEF (RAW) + JPEG, this function acts like the Backup function mentioned previously.

Figure 3.6 – Choosing the Secondary slot function
Here are the steps to select a Secondary slot function:
- 1. Select Secondary slot function from the Photo Shooting Menu and scroll to the right (figure 3.6, image 1).
- 2. Choose one of the three selections from the Secondary slot function screen (figure 3.6, image 2). Press the OK button to lock it in for use.
Settings Recommendation: When I’m out shooting commercially or for any type of photography where maximum image capacity is of primary importance, I select Overflow. This causes the camera to fill up the primary card and then automatically switch to the secondary card for increased image storage. If I’m shooting images that I cannot afford to lose, such as at a unique event like a wedding or graduation, I’ll often use the Backup function for automatic backup of every image.
If I want both a RAW and JPEG file, I’ll use the RAW primary – JPEG secondary function. This lets me have the best of both worlds when card capacity is not worrisome. This too allows a measure of redundancy, like the Backup method. In a sense, you are still backing up the same image, they are just in different formats—one RAW and one JPEG. RAW primary – JPEG secondary also benefits you by providing a JPEG for immediate use and a RAW file for later post-processing. I use each of these three selections from time to time, but my favorite is Overflow.
Flash Control
(User’s Manual: Page 284, Menu Guide: Page 41)
The Nikon D500 has one of the most advanced flash control systems on any HD-SLR camera, with the ability to control multiple banks of external flash units by radio and/or optical control. In figure 3.7A, you will find a dressed-up Nikon D500 with a Nikon SB-5000 Speedlight flash unit and a WR-10 Wireless Remote Controller (radio transmitter) kit mounted.
Using Older Nikon Speedlights with the Nikon D500
Some older Nikon Speedlights will not open the Flash control menu on the D500. It will stay grayed out and unavailable. In this book, I will discuss using the SB-500 and SB-5000 flash units with the D500 camera because those two flash units are specifically mentioned in the User’s Manual as being fully compatible. There is no harm in testing your recent older Nikon flash unit with the D500 to see if it will open the Flash control menu. One qualifier, though: I would not even mount a Speedlight flash older than the SB-800 on a current Nikon HD-SLR camera.

Figure 3.7A – Nikon D500 with WR-10 radio transmitter kit and SB-5000 flash
The Nikon D500 is fully compatible with i-TTL mode on all recent Speedlight flash units since the SB-800—except the SB-R200—and will take correctly exposed pictures with them.
Before I acquired an SB-5000 flash unit, I shot a graduation ceremony with an SB-900 Speedlight on my D500. I made no special adjustments to the flash unit; I just mounted the flash, set it to TTL, and took hundreds of pictures. They were exposed correctly. Therefore, if you do not have an SB-500 or SB-5000 Speedlight, you can continue using your older Nikon flash units for normal i-TTL flash photography.
You cannot use the Commander mode of master-flash compatible units (e.g., SB-700, SB-900, SB-910, SU-800) from within the D500’s Flash control menu (this function) because it remains grayed out when an older Speedlight is mounted. However, you can use the Commander settings in the LCD screen on the back of the Speedlight flash itself to control Nikon’s optical Creative Lighting System (CLS). In other words, the camera allows the built-in Commander (master flash) modes of the SB-700, SB-900, SB-910, and SU-800 (wireless commander) to work as expected.
Note: Several older Nikon Speedlights will work fine in the i-TTL modes with the D500, including the: SB-910, SB-900, SB-800, SB-700, SB-600, SB-400, and SB-300. However, there are limitations on other modes. Please refer to the large chart in the User’s Manual on pages 326–328 that shows what modes are compatible for each Speedlight.
Using the SB-500 and SB-5000 Speedlights for Flash Photography
The SB-500 and SB-5000 Speedlights are mentioned in the Nikon manuals as the most efficient flash units for use on the D500. You can use either of these two Speedlights to control multiple banks of remote Nikon Speedlights, either by using the optical CLS system or by radio control with a WR-10 Wireless Remote Commander kit (figure 3.7A).
Let’s examine how to use either of the Nikon-suggested flash units for Flash control. First let’s examine the five available Flash control modes you can use (figure 3.7B, image 3).
- (TTL) TTL: The camera will take pictures using the excellent i-TTL (TTL-BL or balanced fill-flash) mode built into the Speedlight. The flash fires in two stages. Nikon calls stage one “monitor preflash.” The flash emits a series of almost invisible flashes before the main flash burst fires (stage two). The preflashes allow the camera’s RGB flash sensor to examine all areas of the frame for reflectivity. The D500 then uses the Matrix meter and distance information from a D, G, or E lens to calculate a flash output that is balanced between the main subject and the ambient lighting. You must use Matrix or Center-weighted metering to use this mode. When the Spot meter is used, the camera automatically switches out of balanced fill-flash mode and enters Standard i-TTL (TTL). This mode ignores the background’s ambient light and concentrates on whatever the camera’s selected AF point is focused on. For the most accurate flash output for a specific subject, just set your camera to use its Spot meter (page 498), and the flash will meter for the subject only. TTL and TTL-BL mode are available for both the SB-500 and SB-5000. You can manually select TTL or TTL-BL with the i button (mode menu item) on the back of the SB-5000 flash. However, with the SB-500, the selection is done automatically.
- (A) Auto external flash: This mode uses an older style of reflective light sensing to arrive at a fairly accurate flash. It is the equivalent of using A mode (non-TTL auto) on older Speedlight flash units. This mode also supports auto-aperture flash. If you use a non-CPU lens and do not specify a focal length and maximum aperture (page 372), this mode will be selected automatically. This mode is limited to the SB-5000 Speedlight and will not appear on the Flash control mode menu for lesser flash units.
- (GN) Distance-priority manual: Allows you to input the distance to your subject and the flash unit will adjust itself automatically for a proper exposure. This mode is limited to the SB-5000 Speedlight and will not appear on the Flash control mode menu for lesser flash units.
- (M) Manual: With this mode you can choose the flash output manually, based on a percentage of full power. The flash starts out in 1/1 mode, which means it will provide the maximum flash output that it can generate. It can be adjusted in 1/3 EV steps all the way down to 1/256, which is 1/256th of a full power flash. This mode is available for both the SB-5000 and SB-500 Speedlights (plus some other smaller units, such as the SB-400 and SB-300).
- (RPT) Repeating flash: The flash will fire repeatedly while the shutter is open with a strobe-like effect. You can set the Output, Times, and Frequency. Output means the flash power level (from 1/8 to 1/256), Times means the number of times the flash fires (from 2 to 20 times), and the Frequency means the Hz rate (times per second) the flash fires (from 1 to 100 Hz). This mode is limited to the SB-5000 Speedlight and will not appear on the Flash control mode menu for lesser flash units.
Note: As we go through the following items, please keep in mind that the new Nikon Speedlight units (SB-5000 and SB-500) work more closely together than with previous Nikon cameras and Speedlights. This means that any changes you make on the Flash unit’s LCD menu will be reflected in the camera’s menu settings immediately, and any changes you make in the camera’s menu settings will show up in the Speedlight’s LCD menus and screens. The Speedlight and camera update each other’s settings through the Accessory shoe contact points. In my opinion, this makes things much nicer for flash photographers!
Now let’s examine the screens and steps needed to choose one of these five modes and adjust it to fit your needs.

Figure 3.7B – Using Flash control mode
Use the following steps to choose a Flash control mode:
- 1. Follow the screen flow shown in figure 3.7B, images 1 and 2 (Flash control > Flash control mode) until you arrive at the third screen in the series.
- 2. Choose one of the five Flash control modes and press the OK button to lock in the setting.
Now let’s look closely at how to configure each of the five Flash control mode settings.
TTL Mode Configuration

Figure 3.7C – Configuring TTL mode
Use these steps to configure the TTL mode (continuing from where figure 3.7B, image 3 stops):
- 1. Choose TTL from the Flash control mode menu and press the OK button (figure 3.7C, image 1).
- 2. If you want to use flash compensation for the SB-5000 flash, scroll down to the Flash compensation (TTL) menu item and scroll to the right (figure 3.7C, image 2). Otherwise, skip steps 2 and 3. (See the upcoming special note for compensation for flash units other than the SB-5000.)
- 3. Choose a flash compensation amount from −3.0 to +3.0 EV steps and press the OK button to lock in the value (figure 3.7C, image 3). (Note: If you are using an SB-5000, you will see that the LCD on the back of the flash unit now reflects the value you just selected in the camera menu. If you change it on the flash unit directly, you will see the camera menus update to the new value.)
Note (for those not using the SB-5000 speedlight): The compensation steps above apply to the SB-5000 flash only (and most likely to future Nikon flagship Speedlights). For lesser flash units such as the SB-500, SB-400, SB-300, and others, you must instead select flash compensation by pressing the Flash button on the back of the camera while turning the front Sub-command dial.
Settings Recommendation: I often shoot with the flash underexposing by 1/3 EV step. I find that Nikon’s flash units shoot a little brightly for up-close use so I generally dial it back a little. What is so convenient with the new camera and flash cooperation (D500 and SB-5000) is that I can select a compensation value on either the flash unit or the camera, whichever is easier, and the other device will automatically update its value to match. I love this new feature! Experiment with it and see what you think.
(A) Auto External Flash Configuration

Figure 3.7D – (A) Auto External Flash mode configuration
Use these steps to configure the (A) Auto external flash mode (continuing from where figure 3.7B, image 3 stops):
- 1. Choose Auto external flash from the Flash control mode menu and press the OK button (figure 3.7D, image 1).
- 2. If you want to use flash compensation for the SB-5000 flash, scroll down to the Auto external flash compensation menu item and scroll to the right (figure 3.7D, image 2). Otherwise, skip steps 2 and 3.
- 3. Choose a compensation amount from −3.0 to +3.0 EV steps and press the OK button to lock in the value (figure 3.7D, image 3). The camera and an SB-5000 flash will share and display the compensation values you just entered, on their LCD screens.
(GN) Distance-Priority Configuration

Figure 3.7E – Distance-priority mode configuration
Use these steps to configure the (GN) Distance-priority manual mode (continuing from where figure 3.7B, image 3 stops):
- 1. Choose Distance-priority manual from the Flash control mode menu and press the OK button (figure 3.7E, image 1).
- 2. Scroll down to the Distance-priority options menu item and scroll to the right (figure 3.7E, image 2).
- 3. You now have two options to configure: Distance and Flash compensation (figure 3.7E, image 3). Carefully measure the distance between your subject and the camera with a tape measure, or by using lens marking information, and select that value from the Distance up/down menu. The Distance scale is marked in meters (m); therefore, if you are unfamiliar with using the metric system, have a meter/foot conversion calculator available or use a metric tape measure. You can choose from 0.3 m to 20 m. If you would like to use Flash compensation, scroll to the right and enter a value from −3.0 to +3.0 EV steps in the up/down menu and press the OK button to lock in the value. The camera and an SB-5000 flash will share and display the compensation values you just entered, on their LCD screens.
(M) Manual Configuration

Figure 3.7F – (M) Manual mode configuration
Use these steps to configure the (M) Manual mode (continuing from where figure 3.7B, image 3 stops):
- 1. Choose Manual from the Flash control mode menu and press the OK button (figure 3.7F, image 1).
- 2. Scroll down to the Manual output amount menu item and scroll to the right (figure 3.7F image 2).
- 3. Now you must enter a power output setting (Manual output amount) for the Speed-light to use (figure 3.7F, image 3). By using the up/down menu, you can choose from 1/1 (full power) all the way down to 1/256 (1/256th of a full power flash) in 1/3 EV step increments.
(RPT) Repeating Flash Configuration

Figure 3.7G – (RPT) Repeating flash mode configuration
Use these steps to configure the (RPT) Repeating flash mode (continuing from where figure 3.7B, image 3 stops):
- 1. Choose Repeating flash from the Flash control mode menu and press the OK button (figure 3.7G, image 1).
- 2. Scroll down to the Repeating flash menu item and scroll to the right (figure 3.G image 2).
- 3. Now you must enter three values to set up the strobing effect (figure 3.7G, image 3): Output, or how powerful the flash is—from 1/8 to 1/256 power; Times, or how many times the flash pulse fires—from 2 to 20 times; and Frequency, or how fast the flash pulse fires—from 1 to 100 pulses per second (Hz). When you have everything configured, press the OK button to lock in the settings.
Alternate Flash Compensation
An alternate form of flash compensation is available for older flash units that cannot use the cooperative Flash control menu compensation system discussed in the previous section. It is available by holding down the Flash button on the back of the camera and setting the flash compensation with the front Sub-command dial.

Figure 3.7H – Alternate Flash compensation
Use the following steps to use the alternate Flash compensation system:
- 1. Press the info button (figure 3.7H, image 1) to open the Information display screen on the Monitor.
- 2. Press and hold the Flash button (figure 3.7H, image 2) while turning the front Sub-command dial (figure 3.7H, image 3).
- 3. The Information display (figure 3.7H, image 4) will show the Flash compensation value changing as you turn the Sub-command dial. You can select from +1.0 to −3.0 EV steps of Flash compensation. The changing Flash compensation values will also appear on the top Control panel.
The Speedlight flash will not show the compensation when using this alternate method. You must remember that you have Flash compensation dialed in. You may see the usable flash range figure change on the LCD screen on the back of your flash when you change the compensation values.

Figure 3.7I – Flash compensation is active
To remind you that Flash compensation is active, the camera will display a flash compensation symbol and value on the Information display (figure 3.7I) and in the Viewfinder. My camera has −0.7 EV of Flash compensation dialed in. While compensation is active, you will also see the flash compensation symbol on the Control panel, just below the shutter speed. However, unlike the Information display and Viewfinder, the Control panel displays no value, just the Flash compensation symbol.
Flash Modes
The D500 has several Flash modes that you can select and combine. First let’s see how to select a Flash mode and then discuss what each does.

Figure 3.7J – Selecting a Flash mode
Use the following steps to select a Flash mode:
- 1. Press the info button (figure 3.7J, image 1) to open the Information display screen on the Monitor.
- 2. Press and hold the Flash button (figure 3.7J, image 2) while turning the rear Main command dial (figure 3.7J, image 3).
- 3. The Information display (figure 3.7J, image 4) will show the Flash mode symbol(s) changing as you turn the Main command dial. The changing Flash mode values will also appear on the top Control panel.
Let’s now examine each of the flash modes and what they do. I am using the Information display on the Monitor to show you the various Flash mode symbols so that you can easily see them. If you prefer, you can see the same symbols shown in the lower-left area of the Information display (figure 3.7K–figure 3.7P), also showing on the top Control panel, as you turn the rear Main command dial.
Front-Curtain Sync
In Front-curtain sync mode (figure 3.7K), the camera tries its best to balance the light if you’re using a lens that has a CPU in it.
Older non-CPU lenses cause the camera to ignore the ambient light completely and use only the flash to expose the subject. A CPU lens, like an AF-S Nikkor G, D, or E lens, can balance ambient light and light from the flash equally and makes the lighting look very natural.

Figure 3.7K – Front-curtain sync
If you use this correctly outdoors, it will be hard to tell that you were using flash, except for the catch light in your subject’s eyes and the lack of damaging shadows. The flash simply fills in some extra light without overpowering the ambient light.
In a situation where there is very little ambient light, the camera will use only the flash to get a correct exposure. It balances with ambient light only if there is enough.
There is a side effect to using this mode with slow shutter speeds. Front-curtain sync causes the flash to fire as soon as the front shutter curtain is out of the way and before the rear shutter curtain starts closing. If there is some ambient light, the shutter speed is long (like 1/2 second), and the subject is moving, you’ll see a well-exposed subject with a blurry trail in front of it. The flash correctly exposes the subject as soon as the front curtain gets out of the way, but the ambient light continues exposing the subject before the rear curtain closes. This effect can be seen at shutter speeds as fast as 1/60s if the ambient light is strong enough and the subject is moving.
Use this Flash mode for general flash photography. Just keep the camera’s shutter speed at reasonable levels (1/60 to 1/250).
Red-Eye Reduction
Red-eye reduction (figure 3.7L) mode causes the mounted Speedlight to flash a moderately bright strobe three times in the face of your subject before the Front-curtain sync flash fires. The intention is that the three extra flashes before the main flash burst will cause your subject’s pupils to close somewhat and reduce the redeye effect. Otherwise, this mode performs the same as Front-curtain sync.

Figure 3.7L – Red-eye reduction
Red-Eye Reduction with Slow Sync
Red-eye reduction with slow sync combines two modes, Red-eye reduction and Slow sync, so that you can take portraits indoors using ambient light while still using fill-flash to get rid of unwanted shadows (figure 3.7M).
Slow sync flash causes the camera to fire three moderate bursts of light into your subject’s face to reduce redeye, while allowing the camera to leave its shutter open for a normal nonflash exposure time to record ambient light. The main flash burst then fires to provide some fill flash for shadow reduction and to balance with the ambient light.

Figure 3.7M – Red-eye reduction with slow sync
The exposure will be heavily influenced by ambient light with flash providing only balanced fill light. When you are shooting in a darker environment, you should have your camera on a tripod to prevent blurry pictures. Shutter speeds can get quite low while using this mode in low light because the camera considers ambient light more important than the flash fill light.
In low light, you should ask your subject to stand perfectly still, or there is a chance of subject ghosting.
Slow Sync
Slow sync mode lets the camera use ambient light to make a good exposure and then fires the flash to add some extra light, rounding out the shadows or better exposing a foreground subject (figure 3.7N). Ambient light rules in this mode!

Figure 3.7N – Slow sync
Use this mode in people shots outdoors or where you want ambient light to provide the primary exposure and the flash to add a sparkle to your subjects’ eyes and remove dark shadows from their faces. You can get some beautifully balanced outdoor portraits with Slow sync.
You normally don’t have to worry about red eye outdoors because ambient light is bright enough to reduce your subject’s pupils; therefore, this mode works well for natural- scene portraits. If red eye becomes a concern due to light levels dropping and subject pupils enlarging, switch to Red-eye reduction with slow sync mode instead (previous subsection).
Slow sync is closely related to Front-curtain flash, except the ambient light is more important than the light from the flash. Be careful when using this mode indoors because it will expose for ambient light first and only assist with some flash fill light.
You can get some terrible ghosting and blurred handheld shots when using Slow sync indoors in lower light levels. Use a tripod in low light.
Rear-Curtain Sync
Rear-curtain sync (figure 3.7O) is the opposite of Front-curtain sync. The flash waits to fire until just before the rear curtain starts to close. The entire shutter speed time is just ending when the flash fires. This causes a ghosting effect to the rear of moving subjects when slower shutter speeds are used.

Figure 3.7O – Rear-curtain sync
When you press the Shutter-release button, the front curtain opens, ambient light starts hitting the sensor, and the sensor starts recording the subject. Just as the shutter’s rear curtain is about to close, the flash fires, exposing the subject at its current position.
The subject was fully exposed by the flash at the end of the shutter speed time, so the ambient light had time to register the subject before the flash fired. If the subject is moving, this can produce a blurred ghost behind or after the well-exposed subject.
No-Flash Mode
The No-flash mode disables the flash altogether so that you can take pictures without the flash influencing the exposure. This is the equivalent of removing the flash unit from the Accessory shoe or turning it off. It’s a nice way to temporarily disable the flash unit, without removing it, while you take some ambient light pictures.

Figure 3.7P – No-flash mode
Now that we have discussed using normal flash photography, let’s consider how to extend the use of flash from single Speedlight use to firing multiple remote Speedlights. The D500 allows you to use the normal infrared-based optical Nikon CLS (creative lighting system), or radio controlled flash, or a combination of optical and radio flash control.
Wireless Speedlight Control
The Nikon D500 has the capability of using Commander mode master-flash units to provide optical Nikon CLS (creative lighting system) services. This will let you use older master- flash, Commander-capable units like the SB-700, SB-800, SB-900, SB-910, and SU-800 to control multiple banks of remote Speedlights. Unfortunately, you must use the LCD screens on the flash units themselves to control Nikon CLS Commander mode settings because the camera provides no menus screens to direct the older Speedlights.
However, when a Nikon SB-500 or SB-5000 Speedlight is mounted, the Flash control menu becomes available, and you have full ability to control the attached Speedlight and remote units with the camera’s Photo Shooting Menu > Flash control screens. You can use optical control, radio control (via the WR-R10 receiver), or a combination of both optical and radio. When you use the combined optical and radio systems, you can have older and newer Speedlights working together in a unified system.
Several pages back, figure 3.7A shows a fully loaded Nikon D500 with the SB-5000 and the WR-10 Wireless Remote Controller (radio) kit mounted on the camera. The SB-5000, of course, mounts in the camera’s Accessory shoe, whereas the WR-10 radio kit mounts in its 10-pin socket.
In figure 3.7Q, image 3, is a closeup of the WR-10 radio control kit, which is composed of the WR-R10 receiver (top) and WR-A10 adapter (bottom). The transmitter and adapter snap together to provide a single unit for mounting in the 10-pin port. Let’s see how it mounts.

Figure 3.7Q – Mounting the WR-10 Wireless Remote Controller kit in the 10-pin socket
Use these steps to mount the WR-10 kit in the camera’s 10-pin socket:
- 1. Open the lower rubber flap (Ten-pin remote terminal cover) on the front of the Nikon D500, which covers the Ten-pin remote terminal (figure 3.7Q, image 1).
- 2. Line up the arrowhead on the WR-10 kit with the dot on the camera body (figure 3.7Q, image 2) and insert the WR-10 unit into the camera’s Ten-pin remote terminal (figure 3.7Q, image 3).
Note: Since we are going to be using a WR-R10 receiver and pairing it with an SB-5000 Speedlight, you will need to configure the type of pairing used in the Setup Menu > Wireless remote (WR) options function (page 412) before using the upcoming Wireless flash options.
Next, let’s see how to use the camera’s Wireless flash options and its subfeatures: Remote flash control, Group flash options, and Radio remote flash info.
Wireless Flash Options
When you turn the camera on with a WR-10 Wireless Remote Controller kit mounted, or a compatible Speedlight (SB-500 or SB-5000), or a combination of the WR-10 kit and a compatible Speedlight, the Flash control menu will allow you to enable the Wireless flash options.
These three options allow you to use Nikon’s AWL (Advanced Wireless Lighting)—a subset of Nikon CLS—to control remote flash units as a “Commander” master flash. Let’s examine the three available options. The options are available according to what type of Commander unit is mounted in the Accessory shoe; therefore, the camera menu offers only one or two of these options at a time. Following are all three options:
- Optical AWL: When you are using a Nikon SB-500 or SB-5000 Speedlight—or any compatible future Speedlights—you can use the mounted flash unit as a master-flash unit (Commander) to control multiple banks of remote Speedlight flash units. The mounted Commander Speedlight will emit low-intensity preflashes that send controlling information to the remote units, telling them how to expose the subject.
- Optical/radio AWL: This combination mode is available only when the SB-500 or an older Commander-capable flash unit (e.g., SB-700, SB-800, SB-900, SB-910, or SU-800) is mounted along with the WR-10 Wireless Remote Controller kit. The Flash control menu is not available when an older Speedlight is mounted alone; therefore, you must mount an SB-500 or an older Commander Speedlight (master) in combination with the WR-R10 radio receiver to use optical and radio control at the same time. This mode does allow you to easily control up to six banks (A–F) of remote (slave) Speedlights. Up to three banks (A–C) are devoted to Optical AWL and up to three banks (D–F) are relegated to Radio AWL. The actual number of banks you can control is set by the capabilities of the mounted units. For instance, the SB-500 can control only two banks (A–B) for optical, while the WR-R10 controls banks D–F. When using an SU-800 (or one of the other older Commander Speedlights), you will be able to control banks A–C for Optical AWL (via the Commander menu on the external master unit) and D–F for Radio AWL (via the camera’s menu).
- Radio AWL: In this mode all six available banks for the remote (slave) units (A–F) are controlled by the WR-R10 receiver. You must use remote flash units that supports Radio AWL, such as the Nikon SB-5000 (or compatible future flash units).
Now, let’s consider how to select one of these options. Use the following screens and steps to configure the Wireless flash options, according to which units are mounted on the camera:

Figure 3.7R – The Flash control’s Wireless flash options
- 1. Select Wireless flash options from the Flash control menu and scroll to the right (figure 3.7R).

Figure 3.7S – AWL combinations per flash and radio unit mounted
- 2. You will see a single Wireless flash options screen, with one of the menu selections seen in figure 3.7S, images 1–4. Each of the screens shown represent a different combination of Speedlight and WR-R10 radio unit, per the following descriptions (see bold red text in figure 3.7S, images 1–4):
- a. Figure 3.7S, image 1, displays the available options for using an SB-500 (or an older Commander master unit, such as the SB-910 or SU800) and the WR-R10 receiver (Optical/radio AWL or Radio AWL).
- b. Figure 3.7S, image 2, shows the available options when you have an SB-5000 and a WR-R10 receiver mounted (Optical AWL or Radio AWL).
- c. Figure 3.7S, image 3, displays the single Radio AWL option you have available when you have just the WR-R10 radio receiver unit mounted.
- d. Figure 3.7S, image 4, shows the single Optical AWL option you have when either the SB-500 or SB-5000 (or compatible future Speedlight) is mounted, but no WR-R10 transmitter is in the Ten-pin remote terminal. (Note: While the SB-5000 Speedlight is capable of receiving radio signals through the WR-R10 receiver, it is not capable of replacing the WR-R10 as a radio Commander unit for radio control of remote Speedlights.)
- 3. Select one of the Wireless flash options from the menu and press the OK button to lock in your choice.
Settings Recommendation: After experimenting quite a bit to fully understand these settings, I am now using an SU-800 in the camera’s Accessory shoe and the WR-10 kit in the Ten-pin remote terminal (10-pin port) to control remote flash units by radio and optical at the same time (see figure 3.7S, image 1). The same arrangement can be made using an SB-700, SB-800, SB-900, or SB-910 in the Accessory shoe, along with the WR-R10 receiver in the 10-pin port. With this arrangement, you may control up to three banks of remote Speed-lights (A–C), with the Commander master flash, by using the LCD menu on the master flash itself. Then, you can adjust the camera’s radio settings for the WR-R10 radio transmitter and control up to an additional three banks (D–F) by radio signal. This arrangement allows you to use your older flash unit(s) along with new SB-5000 flash unit(s) for simultaneous optical and radio control.
However, if you are missing some of the equipment necessary to power both radio and optical Speedlight control, you can do one or the other (optical or radio), with one of the combinations shown in figure 3.7S. The only difficulty you will encounter is that you must control your Commander master flash outside of the camera’s menu system when you have no WR-R10 radio unit to use along with the older Commander master-flash unit. The camera’s Flash control menu will be grayed out and unavailable. Therefore, be prepared to use normal Optical AWL from the older Speedlight (or SU-800) LCD menu directly, if you have no WR-R10 radio unit.
If you have a new SB-5000 Speedlight, you can control Optical AWL from the camera’s Flash control menu or the LCD menu on the flash itself. The D500 or SB-5000 will accept settings changes on their respective menus and then transmit the changes immediately to the other device.
Remote Flash Control and Resulting Options
Now, let’s go a little deeper into the usage of Nikon Speedlights and the WR-R10 Wireless Remote Controller for wireless control. We will consider Remote flash control and its companion settings for each Speedlight type. Keep in mind that menu names and choices will vary considerably according to which Speedlight type you are using as a master flash.
Three options are available under Remote flash control. Each of these options affects your choices in the camera’s menus, with the menu choices following Remote flash control changing their names according to which of the three settings you choose under Remote flash control.
When you are using an SB-5000 Speedlight and WR-R10 receiver, you will have all Remote flash control menus choices available to you. Using a different Speedlight, including the SB-500, will limit your menu choices. We will consider the following settings based on a D500 with an SB-5000 Speedlight flash unit in the Accessory shoe and a WR-R10 receiver in the 10-pin port. I’ll mention where limitations or changes come in with other Commander master-flash/WR-R10 receiver combinations.
Remote Flash Control and (GRP) Group Flash Options
The Group flash options allow you to control your remote flash groups in the way most familiar to users of older, optical-only Nikon CLS standards.
This subsection continues where the choices found in figure 3.7S leave off. After you have chosen which AWL method you will use (Optical/radio AWL, Radio AWL, or Optical AWL), you will need to choose a Remote flash control type, and then set the Group flash options that appear on the camera’s menu (figure 3.7T, image 3).

Figure 3.7T – Using Remote flash control and Group flash options
Use the following steps to set the Remote flash control and resulting Group flash options settings:
- 1. After setting the Wireless flash options, as shown in figure 3.7S, choose Remote flash control and scroll to the right (figure 3.7T, image 1).
- 2. Choose the Group flash setting and press the OK button to select it (figure 3.7T, image 2). Please note that using a flash unit other than the SB-5000 will disable any changes to the Remote flash control function, leaving it set to GRP–Group flash. No other Remote flash control setting is available unless you use the SB-5000 flash unit (or a compatible future flash unit).
- 3. Your camera’s menu will now show the words Group flash options just below Remote flash control (figure 3.7T, image 3). Select Group flash options and scroll to the right.
- 4. The final screen in the series (figure 3.7T, image 4) allows you to adjust the Group flash options for the Master flash and the Groups (A–C). It also allows you to set a channel for communicating with the remote flash unit optically. I chose Optical AWL for the first look at these settings because this is the most familiar Commander mode setting for previous Master flash configuration. If you have used Nikon CLS is the past, you have seen this final screen (image 4) many times. We will consider what the final screen looks like for Radio AWL and also Optical/radio AWL in a moment. But first, let’s examine what each of the settings do.
There are three columns in the Group flash options screen (figure 3.7U, images 1–3). The first column represents the Master flash and remote flash group headings (Group A to Group F), plus the communication Channel heading when you are using Optical AWL (image 1), Radio AWL (image 2), or Optical/radio AWL (image 3). Following are descriptions of the screens for each of the AWL types:

Figure 3.7U – Group flash options settings (per-type screen choices in figure 3.7T, image 4)
- • Optical AWL: In the first column of the Group flash options screens, you will notice some differences, according to which AWL type you have selected. For instance, in figure 3.7U, image 1 (Optical AWL), the camera is offering the normal three banks (A–C), the Master flash setting, and the Channel (1–4) selection.
- • Radio AWL: In figure 3.7U, image2 (Radio AWL), you will note that there are extra Groups (A–F) available. You cannot see past Group D (Groups E and F) on the Radio AWL screen unless you scroll down. You can control up to six groups of Speedlight units with the Radio AWL selection—if you have a WR-R10 receiver mounted. You do not have a Channel selection in the camera itself when using Radio AWL because the WR-R10 receiver has a physical switch on it offering three channels (CH) 5, 10, and 15 (see figure 3.7Q, image 3). You must set the radio-controlled Speedlight (e.g., SB-5000) to the same Channel setting as the WR-R10 receiver with the flash unit’s controls (for instance, the SB-5000 has an i button menu with a CHANNEL setting).
- • Optical/radio AWL: In figure 3.7U, image 3 (Optical/radio AWL), you will notice that you see only Groups D, E, and F. Where are Groups A, B, and C? Well, this mode is available only when you have an older Commander Master flash unit in the Accessory shoe (e.g., SB-700, SB-800, SB-900, SB-910, and SU-800). Groups A–C are controlled by the mounted Commander Master flash itself and you do not make any adjustments in the D500’s Group flash options screen. All adjustments for Groups A–C are instead made on the Commander Master flash unit’s LCD menu on back of the Master flash unit. Only Groups D–F can be adjusted from the camera’s Group flash options menu. To make this clearer: with this hybrid Optical/radio AWL setting, the Master flash unit itself controls Groups A, B, and C, while the D500 controls Groups D, E, and F. (Note on pairing the WR-R10 and the SB-5000: If you cannot get your remote SB-5000 to pair with the WR-R10 receiver after setting the CHANNEL (CH) for each unit, make sure you have selected a Mode (e.g., TTL) for the Group (D, E, or F) that is controlling the remote flash SB5000 unit. Note on using an SB-500: The Group flash options screen combines the screens in images 1 and 3 when you have an SB-500 mounted in the Accessory shoe. You must scroll up and down in the screen to see all the available Groups. The SB-500 provides only Groups A and B, but not C, for the optical side of the equation. The WR-R10 receiver will control Groups D, E, and F for the radio side.)
The second column in the Group flash options screens shown in figure 3.7U, images 1–3, represents the Mode setting, which includes the four selections in the following list of Mode types. The third column represents flash Comp. (compensation) for the Master flash and remote Group flashes:
- • TTL mode: The TTL setting allows you to use the full power of i-TTL technology. By leaving Mode set to TTL (figure 3.7U) for the Groups (A–C), you derive maximum flexibility and accuracy from all your flash units. In TTL mode, the Comp setting will display exposure values from −3.0 EV to +3.0 EV, a full six-stop range of exposure compensation for each group of Speedlights. You can set the Comp. in 1/3 EV steps for very fine control. In all three screens in figure 3.7U, Group A and Group B is set to TTL mode with +0.3 EV Comp for Group A and −0.3 EV Comp for Group B.
- • A mode: The A mode is an older non–i-TTL technology included for people who are accustomed to using older flash systems. You can safely ignore the A mode unless you want to experiment with it. It will require more configuration and testing on your part than TTL mode because it is not based on the amazing i-TTL technology. Otherwise, it works basically the same as TTL mode. The SB-5000’s light sensor for non-TTL-auto flash measures the reflected light from the subject. The SB-5000 then controls the ouput level of the main flash burst, with input from the camera and lens, which includes the ISO sensitivity, exposure compensation, and the size of the aperture. A mode use is most accurate when you are using lenses having a CPU that transmits data to the camera and flash (G, D, and E lenses). If you are using a non-CPU lens with no maximum aperture information entered into the camera, the flash is forced into using only reflected light from the subject to judge proper exposure.
- • M mode: This allows you to set different levels of flash output in 1/3 EV steps for the Speedlights in Group A, B, and C. The settings you can put in the Comp field are between 1/1 (full power) and 1/256 in 1/3 EV steps. The intermediate 1/3-step settings are presented as decimals following the power fraction (e.g.,1/16 −0.3). In all three screens in figure 3.7U, Group C is set to M mode at 1/16 power, less −0.3 EV step (1/3 EV step below 1/16 power). This mode requires you to experiment while getting the settings just right, but then provides very stable exposures.
- • −− mode (do not fire mode): The built-in Speedlight will not fire the main flash burst in this mode. It will fire the monitor preflashes because it uses them to determine exposure and communicate with the external flash groups for Optical AWL. It is often best to set the Master flash to – – mode so that the Master flash does not influence the lighting in your carefully arranged Groups of Speedlights (as seen in figure 3.7U, images 1 and 2). When you set Mode for any of the Groups (A–F) to – – mode, that entire group of flashes will not fire any flash output. You can use this mode to temporarily turn off one of the flash groups for testing purposes.
- 5. Once you have configured the options, press the OK button to lock in the settings.
Remote Flash Control and (A:B) Quick Wireless Control Options
The Quick wireless control options allow you to blend the power output of your remote flash groups in a very creative way.
This subsection continues where the choices found in figure 3.7S leave off. After you have chosen which AWL method you will use (Optical/radio AWL, Radio AWL, or Optical AWL), you will need to choose the Remote flash control type named A:B Quick wireless control and then modify the Quick wireless control options from the camera’s menu that shows below Remote flash control (figure 3.7V, image 3).

Figure 3.7V – Using Remote flash control and Quick wireless control options
Use the following steps to set the A:B Quick wireless control options:
- 1. After having previously set the Wireless flash options in figure 3.7S, choose Remote flash control and scroll to the right (figure 3.7V, image 1).
- 2. Choose the A:B Quick wireless control setting and press the OK button to select it (figure 3.7V, image 2). Please note that using a flash unit besides the SB-5000 will disable any changes to the Remote flash control function, leaving it set to GRP–Group flash. No other Remote flash control setting is available unless you use the SB-5000 flash unit (or a compatible future flash unit).
- 3. Your camera’s menu will now show the words Quick wireless control options just below Remote flash control (figure 3.7V, image 3). Select Quick wireless control options and scroll to the right.
- 4. The final screen in the series (figure 3.7W), which is the same screen as figure 3.7V, image 4 (except with adjustments added), allows you to adjust the Quick wireless control options. You can control three Groups of remote Speedlights: Groups A, B, and C. The SB-5000 Master flash will not fire anything except the optical communication preflashes so it cannot be used for primary lighting and has no Master flash selection on this screen. Groups A and B will use TTL only and you can adjust a blend of power between the two groups by adjusting the Output (A:B) setting. You can select from --:1 to 1:--, and a range of settings in between. --:1 means that Group A will not fire, while Group B does fire. 1:-- means that Group A will fire, while Group B does not fire. The in-between settings range from 1:8, which means that Group A is 8 times less powerful than Group B, to 8:1, which means that Group A is 8 times more powerful than Group B. You can select 1:1 to make both flashes use equal TTL-based output power. Following is a list of all the settings in the Output (A:B) up/down menu:
Output (A:B) Settings
--:1, 1:8, 1:6, 1:4, 1:3, 1:2, 1:1.5, 1:1, 1.5:1, 2:1, 3:1, 4:1, 6:1, 8:1, 1:--
Once you have arrived at the proper blend of flash output between Groups A and B, you can also add from +0.3 to –0.3 Compensation, which affects both A and B equally. Additionally, you can use Group C in Manual (M) mode only. You can adjust the flash output in Group C from 1:1 (full power) to 1/256 (1/256th of full power) in 1/3 EV step increments. Group C in figure 3.7W is set to 1/16 –0.3, which is 1/3 EV step below 1/16 of full power. This allows you to use Group C as a fill flash group or as the primary group with Groups A and B providing blended and compensated fill flash. (Note: If you are using Radio AWL instead of Optical AWL, the screen shown in figure 3.7W will not have the Channel selection since that is controlled by a physical switch on the WR-R10 receiver.)
- 5. Once you have configured the options, press the OK button to lock in the settings.

Figure 3.7W – Quick wireless control options with adjustments
Remote Flash Control and (RPT) Remote Repeating Options
The Remote repeating options allow you to set up a creative strobing (multiple-exposure) effect with remote groups of Speedlight flash units.
This subsection continues where the choices found in figure 3.7S leave off. After you have chosen which AWL method you will use (Optical AWL or Radio AWL), you will need to choose the Remote flash control type named RPT Remote repeating. Then you must configure the Remote repeating options setting that shows below Remote flash control (figure 3.7X, image 3).
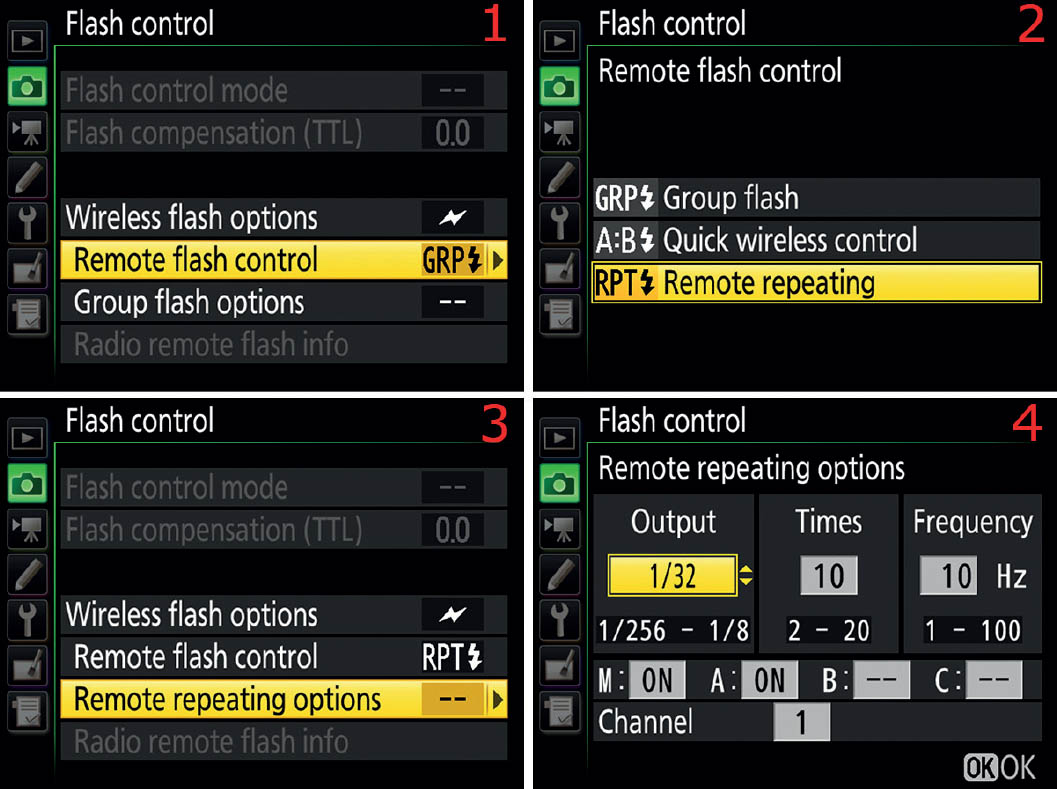
Figure 3.7X – Using Remote flash control and Remote repeating options
Use the following steps to set the RPT Remote repeating options:
- 1. After having previously set the Wireless flash options in figure 3.7S, choose Remote flash control and scroll to the right (figure 3.7X, image 1).
- 2. Choose the RPT Remote repeating setting and press the OK button to select it (figure 3.7X, image 2). Please note that using a flash unit besides the SB-5000 will disable any changes to the Remote flash control function, leaving it set to GRP–Group flash. No other Remote flash control setting is available unless you use the SB-5000 flash unit (or a compatible future flash unit).
- 3. Your camera’s menu will now show the words Remote repeating options just below Remote flash control (figure 3.7X, image 3). Select Remote repeating options and scroll to the right.

Figure 3.7Y – Remote repeating options for Optical and Radio AWL
- 4. The final screen in the series (figure 3.7Y)—which is the same screen as figure 3.7X, image 4—allows you to adjust the Remote repeating options. You must enter three values to set up the strobing effect: Output, or how powerful the flash is—from 1/8 to 1/256 power; Times, or how many times the flash pulse fires—from 2 to 20 times; and Frequency, or how fast the flash pulse fires—from 1 to 100 pulses per second (Hz). On the lower part of the screen, you can control up to three Groups of remote Speedlights in manual mode, including Groups A–C in Optical AWL mode and Groups A–F in Radio AWL mode. You can use the Master flash (M) as an additional flash by setting it to On. Any Group set to On will participate in the repeating flash output. In both of the screens shown in figure 3.7Y, only Groups A and B are active (set to On). If you are using Optical AWL, you will need to choose a Channel (1–4) for the Master flash to transmit to the remote flashes. If you are using Radio AWL, the channel is set with a physical switch on the WR-R10 receiver unit.
- 5. Once you have configured the options, press the OK button to lock in the settings.
Radio Remote Flash Info
The Radio remote flash info function simply allows you to see the Speedlight unit being controlled by the WR-R10 receiver and which Group that flash is working under.

Figure 3.7Z – Radio remote flash info
Use the following steps to examine the Speedlights being controlled by radio transmitter unit:
- 1. Follow the screen flow shown in figure 3.7Z, images 1 and 2 (Flash control > Radio remote flash info) until you arrive at the third screen in the series.
- 2. The final screen (figure 3.7Z, image 3) shows that my D500 is controlling a single SB-5000 Speedlight and it is using Group D to do so (D SB-5000). When you have examined your Speedlight configuration, press the OK button to finish.
Choose Image Area
(User’s Manual: Page 284, Menu Guide: Page 45)
The D500 camera offers two Image area formats: DX and 1.3×. The two pictures in figure 3.8A are of my 1950s Agfa Isolette III folding, medium format (120) camera, with its Solinar 75mm f/3.5 lens and its Syncho-Compur mechanical shutter. The left picture of the Agfa is in DX format and the right picture is in 1.3× format.
To display the two formats properly, I did not vary the camera position at any point when taking these images so that you can see how the change in Image area affects the size of the subject.
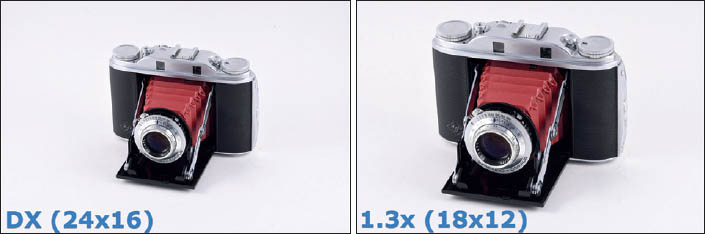
Figure 3.8A – The two Image area formats
Following is a detailed list of specifications for the two available image areas, including sensor format (mm), Image size, pixel count, and megapixel (M) rating:
DX Image area (24 × 16mm):
- Large: 5568 × 3712 – 20.7 M
- Medium: 4176 × 2784 – 11.6 M
- Small: 2784 × 1856 – 5.2 M
1.3x Image area (18 × 12mm):
- Large: 4272 × 2848 – 12.2 M
- Medium: 3200 × 2136 – 10.0 M
- Small: 2128 × 1424 – 3.1 M
The 1.3× format is a 12.2 MP crop from the center of the 20.7 MP DX sensor. Now let’s see how to select one of the Image area formats for those times you need to vary the Image area.

Figure 3.8B – Choosing an Image area format
Use the following steps to select one of the Image area formats:
- 1. Select Choose image area from the Photo Shooting Menu and scroll to the right (figure 3.8B, image 1).
- 2. Select one of the two Image area crops, DX (24 × 16) or 1.3x (18 × 12) and then press the OK button to save the Image area setting.
Micro Four Thirds from a Nikon?
The 1.3x image area (18 × 12mm) is very similar in size to the Micro Four Thirds industry-standard image format (18 × 13.5mm). It still has a reasonably Large image size of 12.2 MP, which allows room for some extra cropping, if needed.
The 1.3x image area is a 50 percent crop of a full-frame (FX) Nikon sensor (36 × 24). While using a telephoto lens in 1.3x mode, the apparent focal length will be doubled compared to FX (e.g., a 300mm lens provides a 600mm field of view), while still maintaining image quality equivalent to the Micro Four Thirds system.
If you’ve been wanting to photograph small objects from a distance, such as birds, this format may be quite useful to you.
Using the i Button Menu
There is an alternate way to access the Image area menu. When you press the i button on the back bottom right of the camera, the i button menu opens, with Image area as the first selection. Let’s examine how to use it.

Figure 3.8C – Using the i button menu to select an Image area
Use the following steps to select one of the Image area formats from the i button menu:
- 1. Press the i button to open the i button menu (figure 3.8C, image 1).
- 2. Select Choose image area from the menu and scroll to the right (figure 3.8C, image 2).
- 3. Select one of the two Image area sizes (figure 3.8C, image 3) and press the OK button to save the Image area setting.
Viewfinder Image Area Frames
When you select the DX Image area mode, the camera will use the entire viewfinder for subject viewing (figure 3.8D, left image). However, when you select the 1.3x Image area mode, the camera will display a special frame in the DX viewfinder that marks off the area encompassed by that cropped Image area mode (figure 3.8D, right image).

Figure 3.8D – DX (left) and 1.3x (right) viewfinder area frames
The DX mode viewfinder (left image) contains a total of 153 focus points (AF points). The user can select any of the 55 larger squares shown in the DX viewfinder—on the left in figure 3.8D—by pressing the Multi selector pad or Sub-selector (joystick). Only the camera can select the AF points represented by the tiny black squares in between the larger squares.
The 1.3x mode uses less of the Viewfinder, as shown by the dark frame surrounding the 117 available AF points in the 1.3x image on the right in figure 3.8D. You can directly control only 45 of those with the Sub-selector or Multi selector pad, as represented by the larger squares. The camera controls the AF points represented by the tiny black squares in between the larger squares.
The normally black 1.3x frame will be briefly displayed in red when you press the Shutter-release button halfway down while the ambient light is low. (Note: You can control when the 1.3x frame line flashes red by adjusting the Custom Setting Menu > a Autofocus > a12 Focus point options > Focus point illumination setting, as described in the chapter titled Custom Setting Menu on page 249.)
When using the smaller 1.3x Image area, any parts of your subject that stray outside of the 1.3x frame when you are taking pictures will not be in the final image.
When you are using Live view photography mode, the camera will compensate for the varying frame sizes and will show you the Image area of the actual DX or 1.3x Image area only. Therefore, you can frame normally when using Live view on the camera’s Monitor.
Settings Recommendation: Being a nature shooter, I normally leave my camera set to DX, its largest image area. If I need a little extra apparent reach for one of my telephoto lenses, I may switch the camera to 1.3x mode for convenience, although I could simply crop the image later in the computer. This extra 1.3x Image area format is merely to prevent you from having to manually crop the image later.
Image Quality
(User’s Manual: Page 284, Menu Guide: 46)
Image quality is simply the type of image your camera creates. You can shoot several distinct image formats with your D500 (NEF/RAW, JPEG, JPEG![]() , and TIFF).
, and TIFF).
We’ll examine each format in detail and discuss the pros and cons of each. When we are done, you will have a better understanding of the formats and will be able to choose an appropriate one for each of your styles of shooting. Following are the screens and steps to select an Image quality setting.
Setting Image Quality with the Menu System

Figure 3.9A – Choosing an Image quality setting
Use these steps to select an image quality via the Photo Shooting Menu:
- 1. Select Image quality from the Photo Shooting Menu and scroll to the right (figure 3.9A, image 1).
- 2. Choose one of the 14 Image quality types listed (figure 3.9A, image 2) and press the OK button to select the format.
Setting Image Quality with External Camera Controls
You can also use the QUAL button, rear Main command dial, Control panel, and Information display to set the image quality. This method can be much faster than using the menus. Here’s how.

Figure 3.9B – Setting the Image quality with external controls
Use these steps to select an image quality with external camera controls (figure 3.9B):
- 1. Hold down the QUAL button (figure 3.9B, image 1).
- 2. Rotate the rear Main command dial (figure 3.9B, image 2) to change the Image quality setting (e.g., RAW, TIFF, FINE, NORM, or BASIC). The FINE, NORM, and BASIC settings— and the settings with the same name, but with a star (
 )—all refer to JPEG formats, with each having a different compression ratio. I selected FINE (Optimal quality JPEG fine), as shown on the Control panel (figure 3.9B, image 3) and the Information display (figure 3.9B, image 4). You can use the Information display in image 4 with the other controls by first pressing the info button to open the screen.
 - 3. Once a quality level is selected, release the QUAL button to lock in the modified Image quality settings.
The camera supports the following 14 Image quality types (figure 3.9A, image 2):
- NEF (RAW) + JPEG fine
- NEF (RAW) + JPEG fine
- NEF (RAW) + JPEG normal
- NEF (RAW) + JPEG normal
- NEF (RAW) + JPEG basic
- NEF (RAW) + JPEG basic
- NEF (RAW)
- JPEG fine
- JPEG fine
- JPEG normal
- JPEG normal
- JPEG basic
- JPEG basic
- TIFF (RGB)
Which Image Quality Format Should I Use?
New DSLR users may feel unsure about which format is best to use. In fact, it is a good idea to use all three formats at different times. We will briefly discuss the basics of the formats, as a nice review for all shooters:
- NEF (RAW): The 12- or 14-bit NEF (RAW) format is designed for those photographers who have the time and inclination to work on, or post-process, each image. The camera merely captures light information when shooting in RAW but does not process the data into a usable image. It is up to you to develop a workflow that allows finalizing the image within the computer. The reward for this extra work is the highest possible image quality that can be achieved with the camera. Note: The D500 also has an NEF (RAW) processing function on the Retouch Menu (page 452) that allows you to convert to JPEG from a RAW file on the memory card. File sizes: When I took a picture of tree leaves, my camera made a Lossless compressed NEF file of 25.9 MB. The same scene had a 21.8 MB Compressed NEF, while the Uncompressed NEF file was 44.8 MB.
- JPEG: The 8-bit JPEG format is for those times when you must have a finished image right now! The image comes out of the camera in ready-to-use form. JPEG is a lossy format, however, and it throws away a considerable amount of image data when the camera converts the 12- or 14-bit RAW file down to 8 bits. The image data that is left is of the highest quality and is ready to use. However, a JPEG cannot be modified and resaved more than a time or two without JPEG compression losses damaging the image. Use JPEG when you have to use the image right away or when you do not have the time or inclination to work with RAW images. JPEG files are smaller than NEF files by far, with an average size for a JPEG file being from 2 to 15 MB, according to the complexity of the scene and compression ratio used. The camera uses the following compression ratios for a JPEG file: JPEG fine = 1:4, JPEG normal = 1:8, and JPEG basic = 1:16. The star symbol () you will find following several of the JPEG choices (e.g., JPEG fine) represents what Nikon called “Optimal quality” in previous cameras. If a JPEG mode does not have the star (e.g., JPEG fine), it means that the camera is using what Nikon calls “Size priority.” Size priority simply adds a higher compression ratio to images that are more complex, leading to a similar image file size for nonstar JPEG images. On the other hand, the JPEG images with a use a similar compression ratio leading to higher-quality pictures as image complexity rises. File sizes on a -rated image will be higher for more complex images. File sizes: When I took a picture of tree leaves, my camera made a JPEG fine file of 12.6 MB and a JPEG fine file size of 11.8 MB. A JPEG normal file was 7.5 MB and the JPEG normal file was 7 MB. The JPEG basic file was 4.4 MB and the JPEG basic file was 2.5 MB.
- TIFF (RGB): The 8-bit TIFF file type, as created by the camera, is basically like a JPEG with no compression routines applied. The image file can be used immediately without conversion. The 12- to 14-bit RAW file is converted into an 8-bit file, throwing away considerable data, so TIFF is initially a lossy format, losing from 4 to 6 bits of image data. However, once the file is created, you can modify and resave it without compressing the data or losing any more image detail. If you are in a situation that requires an immediate-use file and a JPEG won’t do because image modification is required, and you have no interest in or experience with NEF (RAW) files, the TIFF format is a good candidate. The biggest drawback to a TIFF file is its large file size. File size: A picture of tree leaves was recorded as a 65.4 MB TIFF file. It won’t take many of those to fill up a memory card or two.
Combined NEF and JPEG Shooting (Two Images at Once)
Some shooters use the six storage modes at the top of the list in figure 3.9A, image 2, whereby the D500 takes two images at the same time—NEF (RAW) + JPEG fine, normal, or basic (and JPEG![]() versions). This gives you the best of both worlds in that the camera captures an NEF file and creates an additional JPEG file each time you press the Shutter-release button. Here are the first six modes found at the top of the Photo Shooting Menu > Image quality setting list:
versions). This gives you the best of both worlds in that the camera captures an NEF file and creates an additional JPEG file each time you press the Shutter-release button. Here are the first six modes found at the top of the Photo Shooting Menu > Image quality setting list:
- NEF (RAW) + JPEG fine
- NEF (RAW) + JPEG fine
- NEF (RAW) + JPEG normal
- NEF (RAW) + JPEG normal
- NEF (RAW) + JPEG basic
- NEF (RAW) + JPEG basic
You can set the Photo Shooting Menu > Secondary slot function to write the NEF (RAW) file to one card and the JPEG to the other.
You can use the NEF (RAW) file to store all the image data and later process it into a masterpiece, or you can use the JPEG file immediately with no adjustment.
There is no need to go into any amount of detail about these modes since the NEF (RAW) + JPEG modes have the same features as each individual mode. In other words, the RAW file in NEF (RAW) + JPEG mode is just like a normal RAW file if you were using the standalone NEF (RAW) mode. The JPEG in the NEF (RAW) + JPEG mode is just like a standalone JPEG fine, normal, or basic image without the NEF (RAW) file.
Settings Recommendation: Which format do I prefer? Why, NEF (RAW), of course! However, it does require a bit of a commitment to shoot in this format. The camera is simply an image-capturing device, and you are the image manipulator. You decide the final format, compression ratios, sizes, color balances, and so on instead of letting Nikon’s software engineers decide. You create the final image when you post-process it with your computer and save it in a final format, such as JPEG. Your RAW file stays untouched and ready for reuse.
By shooting in NEF (RAW) mode, you have the absolute best image your camera can produce. It is not modified by the camera’s software and is ready for your personal touch. No camera processing allowed!
If you get nothing else from this section of the chapter, remember this: when your camera is processing the images in any way, it is modifying or throwing away image data. There is only a finite amount of data for each image that can be stored on your camera, and later on the computer. With JPEG or TIFF mode, your camera optimizes the image according to the assumptions recorded in its memory. Data is being thrown away permanently, in varying amounts.
If you want to keep all of the image data that was recorded with your images, you must store your originals in RAW format. Otherwise, you’ll never again be able to access that original data to change how the image looks. A RAW file is the closest thing to a film negative or a transparency that your digital camera can make. That’s important if you would like to modify the image later. If you are concerned with maximum quality, you should shoot and store your images in RAW format.
Later, when you have the urge to make another masterpiece out of the original RAW image file, you’ll have all of the original picture data intact for the highest-quality image.
I shoot in NEF (RAW) format for my most important work and JPEG fine for the rest. Some people find that JPEG fine is sufficient for everything they shoot. Those individuals generally do not like working with files in-computer or do not have time to do so. NEF (RAW) files are not yet usable images and must be converted to another format. You’ll use both RAW and JPEG, I’m sure. The format you use most often will be controlled by your time constraints and digital workflow. Most of us use TIFF only when we convert a RAW file in-computer into that format. I rarely, if ever, shoot images in TIFF. There are just not enough benefits in TIFF files to deal with the larger files and slower transfer speeds, in my opinion. Shoot RAW for the best and JPEG for the rest!
Image Size
(User’s Manual: Page 284, Menu Guide: 47)
Image size lets you shoot with your camera set to various megapixel (M) ratings. The default Image size setting for the D500 is Large DX, or 20.7 M (20.7 megapixels) for JPEG, NEF (RAW), and TIFF files. You can change this megapixel rating in two ways (DX or 1.3x), based on the Choose image area settings discussed earlier in the chapter.
This setting is relatively simple because it just affects the megapixel size of the image. Let’s see how to set the Image size for all three image formats.
Image Size for JPEG/TIFF Files
Following are the screens and steps to select the Image size for JPEG and TIFF images (figure 3.10A). Both have the same megapixel size but, of course, will vary the image file size (megabytes). As discussed earlier in the chapter, JPEG files are compressed while TIFF files are uncompressed. Both have 8 bits of color depth. The actual megapixel (M) size of each Image size selection is listed in figure 3.10A, images 3 and 4.

Figure 3.10A – Choosing an Image size setting
Use these steps to choose an JPEG/TIFF Image size for DX or 1.3x shooting:
- 1. Follow the screen flow shown in figure 3.10A, images 1 and 2 (Image size > JPEG/TIFF), until you arrive at the third screen in the series.
- 2. Choose one of the three Image size settings listed for JPEG and TIFF files. Figure 3.10A, image 3, represents the DX setting from the previously considered function Choose image area, whereas image 4 represents the 1.3x setting (see red labels). Press the OK button to choose the size.
Image Size for NEF (RAW) Files
The D500 has three NEF (RAW) Image sizes for more flexibility than previous Nikon HDSLR cameras. You can select from RAW L (Large), RAW M (Medium), and RAW S (Small). Figure 3.10B, images 3 and 4, show the various megapixel (M) sizes for each Image size setting.

Figure 3.10B – Choosing an Image size setting
Use these steps to choose an JPEG/TIFF Image size for DX or 1.3x shooting:
- 1. Follow the screen flow shown in figure 3.10B, images 1 and 2 (Image size > NEF (RAW)) until you arrive at the third screen in the series.
- 2. Choose one of the three Image size settings listed for NEF (RAW) files. Figure 3.10B, image 3, represents the DX setting from the previously considered function Choose image area, whereas image 4 represents the 1.3x setting (see red labels). Press the OK button to choose the size.
Setting the Image Size Using External Camera Controls
Following are the steps, screens, and physical controls used to change the Image size quickly without using the normal menu system.

Figure 3.10C – Setting Image size with external controls
You can also choose the Image size by using external camera controls, as shown in figure 3.10C. Use the following steps:
- 1. Hold down the QUAL button (figure 3.10C, image 1).
- 2. Rotate the front Sub-command dial (figure 3.10C, image 2) to change the Image size setting (L, M, or S).
- 3. Watch the Image size values (L, M, or S) change on the Control Panel (figure 3.10C, image 3) or the Information display (image 4). Press the info button to open the Information display.
- 4. Release the QUAL button to lock in the modified Image size settings.
Settings Recommendation: You’ll get the best images at 20.7 M (DX), of course. Using the smaller sizes won’t affect the quality of a smaller print, but it will limit your ability to enlarge your images. I recommend leaving your camera set to Large (L or RAW L) unless you have a specific reason to shoot smaller images (e.g., social media usage) or you have low-capacity memory cards, which is anything under 16 GB with the D500.
NEF (RAW) Recording
(User’s Manual: Page 285, Menu Guide: Page 48)
NEF (RAW) recording is composed of two menu choices—NEF (RAW) compression, which affects image file size, and NEF (RAW) bit depth, which affects color quality. Let’s examine each choice.
NEF (RAW) Compression
In previous sections, we discussed how JPEG files have different levels of compression that vary the size of a finished image file. NEF (RAW) also has compression choices, though not as many. The nice thing about the RAW compression methods is that they don’t throw away massive amounts of image data like JPEG compression does. NEF (RAW) is not considered a lossy format because the file stays complete, with virtually all the image data your camera captured.
One of the compression methods, called Compressed, is very slightly lossy. The other, Lossless compressed, keeps all the image data intact. Let’s discuss how each of the available compression methods works. There are three NEF (RAW) formats available, as follows:
- NEF (RAW) Lossless compressed (20–40 percent size reduction)
- NEF (RAW) Compressed (35–55 percent size reduction)
- NEF (RAW) Uncompressed (No compression; full file size)
Here are some details on each of the choices for RAW L files:
- NEF (RAW) Lossless compressed: This choice is the best one for most photographers. According to Nikon, this compression will not affect image quality because it is a “reversible” compression algorithm. Because Lossless compressed shrinks the stored file size by 20 to 40 percent—with no image data loss—it’s my favorite compression method to use. It works somewhat like a ZIP file on your computer—it compresses the file but allows you to use it later with all the data still available.
- NEF (RAW) Compressed: Before the newest generation of cameras, including the D500, this mode was known as “visually lossless.” The image is compressed and the size is reduced by 35 to 55 percent, depending on the amount of detail in the image. A small amount of data loss is involved in this compression method. Most people won’t be able to see the loss because it doesn’t affect the image visually. I’ve never really seen any loss in my images using this method. However, I’ve read that some have noticed slightly less highlight detail. Nikon says that this is a nonreversible compression, so once you’ve taken an image using this mode, any small amount of data loss is permanent. If this concerns you, then use the Lossless compressed method discussed previously. It won’t compress the image quite as much (20–40 percent) but is guaranteed by Nikon to be a reversible compression that in no way affects the image.
- NEF (RAW) Uncompressed: No compression is applied to the image. The main drawback to this mode is that your images will be larger. Each will be in the 42- to 45-megabyte range, so it will take larger storage media to contain your images. With Lossless compressed available, I feel that this method is semi-obsolete.
NEF (RAW) Real File Sizes
I took a picture of the same complex subject with my D500 in all three NEF (RAW) modes, just to compare file size. Here are my findings:
• Lossless compressed: |
24.9 MB |
• Compressed: |
20.3 MB |
• Uncompressed: |
44.2 MB |
Although the file size will vary by a few megabytes, according to the complexity (detail) in the subject, the RAW file sizes will be similar in your D500.
Selecting an NEF (RAW) Compression Level

Figure 3.11A – RAW (NEF) compression
Here are the steps to select one of the NEF (RAW) compression types:
- 1. Follow the screen flow shown in figure 3.11A, images 1 and 2 (NEF (RAW) recording > NEF (RAW) compression) until you arrive at the third screen in the series.
- 2. Select one of the three compression methods (figure 3.11A, image 3) and then press the OK button to save your selection.
Settings Recommendation: I shoot in Lossless compressed RAW most of the time because I’m concerned with maximum quality along with good storage capacity. The Lossless compressed method makes the most sense to me. It gives me a file size significantly smaller (22–28 MB) than the Uncompressed setting’s results (44+ MB). I do not use Compressed simply because Lossless compressed is available. Even though I might not be able to see any image quality loss, it bothers me that it is there, if only slightly. A few extra percentage points of compression is not worth the potential small data loss to me. If I were running out of card space but wanted to keep shooting RAW, I might consider changing to Compressed temporarily. Otherwise, it’s Lossless compressed for me!
Why does your memory card’s remaining image capacity seem to stay the same in NEF Lossless compressed and Compressed modes as in Uncompressed mode? Shouldn’t it show lots more capacity in the compressed modes since they make the image smaller by 20 to 55 percent? The reason your camera does not show any increased image capacity on the Control panel in the compressed modes is because the D500 has no idea how well it will be able to compress a particular image.
An image with a large amount of blank space, such as an expanse of sky, will compress a lot more efficiently than an image of a forest with lots of detail. The camera shows a certain amount of image storage capacity in NEF (RAW) modes—about 1300 Lossless compressed RAW images with a 64-gigabyte card. However, you’ll find that in the compressed modes, the D500 does not decrease the image capacity by one for each picture taken, as it does in Uncompressed mode.
This means that the camera will decrease the number of available images only every two or three shots, according to how well it was able to compress each image. When the card is full, it might have more than twice as many images stored as it initially reported it could hold. Basically, your D500 deliberately underreports storage capacity when you are shooting in either of the NEF (RAW) compressed modes.
NEF (RAW) Bit Depth
NEF (RAW) bit depth is a special feature for those of us concerned with capturing the best color in our images. The D500 has three color channels: one for red, another for green, and the final one for blue. It combines those color channels to form all the colors you see in your images. You may have seen the acronym RGB in your camera study. RGB stands for red, green, blue—the three color channels. Let’s talk about how bit depth, or the number of colors per channel, can make your pictures even better.
With the D500, you can select the bit depth stored in an image. More bit depth equals potentially better color gradations. The default for the D500 is 14-bit (16,384 colors for each RGB channel), or you can switch it to 12-bit (4,096 colors per RGB channel). The more color bit depth in your images, the better they can look—if there is a lot of color in your subject in the first place.
Why would anyone set their camera to a lower bit depth and reduce its color capacity and smoothness? Older DSLRs used to suffer from a slower frame rate when shooting bursts of images in continuous high-speed (CH) shooting mode. The D500 does not have slower frame rates from 14-bit shooting.
However, a 14-bit image file is bigger and will make the internal buffer space in the camera hold less. Also, the additional file size from the greater color capacity in a 14-bit image can lead to a little slower image writing to the memory cards and transfer to the computer later.
Therefore, people who are concerned about maximum camera speed will sometimes shoot in 12-bit mode. A photographer shooting a football game will not have as great a concern for maximum color depth; he wants shooting speed to capture the shot. On the other hand, a landscape artist wants as much color depth as her pictures can contain. She wants beautiful color gradations and maximum color fidelity.
The good thing for D500 users is that shooting speed is barely affected by using the best bit depth (14-bit). Therefore, most serious sports shooters on a budget will opt for a camera like the Nikon D500 with an extremely high frame rate of up to 10 fps. Why settle for less?
Selecting a Bit-Depth
As mentioned earlier, the D500 has the following two bit depths available for RAW L images:
- 12-bit: 4,096 colors per channel
- 14-bit: 16,384 colors per channel

Figure 3.11B – Choosing an NEF (RAW) bit depth
Here are the steps to choose a bit depth:
- 1. Follow the screen flow shown in figure 3.11B, images 1 and 2 (NEF (RAW) recording > NEF (RAW) bit depth) until you arrive at the third screen in the series.
- 2. Select 12-bit or 14-bit from the menu (figure 3.11B, image 3) and press the OK button to save your selection.
Settings Recommendation: Which bit depth setting is best? Well, I always use 14-bit because I want all the color my camera can capture for the best pictures later. If you read my tutorial on bit depth in the next section, you’ll understand why I feel that way. However, my style of shooting is nature oriented, so I am concerned with capturing every last drop of color I can.
There is one small disadvantage to using the 14-bit mode. If you choose 14-bit, be aware that your file sizes will be 10 to 20 percent larger than they would be in 12-bit. There is a lot more color information being stored, after all; therefore, 14-bits is best overall for image color quality, even if the file size is a little larger. Memory card sizes and computer hard drives are less expensive these days.
Channel and Bit Depth Discussion
Many experienced D500 users may already have a handle on this bit-depth information. However, I decided to include this short tutorial in the book because it is very important information to a digital photographer. This information is a good review for most of us.
- 1. 12-bit image: An image from your camera is an RGB image. As mentioned previously, RGB stands for red, green, blue. Each of the colors has its own “channel.” If you are shooting in 12-bit mode, your camera will record up to 4,096 colors for each channel—which means there will be up to 4,096 different reds, 4,096 different greens, and 4,096 different blues. Lots of color! In fact, almost 69,000,000,000 (69 billion) colors (4,096 × 4,096 × 4,096).
- 2. 14-bit image: However, if you set your camera to 14-bit mode, instead of just 4,096 different colors per channel (as in 12-bit mode), the camera can now store 16,384 different colors in each channel. Wow! That’s quite a lot more color—almost 4,400,000,000,000 (4.4 trillion) shades (16,384 × 16,384 × 16,384). Is that important? Well, it can be, because the more color information you have available, the better the image. I always use the 14-bit mode now that it’s available. That allows for smoother color changes when a large range of color is actually in the image. I like that!
- 3. 8-bit image: Of course, once you shoot and save your image as an 8-bit JPEG or 8-bit TIFF, most of those colors are compressed or thrown away. Shooting a TIFF or JPEG image in-camera (as opposed to a RAW L (Large) image) means that the D500 converts from a 12- or 14-bit RGB file down to an 8-bit file. An 8-bit file can hold only 256 different colors per RGB channel, or a little over 16,700,000 (16.7 million) colors (256 × 256 × 256). That sounds like quite a lot of color, and it is. However, when you compare the 16.7 million colors in a camera-created 8-bit JPEG or TIFF image to the potential 4.4 trillion colors in a 14-bit NEF (RAW) file, the 8-bit color potential is relatively small in comparison.
I always shoot in the 20.7 MP RAW L (Large) format, so that later I can make full use of all those potential extra colors to create a different look for the same image if I’d like.
If you shoot RAW L and in 14-bit, you can later save the file as a 16-bit TIFF and not lose any color information. The D500 will not create a 16-bit TIFF; it is limited to an 8-bit TIFF.
You can still save the image in your graphics program in a 16-bit format. A 16-bit file can contain 65,536 different colors in each of its RGB channels; therefore, all the color in the 14-bit RAW file will fit, with room to spare. Some photographers (like me) save their RAW files as intermediate 16-bit TIFF files to post-process the image. TIFF is a known and safe industry-standard format that will fully contain all image color information from a RAW file. However, an uncompressed, 16-bit TIFF file (saved in Photoshop) from a D500 image is well over 60 MB in size. That’s less than 20 images per gigabyte of storage space. Therefore, once I have saved the post-processed TIFF file as the final JPEG file for image use, I may delete the intermediate 16-bit TIFF. The RAW file remains untouched and ready for reuse.
Lossless compressed NEF (RAW L) is the best way to store your D500 images long-term, at only about 24 MB each, with all potential color information included in the file.
ISO Sensitivity Settings
(User’s Manual: Page 285, Menu Guide: 49)
ISO sensitivity settings give you control over the light sensitivity of the imaging sensor, including whether you manually control it or the camera sets it automatically.
An ISO sensitivity number, such as 200 or 3200, is an agreed-upon sensitivity level for the image-capturing sensor. Virtually everywhere one goes in the world, all camera ISO numbers will mean the same thing. With that fact established, camera bodies and lenses can be designed to take advantage of the ISO sensitivity ranges they will have to deal with.
In figure 3.12A we see the external camera controls used to change the ISO sensitivity on the D500. This is the easiest method to change the camera’s ISO sensitivity setting, although it doesn’t involve the Photo Shooting Menu, which we are now examining.

Figure 3.12A – External controls to set ISO manually
Here are the steps you’ll use to manually adjust the camera’s ISO sensitivity:
- 1. Hold down the ISO button near the Shutter-release button (figure 3.12A, image 1).
- 2. Rotate the rear Main command dial counterclockwise to increase the ISO sensitivity or clockwise to decrease sensitivity (figure 3.12A, image 2). Release the ISO button to set the value.
- 3. The ISO sensitivity number will show on the bottom right of the Control panel, Viewfinder, Live view screen (when active), and Information display (when active). Figure 3.12A, image 3, shows the Control panel, which is most often used. Image 4 shows the ISO sensitivity setting on the Information display, which appears on the Monitor only when the info button has been pressed before you start using the external controls.
ISO Sensitivity
You can also use ISO sensitivity settings directly from the Photo Shooting Menu to change the camera’s ISO sensitivity. Figure 3.12B shows the three screens used. Select your favorite ISO sensitivity for the circumstances in which you find yourself.
Notice in image 3 of figure 3.12B that you have a scrollable list of ISO sensitivity settings, from Lo 1 (ISO 50) to Hi 5 (ISO 1,638,400). The “normal” ISO range for the D500 is ISO 100 to 51200. Following is a list of what the Lo and Hi numbers mean and the normal ISO range. Nikon does not publish what the actual Lo and Hi numbers represent, so these figures are approximations. (The math for the Lo and Hi figures was based on the cube root of 2, or 1.2599, for proportional divisions of the Lo and Hi 0.3 and 0.7 values):
• Lo 1: |
ISO 50 |
• Lo 0.7: |
ISO 79.37 (~ISO 80) |
• Lo 0.3: |
ISO 62.99 (~ISO 63) |
• Normal ISO range: |
ISO 100 to ISO 51,200 |
• Hi 0.3: |
ISO 64,507 (~ISO 64,000) |
• Hi 0.7: |
ISO 81,274 (~ISO 81,000) |
• Hi 1: |
ISO 102,400 |
• Hi 2: |
ISO 204,800 |
• Hi 3: |
ISO 409,600 |
• Hi 4: |
ISO 819,200 |
• Hi 5: |
ISO 1,638,400 |

Figure 3.12B – Setting ISO sensitivity from the Photo Shooting Menu
Here are the steps to select an ISO sensitivity setting:
- 1. Follow the screen flow shown in figure 3.12B, images 1 and 2 (ISO sensitivity settings > ISO sensitivity) until you arrive at the third screen in the series.
- 2. Scroll up or down in the ISO sensitivity menu until you highlight the ISO value you want to use (figure 3.12B, image 3) and press the OK button to save the ISO sensitivity setting.
The minimum ISO sensitivity for the D500 is ISO 50 (Lo 1). As shown in the previous ISO sensitivity list, the camera’s ISO sensitivity can be adjusted in a range from ISO 50 (Lo 1) to ISO 1,638,400 (Hi 5), in 1/3 steps. The ISO step increment is controlled by Custom Setting Menu > b Metering/exposure > b1 ISO sensitivity step value, and can be set to 1/3, 1/2, or 1 step. We’ll look at this more carefully in the upcoming chapter titled Custom Setting Menu (page 252).
Select your favorite ISO sensitivity setting, using either the external camera controls or the Photo Shooting Menu’s ISO sensitivity settings function.
If you want, you can simply let your camera decide which ISO it would like to use. Let’s consider this often-misunderstood feature in detail.
Auto ISO Sensitivity Control (ISO-AUTO)
You may have noticed in figure 3.12B, image 2, that another setting is available, Auto ISO sensitivity control, which defaults to Off. This setting allows the camera to control the ISO sensitivity and shutter speed according to the light levels sensed by the camera. Figure 3.12C shows the Photo Shooting Menu screens used to enable Auto ISO sensitivity control.

Figure 3.12C – Enabling Auto ISO sensitivity control
Here are the steps to enable the Auto ISO sensitivity control:
- 1. Follow the screen flow shown in figure 3.12C, images 1 and 2 (ISO sensitivity settings > Auto ISO sensitivity control) until you arrive at the third screen in the series.
- 2. Select either On or Off (figure 3.12C, image 3) and press the OK button.
Once you’ve set Auto ISO sensitivity control to On, you should immediately set two values, according to how you shoot: Maximum sensitivity and Minimum shutter speed. Let’s discuss each of them.
Maximum Sensitivity
The Maximum sensitivity setting is a safeguard for you (figure 3.12D). It allows the camera to adjust its own ISO sensitivity from the minimum value you have set in ISO sensitivity (figure 3.12B) to the value set in Maximum sensitivity (figure 3.12D), according to light conditions. This allows you to have low and high ISO sensitivity values that the camera will not exceed. The D500 will try to maintain the lowest ISO sensitivity it can to get the picture. However, if needed, it can rapidly rise to the Maximum sensitivity level to “get the picture” no matter what.

Figure 3.12D – Auto ISO sensitivity control—Maximum sensitivity
Use the following steps to select a maximum ISO sensitivity for nonflash and flash use (two menu items):
- 1. After you have enabled the Auto ISO sensitivity control, as shown in figure 3.12C, scroll down and select either of the Maximum sensitivity settings (nonflash or flash). Figure 3.12D, images 1 and 2, show the maximum ISO sensitivity settings for nonflash ISO control, and images 3 and 4 show the maximum ISO sensitivity settings for using flash.
- 2. In figure 3.12D, images 2 (nonflash) and 4 (flash), you have a selection of the ISO values from ISO 200 to ISO 1,638,400 (Hi 5), and you can choose the one you want to use for Maximum sensitivity. You will note that image 4 (flash use) has a setting Same as without flash, which, when selected, allows you to tie all Maximum sensitivity to the value for nonflash (image 2). The current nonflash value is shown directly below the words Same as without flash (51200). If you want, you can have separate values for nonflash and flash use, by selecting a different value for each of the screens in images 2 and 4. Press the OK button to save your values.
The Maximum sensitivity default for nonflash use is ISO 51,200 and the default for flash use is Same as without flash. These settings will allow the camera take the ISO sensitivity all the way up to ISO 51,200 in a low-light situation. It is the maximum ISO value the camera will use to get a good exposure when the light drops.
What happens when the camera reaches the Maximum sensitivity setting and there still isn’t enough light for a good exposure? Let’s find out by examining the second part of the Auto ISO sensitivity control, Minimum shutter speed.
Minimum Shutter Speed
Because shutter speed helps control how sharp an image can be, depending on camera shake and subject movement, you will need some control over the minimum shutter speed allowed while the Auto ISO sensitivity control is enabled (figure 3.12E).
The Minimum shutter speed setting allows you to select the minimum shutter speed that the camera will allow when the light diminishes. In exposure modes Programmed auto (P mode—camera controls shutter and aperture) and Aperture-priority (A mode—camera controls shutter and you control aperture), the camera will not go below the Minimum shutter speed unless the Maximum sensitivity setting still won’t give you a good exposure.

Figure 3.12E – Auto ISO sensitivity control—Minimum shutter speed
Here are the steps to select a Minimum shutter speed value:
- 1. Follow the screen flow shown in figure 3.12E, images 1 and 2 (ISO sensitivity settings > Minimum shutter speed) until you arrive at the third screen in the series.
- 2. Either leave the camera set to the default Auto, which lets the camera decide which shutter speed to use (we will discuss Auto in the next subsection), or select a different speed, such as the 1/30 s chosen in figure 3.12E, image 3, and the press the OK button to save the setting. The shutter speed range you can select manually is from 30 seconds (30 s) to 1/4000 s.
This is the answer to our question in the last section about what happens when there is not enough light and the camera has reached the Maximum sensitivity level. Take careful note of this: even though you’ve selected a Minimum shutter speed, the camera will go below the Minimum shutter speed when the Maximum sensitivity ISO number has been reached and the light is still too low for a good exposure.
In other words, in Programmed auto (P) or Aperture-priority (A) exposure modes, if you get into low light and try to take pictures, the camera will attempt to keep the ISO sensitivity as low as possible until the shutter speed drops to your selected Minimum shutter speed. Once it hits the selected Minimum shutter speed value—like the 1/30s shown in figure 3.12E, image 3—the ISO sensitivity will begin to rise up to your selected Maximum sensitivity value, like the ISO 51200 shown in figure 3.12D, image 2 (and 4).
Once the camera hits the Maximum sensitivity value, if there still isn’t enough light for a good exposure, it won’t keep raising the ISO sensitivity. Instead, the camera will now go below your selected Minimum shutter speed, dropping below the 1/30s shown in figure 3.12E, image 3. Be careful, because if the light gets that low, your camera can go all the way down to a shutter speed of 30 seconds to get a good exposure. You had better have your camera on a tripod and have a static subject with shutter speeds that low.
Look at the Minimum shutter speed value as the lowest “safe” speed, after which you’ll put your camera on a tripod. Most people can handhold a camera down to about 1/60s if they are careful, and maybe 1/30s if they’re extra careful and brace themselves. Below that, it’s blur city for your images. It’s even worse with telephoto lenses. Camera movement is greatly magnified with a long lens, and a Minimum shutter speed of 1/250s to 1/500s or more may be required.
The next section discusses an excellent solution the Nikon D500 gives us for those times when we are using a longer lens requiring a faster shutter speed to maintain sharp images—the Auto Minimum shutter speed setting.
Auto Minimum Shutter Speed
There is an important principle in photography called the reciprocal of focal length shutter speed rule. You may know the rule, but a short review won’t hurt. This impressive-sounding rule simply means that you should use a tripod (no handholding) whenever the shutter speed in use is below the reciprocal of the lens’s focal length.
For example, if you are using a 50mm zoom position on your lens, you should not use a shutter speed below 1/50s without having the camera on a tripod. With a 105mm focal length, the minimum handheld shutter speed is 1/100s or 1/125s. There is no 1/105s available, so you can use the closest one. If you are using a 300mm lens, you should not use a shutter speed below 1/300s.
The reason this rule exists is because a longer focal length tends to magnify the subject and any vibrations you introduce when you press the shutter-release button. With a shutter speed below the reciprocal of the lens focal length, you can introduce movement just from your heartbeat, the reflex mirror slap, or natural hand shakiness.
If you are going to handhold the camera at slower shutter speeds, you need to learn how to brace yourself properly. The best thing is to use a tripod any time you have to shoot below the reciprocal of the lens’s length. Otherwise, you will be known for your well-exposed, yet blurry images (from camera shake). Although lenses with vibration reduction (VR) can help, they are not a cure-all for camera shake at slow shutter speeds.
When using the Auto ISO sensitivity control, you have an opportunity to implement the reciprocal of focal length shutter speed rule in an automatic fashion. It is even more important on a DX camera than an FX camera because the DX field of view is 1.5x the FX (1.0) field of view, which has the effect of magnifying camera shake by 1.5x.
The Nikon D500 has added an Auto setting for Minimum shutter speed, which allows the camera to sense what focal length is currently in use and prohibits the camera from using a minimum shutter speed that would cause camera shake. Let’s examine how to use it.

Figure 3.12F – Auto ISO sensitivity control—Auto Minimum shutter speed
Use these steps to enable Auto Minimum shutter speed:
- 1. Follow the screen flow shown in figure 3.12F, images 1 and 2 (ISO sensitivity settings > Minimum shutter speed) until you arrive at the third screen in the series.
- 2. Select Auto from the top of the Minimum shutter speed list and scroll to the right (figure 3.12F, image 3).
- 3. Adjust the Auto Minimum shutter speed fine-tuning scale (figure 3.12F, image 4). Each position on the scale is the equivalent of one stop (1 EV). The camera will use the reciprocal of the focal length of the mounted lens if the yellow pointer is set in the center as seen in figure 3.12F, image 4. If you move it one notch to the right of center the camera will switch to the reciprocal of the focal length plus one stop. If you are using a 50mm lens, the reciprocal of 50mm plus one stop is 1/100s (1/50s plus 1 EV) for the camera’s minimum shutter speed. If you move the scale one notch to the left of center, the camera will use 1/25s instead (1/50s less 1 EV). Here is a list matching what each position on the scale represents if you are using a 50mm lens: 1/13s, 1/25s, 1/50s, 1/100s, 1/200s. Of course, these numbers will vary with the focal length of the lens mounted on the camera.
- 4. Press the OK button to lock in the fine-tuned Auto Minimum shutter speed.
Settings Recommendation: When I use the Auto ISO sensitivity control with my D500, I set my camera to Auto Minimum shutter speed. Why worry about having to adjust a setting just because I changed lenses? The camera is smart enough to know what to do and tries to protect me from losing sharpness from camera shake.
However, I am also cognizant that slow shutter speeds will cause camera shake and use a tripod when the shutter speed may drop to a value that I cannot successfully handhold while still having a sharp image.
Note: Shutter-priority (S) and Manual (M) modes allow you to control the camera in a way that overrides certain parts of the Auto ISO sensitivity control.
In Manual mode (M), the camera relinquishes all control of the shutter and aperture. It can adjust only the ISO sensitivity by itself, so it can obey the Maximum sensitivity but the Minimum shutter speed is overridden and does not apply.
In Shutter-priority mode (S), the camera can control the aperture, but the shutter speed is controlled only by the camera user. So, the Auto ISO sensitivity control can still control the Maximum sensitivity but has lost control over the Minimum shutter speed.
Also, it may be a good idea to enable High ISO NR (page 156) when you use the Auto ISO sensitivity control. This is especially true if you leave the camera set to the default Maximum sensitivity value of 51,200. Otherwise, you may have excessive noise when the light drops.
In summation: if Auto is selected for Minimum shutter speed, the camera will decide which shutter speed to use as a minimum based on the focal length of the lens in use, for both CPU and registered non-CPU lenses.
Enabling ISO-AUTO with External Controls
If you like to use external controls to make adjustments when possible (don’t we all?), be aware that you can conveniently turn the Auto ISO sensitivity control on and off with the ISO button, the front Sub-command dial, and the Control panel (or Information display).
Figure 3.12G shows the controls. You will need to configure ISO-AUTO before you use the external controls or the camera will use factory defaults.

Figure 3.12G – Enabling Auto ISO sensitivity control with external camera controls
Here are the steps you’ll use to manually enable or disable ISO-AUTO:
- 1. Hold down the ISO button near the Shutter-release button (figure 3.12G, image 1).
- 2. Rotate the front Sub-command dial to enable or disable ISO-AUTO, the Auto ISO sensitivity control (figure 3.12G, image 2). Release the ISO button to set the value.
- 3. The ISO-AUTO symbol will appear on the Control panel (figure 3.12G, image 3) and On will display on the Auto ISO sensitivity control line in the Information display (press the info button to use the Information display, as seen in image 4). You can also see the ISO Auto adjustment on the bottom right of the Viewfinder and the Live view display.
When, Why, and How Should I Use ISO-AUTO?
How much automation do you need to produce consistently excellent images? Let’s explore how and when automatic, self-adjusting ISO might improve or degrade your images. What is this feature all about? When and why should I use it? Are there any compromises in image quality when using this mode?
Normally, you set your camera to a particular ISO number, such as 200 or 400, and shoot your images. As the light gets darker, or in the deep shade, you might increase the ISO sensitivity to continue taking handheld images.
If you absolutely must get the shot, the Auto ISO sensitivity control will work nicely. Here are a few scenarios:
- Scenario # 1: Let’s say you are a photojournalist and you’re taking flash pictures of the president as he disembarks from his airplane, walks into the terminal, and drives away in his limousine. Under these circumstances, you have little time to check your ISO settings or shutter speeds and are shooting in widely varying light conditions.
- Scenario # 2: You are a wedding photographer shooting in a church that doesn’t allow the use of flash. As you follow the bride and groom from the dark inner rooms of the church out into the lobby and finally up to the altar, your light conditions vary constantly. You have no time to deal with the fluctuations in light by changing your ISO because things are moving too quickly.
- Scenario # 3: You are at a party, and you want some great pictures. You really don’t want to be bothered with camera configuration at this time but still want some well-exposed images. Light will vary as you move around the room, talking, laughing, and snapping pictures.
These scenarios present excellent environments for the Auto ISO sensitivity control. The camera will use your normal settings, such as your normal ISO sensitivity, shutter speed, and aperture, until the light will not allow those settings to provide an accurate exposure. Only then will the camera raise the ISO sensitivity or lower the shutter speed to keep functioning within the shutter/aperture parameters you have set.
Look at ISO Auto as a failsafe for times when you must get the shot but have little time to deal with camera settings, or when you don’t want to vary the shutter/aperture settings but still want to be assured of a well-exposed image.
Unless you are a private detective shooting handheld telephoto images from your car or a photojournalist or sports photographer who must get the shot every time regardless of maximum quality, I personally would not recommend leaving Auto ISO sensitivity control set to On all the time. Use it only when you really need to get the shot under any circumstances!
Of course, if you are unsure of how to use the correct ISO for the light level due to lack of experience, don’t be afraid to experiment with this mode. At the very worst, you might get noisier-than-normal images. Keep in mind that it may not be a good idea to depend on this mode over the long-term because noisy images are not very nice.
Are There Any Drawbacks to Using ISO-AUTO?
Maybe! It really depends on how widely the light conditions vary when you are shooting. Most of the time, your camera will maintain the normal range of ISO settings in Auto ISO sensitivity control, so your images will be their normal low-noise, sharp masterpieces. However, at times the light may be so low that the ISO may exceed low-noise range and will start getting into the noisier ranges above ISO 1600.
Just be aware that the Auto ISO sensitivity control can and will push your camera’s ISO sensitivity into a range that causes noisier images when light levels drop, if you have allowed it. Use it with this understanding and you’ll be fine.
The Auto ISO sensitivity control is yet another feature of our powerful Nikon cameras. Maybe not everyone needs this failsafe feature, but for those who do, it must be there. I will use it myself in circumstances where getting the shot is the most important thing and where light levels may get too low for normal ISO image-making.
Even if you think you might only use it from time to time, do learn how to use it for those times. Experiment with the Auto ISO sensitivity control. It’s fun and can be useful!
White Balance
(User’s Manual: Page 159, Menu Guide: Page 49)
White balance is designed to let you capture accurate colors in each of your camera’s RGB color channels. Your images can reflect realistic colors if you understand how to use the White balance settings.
This is one of the more important things to learn about digital photography. If you don’t understand how white balance works, you’ll have a hard time when you want consistent color across a number of images.
In this chapter we will look at white balance briefly and learn only how to select the various White balance settings. This is such an important concept to understand that an entire chapter—titled White Balance—is devoted to this subject. Please read that chapter very carefully. It is critical that you thoroughly learn to control the White balance settings. A lot of what you’ll do in computer post-processing requires a good understanding of white balance control.
Many people leave their cameras set to Auto White balance (Figure 3.13A). This works fine most of the time because the camera is quite capable of rendering accurate color. However, it’s hard to get exactly the same white balance in each consecutive picture when you are using Auto mode. The camera has to make a new white balance decision for each picture in Auto. This can cause the white balance to vary from picture to picture.
For many of us this isn’t a problem, but if you are shooting in a studio for a product shot, I’m sure your client will want the pictures to be the same color as the product. White balance lets you control that carefully when needed.

Figure 3.13A – Choosing a White balance setting
The steps to select a White balance setting are as follows:
- 1. Follow the screen flow shown in figure 3.13A, images 1 and 2 (White balance > Auto, or another selection such as White balance > Flash) until you arrive at the third screen in the series.
- 2. If you choose Auto, Fluorescent, Choose color temp., or Preset manual you will need to select from an intermediate screen, shown in figure 3.13A, image 3. The other settings will skip image 3 and go directly to image 4. Auto presents three settings: Auto0 Keep white (reduce warm colors), Auto1 Normal, and Auto2 Keep warm lighting colors. Fluorescent presents seven different types of fluorescent lighting. Choose color temp. lets you select a color temperature manually from a range of 2500 K (cool) to 10000 K (warm). Preset manual (PRE) shows the six stored white balance memory locations d-0 through d-6 and allows you to select one of them. If you are unsure which is best, choose Auto1 Normal for now. The chapter titled White Balance (page 521) will explain how to use all these settings; therefore, consider this section an introduction to how to choose a white balance. Press the OK button to choose a value, or if you would like to fine-tune the highlighted value, scroll to the right (see step 3).
- 3. If you scroll to the right instead of pressing the OK button, as shown in figure 3.13A, image 4, you’ll arrive at the White balance fine-tuning screen. With this screen you can adjust how this particular White balance setting records color by introducing a color bias toward green, yellow, blue, or magenta. You do this by moving the little black square in the middle of the color box toward the edges of the box in any direction. If you make a mistake, simply move the black square to the middle of the color box. Most people do not change this setting. After you have finished adjusting (or not) the colors, press the OK button to save your setting. Most people press the OK button as soon as they see the fine-tuning screen so they do not change the default settings for this particular White balance setting.
Note: You can directly access the White balance fine-tuning screen for the currently selected White balance by following this procedure:
- 1. Press and release the info button, which opens the Information display.
- 2. Press and hold the WB button, opening the fine-tuning screen on the Monitor (having a screen similar to figure 3.13A, image 4).
- 3. While continuing to hold the WB button, move the little black box to the color bias you want to use with the Multi selector pad. Release the WB button to save the setting.
Now let’s examine how to use external camera controls for quick WB setting adjustments.

Figure 3.13B – Setting White balance with external camera controls
Many find it convenient and even faster to change the White balance settings by using external camera controls. Following are the steps to do so:
- 1. Press and hold the WB button (figure 3.13B, image 1).
- 2. Turn the rear Main command dial (figure 3.13B, image 2) as you watch the WB icons change on the Control panel (figure 3.13B, image 3).
- 3. Release the WB button to lock in your choice.
Settings Recommendation: Until you’ve read the chapter on white balance, I suggest that you leave the camera set to one of the Auto White balance selections. However, please do take the time to understand this setting by reading the dedicated chapter carefully. Understanding White balance is especially important if you plan on shooting JPEGs regularly.
Set Picture Control
(User’s Manual: Page 285, Menu Guide: 51)
Set Picture Control allows you to choose a Picture Control for a shooting session. Nikon’s Picture Control system lets you control how your JPEG image appears in several ways. Each control has a specific effect on the image’s appearance. If you shot film a few years ago, you will remember that each film type has a distinct look. No two films produce color that looks the same.
In today’s digital photography world, Picture Controls give you the ability to impart a specific look to your images. You can use Picture Controls as they are provided from the factory, or you can fine-tune Sharpening, Contrast, Brightness, Saturation, and Hue.
We’ll discuss how to fine-tune a Nikon Picture Control later in this section. In the next section, Manage Picture Control, we’ll discuss how to save a modified Picture Control under your own Custom Picture Control name. You can create up to nine Custom Picture Controls.
I’ll refer to Picture Controls included in the camera as Nikon Picture Controls because that’s how Nikon refers to them. You may also hear them called Original Picture Controls in some Nikon literature. If you modify and save a Nikon Picture Control under a new name, it becomes a Custom Picture Control. I’ll also use the generic name of Picture Control when referring to any of them.
The cool thing about Picture Controls is that they are shareable. If you tweak a Nikon Picture Control and save it under a name of your choice, you can then share your control with others. Compatible cameras, software, and other devices can use these controls to maintain the look you want from the time you press the Shutter release button until you print the picture.
Now, let’s look closer at the Picture Control system. As shown in figure 3.14A, image 2, there is a series of Picture Control selections that modify how your D500 captures an image. They are as follows:
- SD – Standard
- NL – Neutral
- VI – Vivid
- MC – Monochrome
- PT – Portrait
- LS – Landscape
- FL – Flat
Each of these settings has a different and variable combination of the following settings:
- Sharpening
- Clarity
- Contrast
- Brightness
- Saturation
- Hue
- Filter effects (applies only to MC – Monochrome)
- Toning (applies only to MC – Monochrome)
You can select one of the controls (SD, NL, VI, MC, PT, LS, or FL) and leave the settings at the factory default, or you can modify the settings (figure 3.14A, image 3) and completely change how the D500 captures the JPEG image.
Note: If you are shooting in NEF (RAW) mode, the D500 does not apply these settings directly to the image as it does with a JPEG or TIFF, but it stores the settings with the image, allowing you to change to a different Picture Control later, in-computer using Nikon Capture NX-D or Nikon View NX 2, if you so desire.

Figure 3.14A – Choosing a Nikon Picture Control from the menus
Here are the steps to choose a Picture Control from the Photo Shooting Menu:
- 1. Select Set Picture Control from the Photo Shooting Menu and scroll to the right (figure 3.14A, image 1).
- 2. Choose one of the Nikon Picture Controls from the Set Picture Control screen (figure 3.14A, image 2). At this point, you can simply press the OK button and the control you’ve chosen will be available for immediate use. It will show up as a two-letter name in the Photo Shooting Menu next to Set Picture Control. You can see this in figure 3.14A, image 1, where SD is shown next to Set Picture Control. You can also modify the currently highlighted control by scrolling to the right instead of pressing the OK button.
- 3. Scroll to the right when using the Set Picture Control menu shown in figure 3.14A, image 2, and your camera will present the Picture Control fine-tuning screen, as shown in figure 3.14A, image 3. You can adjust the Sharpening, Clarity, Contrast, Brightness, Saturation, or Hue by scrolling up or down to select a line and then right or left (+/−) to fine-tune the value of that line item. Please notice the Quick adjust selection at the top of figure 3.14A, image 3. By highlighting Quick adjust and scrolling left or right, you can change Sharpening, Contrast, and Saturation all at once in up to +2/-2 steps. Clarity, Brightness, and Hue remain individual adjustments only. By using Quick adjust instead of adjusting the individual settings, such as Sharpening or Saturation, you may tend to keep the control more in balance while making the effect of the control stronger or weaker. If the Quick Adjust setting is sufficient for your needs, make the adjustment, press the OK button to set the values for that Picture Control, and skip the rest of these steps. If you want to fine-tune each setting individually, continue with step 4.

Figure 3.14B – Fine-tuning a Picture Control setting
- 4. Figure 3.14B starts where figure 3.14A leaves off. Please notice that Contrast is selected in figure 3.14B, image 1. We will use Contrast as our sample; however, you can use the information in this step for any of the individual settings (e.g., Clarity, Brightness, Saturation). As you can see, Contrast is currently set at 0.00 (image 1, red arrows). You can adjust Contrast in 0.25 increments up to +/− 2.0 steps. You can also toggle AUTO mode on and off for an individual setting by pressing the Playback zoom in button. AUTO will appear after Contrast, and the tiny yellow pointer on the adjustment scale will point to A instead of 0, as shown in image 2. AUTO means the camera will decide how much contrast to add to the image. In image 3, you can see that the pointer on the adjustment scale has been moved toward the + side (higher contrast). Fine adjustments can be made in 0.25 step increments by turning the front Sub-command dial (image 3, red arrow). Or you can adjust the contrast in larger, 1.0 step increments by pressing left or right on the Multi selector pad (image 4). Notice that there are two tiny indicators showing at the point of the two red arrows in image 4. The one that is bright yellow (right arrow) is the new adjustment position you have selected. The one that is a pale dim yellow (left arrow) is the current (old) setting for Contrast. Until you have made a new selection permanent, you will always be able to see where the current setting is in relation to the new setting based on the position of the dim pointer.
- 5. Repeat step 4 for any of the individual settings you want to adjust for this Picture Control. Once you are finished, press the OK button to lock in the setting.
Now that you have adjusted a Picture Control away from its factory default settings, it would be good to know how to return the control to its default settings. Let’s consider how to do so (figure 3.14C).

Figure 3.14C – Resetting a Nikon Picture Control
Use the following steps to reset a Picture Control:
- 1. Open the adjustment screen for the Picture Control you want to reset, and then press the Delete button (garbage can; figure 3.14C, image 1).
- 2. A box will appear that says, Selected Picture Control will be reset to default settings. OK? (figure 3.14C, image 2). Select Yes and press the OK button to return the Picture Control to its factory default settings.
Note: If you choose to modify a Picture Control using Quick adjust or with the individual line item settings (Sharpness, etc.), it is not yet a Custom Picture Control because you have not saved it under a new name. Instead, it is merely a modified Nikon Picture Control. We’ll discuss how to name and save your own Custom Picture Controls in the upcoming section, Manage Picture Control.

Figure 3.14D – An adjusted Nikon Picture Control (see asterisks)
Figure 3.14D shows an asterisk after the Vivid control (VI* Vivid) in both Photo Shooting Menu screens (see red arrows). This asterisk appears after you have made a modification to any of the Picture Control’s inner settings (Contrast, etc.). The asterisk will go away if you reset the Picture Control to its factory settings.
Because many of us change Picture Controls often, Nikon has given us a handy external button to quickly open the Picture Control menu (figure 3.14E).

Figure 3.14E – Using the Picture Control button to open Set Picture Control
Use the following steps to set a Picture Control by using an external camera control button:
- 1. As shown in figure 3.14E, you can press the Picture Control button, which is a combo button that has the rather long full name of Protect/Picture Control/Help button (as evidenced by the other two symbols above and below it on the left of the button). If there is nothing showing on the camera’s Monitor and you press the Picture Control button, the menu shown in figure 3.14E, image 2, will open, giving you immediate access to the Picture Controls.
- 2. Choose one of the Picture Controls and press the OK button.
Protect/Picture Control/Help button details: If you press the button shown in figure 3.14E, image 1, when a picture is showing on the Monitor, the camera will protect that picture from deletion (Protect button). When you press the button with nothing on the Monitor, as mentioned in step 1 of the preceding steps, the Set Picture Control screen opens (Picture Control button). Finally, if you press the button when a menu item is showing, it will open a Help screen describing the functionality of that setting (Help button).
Let’s examine the basic functionality of each of the Picture Controls.
Examining Picture Controls
Now it’s time to break out my red, green, and blue (RGB) Lego blocks as sample subjects for Picture Control Sharpening, Clarity, Contrast, Brightness, Saturation, and Hue variation comparisons.

Figure 3.14F – Sample color variations among Nikon Picture Controls
Figure 3.14F provides a look at the differences in color saturation and shadow with the various controls. Due to limitations in printing, it may be hard to see the variations, but they are clearly visible in a picture. Saturation and Contrast depth increase within these Picture Control choices, in this order: FL (very low) > NL (low) > SD (medium) > VI (high). PT appears to be a modified form of the NL control, and LS seems to be a modified form of the VI control.
The following is an overview of what Nikon says about Picture Controls and what I see in my sample images taken with the various controls (figure 3.14F).
- SD, or Standard, is Nikon’s recommendation for getting “balanced” results. Nikon recommends SD for most general situations. Use this if you want a balanced image and do not want to post-process it. It has what Nikon calls “standard image processing.” The SD control provides what I would call medium saturation, with darker shadows to add contrast. If I were shooting JPEG images in a studio or during an event, I would seriously consider using the SD control. I would compare this setting to Fuji Provia or Kodak Kodachrome 64 slide films.
- NL, or Neutral, is best for an image that will be extensively post-processed in a computer. It has the widest available dynamic range of any of the Picture Controls. It too is a balanced image setting, but it applies minimal camera processing, so you’ll have room to do more with the image during post-processing. NL has less saturation and weaker shadows, so the image will be less contrasty (wider dynamic range). The effects of the NL and SD controls are harder to see in figure 3.14F because there’s not a marked difference. However, the NL control will give you extra dynamic range in each image due to more open shadows and slightly less saturated colors. If you’ve ever shot with Fuji NPS film or Kodak Portra negative films and liked them, you’ll like this control.
- VI, or Vivid, is for those of us who loved Fuji Velvia slide film. This setting places emphasis on saturating primary colors for intense imagery. The contrast is higher for striking shadow contrast, and the sharpness is higher, too. If you are shooting JPEGs and want to imitate a saturated transparency film like Velvia, this mode is for you! If you look at the red block in the VI example in figure 3.14F, you’ll see that it’s pushed into deep saturation, almost to the point of oversaturation. Plus, the greens and blues are extra strong. That means your nature shots will look saturated and contrasty. Be careful when you are shooting on a high-contrast day, such as in direct sunshine in the summer. If you use the VI control under these conditions, you may find that your images are too high in contrast. It may be better to back off to the SD or NL control when shooting in bright sunshine. You will need to experiment with this to see what I mean. On a cloudy or foggy low-contrast day, when the shadows are weak, you may find that the VI control adds pleasing saturation and contrast to the image.
- MC, or Monochrome, allows the black-and-white lovers among us to shoot in toned black-and-white. The MC control basically removes the color by desaturation. It’s still an RGB color image, but the colors have become levels of gray. It does not look the same as black-and-white film, in my opinion. The blacks are not as deep, and the whites are not as bright. To me, it seems that the MC control is fairly low contrast, and that’s where the problem lies. Good black-and-white images should have bright whites and deep blacks. To get images like that from a digital camera, you’ll have to manually work with the image in a graphics program like Photoshop, using the Channel Mixer (see the upcoming Note on Photoshop for D500 Black-and-White Images). However, if you want to experiment with black-and-white photography, this gives you a good starting point. Additionally, two extra settings in the MC control allow you to experiment with Filter effects and Toning. We’ll look at these settings in the upcoming section called MC Picture Control Filter Effects and Toning. The MC control creates a look that is somewhat like Kodak Plus-X Pan negative film, with blacks that are not as deep.
- PT, or Portrait, is a control that “lends a natural texture and rounded feel to the skin of portrait subjects” (Nikon’s description). I’ve taken numerous images with the PT control and shot the same images with the NL control. The results are very similar. I’m sure that Nikon has included some software enhancements specifically for skin tones in this control, so I would definitely use this control for portraits of people. The results from the PT control look a bit like smooth Kodak Portra or Fuji NPS negative film.
- LS, or Landscape, is a control that “produces vibrant landscapes and cityscapes,” according to Nikon. That sounds like the VI control to me. I shot a series of images using both the LS and VI controls and got similar results. Compared to the VI control, the LS control seemed to have slightly less saturation in the reds and a tiny bit more saturation in the greens. The blues stayed about the same. It seems that Nikon has created the LS control to be similar to, but not quite as drastic as, the VI control. In my test images, the LS control created smoother transitions in color. However, there was so little difference between the two controls that you’d have to compare the images side by side to notice. Maybe this control is meant to be more natural than the super-saturated VI control. It will certainly improve the look of your landscape JPEG images. The look of this control is somewhere between Fuji Provia and Velvia. You get great saturation and contrast, with emphasis on the greens and blues in natural settings.
- FL, or Flat, is a control that allows you to preserve details “over a wide tone range, from highlights to shadows.” If you are a JPEG or TIFF shooter and need maximum dynamic range in your image but do not want to use HDR (high dynamic range) imaging (where you shoot several images at different exposures and then combine them), you may be able to use this Picture Control as a substitute. The D500 has a wide dynamic range already, with excellent detail in the shadow areas; therefore, a very low contrast Picture Control setting can help maintain maximum dynamic range in a single image. You may also use this Picture Control when you are shooting video and later want to professionally color grade the results. It is hard to compare this Picture Control to a certain film stock; I have never shot any film with contrast and saturation this low.
MC Picture Control Filter Effects and Toning
The Monochrome, or MC, Picture Control has some added features that are enjoyable for those who love black-and-white photography. As shown in figure 3.14G, there are Filter effects that simulate the effect of yellow (Y), orange (O), red (R), and green (G) filters on a monochrome image. Yellow, orange, and red (Y, O, R) change the contrast of the sky in black-and-white images. Green (G) is often used in black-and-white portrait work to change the appearance of skin tones. You do not have to go buy filters for your lenses; they are included in your D500.

Figure 3.14G – Filter effects

Figure 3.14H – Monochrome Filter effects compared
In figure 3.14H, you’ll see an unretouched sample of a color SD Picture Control (for comparison) alongside the five flavors of Monochrome (MC) Filter effects. It is rather interesting how the yellow, orange, red, and green filters affect the RGB Lego blocks. The Filter effects settings are more pronounced than those you would achieve using a glass filter attached to your lens. Now, let’s examine the MC Toning effects.
As shown in figure 3.14I, 10 variable Toning effects are available—B&W (standard black-and-white), Sepia, Cyanotype, Red, Yellow, Green, Blue Green, Blue, Purple Blue, and Red Purple. Each of the Toning effects is variable within itself, and you can adjust the saturation of the individual tones. In figure 3.14I, I cranked them all the way up to the maximum setting, which tends to oversaturate the toning color. I wanted you to clearly see the maximum potential of the Toning settings.

Figure 3.14I – Monochrome Toning screen and samples
Compare how the RGB blocks look under the various toning settings. The red block is on top, green in the middle, and blue on the bottom. Clearly, the toned blocks all look similar in brightness (with only minor variation) to the B&W blocks, showing that the underlying image for each of the color tones is simply black-and-white.
Note on Photoshop for D500 Black-and-White Images
Since the RGB color channels are still intact in the camera’s black-and-white image, you can use Photoshop’s Channel Mixer Image Menu > Adjustments > Channel Mixer . . . to manipulate the color channels and improve the blacks and whites. If you use Photoshop to play with the channels, be sure to check the Monochrome box on the Channel Mixer window. If you don’t, you’ll simply add color back into your black-and-white image. The fact that you must check the Monochrome box proves that a D500 black-and-white image is really just a color image with the colors desaturated to levels of gray. The good thing about this is that you now have room to play with the three color channels, similar to how you use filters when shooting black-and-white film. You can add or subtract contrast by moving the channel sliders until you are happy with the results. There is a lot of discussion of these techniques on the Internet. Why not join the Nikonians.org forum to discuss how to best achieve beautiful black-and-white images? Look for the Nikonians Gold Membership 50 percent off coupon in the front of this book.
You can shoot a basic black-and-white image, use filters to change how colors appear, or tone the image in experimental ways. Can you see the potential for a lot of fun with these tones?
In the Monochrome menu screen at the top left of figure 3.14I, notice that to the right of the word Toning is a row of tiny colored rectangles. The first rectangle is half black and half white; that is the normal black-and-white (B&W) selection, and it has no extra toning. Next to that you’ll see a golden-brown rectangle; that is the Sepia toning effect (selected). To the right of that is the bluish Cyanotype effect. The smaller rectangles that follow the first three selections are the other available colors for toning.
Figure 3.14J shows how to adjust the depth of color saturation for each of the colors shown in figure 3.14I. Each color has seven major saturation gradations available, as shown in the little bar tinted the same color as the one you have selected for toning—in this case, Sepia. This saturation adjustment bar allows you to select the depth of saturation for each of the colors. In figure 3.14J, the setting has been moved from Sepia, 4.00 (default) to Sepia, 5.00. The higher the number, the deeper the saturation, and vice versa.
Use these steps to adjust the depth of color saturation for toning an image (figure 3.14J):
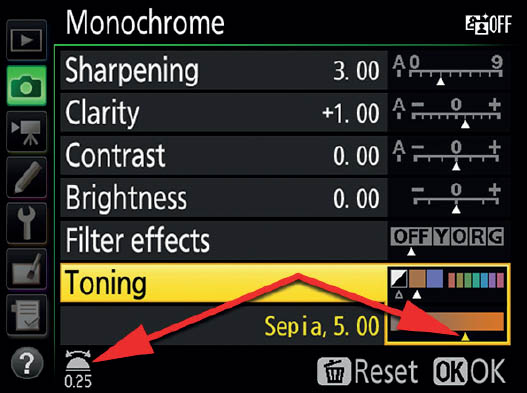
Figure 3.14J – Fine-tuning the Toning setting
- 1. Scroll to Toning on the Monochrome screen, and then press left or right on the Multi selector pad to select a color (e.g., B&W, Sepia, Cyanotype).
- 2. To make adjustments to the saturation level of the Toning color, first press down on the Multi selector pad to select the saturation adjustment bar below the color selections, and then press right or left on the Multi selector pad to make one-step saturation adjustments. The available saturation adjustment range is from 1.00 to 7.00, with the default being level 4.00 saturation. For adjustments finer than one step, turn the front Subcommand dial in 0.25 increments to select more or less color saturation.
- 3. Make your Toning saturation-level selection and then press the OK button to lock in the new saturation level.
I’m sure you will agree that Nikon’s Picture Control system is very powerful and flexible, especially for those who like to shoot mostly JPEG images. Now, let’s see how to go about managing your own Custom Picture Controls in our next section, Manage Picture Control.
Manage Picture Control
(User’s Manual: Page 285, Menu Guide: Page 52)
The Manage Picture Control function is designed to allow you to create and store Custom Picture Control settings for future use. You can take an existing Nikon Picture Control (SD, NL, VI, MC, PT, LS, or FL) that is included with the camera, make modifications to it, and then rename it.
If you modify a Picture Control using the Set Picture Control function discussed in the previous section, you simply create a one-off setting. If you’d like to go further and create your own named Custom Picture Controls, the D500 is happy to oblige. There are four choices on the Manage Picture Control screen:
- Save/edit
- Rename
- Delete
- Load/save
Let’s look at each of these settings and see how to manage Picture Controls effectively.
Save/Edit a Custom Picture Control
There are six screens used to Save/edit a Nikon Picture Control (figure 3.15A)—storing the results for later use as a Custom Picture Control.

Figure 3.15A – Save/edit a Custom Picture Control
Here are the steps to edit and save a Picture Control with a modified setting:
- 1. Select Manage Picture Control from the Photo Shooting Menu and scroll to the right (figure 3.15A, image 1).
- 2. Highlight Save/edit and scroll to the right (figure 3.15A, image 2).
- 3. Choose a Picture Control that you want to use as a base for your new settings and then scroll to the right (figure 3.15A, image 3). I am modifying the SD Standard Picture Control and will save it under a different name.
- 4. Make your adjustments to Sharpening, Contrast, and so forth. I simply used the Quick adjust setting and added +1 to it, increasing the overall effect of Standard by +1 (out of 2). When you have modified the control in a way that makes it yours, press the OK button (figure 3.15A, image 4). If you want to abandon your changes and start over, you can simply press the Delete button (garbage can) and it will reset the control to factory specs.
- 5. Select one of nine storage areas named C-1 to C-9 and scroll to the right (figure 3.15A, image 5). In figure 3.15A, image 5, they are all currently marked as Unused. I can save as many as nine different Custom Picture Controls here for later selection with Set Picture Control.
- 6. You will now see the Rename screen (figure 3.15A, image 6), which works just like the other touch screens you have used to rename things. Insert a new name for the control by selecting characters from the list at the bottom of the screen and touching the Input button at the bottom of the screen for each character. You can touch the characters you want to use with your fingertip on the Monitor and they will appear in the position marked with the dark gray cursor in the name field (STANDARD-02). You can use the left/right arrow tip touch buttons in the top-left corner to move left and right in the name field. To change case from upper to lower, touch the Aa& button in the lower-right corner of the screen (just above OK). If you make a mistake, position the dark-gray cursor over the error and touch the Delete button at the bottom of the screen. When you have the name completed, touch the OK button to save it. You will see the word Saved appear briefly on the Monitor. (Note: If you would prefer not to use the convenient touch screen features, you can move the selection cursor with the Multi selector pad to choose a highlighted character from the list below the name field (figure 3.15A, image 6). Insert a new character with the Multi selector center button. To correct an error, hold down the Thumbnail/Playback zoom out button, use the Multi selector pad to move back and forth along the field that contains the new name, and press the Delete button to remove the error.) The camera will create a default name for you by appending a dash and two numbers at the end of the current control name in case you do not want to change the name yourself. I left it at the default of STANDARD-02.
Once you have created and saved a Custom Picture Control, you can still tell which control was used as its base, just in case you name it in a way that does not suggest its origins. Notice the red arrow in the upper-right corner of the screen in figure 3.15B. This is the control we just created in the previous steps (Standard–02), and it is derived from an SD Nikon Picture Control, as shown by the SD label at which the arrow is pointing.

Figure 3.15B – Identifying the base of a Custom Picture Control
Your camera is now set to your Custom Picture Control. You switch between your Custom Picture Controls and the basic Nikon Picture Controls by using Set Picture Control (see previous section titled Set Picture Control). In other words, each of your newly named Custom Picture Controls will appear in the Set Picture Control menu (below the Nikon Picture Controls) for later selection.
Now, let’s look at how to rename an existing Custom Picture Control.
Rename a Custom Picture Control

Figure 3.15C – Rename a Custom Picture Control
If you decide to rename an existing Custom Picture Control, you can do so with the following steps:
- 1. Select Manage Picture Control from the Photo Shooting Menu and scroll to the right (figure 3.15C, image 1).
- 2. Select Rename and scroll to the right (figure 3.15C, image 2).
- 3. Select one of your Custom Picture Controls from the list (C-1 to C-9) and scroll to the right (figure 3.15C, image 3). I selected to rename STANDARD-02. This is the Custom Picture Control we created in the preceding subsection. You will now be presented with the Rename screen. Insert a new name for the control by selecting characters from the list at the bottom of the screen and touching the Input button at the bottom of the screen for each character. You can touch the characters you want to use with your fingertip on the Monitor and they will appear in the position marked with the dark-gray cursor in the name field (STANDARD-02). You can use the left/right arrow tip touch buttons in the top-left corner to move left and right in the name field. To change case from upper to lower, touch the Aa& button in the lower-right corner of the screen (just above OK). If you make a mistake, position the dark-gray cursor over the error and touch the Delete button at the bottom of the screen. When you have the name completed, touch the OK button to save it. You will see the word Saved appear briefly on the Monitor. (Note: If you would prefer not to use the convenient touch screen features, you can move the selection cursor with the Multi selector pad to choose a highlighted character from the list below the name field (figure 3.15C, image 4). Insert a new character with the Multi selector center button. To correct an error, hold down the Thumbnail/Playback zoom out button, use the Multi selector pad to move back and forth along the field that contains the new name, and press the Delete button to remove the error.) I renamed the STANDARD-02 Custom Picture Control STANDARD-EX2. Press the OK button to save when you have completed the new name.
Note: You can have more than one control with exactly the same name in your list of Custom Picture Controls. The camera does not get confused because each control has a different location (C-1 to C-9) to keep it separate from the rest. However, I don’t suggest that you give several custom controls the same name. How would you tell them apart?
When a Custom Picture Control is no longer needed, you can easily delete it; let’s see how.
Delete a Custom Picture Control
You cannot delete a Nikon Picture Control (SD, NL, VI, MC, PT, LS, FL). In fact, they don’t even appear in any of the Manage Picture Control menu screens.

Figure 3.15D – Deleting a Custom Picture Control
However, you can delete one or more of your Custom Picture Controls with the following screens and steps:
- 1. Follow the screen flow shown in figure 3.15D, images 1 and 2 (Manage picture control > Delete) until you arrive at the third screen in the series.
- 2. Select one of the nine available Custom Picture Controls and scroll to the right (figure 3.15D, image 3). I selected STANDARD-EX2 for deletion.
- 3. Choose Yes at the Delete Picture Control? prompt (figure 3.15D, image 4) and then press the OK button to delete the unneeded control.
Now, let’s move to our last menu selection from the Manage Picture Control screen, Load/save.
Load/Save a Custom Picture Control
There are three parts to the Load/save function. They allow you to copy Custom Picture Controls to and from the memory card or delete them from the card.
If you have two memory cards in the camera, the D500 will automatically choose the one assigned as Primary card slot when you save a custom control. You cannot choose to write to the Secondary card slot. However, you could write to the Secondary slot by removing the Primary card, leaving the camera no choice but to write to the only card it can find. (Use Photo Shooting Menu > Primary slot selection to set one of the memory card slots to primary).

Figure 3.15E – Load/save a Custom Picture Control
Here are the three selections on the Load/save menu (Manage Picture Control > Load/save), as shown in figure 3.15E, image 3:
- Copy to camera: Loads Custom Picture Controls from the memory card into your camera. You can store up to nine controls in your camera’s nine available memory locations (C1–C9).
- Delete from card: Displays a list of any Custom Picture Controls found on the memory card. You can selectively delete them.
- Copy to card: Allows you to copy your carefully crafted Custom Picture Controls (C1–C9) from your camera to a memory card. You can then share them with others. The camera will display up to 99 control locations (01–99) on any single memory card.
Let’s examine each of these selections and see how best to use them.
Copy to Camera
You can use the Copy to camera function to copy Custom Picture Controls from your camera’s memory card to the camera’s Set Picture Control menu. Once you have transferred a Custom Picture Control from your memory card to your camera, it will show up in the Photo Shooting Menu > Set Picture Control menu.

Figure 3.15F – Manage Picture Control – Copy to camera
Here are the steps to copy a Custom Picture Control from the memory card to the camera itself:
- 1. Figure 3.15F continues from the last screen shown in figure 3.15E (Manage Picture Control > Load/save > Copy to camera). Choose Copy to camera and scroll to the right (figure 3.15F, image 1).
- 2. You will be presented with the list of Custom Picture Controls that are currently on the memory card (figure 3.15F, image 2). If there are no controls on the memory card, the camera will display a screen that says, No Picture Control file found on memory card. Figure 3.15F, image 2, shows two controls—NEUTRAL-02 and VIVID-02. Select a control from the list and press the OK button. (If you scroll to the right instead, you will be able to examine and adjust the control’s settings before saving it to your camera, as seen in figure 3.15F, image 3. If you don’t want to modify it, simply press the OK button.)
- 3. You will now see the Manage Picture Control Save as menu, which lists any Custom Picture Controls already in your camera (figure 3.15F, image 4). Select one of the Unused memory locations and press the OK button.
- 4. You’ll now be presented with the Rename screen, just in case you want to change the name of the Custom Picture Control (figure 3.15G). If you don’t want to change the name, simply press the OK button and the custom control will be added to your camera’s Set Picture Control menu. It is okay to have multiple controls with exactly the same name. The camera keeps each control separate in its list of controls (C-1 to C-9). However, I always rename them to prevent future confusion. Insert a new name for the control by selecting characters from the list at the bottom of the screen and touching the Input button at the bottom of the screen for each character. You can touch the characters you want to use with your fingertip on the Monitor and they will appear in the position marked with the dark-gray cursor in the name field (STANDARD-02). You can use the left/right arrow tip touch buttons in the top-left corner to move left and right in the name field. To change case from upper to lower, touch the Aa& button in the lower-right corner of the screen (just above OK). If you make a mistake, position the dark-gray cursor over the error and touch the Delete button at the bottom of the screen. When you have the name completed, touch the OK button to save it. You will see the word Saved appear briefly on the Monitor. (Note: If you would prefer not to use the convenient touch screen features, you can move the selection cursor with the Multi selector pad to choose a highlighted character from the list below the name field (figure 3.15G). Insert a new character with the Multi selector center button. To correct an error, hold down the Thumbnail/Playback zoom out button, use the Multi selector pad to move back and forth along the field that contains the new name, and press the Delete button to remove the error.) The name is limited to a maximum of 19 characters. Press the OK button when you have completed the new name.

Figure 3.15G – Manage Picture Control – Choose a new name (or Rename)
Now let’s examine how to delete a Custom Picture Control that you no longer need from where it is stored on the memory card.
Delete from Card
Once you’ve finished loading Custom Picture Controls or optional Nikon Picture Controls to your camera, you may be ready to delete a control or two from the memory card. You could format the memory card, but that will blow away all images and Picture Controls on the card. A less drastic method that allows you to be more selective in removing Picture Controls is the Delete from card function.

Figure 3.15H – Manage Picture Control – Delete from card
Here are the steps used to remove Custom Picture Controls from your camera’s memory card:
- 1. Figure 3.15H continues where figure 3.15E left off. Choose Delete from card from the Load/save menu and scroll to the right (figure 3.15H, image 1).
- 2. Choose one of the Custom Picture Controls that you want to delete (figure 3.15H, image 2). I chose STANDARD-02. You can confirm that you are deleting the correct control by scrolling to the right, which gives you the fine-tuning screen with current adjustments for that control (figure 3.15H, image 3). If you are sure that this is the control you want to delete, move on to the next step by pressing the OK button.
- 3. You will be shown a screen that asks, Delete Picture Control? Choose either Yes or No (figure 3.15H, image 4). If you choose Yes, the Picture Control will be deleted from the memory card. If you choose No, the camera will return to the previous screen. Press the OK button to execute your choice.
Next, let’s examine the method for copying a Custom Picture Control to a memory card so that you can share it with others or store it off-camera.
Copy to Card
After you create up to nine Custom Picture Controls using the instructions in the last few sections, you can use the Copy to card function to save them to a memory card. Once they are on a memory card, you can share your custom controls with friends who have compatible Nikon cameras.
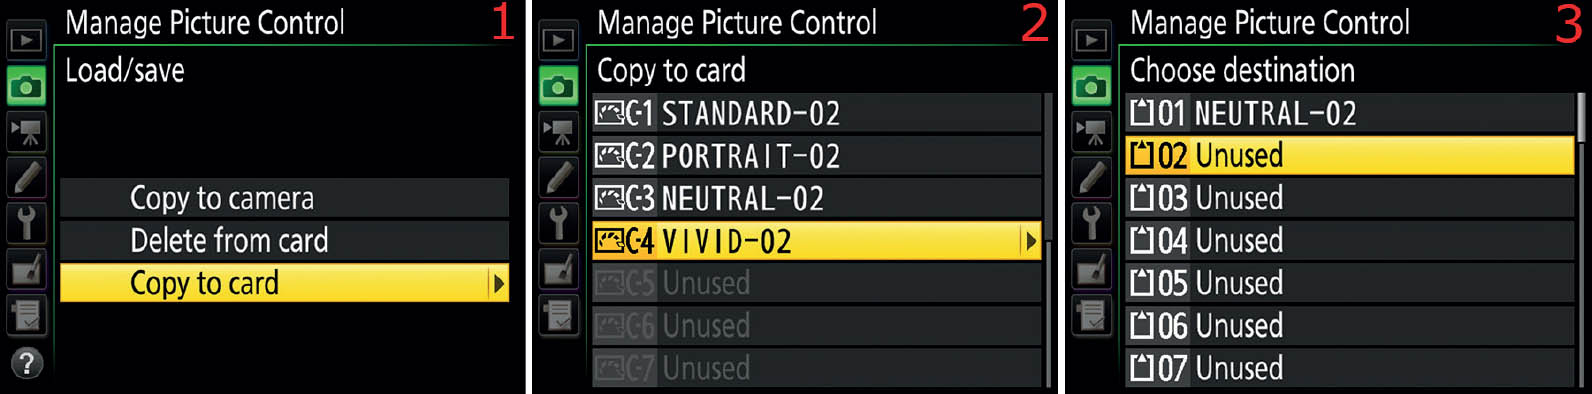
Figure 3.15I – Manage Picture Control – Copy to card
When your Custom Picture Controls are ready to go, use the following steps to copy them to a memory card:
- 1. Figure 3.15I continues where figure 3.15E left off. Choose Copy to card from the Load/save menu and scroll to the right (figure 3.15I, image 1).
- 2. Select one of your current Custom Picture Controls from the Copy to card menu and scroll to the right (figure 3.15I, image 2). I chose VIVID-02 to copy to the memory card.
- 3. Now you’ll use the Choose destination menu to select the location in which you want to save the custom control (figure 3.15I, image 3). You have 99 choices; select any Unused location. You do not have to save to the next available Unused location since any of the 99 numbers are available. Be careful, though! If you select a location with an existing Custom Picture Control already there and press the OK button, the camera will immediately overwrite the existing control with no complaint or warning.
- 4. When you are ready, press the OK button and you’ll briefly see a screen that says Data saved to memory card. Your Custom Picture Control is now ready to distribute to the world or load onto another of your compatible Nikon cameras.
Color Space
(User’s Manual: Page 286, Menu Guide: 52)
Using a Color space is an interesting and important part of digital photography. They help your images fit into a much broader range of imaging devices. Software, printers, monitors, and other devices recognize which Color space is attached to your image and use it, along with other color profiles, to help balance the image to the correct output colors for the device in use. The two Color spaces available on the Nikon D500—sRGB and Adobe RGB—each have a different gamut, or range of color. We’ll discuss which might be better after we look into how to select one of the Color spaces.