08 My Menu and Recent Settings

Crossing the Finish Line © 2016 John McGarry (jtmcg)
As you have read through this book and experimented with your camera, you’ve surely noticed that the D500 has a large number of menus, screens, functions, and settings. When I took pictures of the camera’s menus and screens for this book, I ended up with hundreds of images. That many screens can be complex to navigate. We need a shortcut menu for our most-used settings—a place to keep the functions we’re constantly changing.
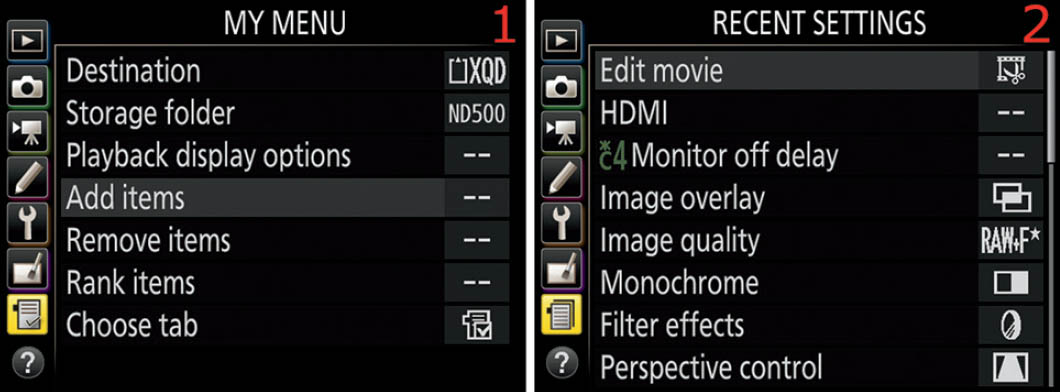
Figure 8.0 – My Menu and Recent Settings
Nikon has given us two specialty menus in the D500: My Menu and Recent Settings (figure 8.0). These are both designed to give us exactly what we need—a menu that we can customize with only our most-used functions, and a menu of recent changes to functions.
For instance, I often turn Exposure delay mode on and off. Instead of having to search through all the Custom settings, trying to remember exactly where Exposure delay mode lives, I simply added that Custom setting to My Menu. Now, whenever I want to enable Exposure delay mode, I can just go to My Menu and select it. I can do it quickly and without searching.
I rarely use Recent Settings. I prefer the control I get with my own personally customizable menu—My Menu. The Recent Settings menu has very little flexibility because it’s an automatically updated, camera-controlled menu system. On the other hand, My Menu is a personal collection of links to my most-used settings. It is completely configurable.
We’ll consider both menus in this chapter, with an emphasis on configuring My Menu.
What’s the Difference between My Menu and Recent Settings?
You can add up to 20 settings from the Playback Menu, Shooting Menu, Custom Setting Menu, Setup Menu, and Retouch Menu to My Menu. Recent Settings will automatically show the last 20 settings you’ve modified in the other menus, but it’s not configurable. The two menus are mutually exclusive and cannot appear on the D500 at the same time. One takes the place of the other when you select the Choose tab setting at the end of each menu. The most important difference between the two menus is the level of control you have over what appears on them. My Menu is completely customizable and does not change unless you change it, and as mentioned previously, Recent Settings simply shows the last 20 changes you’ve made to your camera’s settings. Recent Settings will change every time you change a setting in your camera. However, because it shows the last 20 changes, you ought to be able to find the ones you change most often somewhere in the list.
My Menu
(User’s Manual: Page 313, Menu Guide: Page 179)
My Menu is my menu! I can add or remove virtually any camera setting found on one of the primary menus. When I use My Menu, I don’t have to spend time looking for the function buried in the main menu system. Because I often use each critical function on My Menu, I’m glad to have it immediately available.

Figure 8.1 – My Menu
My Menu is the last selection on the D500’s menu system (figure 8.1). Its icon looks like a list, with a check mark on it.
When you first look at My Menu, you’ll see nothing but the following menu options:
- Add items
- Remove items
- Rank items
- Choose tab
Let’s examine each of these menu choices in detail.
Add Items
To add an item to My Menu, you’ll need to locate the item first. Search through the menus until you find the setting you want to add, and then make note of where it’s located. You could do this from within the Add items menu, but I find that it’s harder to locate what I’m looking for if I haven’t already confirmed where it lives. Is it under the Custom Setting Menu or one of the Shooting Menus or maybe the Setup Menu? Make a note of where items you want to add to My Menu are located before you start adding them, or it may take longer than necessary.

Figure 8.2 – Adding items to My Menu
After you’ve found the item you want to add and made note of its location, use the following steps:
- 1. Select Add items from My Menu. Notice that I already have Set Picture Control and Active D-Lighting added to My Menu (figure 8.2, image 1). I want to add something else.
- 2. Use the Multi selector pad to scroll right, and you’ll find a list of menus to choose from. The Add items screen shows all the menus available in the D500 except My Menu and Recent Settings (figure 8.2, image 2). Let’s add one of my favorites, Exposure delay mode.

Figure 8.3 – Adding Exposure delay mode to My Menu
- 3. Figure 8.3 picks up where figure 8.2 left off. We already know that Exposure delay mode is under the Custom Setting Menu, so let’s scroll down to it and then scroll to the right (figure 8.3, image 1).
- 4. We now see the Custom Setting Menu and Custom settings a through e (figure 8.3, image 2). Scroll down to d Shooting/display and then scroll to the right. Note: There are more Custom settings than appear on image 2. If you scroll down, you will also find Custom settings f and g.
- 5. Figure 8.3, image 3, shows the d5 Exposure delay mode function that we want to add. All we have to do is highlight it and press the OK button. Once that is done, the D500 switches to the Choose position screen (figure 8.3, image 4).

Figure 8.4 – Choosing a position for Custom setting d5 Exposure delay mode on My Menu
- 6. Figure 8.4 begins where figure 8.3 left off. Since I’ve already added a couple of other items to My Menu, I now have to decide the order in which I want them to be presented. The new d5 Exposure delay mode setting is on top because it is the newest entry (figure 8.4, image 1). I think I’ll move it down two rows and put Set Picture Control in the top position.
- 7. To move the position of the selected item, simply scroll down. The d5 Exposure delay mode setting has a yellow box around it (figure 8.4, image 2). As you scroll down, a yellow underline moves down the list (figure 8.4, image 2, red arrow). This yellow underline represents the place to which I want to move d5 Exposure delay mode. When I’ve decided on the position and have the yellow underline in place, I just press the OK button. The screen pops back to the first My Menu screen, with everything arranged the way I want it (figure 8.4, image 3). Notice that d5 Exposure delay mode is now at the bottom of the list.
Remove Items
Now that I’ve shown you how to Add items, let’s examine how to Remove items. The D500 allows me to open the Set Picture Control menu by pressing the Protect/Help/Picture Control button when nothing is showing on the Monitor. I think I’d rather just press the Picture Control button than use My Menu, so I’ll remove it from My Menu and save one of the 20 slots for something else.

Figure 8.5 – Removing an item from My Menu
Use the following steps to Remove items from My Menu:
- 1. Select Remove items from My Menu and scroll to the right (figure 8.5, image 1).
- 2. The Remove items screen presents a series of selections with check boxes (figure 8.5, image 2). Whichever boxes you check will be deleted when you press the OK button. You can check the boxes by highlighting the line item you want to delete and scrolling right with the Multi selector pad. Pressing right on the Multi selector pad acts like a toggle and will check or uncheck a line item.
- 3. When you’ve checked the settings you want to remove, simply press the OK button. A small white box pops up and asks, Delete selected item? (figure 8.5, image 3).
- 4. Pressing the OK button signifies Yes and removes the Set Picture Control setting from My Menu. A screen displaying Done shows briefly, and then the D500 switches back to the My Menu screen. You can press the MENU button to cancel if you decide you don’t want to remove an item. You will notice, in image 4, that Set Picture Control is now gone.
Rank Items
Ranking items is similar to positioning new additions in My Menu. All the Rank items selection does is move an item up or down in My Menu. You can switch your most-used My Menu items to the top of the list.

Figure 8.6 – Ranking items in My Menu
Use the following steps to Rank items:
- 1. Select Rank items from My Menu and scroll to the right (figure 8.6, image 1).
- 2. Now you’ll see the Rank items screen and all the current My Menu items (figure 8.6, image 2). I’ve decided that I use d5 Exposure delay mode more than Active D-Lighting, so I’ll move it to the top.
- 3. Highlight d5 Exposure delay mode and press the OK button (figure 8.7, image 1).
- 4. A yellow box will appear around that item and Move appears at the bottom of the screen (figure 8.7, image 2). Scroll up with the Multi selector pad. This action moves the yellow positioning underline to the top of the list (figure 8.7, image 2, red arrow).
- 5. Press the OK button to select the new position and d5 Exposure delay mode will move to the top of the list (figure 8.7, image 3).

Figure 8.7 – Ranking items in My Menu (continued)
Choose Tab
Choose tab allows you to switch between My Menu and Recent Settings. Both menus have the Choose tab selection as their last menu choice.

Figure 8.8 – Selecting My Menu or Recent Settings (Choose tab)
Use the following steps to switch between My Menu and Recent Settings:
- 1. At the bottom of My Menu, select Choose tab and scroll to the right (figure 8.8, image 1).
- 2. You’ll now have a choice between My Menu and Recent Settings. Choose Recent Settings and press the OK button (figure 8.8, image 2).
- 3. The Recent Settings screen will now appear, completely replacing My Menu on the main menu screen (figure 8.8, image 3). Notice that it has a Choose tab selection at the bottom, just as My Menu does. The items you see on the Recent Settings menu are items I have recently adjusted. Your camera will display a different list of items. The last 20 items adjusted will be displayed when you scroll up or down on the Recent Settings menu. If you have never used the Recent Settings menu, expect the Choose tab selection to initially appear on the screen. As you make adjustments to other menu items, they will appear on the Recent Settings menu.
- 4. Select Choose tab and press the OK button to return to My Menu.
Clearly, this is a circular reference. You can use the Choose tab selection as a toggle between the two menus. When you do, one menu replaces the other as the last selection on the camera’s main menu screen.
Settings Recommendation: You can see how My Menu gives you nice control over a customized menu that is entirely yours. Configure it however you want by choosing from selections in the primary menus. My Menu will save you significant time when you look for your 20 most-used selections.
If you’re inclined to use Recent Settings, just remember that after you pass 20 camera setting adjustments, the next setting you use will jump to the top of the list, moving everything down by one position. The last item on the list will simply disappear.
Now, let’s take a look at Recent Settings in a little more detail.
Recent Settings
(User’s Manual: Page 313, Menu Guide: Page 179)
Recent Settings is very simple. This menu remembers the last 20 changes you’ve made to your D500 camera. Each menu selection that was modified is stored in a temporary place called Recent Settings.
If you change something in your camera that’s not already on the Recent Settings menu (figure 8.9), it will be added to the menu, replacing the oldest change with your new one—at the top of the list—if there is no room left at the bottom (i.e., you’ve exceeded 20 items).

Figure 8.9 – Recent Settings Menu
This can be a convenient way to find something you’ve changed recently but whose location you have trouble remembering on the main menu systems.
Settings Recommendation: If you want a more permanent menu for your favorite changes to the D500, you’ll need to enable the My Menu system instead of the Recent Settings Menu. The Recent Settings Menu is fine, but I want to directly control what settings I have quick access to without searching. My Menu is my choice!
Author’s Conclusion
This is the last of the text-based menus we’ll cover in the D500. We’ve been through all the menu screens in the last several chapters!
Now it’s time to see how to use the controls we’ve carefully configured. Our next chapter takes up the subjects of exposure metering, exposure modes, and the histogram.