13 Movie Live View

Big Daddy Dune in Namibia © 2016 Bonnie Christensen (BChrisRad)
With each new DSLR camera released, Nikon has advanced the capability of the video recording system. The Nikon D500 is no exception. In fact, this camera has achieved a level of video capability that few other cameras can claim, even outside the 35mm form factor. Due to the power and flexibility of its Movie live view video mode, it has led the way in fully establishing a new type of camera, the hybrid digital single-lens reflex camera, or HD-SLR. The new HD-SLR D500 was constructed with a video system just as capable as the still-image system.
When you create videos with the D500, you can create video that few cameras can match. The Nikon D500 has the ability to stream broadcast-quality, uncompressed, HD (720p), Full HD (1080p), and 4K UHD (2160p) video with no camera control overlays—called clean video—from its HDMI port.
In a sense, the Nikon D500 has two video subsystems:
- Recording to Memory Cards: The first video output type is for recording high-quality, compressed, H.264 home videos in MOV format, up to 29 minutes and 59 seconds long each, to the camera’s XQD and SD memory cards.
- Recording to External Video Recorders: The second video output type is for outputting a clean, uncompressed, 4.2.2, 8-bit, 4K video stream from the HDMI port with no time constraints. The second video type allows true commercial use of the Nikon D500 for shooting 4K video.
This camera is so appealing and powerful in both its still-image and video modes that it is causing quite a few other-brand users to come over to Nikon. And the cool thing is—you already own a Nikon D500!
High Definition vs. Hybrid Digital
You will find quite a bit of discussion on the Internet about what HD-SLR truly stands for. Some claim it stands for High Definition Single Lens Reflex and others claim Hybrid Digital Single Lens Reflex. In fact, the HD in HD-SLR stands for hybrid digital. The camera is a hybrid that shoots both stills and video.
Honestly, though, where do the abbreviations stop? What new abbreviations will the next generation of cameras bring? If you want to go all out on abbreviation usage, the Nikon D500 is an ultrahigh-definition, video-enabled, hybrid, digital single-lens reflex camera (UHDVEHDSLR). Now that’s a satisfying abbreviation.
Selecting Movie Live View Mode
Just in case you are a new HD-SLR user and have never used Nikon’s Live view modes, let’s see how to switch the camera into Movie live view mode. In figure 13.1, the camera is set to Movie live view mode, which is just below the setting for Live view photography mode (see the previous chapter) on the Live view selector switch.
Once you have selected Movie live view mode, you should press the Lv button to enter Live view. When in Movie live view mode, you can take HD-ratio (16:9) still images and record 4K UHD videos in the 16:9 aspect ratio only (DX frame size). For both image areas set in Movie Shooting Menu > Choose image area, the still images and video will use 16:9 ratio.

Figure 13.1 – Choosing Movie live view mode
If you are shooting in 1.3x mode, the images and movies are still in the 16:9 aspect ratio. However, the camera creates a cropped, 16:9 ratio image or video that gives the appearance of pulling the subject in closer (1.3x frame size).
The camera isn’t really magnifying the image in 1.3x mode; it’s just using less of the imaging sensor to capture the subject—18.0×10.1mm versus DX mode’s 23.5×13.3mm—so your subject appears larger in the image or video when displayed.
Movie Live View Still Images
The Nikon D500 provides a still-image capability in Movie live view mode that is very similar to that of Live view photography mode, except that your images are limited to a single aspect ratio (16:9). The DX image in 16:9 ratio is 17.4 MP in size (5568×3128 pixels). The 1.3x image in 16:9 ratio is 10.3 MP in size (4272×2400 pixels).
Most of what is written in the chapter Live View Photography applies equally to Movie live view mode’s 16:9 ratio still images. For that reason, we will not discuss all the capability of the Movie live view still-imaging function because that would merely be a repeat of the previous chapter. When you decide to take a picture (instead of a movie) using Movie live view mode, let the information in chapter 12 govern how you shoot, tempered by the differences discussed in this chapter.
Movie Live View Screens
Let’s start out by examining each of the five screen overlays you can use while taking stills or shooting movies in Movie live view mode. You can scroll through each of the five screens by pressing the info button repeatedly.
Movie Live View: Screen 1
The Nikon D500 has two screens for each overlay in Movie live view. The first screen is available when you are shooting still images and the second when you are recording video. I am using the first screen as a guide initially so that we can examine each of the controls on the screen. Once you start recording movies, some of the controls in the overlay disappear. Figure 13.2A shows the first screen you should see when you enter Movie live view. Let’s examine each of the controls displayed in the overlay.

Figure 13.2A – Movie live view screen overlay 1
Here is a list of controls shown on the first screen. Each number in figure 13.2A has a corresponding entry in the list that follows:
- 1. Exposure mode: Selected by holding down the MODE button on top of the camera while turning the rear Main command dial. The available selections you will see on the Monitor are Programmed auto (P), Shutter-priority auto (S), Aperture-priority auto (A), and Manual (M).
- 2. Autofocus mode: Set with the AF-mode button and rear Main command dial. Available settings are AF-S and AF-F. AF-S uses single autofocus that locks on your subject; AF-F provides continuous autofocus.
- 3. AF-area mode: Set with the AF-mode button and front Sub-command dial. Available settings are Face-priority AF, Wide-area AF, Normal-area AF, and Subject-tracking AF (uses graphical symbols).
- 4. Active D-Lighting: Controlled by Movie Shooting Menu > Active D-Lighting, with settings Low to Extra High, Auto, and Off (L = Low, N = Normal, H = High, H
 = Extra high, A = Auto, Off). You can also adjust this setting before you start shooting a video with the Active D-Lighting setting in the i Button Menu, as described in the upcoming Preparing to Make Movies section.
 - 5. Picture Control: Controlled with Movie Shooting Menu > Set Picture Control. You can also control this setting by pressing the Protect/Help/Picture Control button and selecting a Picture Control from the Monitor with the Multi selector pad.
- 6. White balance: Set the camera’s White balance by holding down the WB button and rotating the rear Main command dial. Select from nine white balance settings: Auto, Incandescent, Fluorescent, Direct sunlight, Flash, Cloudy, Shade, Choose color temp., and Preset manual (uses graphical symbols).
- 7. Image area: Controlled by the Movie Shooting Menu > Choose Image area setting. You can select either of the two available image areas, including DX and 1.3x. The Monitor will display an image or video, correctly sized to fit the screen. You can also adjust this setting before you start shooting a video with the Choose image area setting in the i Button Menu, as described in the upcoming Preparing to Make Movies section.
- 8. Frame size/frame rate: This is controlled with Shooting Menu > Movie settings > Frame size/frame rate. It shows the frame size and frame rate to which your Movie mode is currently set. The choices are 2160p (4K UHD) at 30, 25, or 24 fps; 1080p (Full HD) at 60, 50, 30, 25, or 24 fps; or 720p (HD) at 60 or 50 fps. You can also adjust this setting before you start shooting a video with the Frame size/frame rate setting in the i Button Menu, as described in the upcoming Preparing to Make Movies section.
- 9. Movie destination: This setting reflects the configuration stored in Movie Shooting Menu > Destination. You can also adjust this setting before you start shooting a video with the Destination setting in the i Button Menu, as described in the upcoming Preparing to Make Movies section. You have a choice of the XQD card slot or the SD card slot. Movies will be recorded only to the selected destination card unless it has been removed from the camera, at which time the D500 will record video to the only available card.
- 10. Electronic VR: This function attempts to reduce handheld camera shake by shifting the pixels used to record the video in time with slight camera movements. The image or video will be trimmed slightly on its edges as the Electronic VR adjusts the capture. You control this function with either the Movie Shooting Menu > Electronic VR setting or the Electronic VR setting on the i Button Menu. Your choices are On and Off.
- 11. Highlight display: This function helps you to prevent losing detail in the brightest areas of your image or video due to overexposure. Any area in the frame that shows slanted lines (off-level black-and-white stripes) contains no detail. You will need to adjust the camera’s exposure or suffer lost highlight data. You can turn this function On or Off with the Highlight display setting on the i Button Menu, as described in the upcoming Preparing to Make Movies section.
- 12. Time remaining: When you are recording a movie, this feature shows you how much time is left before the camera automatically stops recording. In the Nikon D500, all Frame size/frame rate settings (#8) allow for 29 minutes and 59 seconds of recording time to the camera’s memory card per video clip, with each clip having a maximum of 4 GB. When you use the HDMI port to send uncompressed video to an external video recording device, there is no limit on the recording time.
- 13. AF point (focus): This AF point square can be moved around the screen with the Multi selector pad, or the Sub-selector joystick, to select the subject for autofocus. This focus rectangle will vary in size and color according to the AF-area mode selected (#3) and whether or not the subject is in focus.
- 14. Movie live view symbol: This symbol is merely a label to let you know you have the camera set to Movie live view mode.
- 15. ISO sensitivity: Controlled by Shooting Menu > Movie settings > ISO sensitivity (mode M), with ISO value choices from ISO 100 to Hi 5 (ISO 1,638,400). You must choose an ISO sensitivity setting before you start shooting the movie. If this value needs to vary, you will need to use ISO Auto mode as discussed in #16.
- 16. ISO Auto mode: Controlled by Movie Shooting Menu > ISO sensitivity settings > Auto ISO control (mode M), with the choice of On or Off. You must choose and adjust this setting before you start recording a video.
- 17. Exposure compensation: This symbol will appear only when +/− exposure compensation has been dialed into the camera. Adjust this value with the +/− Exposure compensation button to the right of the ISO button.
- 18. Aperture: Set by turning the front Sub-command dial, with aperture minimum and maximums that vary according to the mounted lens. Manual change is available only in Aperture-priority auto (A) and Manual (M) modes. The camera controls this value in Shutter-priority auto (S) and Programmed auto (P) modes.
- 19. Shutter speed: Set shutter speed with the rear Main command dial. Settings range from 1/25 second to 1/8000 second (8000) when using Manual mode (M) only. The camera controls this value in Aperture-priority auto (A), Shutter-priority auto (S), and Programmed auto (P) modes. Even in Shutter-priority auto (S) mode, the camera forces you to use the ISO Auto setting (#16). Only in Manual mode (M) do you have limited control over the shutter speed (1/25 to 1/8000 sec), and the lower number is affected by the Frame rate setting (you will be limited to only as low as 1/60 when using 1080/60p mode, 1/50 in 1080/50p mode, and 1/30 in 1080/30p mode). (Note: You can enable or disable ISO Auto in Manual (M) exposure mode by setting Auto ISO control (mode M) to On or Off with Movie Shooting Menu > ISO sensitivity settings > Auto ISO control (mode M). That’s right, you can use Auto ISO in Manual (M) mode in case the light changes too quickly for you to manage it with manual controls. This is a powerful feature and safety factor for the Nikon D500 camera.)
- 20. Metering mode: Movie live view allows you to use three of the four metering modes the camera offers: Matrix metering, Highlight-weighted metering, and Center-weighted metering (uses graphical symbols). Hold down the Metering button and rotate the rear Main command dial to change the metering mode. This must be set before you start recording video.
- 21. Microphone sensitivity: This setting allows you to adjust the current Microphone sensitivity setting. As shown in figure 13.2A, #21, three symbols are associated with this setting. The top symbols of a mic and the letter A means that I have the mic set to Auto. The two side-by-side lines of bars show a live view of the left and right sound channels in action, and the L (left) and R (right) symbols indicate which channel is which. For the side-by-side sound level bars, white means normal sound, yellow means loud sound, and red means too-loud sound that may be distorted. The Mic sensitivity is controlled by Movie Shooting Menu > Microphone sensitivity, with the choice of Auto sensitivity, Manual sensitivity (in 20 steps), and Microphone off. You can also adjust this setting before a recording session begins with the Microphone sensitivity setting in the i Button Menu, as described in the upcoming Preparing to Make Movies section.
- 22. Headphone volume: This setting lets you adjust the volume output by the camera to a set of headphones. You can also adjust this setting before you start shooting a video with the i Button Menu, as described in the upcoming Preparing to Make Movies section. You can adjust the volume level anywhere between OFF and level 30. You adjust the volume level by scrolling up or down with the Multi selector pad until you have selected a comfortable volume level. You must adjust the volume before starting a movie recording session.
- 23. Tap Shooting: This function is more limited than the Tap shooting function in Live view photography mode. By touching the Tap shooting symbol, you can enable or disable Touch AF (autofocus). Your two choices are Touch AF: Off and Touch AF: On. The touch symbol will reflect OFF or AF with the hand and finger, according to which mode you are using. If Touch AF: On is selected, you can cause the camera to autofocus by touching your subject on the Monitor.
- 24. Center of Frame Dot: This small dot appears when the AF point rectangle is directly in the middle of the frame. This dot, as well as the surrounding AF point square (#13), will be red when the subject is out of focus and green when it is in focus. If you have not reassigned the Multi selector center button, pressing it will center the AF point square.
- 25. Wind noise reduction: This symbol will appear when Wind noise reduction is enabled. This function attempts to remove the worst of the rumbling sound you hear when wind strikes an unprotected microphone. This function is controlled by the Movie Shooting Menu > Wind noise reduction setting, or by the Wind noise reduction setting in the i Button Menu, as described in the upcoming Preparing to Make Movies section.
- 26. Frequency response: This symbol will appear to let you know whether you have the microphone’s frequency response set to Wide or Voice. Wide will capture a much broader range of sound for when you want to record all sounds in a scene. The Voice setting limits the sound recording sensitivity to ranges encompassing human voice frequencies, making it best for recording human speech, such as during a public discourse or lecture. This function is controlled by the Movie Shooting Menu > Frequency response setting, or by the Frequency response setting in the i Button Menu, as described in the upcoming Preparing to Make Movies section.
When you press the Movie-record button, the screen removes several of the controls in the overlay along the top, as shown in figure 13.2B. You can tell this is a screen from a video being recorded by the REC symbol in the top-left corner, next to the red dot. REC blinks the whole time you are recording.

Figure 13.2B – Movie Live view screen overlay 1, during a video recording
Why do some of the controls disappear during a video recording? Basically, to clean up the screen a bit so the overlay is less distracting while you are concentrating on your subject. During the video recording, you can still change some of the control functions shown in figure 13.2A, with the exception of the following functions:
- Picture Control
- Frame size/frame rate
- Headphone volume
- Metering mode
- Movie destination
- Sound level
- Exposure mode
The MENU button has no effect during a video recording, so you are locked out of even attempting to make any serious camera adjustments that have no button/dial combinations on the camera. However, you can still adjust many of the control functions shown or not shown.
For instance, if you press the AF-mode button while recording a video, the Autofocus and AF-area mode symbols will reappear, allowing you to turn the rear Main command dial to change the Autofocus mode or the front Sub-command dial to change the AF-area mode. Try it.
Likewise, if you press the WB button during a recording, you can change White balance on the fly. According to which Exposure mode was previous selected (P, S, A, or M), you can adjust the aperture, shutter speed, and ISO sensitivity. Finally, you can always add or subtract Exposure compensation with the +/− Exposure compensation button.
Shooting in Manual (M) mode gives you the greatest control over the camera during a video recording. In Manual, you can adjust the following functions:
- Autofocus mode
- AF-area mode
- AF point (focus)
- White balance
- Aperture
- Shutter speed
- Exposure compensation
- ISO sensitivity
Manual mode (M) gives you full control of the camera while recording a video. Aperture-priority auto (A) allows you to control the aperture, while the camera controls the rest. Shutter-priority auto (S) and Programmed auto (P) give you much less control and could almost be considered point-and-shoot modes when recording video.
Now, let’s consider the other available screen overlays and their purposes. Press the info button when you see image 1 (figure 13.2A or 13.2B) and the camera will switch to image 2 (figure 13.2C).
Movie Live View: Screen 2

Figure 13.2C – Movie live view screen overlay 2, for still images (1) and video recording (2)
Image 2 in the overlay series is a very bare screen for those times when you want little distraction while making a still image or recording a video (figure 13.2C). You can still see the most important controls at the bottom of the screen (aperture, shutter speed, and ISO sensitivity), but almost everything else is stripped out of the overlay.
Nikon calls the screen in figure 13.2A the Information on screen, whereas the screen in figure 13.2C is called the Information off screen.
Movie Live View: Screen 3

Figure 13.2D – Movie live view screen overlay 3, for still images (1) and video recording (2)
Most photographers have a tendency to tilt their cameras to the left or right slightly. The Framing guides screen is designed to help keep things level in the Viewfinder (figure 13.2D). The grid lines are very useful for keeping horizons level and architecture straight.
I leave these grid lines turned on in my Viewfinder-based photography all the time and use them in Live view mode when I need to level things in comparison to a feature in my subject, such as the horizon.
Movie Live View: Screen 4

Figure 13.2E – Movie live view screen overlay 4, for still images (1) and video recording (2)
The Histogram screen gives you a live histogram to help you judge exposure during video recording (figure 13.2E). In Manual (M) mode, you can adjust the aperture, shutter speed, or ISO sensitivity to correct for under- or overexposure. In other Exposure modes, you can use the +/− Exposure compensation button to push the exposure toward the dark or light sides, making the exposure better.
If you are a video perfectionist who wants to control all aspects of the video production, you will certainly enjoy having a live histogram to keep you informed immediately when light levels change in a way that will damage your video’s quality. This is a truly professional tool and one all serious videographers should use regularly, especially in Manual (M) mode!
Movie Live View: Screen 5

Figure 13.2F – Movie live view screen overlay 5, for still images (1) and video recording (2)
The Virtual horizon screen displays roll and pitch from the camera’s built-in tilt sensor (figure 13.2F). If the lines are green, it means the camera is level. The tilt sensor senses left and right tilts and forward and backward tilts. When the camera is not level in one direction or the other, the line for that direction turns yellow and signifies the approximate degree of tilt.
This is very useful when setting up a camera on a tripod to shoot a video. You can start the video with the knowledge that the camera is level both left to right and front to back. While you’re shooting a video handheld, this screen may be invaluable to prevent introducing tilt into an otherwise excellent video.
Preparing to Make Movies
The Movie mode in the D500 is one of the best video recording systems Nikon has put in a DSLR. It has automatic or manual focus, 4K UHD recording, stereo sound, 29-minute 59-second recording segments, a 4 GB movie length maximum, and excellent rolling shutter correction.
Another excellent improvement is the fact that you can control the D500 in a fully manual way while recording video, just as when taking still images. This is an important level of control for serious video mavens. If you want to buy all the cool attachments, like stabilization frames, bigger external video monitors, external streaming video recorders, a headphone set, and an external stereo mic, this camera has the ports and controls to support them.
Let’s examine how to prepare for and record videos and then how to display them on various devices. Keep in mind that the D500 offers two levels of video recording; first, to the camera’s memory card as a compressed (b-frame H.264/MPEG-4 AVC) QuickTime MOV file; and second, as an uncompressed 4:2:2, clean (overlay-free), broadcast-quality HDMI video stream through the HDMI port to an external recording device.
Basic HD Video Information
Before shooting your first movie, you’ll need to configure the camera for your favorite video frame size and rate. We’ll look into the actual configuration in a later section. For now, let’s briefly discuss some basics.
A video frame is much smaller, in terms of pixels, than a normal still-image frame. Although your D500 can create beautiful 20.9-megapixel still images, its best HD video image is just above 8 megapixels (8,294,400 pixels).
However, the number of megapixels is not normally how video devices are rated. Instead of the number of pixels, most HD information talks about the number of lines of resolution. There are several HD standards for lines of resolution. The most common standards are 720p, 1080i, 1080p, and 2160p. The p and i after the numbers refer to progressive and interlaced. We’ll talk about what that means in the next section.
The D500’s best Movie mode captures video at 2160p, which is a display-quality UHD TV standard. As of this writing, much over-the-air broadcast-quality HD is 720p and 1080p, but 4K (2160p) is growing in popularity as 4K UHD televisions become less expensive. The 2160p designation simply means that your camera captures and displays 4K UHD video with 2160 lines of vertical resolution. Each of those lines is 3840 pixels long, which allows the D500 to match the 16:9 aspect ratio expected in an UHD TV.
Of course, you can also capture video in the lower resolution standards and use your video on a very common HDTV (720p and 1080p resolution).
Progressive versus Interlaced
What’s the difference between progressive and interlaced? Technically speaking, progressive video output displays the video frame starting with the top line and then draws the other lines until the entire frame is shown. The D500 displays 2160 lines progressively from the top of what the imaging sensor captured to the bottom (lines 1, 2, 3, 4 . . . 2160).
Interlaced video output displays every even line from top to bottom, then comes back to the top and displays every odd line (lines 2, 4, 6, 8 . . . 2160, then 1, 3, 5, 7 . . . 2159).
Progressive output provides a higher-quality image with less flicker and a more cinematic look. I’m sure that’s why Nikon chose to make the D500 shoot progressive video. Now, let’s set up our cameras and make some movies!
Camera Setup for Making Quick Movies
The D500 lets you create movies at any time and with little thought, by simply using the following settings and actions:
- Select Autofocus mode AF-F (Full-time-servo AF)
- Set the Exposure mode to Programmed auto (P)
- Flip the Live view selector lever to Movie live view
- Press the Lv button to enter Live view
- Press the Movie-record button
Setting up the camera in this way makes it act like a standard video camera, where you give little consideration to camera settings and simply shoot the video.
However, you have purchased an advanced-level camera, and you may want to do more than just take automatic movies. The D500 can do it either way. Let’s discuss how to set up the camera for more professional movie creation. First, we will consider the 13 primary settings found on the i Button Menu, and then we will consider a few more settings that are critical for proper video capture.
Using the i Button Menu in Movie Live View
Pressing the i button while in Movie live view mode gives you access to 13 convenient control functions:
- Choose image area
- Frame size/frame rate
- Active D-Lighting
- Movie quality
- Microphone sensitivity
- Frequency response
- Wind noise reduction
- Destination
- Monitor brightness
- Multi-selector power aperture
- Highlight display
- Headphone volume
- Electronic VR
Let’s examine each of these settings individually and prepare for recording premium-quality videos. Some of the settings are fully covered in previous chapters of this book, so we won’t go into extreme detail about how to select the settings; only the screens that are necessary. If you need more detail about a particular setting, refer to the chapter that covers it; for example, Shooting Menu > Set Picture Control is covered in the chapter Shooting Menu.
These 13 setting are all available in the i Button Menu (found by pressing the i button while the camera is in Movie live view mode).
Choose Image Area
The camera has two Image area settings available for video capture: DX and 1.3x.
- DX: The DX choice is available only when you are capturing a Frame size of 1080p (Full HD) or 720p (HD) video, but not for 2160p (4K UHD). It takes data from the camera’s 5568×3712 sensor pixel array and subsamples a 1920×1080 (or 1280×720) subset of the DX sensor data for the video capture. DX also gives you shallow depth of field for pulling focus—changing focus to a different subject while recording—a technique that makes HD-SLR video very interesting.
- 1.3x: The 1.3x choice uses data from a 4272×2848 pixel rectangle in the center of the D500’s sensor, subsampling up to a 3840×2160 subset of the DX sensor data for the video capture. You can choose any of the three Frame sizes (2160p, 1080p, and 720p) when capturing video in 1.3x mode. When you are capturing 2160p (2K UHD) video, the camera will always use 1.3x mode, even if it is set to DX mode.

Figure 13.3A – Choosing an Image area
Use these steps to choose a video Image area (FX or DX):
- 1. Make sure the Live view selector lever is set to Movie live view mode (figure 13.1) and that you have pressed the Lv button to enter Movie live view.
- 2. Press the i button to open the i Button Menu. Select Choose image area from the list (figure 13.3A, image 1). Scroll to the right.
- 3. Choose DX or 1.3x from the Choose image area menu (figure 13.3A, image 2).
- 4. Press the OK button to lock in the setting.
Settings Recommendation: I like to use the DX setting because I enjoy pulling focus, and the shallower depth of field of the DX mode makes that easy. When I need more depth of field than DX can easily provide, or when I am shooting 4K video, I use the 1.3x mode. You should shoot video in both modes and see which look you prefer.
Frame Size/Frame Rate
There are three Frame size settings available in Movie Shooting Menu > Frame size/frame rate, and five frame rate settings. The frame sizes are 3840×2160, 1920×1080, and 1280×720. The frame rates are 60, 50, 30, 25, and 24 fps. Not all frame rates are available for all three frame sizes.
The camera records video using the progressive (p) scanning method (sequential lines) and can output both progressive (p) and interlaced (i) standards through its HDMI port to external devices.
Choose your favorite rate and size using the menu screens shown in figure 13.3B. For more information on choosing a Frame size/frame rate, see the section Frame size/Frame Rate in the chapter Movie Shooting Menu (page 191).

Figure 13.3B – Choosing a Frame size/frame rate
Use these steps to choose a video Frame rate and frame size:
- 1. Make sure the Live view selector lever is set to Movie live view mode (figure 13.1) and that you have pressed the Lv button to enter Movie live view.
- 2. Press the i button to open the i Button Menu. Select Frame size/frame rate from the list (figure 13.3B, image 1). Scroll to the right.
- 3. Choose one of the 10 choices from the Frame size/frame rate menu (figure 13.3B, image 2).
- 4. Press the OK button to lock in the setting.
Obviously, you must set the Frame size/frame rate before you actually start recording video (see table 13.1). The Frame size/frame rate setting changes how large the resulting movie will be when it’s stored on your memory card and computer hard drive. The maximum the camera will allow is 4 GB in any single movie segment. All frame sizes and rates are limited to a recording time length of 29 minutes 59 seconds.

Table 13.1 – Frame size/frame rate, Movie quality bit rates, and Maximum movie length
We will discuss how to choose the bit rate, or Movie quality, in the upcoming subsection, Movie Quality (page 606). The Movie quality affects how much data is collected by the camera and directly affects the resulting video’s file size along with the maximum length of time you can record in one video clip.
Note: When you select 4K UHD mode (2160p), the camera will disable several items on the i Button Menu and main menu, including:
- Choose image area
- Active D-Lighting
- Movie quality
- Electronic VR
Video File Format
The file format used by the D500 is the popular Apple QuickTime MOV format (container). This format is handled by virtually all computer movie players. The video compression used inside the MOV file is H.264/MPEG-4 Advanced Video Coding.
A computer should display any of the Movie quality modes. Using a mini-HDMI (type c) to HDMI standard (type a) cable, you can play full HD videos on an HDTV. An HDMI cable is not included with the camera. They are easily available online and in many electronics stores. We’ll talk more about how to display video in a later section, which includes pictures of the cables.
Settings Recommendation: You have three considerations when selecting a Movie quality setting: First, how much storage capacity do you have on your camera’s memory cards? Second, what type of display device will you show the movies on? Third, are you a video fanatic?
If you are fanatical about video, you’ll shoot only at the fastest rates and highest quality. Others may want to shoot a lot of family videos and hate storing the huge files that result from high frame sizes and rates. In that case, the normal quality setting and lower resolutions may be sufficient.
If you can’t stand watching a non-HD video on YouTube, maybe you should stick to maximum quality. If standard YouTube videos are sufficient for your needs, nearly any quality setting from the D500 will look great on your computer.
This is a personal decision, and you’ll need to experiment with video modes to find a balance between quality and file size.
Why Different Frame Rates?
The NTSC encoding format, established in the 1940s, originally used two frame rates: 30 and 60 fps. In the 1960s a new German standard was created called PAL, which used 25 and 50 fps. Today, frame rates of 24, 25, 30, 50, and 60 are common in DSLR cameras. These rates can also be expressed as a hertz (Hz) rate on progressive scan monitors. The primary frame rate used in the movie industry is 24p.
A video is many still pictures joined together and moved past your eye at a very fast rate. The human eye maintains an image at about 10 to 16 fps (1/10 to 1/16 second), so frame rates faster than that do not flicker for many people. However, some people’s eyes are more sensitive and can see flicker in faster frame rates. I am afraid to say much more about this issue because it can rapidly degrade into an almost religious discussion; people have very strong opinions about their favorite frame rates.
Let me just say that many people prefer 24 fps because that is normal for cinema movies. This rate is called a cinematic rate. Other people like the faster frame rate of 30 fps due to its lack of flicker and less blurring of moving subjects. I suggest that you try all the frame rates and see which you like best. You might even want to shoot some video at 60 fps and play it back at 30 fps for cool slow-motion effects.
Active D-Lighting
Since each frame of a video is basically a small picture, the Active D-Lighting (ADL) system can be of benefit in high-contrast video capture situations. If you are shooting video in direct sunlight, for instance, the contrast between the brightest highlights and deepest shadows can be quite large. Under those circumstances, using Active D-Lighting may help bring out some of the detail that may otherwise be lost to the shadows, and help prevent the highlights from burning out, too.

Figure 13.3C – Enabling or disabling Active D-Lighting
Use the following steps to configure Active D-Lighting for your videos:
- 1. Make sure the Live view selector lever is set to Movie live view mode (figure 13.1) and that you have pressed the Lv button to enter Movie live view.
- 2. Press the i button to open the i Button Menu. Select Active D-Lighting from the list (figure 13.3C, image 1). Scroll to the right.
- 3. Choose one of the five choices from the Active D-Lighting menu (figure 13.3C, image 2).
- 4. Press the OK button to lock in the setting.
Settings Recommendation: You should experiment with Active D-Lighting during video capture. It may help you keep contrast under control. Be careful, though; Active D-Lighting can increase the noise in a video, especially at higher levels. I generally leave my camera set to Low or Normal ADL when the lighting is high-contrast.
Movie Quality
The Movie quality setting has to do with the Maximum bit rate, or megabits per second (Mbps), that the camera can flow while making the movie. The higher the bit rate, the higher the quality of the movie. The bit rate can go as low as 12 Mbps in Normal quality mode and as high as 144 Mbps in High quality mode. Table 13.2 shows the Mbps flow in High (HIGH) and Normal (NORM) quality modes.

Table 13.2 – Bit rates per Movie quality setting

Figure 13.3D – Choosing a Movie quality (bit rate)
Use these steps to choose a Movie quality (bit rate) for your video:
- 1. Make sure the Live view selector lever is set to Movie live view mode (figure 13.1) and that you have pressed the Lv button to enter Movie live view.
- 2. Press the i button to open the i Button Menu. Select Movie quality from the list (figure 13.3D, image 1). Scroll to the right.
- 3. Choose HIGH or NORM from the Movie quality menu (figure 13.3D, image 2).
- 4. Press the OK button to lock in the setting.
Changing the bit rate is one way to control the amount of data the video contains. The higher the bit rate, the better the movie quality—but the larger the movie file size. You will need to decide which is more important, quality or size.
Settings Recommendation: Unless I am just shooting a video for the Internet only (Facebook or YouTube) and of a subject with no commercial value, I shoot with the camera set to Maximum frame rate, frame size, bit rate, and whatever other maximums I can find and max out. If a video has potential to make me some money or is of an interesting subject that others will enjoy watching, I want the best quality I can wring out of those little video frames. However, that comes with a trade-off of much larger file sizes, so I have committed to buying larger and larger hard drives each year or two.
Microphone Sensitivity
The Microphone sensitivity setting is designed to give you the ability to set how sensitive the Microphone is to surrounding sound. This setting affects the Built-in microphone until you plug in an external Microphone in the camera’s Microphone jack under the rubber Connector cover (see figure 13.3H on page 609). Let’s look at the best way to set the Microphone level just before recording a video.
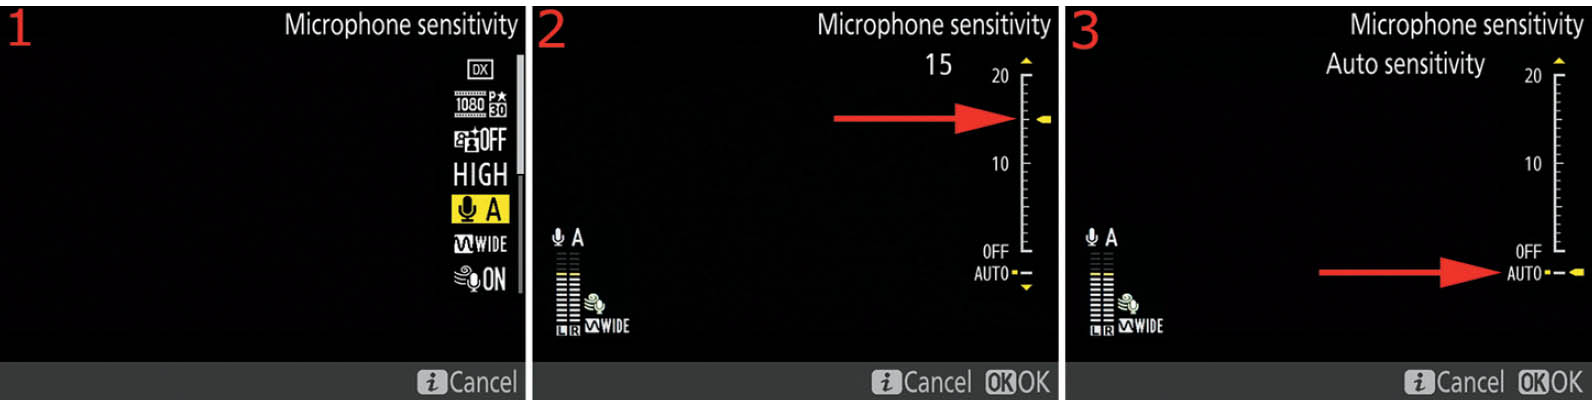
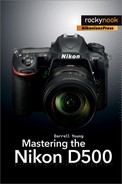
Figure 13.3E – Manually setting the Microphone sensitivity with camera controls
Use these steps to choose a Microphone sensitivity:
- 1. Make sure the Live view selector lever is set to Movie live view mode (figure 13.1) and that you have pressed the Lv button to enter Movie live view.
- 2. Press the i button to open the i Button Menu. Select Microphone sensitivity from the list (figure 13.3E, image 1). Scroll to the right.
- 3. Choose from as low as Off to as high as level 20 from the Movie quality slider on the right side of the screen (figure 13.3E, image 2, red arrow). I have selected Microphone sensitivity level 15.
- 4. If you would rather have the camera decide which Microphone sensitivity to use, select the Auto setting at the bottom of the sensitivity slider (figure 13.3E, image 3, red arrow).
- 5. Make a selection and press the OK button to lock in your chosen mic sensitivity level.
The Microphone must be set before you start recording a video, so you may want to test the level to see if the sound gets into the yellow or red zones. Keep the indicator in the middle to upper white zone for normal sound (figure 13.3F, red arrow). As the sound increases, the indicator hits the yellow zone and finally the red zone, where clipping may occur.

Figure 13.3F – Monitoring the sound level (Microphone sensitivity)
The D500 offers the ability to plug in an optional stereo microphone (figure 13.3G). It disables the Built-in mic and overcomes some of its limitations. There are several microphones available for the D500, including a few that mount onto the camera’s Accessory shoe like a flash unit does. I like Nikon’s ME-1 microphone, shown in figure 13.3G.

Figure 13.3G – Nikon D500, AF-S Nikkor 16–85mm f/3.5–5.6G ED VR lens, and the Nikon ME-1 Microphone (in Accessory shoe)
In figure 13.3H you can see where an external microphone plugs into the camera. The right-hand plug is for a microphone and the left-hand plug is for a headphone.

Figure 13.3H – Headphone and microphone plugs

Figure 13.3I – Built-in stereo microphone
If you decide to simply use the Built-in microphone, just be sure you don’t accidentally cover one of the inputs while recording a video. The Built-in stereo microphone is a single hole on either side of the prism housing on the front of the camera (figure 13.3I, red arrows), for left and right stereo input.
Sound Output from Camera
When you are not using headphones, the video’s sound is output through a small speaker on the back of the camera during camera playback. You’ll see three small holes between the Viewfinder eyepiece and the Sub-selector joystick (figure 13.3J). This little three-hole speaker can put out an amazing amount of volume.

Figure 13.3J – D500 sound output speaker
When a video is playing, you can control the volume output of the speaker with the Thumbnail/playback zoom out button (volume down) and Playback zoom in button (volume up). The setting range is 1 through 30, and Off. I find that level 20 is about right to hear well in a normal environment.
You can use headphones to listen to the sound from the video, too. I find that 12 or 13 is plenty loud for my headphones. For more information about using headphones with the D500, see the upcoming subsection titled Headphone volume (page 615).
Settings Recommendation: First of all, I strongly suggest that you acquire the Nikon ME-1 external microphone. I have really enjoyed using it. It vastly improves the quality of sound flowing into the camera during a video and isolates the camera’s clicking and whirring noises more effectively. The ME-1 is relatively inexpensive—well, compared to a lens, anyway.
I leave the sound level set to Auto (A) most of the time. However, if I am in an especially loud environment, I will set the Microphone sensitivity manually to about 15. When there are sudden loud sounds in Auto mode, the camera might clip the sound as it overwhelms the camera’s sound circuitry.
I suggest experimenting with this because normally it’s not a problem. Where the problem occurs is at something like a ball game. You will be recording the game and someone scores, to the crowd’s great yelling and stomping happiness. Auto may not be the best setting under those circumstances.
Frequency Response
Sound is a very important part of video recording. Maybe you want to record a video while visiting a national park and would like to pick up the sound of every birdsong, leaf rustle, and gurgling stream. Using the wide frequency option will allow this type of sound recording. On the other hand, using the voice frequency option while recording a video of a wedding ceremony is a good choice because it won’t pick up the sounds of a bird singing or road traffic as easily.
With a combination of the Microphone sensitivity and Frequency response functions, you can capture some very high-quality sound. Microphone sensitivity affects how sensitive the microphone is to sound, and Frequency response affects which sound frequencies the mic is most sensitive to. We’ve already considered Microphone sensitivity, so now let’s see how to make the mic sensitive to a wide frequency range (national park) or a human voice frequency range (wedding ceremony).

Figure 13.3K – Choosing a Frequency response for the mic
Use these steps to choose a Frequency response range for the microphone in use:
- 1. Make sure the Live view selector lever is set to Movie live view mode (figure 13.1) and that you have pressed the Lv button to enter Movie live view.
- 2. Press the i button to open the i Button Menu. Select Frequency response from the list (figure 13.3K, image 1). Scroll to the right.
- 3. Choose WIDE (Wide range) or VOICE (Vocal range) from the Frequency response menu (figure 13.3K, image 2).
- 4. Press the OK button to lock in the setting.
Settings Recommendation: If you are recording a human speaker, use VOICE, and for about anything else use WIDE. I leave my camera set to WIDE most of the time because I am a nature photographer and enjoy hearing natural sounds.
Wind Noise Reduction
Have you ever recorded a video on a beautiful, breezy summer afternoon, only to later find that you have recorded that distinctive rumbling sound of wind blowing across a microphone instead of the clear sound you desired?
While that sound may not be completely eliminated without using special microphones designed to deal with it—such as the Nikon ME-1—it can be significantly reduced with the Wind noise reduction function, which removes or cuts low frequency noises like wind rumbles.
Let’s see how to enable and disable the Wind noise reduction low-cut filter.

Figure 13.3L – Enabling or disabling Wind noise reduction
Use these steps to enable or disable Wind noise reduction:
- 1. Make sure the Live view selector lever is set to Movie live view mode (figure 13.1) and that you have pressed the Lv button to enter Movie live view.
- 2. Press the i button to open the i Button Menu. Select Wind noise reduction from the list (figure 13.3L, image 1). Scroll to the right.
- 3. Choose ON or OFF from the Wind noise reduction menu (figure 13.3L, image 2).
- 4. Press the OK button to lock in the setting.
Settings Recommendation: I use this wind noise filter selectively. Most of the time I am using an external Nikon ME-1 hotshoe microphone, which has a foam screen around the mic to reduce or eliminate any wind noise. I do use Wind noise reduction when I am using the built-in stereo mic to record family events outside.
Destination
The D500 allows you to choose which of your camera’s two card slots will receive the video. It also gives you an estimate of available video recording time for each card, based on the current Frame size/frame rate and Movie quality settings.

Figure 13.3M – Choosing a Destination for your video (SD or CF)
Use these steps to choose which memory card the camera will use to save your new video:
- 1. Make sure the Live view selector lever is set to Movie live view mode (figure 13.1) and that you have pressed the Lv button to enter Movie live view.
- 2. Press the i button to open the i Button Menu. Select Destination from the list (figure 13.3M, image 1). Scroll to the right.
- 3. Choose XQD or SD from the Destination menu (figure 13.3M, image 2). Notice that the video recording capacity for the selected card is shown just below the XQD card slot label in image 2:4 hours (04h), 49 minutes (49m), and 33 seconds (33s) capacity. Check to see which of your cards has the greatest capacity and use it. You cannot switch the Destination while recording a video.
- 4. Press the OK button to lock in the setting.
Settings Recommendation: Deciding which card to use is based on the speed and quality of your current cards. XQD cards often have better transfer rates, so you may want to default video output to your XQD card. However, SD cards are cheap, plentiful, and fast enough that you may want to have several with you to swap out as you create video.
This boils down to personal preference. All I can advise is to have either big cards (32 or 64 GB minimum) or a bunch of smaller ones because the Nikon D500 can quickly fill up a memory card with its video files.
I generally relegate video to the secondary slot, which is my SD slot. I don’t shoot as much video as I do still images, so it’s SD for me. Memory cards, especially SD, are getting cheaper every day. With a D500, that’s a good thing!
Monitor Brightness
The Monitor brightness function is for your convenience when shooting in very light or dark environments. You can quickly turn the brightness up or down with camera controls. The brightness setting in no way affects the video recording itself. It is just for your Monitor viewing comfort while recording video.

Figure 13.3N – Setting the Monitor brightness to a comfortable level for viewing
Use these steps to choose a Monitor brightness level for video recording:
- 1. Make sure the Live view selector lever is set to Movie live view mode (figure 13.1) and that you have pressed the Lv button to enter Movie live view.
- 2. Press the i button to open the i Button Menu. Select Monitor brightness from the list (figure 13.3N, image 1). Scroll to the right.
- 3. Use the Multi selector pad to scroll up or down and set the brightness to a comfortable level (figure 13.3N, image 2). You can scroll up or down over a range of 11 steps (–5 to +5). The yellow indicator at the point of the red arrow in image 2 is set to 0 (factory default), a medium setting.
- 4. Press the OK button to lock in the setting.
Settings Recommendation: I generally leave my camera set to the middle setting (0) unless I am out in bright sunshine, when I may crank it all the way up to the + sign on top of the indicator (maximum). At night, when I am out shooting star trails, I may crank it all the way down to –5, to save my night vision. The 0 setting is about right for normal use.
Multi-Selector Power Aperture
The Multi-selector power aperture function is a feature that is very convenient for fast and relatively quiet aperture changes while recording videos. Most lenses will work with this feature, even camera-registered, non-CPU lenses. Basically, if you enable this setting you can open and close the aperture by pressing up or down on the Multi selector pad.
This function will work in manual (M) and Aperture-priority auto (A) exposure modes only. The camera controls the aperture in the other two modes (P and S).

Figure 13.3O – Using the Multi-selector power aperture function
Use the following steps to enable or disable the Multi-selector power aperture:
- 1. Make sure the Live view selector lever is set to Movie live view mode (figure 13.1) and that you have pressed the Lv button to enter Movie live view.
- 2. Press the i button to open the i Button Menu. Select Multi-selector power aperture from the list (figure 13.3O, image 1). Scroll to the right.
- 3. Select On or Off for the power aperture (figure 13.3O, image 2).
- 4. Press the OK button to lock in the setting.
Note: If you are accustomed to using the Multi selector pad to move the AF point square around the Monitor, you will need to learn to use the Sub-selector joystick instead. When this function is enabled and your camera is set to A or M exposure modes, the Multi selector pad will be tied up with this function and will not provide any AF point movement capability.
Settings Recommendation: I’ve been using the power aperture when I am shooting family videos for fun. When I shoot commercially, I would rather use a manual lens and push or pull focus. Check this feature out! Most lenses will work fine with it. It is a lot of fun to use.
Highlight Display
The Highlight display or Zebra stripe mode is a welcome addition to the Nikon D500’s features. This display allows you to determine when an area of your video has lost all highlight detail (it is blown out to pure white).
In figure 13.3P, images 2 and 3, you can see the zebra stripes in the white background of my deliberately overexposed image. See how the small alternating stripes show exactly the area that has no highlight detail left? If there is any detail left, even a small amount, the zebra stripes will not show in that area, as can be seen by the very faint shadow areas to the left of the subjects and in the region on the top left of the frame.
This can be a useful function for shooting video in high-contrast lighting conditions, so that you can see areas of your video that have lost all detail.

Figure 13.3P – Using the Highlight display (Zebra stripe mode)
Use these steps to enable or disable the Highlight display (zebra stripes) for video recording:
- 1. Make sure the Live view selector lever is set to Movie live view mode (figure 13.1) and that you have pressed the Lv button to enter Movie live view.
- 2. Press the i button to open the i Button Menu. Select Highlight display from the list (figure 13.3P, image 1). Scroll to the right.
- 3. Select ON or OFF from the list (figure 13.3P, image 2). Image 1 shows a normal picture that has clear overexposure but no zebra stripes. In image 2 you can see the same image as in image 1, except the Highlight display‘s alternating black-and-white zebra stripes are enabled and show the blown out (pure white) areas with no detail. Figure 13.3P, image 3, shows a larger example of how the blown-out areas of the video frame will be marked for you. Of course, these stripes do not appear in the video itself.
- 4. Press the OK button to lock in the setting.
Settings Recommendation: I generally leave Highlight display enabled because I want to know when the highlights are blown out in certain areas of my videos. I can then reduce the exposure quietly with my cool power aperture (see the previous subsection) and prevent overexposure.
Headphone Volume
The Headphone port under the rubber Connector cover is an excellent addition to the Nikon D500 (figure 13.3Q). It allows you to plug in a headphone set to isolate yourself from surrounding sounds and focus on hearing what the camera is actually recording. This is important for those who are concerned about maximum sound quality.

Figure 13.3Q – Headphone and microphone ports
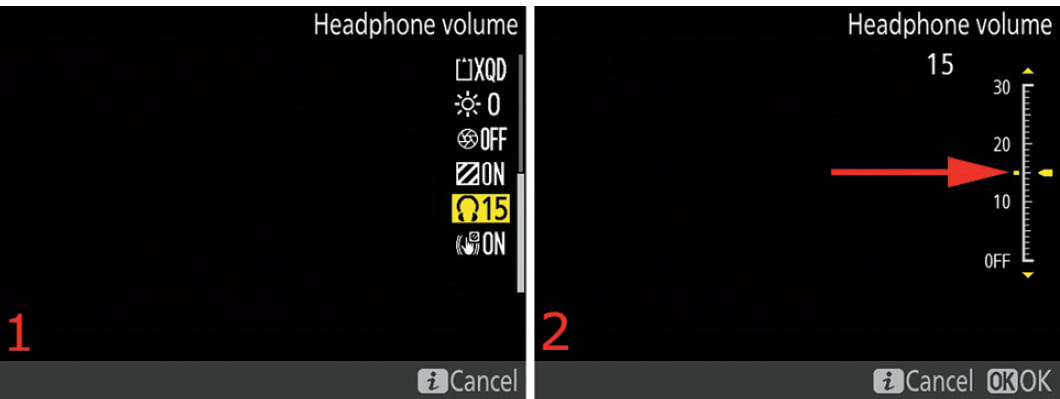
Figure 13.3R – Choosing a Headphone volume output level
Use these steps to select a Headphone volume to use while recording your video:
- 1. Make sure the Live view selector lever is set to Movie live view mode (figure 13.1) and that you have pressed the Lv button to enter Movie live view.
- 2. Press the i button to open the i Button Menu. Select Headphone volume from the list (figure 13.3R, image 1). Scroll to the right.
- 3. Choose a level from Off to 30 for the Headphone volume (figure 13.3R, image 2). Be careful not to have it turned up high when you use the headset or earbuds or you could damage your hearing. The camera is set to level 15 on the volume range in image 2, which is a medium setting.
- 4. Press the OK button to lock in the setting.
Settings Recommendation: The headphone you use doesn’t have to be an expensive outfit to be effective. I often simply use a set of normal isolation ear buds, like the ones you would plug into your smartphone or iPod. Ear bud headsets can be stored in a small pocket in your camera bag, so they will always be with you. I like the type that have good bass response and can be inserted in your ear, instead of the type that kind of hang off of your ear (like the ones that come with an iPhone).
I have found that output level 15 is about right for my hearing while recording and for playback. However, I hear less well than I did when I was young due to listening to my Walkman (remember those?) at high volume as a kid. Be careful not to go too loud because sudden sound increases might damage your hearing. You may be more comfortable with the volume around 10 or 12.
Electronic VR
Electronic VR (vibration reduction) allows the camera to compensate somewhat for minor handheld camera movements during video capture. It is available only with Frame sizes of 1080p (Full HD) and 720p (HD) modes—2160p (4K) is not supported.
This feature works best when you are shooting in 1.3x Image area mode. It works in DX mode, but there will be some narrowing of the field of view because the camera must make room for shifting the pixels to counteract minor movements.
This is not an optical stabilization system involving the lens. It is a pixel-shifting technology, whereby the camera quickly changes the video capture’s row and column in the photosite array to compensate for small camera movements.

Figure 13.3S – DX image sensor (black outline) with column-and-row, pixel-shifting, 1.3x video capture frame (bird and background moving around the sensor)
Figure 13.3S is a rough representation of the entire image sensor (black outline) in 1.3X mode with the smaller video capture area (bird in shifting frame) pixel-shifting within the frame to counteract minor handheld camera movement.

Figure 13.3T – Enabling or disabling Electronic VR
Use the following steps to turn Electronic VR on and off:
- 1. Make sure the Live view selector lever is set to Movie live view mode (figure 13.1) and that you have pressed the Lv button to enter Movie live view.
- 2. Press the i button to open the i Button Menu. Select Electronic VR from the list (figure 13.3T, image 1). Scroll to the right.
- 3. Choose either On or Off to enable or disable Electronic VR.
- 4. Press the OK button to lock in the setting.
Settings Recommendation: Electronic VR can be a somewhat useful function for those times when you are handholding the camera without any mechanical stabilization devices. It will certainly not replace real stabilization; however, it is useful for minor corrections on family video. Be careful not to move too much when using Electronic VR because it could make your video look jumpy. Give this function a try and see what you think about it.
Additional Settings Before Shooting Video
In addition to the 10 controls found in the i Button Menu, there are a few more that you should consider before shooting a video.
Picture Control
Using different Picture Controls can give you powerful control over the look of your videos. Since videos are not still-image RAW files that can be adjusted as easily after the fact for color errors, it’s a good idea to carefully choose a look based on a Picture Control that you are comfortable with and that matches the current situation.
For instance, let’s say you are shooting a video on an overcast, low-contrast day and you want to add some snap to your movie. You can simply preselect the Vivid (VI) Picture Control, which will saturate the colors and darken the shadows.
Or you might be shooting on a very high-contrast, sunny day and want to tone down the contrast a bit. Simply preselect the Neutral (NL) Picture Control, which will open up the shadows for a lower-contrast look.
If you are an experienced video editor and know how to do color grading, you might consider shooting the video with the Flat (FL) Picture Control. This will give you greater dynamic range and lower-saturation colors for better color grading with professional video-editing software.
Just remember, you must select the Picture Control before you start recording the video. Here’s how.

Figure 13.3U – Choosing a Picture Control for the best movie look
Use the following steps to choose a Picture Control:
- 1. While in Movie live view mode, press and release the Protect/Help/Picture Control button (figure 13.3U, image 1).
- 2. Choose a Picture Control with the Multi selector pad (figure 13.3U, image 2).
- 3. Press the Multi selector center button or OK button to choose the control.
Fortunately, you can actually see the effect each Picture Control will have on your video. Use the Movie live view screen to select Picture Controls and see how they look by pointing the camera at your subject. When you have found a Picture Control that benefits the subject, use it for the video.
Settings Recommendation: I like to shoot with the Neutral (NL) Picture Control for most of my videos that involve people because I like the skin tones better with that control. However, when I am outdoors enjoying the beauty of nature, I will often select the Landscape (LS) Picture Control, or if I am feeling a bit frisky in the autumn colors, I might even use the Vivid (VI) Picture Control. If I am shooting commercial work, I sometimes will use the Flat (FL) Picture Control. However, the use of the FL control means I must use grading to bring the color back up to where I like it for the video.
The key is to use the Picture Controls enough to know what you’ll get with each one. That way, you are in command of your camera.
Choosing a White Balance
White balance sets the color tint of the video. It is very important to use a White balance that matches the light source where you will be shooting the video. Auto WB works most of the time but can sometimes have problems with mixed lighting.
You should be aware of the White balance and even experiment with it for your videos. Maybe you should switch to Shade White balance when in the shade or Direct sunlight when in the sunlight. If you pay careful attention to your camera’s White balance, your videos will have superior quality.

Figure 13.3V – Choosing and fine-tuning a White balance
Use the following steps to set the White balance before or during a video recording:
- 1. While in Movie live view mode, press and hold the WB button (figure 13.3V, image 1).
- 2. Notice that the Movie live view screen shows a White balance (WB) setting (figure 13.3V, image 2). Auto1 (A1) is currently selected.
- 3. Choose a White balance by rotating the rear Main command dial (figure 13.3V, image 3).
- 4. In figure 13.3V, image 4, you will see that the WB value is no longer set to A1. Instead, the Direct sunlight symbol is selected.
- 5. You can fine-tune the WB value by rotating the front Sub-command dial (figure 13.3V, image 5).
- 6. Fine-tuning allows you to add amber (warm) or blue (cool) fine-tuning to the standard for that WB setting. You can fine-tune the colors in a range of 0.5 to 6.0 steps of amber (A) or blue (B). Notice that in figure 13.3V, screen 6, B0.5 is selected (left red arrow), which means a 1/2 step of blue is added to the normal Direct sunlight value, cooling it down a little. Also, notice that an asterisk has appeared after the WB symbol (right red arrow). This shows that you have fine-tuned the WB value. The asterisk will stay until you reset the WB value back to 0.0 (where B0.5 is currently set). Figure 13.3V, image 2, shows the fine-tuning value still set to 0.0.
- 7. Release the WB button to select the White balance.
Watch carefully as you select the different White balance settings. You will see the color tint of the current White balance on your camera’s Monitor. You can change the White balance during the actual video recording, as well as fine-tune the color tint. This shows how serious it is to use a correct White balance. Fortunately, the Nikon D500 makes it easy.
Note: You can also use the Movie Shooting Menu > White balance setting to manage the WB value for your movie. Refer to the section on the White balance setting for more information.
Settings Recommendation: I often use Auto WB (A1) unless I am in tricky lighting situations, such as inside under fluorescent lighting with some outside lighting coming in through the windows. In situations like that, I try to match the camera to the most prevalent light source.
The camera does well outside in natural light, although I have at times seen a little blueness in the shade. If the look seems a little blue in shade, I might use Shade WB. The critical thing is whether the color tint in the video you are seeing on the Monitor looks like the scene you see with your own eyes. If not, try to make the camera match what you see.
Selecting an Autofocus Mode
The Autofocus modes available in Movie live view are AF-S and AF-F. AF-S is single-point AF and you control it. AF-F is camera-controlled Autofocus. There are no other Autofocus modes available for Movie live view. You can move the focus square to any point on the Monitor to focus on the best area of your subject in either Autofocus mode. If you are using AF-S, you can focus with either the Shutter-release button or the AF-ON button. You can even change Autofocus modes while recording a video. Here’s how to select the AF mode with external camera controls.

Figure 13.3W – Choosing an Autofocus mode
Use the following steps to set an Autofocus mode before or during a video recording:
- 1. While in Movie live view mode, press and hold the AF-mode button (figure 13.3W, image 1).
- 2. Choose an Autofocus mode by rotating the rear Main command dial (figure 13.3W, image 2). In figure 13.3W, image 3, you will see that the AF-S mode is selected. As you rotate the rear Main command dial, this value will change between AF-S and AF-F.
- 3. Release the AF-mode button to select the Autofocus mode.
Settings Recommendation: Many people use Full-time-servo AF (AF-F mode) for fun video shooting. However, for commercial purposes, AF-F mode is lacking. It struggles to remain in focus in low light, and even in the best light it tends to rack in and out on a frequent basis, which is very distracting to viewers. That’s why many serious videographers use manual focus lenses, so they can control the focus with great smoothness—after much practice, of course.
I like videoing with my manual and autofocus prime lenses, such as my AI Nikkor 35mm f/2 or AF-S Nikkor 50mm f/1.4G in MF mode. I’m sure you already have, or will soon have, several favorite lenses that work well for video. Just be sure to try them in Manual mode for best focus results.
Choosing an AF-Area Mode
The AF-area mode lets you choose where the camera will autofocus on your subject. The setting modifies the basic way autofocus decides what part of the subject is important. Let’s examine each screen and the four AF-point styles and then see how to select one of the four AF-area modes.
The following list explains the four available AF-area modes:
- Face-priority AF (figure 13.3X, image 3): The camera has the ability to track focus on the faces of several people at the same time. It is quite fun to watch as the little green and yellow AF point squares find faces and stay with them as they move. Nikon claims it can detect up to 35 faces at the same time.
- Wide-area AF (figure 13.3X, image 4): For the landscape shooters among us who like to use Live view mode or shoot movies of beautiful scenic areas, this is the mode to use. The camera will display a big red (out of focus) or green (in focus) AF point square on the Monitor. You can move this big AF point square around until it rests exactly where you want the best focus to be. The camera will sense a wide area and determine the best focus, with priority on the area under the green square.
- Normal-area AF (figure 13.3X, image 5): This is a mode primarily for shooters who need to get very accurate focus on a small area of the frame. This is a great mode to use with a macro lens because it gives you a much smaller AF point square that you can move around the frame.
- Subject-tracking AF (figure 13.3X, image 6): In this mode you have to autofocus first with the Shutter-release button or AF-ON button (AF-F mode does this automatically). Then you start subject tracking by pressing the Multi selector center button once. To stop subject tracking, press it again.

Figure 13.3X – The four AF-area modes
Use the following steps to set an AF-area mode before or during a video recording:
- 1. While in Movie live view mode, press and hold the AF-mode button (figure 13.3X, image 1).
- 2. Choose an AF-area mode by rotating the front Sub-command dial (figure 13.3X, image 2).
- 3. In figure 13.3X, screens 3 to 6, you will see the four AF-area modes. Use the preceding AF-area mode list to select the best mode for your video making.
- 4. Release the AF-mode button to select the AF-area mode.
Settings Recommendation: Why not leave the AF-area mode set to Face-priority AF if you photograph people a lot? If you are using Movie live view for macro shooting, Normal-area AF gives you the smallest, most accurate area mode for detailed, up-close focusing. Landscape shooters should use Wide-area AF, and wildlife or sports shooters should use Subject-tracking AF.
Selecting an Exposure Mode
The Exposure, or Shooting, modes—Programmed auto (P), Shutter-priority auto (S), Aperture-priority auto (A), and Manual (M)—give you various levels of control over the D500. It is best to use Manual (M) mode when possible if you want complete control over the camera. Every other mode has limitations.
When you control the aperture in M or A mode, you can also control depth of field for cinematic blurred backgrounds in videos containing people and deep focus in landscapes. When you adjust the shutter speed during the video (in M mode only), you can capture a beautiful blur effect for a waterfall (slow shutter speed) and quickly switch to a fast shutter speed to get that deer leaping over a fence. With ISO sensitivity control (in M mode only), you can select the best ISO for the current video and vary it only when needed.
Or, you can relinquish part or all of the control to the camera. The Nikon D500 lets you decide. The following list provides information about using the aperture, shutter speed, and ISO sensitivity settings while recording a movie. Unlike previous Nikons, the D500 gives you full control of the camera in Manual mode only, including all three corners of the exposure triangle: aperture, shutter speed, and ISO sensitivity.
- Aperture: When using Aperture-priority mode (A) or Manual mode (M), you have complete control over the aperture of the mounted lens. You can change the aperture any time you want while shooting the movie when in those two modes, allowing you to change depth of field throughout the video. You simply turn the front Sub-command dial whenever you need to change the aperture. Be careful, though, because the camera makes an audible noise that can be picked up by the internal stereo microphone for each aperture change when using the Sub-command dial. Fortunately, you can use the Multi-selector power aperture function (page 614), available on the i Button Menu, while recording a video. It is very quiet!
- Shutter speed: Manual mode (M) is the only mode where you have complete control of the shutter speed during the video recording session. This allows you to control the level of motion blur by simply rotating the rear Main command dial, thereby changing the shutter speed to any value between 1/25 and 1/8000 second (according to which Frame size/frame rate setting you are using). You cannot reduce the shutter speed to below 1/25 second when in Movie live view mode. Shutter-priority mode (S) does not allow you to change the shutter speed when in Movie live view mode.
- ISO sensitivity: You have full control over the ISO sensitivity of the camera only when using Manual mode (M). You control the ISO sensitivity by holding in the ISO button on top of the camera while rotating the rear Main command dial. Use this in conjunction with the shutter speed or aperture to make adjustments when conditions change. You can adjust ISO sensitivity to anything between ISO 100 and Hi 5 (ISO 1,638,400).
Note: It is best to shoot in Manual (M) mode for full camera control, or Aperture-priority auto (A) mode to control the aperture while the camera automatically adjusts the rest of the exposure controls.
When using Shutter-priority mode (S) or Programmed auto (P) mode, the camera acts like a consumer video camera and leaves you little control over any of the exposure controls, with the exception of using the +/− Exposure compensation button to add or subtract exposure.
Also, remember that the D500 allows you to use Auto ISO control (mode M) in Manual (M) mode, in which the camera adjusts the ISO sensitivity to maintain a correct exposure. You can enable Auto ISO control (mode M) in Movie Shooting Menu > ISO sensitivity settings.
Let’s examine how to select an Exposure mode.
Figure 13.3Y – Selecting an Exposure mode (P, S, A, or M)
Here are the steps to select an Exposure mode:
- 1. While in Movie live view, press and hold in the MODE button (figure 13.3Y, image 1).
- 2. Rotate the rear Main command dial (figure 13.3Y, image 2) to the left or right to select one of the four Exposure modes: P, S, A, or M. As you rotate the rear Main command dial, each of the four modes will appear in the position indicated by the red arrow in image 3. In image 3, Manual (M) mode is selected.
- 3. Release the MODE button to set the Exposure mode.
Note: If you use semi-automated Exposure modes (P, S, and A), the camera will change the ISO sensitivity to maintain a good exposure. The Nikon D500 uses the ISO sensitivity as a failsafe to make sure the video is usable. It will raise the ISO up to noisy levels pretty quickly when light starts falling, so be aware of that and use artificial light (e.g., LED) to prevent having noisy videos.
If you are shooting in Manual mode and change the aperture or shutter speed quickly, the camera cannot adjust the ISO to compensate—unless you have enabled Movie Shooting Menu > ISO sensitivity settings > Auto ISO control (mode M)—so your video may get dark or overly bright until you change the ISO or opposite control to match the new settings. Video is a little harder to shoot in Manual compared to still images because it is live and everything you do to affect exposure is immediately apparent to all viewers. Practice, practice, practice!
Settings Recommendation: The Nikon D500 is a truly professional video camera. It can do things that even expensive pro video cameras cannot do because the large sensor makes such shallow depth of field and the lens selection is so great. However, that puts a burden on you when you use the camera manually. You now have the control you need for expert usage, so go practice and make the camera’s controls second nature so that you can react well to changes.
I recommend shooting most videos in Aperture-priority auto (A) mode until you are fully comfortable with operating the camera manually and understand what will happen. As a videographer, you now have complete control to make a masterpiece video or really bad video. Get some books on the subject and learn your new skills well. We are no longer just still photographers!
A couple of books I highly recommend are How to Shoot Videos That Don’t Suck: Advice to Make Any Amateur Look Like a Pro by Steve Stockman (Workman Publishing Company, 2011) and Mastering HD Video with Your DSLR by Helmut Kraus and Uwe Steinmueller (Rocky Nook, 2010). These books set me on the path to much better videos by not only discussing the formats and cameras involved but also offering great advice on video technique.
Recording a Video with Your D500
Now let’s look at the process of recording a video to the camera’s memory card. There are several easy steps, as shown in the upcoming description. This is assuming you’ve gone through the configuration process discussed in the first part of this chapter that readies your camera to record video in the modes you prefer to use. Let’s record a video!

Figure 13.4 – Recording a video
Here are the steps to start recording a movie:
- 1. Flip the Live view selector on the back of the camera to the bottom position to enable Movie live view (figure 13.4, image 1).
- 2. Press the Live view button to enter Movie live view (figure 13.4, image 2).
- 3. Press the Movie-record button to start recording (figure 13.4, image 3).
- 4. The video will now start recording with the REC icon blinking in the upper-left corner, the time-left counter counting down in the upper-right corner, the Microphone sensitivity indicator moving as the camera records sound, and your new video recording being written to the camera’s selected memory card (figure 13.4, image 4).
- 5. To end the movie recording, simply press the Movie-record button once again.
Amazingly, that’s all there is to it. You have a powerful, professional video camera built into your still camera. It is available with the flip of a switch and the press of a button.
Settings Recommendation: In most cases, unless you really want to try to control the camera manually, just shoot your video in a semi-automated mode and enjoy what you have captured. The camera will make a good exposure in almost all circumstances. When you are ready to move into high-end video production, the Nikon D500 is ready to help you move up.
Recording Video from the HDMI Port
The Nikon D500 has a unique ability in the 35mm camera genre: streaming uncompressed, broadcast-quality video out of its HDMI port to an external recording device. Doing so is a fairly complex process, requiring knowledge of wrappers, containers, formats, and interfacing with expensive recording equipment. The process of creating commercial video is beyond the scope of this book.
For those of you who are interested in learning about the much more complex process of streaming uncompressed HDMI video, I have prepared a document that should get you started. It is called Streaming Uncompressed HDMI Video from Your Nikon D500 and is available at the following websites:
http://www.nikonians.org/NikonD500
http://rockynook.com/NikonD500
Please download this document and consider it. I give you the basics on working with the HDMI port along with format information to make your learning process easier. I also list several websites and forums where you can gain very deep knowledge on using your D500 for high-end video creation.
Displaying Movies
Now the fun begins! You have created a video on one of your memory cards. What next? You can always simply transfer the video to your computer and view it there or upload it to Facebook or YouTube, both of which know how to convert the QuickTime MOV file to display on their respective sites.
Let’s also discuss how to enjoy one of your movies directly from the camera, either on the camera’s LCD Monitor or on an HDTV.
Displaying a Movie on the Camera LCD Monitor
Viewing a movie on the D500 Monitor is simplicity itself, just like video capture. Videos are stored on the camera’s memory card just like still pictures. All you have to do is select the video you want and press the Multi selector center button to play it.

Figure 13.5A – Playing a movie on the Monitor
Use the following steps to play a movie on the Monitor:
- 1. Press the Playback button to display images and videos on the Monitor (figure 13.5A, image 1, red arrow).
- 2. Locate the video you want to play by scrolling through your images and videos with the Multi selector pad. When the video appears on the camera Monitor, you’ll be able to identify it by three signs: a small movie camera icon in the top-left corner, a minutes and seconds (total time) counter at the top center of the screen, and the word Play at the bottom of the screen (not to mention the large touch play button in the middle of the screen; figure 13.5A, image 2). The image you will see under the touch play button is the first frame of the video. My sample video (image 2) was recorded with the lens cap on to show the controls more effectively (black screen).
- 3. Press the Multi selector center button to start playing the video (figure 13.5A, image 3).
Settings Recommendation: The Monitor on the D500 is big enough for several people to enjoy one of your videos. Don’t be afraid to show off a bit because your camera creates excellent high-resolution videos. Set it up on the kitchen table, put a jar next to it for tips, and start a video. You’ll find viewers!
Displaying a Movie on an HDTV
To display a video from your camera on an HDTV, you’ll need an HDMI cable with a mini-HDMI (type C) end to insert into your D500; the other end will have to match your HDTV’s HDMI port, which is usually HDMI standard (type A). We’ll talk more about the cable specs in a moment, but first let’s discuss your camera’s HDMI output frequencies.
Before you attempt to connect your Nikon D500 to your HDTV, be sure that you’ve correctly configured your HDMI output to match what your HDTV needs or you won’t get a picture. Use the Setup Menu > HDMI setting to select a specific Output resolution, or just select Auto so the camera and HDTV can figure it out for you. Here is a list of formats supported by your camera for video playback:
- Auto—Allows the camera to select the most appropriate format for displaying on the currently connected device
- 2160p—3840×2160 progressive format
- 1080p—1920×1080 progressive format
- 1080i—1920×1080 interlaced format
- 720p—1280×720 progressive format
- 576p—720×576 progressive format
- 480p—640×480 progressive format

Figure 13.5B – Selecting an HDMI Output resolution
Here are the steps to select an Output resolution:
- 1. Select HDMI from the Setup Menu and scroll to the right (figure 13.5B, image 1).
- 2. Choose Output resolution from the menu and scroll to the right (figure 13.5B, image 2).
- 3. Select one of the five output resolutions (figure 13.5B, image 3). I suggest using Auto initially because it works well in most cases.
- 4. Press the OK button to lock in your selection.
Settings Recommendation: If you have any difficulty getting your camera to interface with your HDTV, please refer to the section HDMI in the chapter titled Setup Menu. In my experience with the camera, most of the time it just works when you plug it into the HDTV and video flows immediately. However, sometimes there are some configuration issues that involve using the Advanced setting on the HDMI menu. I won’t go back over those here because most of the time the camera interfaces well, and you can always refer back to the chapter on the Setup Menu if you have any problems.
One thing I will recommend is to make sure you have the correct HDMI port selected if your HDTV has more than one HDMI port. Often there is a control on the HDTV’s remote that lets you select a particular HDMI port. Until that port is active, you will see nothing from the camera.
If the video appears too big to fit on the HDTV screen, you can reduce the size of the D500’s video output by 5 percent with Setup Menu > HDMI > Advanced > Output display size. If the colors appear washed out in your video, you may have to try a different Output range (Full or Limited) with Setup Menu > HDMI > Advanced > Output range. Finally, if you don’t want the camera to display its control overlays on the screen, just the pure video, you can turn off the overlays for the HDTV display with Setup Menu > HDMI > Advanced > Live view on-screen display (set to Off).
Now your camera is ready to output video on a compatible HDTV. Figure 13.5C shows what compatible HDMI cable ends look like. Unfortunately, you’ll have to purchase an HDMI cable because you don’t receive one with your D500. You’ll need to use a mini-HDMI (type C) to HDMI standard (type A) cable. And, of course, you’ll need to plug your HDMI cable into the correct port on the D500.

Figure 13.5C – HDMI cable for use with the Nikon D500 (Type C) and an HDTV (Type A)
In figure 13.5D, you can see the port you’ll need to use with your mini-HDMI (type C) connector. Before it is plugged in, here are the steps to display a video on your HDTV:

Figure 13.5D – HDMI Type C cable plugs into the HDMI port
- 1. Turn your camera off. Why take a chance on blowing up your camera from a static spark?
- 2. Open the lower rubber flap on the left side of your D500 and insert the mini-HDMI (Type C) cable end into the HDMI port (figure 13.5D, red arrow).
- 3. Insert the HDMI standard (Type A) cable into one of your HDTV’s HDMI ports. (Both video and sound are carried on this one cable.)
- 4. Your HDTV may have multiple HDMI ports, and you may have other devices connected, like a cable box or satellite receiver. When you plug the D500’s HDMI cable into your HDTV, be sure to select that HDMI input port on your HDTV or you won’t see the D500’s video output. You may have to select the input from your HDTV remote or use another method. If in doubt, check your HDTV manual. (If your HDTV only has one HDMI port, please ignore this step.)
- 5. Turn on the camera and press the Playback button; then locate the video you want to show off.
- 6. Press the OK button to play the video on your HDTV.
The Nikon D500 can display movies on both progressive and interlaced devices.
Settings Recommendation: Unless you are heavily into HDMI and understand the various formats, I would just leave the camera set to Auto. That allows the D500 to determine the proper format as soon as it’s plugged into the display device and the HDMI input port is selected—if the HDTV has multiple ports.
Author’s Conclusion
The video capability in the Nikon D500 is simply amazing. You will create some of the best videos of your life with this camera. When you are out shooting still images, why not grab some video, too? Years from now, actually hearing and seeing friends and family who are no longer with us will mean a lot.
Pictures are important, but so is video. Your camera does both, and either is available at a moment’s notice. Carry your camera with you and record your life. Hard drives are cheap compared to the memories you will lose if you don’t record them. Make good backups and give away family videos to your family. Share the good qualities of your powerful camera with others, and the goodwill will come back to you later.
Afterword
Check the book’s downloadable resources section from time to time because I intend to keep on adding material to supplement Mastering the Nikon D500. The downloadable resources are found at these two web addresses:
http://www.nikonians.org/NikonD500
http://rockynook.com/NikonD500
Stay in touch with me by using the following points of contact:
- Website: http://www.pictureandpen.com
- Facebook: https://www.facebook.com/groups/MasterYourNikon/
Thank You!
I’d like to express my personal appreciation to you for buying this book and for sticking with me all the way to the end of it. I sincerely hope that it has been useful to you and that you’ll recommend my books to your Nikon-using friends.
Keep on capturing time . . .