
Chapter 16. Repository Manager
Introduction
Repository managers serve two purposes: they act as highly configurable proxies between your organization and the public Maven repositories, and they also provide an organization with a deployment destination for your own generated artifacts.
Proxying a Maven repository brings a number of benefits. Proxying speeds up builds throughout your organization by installing a local cache for all artifacts from the central Maven repository. If a developer in your organization needs to download version 2.5 of the Spring Framework and you are using Nexus, the dependencies (and the dependencies’ dependencies) need to be downloaded from the remote repository only once. With a high-speed connection to the Internet, this might seem like a minor concern, but if you are constantly asking your developers to download hundreds of megabytes of third-party dependencies, the real cost savings are going to be the time it takes Maven to check for new versions of dependencies and to download them. Serving Maven dependencies from a local repository can save you hundreds of requests over HTTP, and in very large multiproject builds, this can shave minutes from a build.
If your project is relying on a number of snapshot dependencies, Maven will need to check for updated version of these snapshots. Depending on the configuration of your remote repositories, Maven will check for snapshot updates periodically, or it might check for snapshot updates on every build. When Maven checks for a snapshot update, it needs to interrogate the remote repository for the latest version of the snapshot dependency. Depending on your connection to the public Internet and the load on the central Maven repository, a snapshot update can add seconds to your project’s build for each snapshot update. When you host a local repository proxy with a repository like Nexus, your repository manager is going to check for snapshot updates on a regular schedule, and your applications will be able to interact with a local repository. If you develop software with a lot of snapshot dependencies, using a local repository manager can often shave minutes from a large multimodule project build. Your 5–10 second snapshot update checks against the public central repository are going to execute in hundreds of milliseconds (or less).
In addition to the simple savings in time and bandwidth, a repository manager provides an organization with control over what is downloaded by Maven. You can include or exclude specific artifacts from the public repository. Having this level of control over what is downloaded from the central Maven repository is a prerequisite for organizations that need strict control over which dependencies are used throughout an organization. An organization that wants to standardize on a specific version of a dependency such as Hibernate or Spring can enforce this standardization by providing access to only a specific version of an artifact in a repository manager such as Nexus. Other organizations might be concerned with making sure that every external dependency has a license compatible with the legal standards of that organization. If a corporation is producing an application that is distributed, it might want to make sure that no one inadvertently adds a dependency on a third-party library that is covered under a copy-left license such as the GNU General Public License (GPL). Repository managers provide for the level of control that an organization needs to make sure that overall architecture and policy can be enforced.
Aside from the benefits of mediating access to remote repositories, a repository manager also provides something essential to full adoption of Maven. Unless you expect every member of your organization to download and build every single internal project, you will want to provide a mechanism for developers and departments to share both snapshots and releases for internal project artifacts. Nexus provides your organization with such a deployment target. Once you install Nexus, you can start using Maven to deploy snapshots and releases to a custom repository managed by Nexus. Over time, this central deployment point for internal projects becomes the fabric for collaboration between different development teams.
History of Nexus
Tamás Cservenák started working on Proximity in December 2005 as he was trying to find a way to isolate his own systems from an incredibly slow ADSL connection provided by a Hungarian ISP. Proximity started as a simple web application to proxy artifacts for a small organization with connectivity issues. Creating a local on-demand cache for Maven artifacts from the central Maven repository gave an organization access to the artifacts on the central Maven repository, but it also made sure that these artifacts weren’t downloaded over a very slow ADSL connection used by a number of developers. In 2007, Sonatype asked Tamas to help create a similar product named Nexus. Nexus is currently considered the logical next step from Proximity. Nexus currently has an active development team, and portions of the indexing code from Nexus are also being used in m2eclipse.
Installing Nexus
The following subsections explain how to download, install, run, configure, and upgrade Nexus on your system.
Downloading Nexus from Sonatype
You can find information about Nexus at http://nexus.sonatype.org. To download Nexus, go to http://nexus.sonatype.org/downloads/. Click on the Download link and download the appropriate archive for your platform. Nexus is available as a ZIP and a GZipped TAR file.
Installing Nexus
Installing Nexus is straightforward: unpack the Nexus archive in a directory. If you are installing Nexus on a local workstation to give it a test run, you can install it in your home directory or wherever else you like. Nexus doesn’t have any hardcoded directories; it will run from any directory. If you download the ZIP archive, run this:
$ unzip nexus-1.0.0-bundle.zip
And if you download the GZipped TAR archive, run this:
$ tar xvzf nexus-1.0.0-bundle.tgz
Note
There are some known incompatibilities with the version of TAR provided by Solaris and the GZip TAR format. If you are installing Nexus on Solaris, you must use the GNU tar application or you will end up with corrupted files. Please see http://sunsolarisadmin.blogspot.com/2007/03/how-to-install-gnu-tar-in-solaris.html.
If you are installing Nexus on a server, you might want to use a directory other than your home directory. On a Unix machine, this could be under /usr/local/nexus-1.0.0 with a symbolic link /usr/local/nexus to the nexus directory. Using a generic symbolic link nexus to a specific version is a common practice that makes it easier to upgrade when a newer version of Nexus is made available:
$ sudo cp nexus-1.0.0-bundle.tgz /usr/local
$ cd /usr/local
$ sudo tar xvzf nexus-1.0.0-bundle.tgz
$ ln -s nexus-1.0.0 nexus
Although it isn’t required for Nexus to run, you may want to
set an environment variable NEXUS_HOME in your
environment that points to the installation directory of Nexus. This
chapter will refer to this location as
${NEXUS_HOME}.
Running Nexus
When you start Nexus, you are starting a web server on the
default port of localhost:8081. Nexus runs within
a servlet container called Jetty and is started with a native
service wrapper called the Tanuki
Java Service Wrapper. This service wrapper can be configured
to run Nexus as a Windows service or a Unix daemon. To start Nexus,
you will need to find the appropriate startup script for your
platform. To see the list of available platforms, list the contents
of the ${NEXUS_HOME}/bin/jsw
directory.
The following example code starts Nexus using the script for
Mac OS X. First we list the contents of the ${NEXUS_HOME}/bin/jsw to show you the
available platforms, then we make the contents of the bin directory
executable with chmod. The Mac OS
X wrapper is started with a call to app
start, and after that we tail the wrapper.log in ${NEXUS_HOME}/container/logs. Nexus
will initialize itself and print a message that it is listening on
localhost:8081:
$ cd Nexus
$ ls ./bin/jsw/
aix-ppc-32/          linux-ppc-64/        solaris-sparc-32/
aix-ppc-64/          linux-x86-32/        solaris-sparc-64/
hpux-parisc-32/      linux-x86-64/        solaris-x86-32/
hpux-parisc-64/      macosx-universal-32/ windows-x86-32/
$ chmod -R a+x bin
$ ./bin/jsw/macosx-universal-32/nexus start
Nexus Repository Manager...
$ tail -f container/logs/wrapper.log
INFO  ... [ServletContainer:default] - [email protected]:8081
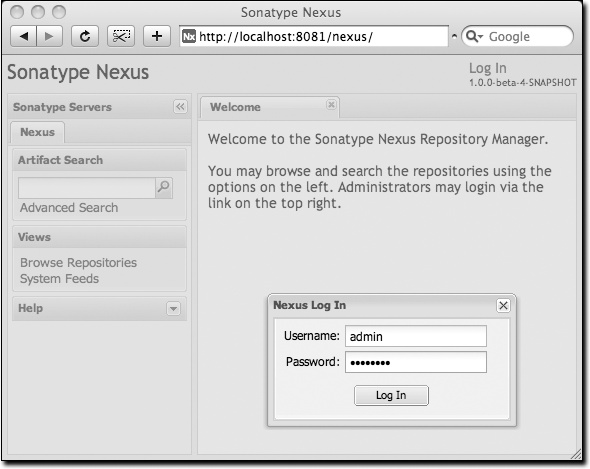
At this point, Nexus will be running and listening on port 8081. To use Nexus, fire up a web browser and type in the URL http://localhost:8081/nexus. Click on the “Log In” link in the upper-righthand corner of the web page, and you should see the login dialog shown in Figure 16-1.
Tip
The default Nexus username and password are “admin” and “admin123”.
Post-Install Checklist
Nexus ships with some default passwords and settings for repository indexing that need to be changed for your installation to be useful (and secure). After installing and running Nexus, you need to make sure to complete the following tasks:
- Change the administrative password and email address
The administrative password defaults to “admin123”. The first thing you should do to your new Nexus installation is change this password. To change the administrative password, log in as “admin” with the password “admin123”, and click on under the Security menu in the lefthand side of the browser window.
- Configure the SMTP settings
Nexus can send username and password recovery emails. To enable this feature, you need to configure Nexus with an SMTP host and port, as well as any necessary authentication parameters that Nexus needs to connect to a mail server. To configure the SMTP settings, load the server configuration dialog shown in Customizing Server Configuration.”
- Enable remote index downloads
Nexus ships with three important proxy repositories: the central Maven repository, the Apache snapshot repository, and the Codehaus snapshot repository. Each of these repositories contains thousands (or tens of thousands) of artifacts, and it would be impractical to download the entire contents of each. To that end, most repositories maintain a Lucene index that catalogs the entire contents and provides for fast and efficient searching. Nexus uses these remote indexes to search for artifacts, but index downloads are disabled as a default setting. To download remote indexes:
Click on under the menu, and change Download Remote Indexes to “true” for the three proxy repositories. You’ll need to load the dialog shown in Managing Repositories” for each of the three repositories.
Right-click on each proxy repository and select “Re-index.” This will trigger Nexus to download the remote index files.
It might take Nexus a few minutes to download the entire index, but once you have it, you’ll be able to search the entire contents of the Maven repository.
Once you’ve enabled remote index downloads, you still won’t be able to browse the complete contents of a remote repository. Downloading the remote index allows you to search for artifacts in a repository, but until you download those artifacts from the remote repository, they will not show in the repository tree when you are browsing a repository. When browsing a repository, you will be shown only artifacts that have been downloaded from the remote repository.
Startup Scripts for Linux
You can configure Nexus to start automatically by copying the app script to the /etc/init.d directory. On a Linux system (tested with Red Hat, Fedora, Ubuntu, or CentOS), perform the following operations as the root user:
Copy either ${NEXUS_HOME}/bin/jsw/linux-ppc-64/app, ${NEXUS_HOME}/bin/jsw/linux-x86-32/app, or ${NEXUS_HOME}/bin/jsw/linux-x86-64/app to /etc/init.d/nexus.
Make the /etc/init.d/nexus script executable: chmod 755 /etc/init.d/nexus.
Edit this script changing the following variables:
Change
APP_NAMEto “nexus”Change
APP_LONG_NAMEto “Sonatype Nexus”Add a variable
NEXUS_HOMEthat points to your Nexus installation directoryAdd a variable
PLATFORMthat contains eitherlinux-x86-32,linux-x86-64, orlinux-ppc-64Change
WRAPPER_CMDto ${NEXUS_HOME}/bin/jsw/${PLATFORM}/wrapperChange
WRAPPER_CONFto ${NEXUS_HOME}/conf/wrapper.confChange
PIDDIRto /var/runAdd a
JAVA_HOMEvariable that points to your local Java installationAdd a ${JAVA_HOME}/bin to the
PATH
(Optional.) Set the
RUN_AS_USERto “nexus”. If you do this, you will need to:Create a Nexus user
Change the owner and group of your Nexus install directory to “nexus”
At the end of this, you should have a file in /etc/init.d/nexus that starts with a series of configuration properties that look something like this (assuming you’ve installed Nexus in /usr/local/nexus and Java in /usr/java/latest):
JAVA_HOME=/usr/java/latest
PATH=${PATH}:${JAVA_HOME}/bin
APP_NAME="nexus"
APP_LONG_NAME="Sonatype Nexus"
NEXUS_HOME=/usr/local/nexus
PLATFORM=linux-x86-64
WRAPPER_CMD="${NEXUS_HOME}/bin/jsw/${PLATFORM}/wrapper"
WRAPPER_CONF="${NEXUS_HOME}/conf/wrapper.conf"
PRIORITY=
PIDDIR="/var/run"
#RUN_AS_USER=nexus
Add Nexus as a service on Red Hat, Fedora, and CentOS
This script has the appropriate chkconfig directives, so all you need to do to add Nexus as a service is run the following commands:
$ cd /etc/init.d
$ chkconfig --add nexus
$ chkconfig --levels 345 nexus on
$ service nexus start
Starting Sonatype Nexus...
$ tail -f /usr/local/nexus/logs/wrapper.log
The second command adds Nexus as a service to be started and stopped with the service command and managed by chkconfig command. chkconfig manages the symbolic links in /etc/rc[0-6].d that control the services that are started and stopped when the operating system restarts or transitions between run-levels. The third command adds Nexus to run-levels 3, 4, and 5. The service command starts Nexus, and the last command tails the wrapper.log to verify that Nexus has been started successfully. If Nexus has started successfully, you should see a message notifying you that Nexus is listening for HTTP connections on a port.
Add Nexus as a service on Ubuntu
The process for setting up Nexus as a service on Ubuntu differs slightly from the process used on a Red Hat variant. Instead of running chkconfig, you should run the following sequence of commands once you’ve configured the startup script in /etc/init.d:
$ cd /etc/init.d
$ update-rc.d nexus defaults
$ service nexus start
Starting Sonatype Nexus...
$ tail -f /usr/local/nexus/logs/wrapper.log
Running Nexus Behind a Proxy
This section is entirely optional. Nexus is based on Jetty,
which is a very high-performance servlet container based on
Java NIO. From a performance perspective, there is no reason for you
not to run Nexus by itself without a proxy. Yet, more often than
not, organizations run applications behind a proxy for security
concerns and to consolidate
multiple disparate applications using tools such as
mod_rewrite and mod_proxy. For
this reason, we’ve included some brief instructions for
configuration mod_proxy in Apache HTTPd. We
assume that you’ve already installed Apache 2 and that you are using
a virtual host for www.somecompany.com.
Let’s assume that you want to host Nexus behind Apache HTTPd at the URL http://www.somecompany.com. To do this, you’ll need to change the context path that Nexus is served from:
Edit plexus.xml in ${NEXUS_HOME}/conf. You’ll see an element named
webappInfosthat contains the relevant elements. Change thecontextPathelement from “/nexus” to “/”Restart Nexus and verify that it is available on http://localhost:8081/.
Clear the Base URL in Nexus as shown in Customizing Server Configuration” under Application Server Settings.
At this point, edit the HTTPd configuration file for the
www.somecompany.com virtual host. Include the
following to expose Nexus via mod_proxy at
http://www.somecompany.com:
ProxyRequests Off
ProxyPreserveHost On

<VirtualHost *:80>
  ServerName www.somecompany.com
  ServerAdmin [email protected]
  ProxyPass / http://localhost:8081/
  ProxyPassReverse / http://localhost:8081/
  ErrorLog logs/somecompany/nexus/error.log
  CustomLog logs/somecompany/nexus/access.log common
</VirtualHost>
Alternatively, if you just wanted to continue to serve Nexus
at the /nexus context path, you
would not change the contextPath in ${NEXUS_HOME}/conf/plexus.xml, and you
would include the context path in your ProxyPass
and ProxyPassReverse directives as
follows:
  ProxyPass /nexus/ http://localhost:8081/nexus/
  ProxyPassReverse /nexus/ http://localhost:8081/nexus/
Apache configuration is going to vary based on your own
application’s requirements and the way you intend to expose Nexus to
the outside world. If you need more details about Apache HTTPd and
mod_proxy, please see http://httpd.apache.org.
Using Nexus
Nexus provides for anonymous access for users who only need to search repositories, browse repositories, and peruse the system feeds. This anonymous access level changes the navigation menu and some of the options available when you right-click on a repository. This read-only access displays a user interface shown in Figure 16-2.
Browsing Repositories
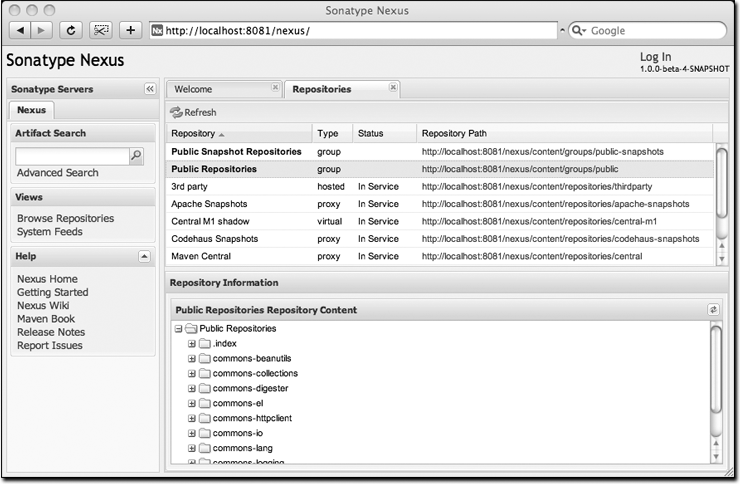
One of the most straightforward uses of the Nexus is to browse the structure of a Maven repository. If you click on the Browse Repositories menu item in the Views menu, you should see the display shown in Figure 16-3. The top half of the figure shows you a list of groups and repositories along with the type of the repository and the repository status.
When you are browsing a repository, you can right-click on any file and download it directly to your browser. This allows you to retrieve specific artifacts manually or examine a POM file in the browser.
Note
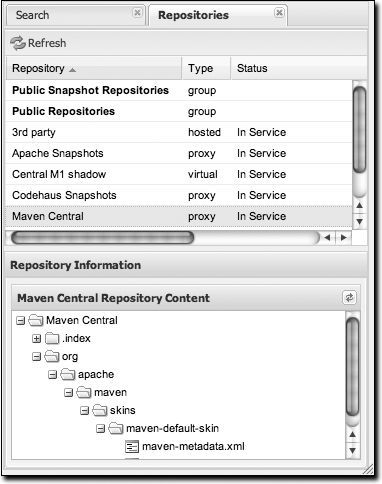
When browsing a remote repository, you might notice that the
tree doesn’t contain all of the artifacts in a repository. When
you browse a proxy repository, Nexus is displaying the artifacts
that have been cached locally from the remote repository. If you
don’t see an artifact you expected to see through Nexus, it means
only that Nexus has yet to cache the artifact locally. If you have
enabled remote repository index downloads, Nexus will return
search results that may include artifacts not yet downloaded from
the remote repository. Figure 16-3 is
just an example, and you may or may not have the
maven-default-skin artifact available in your
installation of Nexus.
Browsing Groups
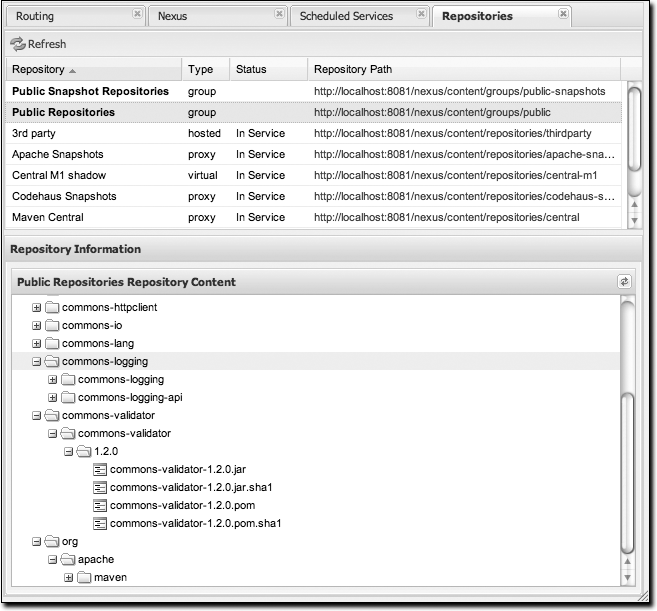
Nexus contains ordered groups of repositories that allow you to expose a series of repositories through a single URL. More often than not, an organization is going to point Maven at the two default Nexus groups: public repositories and public snapshot repositories. Most end users of Nexus are not going to know which artifacts are being served from which specific repository, and they are going to want to be able to browse the public repository. To support this use case, Maven allows you to browse the contents of a Nexus group as if it were a single merged repository with a tree structure. Figure 16-4 shows the browsing interface with a Nexus group selected for browsing. The user experience of browsing a Nexus group is no different from that of browsing a Nexus repository.
Searching for Artifacts
In the lefthand navigation area, there is an Artifact Search
text field next to a magnifying glass. To search for an artifact by
groupId or artifactId, type in some text and click
the magnifying glass. Typing in the search term “maven” and clicking
the magnifying glass should yield a search result similar to Figure 16-5.
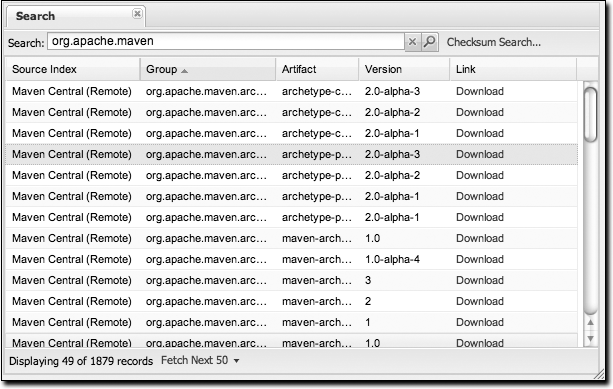
Once you’ve located the artifact you were looking for, you can click on the Download link to download the artifact. Nexus shows you 50 results at a time and provides links on the bottom of the search result panel for you to navigate through the results. If you would prefer to see a list of all of the matching artifacts, you can select Fetch All from the drop-down at the bottom of the search result panel.
In addition to searching by a groupId or an artifactId, Nexus has a feature that
allows you to search for an artifact by a checksum.
Warning
Let me guess—you installed Nexus, ran to the search box, typed in the name of a group or an artifact, clicked the magnifying glass, and saw absolutely nothing. No results. Why? Nexus won’t retrieve the remote repository indexes by default; you need to activate downloading of remote indexes for the three proxy repositories that Nexus ships with. Without these indexes, Nexus has nothing to search. Find instructions for activating index downloads in Post-Install Checklist.”
Browsing System Feeds
Nexus provides feeds that capture system events. You can browse these feeds by clicking on System Feeds under the View menu. This will show the panel in Figure 16-6. You can use this simple interface to browse the most recent reports of artifact deployments, cached artifacts, broken artifacts, and storage changes that have occurred in Nexus.
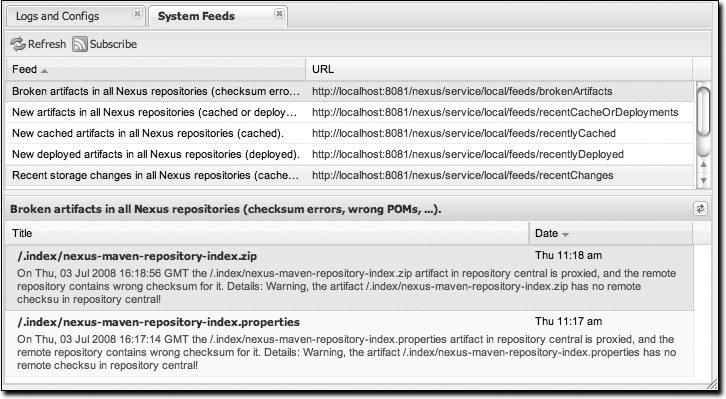
These feeds can come in handy if you are working at a large organization with multiple development teams deploying to the same instance of Nexus. In such an arrangement, all developers in an organization can subscribe to the RSS feeds for New Deployed Artifacts as a way to ensure that everyone is aware when a new release has been pushed to Nexus. Exposing these system events as RSS feeds also opens the door to other, more creative uses of this information, such as connecting Nexus to external automated testing systems. To access the RSS feeds for a specific feed, select the feed in the System Feeds view panel and then click on the Subscribe button. Nexus will load the RSS feed in your browser and you can subscribe to the feed in your favorite RSS reader.
Six system feeds are available in the System Feeds view, and each has a URL that resembles the following:
http://localhost:8081/nexus/service/local/feeds/recentChanges
where recentChanges would be replaced with
the identifier of the feed you were attempting to read. Available
system feeds are shown in Table 16-1.
| Feed Identifier | Description |
brokenArtifacts | Checksum mismatch, missing checksums, invalid POMs |
recentCacheOrDeployments | New artifacts in all repositories (cached or deployed) |
recentlyCached | New cached artifacts in all repositories |
recentlyDeployed | New deployed artifacts in all repositories |
recentChanges | All caches, deployments, or deletions |
systemRepositoryStatusChanges | Automatic or user-initiated status changes (out-of-service and blocked proxies) |
systemChanges | Booting Nexus, changing configuration, re-indexing, and rebuilding of attributes |
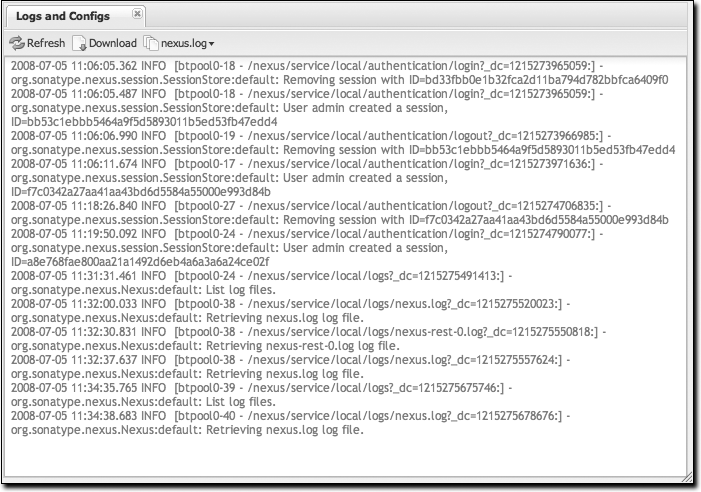
Browsing Log Files and Configuration
“Logs and Config Files” under the Views menu is visible only to administrative users. Clicking on this option brings up the dialog shown in Figure 16-7. From this screen, you can view the following log and configuration files by clicking on the drop-down selection next to the Download button:
- nexus.log
Think of this as the general application log for Nexus. Unless you are an administrative user, you might not have much interest in the information in this log. If you are trying to debug an error, or if you have uncovered a bug in Nexus, you’ll use this log viewer to diagnose problems with Nexus.
- nexus.xml
This XML file contains most of the configuration data for your instance of Nexus. It is stored in ${NEXUS_HOME}/runtime/apps/nexus/conf/nexus.xml.
Changing Your Password
If you have the appropriate security privilege, you will see an option to change your password in the lefthand side of the browser. To change your password, click on Change Password, supply your current password, and choose a new password. When you click on Change Password at the bottom, as shown in Figure 16-8, your Nexus password will be changed.

Configuring Maven to Use Nexus Repositories
To use Nexus, you will configure Maven to check Nexus instead of the public repositories. To do so, you’ll need to edit your mirror settings in your ~/.m2/settings.xml file. First, we’re going to demonstrate how to configure Maven to consult your Nexus installation instead of retrieving artifacts directly from the central Maven repository. After we override the central repository and demonstrate that Nexus is working, we’ll circle back to provide a more sensible set of settings that will cover both releases and snapshots.
Using the Nexus Central Proxy Repository
To configure Maven to consult Nexus instead of the central Maven repository, add the mirror settings from Example 16-1 to your ~/.m2/settings.xml file.
<?xml version="1.0"?><settings>...<mirrors><mirror><id>Nexus</id><name>Nexus Public Mirror</name><url>http://localhost:8081/nexus/content/groups/public</url><mirrorOf>central</mirrorOf></mirror></mirrors>...</settings>
Once you’ve configured Nexus to be the mirror for all repositories, Maven will now consult the local installation of Nexus instead of going out to the central Maven repository. If Nexus has the artifact requested, the artifact will be served from the local Nexus installation. If Nexus does not have the artifact, Nexus will retrieve it from the remote repository and then add it to the local mirror of that remote repository.
To test how Nexus is working, try deleting a directory from your local Maven repository and then running a Maven build. If you delete ~/.m2/repository/org, you’ll be deleting a large number of dependencies (including Maven plugins). The next time you run Maven, you should see the following:
$ mvn clean install
...
Downloading: http://localhost:8081/nexus/content/groups/public/...
3K downloaded
This output should convince you that Maven is communicating with your local installation of Nexus instead of going out to the central Maven repository to retrieve an artifact. After you’ve run a few builds against your local Nexus installation, you can start to browse the contents cached in your local instance of Maven.
Using Nexus for Snapshot Repositories
The Maven settings described earlier in Using the Nexus Central Proxy Repository” will allow you to use the
Nexus public group. This resolves artifacts from four repositories
managed by Nexus, but it won’t allow you to reference the
public-snapshots group that includes the Apache
and Codehaus snapshots. To configure Maven to use Nexus for both
releases and plugins, you will have to configure Maven to reference
the Nexus groups by adding the mirror configuration shown in Example 16-2 to your Maven settings in ~/.m2/settings.xml.
<settings><mirrors><mirror><!--This is used to direct the public snapshots repo in theprofile below over to a different nexus group --><id>nexus-public-snapshots</id><mirrorOf>public-snapshots</mirrorOf><url>http://localhost:8081/nexus/content/groups/public-snapshots</url></mirror><mirror><!--This sends everything else to /public --><id>nexus</id><mirrorOf>*</mirrorOf><url>http://localhost:8081/nexus/content/groups/public</url></mirror></mirrors><profiles><profile><id>development</id><repositories><repository><id>central</id><url>http://central</url><releases><enabled>true</enabled></releases><snapshots><enabled>true</enabled></snapshots></repository></repositories><pluginRepositories><pluginRepository><id>central</id><url>http://central</url><releases><enabled>true</enabled></releases><snapshots><enabled>true</enabled></snapshots></pluginRepository></pluginRepositories></profile><profile><!--this profile will allow snapshots to be searched when activated--><id>public-snapshots</id><repositories><repository><id>public-snapshots</id><url>http://public-snapshots</url><releases><enabled>false</enabled></releases><snapshots><enabled>true</enabled></snapshots></repository></repositories><pluginRepositories><pluginRepository><id>public-snapshots</id><url>http://public-snapshots</url><releases><enabled>false</enabled></releases><snapshots><enabled>true</enabled></snapshots></pluginRepository></pluginRepositories></profile></profiles><activeProfiles><activeProfile>development</activeProfile></activeProfiles></settings>
In this example, we have defined two profiles:
development and
public-snapshots. The
development profile is configured to download
from the central repository with a bogus URL of
http://central. The
public-snapshots profile is configured to
download from the public-snapshots repository with a bogus URL of
http://public-snapshots. These bogus
URLs are overridden by two mirror settings in the
same settings.xml file. The
first mirror is configured to override the public-snapshots
repository to the public-snapshots Nexus group. The second mirror
overrides all other repositories to the public Nexus group. With
these settings, all builds will include the public Nexus group. If
you want to include the public-snapshots group, you would have to
add the public-snapshots
profile by using the -P flag on
the command line as follows:
$ mvn -Ppublic-snapshots clean install
Adding Custom Repositories for Missing Dependencies
If you’ve configured your Maven settings.xml to list Nexus as a mirror
for all public repositories and all public-snapshot repositories,
you might encounter projects that are unable to retrieve artifacts
from your local Nexus installation. This usually happens because you
are trying to build a project that has defined a custom set of
repositories and
snapshotRepositories in a pom.xml. This is definitely going to
happen if you are building open source projects or if you’ve added
custom third-party Maven repositories to your configuration.
As an example, let’s try to build Apache Shindig from source we’ve checked out of the Apache Incubator. What is Apache Shindig? It doesn’t matter to this example; all we need is an example project we can easily check out from source control and build. If you really want to know, Shindig is a project in the Apache Incubator that revolves around the OpenSocial API from Google. Shindig aims to provide a container that will allow people to execute OpenSocial gadgets. It provides us with an interesting example project because it depends on some custom Maven repositories for components that have yet to be added to the central Maven repository. Using Shindig, we can show you what happens when Nexus doesn’t have your artifacts and what steps you can take to add repositories to Nexus.
The following example assumes that you have Subversion installed and that you are running Subversion from the command line. Let’s check out Apache Shindig from the Apache Incubator with Subversion and attempt to build it from source. To do this, execute the following commands:
$ svn co http://svn.apache.org/repos/asf/incubator/shindig/trunk shindig
... Subversion will checkout the trunk of Apache Shindig ...
$ cd shindig
$ mvn install
... Maven will build Shindig ...
Downloading: http://localhost:8081/nexus/content/groups/public/
    caja/caja/r2178/caja-r2178.jar
...
[INFO] -------------------------------------------------------------------
[ERROR] BUILD ERROR
[INFO] -------------------------------------------------------------------
[INFO] Failed to resolve artifact.

Missing:
----------
1) caja:caja:jar:r2178

  Try downloading the file manually from the project website.

...
----------
3 required artifacts are missing.

for artifact:
  org.apache.shindig:shindig-gadgets:jar:1-SNAPSHOT

from the specified remote repositories:
  nexus (http://localhost:8081/nexus/content/groups/public)
The build fails because it is unable to download three
artifacts. One of the artifacts Maven tries to download has a group
identifier of caja, an artifact identifier of
caja, and a version of r2178.
It is an artifact that is hosted on a custom repository: http://google-caja.googlecode.com/svn/maven. Maven
fails to download this artifact because your settings.xml is configured to direct all
mirrors to the public and public-snapshots groups hosted on our
Nexus installation. Even though the pom.xml for Apache Shindig defines a
repository and points it to http://google-caja.googlecode.com/svn/maven, Nexus
won’t retrieve an artifact from a repository it doesn’t know about,
and you’ve configured all requests for remote artifacts to pass
through Nexus. In fact, there are two repositories that Nexus
doesn’t know about in this build: caja and
oauth. Caja and OAuth are two
libraries that are still in development. Both projects have been
“released,” and the versions that Shindig depends on are certainly
not snapshot releases, but these projects have not been published to
the central Maven repository. We need to find a way to let Nexus
know about these repositories before we can build this
project.
There are two ways to fix this problem. First, you can change
your settings.xml to override
specific repository identifiers. Instead of listing the Nexus public
group as a mirrorOf all repositories, you can
change the mirrorOf element in your settings.xml to “central”. If you do
this, Maven will then attempt to download the dependencies directly
from the oauth and caja
repositories at the URLs listed in the previous
code listing. This will work because Maven will only consult Nexus
for repositories that match those specified in the
mirrorOf element in settings.xml. If Maven sees the
repositories identifier caja or
oauth, and doesn’t see a mirror configured in
your settings.xml, it will attempt to
connect to the repository directly.
The second, more interesting option is to add both of these repositories to Nexus and then add these repositories to the public group. You’ll see how to do this in the next sections.
Adding a New Repository
To add the caja repository, log into Nexus as an administrator and click on the Repositories link in the lefthand navigation menu in the Configuration section. Clicking on this link should bring up a window that lists all the repositories Nexus knows about. You’ll then want to create a new proxy repository. To do this, click on the Add link that is directly above the list of repositories. When you click this button, click the down arrow directly to the right of the word Add; this will show a drop-down that has the options Hosted, Proxy, and Virtual. Since you are creating a proxy repository, click on Proxy. Once you do so, you will see a screen resembling Figure 16-9. Populate the required fields Repository ID and Repository Name with “caja” and “Google Caja”. Set the Repository Policy to “Release” and the Remote Storage Location to http://google-caja.googlecode.com/svn/maven.
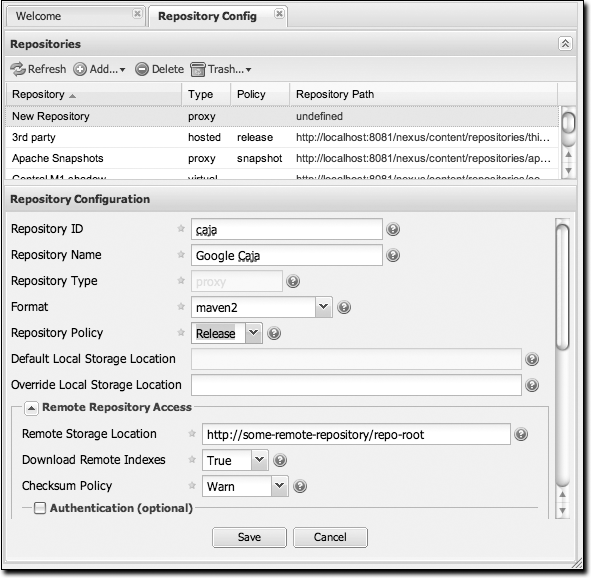
Once you’ve filled out this screen, click on the button. Nexus will then be configured with the caja proxy repository. Do the same thing for the oauth repository. Create a repository with a Repository ID of “oauth”, a Release policy, and a Remote Storage Location of http://oauth.googlecode.com/svn/code/maven.
Adding a Repository to a Group
Next, you will need to add both of these new repositories to the public Nexus group. To do so, click on the Groups link in the lefthand navigation menu in the Configuration section. When you see the Group management screen, click on the public group. Clicking on the public group should bring up a screen which resembles Figure 16-10.
To add the two new repositories to the public Nexus group, find the repositories in the Available Repositories list on the right, click on the repository you want to add, and drag it to the left to the Ordered Group Repositories list. Once the repository is in that list, you can click and drag the repository within the list to alter the order in which it will be searched for a matching artifact. Once the Google Caja and Google OAuth project repositories are added to the public Nexus group, you should be able to build Apache Shindig and watch Maven download the Caja and OAuth artifacts from the respective repositories.
Note
Nexus makes use of an interesting JavaScript widget library called ExtJS. ExtJS provides for a number of interesting UI widgets that allow for rich interaction such as the drag-and-drop UI for adding repositories to a group and reordering the contents of a group.
In the last few sections, you encountered a situation where
you needed to add two custom repositories to a build in order to
download two libraries (Google Caja and Google OAuth) that are not
available in the central Maven repository. If you were not using a
repository manager, you would have added these repositories to the
repository
element of your project’s POM, or you would have
asked all of your developers to modify ~/.m2/settings.xml to reference two new
repositories. Instead, you used the Nexus repository manager to add
the two repositories to the public group. If all of the developers
are configured to point to the public group in Nexus, you can freely
swap in new repositories without asking your developers to change
local configurations, and you’ve gained a certain amount of control
over which repositories are made available to your development
team.
Configuring Nexus
Many of the configuration screens shown in this section are available only to administrative users. Nexus allows the admin user to customize the list of repositories, create repository groups, customize server settings, and create routes or “rules” that Maven will use to include or exclude artifacts from a repository.
Customizing Server Configuration
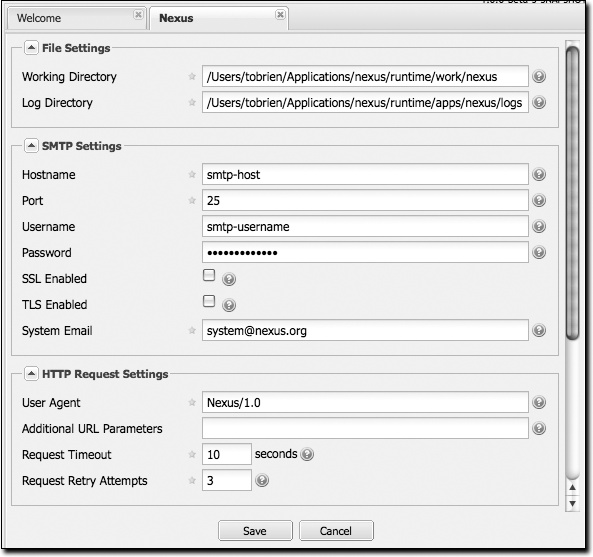
In a real installation of Nexus, you’ll probably want to customize the administrative password to something other than “admin123”, and you might want to override the default directories that Nexus uses to store repository data. To do this, log in as the administrative user and click on Server under Configuration in the lefthand navigation menu. The server configuration screen is shown in Figures 16-11 and 16-12.
This screen allows you to change:
- Working directory
Under the File Settings group, you can customize the working directory. You may wish to customize the working directory if your Nexus installation is going to be mirroring very large repositories and you want to put your working directory on another partition.
- Log directory
You can change where Nexus looks for logs. On a Unix machine, a common practice is to place all log files under /var/log. If you wanted to follow this practice, you could create a /var/log/nexus directory with the appropriate permissions. Note that this setting does not change the logging directory used by Nexus; it simply tells Nexus where to look for the logs. To change the location of the logs, you will need to change the jul-logging.properties and log4j.properties files in the runtime/apps/nexus/conf directory of your Nexus installation.
- SMTP settings
Nexus sends email to users who need to recover usernames and password. To set this up, you’ll need to configure the SMTP server settings in this dialog. This section of the form takes an SMTP host and port as well as other parameters relating to SMTP authentication and encryption. You can also change the From: header of an email from Nexus.
- User agent
This is the identifier Nexus uses when it is making an HTTP request. You may want to change this if Nexus needs to use an HTTP proxy, and the proxy will work only if the user agent is set to a specific value.
- Additional URL parameters
This is a list of extra parameters to place on a GET request to a remote repository. You could use this to add identifying information to requests.
- Request timeout
The amount of time Nexus will wait for a request to succeed when interacting with an external, remote repository.
- Request retry attempts
The number of times Nexus will retry a failed HTTP request.
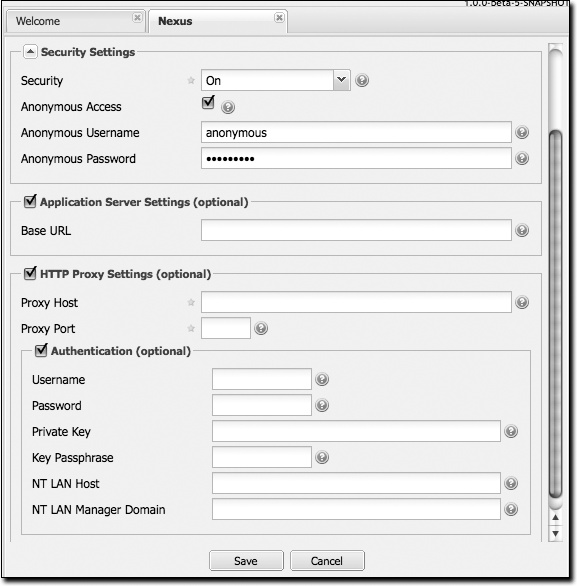
- Security settings
You can choose to enable or disable security, enable or disable anonymous access, and set the username and password for anonymous access. If you choose to enable security, you are telling Nexus to enforce role-based access control to enforce read and write access to repositories.
The anonymous username and password is used to integrate with other realms that may need a special username for anonymous access. In other words, the username and password here are what we attempt to authorize when someone makes an anonymous request. You would change the anonymous username to “guest” if you wanted to integrate Nexus with Microsoft’s Active Directory.
- Application server settings
This section allows you to change the Base URL for your Nexus installation. It is used when generating links in emails and RSS feeds. The Sonatype Nexus repository is available on http://respository.sonatype.org, and it makes use of this Base URL field to ensure that links in emails and RSS feeds point to the correct URL.
- HTTP proxy settings
A number of HTTP proxy settings for Nexus installations need to be configured to use an HTTP Proxy. You can specify a host, port, and a number of authentication options that might be required by your proxy server.
Managing Repositories
To manage Nexus repositories, log in as the administrative user and click on Repositories in the Configuration menu in the lefthand navigation menu. Nexus provides for three different kinds of repositories:
- Proxy repository
A proxy repository is a proxy of a remote repository. By default, Nexus ships with the following configured proxy repositories:
- Apache Snapshots
This repository contains snapshot releases from the Apache Software Foundation: http://people.apache.org/repo/m2-snapshot-repository
- Codehaus snapshots
This repository contains snapshot releases from Codehaus: http://snapshots.repository.codehaus.org/
- Central Maven repository
This is the central Maven repository (for releases): http://repo1.maven.org/maven2/
- Hosted repository
A hosted repository is a repository that is hosted by Nexus. Maven ships with the following configured hosted repositories:
- 3rd party
This hosted repository should be used for third-party dependencies not available in the public Maven repositories. Examples of these dependencies could be commercial, proprietary libraries such as an Oracle JDBC driver that may be referenced by your organization.
- Releases
This hosted repository is where your organization will publish internal releases.
- Snapshots
This hosted repository is where your organization will publish internal snapshots.
- Virtual repository
This serves as an adapter to and from different types of repositories. Currently Nexus supports conversion to and from Maven 1 repositories and Maven 2 repositories.
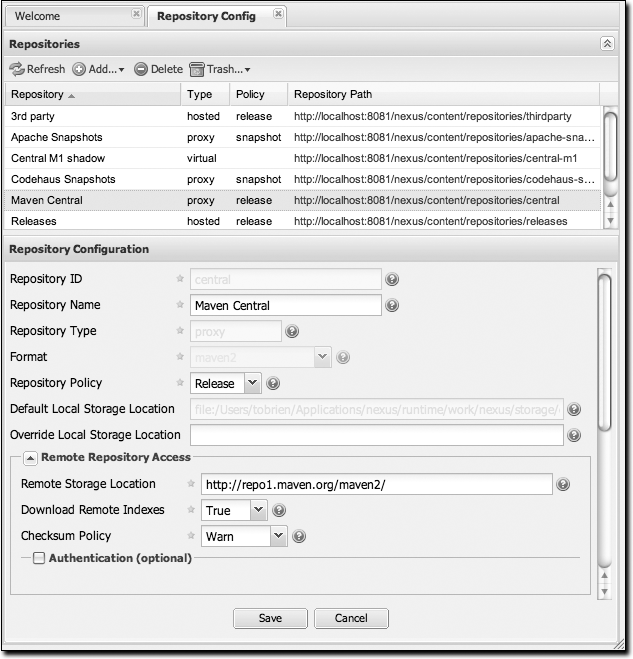
Figure 16-13 shows the Repository configuration screen for a proxy repository in Nexus. From this screen, you can manage the settings for proxying an external repository. You can configure:
- Repository ID
The repository ID is the identifier that will be used in the Nexus URL. For example, the central proxy repository has an ID of “central”, which means Maven can access the repository directly at http://localhost:8081/nexus/content/repositories/central. The Repository ID must be unique in a given Nexus installation. An ID is required.
- Repository name
The display name for a repository. A name is required.
- Repository type
The type of repository (proxy, hosted, or virtual). You can’t change the type; it is selected when you create a repository.
- Repository policy
If a proxy repository has a policy of release, it will only access released versions from the remote repository. If a proxy repository has a policy of snapshot, it will download snapshots from the remote repository.
- Default storage location
Not editable; shown only for reference. This is the default storage location for the local cached contents of the repository.
- Override storage location
You can choose to override the storage location for a specific repository. You would do this if you were concerned about storage and wanted to put the contents of a specific repository (such as central) in a different location.
- Remote repository access
This section tells Nexus where to look for and how to interact with the remote Maven repository being proxied:
- Remote storage location
This is the URL of the remote Maven repository.
- Download remote indexes (not shown in figure)
This field controls the downloading of the remote indexes. Currently, only central has an index at http://repo1.maven.org/maven2/.index. If enabled, Nexus will download the index and use that for its searches as well as serve it up to any clients that ask for the index (such as m2eclipse). The default for new proxy repositories is enabled, but all of the default repositories included in Nexus have this option disabled. To change this setting for one of the proxy repositories that ship with Nexus, change the option, save the repository, and then re-index the repository. Once this is done, artifact search will return every artifact available in the central Maven repository. The section Managing Repositories,” earlier in this chapter, details the process for re-indexing a repository.
- Checksum policy
Sets the checksum policy for a remote repository. This option is set to
Warnby default. The possible values of this setting are:IgnoreIgnore the checksums entirely.
WarnPrint a warning in the log if a checksum is not correct.
StrictIfExistsRefuse to cache an artifact if the calculated checksum is inconsistent with a checksum in the repository. Perform this check only if the checksum file is present.
StrictRefuse to cache an artifact if the calculated checksum is inconsistent or if there is no checksum for an artifact.
- Authentication
This section allows you to set a username, password, private key, key passphrase, NT LAN host, and NT LAN manager domain for a remote repository.
- Access settings
This section configures access settings for a repository:
- Allow deployment
If set to true, Nexus will allow Maven to deploy artifacts to this repository. This option is visible for hosted repositories.
- Allow file browsing
When set to true, users can browse the contents of the repository with a web browser.
- Include in search
When set to true, this repository is searched when you perform an artifact search in Nexus. If this setting is false, the contents of the repository are excluded from a search.
- Expiration settings
Nexus maintains a local cache of artifacts and metadata. You can configure expiration parameters for a proxy repository. The expiration settings are:
- Not found cache TTL
If Nexus fails to locate an artifact, it will cache this result for a given number of minutes. In other words, if Nexus can’t find an artifact in a remote repository, it will not repeatedly attempt to resolve this artifact until the Not Found Cache TTL time has been exceeded. The default for this setting is 1440 minutes (or 24 hours).
- Artifact max age
Tells Nexus when that maximum age of an artifact is before it retrieves a new version from the remote repository. The default for this setting is –1 for a repository with a release policy and 1440 for a repository with snapshot policy.
- Metadata max age
Nexus retrieves metadata from the remote repository. It will retrieve updates to metadata only after the Metadata Max Age has been exceeded. The default value for this setting is 1440 minutes (or 24 hours).
- HTTP request settings
This section lets you change the properties of the HTTP request to the remote repository. You can configure the user agent of the request, add parameters to a request, and set the timeout and retry behavior. This section refers to the HTTP request made from Nexus to the remote Maven repository being proxied.
- HTTP proxy settings
This section lets you configure the HTTP proxy for the request from Nexus to the remote repository. You can configure a proxy host and port plus any authentication settings you need to tell Nexus to use an HTTP proxy for all requests to a remote repository.
Managing Groups
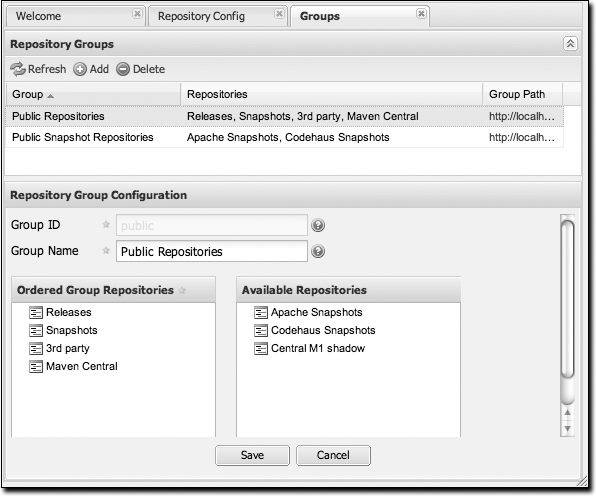
Groups are a powerful feature of Nexus—they allow you to combine multiple repositories in a single URL. Nexus ships with two groups: public and public-snapshots. The public group combines the three hosted repositories: 3rd party, releases, and snapshots with the central Maven repository. The public-snapshots repository combines the Apache snapshots and Codehaus snapshots repositories. In Configuring Maven to Use Nexus Repositories,” earlier in this chapter, we configured Maven via the settings.xml to look for artifacts in the public group managed by Nexus. Figure 16-14 shows the group configuration screen in Nexus; you can see the contents of the public group.
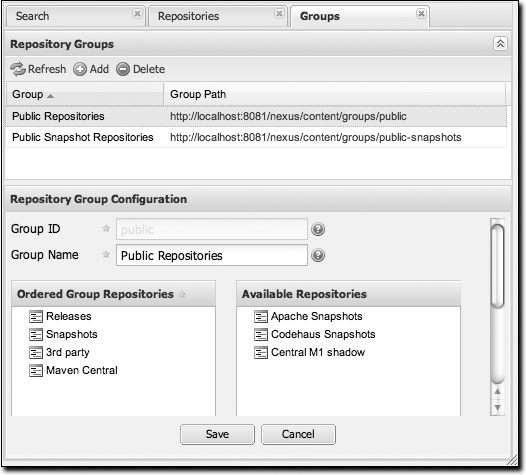
Note that the order of the repositories listed in Order Group Repositories is important. When Nexus searches for an artifact in a group of repositories, it returns the first match. To reorder a repository in this list, click and the drag the repositories in the Ordered Group Repositories selection list.
The order of repositories in a group can be used to influence
the effective metadata that will be retrieved by Maven from a Nexus
repository group. We recommend placing release repositories higher
in the list than snapshot repositories so that LATEST and RELEASE versions are merged appropriately.
We also recommend placing repositories with a higher probability of
matching the majority of artifacts higher in this list. If most of
your artifacts are going to be retrieved from the central Maven
repository, putting the central repository higher in this list than
a smaller, more focused repository will be better for performance,
as Nexus will not interrogate the smaller remote repository for as
many missing artifacts.
Managing Routes
Nexus routes are like filters you can apply to Nexus groups; they allow you to configure Nexus to include or exclude repositories from a particular artifact search when Nexus is trying to locate an artifact in a Nexus group. There are a number of different scenarios in which you might configure a route in Nexus. The most common is when you want to make sure that you are retrieving artifacts in a particular group ID from a particular repository. This is especially useful when you want to make sure that you are trying to retrieve your own organization’s artifacts from the hosted release and snapshot repositories. Nexus routes are applicable when you are trying to resolve an artifact from a Nexus group; using routes allows you to modify the repositories Nexus will consult when it tries to resolve an artifact from a group of repositories.
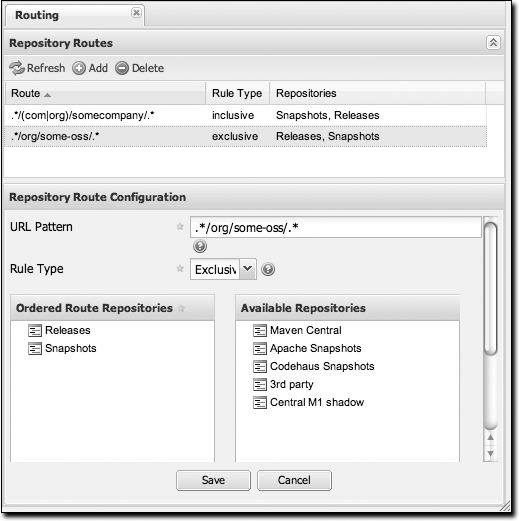
Figure 16-15 shows the route configuration screen. Clicking on a route will bring up a screen that allows you to configure the properties of the route. The configuration options available are:
- URL Pattern
This is the pattern that Nexus will use to match a request to Nexus. If the regular expression in this pattern is matched, Nexus will either include or exclude the listed repositories from a particular artifact query. In Figure 16-15, the two patterns are:
- .*/(com|org)/somecompany/.*
This pattern would match all of the paths that included either “/com/somecompany/” or “/org/somecompany”. The expression in the parentheses matches either com or org, and the .* matches one or more characters. You would use a route like this to match your own organization’s artifacts and map these requests to the hosted Nexus releases and snapshots repositories.
- .*/org/some-oss/.*
This pattern is used in an exclusive route. It matches every path that contains “/org/some-oss/”. This particular exclusive route excludes the local hosted releases and snapshots directory for all artifacts that match this path. When Nexus tries to resolve artifacts that match this path, it will exclude the releases and snapshots repositories.
- Rule Type
Rule type can be either “inclusive” or “exclusive.” An inclusive rule type defines the set of repositories that should be searched for artifacts when the
URLpattern has been matched. An exclusive rule type defines repositories which should not be searched for a particular artifact.- Ordered Route Repositories
This is an ordered list of repositories which Nexus will search to locate a particular artifact. Nexus searches top to bottom; if it’s looking for an artifact, it will return the first match. When Nexus is looking for metadata, all repositories in a group are checked and the results are merged. The merging gives preference to the earlier repositories. This is relevant when a project is looking for a
LATESTor aRELEASEversion. Within a Nexus group, you should define the release repositories before the snapshot repositories; otherwise,LATESTmay incorrectly resolve to a snapshot version.
In Figure 16-15, you can see the two
dummy routes that Nexus has as default routes. The first route is an
inclusive route; it is provided as an example of a custom route that
an organization might use to make sure that internally generated
artifacts are resolved from the releases and snapshots repositories.
If your organization’s group IDs all start with com.somecompany, and if you deploy
internally generated artifacts to the releases and snapshots
repositories, this route will make sure that Nexus doesn’t waste
time trying to resolve these artifacts from public Maven
repositories such as the central Maven repository or the Apache
snapshots repository.
The second dummy route is an exclusive route. This route excludes the releases and snapshots repositories when the request path contains “/org/some-oss”. This example might make more sense if we replaced “some-oss” with “apache” or “codehaus”. If the pattern were “/org/apache”, this rule would be telling Nexus to exclude the internal releases and snapshots repositories when it is trying to resolve these dependencies. In other words, don’t bother looking for an Apache dependency in your organization’s internal repositories.
What if there is a conflict between two routes? Nexus will process inclusive routes before it will process the exclusive routes. Remember that Nexus routes only affect Nexus’ resolution of artifacts when it is searching a group. When Nexus starts to resolve an artifact from a Nexus group, it will start with the list of repositories in a group. If there are matching inclusive routes, Nexus will then take the intersection of the repositories in the group and the repositories in the inclusive Nexus route. The order as defined in the Nexus group will not be affected by the Inclusive routes. Nexus will then take the result of applying the inclusive routes and apply the exclusive routes to this new group. The resulting list is then searched for a matching artifact.
One straightforward use of routes is to create one that
excludes the central Maven repository from all searches for your own
organization’s hosted artifacts. If you are deploying your own
artifacts to Nexus under a groupId of
org.mycompany, and if you are not deploying these
artifacts to a public repository, you can create a rule that tells
Nexus not to interrogate central for your own organization’s
artifacts. This will improve performance because Nexus will not need
to communicate with a remote repository when it serves your own
organization’s artifacts. In addition to the performance benefits,
excluding central from searches for your own artifacts will reduce
needless queries to the public repositories.
To summarize, there are creative possibilities with routes that the designers of Nexus may not have anticipated, but we advise you to proceed with caution if you start relying on conflicting or overlapping routes. Use routes sparingly, and use course URL patterns. As Nexus evolves, there will be more features that allow for more fine-grained rules to allow you to prohibit requests for specific artifacts and specific versions of artifacts. Remember that routes are applied only to Nexus groups, and that routes are not used when an artifact is requested from a specific repository.
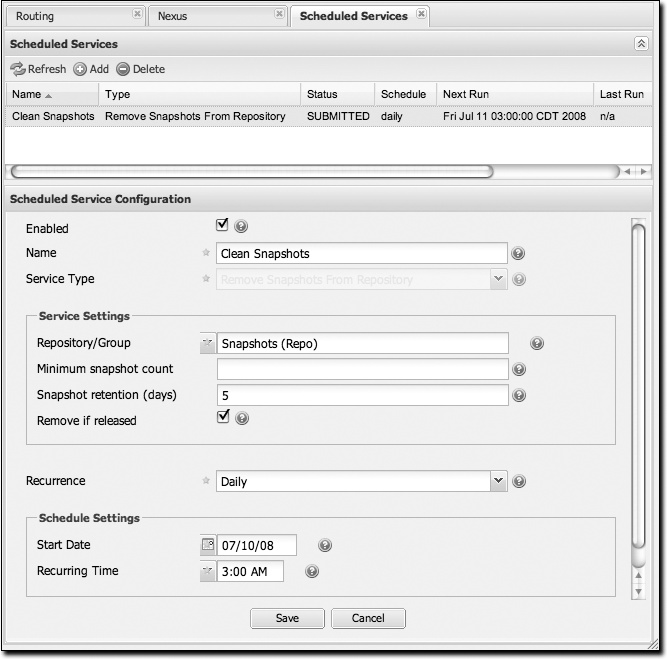
Managing Scheduled Services
Nexus allows you to schedule tasks that will be applied to all repositories or to specific repositories on a configurable schedule. You can create the following kinds of scheduled services:
- Remove snapshots from a repository
Often, you will want to remove snapshots from a snapshot repository to preserve storage space. When you create a scheduled service to remove snapshots, you can specify:
Minimum snapshots to preserve in a repository
Snapshot retention (in days)
Whether snapshots should be removed if an artifact has been released
- Clear repository caches
Nexus maintains information about a proxied remote repository to avoid unnecessary network traffic. Clear cache simply expires the artifacts so that the next time they are requested, Nexus will recheck the remote. This scheduled job clears all cached information about a remote repository stored in your installation of Nexus and forces Nexus to retrieve artifacts and information from the remote repository.
- Evict unused proxied items from repository caches
Use it or lose it. This scheduled service tells Nexus to get rid of all proxied items that haven’t been “used” (referenced or retrieved by a client). This can be a good job to run if you are try to conserve storage space. In this service, you can specify the number of days over which Nexus will look for activity before making the decision to evict an artifact. (See the upcoming note about deletion.)
- Publish indexes
Just as Maven downloads an index from a remote repository, Nexus can publish an index in the same format. This will make it easier for people using m2eclipse or Nexus to interact with your repositories.
- Purge nexus timeline
Nexus maintains a lot of data that relates to the interaction between itself, proxied remote repositories, and clients on Nexus. While this information can be important for purposes of auditing, it can also take up storage space. Using this scheduled service, you can tell Nexus to periodically purge this information. (See the upcoming note about deletion.)
- Rebuild repository attributes
This scheduled service tells Nexus to walk every file in a repository and gather information such as checksums and file contents for every file.
- Re-index repositories
This service tells Nexus to re-index a repository.
Note
The evict and purge actions do not delete data from the Nexus working directory. They simply move data to be cleared or evicted to a trash directory under the Nexus work directory. If you want to reclaim disk space, you need to clear the trash on the Browse Repositories screen. If something goes wrong with an evict or clear service, you can move the data back to the appropriate storage location from the trash.
When you create a new service, you can configure it to apply to all repositories, the repositories in a Nexus group, or a specific Nexus repository. A service can be scheduled to run once at a specific date and time, or periodically once every day, week, or month. If none of these options suit your specific needs, you can select a recurrence of “Advanced” that will allow you to supply your own cron expression to specify when the job should execute.
To create a new scheduled service, click on Scheduled Services under the Administration menu, and click on the Add button. This will bring up the screen shown in Figure 16-16.
Managing Security
The latest release of Nexus has role-based access control
(RBAC), which gives administrators very fine-grained control over
who can read from a repository (or a subset of repositories), who
can administer the server, and who can deploy to repositories. The
security model in Nexus is also so flexible that it allows you to
specify that only certain users or roles can deploy and manage
artifacts in a specific repository under a specific groupId or asset class. The default
configuration of Nexus ships with three roles and three users with a
standard set of permissions that will make sense for most users. As
your security requirements evolve, you’ll likely need to customize
security settings to create protected repositories for multiple
departments or development groups. Nexus provides a security model
that can adapt to almost anything.
Nexus’ RBAC system is designed around the following four security concepts:
- Privileges
Privileges are rights to read, update, create, or manage resources and perform operations. Nexus ships with a set of core privileges that cannot be modified, and you can create new privileges to allow for fine-grained targeting of role and user permissions for specific repositories.
- Targets
Privileges are usually associated with resources or targets. In the case of Nexus, a target can be a specific repository or a set of repositories grouped in something called a repository target. A target can also be a subset of a repository or a specific asset class within a repository. Using a target you can apply to a specific privilege to apply to a single
groupId.- Roles
Collections of privileges can be grouped into roles to make it easier to define collections of privileges common to certain classes of users. For example, deployment users will all have similar sets of permissions. Instead of assigning individual privileges to individual users, you use roles to make it easier to manage users with similar sets of privileges. A role has one or more privilege and/or one or more roles.
- Users
Users can be assigned roles and privileges, and model the individuals who will be logging into Nexus and read, deploying, or managing repositories.
Managing privileges
Nexus has two types of privileges: application privileges, which cover actions a user can execute in Nexus, and repository-target privileges, which govern the level of access a user has to a particular repository or repository target. Behind the scenes, a privilege is related to a single REST operation and method such as create, update, delete, or read. See Figure 16-17.
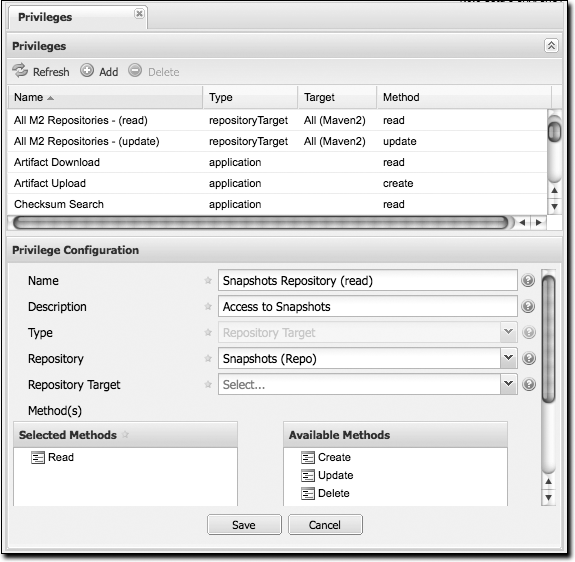
Repository target privileges can apply to individual repositories or repository targets. All of the permissions that ship with Nexus target repository targets. To create a new repository target privilege that targets a specific repository, click on the Add button and select a repository from the repository drop-down. Application permissions correspond to areas of the application to which a user has a specific level of access (method). The available methods are create, read, update, and delete (CRUD). The list of application permissions are as follows:
Administrator privilege (ALL)
Artifact download
Artifact upload
Checksum search
Clear repository cache
Configuration file
Login to UI
Logs
Nexus remote control
Read repository metadata
Read repository status
Rebuild repository attributes
Re-index
Repositories
Repository groups
Repository routes
Repository targets
Repository templates
RSS feeds
Scheduled tasks
Search repositories
Server settings
Server status
Status
User change password
User forgot password
User forgot user ID
User privileges
User reset password
User roles
Users
Wastebasket
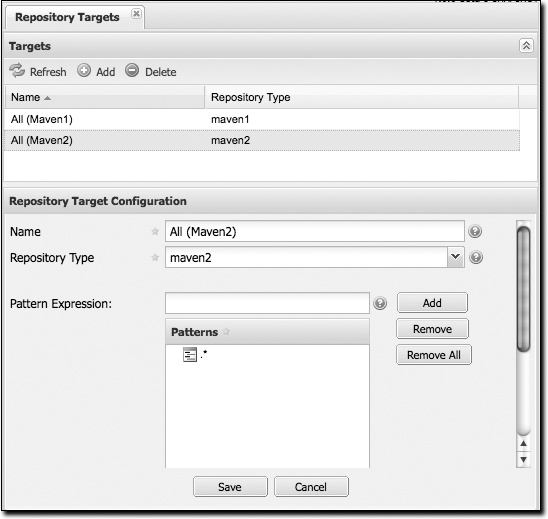
Managing repository targets
A target is a set of regular expressions to match on a path
(exactly how the route rules work now). This allows you to define,
for example, a target called Apache Maven that is org/apache/maven/.* You can then add a
new privilege that relates to the target and controls the CRUD
operations for artifacts matching that path (the privilege can
span multiple repositories if you want). You could thus delegate
all control of org.apache.maven
targets to a “Maven” team. In this way, you don’t need to create
separate repositories for each logical division of your artifacts.
See Figure 16-18.
Managing security roles
Nexus ships with three roles: Nexus administrator role, Nexus anonymous role, and Nexus deployment role. The administrator role grants all privileges, the anonymous role grants read-only privileges, and the deployment role grants read and update permissions for all repositories. See Figure 16-19.
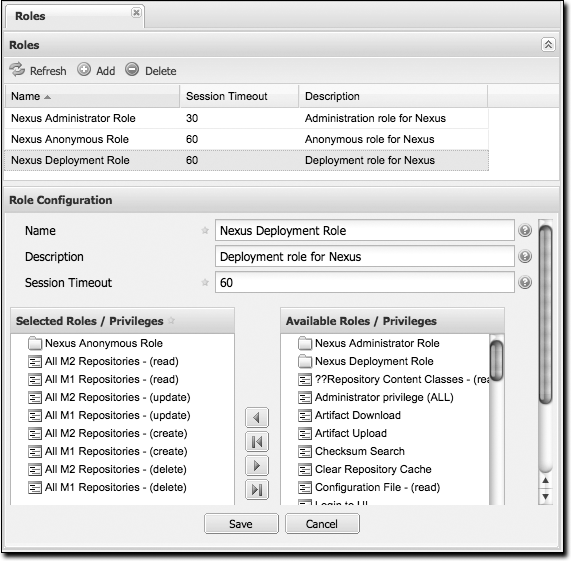
With the repository targets, you have fine-grained control
over every action in the system. For example, you could make a
target that includes everything except sources (.*(?!-sources).*) and assign that to
one group while giving yet another group access to everything.
This means that you can host your public and private artifacts in
a single repository without giving up control of your private
artifacts.
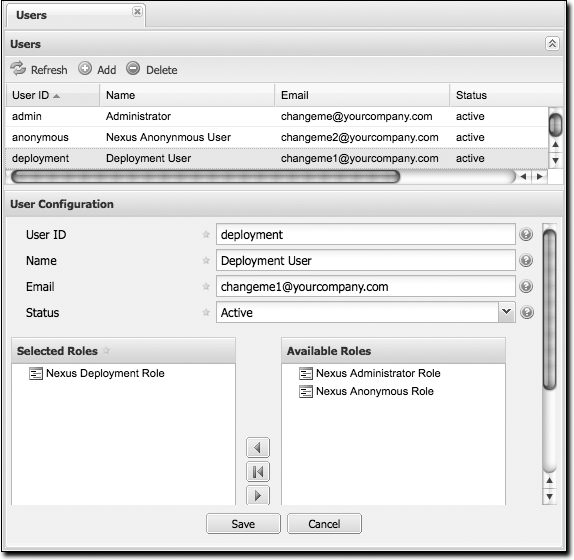
Managing users
Nexus ships with three users: admin, anonymous, and deployment. The admin user has all privileges, the anonymous user has read-only privileges, and the deployment user can both read and deploy to repositories. If you need to create users with a more focused set of permissions, you can click on Users under Security in the lefthand navigation menu. Once you see the list of users, you can click on a user to edit that specific user ID, name, email, or status. You can also assign or revoke specific roles or permissions for a particular user. See Figure 16-20.
Network Configuration
By default, Nexus listens on port 8081. You can change this
port by changing the value in ${NEXUS_HOME}/conf/plexus.properties;
this file is shown in Example 16-3. To change
the port, stop Nexus, change the value of
applicationPort in this file, and then restart
Nexus. Once you do this, you should see a log statement in ${NEXUS_HOME}/logs/wrapper.log telling
you that Nexus is listening on the altered port.
Maintaining Repositories
Once you’ve set up a series of repositories and grouped those repositories into Nexus groups, users will be able to see a list of repositories in the Nexus UI by clicking on the Repositories link in the lefthand navigation menu in the Maintenance section. This will bring up a list of repositories. This list will show you the status of the remote repository. To test this, edit one of your repositories to have a garbage remote storage location URL; you will then notice that the status of this repository will change on the Manage Repositories screen. Clicking on a repository will bring up a tree view that provides users with a way to navigate through the contents of a repository.
Right-clicking on a repository will bring up a series of actions that can be applied to a repository. The available actions for each repository are as follows (some are shown in Figure 16-21):
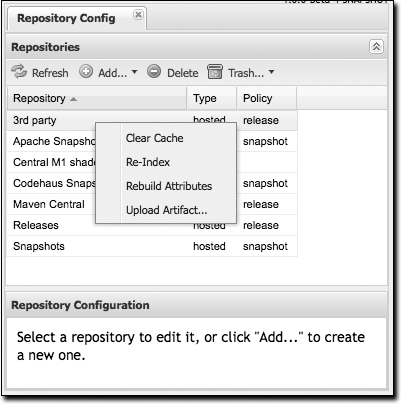
- Clear Cache
Clears the cache for the repository. This causes Nexus to check the remote repository for new updates or snapshots. It also resets the Not Found Cache.
- Re-Index
Causes Maven to re-index a repository. Nexus will recreate the index it uses to search for a request artifact. If the repository has been configured to download the remote index, this option will cause Nexus to download the remote index from the remote repository. Note that if you have enabled the remote index download, the remote index may take some time to download from the remote repository. You will know that the remote repository has been updated for a large remote repository, such as the central Maven repository, when the artifact search results start showing artifacts that haven’t been cached or requested.
- Rebuild Attributes
Rebuilds the attributes for a given repository. This will cause Nexus to go through the entire repository and process every file, updating attributes such as checksums.
- Upload Artifact...
(Only visible for hosted repositories.) You can use this option to upload an artifact to a hosted repository.
- Put Out of Service
In the Browse Repositories view, you have the option of putting a repository “out of service.” When a hosted repository is put out of service, no artifacts can be served from that repository.
- Block Proxy
In the Browse Repositories view, you have the option of blocking a proxy for a proxy repository. Blocking a proxy repository has the side effect of cutting communication between Nexus and the remote repository. Although this is a rather blunt instrument for controlling the contents of a repository, you can use this feature to make certain that no new artifacts are downloaded from a remote repository.
Uploading Artifacts to Hosted Repositories
If you are using Nexus hosted repositories, the best way to deploy an artifact is to use the procedure details covered in the upcoming section Deploying Artifacts to Nexus.” But there may be times when you just need to upload an artifact to Nexus manually for a number of reasons. One frequent reason for uploading an artifact manually is that a vendor or proprietary software vendor has left you with a single JAR file for something like a commercial database and they haven’t bothered to publish this driver’s JAR file in a public Maven repository. In this case, you’ll want to upload a JAR artifact and supply the Maven coordinates so that Nexus can serve it from your third-party hosted repository just like any other artifact.
To upload an artifact, select the repository in either the Browse Repositories list or the list that is displayed when clicking on Repositories in the Administration menu. Right-click on a hosted repository, and select . You should then see the Artifact Upload form shown in Figure 16-22.
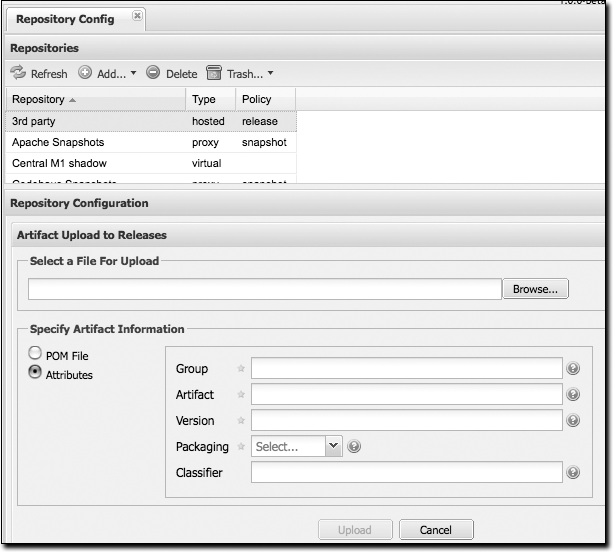
When you upload an artifact, you must choose a file to upload,
and then you must either supply a POM file or
populate the Maven coordinates by selecting Attributes. If you
upload a JAR file such as test.jar, and then you supply a group ID,
artifact ID, version, and packaging of org.test,
test, 1.0, and
jar, Nexus will upload the file to the
appropriate directory and create a POM and a few
checksums for the artifact. If you choose to upload a pom.xml, Nexus will use the group ID,
artifact ID, version, and packaging of the upload
POM to find the appropriate location for your
manually uploaded artifact.
Deploying Artifacts to Nexus
Different organizations have different reasons for deploying artifacts to an internal repository. In large organizations with hundreds (or thousands) of developers, an internal Maven repository can be an efficient way for different departments to share releases and development snapshots with one another. Most organizations that use Maven will eventually want to start deploying both releases and artifacts to a shared, internal repository. Using Nexus, it is easy to deploy artifacts to Nexus hosted repositories.
To deploy artifacts to Nexus, supply the repository
URL in distributionManagement
and run mvn deploy. Maven will push
project POMs and artifacts to your Nexus
installation with a simple HTTP PUT. No extra wagon
extension is needed in your project’s POM. Nexus
works with Maven’s built-in
wagon-http-lightweight.
Configuring Deployment Security
Nexus ships with a deployment user that has a default password
of deployment123. For this chapter, we’ll assume
that you are using the default deployment password. To configure
Maven to deploy to Nexus, add the following server elements to your
~/.m2/settings.xml file:
<settings>
  ...
  <servers>
    <server>
      <id>releases</id>
      <username>deployment</username>
      <password>deployment123</password>
    </server>
    <server>
      <id>snapshots</id>
      <username>deployment</username>
      <password>deployment123</password>
    </server>
    <server>
      <id>thirdparty</id>
      <username>deployment</username>
      <password>deployment123</password>
    </server>
  </servers>
  ...
</settings>
You supply security credentials in your own Maven settings
file in the form of a server name, a username, and a password. When
you attempt to deploy to a server with an identifier of
releases or snapshots, Maven
will consult your settings.xml
to find these credentials.
Deploying Releases
To deploy a release artifact to Nexus, you need to configure a
repository in the
distributionManagement section of your project’s
POM. Example 16-4 shows
an example of a release deployment repository that is configured to
point to the releases repository at http://localhost:8081/nexus/content/repositories/releases.
This is one of the default hosted repositories that comes configured
in Nexus.
<project>...<distributionManagement>...<repository><id>releases</id><name>Internal Releases</name><url>http://localhost:8081/nexus/content/repositories/releases</url></repository>...</distributionManagement>...</project>
You would replace localhost:8081 with the
host and port of your Nexus installation. Once your project has this
configuration, you can deploy an artifact by executing mvn deploy:
$ mvn deploy
[INFO] Scanning for projects...
[INFO] Reactor build order:
[INFO]   Sample Project
[INFO] ------------------------------------------------------------------
[INFO] Building Sample Project
[INFO]    task-segment: [deploy]
[INFO] ------------------------------------------------------------------
[INFO] [site:attach-descriptor]
[INFO] [install:install]
[INFO] Installing ~/svnw/sample/pom.xml to ~/.m2/repository/sample/sample
                                            /1.0/sample-1.0.pom
[INFO] [deploy:deploy]
altDeploymentRepository = null
[INFO] Retrieving previous build number from snapshots
Uploading: http://localhost:8081/nexus/content/repositories/releases/
           sample/sample/1.0/sample-1.0.pom
24K uploaded
Note that Nexus can support multiple hosted repositories; you don’t need to stick with the default releases and snapshots repositories. You can create different hosted repositories for different departments and then combine multiple repositories into a single Nexus group.
Deploying Snapshots
To deploy a snapshot artifact to Nexus, you need to configure
a snapshotRepository in the
distributionManagement section of your project’s
POM. Example 16-5 shows
an example of a snapshot deployment repository that is configured to
point to the snapshots repository at http://localhost:8081/nexus/content/repositories/snapshots.
<project>...<distributionManagement>...<snapshotRepository><id>snapshots</id><name>Internal Snapshots</name><url>http://localhost:8081/nexus/content/repositories/snapshots</url></snapshotRepository>...</distributionManagement>...</project>
You would replace localhost:8081 with the
host and port of your Nexus installation. Once your project has this
configuration, you can deploy an artifact by executing mvn deploy. Maven will deploy to the
snapshotRepository if your project has a snapshot
version (i.e., 1.0-SNAPSHOT):
$ mvn deploy
[INFO] Scanning for projects...
[INFO] Reactor build order:
[INFO]   Sample Project
[INFO] ------------------------------------------------------------------------
[INFO] Building Sample Project
[INFO]    task-segment: [deploy]
[INFO] ------------------------------------------------------------------------
[INFO] [site:attach-descriptor]
[INFO] [install:install]
[INFO] Installing ~/svnw/sample/pom.xml to ~/.m2/repository/sample/sample
           /1.0-SNAPSHOT/sample-1.0-20080402.125302.pom
[INFO] [deploy:deploy]
altDeploymentRepository = null
[INFO] Retrieving previous build number from snapshots
Uploading: http://localhost:8081/nexus/content/repositories/releases/
           sample/sample/1.0-SNAPSHOT/sample-1.0-20080402.125302.pom
24K uploaded
Deploying Third-Party Artifacts
Your Maven projects may start depending on artifacts that are not available from the central Maven repository or any other public Maven repository. This can happen for a number of reasons; perhaps the artifact in question is a JDBC driver for a proprietary database such as Oracle, or perhaps you are depending on another JAR that is neither open source nor freely available. In these cases, you will have to get your hands on the artifact in question and publish it to your own repository. Nexus provides a hosted “third-party” repository for just this purpose.
To illustrate the process of publishing an artifact to the third-party repository, we will use a real artifact: the Oracle JDBC drivers. Oracle publishes a widely used commercial database product that has a JDBC driver that is not present in the central Maven repository. Although the central Maven repository maintains some POM information for the Oracle JDBC driver at http://repo1.maven.org/maven2/com/oracle/ojdbc14/10.2.0.3.0/, there is only a POM that references the Oracle site. Let’s say you add the dependency shown in Example 16-6 to your project.
<project>...<dependencies>...<dependency><groupId>com.oracle</groupId><artifactId>ojdbc14</artifactId><version>10.2.0.3.0</version></dependency>...</dependencies>...</project>
Running a Maven build with this dependency will produce the following output:
$ mvn install
...
[INFO] ----------------------------------------------------------------------
[ERROR] BUILD ERROR
[INFO] ----------------------------------------------------------------------
[INFO] Failed to resolve artifact.

Missing:
----------
1) com.oracle:ojdbc14:jar:10.2.0.3.0

  Try downloading the file manually from:
      http://www.oracle.com/technology/software/tech/java/sqlj_jdbc/index.html

  Then, install it using the command:
      mvn install:install-file -DgroupId=com.oracle -DartifactId=ojdbc14
               -Dversion=10.2.0.3.0 -Dpackaging=jar -Dfile=/path/to/file

Alternatively, if you host your own repository you can deploy the file there:
      mvn deploy:deploy-file -DgroupId=com.oracle -DartifactId=ojdbc14
                 -Dversion=10.2.0.3.0 -Dpackaging=jar -Dfile=/path/to/file
                 -Durl=[url] -DrepositoryId=[id]

  Path to dependency:
  	1) sample:sample:jar:1.0-SNAPSHOT
  	2) com.oracle:ojdbc14:jar:10.2.0.3.0

----------
1 required artifact is missing.
The Maven build fails because it can’t find the Oracle JDBC driver in the Maven repository. To remedy this situation, you need to publish the Oracle JDBC artifact to your Nexus third-party repository. To do so, download the Oracle JDBC driver from http://www.oracle.com/technology/software/tech/java/sqlj_jdbc/index.html and save it to the file ojdbc.jar.
Once you have downloaded the file for this third-party asset,
we recommend that you use the UI-based upload that was shown in the
section Uploading Artifacts to Hosted Repositories,” earlier in this
chapter. Uploading via the UI is easier and less error-prone than
calling the deploy:deploy-file goal from the
command line. If you prefer to upload this third-party from the
command line, execute the following command:
$ mvn deploy:deploy-file -DgroupId=com.oracle -DartifactId=ojdbc14
> -Dversion=10.2.0.3.0 -Dpackaging=jar -Dfile=ojdbc.jar
> -Durl=http://localhost:8081/nexus/content/repositories/thirdparty
> -DrepositoryId=thirdparty
...
[INFO] [deploy:deploy-file]
Uploading: http://localhost:8081/nexus/content/repositories/thirdparty/
                  com/oracle/ojdbc14/10.2.0.3.0/ojdbc14-10.2.0.3.0.jar
330K uploaded
[INFO] Retrieving previous metadata from thirdparty
[INFO] Uploading repository metadata for: 'artifact com.oracle:ojdbc14'
[INFO] Retrieving previous metadata from thirdparty
[INFO] Uploading project information for ojdbc14 10.2.0.3.0
After you run mvn deploy:deploy-file, this artifact will be published to the third-party repository in Nexus.