
Chapter 14. Maven and Eclipse: m2eclipse
Introduction
The Eclipse Integrated Development Environment (IDE) is the most widely used IDE for Java development today. Eclipse has a huge number of plugins (see http://www.eclipseplugincentral.com/), and innumerable organizations are developing their own software on top of it. Quite simply, Eclipse is ubiquitous. The m2Eclipse project provides support for Maven within the Eclipse IDE, and in this chapter, we will explore the features it provides to help you use Maven with Eclipse.
m2eclipse
The m2Eclipse plugins (see http://m2eclipse.codehaus.org/) provide Maven integration for Eclipse. m2Eclipse also has hooks into the features of both the Subclipse plugin (see http://subclipse.tigris.org/) and the Mylyn plugin (see http://www.eclipse.org/mylyn/). The Subclipse plugin provides the m2eclipse plugin with the ability to interact with Subversion repositories, and the Mylyn plugin provides the m2eclipse plugin with the ability to interact with a task-focused interface that can keep track of development context. Just a few of the features m2eclipse provides include:
Creating and importing Maven projects
Dependency management and integration with the Eclipse classpath
Automatic dependency downloads and updates
Artifact Javadoc and source resolution
Creating projects with Maven archetypes
Browsing and searching remote Maven repositories
POM management with automatic update to dependency list
Materializing a project from a Maven POM
Checking out a Maven project from several SCM repositories
Adapting nested multimodule Maven projects to the Eclipse IDE
Integration with Web Tools Project (WTP)
Integration with AspectJ Development Tools (AJDT)
Integration with Subclipse
Integration with Mylyn
Form-based POM Editor
Graphical display of dependency graph
GUI presentation of Dependency Tree and resolved dependencies
m2eclipse has many more features beyond those listed here, and this chapter introduces some of the more impressive features that are currently available. Let’s get started by installing the m2Eclipse plugin.
Installing the m2eclipse Plugin
To install the m2Eclipse plugin, you need to install some prerequisites. You need to be running Eclipse 3.2 or higher, JDK 1.4 or higher, and you also need to make sure that Eclipse is running on a JDK, not a JRE. Once you have Eclipse and a compatible JDK, you need to install two Eclipse plugins: Subclipse and Mylyn.
Installing Prerequisites
You can install these prerequisites when you install m2eclipse; just add a new remote update site to Eclipse for each of the prerequisite components. To do so, go to Help → → . Selecting this menu item will load the Install/Update dialog box. Choose the “Search for new features to install” option and click . You will then be presented with a list of “Update sites to visit.” Click , and add a new update site for each new prerequisite. Add a new remote site for each plugin, and then make sure that the remote site is selected. After you click , Eclipse will ask you to select plugins components to install. Select the components you want to install, and Eclipse will download, install, and configure your plugins.
Note that if you are using a recent build of Eclipse 3.4 (Ganymede; see http://www.eclipse.org/ganymede), your plugin installation experience may be slightly different. In Ganymede, you will select → , which will load the “Software Updates and Add-ons” dialog. In this dialog, choose the Available Software panel and click on , which will load the simple “Add Site” dialog. Enter the URL of the update site you wish to add, and click . In the “Software Updates and Add-ons” dialog, the available plugins from an update site will appear as soon as the site is added. You can then select the modules you want to install and click the button. Eclipse will then resolve all the dependencies for the selected plugins and will ask you to agree to the plugin license. After Eclipse installs new plugins, it will likely ask you for permission to restart.
Installing Subclipse
To install Subclipse, use the following Eclipse plugin update site:
- Subclipse 1.2
For other versions of Subclipse, and for more information about the Subclipse plugin, please see the Subclipse project’s web site at http://subclipse.tigris.org/.
Installing Mylyn
To install JIRA integration with Mylyn, add the Mylyn extras Eclipse update URL. You’ll want to do this if your organization uses Atlassian’s JIRA for issue tracking. To install Mylyn, use the following update sites:
- Mylyn (Eclipse 3.3)
- Mylyn (Eclipse 3.4)
- Mylyn extras (JIRA support)
For more information about the Mylyn project, see the project’s web site at http://www.eclipse.org/mylyn/.
Installing AspectJ Development Tools (AJDT)
If you are installing the 0.9.4 release of m2eclipse, you may also want to install both the Web Tools Platform (WTP) and the AspectJ Development Tools (AJDT). To install the AJDT, use one of the following update URLs in Eclipse:
- AJDT (Eclipse 3.3)
- AJDT (Eclipse 3.4)
For more information about the AJDT project, see the project’s web site at http://www.eclipse.org/ajdt/.
Installing the Web Tools Platform (WTP)
To install the Web Tools Platform (WTP), use one of the following update URLs in Eclipse, or just look for the Web Tools Project in the Discovery Site, which should already be in your Eclipse remote update sites list:
For more information about the Web Tools Platform project, see the project’s web site at http://www.eclipse.org/webtools/.
Installing m2eclipse
Once you’ve installed the prerequisites, you can install the m2eclipse plugin from the following Eclipse update URL:
- m2eclipse plugin
If you would like to install the latest snapshot development version of the plugin, you should use the update-dev URL instead:
- m2eclipse plugin (development snapshot)
To install m2eclipse, just add the appropriate update site for m2eclipse. Go to Help → → . Selecting this menu item will load the Install/Update dialog box. Choose the “Search for new features to install” option, and click . You will then be presented with a list of “Update sites to visit.” Click , and add a new update site for m2eclipse. Add a new remote site for m2eclipse, and then make sure that the remote site is selected. After you click , Eclipse will ask you to select plugins components to install. Select the components you want to install, and Eclipse will download, install, and configure m2eclipse.
If you’ve installed the plugin successfully, you should see a Maven option in the list of preferences options when you go to Window → .
Enabling the Maven Console
Before we begin to examine the features of m2eclipse, let’s first enable the Maven console. Open the Console View by going to → → . Then, click on the little arrow on the righthand side of the Open Console icon and select Maven Console, as shown in Figure 14-1.

Maven Console shows the Maven output that normally appears on the console when running Maven from the command line. It is useful to be able to see what Maven is doing and to work with Maven debug output to diagnose issues.
Creating a Maven Project
When using Maven, project creation takes place through the use of a Maven archetype. In Eclipse, project creation takes place via the new project wizard. The new project wizard inside of Eclipse offers a plethora of templates for creating new projects. The m2eclipse plugin improves on this wizard to provide the following additional capabilities:
Checking out a Maven project from a SCM repository
Creating a Maven project using a Maven archetype
Creating a Maven POM file
As shown in Figure 14-2, all three of these options are important to developers using Maven. Let’s take a look at each option in the sections that follow.
Checking Out a Maven Project from SCM
m2eclipse provides the ability to check out a project directly from a SCM repository. Simply enter the SCM information for a project, and it will check it out for you to a location of your choice, as shown in Figure 14-3.
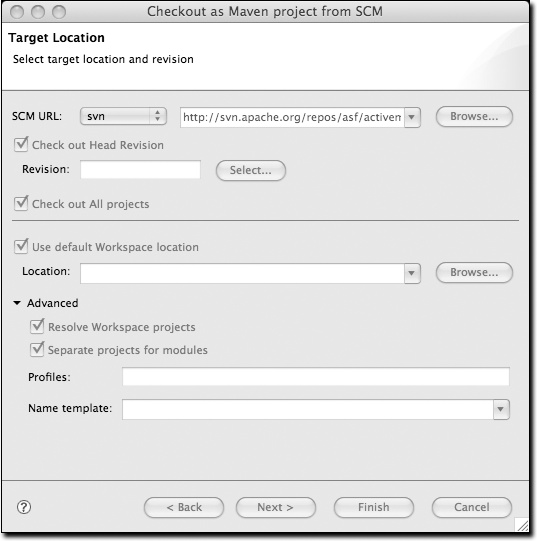
This dialog offers additional options for specifying a particular revision, either by browsing the revisions in a Subversion repository or simply by entering the revision number manually. These features reuse of some of the features in the Subclipse plugin to interact with the Subversion repository. In addition to Subversion, the m2eclipse plugin also supports the following SCM providers:
Bazaar
Clearcase
CVS
git
hg
Perforce
Starteam
Subversion
Synergy
Visual SourceSafe
Creating a Maven Project from a Maven Archetype
m2eclipse offers the ability to create a Maven project using a Maven archetype. There are many Maven archetypes provided in the list that comes with m2eclipse, as shown in Figure 14-4.
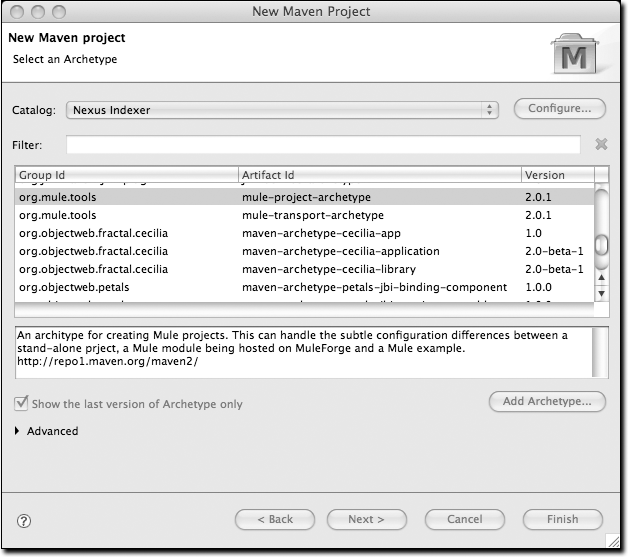
The list of archetypes in Figure 14-4 is generated by something called the Nexus Indexer. Nexus is a repository manager that will be introduced in Chapter 16. The Nexus Indexer is a file that contains an index of the entire Maven repository, and m2eclipse uses it to list all of the available archetypes in the entire Maven repository. At the time of this writing, m2eclipse has approximately 90 archetypes in this archetype dialog. Highlights of this list include:
Standard Maven archetypes to create
Maven Plugins
Simple Web Applications
Simple Projects
New Maven Archetypes
Databinder archetypes (data-driven Wicket applications) under
net.databinderApache Cocoon archetypes under
org.apache.cocoonApache Directory Server archetypes under
org.apache.directory.serverApache Geronimo archetypes under
org.apache.geronimo.buildsupportApache MyFaces archetypes under
org.apache.myfaces.buildtoolsApache Tapestry archetypes under
org.apache.tapestryApache Wicket archetypes under
org.apache.wicketAppFuse archetypes under
org.appfuse.archetypesCodehaus Cargo archetypes under
org.codehaus.cargoCodehaus Castor archetypes under
org.codehaus.castorGroovy-based Maven plugin archetypes (deprecated)[4] under
org.codehaus.mojo.groovyJini archetypes
Mule archetypes under
org.mule.toolsObjectweb Fractal archetypes under
org.objectweb.fractalObjectweb Petals archetypes under
org.objectweb.petalsops4j archetypes under
org.ops4jParancoe under
org.parancoeslf4j archetypes under
org.slf4jSpring Framework OSGI and Web Services archetypes under
org.springframeworkTrails Framework archetypes under
org.trailsframework
And these were just the archetypes that were listed under the Nexus Indexer catalog, if you switch catalogs, you’ll see other archetypes. Though your results may vary, the following additional archetypes were available in the Internal catalog:
Atlassian Confluence plugin archetype under
com.atlassian.maven.archetypesApache Struts archetypes under
org.apache.strutsApache Shale archetypes under
org.apache.shale
A catalog is simply a reference to a repository index. You can manage the set of catalogs that the m2eclipse plugin knows about by clicking on the button next to the catalog drop-down. If you have your own archetypes to add to this list, you can click on and add them.
Once you choose an archetype, Maven will retrieve the appropriate artifact from the Maven repository and create a new Eclipse project with the selected archetype.
Creating a Maven Module
m2eclipse provides the ability to create a Maven module, as shown in Figure 14-5. Creating a Maven module is almost identical to creating a Maven project, as it also creates a new Maven project using a Maven archetype. However, a Maven module is a subproject of another Maven project typically known as a parent project.
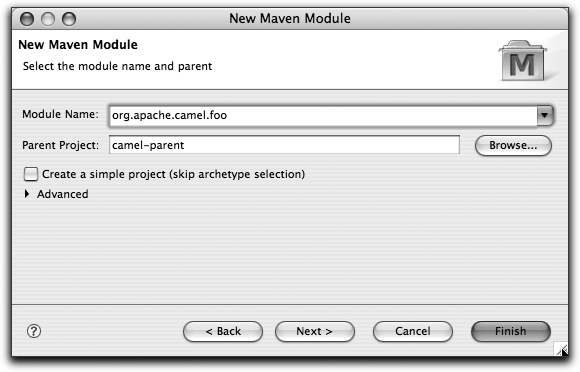
When creating a new Maven module you must select a parent project that already exists inside of Eclipse. Clicking the browse button displays a list of projects that already exist, as shown in Figure 14-6.
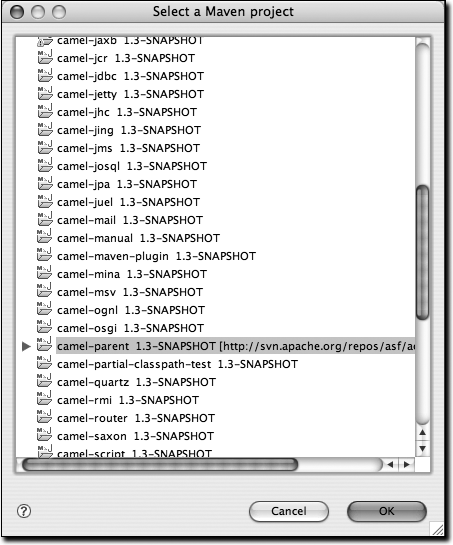
After selecting a parent project from the list, you are returned to the New Maven Module window, and the Parent Project field is populated as shown in Figure 14-5. Clicking will display the standard list of archetypes described earlier in the section Creating a Maven Project from a Maven Archetype” so you can choose which one should be used to create the Maven module.
Create a Maven POM File
Another important feature that m2eclipse offers is the ability to create a new Maven POM file. m2eclipse provides a wizard that helps you easily create a new POM file inside a project that is already in Eclipse. This POM creation wizard is shown in Figure 14-7.

Creating a new Maven POM is just a matter of selecting a project, entering the Group ID, Artifact ID, Version, choosing the Packaging type, and providing a Name in the fields provided by m2eclipse. Click the Next button to start adding dependencies, as shown in Figure 14-8.
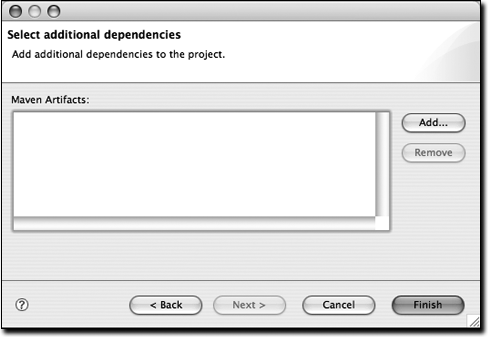
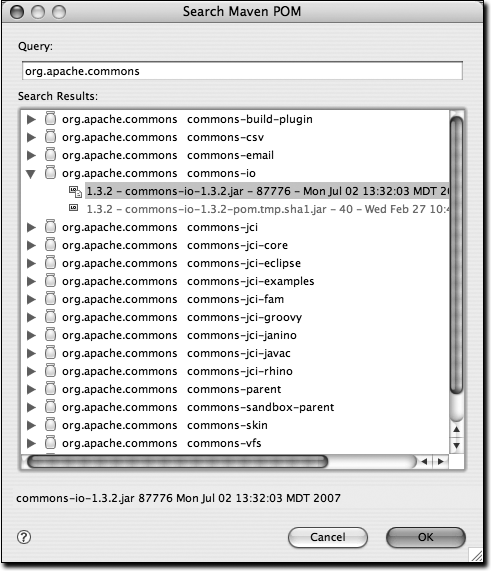
As you can see, no dependencies are in the POM yet. Just click the button to query the central Maven repository for dependencies, as shown in Figure 14-9.
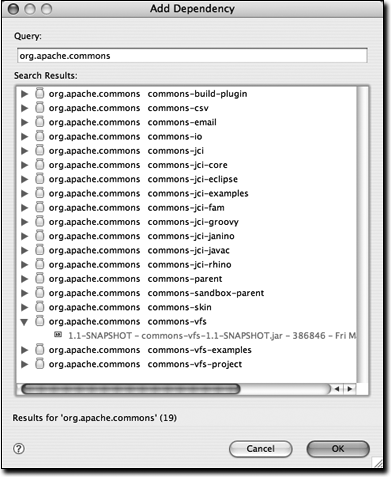
Querying for dependencies is as easy as entering the
groupId for the artifact you need. Figure 14-9 shows a query for
org.apache.commons with
commons-vfs expanded to see which versions are
available. Highlighting the 1.1-SNAPSHOT version of
commons-vfs and clicking takes you back to the dependency
selection where you can either query for more artifacts or just click
finish to create the POM. When you search for
dependencies, m2eclipse is making use of the same Nexus repository
index that is used in the Nexus Repository Manager from Chapter 16.
Now that the you’ve seen the m2eclipse features for creating a new project, let’s look at a similar set of features for importing projects into Eclipse.
Importing Maven Projects
m2eclipse provides three options for importing a Maven project into Eclipse, including:
Import an existing Maven project
Check out a Maven project from SCM
Materialize a Maven project
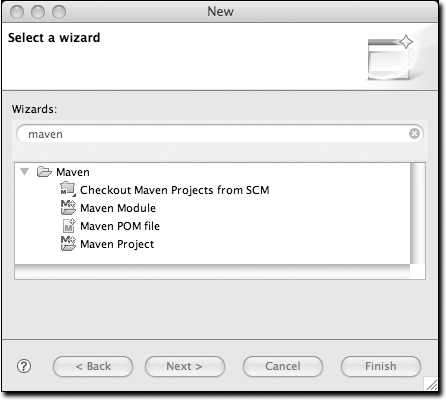
Figure 14-10 shows the wizard for importing projects with the options for Maven provided by m2eclipse.
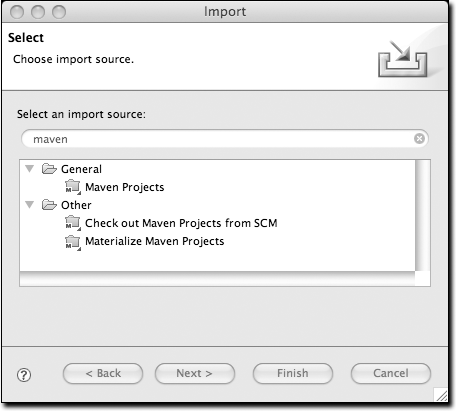
The dialog in Figure 14-10 is displayed when you use the File → command in Eclipse and then filter the options by entering the word “maven” in the filter field. As noted earlier, three options are available for importing a Maven project into Eclipse, including: Maven Projects, Check out Maven Project from Subversion, and Materialize Maven Projects.
Importing a Maven project from Subversion is identical to creating a Maven project from Subversion, as discussed in the previous section, so discussion of it here would be redundant. Let’s move on now to review the other two options for importing a Maven project into Eclipse.
Importing a Maven Project
m2eclipse can import a Maven project with an existing pom.xml. By pointing at the directory where a Maven project is located, m2eclipse detects all the Maven POMs in the project and provides a hierarchical list of them as shown in Figure 14-11.
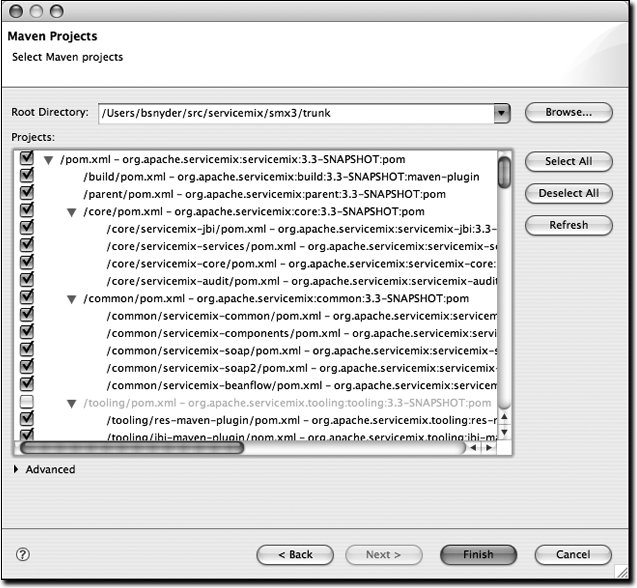
Figure 14-11 displays the view of the project being imported. Notice that all the POMs from the project are listed in a hierarchy. This allows you to easily select which POMs (and therefore which projects) you want to be imported into Eclipse. Once you select the project you would like to import, m2eclipse will import and build the project(s) using Maven.
Materializing a Maven Project
m2eclipse also offers the ability to “materialize” a Maven project. Materialization is similar to the process of checking out a Maven project from Subversion, but instead of manually entering the URL to the project’s Subversion repository, the Subversion URL is discovered from the project’s root POM file. You can use this feature to “materialize” projects from nothing more than a POM file if the POM file has the appropriate elements to specify the location of a source repository. Using this feature, you can browse the central Maven repository for projects and materialize them into Eclipse projects. This comes in handy if your project depends on a third-party open source library and you need to get your hands on the source code. Instead of tracking down the project web site and figuring out how to check it out of Subversion, just use the m2eclipse project to magically materialize the Eclipse project.
Figure 14-12 shows the wizard after choosing to materialize Maven projects.
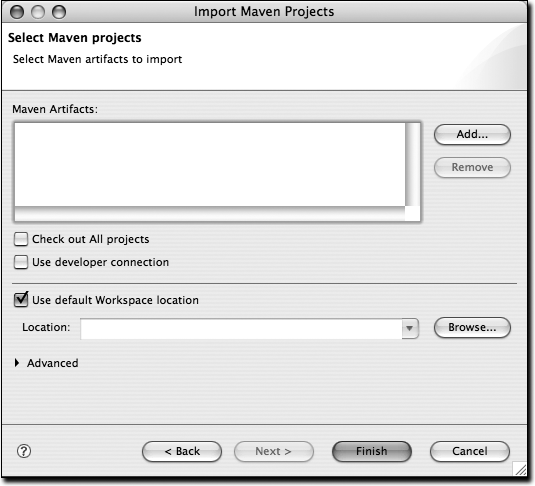
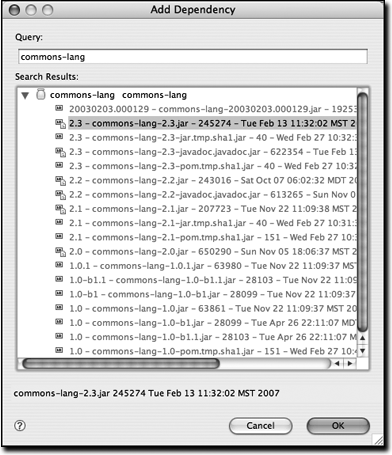
Notice that the dialog box for Maven artifacts in Figure 14-12 is empty. This is because no projects have been added yet. To add a project, you must click the button on the right side and select a dependency to add from the central Maven repository. Figure 14-13 shows how to add a project.
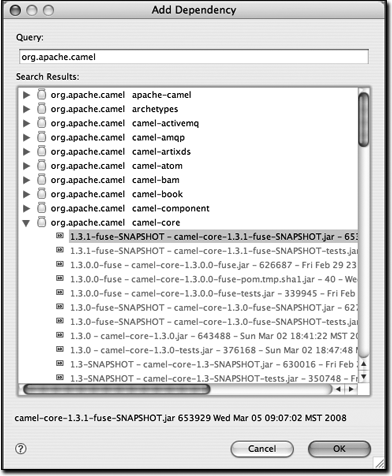
Upon entering a query, candidate dependencies will be located in the local Maven repository. After a few seconds of indexing the local Maven repository, the list of candidate dependencies appears. Select the dependency to add and click OK so that they are added to the list, as shown in Figure 14-14.
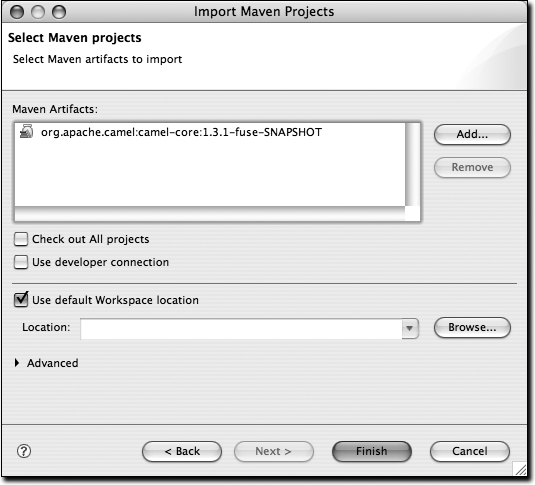
Upon adding a dependency, you have the option of telling the m2eclipse plugin to check out all projects for the artifact.
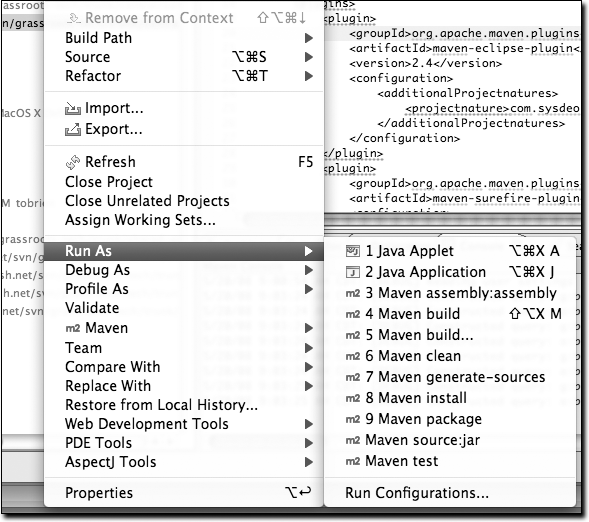
Running Maven Builds
m2eclipse modifies the and
menus to allow you to run a Maven build within Eclipse. Figure 14-15 shows the menu for an m2eclipse project.
From this menu you can run one of the more common lifecycle phases
such as clean, install, or package. You can also load up the Run
configuration dialog window and configure a Maven build with
parameters and more options.
If you need to configure a Maven build with more options, you can choose and create a new Maven build. Figure 14-16 shows the Run dialog for configuring a Maven build.
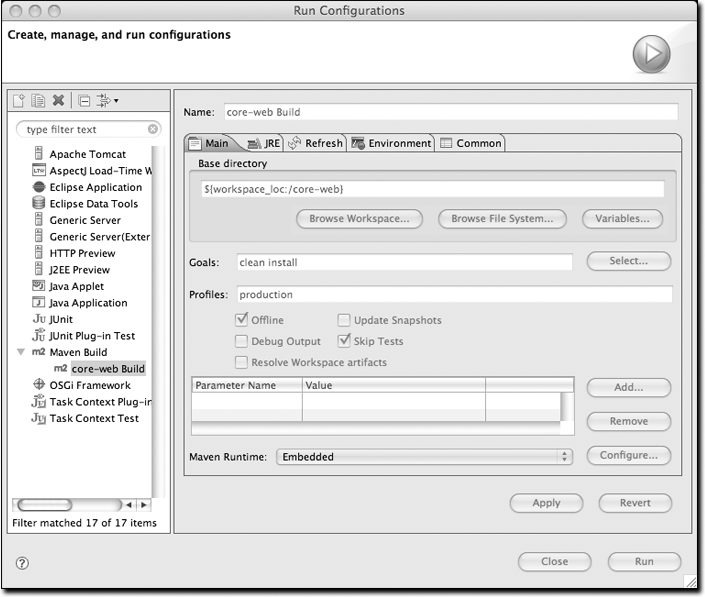
The Run configuration dialog allows you to specify multiple goals and profiles. It exposes options such as “skip tests” and “update snapshots” and allows you to customize everything from the project to the JRE to the environment variable. You can use this dialog to support any custom Maven build that you wish to launch with m2eclipse.
Working with Maven Projects
The m2eclipse plugin also provides a set of features for working
with Maven projects once they are inside Eclipse. Many features make Maven in Eclipse easier to use, so
let’s dive right into them. In the previous section, I materialized a
Maven project and selected a subproject from the Apache Camel project
named camel-core. We’ll use that project to
demonstrate these features.
By right-clicking on the camel-core project and selecting the Maven
menu item, you can see the available Maven features. Figure 14-17 shows a screenshot of
this.
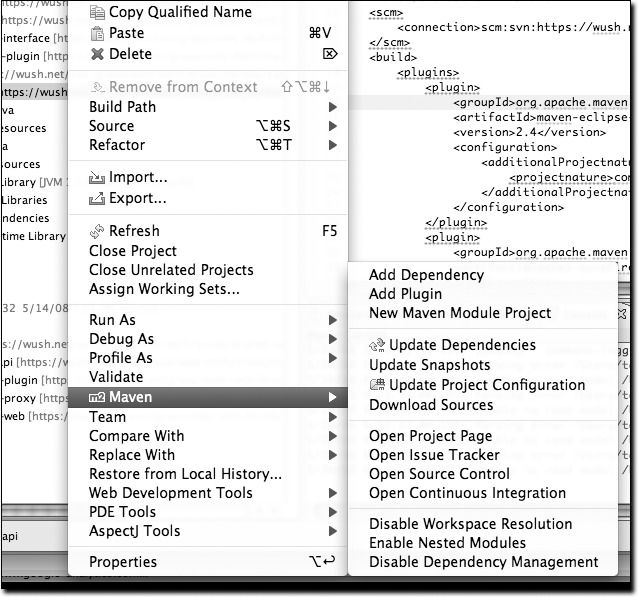
Notice in Figure 14-17 the
available Maven features for the camel-core project, including:
Adding dependencies and plugins
Updating dependencies, snapshots and source folders
Creating a Maven module
Downloading the source
Opening Project URLs such as the Project Web Page, Issue Tracker, Source Control, and Continuous Integration tool
Enabling/disabling workspace resolution, nested Maven modules and dependency management
These features are also big timesavers, so let’s review them briefly.
Adding and Updating Dependencies and Plugins
Let’s say we’d like to add a dependency or a plugin to the
camel-core POM. For the sake of demonstration, we’re going to add
commons-lang as a dependency. (Please note that
the functionality for adding a dependency and a plugin is exactly
the same, so we’ll demonstrate it by adding a dependency.)
m2eclipse offers two options for adding dependencies to a
project. The first option is manually editing the
POM file to type in the XML to
add the dependency. The downside to manually editing the
POM file to add a dependency is that you must
already know the information about the artifact, or use the features
discussed in the next section to manually locate the artifact
information in the repository indexes. The upside is that after
manually adding the dependency and saving the
POM, the project’s Maven Dependencies container
will be automatically updated to include the new dependency. Figure 14-18 shows how I added a dependency
for commons-lang to the
camel-console POM and the
Maven Dependencies container was automatically updated to included
it.
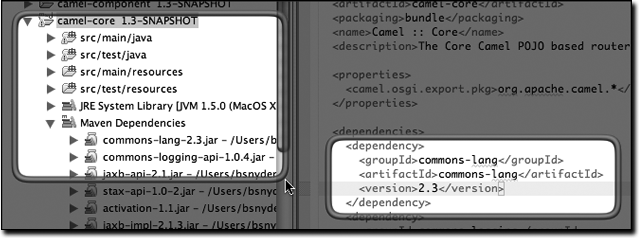
Manually adding a dependency works well, but it requires more
work than the second approach. Upon manually adding the dependency element to the
POM, the Eclipse progress in the lower righthand
corner of the Eclipse workbench reflects the action, as shown in
Figure 14-19.

The second option for adding a dependency is much easier
because you don’t have to know any information about the artifact
other than its groupId. Figure 14-20 shows this
functionality.
By simply entering a groupId into the query
field, m2eclipse queries the repository indexes and even shows a
version of the artifact that is currently in your local Maven
repository. This option is preferred because it is such a tremendous
timesaver. With m2eclipse, you no longer need to hunt through the
central Maven repository for an artifact version.
Creating a Maven Module
m2eclipse makes it very easy to create a series of nested projects in a multimodule Maven project. If you have a parent project, and you want to add a module to the project, just right click on the project, go the Maven menu, and choose New Maven Module Project. m2eclipse will walk you through the project creation process to create a new project, then it will update the parent project’s POM to include the module reference. Before m2eclipse came along it was very difficult to use a hierarchy of Maven projects within Eclipse. With m2eclipse, the details of the underlying relationships between parent and child projects are integrated into the development environment.
Downloading Source
If the central Maven repository contains a source artifact for a particular project, you can download the source from the repository and expose it to the Eclipse environment. When you are trying to debug a complex issue in Eclipse, nothing can be easier than being able to right-click on a third-party dependency and drill into the code in the Eclipse debugger. Select this option, and m2eclipse will attempt to download the source artifact from the Maven repository. If it is unable to retrieve this source artifact, you should ask the maintainers of the project in question to upload the appropriate Maven source bundle to the central Maven repository.
Opening Project Pages
A Maven POM contains some valuable URLs that a developer may need to consult. These are the project’s web page, the URL for the source code repository, a URL for a continuous integration system such as Hudson, and a URL for an issue tracker. If these URLs are present in a project’s POM, m2eclipse will open these project pages in a browser.
Resolving Dependencies
You can configure a project to resolve dependencies from a
workspace. This has the effect of altering the way that Maven
locates dependency artifacts. If a project is configured to resolve
dependencies from the workspace, these artifacts do not need to be
present in your local repository. Assume that
project-a and project-b are
both in the same Eclipse workspace, and that
project-a depends on
project-b. If workspace resolution is disabled,
the m2eclipse Maven build for project-a will
succeed only if project-b’s artifact is present
in the local repository. If workspace resolution is enabled,
m2eclipse will resolve the dependency via the eclipse workspace. In
other words, when workspace resolution is enabled, project’s don’t
have to be installed in the local repository to relate to one
another.
You can also disable dependency management. This has the effect of telling m2eclipse to stop trying to manage your project’s classpath, and it will remove the Maven Dependencies classpath container from your project. If you do this, you are essentially on your own when it comes to managing your project’s classpath.
Working with Maven Repositories
m2eclipse also provides some tools to make working with Maven repositories a bit easier. These tools provide functionality for:
Searching for artifacts
Searching for Java classes
Indexing Maven repositories
Searching For Maven Artifacts and Java classes
m2eclipse adds a couple of items to the Eclipse navigation menu that make searching for Maven artifacts and Java classes easy work. Each option is available by clicking on the menu, as shown in Figure 14-21.
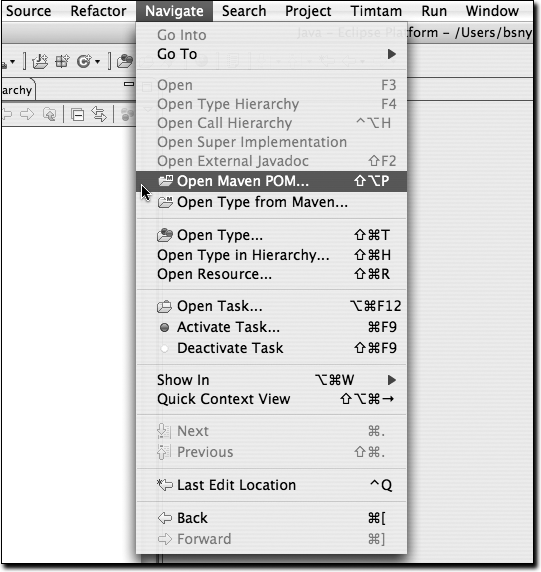
Notice the available options in Figure 14-21 under the Eclipse menu named and . The option allows you to search the Maven repository for a given POM, as shown in Figure 14-22.
Upon selecting an artifact and clicking , the POM for that artifact is opened in Eclipse for browsing or editing. This is handy when you need to take a quick look at the POM for a given artifact.
The second m2eclipse option in the menu is named . This feature
allows you to search for a Java class by name in a remote
repository. Upon opening this dialog, simply type “factorybean” and
you’ll see many classes with the name
FactoryBean in them, as shown in Figure 14-23.
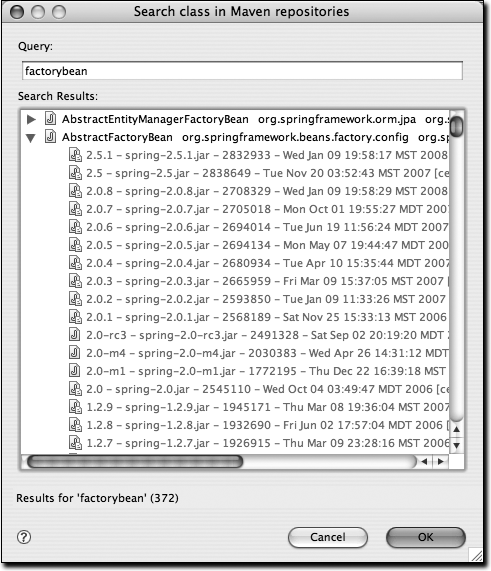
This is a big timesaving feature because it means that manually searching through artifacts in a Maven repository for a particular class is a thing of the past. If you need to use a specific class, just fire up Eclipse, go to the menu, and search for the class. m2eclipse will show you the list of artifacts in which it appears.
Indexing Maven Repositories
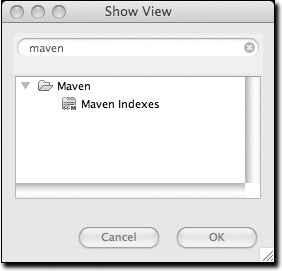
The Maven Indexes view allows you to manually navigate to POMs in a remote repository and open them in Eclipse. To see this view, go to View → → , type the word “maven” into the search box, and you should see a view named Maven Indexes, as shown in Figure 14-24.
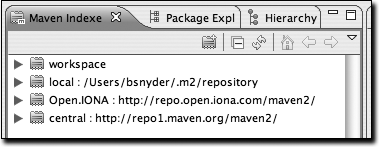
Select this view, and click . This will show the Maven Indexes view, as shown in Figure 14-25.
Additionally, Figure 14-26 shows the Maven Indexes view after you manually navigate to locate a POM.
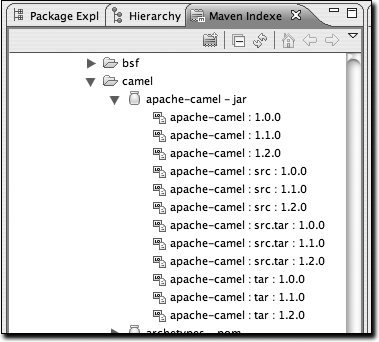
After finding the apache-camel artifact,
double-clicking on it will open it in Eclipse for browsing or
editing.
These features make working with remote repositories from inside of Eclipse so much easier and faster. After all the hours you may have spent doing these types of tasks by manually over the last few years—visiting repositories through a web browser, downloading artifacts, and grepping through them for classes and POMs—you’ll find that m2eclipse is a welcome improvement.
Using the Form-Based POM Editor
The latest release of the m2eclipse plugin has a form-based POM editor that allows you to edit every part of a project’s pom.xml with an easy-to-use GUI interface. To open the POM editor, click on a project’s pom.xml file. If you have customized the editors for a pom.xml file, and the POM editor is not the default editor, you may need to right-click on the file and choose Open With... → . The POM editor will then display the Overview tab, as shown in Figure 14-27.
One common complaint about Maven is that it forces a developer to confront large and often overwhelming XML documents in a highly complex multimodule project build. Although the authors of this book believe this is a small price to pay for the flexibility of a tool such as Maven, the graphical POM editor is a tool that makes it possible for people to use Maven without ever having to know about the XML structure behind a Maven POM.
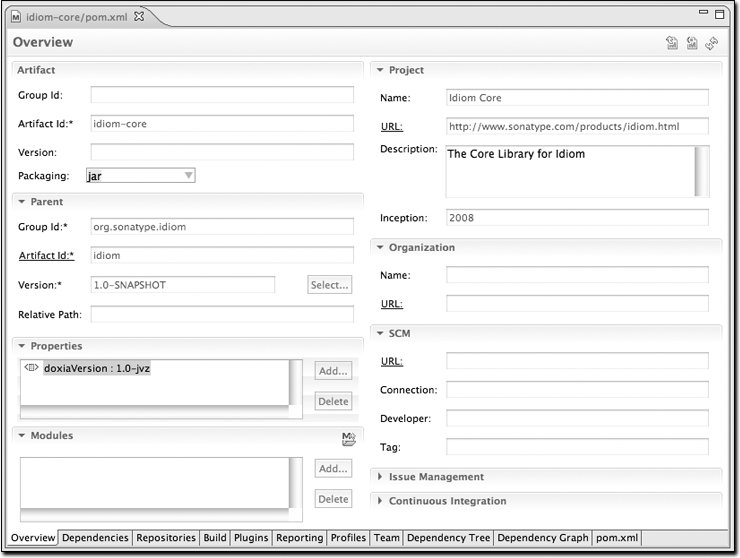
The project shown in Figure 14-27 is a project with an
artifactId of idiom-core. You’ll
notice that most of the fields in this idiom-core
project are blank. There is no groupId or
version, and there is no SCM
information supplied in the POM editor. This is
because
idiom-core inherits most of this information from a
parent project named idiom. If we open the
pom.xml for the parent project in
the POM editor, we’ll see the Overview tab shown in
Figure 14-28.
That “open folder” icon on the various list entries throughout the POM editor indicate that the corresponding entry is present in the Eclipse workspace, and the “jar” icon indicates artifacts that are referenced from the Maven repository. You can double-click those entries to open their POMs in the POM editor. This works for modules, dependencies, plugins, and other elements that have corresponding Maven artifacts. Underlined labels in several POM editor sections represent hyperlinks that can be used to open the POM editor for corresponding Maven artifacts.
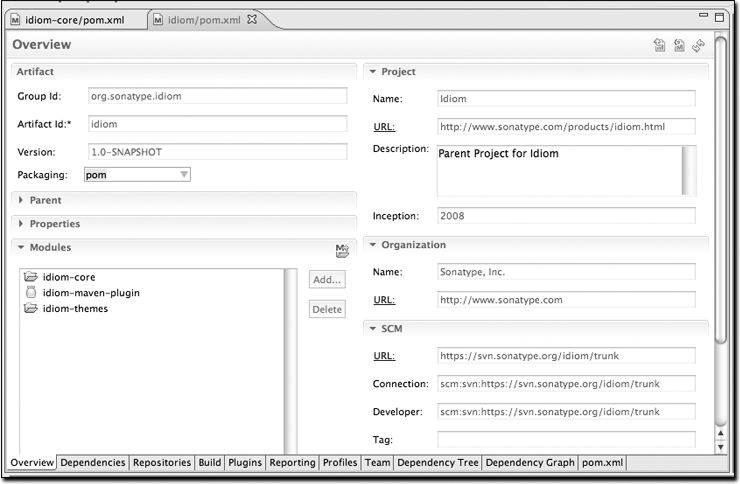
In this parent POM, we see that the
groupId and version are defined
and that the parent POM supplies much of the
information that was missing in the idiom-core
project. The POM editor will show you the contents
of the POM that you are editing, and it will not
show you any of the inherited values. If you want to look at the
idiom-core project’s effective
POM in the POM editor, you can
use the
action in the tool bar in the upper-righthand corner of the
POM editor, which shows a left bracket and an
equals sign on a page with a blue M. It will load the effective
POM for idiom-core in the
POM editor, as shown in Figure 14-29.
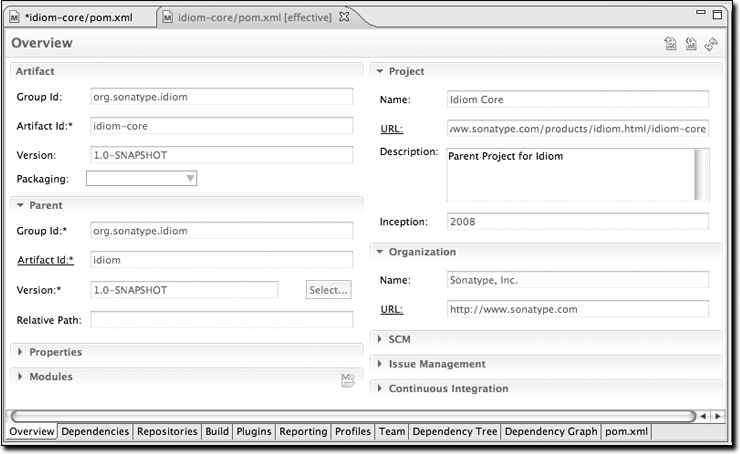
This effective view of the POM merges the
idiom-core POM with the ancestor
POMs (the parent, the grandparent, etc.)—similar to
the mvn help:effective-pom
command—and displays the POM editor with the
effective values. Because the POM editor displays a
composite view of many different merged POMs, this
effective POM editor is read-only, and you will not
be able to update any of the fields in this effective
POM view.
If you are looking at the POM editor for the
idiom-core project as shown in Figure 14-27, you can also navigate to
the parent POM using the action from the
POM editor tool bar in the upper-righthand corner
of the POM editor.
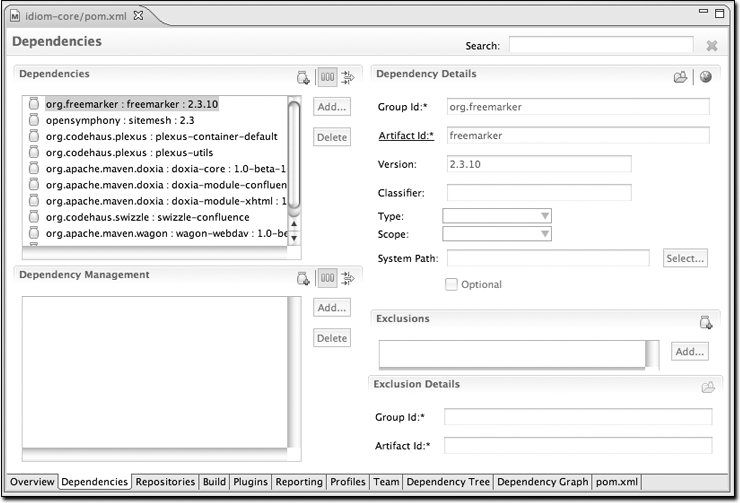
The POM editor shows a number of tabs
displaying various information from the POM. The
final tab exposes the pom.xml as
an XML document. The Dependencies tab, shown in
Figure 14-30, exposes an
easy-to-use interface for adding and editing dependencies to your
project, as well as for editing the
dependencyManagement section of the
POM. This dependency management screen is also
integrated with the artifact searching facilities in the m2eclipse
plugin. You can use actions from the editor sections as well as
Ctrl-Space typing assistance for the fields in the Dependency Details
section.
If you need to know more about one of the artifacts, you can use action from the Dependency Details section tool bar to check the project web page.
The Build tab shown in Figure 14-31 provides access to the
contents of the build element. From
this tab you can customize source directories, add extensions, change
the default goal name, and add resources directories.

We have shown only a small subset of the POM editor here. If you are interested in seeing the rest of the tabs, please download and install the m2eclipse plugin.
Analyzing Project Dependencies in m2eclipse
The latest release of m2eclipse contains a
POM editor that provides some dependency analysis
tools. These tools promise to change the way users maintain and
monitor a project’s transitive dependencies. One of Maven’s main
attractions is the fact that it manages a project’s dependencies. If
you are writing an application that depends on the Spring Framework’s
Hibernate3 integration, all you need to do is depend on the
spring-hibernate3 artifact from the central Maven
repository. Maven then reads this artifact’s POM
and adds all of the necessary transitive dependencies. Although this
is a great feature that attracts people to Maven in the first place,
it can become confusing when a project depends on tens of
dependencies, each with tens of transitive dependencies.
Problems begin to occur when you depend on a project with a
poorly crafted POM that fails to flag dependencies
as optional, or when you start encountering conflicts between
transitive dependencies. If one of your requirements is to exclude a
dependency such as commons-logging or the
servlet-api, or if you need to find out why a
certain dependency is showing up under a specific scope you will
frequently need to invoke the dependency:tree and
dependency:resolve goals from the command-line to
track down the offending transitive dependencies.
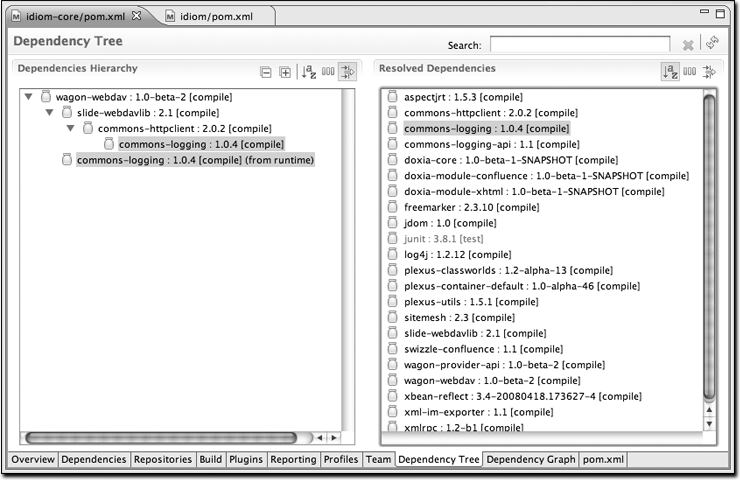
This is where the POM editor in m2eclipse comes in handy. If you open a project with many dependencies, you can open the Dependency Tree tab and see a two-column display of dependencies, as shown in Figure 14-32. The lefthand side of the panel displays a tree of dependencies. The first level of the tree consists of direct dependencies from your project, and each subsequent level lists the dependencies of each dependency. This lefthand side is a great way to figure out how a specific dependency made its way into your project’s resolved dependencies. The righthand side of this panel displays the resolved dependencies. This is the list of effective dependencies after all conflicts and scopes have been applied, and it is the effective list of dependencies that your project will use for compilation, testing, and packaging.
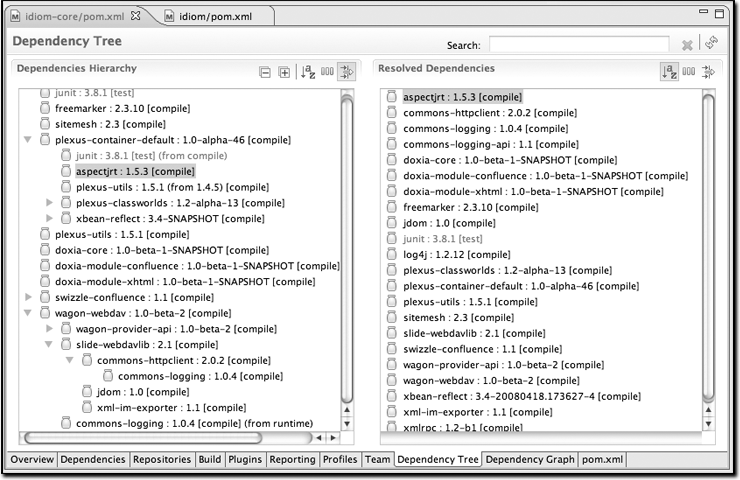
The feature that makes the Dependency Tree tab so valuable is
that it can be used as an investigative tool to figure out how a
specific dependency made it into the list of resolved dependencies.
Searching and filtering functionality available in the editor makes it
really easy to search and browse through the project dependencies. You
can use Search entry field from the editor tool bar and the
and actions from the Dependency
Hierarchy and Resolved Dependencies sections to navigate through
dependencies. Figure 14-33
shows what happens when you click on commons-logging in the Resolved
Dependencies list. When filtering is enabled in the Dependencies
Hierarchy section, clicking on a resolved dependency filters the
hierarchy on the lefthand side of the panel to show all of the nodes
that contributed to the resolved dependency. If you are trying to get
rid of a resolved dependency, you can use this tool to find out which
dependencies (and which transitive dependencies) are contributing the
artifact to your resolved dependencies. In other words, if you are
trying to get rid of something like commons-logging
from your dependency set, the Dependency Tree tab is the tool you will
likely want to use.
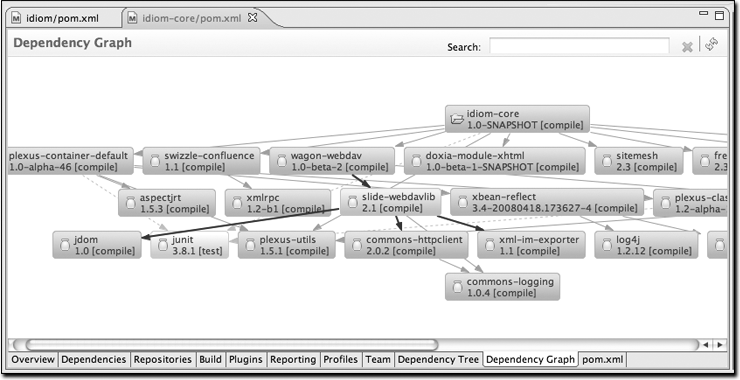
m2eclipse also provides you with the ability to view your
project’s dependencies as a graph. Figure 14-34 shows the dependencies of
idiom-core. The topmost box is the
idiom-core project, and the other dependencies are
shown below it. Direct dependencies are linked from the top box, and
the transitive dependencies are linked from those. You can select a
specific node in the graph to highlight the linked dependencies, or
you can use the Search field at the top of the page to find matching
nodes.
Note that the “open folder” icon on each graph node indicates that the corresponding artifact is present in the Eclipse workspace, and the “jar” icon indicates that the node’s artifact is referenced from the Maven repository.
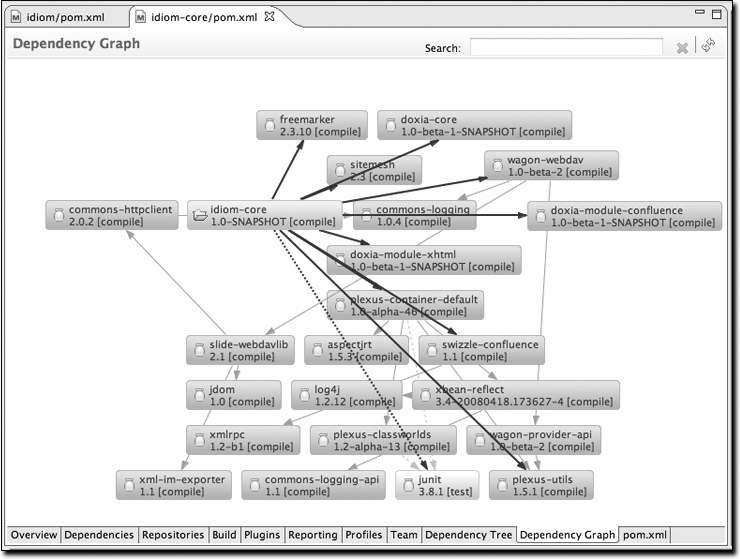
The graph presentation can be changed by right-clicking in the editor. You can choose to show artifact IDs, group IDs, versions, scopes, or whether you want to wrap node text or show icons. Figure 14-35 shows the same graph from Figure 14-34 but with a radial layout.
Maven Preferences
The ability to adjust the Maven preferences and some Maven options is an important aspect of developing with Maven, and m2eclipse offers the ability to tweak these items via the Maven preferences page inside of Eclipse. Typically, when using Maven on the command line, such preferences and options are available from files in your ~/.m2 directory and as command-line options. m2eclipse provides access to some of the most important preferences and options from the Eclipse IDE. Figure 14-36 shows the Maven preferences page in Eclipse.
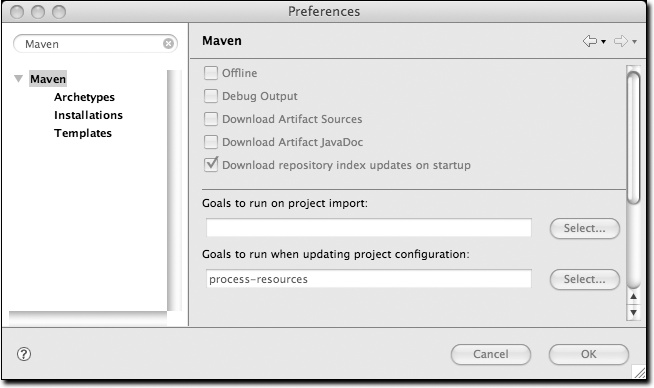
The checkboxes in the top section of Figure 14-36 provide you with the ability to:
Run Maven in offline mode, disabling any downloads from remote repositories
Enable debug output in the Maven console
Download source JARs for artifacts from remote Maven repositories
Download Javadoc JARs for artifacts from remote Maven repositories
Download and update local indexes for remote repositories on startup
The next section offers a pop-up menu to select which goal you’d
like to be executed when a project is imported and when the source
folders for a given project are updated. The default goal is named
process-resources, which copies and process the
resources for the project into the destination directory to make the
project ready for packaging. Customizing this list of goals can come
in handy if you need to run any custom goals that process resources or
generate supporting configuration.
If you need help selecting a goal, click the button to see the Goals dialog. The dialog on the lefthand side ofFigure 14-37 shows the Goals dialog with a list of all the phases in the default Maven lifecycle.
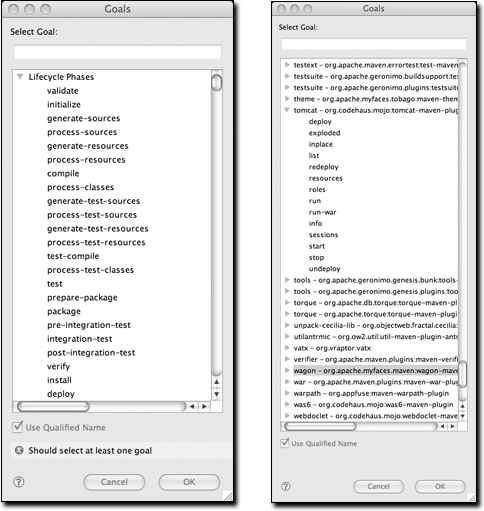
When you see the Goals dialog for the first time, you might be overwhelmed by the number of goals it lists. There are literally hundreds of Maven plugins, for everything from generating a database to running integration tests to performing static analysis to generating web services with XFire. Over 200 plugins with selectable goals are listed in the Goals dialog. The dialog on the righthand side of Figure 14-37 shows the Goals dialog with the Tomcat Maven plugin’s goals highlighted. You can always narrow down the list of goals shown in this dialog by typing some text in the search field. As you type in text, m2eclipse reduces the list of available goals to those that contain the text in the search field.
Another Maven preference page is the Maven installations configuration page, shown in Figure 14-38.
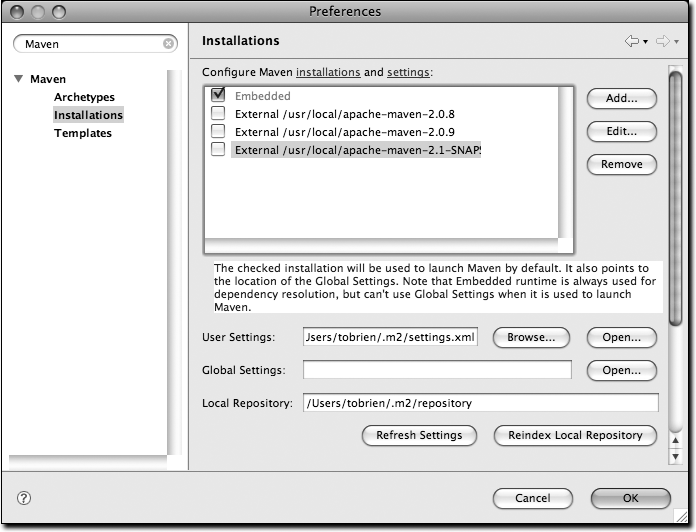
This page allows you to add other Maven installations to the Eclipse environment. If you want to use a different version of Maven with the m2eclipse plugin, you can configure multiple installations of Maven from this configuration page. This is very similar to the ability to add more than one Java Virtual Machine to be run inside of Eclipse. An embedded version of the Maven known as the Maven Embedder is already specified. This is what is used to execute Maven inside of Eclipse. If you have another installation of Maven that you want to use instead of the Maven Embedder, you can add another Maven runtime by clicking on the button. Figure 14-38 shows a configuration page that lists the Maven Embedder, Maven 2.0.9, and an installation of Maven 2.1-SNAPSHOT.
The installations configuration page also allows you to specify the location of the global Maven settings file. If you do not specify the location of this file on the configuration page, Maven will use the default global settings file found in conf/settings.xml of the selected Maven installation. You can also customize the location of your user settings file from the default location of ~/.m2/settings.xml, and you can customize the location of your local Maven repository from the default location of ~/.m2/repository.
Also available in the Eclipse preferences is the ability to enable a decorator called the Maven Version Decorator. This preference provides a given project’s current version on the Eclipse Package Explorer and is shown in Figure 14-39.
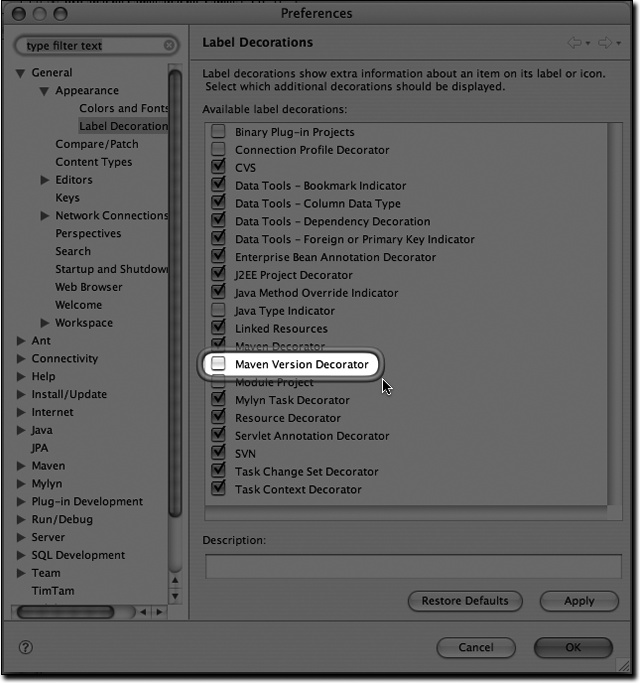
To enable this preference, simply check the Maven Version Decorator option that is highlighted in Figure 14-39. If the Maven Version Decorator is not enabled, a project will list only its name and relative path in the Package Explorer, as shown in Figure 14-40.
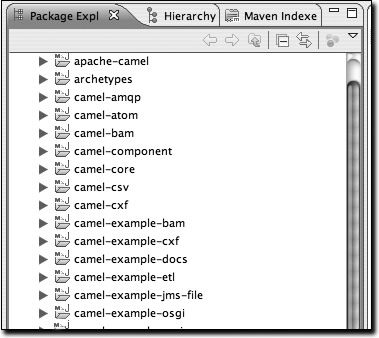
Upon enabling the Maven Version Decorator, the project name will include the current project version, as shown in Figure 14-41.
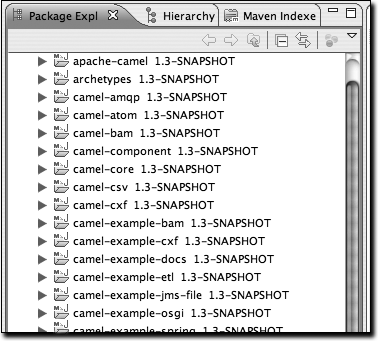
This is a helpful feature that provides you with the project
version at a glance instead of requiring you to open the
POM to locate the version element.
Summary
m2eclipse is more than just a simple plugin that adds Maven support to Eclipse; it is a comprehensive integration that will make everything from creating new projects to locating third-party dependencies orders of magnitude easier. m2eclipse is the first step toward an IDE that is aware of the rich semantic treasure that is the central Maven repository. As more people come to use m2eclipse, more projects are going to be releasing Maven archetypes, and more projects are going to see value in publishing source artifacts to the Maven repository. If you’ve tried to use Eclipse and Maven together without a tool that can comprehend the hierarchical project relationships that are central to any multimodule Maven project, you will know that the ability to work with nested projects is essential to smooth integration between the Eclipse IDE and Maven.
[4] Don’t use the Groovy Maven plugin in Codehaus’ Mojo project. Jason Dillon has moved the Groovy Maven integration to the Groovy project in Codehaus. For more information, see http://groovy.codehaus.org/GMaven.