
Chapter 3. A Simple Maven Project
Introduction
In this chapter, we introduce a simple project created from scratch using the Maven Archetype plugin. This elementary application provides us with the opportunity to discuss some core Maven concepts while you follow along with the development of the project.
Before you can start using Maven for complex, multimodule builds, we have to start with the basics. If you’ve used Maven before, you’ll notice that it does a good job of taking care of the details. Your builds tend to “just work,” and you only really need to dive into the details of Maven when you want to customize the default behavior or write a custom plugin. However, when you do need to dive into the details, a thorough understanding of the core concepts is essential. This chapter aims to introduce you to the simplest possible Maven project and then presents some of the core concepts that make Maven a solid build platform. After reading it, you’ll have an fundamental understanding of the build lifecycle, Maven repositories, dependency management, and the Project Object Model (POM).
Downloading This Chapter’s Example
This chapter develops a very simple example that will be used to explore core concepts of Maven. If you follow the steps as described, you shouldn’t need to download the examples to recreate the code produced by Maven. We will be using the Maven Archetype plugin to create this simple project, and in this chapter we won’t modify the project in any way. If you would prefer to read this chapter with the final example source code, the example project may be downloaded with the book’s example code at http://www.sonatype.com/book/mvn-examples-1.0.zip or http://www.sonatype.com/book/mvn-examples-1.0.tar.gz. Unzip this archive in any directory, and then go to the ch03/ directory. There you will see a directory named simple/, which contains the source code for this chapter. If you wish to follow along with the example code in a web browser, go to http://www.sonatype.com/book/examples-1.0 and click on the ch03/ directory.
Creating a Simple Project
To start a new Maven project, use the Maven Archetype plugin from the command line:
$ mvn archetype:create -DgroupId=org.sonatype.mavenbook.ch03
                                         -DartifactId=simple
                                         -DpackageName=org.sonatype.mavenbook
[INFO] Scanning for projects...
[INFO] Searching repository for plugin with prefix: 'archetype'.
[INFO] artifact org.apache.maven.plugins:maven-archetype-plugin: checking for
       updates from central
[INFO] -----------------------------------------------------------------------
[INFO] Building Maven Default Project
[INFO]    task-segment: [archetype:create] (aggregator-style)
[INFO] --------------------------------------------------------------------
[INFO] [archetype:create]
[INFO] artifact org.apache.maven.archetypes:maven-archetype-quickstart:
       checking for updates from central
[INFO] Parameter: groupId, Value: org.sonatype.mavenbook.ch03
[INFO] Parameter: packageName, Value: org.sonatype.mavenbook
[INFO] Parameter: basedir, Value: /Users/tobrien/svnw/sonatype/examples
[INFO] Parameter: package, Value: org.sonatype.mavenbook
[INFO] Parameter: version, Value: 1.0-SNAPSHOT
[INFO] Parameter: artifactId, Value: simple
[INFO] * End of debug info from resources from generated POM *
[INFO] Archetype created in dir: /Users/tobrien/svnw/sonatype/examples/simple
mvn is the Maven 2 command.
archetype:create is called a Maven goal. If you
are familiar with Apache Ant, a Maven goal is analogous to
an Ant target; both describe a unit of work to be completed in a
build. The -Dname=value pairs are arguments that
are passed to the goal and take the form of -D
properties, similar to the system property options you might pass to
the Java Virtual Machine via the command line. The purpose of the
archetype:create goal is to quickly create a
project from an archetype. In this context, an archetype is defined as “an original model or type
after which other similar things are patterned; a prototype.”[2] A number of archetypes are available in Maven for
anything from a simple Swing application to a complex web application.
In this chapter, we are going to use the most basic archetype to
create a simple skeleton starter project. The plugin is the prefix
archetype, and the goal is create.
Once we’ve generated a project, take a look at the directory structure Maven created under the simple directory:
simple/simple/pom.xml
/src/ /src/main/
/main/java /src/test/
/test/java
This generated directory adheres to the Maven Standard Directory Layout. We’ll get into more details later in this chapter, but for now, let’s just try to understand these few basic directories:
-
The Maven Archetype plugin creates a directory that matches the
artifactId. Simple. This is known as the project’s base directory.-
Every Maven project has what is known as a Project Object Model (POM) in a file named pom.xml. This file describes the project, configures plugins, and declares dependencies.
-
Our project’s source code and resources are placed under src/main. In the case of our simple Java project, this will consist of a few Java classes and some properties files. In another project, this could be the document root of a web application or configuration files for an application server. In a Java project, Java classes are placed in src/main/java, and classpath resources are placed in src/main/resources.
-
Our project’s test cases are located in src/test. Under this directory, Java classes such as JUnit or TestNG tests are placed in src/test/java, and classpath resources for tests are located in src/test/resources.
The Maven Archetype plugin generated a single class
org.sonatype.mavenbook.App, which is a 13-line
Java class with a static main function that prints out a
message:
package org.sonatype.mavenbook;

/**
 * Hello world!
 *
 */
public class App
{
    public static void main( String[] args )
    {
        System.out.println( "Hello World!" );
    }
}
The simplest Maven archetype generates the simplest possible program: a program that prints “Hello World!” to standard output.
Building a Simple Project
Once you have created the project with the Maven Archetype plugin by following the directions from the previous section (Creating a Simple Project”) you will want to build and package the application. To do so, run mvn install from the directory that contains the pom.xml:
$ mvn install
[INFO] Scanning for projects...
[INFO] -------------------------------------------------------
[INFO] Building simple
[INFO]    task-segment: [install]
[INFO] -------------------------------------------------------
[INFO] [resources:resources]
[INFO] Using default encoding to copy filtered resources.
[INFO] [compiler:compile]
[INFO] Compiling 1 source file to /simple/target/classes
[INFO] [resources:testResources]
[INFO] Using default encoding to copy filtered resources.
[INFO] [compiler:testCompile]
[INFO] Compiling 1 source file to /simple/target/test-classes
[INFO] [surefire:test]
[INFO] Surefire report directory: /simple/target/surefire-reports

-------------------------------------------------------
 T E S T S
-------------------------------------------------------
Running org.sonatype.mavenbook.AppTest
Tests run: 1, Failures: 0, Errors: 0, Skipped: 0, Time elapsed: 0.105 sec

Results :

Tests run: 1, Failures: 0, Errors: 0, Skipped: 0

[INFO] [jar:jar]
[INFO] Building jar: /simple/target/simple-1.0-SNAPSHOT.jar
[INFO] [install:install]
[INFO] Installing /simple/target/simple-1.0-SNAPSHOT.jar to
  ~/.m2/repository/org/sonatype/mavenbook/ch03/simple/1.0-SNAPSHOT/
  simple-1.0-SNAPSHOT.jar
You’ve just created, compiled, tested, packaged, and installed the simplest possible Maven project. To prove to yourself that this program works, run it from the command line:
$ java -cp target/simple-1.0-SNAPSHOT.jar org.sonatype.mavenbook.App
Hello World!
Simple Project Object Model
When Maven executes, it looks to the Project Object Model
for information about the project. The
POM answers such questions as: What type of project
is this? What is the project’s name? Are there any build
customizations for this project? Example 3-1 shows the default pom.xml file created by the Maven Archetype
plugin’s create goal.
<project xmlns="http://maven.apache.org/POM/4.0.0"
         xmlns:xsi="http://www.w3.org/2001/XMLSchema-instance"
         xsi:schemaLocation="http://maven.apache.org/POM/4.0.0
         http://maven.apache.org/maven-v4_0_0.xsd">
  <modelVersion>4.0.0</modelVersion>
  <groupId>org.sonatype.mavenbook.ch03</groupId>
  <artifactId>simple</artifactId>
  <packaging>jar</packaging>
  <version>1.0-SNAPSHOT</version>
  <name>simple</name>
  <url>http://maven.apache.org</url>
  <dependencies>
    <dependency>
      <groupId>junit</groupId>
      <artifactId>junit</artifactId>
      <version>3.8.1</version>
      <scope>test</scope>
    </dependency>
  </dependencies>
</project>
This pom.xml file is the
most basic POM you will ever deal with for a Maven
project. Usually a POM file is considerably more
complex, defining multiple dependencies and customizing plugin
behavior. The first few elements—groupId,
artifactId, packaging,
version—are known as the Maven coordinates, which uniquely identify
a project. name and url are
descriptive elements of the POM, providing a
human-readable name and associating the project with a project web
site. Lastly, the dependencies
element defines a single, test-scoped dependency on a unit testing
framework called JUnit. These topics will be further introduced in the
next section, Core Concepts,” and in Chapter 9. All you need to know at this point is
that the pom.xml is the file that
makes Maven go.
Maven always executes against an effective POM, a combination of settings from this project’s pom.xml, all parent POMs, a Super POM defined within Maven, user-defined settings, and active profiles. All projects ultimately extend the Super POM, which defines a set of sensible default configuration settings and which is fully explained in Chapter 9. Although your project might have a relatively minimal pom.xml, the contents of your project’s POM are interpolated with the contents of all parent POMs, user settings, and any active profiles. To see this “effective” POM, run the following command in the simple project’s base directory:
$ mvn help:effective-pom
When you run this, you should see a much larger POM that exposes the default settings of Maven. This goal can come in handy if you are trying to debug a build and want to see how all of the current project’s ancestor POMs are contributing to the effective POM. For more information about the Maven Help plugin, see Using the Maven Help Plugin” in Chapter 2.
Core Concepts
Now that we’ve just run Maven for the first time, this is a good point to introduce a few of the core concepts of Maven. In Example 3-1, you generated a project that consisted of a POM and some code assembled in the Maven Standard Directory Layout. You then executed Maven with a lifecycle phase as an argument that prompted Maven to execute a series of Maven plugin goals. Lastly, you installed a Maven artifact into your local repository. Wait—what is a “lifecycle”? What is a “local repository”? The following section defines some of Maven’s central concepts.
Maven Plugins and Goals
In the previous section, we ran Maven with two different types
of command-line arguments. The first command was a
single plugin goal, the create goal of the
Archetype plugin. The second execution of Maven was a lifecycle
phase, install. To execute a single Maven plugin goal, we used the
syntax mvn archetype:create,
where archetype is the identifier of a plugin and
create is the identifier of a goal. When Maven
executes a plugin goal, it prints out the plugin identifier and goal
identifier to standard output:
$ mvn archetype:create -DgroupId=org.sonatype.mavenbook.ch03
                                        -DartifactId=simple
                                        -DpackageName=org.sonatype.mavenbook
...
[INFO] [archetype:create]
[INFO] artifact org.apache.maven.archetypes:maven-archetype-quickstart:
       checking for updates from central
...
A Maven plugin is a collection of one or more goals (see Figure 3-1). Examples of Maven plugins can be simple core plugins such as the Jar plugin that contains goals for creating JAR files, the Compiler plugin that contains goals for compiling source code and unit tests, or the Surefire plugin that contains goals for executing unit tests and generating reports. Other, more specialized Maven plugins include the Hibernate3 plugin, for integration with the popular persistence library Hibernate, and the JRuby plugin, which allows you to execute Ruby as part of a Maven build or to write Maven plugins in Ruby. Maven also provides you with the ability to define custom plugins. A custom plugin can be written in any number of languages, including Java, Ant, Groovy, BeanShell, and, as previously mentioned, Ruby.
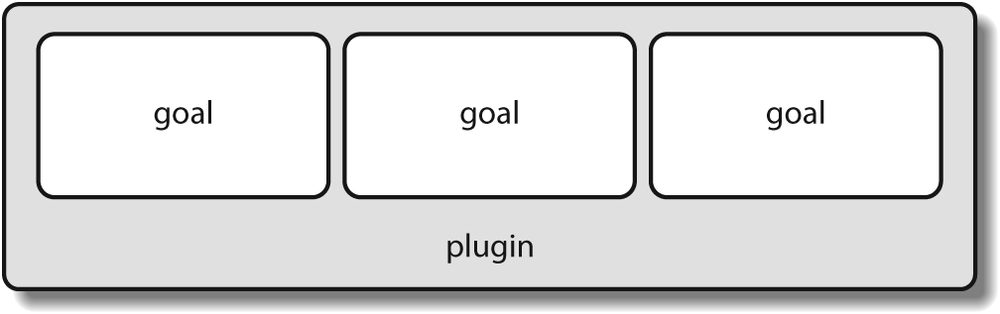
A goal is a specific task that may be executed as a
standalone goal or along with other goals as part of a larger
build. A goal is a “unit of work” in Maven. Examples of goals
include the compile goal in the Compiler plugin,
which compiles all of the source code for a project, or the
test goal of the Surefire plugin, which can
execute unit tests. Goals are configured via configuration
properties that can be used to customize behavior. For example, the
compile goal of the Compiler plugin defines a set
of configuration parameters
that allow you to specify the target JDK version or whether to use
the compiler optimizations. In
the previous example, we passed in the configuration parameters groupId
and artifactId to the create
goal of the Archetype plugin via the command-line parameters
-DgroupId=org.sonatype.mavenbook.ch03 and
-DartifactId=simple. We also passed the
packageName parameter to the create goal as
org.sonatype.mavenbook. If we had omitted the
packageName parameter, the package name would
have defaulted to
org.sonatype.mavenbook.ch03.
Note
When referring to a plugin goal, we frequently use the
shorthand notation: pluginId:goalId.
For example, when referring to the create goal in the Archetype plugin,
we write archetype:create.
Goals define parameters that can define sensible default
values. In the
archetype:create example, we
did not specify what kind of archetype the goal was to create on our
command line; we simply passed in a groupId and
an artifactId. This is our first brush
with convention over configuration.
The convention, or default, for the create goal
is to create a simple project called Quickstart. The
create goal defines a configuration property
archetypeArtifactId that has a default value of
maven-archetype-quickstart.
The Quickstart archetype generates a minimal project shell that
contains a POM and a single class. The Archetype
plugin is far more powerful than this first example suggests, but it
is a great way to get new projects started fast. Later in this book,
we’ll show you how the Archetype plugin can be used to generate more
complex projects such as web applications, and how you can use the
Archetype plugin to define your own set of projects.
The core of Maven has little to do with the specific tasks involved in your project’s build. By itself, Maven doesn’t know how to compile your code or even how to make a JAR file. It delegates all of this work to Maven plugins like the Compiler plugin and the Jar plugin, which are downloaded on an as-needed basis and periodically updated from the central Maven repository. When you download Maven, you are getting the core of Maven, which consists of a very basic shell that knows only how to parse the command line, manage a classpath, parse a POM file, and download Maven plugins as needed. By keeping the Compiler plugin separate from Maven’s core and providing for an update mechanism, Maven makes it easier for users to have access to the latest options in the compiler. In this way, Maven plugins allow for universal reusability of common build logic. You are not defining the compile task in a build file; you are using a Compiler plugin that is shared by every user of Maven. If there is an improvement to the Compiler plugin, every project that uses Maven can immediately benefit from this change. (And, if you don’t like the Compiler plugin, you can override it with your own implementation.)
Maven Lifecycle
The second command we ran in the previous section was mvn install.
This command didn’t specify a plugin goal; instead, it specified a
Maven lifecycle phase. A phase is a step in what Maven calls the
“build lifecycle.” The build lifecycle is an ordered sequence of
phases involved in building a project. Maven can support a number of
different lifecycles, but the one that’s most often used is the
default Maven lifecycle, which begins with a phase to
validate the basic integrity of the project and ends with a phase
that involves deploying a project to production. Lifecycle phases
are intentionally vague, defined solely as validation, testing, or
deployment, and they may mean different things to different
projects. For example, the package phase in a
project that produces a JAR, means “package this
project into a JAR”; in a project that produces a web application,
the package phase may produce a
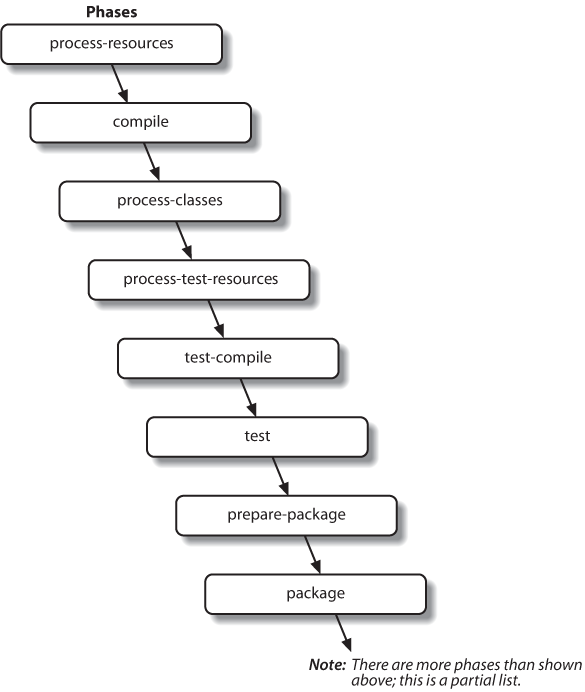
WAR file. Figure 3-2
shows a simplified representation of the default Maven
lifecycle.
Plugin goals can be attached to a lifecycle phase. As Maven moves through the
phases in a lifecycle, it will execute the goals attached to each
particular phase. Each phase may have zero or more goals bound to
it. In the previous section, when you ran mvn install, you might have noticed that
more than one goal was executed. Examine the output after running
mvn install and take note of the
various goals that are executed. When this simple example reached
the package phase, it executed the
jar goal in the Jar plugin. Since our simple
Quickstart project has (by default) a jar
packaging type, the jar:jar goal is bound to the
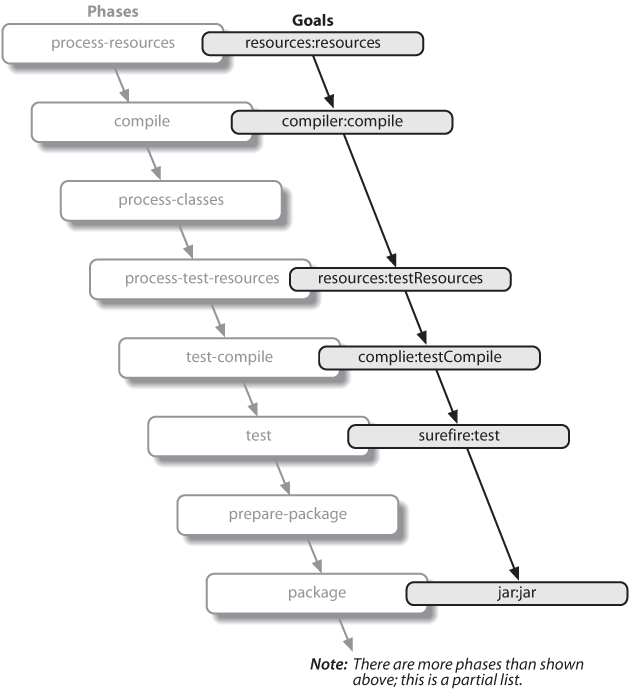
package phase (see Figure 3-3).

We know that the package phase is going to
create a JAR file for a project with
jar packaging. But what of the goals preceding
it, such as compiler:compile and surefire:test? These goals are
executed as Maven steps through the phases preceding
package in the Maven lifecycle; executing a phase will first execute
all proceeding phases in order, ending with the phase specified on
the command line. Each phase corresponds to zero or more goals, and
since we haven’t performed any plugin configuration or
customization, this example binds a set of standard plugin goals to
the default lifecycle. The following goals are executed in order
when Maven walks through the default lifecycle ending with
package:
resources:resourcesThe
resourcesgoal of the Resources plugin is bound to theprocess-resourcesphase. This goal copies all of the resources from src/main/resources and any other configured resource directories to the output directory.compiler:compileThe
compilegoal of the Compiler plugin is bound to thecompilephase. This goal compiles all of the source code from src/main/java or any other configured source directories to the output directory.resources:testResourcesThe
testResourcesgoal of the Resources plugin is bound to theprocess-test-resourcesphase. This goal copies all of the resources from src/test/resources and any other configured test resource directories to a test output directory.compiler:testCompileThe
testCompilegoal of the Compiler plugin is bound to thetest-compilephase. This goal compiles test cases from src/test/java and any other configured test source directories to a test output directory.surefire:testThe
testgoal of the Surefire plugin is bound to thetestphase. This goal executes all of the tests and creates output files that capture detailed results. By default, this goal will terminate a build if there is a test failure.jar:jarThe
jargoal of the Jar plugin is bound to thepackagephase. This goal packages the output directory into a JAR file.
To summarize, when we run mvn
install, Maven executes all phases up to
install, and in the process of stepping through
the lifecycle phases, it executes all goals bound to each phase (see
Figure 3-4). Instead
of executing a Maven lifecycle goal, you could achieve the same
results by specifying a sequence of plugin goals as follows:
mvn resources:resources
    compiler:compile
    resources:testResources
    compiler:testCompile
    surefire:test
    jar:jar
Executing the package phase is preferable
to keeping track of all of the goals involved in a particular build.
It also allows every project that uses Maven to adhere to a
well-defined set of standards. The lifecycle is what allows a
developer to jump from one Maven project to another without having
to know very much about the details of each particular project’s
build. If you can build one Maven project, you can build them
all.
Maven Coordinates
The Archetype plugin created a project with a file
named pom.xml. This is
the Project Object Model (POM), a declarative
description of a project. When Maven executes a goal, each goal has
access to the information defined in a project’s
POM. When the jar:jar goal
needs to create a JAR file, it looks to the
POM to find out what the JAR file’s name is. When
the compiler:compile task compiles Java source
code into bytecode, it looks to the POM to see if
there are any parameters for the compile goal. Goals execute in the
context of a POM. Goals are actions we wish to
take upon a project, and a project is defined by a
POM. The POM names the
project, provides a set of unique identifiers (coordinates) for a
project, and defines the relationships between this project and
others through dependencies, parents, and prerequisites. A
POM can also customize plugin behavior and supply
information about the community and developers involved in a
project.
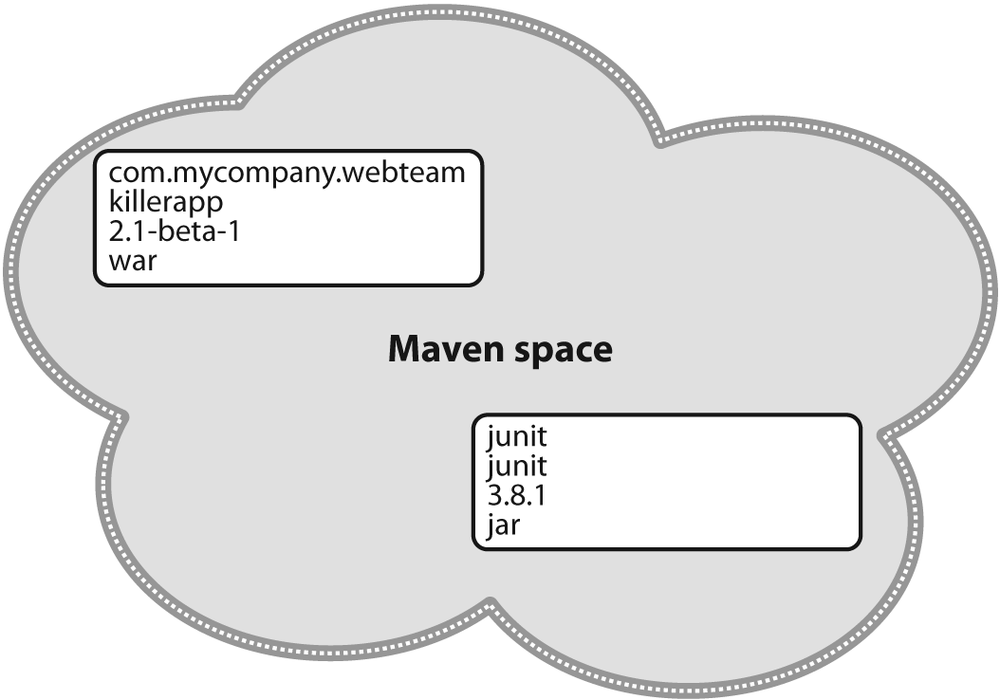
Maven coordinates define a set of identifiers that can be used to uniquely identify a project, a dependency, or a plugin in a Maven POM. Take a look at the POM shown in Figure 3-5.
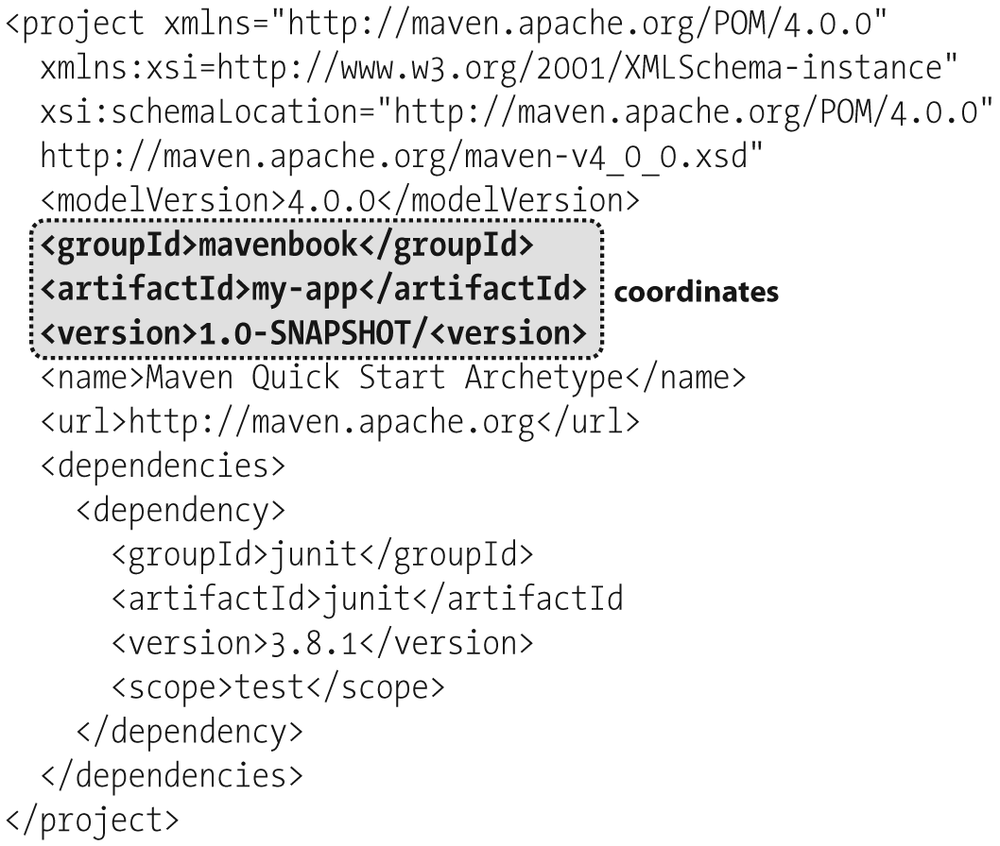
We’ve highlighted the Maven coordinates for this project:
groupId, artifactId, version and
packaging. These combined identifiers make up a
project’s coordinates.[3] Just as in any other coordinate system, a Maven
coordinate is an address for a specific point in “space”: from
general to specific. Maven pinpoints a project via its coordinates
when one project relates to another, either as a dependency, a
plugin, or a parent project reference. Maven coordinates are often
written using a colon as a delimiter in the following format:
groupId:artifactId:packaging:version. In the pom.xml file for our current project, its
coordinate is represented as
mavenbook:my-app:jar:1.0-SNAPSHOT. This notation also
applies to project dependencies. Our project relies on JUnit version
3.8.1, and it contains a dependency on
junit:junit:jar:3.8.1. Here is some more
information about each part of the coordinate:
groupIdThe group, company, team, organization, project, or other group. The convention for group identifiers is that they begin with the reverse domain name of the organization that creates the project. Projects from Sonatype would have a
groupIdthat begins with com.sonatype, and projects in the Apache Software Foundation would have agroupIdthat starts with org.apache.artifactIdA unique identifier under
groupIdthat represents a single project.versionA specific release of a project. Projects that have been released have a fixed version identifier that refers to a specific version of the project. Projects undergoing active development can use a special identifier that marks a version as a
SNAPSHOT.
The packaging format of a project is also an important
component in the Maven coordinates, but it isn’t a part of a
project’s unique identifiers. A project’s
groupId:artifactId:version make
that project unique; you can’t have a project with the same three
groupId, artifactId, and
version identifiers.
These four elements become the key to locating and using one particular project in the vast space of other “Mavenized” projects (see Figure 3-6). Maven repositories (public, private, and local) are organized according to these identifiers. When this project is installed into the local Maven repository, it immediately becomes locally available to any other project that wishes to use it. All you must do is add it as a dependency of another project using the unique Maven coordinates for a specific artifact.
Maven Repositories
When you run Maven for the first time, you will notice that
Maven downloads a number of files from a remote Maven repository. If
the simple project described in this chapter is the first time you
run Maven, the first thing it will do is download the latest release
of the Resources plugin when it triggers the
resources:resource goal. In Maven, artifacts and
plugins are retrieved from a remote repository when they are needed.
One of the reasons the initial Maven download is so small (1.5 MiB)
is that Maven doesn’t ship with much in the way of plugins. Maven
ships with the bare minimum and fetches from a remote repository
when it needs to. Maven ships with a default remote repository
location (http://repo1.maven.org/maven2),
which it uses to download the core Maven plugins and
dependencies.
Often you will be writing a project that depends on libraries that are neither free nor publicly distributed. In that case, you will either need to set up a custom repository inside your organization’s network or download and install the dependencies manually. The default remote repositories can be replaced or augmented with references to custom Maven repositories maintained by your organization. Multiple products are available that allow organizations to manage and maintain mirrors of the public Maven repositories.
What makes a Maven repository? It’s defined by structure. A
repository is a collection of project artifacts stored in a
structure and format that can be easily understood by Maven.
Everything is stored in a directory structure that closely matches a
project’s coordinates. You can see this structure by opening up a
web browser and going to the central Maven repository at http://repo1.maven.org/maven2/. You will notice that
an artifact with the coordinates
org.apache.commons:commons-email:1.1 is available
under the directory /org/apache/commons/commons-email/1.1/ in
a file named commons-email-1.1.jar. The standard for a
Maven repository is to store an artifact in a directory relative to
the root of the repository:
/<groupId>/<artifactId>/<version>/<artifactId>-<version>.<packaging>
Maven downloads artifacts and plugins from a remote repository
to your local machine and stores these artifacts in your
local Maven repository. Once Maven has downloaded an artifact from
the remote repository, it never needs to download that artifact
again, as Maven will always look for the artifact in the local
repository before looking elsewhere. On Windows XP, your local
repository is likely in C:Documents and
SettingsUSERNAME.m2
epository, and on Windows Vista,
your local repository is in C:UsersUSERNAME.m2
epository. On
Unix systems, your local Maven repository is available in ~/.m2/repository. When you build a
project such as the simple one you created in the previous section,
the install phase executes a goal that installs
your project’s artifacts in your local Maven repository.
In your local repository, you should be able to see the artifact created by your simple project. If you run the mvn install command, Maven will install our project’s artifact in your local repository. Try it:
$ mvn install
...
[INFO] [install:install]
[INFO] Installing .../simple-1.0-SNAPSHOT.jar to
       ~/.m2/repository/org/sonatype/mavenbook/simple/1.0-SNAPSHOT/
       simple-1.0-SNAPSHOT.jar
...
As you can see from the output of this command, Maven
installed our project’s JAR file into our local
repository. Maven uses the local repository to share dependencies
across local projects. If you develop two projects—project-a and project-bproject-b depends on the artifact produced
by project-a, Maven will retrieve
project-a’s artifact from your
local repository when it is building project-b. A Maven repository is both a
local cache of artifacts downloaded from a remote repository and a
mechanism for allowing your projects to depend on each other.
Maven’s Dependency Management
In this chapter’s simple example project, Maven resolved
the coordinates of the JUnit
dependency—junit:junit:3.8.1—to a path in a Maven
repository: /junit/junit/3.8.1/junit-3.8.1.jar. The
ability to locate an artifact in a repository based on Maven
coordinates gives us the ability to define dependencies in a
project’s POM. If you examine the simple
project’s pom.xml file, you
will see that there is a section that deals with dependencies, and that this section
contains a single dependency—JUnit.
A more complex project would contain more than one dependency, or it might contain dependencies that depend on other artifacts. Support for transitive dependencies is one of Maven’s most powerful features. Let’s say your project depends on a library that, in turn, depends on 5 or 10 other libraries (Spring or Hibernate, for example). Instead of having to track down all of these dependencies and list them in your pom.xml explicitly, you can simply depend on the library you are interested in and Maven will add the dependencies of this library to your project’s dependencies implicitly. Maven will also take care of working out conflicts between dependencies, and provides you with the ability to customize the default behavior and exclude certain transitive dependencies.
Let’s take a look at a dependency that was downloaded to your local repository when you ran the previous example. Look in your local repository path under ~/.m2/repository/junit/junit/3.8.1/. If you have been following this chapter’s examples, there will be a file named junit-3.8.1.jar and a junit-3.8.1.pom file, in addition to a few checksum files that Maven uses to verify the authenticity of a downloaded artifact. Note that Maven doesn’t just download the JUnit JAR file, it also downloads a POM file for the JUnit dependency. The fact that Maven downloads POM files in addition to artifacts is central to Maven’s support for transitive dependencies.
When you install your project’s artifact in the local repository, you will also notice that Maven publishes a slightly modified version of the project’s pom.xml file in the same directory as the JAR file. Storing a POM file in the repository gives other projects information about this project, most importantly what dependencies it has. If Project B depends on Project A, it also depends on Project A’s dependencies. When Maven resolves a dependency artifact from a set of Maven coordinates, it also retrieves the POM and consults the dependencies POM to find any transitive dependences. These transitive dependencies are then added as dependencies of the current project.
A dependency in Maven isn’t just a JAR file; it’s a POM file that, in turn, may declare dependencies on other artifacts. These dependencies of dependencies are called transitive dependencies, and they are made possible by the fact that the Maven repository stores more than just bytecode; it stores metadata about artifacts. Figure 3-7 shows a possible scenario for transitive dependencies.
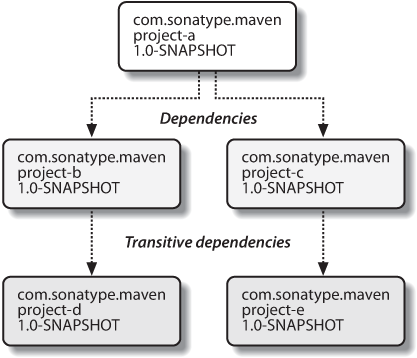
In this figure, project-a
depends on project-b and project-c, project-b depends on project-d, and project-c depends on project-e. The full set of direct and
transitive dependencies for project-a would be project-b, project-c, project-d, and project-e, but all project-a has to do is define a dependency
on project-b and project-c. Transitive dependencies come in
handy when your project relies on other projects with several small
dependencies (such as Hibernate, Apache Struts, or the Spring
Framework). Maven also provides you with the ability to exclude
transitive dependencies from a project’s classpath.
Maven also provides for different dependency scopes. The
simple project’s pom.xml contains a single
dependency—junit:junit:jar:3.8.1—with a scope of
test. When a dependency has a scope of
test, it will not be available to the
compile goal of the Compiler plugin. It will be
added to the classpath for only the
compiler:testCompile and
surefire:test goals.
When you create a JAR for a project,
dependencies are not bundled with the generated artifact; they are
used only for compilation. When you use Maven to create a
WAR or an EAR file, you can
configure Maven to bundle dependencies with the generated artifact,
and you can also configure it to exclude certain dependencies from
the WAR file using the
provided scope. The provided
scope tells Maven that a dependency is needed for compilation, but
should not be bundled with the output of a build. This scope comes
in handy when you are developing a web application. You’ll need to
compile your code against the Servlet specification, but you don’t
want to include the Servlet API
JAR in your web application’s WEB-INF/lib directory.
Site Generation and Reporting
Another important feature of Maven is its ability to generate documentation and reports. In your simple project’s directory, execute the following command:
$ mvn site
This will execute the site lifecycle phase.
Unlike the default build lifecycle that manages generation of code,
manipulation of resources, compilation, packaging, etc., this
lifecycle is concerned solely with processing site content under the
src/site directories and
generating reports. After this command executes, you should see a
project web site in the target/site directory. Load target/site/index.html and you should see
a basic shell of a project site. This shell contains some reports
under “Project Reports” in the lefthand navigation menu, and it also
contains information about the project, the dependencies, and
developers associated with it under “Project Information.” The
simple project’s web site is mostly empty, since the
POM contains very little information about itself
beyond a coordinate, a name, a URL, and a single
test dependency.
On this site, you’ll notice that some default reports are available. A unit test report communicates the success and failure of all unit tests in the project. Another report generates Javadoc for the project’s API. Maven provides a full range of configurable reports, such as the Clover report that examines unit test coverage, the JXR report that generates cross-referenced HTML source code listings useful for code reviews, the PMD report that analyzes source code for various coding problems, and the JDepend report that analyzes the dependencies between packages in a codebase. You can customize site reports by configuring which reports are included in a build via the pom.xml file.
Summary
In this chapter, we have created a simple project, packaged the project into a JAR file, installed that JAR into the Maven repository for use by other projects, and generated a site with documentation. We accomplished this without writing a single line of code or touching a single configuration file. We also took some time to develop definitions for some of the core concepts of Maven. In the next chapter, we’ll start customizing and modifying our project pom.xml file to add dependencies and configure unit tests.