
IN THIS CHAPTER
“Friday night is “make-it”. After the meeting we slip away into the darkness, the cold night flogging us with a primal urgency. Tonight we hack Dallas. Crouched in a tricked-out SUV—ebony with tinted windows— the bizarre array of protruding antennas makes us a giant insect. We crawl along the Richardson Telecom Corridor, our faces deathly pallid in the glow of a laptop. It starts immediately, the walls of network security melting around us like ice. Within moments, the largest networks fly open. Nortel—28 access points—all wide open. Driving a little farther, our antenna starts to hum. Fujitsu, Ericsson, Alcatel…hundreds of unsecured portals streaming down our laptop in a torrent. A few are encrypted, albeit weakly, but most are bereft of even a password. And we know that they are ours. And we feel ourselves rising, towering above these buildings of steel and glass, and like gods we look down on them in scorn and pity. And then we enter…” | ||
| --from Windows .NET Server Security Handbook | ||
Wireless technology and Internet security are two of the fastest growing technology trends, according to a leading information security magazine. However, these two fields have developed upon discrete paths. When wireless and security finally collided, the results were disastrous. For example, in this chapter, we address wireless local area network (WLAN) security concerns. Specifically, we cover war driving, which is the process of auditing wireless networks while mobile. With nascent wireless community networks set to explode, and to potentially usurp the dominion of traditional Internet bandwidth providers, this material becomes crucial.
This is meant to be a practical chapter. We will show you how to choose your equipment, how to set up your test lab, and how to start auditing your wireless networks. In addition, we will briefly introduce how to crack the Wired Equivalent Privacy (WEP) algorithm, which is part of the 802.11 wireless standard.
The information covered in this chapter often shows up in certification exams such as the Wireless Security Expert Certification (WSEC), which is the most difficult, most widely recognized, and most respected wireless security certification in the world. Thus, this material can help you cram for your WSEC exam.
The following sections review the very best hardware used in setting up a typical wireless LAN, including access points, Wireless Network Cards, antennas, and PDAs. We then cover war driving as seen by real experts in the field.
One final point before we begin—remember that all of the techniques in this chapter are available freely on the Web, and are well known to hackers and criminals. We are simply summarizing the information here so that honest administrators will at least have a fighting chance to protect their own networks. So grab your equipment and start legitimately auditing your own network—before someone maliciously does it for you!
Wireless Local Area Networks (WLANs) and their topologies differ from those of traditional wired Ethernet networks, but not by much. The premise of WLANs is the same as their hardwired counterparts, with a few minor variations. Let’s begin by examining wireless peer networks.
Peer networks, also known as ad-hoc networks, are mostly used in smaller-scale implementations where there are only a few clients in close proximity of each other. This type of network can best be compared with a peer-to-peer network in which there is no central point of management, and all clients are left to themselves to communicate with one another. In a peer topology, clients communicate directly to other clients without any intermediary point. This type of wireless network is most commonly used as an alternative to infrared (IR) when two people want to transfer files between two sources.
Larger corporate environments require additional central control and the capability to manage clients more effectively. This is achieved with an Infrastructure type of topology. When wireless clients are put into Infrastructure mode, they look for a device called an access point and use it to send data to other networked clients. You can think of this access point (AP) as being analogous to a wired network’s gateway and hub. The AP receives traffic from multiple clients like a hub, but it also serves as a gateway for the wireless clients to access the wired network beyond. It will also do this in reverse, allowing the wired network to access the wireless one. Some access points even have advanced features such as Network Address Translation (NAT) and basic packet filtering. On a fairly regular basis, an access point will send out a beacon broadcast announcing its presence. Wireless clients then receive these beacons and attempt to connect to the network associated with the access point. Once a client has been authenticated and authorized by the access point, it is the same as the client being given an Ethernet connection to the wired network. Unless other restrictions are in place, the wireless clients will then be able to do everything as if they were directly connected via a cable to the network. An Infrastructure topology does not necessarily indicate a connection to a larger wired network. Quite often, this type of topology is used to allow multiple clients to access common resources on a wireless network without the use of any wired devices.
Wireless networks in Infrastructure mode can be located practically anywhere within a company’s regular network topology. However, clients in Peer mode would not have the capability to access the resources of a larger supporting wired network without the use of additional routing resources. In addition, the clients in Peer mode must be located within a close proximity of each other, while the clients using Infrastructure mode are only bound by the constraints of the wired or wireless network that they help comprise.
As a wireless network auditor (or ethical hacker), a good antenna will make your job easier. There are two primary types of antennas used on wireless networks— omni-directional and directional. Omni-directional antennas can receive and transmit from all sides (360 degrees). These are useful when covering a large room, or for providing general coverage. Contrary to popular belief, a true omni-directional antenna is not capable of having any gain. Most antennas sold as omni-directional do not send the radio frequency in all directions. The design of the antenna will null the signal on the Y-axis, and concentrate the power across the X-axis.
Directional antennas take the radio frequency (RF) energy and concentrate it in a specific direction. This can be compared to a naked light bulb versus a flashlight. The light bulb would be similar to the omni-directional antenna, as it gives off light in all directions equally. In contrast, the flashlight (similar to the directional antenna) focuses the light bulb with the help of a reflector, and concentrates it in a single direction. Directional antennas are helpful when you are creating point-to-point wireless links, or when you are trying to reduce the RF signal “bleed” in a specific location.
The following sections will review wireless hardware that we personally recommend. The results are based on testing that we performed for our book, Maximum Wireless Security (Sams, 2002). Let’s first examine access points, which are a crucial part of WLANs.
There are many different manufacturers of access points, and all of them perform essentially the same function. However, there are substantial differences in security and features among the various vendors. For example, some access points are capable of restricting user connections based on the MAC address (unique product identifier) of the Wireless Network Card, while others have the capability to turn off the beacon broadcast, making the access point invisible to hacking programs. Fortunately, advanced security features such as these are becoming more common in SOHO (small office/home office) access points.
In our 2002 field survey of more than 1,300 access points in five cities, Cisco was the leader with 39.7%. Lucent had 19.2%, while Linksys had 17.1%; the remaining 24% were from various other manufacturers. Interestingly, the Linksys access points that are designed for SOHO use are finding their way into the corporate workplace at a rapid pace. This could be because of their low cost, wide availability, the addition of MAC restriction, and the capability to control whether the card broadcasts. However, with the more expensive Cisco AP holding the majority, we can infer that a good deal of money is being spent on the expansion and development of internal, corporate wireless networks. The following section will review APs that we recommend from personal experience.
Homepage: http://www.linksys.com
The Linksys WAP11 is a simple but effective low cost/high performance access point. Previously, the widespread use of the WAP11 was held back by its lack of security features. Fortunately, however, this has been resolved. As of firmware version (1.4i.1), the device has several new capabilities, such as the capability to disable the beacon broadcast and to restrict connections based on the client’s MAC address.
Administration of the WAP11 requires client-based software and is performed via a USB interface or SNMP over an Ethernet connection (not wireless). Some of the features that were added in the 1.4i.1 firmware require the use of the SNMP interface. However, the settings are only viewable when using a USB interface. When we contacted them, Linksys support was unclear as to why the features are not configurable from both interfaces. They also indicated that this would not be changed in the future. Nevertheless, the administration interface is a joy to navigate and configure in both cases.
The WAP11 features two antennas that can be configured for dedicated sending and receiving. By default, the access point is configured to use each antenna to both send and receive transmissions. Having the capability to configure how the antennas are used can maximize the WAP11’s capability to work in almost any environment. The WAP11 uses a standard (RP-TNC) connector making the default antennas replaceable with higher-gain aftermarket products. This is useful for helping you limit coverage to specific areas, or in directing coverage into a specific area. Please see the section titled “Antennas” later in this chapter for more information on this topic.
Homepage: http://www.netgear.com
The NetGear ME102 is a fully functional access point packed into a very small package. Measuring only 6.4 inches long, 5.6 inches wide, and 1.1 inches high, it is one of the smallest access points on the market. This makes it perfect for traveling, or for use in any area where space is a consideration. However, do not let the small size fool you. With the 1.4h3 firmware upgrade, the ME102 is capable of 128-bit WEP encryption, point-to-point and point-to-multipoint configurations, and enhanced access point client features with MAC address restriction.
Administration of the ME102 requires client-based software, and is done via a USB interface or SNMP over an Ethernet connection (not wireless). To access and configure the MAC restriction, you must use the SNMP interface. In addition, a statistics page is also available via SNMP that shows various stats for the wireless and Ethernet interfaces on the access point. Another useful feature of the ME102 is the capability to set multiple passwords for the administration interface. This allows an administrator to keep her password a secret while allowing a user to check out the configurations on the access point. While logged in as the user, you are able to browse all configurations, but you are not permitted to change any settings.
In several tests, we found that the ME102 exceeded our expectations in overall functionality and total usability. This access point is very powerful, and is perfect for many situations. Although not quite in the same class as enterprise-level access points, this one will definitely provide you with great value for the money spent.
Almost everyone uses at least one antenna each day. In fact, the majority of people use antennas for many conveniences in their daily life, whether they realize it or not. Devices such as keyless entry systems, freeway toll passes, satellite TV systems, pagers, cell phones, and wireless networks all require antennas. Very few people that use these antennas can explain how and why they work. Let’s take a brief look at antenna technology, and how antennas relate to radio frequency (that is, wireless) networks.
Antennas are merely an extension of a radio transmitter or receiver. As a signal is generated, it is passed from the radio to the antenna to be sent out over the air and received by another antenna and then passed to another radio. The signal that is generated and later transmitted is measured in Hertz (Hz); not the car rental company, but rather a measurement unit of cycles per second. This is better defined as the amount of time it takes a radio wave to complete a full cycle. Imagine that you have a Slinky (a coiled metal spring) on a smooth surface with one end attached to the floor. If you start to move the other end from side to side, you will begin to create waves. These waves represent the radio frequency energy being sent out over the air. By moving your hand side to side at a slow pace, thus creating longer waves, you are creating a low frequency. If you speed up the movement from side to side, making the waves shorter but more frequent, you are generating a higher frequency. Lower frequencies generally have the capability to travel further distances, but are more subject to interference from objects such as building and trees, which block the signal. A higher frequency has a better capability to penetrate buildings and other obstructions, but it has a limited distance.
For example, consider your local FM radio station. If they broadcast their signal on 103.5MHz, this translates to 103,500,000 cycles per second. Their signal can be heard all over your city, even inside buildings and houses, with very little interruption. Meanwhile, an AM radio station two states away is broadcasting on 1320KHz, which translates to 1,320,000 cycles per second. With the correct antenna placed outside you can receive their signal from a longer distance, but with the added difficulty of needing to adjust your antenna.
Antennas are fundamental components to the transmission of radio frequencies. In many situations, a lower power signal transmitted using a good antenna can arrive at its destination with more accuracy than a high-powered signal transmitted using a poor antenna.
Antennas are rated by the amount of gain that they provide. Gain is the increase in power you get by using a directional antenna. The overall gain is compared to a theoretical isotropic antenna. Isotropic antennas cannot exist in the real world, but they serve as a common point of reference.
A dipole antenna has 2.14-dB gain over a 0-dBi isotropic antenna. So if an antenna gain is given in dBd and not dBi, add 2.15 to it to get the dBi value.
If an antenna’s gain is just specified as dB, check with the manufacturer if the rating is dBi or dBd. If they cannot tell you, or simply do not know, save your money and go someplace else.
As stated previously, most antennas are sold with gain measured in dBi, but this is not the only factor to consider when evaluating overall performance. For example, the power input to the antenna plays a major part. Most 802.11b wireless cards transmit 32mW of power. Looking at the conversion chart in Table 27.1, you can see that 32mW (the Po column stands for “Power”) is equal to 15dBm. The dBm is calculated by the following equation:
Table 27.1. dBm to Power Conversion Chart
dBm | Po | dBm | Po |
|---|---|---|---|
53 | 200W | 25 | 320mW |
50 | 100W | 24 | 250mW |
49 | 80W | 23 | 200mW |
48 | 64W | 22 | 160mW |
47 | 50W | 21 | 125mW |
46 | 40W | 20 | 100mW |
45 | 32W | 19 | 80mW |
44 | 25W | 18 | 64mW |
43 | 20W | 17 | 50mW |
42 | 16W | 16 | 40mW |
41 | 12.5W | 15 | 32mW |
40 | 10W | 14 | 25mW |
39 | 8W | 13 | 20mW |
38 | 6.4W | 12 | 16mW |
37 | 5W | 11 | 12.5mW |
36 | 4.0W | 10 | 10mW |
35 | 3.2W | 9 | 8mW |
34 | 2.5W | 8 | 6.4mW |
33 | 2W | 7 | 5mW |
32 | 1.6W | 6 | 4mW |
31 | 1.25W | 5 | 3.2mW |
30 | 1.0W | 4 | 2.5mW |
29 | 800mW | 3 | 2.0mW |
28 | 640mW | 2 | 1.6mW |
27 | 500mW | 1 | 1.25mW |
26 | 400mW | 0 | 1.0mW |
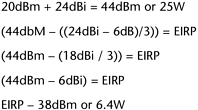
Why are these numbers important? Because they allow you to calculate Effective Isotropic Radiated Power (EIRP), also known as Effective Radiated Power (ERP). EIRP is the amount of power that is actually transmitted from the antenna. This information is necessary to help calculate how effective the antenna system is. EIRP also forms the basis of FCC laws regulating maximum output.
For instance, if you know that a typical card is transmitting 15dBm and you want to use, say, a 3-dBi antenna, you can use the following equation to calculate Effective Isotropic Radiated Power (EIRP):
The Federal Communication Commission (FCC) currently limits mobile 802.11 stations to 1W or 30dBm EIRP. Fixed stations are given a slight exception to the rule and are allowed to exceed the 1W limitation. When calculating for fixed stations, they are required to subtract 1dB for every 3dB over 6dBi of antenna gain. The following example demonstrates this for a Linksys WAP11 and a 24-dBi antenna:
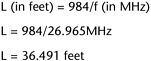
In addition to antenna gain and transmitter power, you should also consider the difference in sizes of antennas. Depending on the frequency and type of antenna, there will be a variety of sizes to choose from. The size of the antenna is directly related to the frequency for which it is used. For example, consider a CB radio installed in a car that operates between 26.965MHz (channel 1) and 27.405MHz (channel 40). If you want to have a full wavelength antenna for channel 1, it would need to be 36.491 feet long. This is calculated as follows:
Now compare that CB antenna to a full wavelength antenna used by a police officer to communicate with his dispatcher on 460.175MHz.
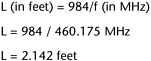
As you can see, there is a difference of about 34.349 feet between the two antennas. Fortunately for us, wireless 802.11b networks operate in the 2.4GHz or 2400MHz range, thus making the antennas very small.
The following section reviews antennas that are useful to you as a wireless network auditor. These are antennas that we have used and tested, and they come with our strong personal recommendation.
Homepage: http://www.hyperlinktech.com
The HG2415Y is a high quality Yagi (directional) antenna with very strong performance. The antenna weighs approximately 1.8 pounds, which makes it lightweight and extremely easy to install. It comes complete with two U-bolt mounting brackets that will allow the antenna to be connected to a mast up to 2 3/8” in diameter.
The antenna is supplied with a 24” pigtail that terminates in a choice of N, TNC, or SMA connectors. The part number that we tested (HG2415Y) corresponds to an antenna terminated in N Female. We used a CA-WL2CABLE1 to connect the antenna to an ORiNOCO PCMCIA card. Our initial tests revealed that while using this antenna, we were able to connect to our test access point from three times the distance, on an unamplified signal, using stock antennas on the access point.
This antenna is great for point-to-point links and is built to withstand the forces of Mother Nature. In fact, it is capable of surviving wind speeds of up to 150 miles per hour, so this antenna will perform under extreme conditions. Overall, this antenna is the top of the line, and should be one of your first choices.
Frequency: | 2400–2500MHz |
Gain: | 14.5 dBi |
-3dB Beam Width: | 30 degrees |
Impedance: | 50 Ohm |
Max. Input Power: | 50 Watts |
VSWR: | < 1.5:1 avg. |
Weight: | 1.8 lb. |
Length: | 19” long × 3” diameter |
Polarization: | Vertical |
Wind Survival: | > 150 MPH |
Homepage: http://www.hyperlinktech.com
The HyperLink HG2419G is also a very high performance tool. This high-gain, ultra-efficient antenna is extremely well-engineered. The antenna is built from durable, galvanized welded steel, and is coated with a light gray UV powdercoat, making it not only strong but also attractive.
Hyperlink makes three versions of this antenna: a 15-dBi, a 19-dBi (the model we tested for this book), and the granddaddy of them all, a 24-dBi model. In addition to offering high gain, this antenna is also extremely selective. By offering an eight-degree beam on the 24-dBi models, the antenna minimizes interference and maximizes power. As with most directional antennas, this one is best for point-to-point links connecting multiple networks. In our tests with the HG2919G, we were able to connect to our test access point with a solid connection from well over three times the distance, on an unamplified signal, using stock antennas on the access point.
The HG2419G can be mounted to a standard mast up to 2.5” in diameter, and the elevation can be adjusted up to fifteen degrees. This allows you to use it in a wide range of situations and makes it optimal for rooftop mounting. With its capability to select horizontal or vertical wave patterns, high gain ratings, tight beam width, and rugged construction, this antenna is one of the best on the market.
Homepage: http://www.signull.com
The SMISMCO10 is an omni-directional antenna designed for medium- to long-range multipoint applications. Standing at less than three feet tall and weighing less than a pound, this antenna packs quite a punch for its size.
Signull Technologies offers three versions, a 10-dBi (the model we tested for this chapter), 8-dBi, and a 5-dBi model. All three of these antennas are perfect for extending the coverage of corporate access points or wireless nodes. They can easily be mounted indoors to provide coverage for a cubical farm, or utilized in a warehouse to help provide coverage for wireless inventory devices. In addition, they are also suitable for outdoor mounting to help provide general coverage in a courtyard or parking lot. While testing the SMISMCO10, we found that it was capable of delivering the high performance that Signull has promised. With its firm construction, light weight, and superior performance, the SMISMCO10 is a useful addition to your wireless LAN.
Homepage: http://www.signull.com
This circular Yagi antenna from Signull Technologies is another of our favorites. In addition to great performance ratings, it has a truly stylish design—and isn’t style what wireless security is all about? In addition, because the body of the antenna is clear, you can see the internal design. This allows you to also use the antenna as an educational tool.
In our tests, we were able to increase our signal strength dramatically while directing this antenna toward our test access point. Signull Technologies offers this antenna in three models: 8-dBi, 12-dBi (the model we tested for this chapter), and 15-dBi. The 12-dBi antenna we tested seemed to have a sufficient performance boost, but depending on the application, the 15-dBi could be a better option.
Although the antenna’s design is attractive with its clear body, long-term exposure to weather may prove to be a problem. This makes the antenna more useful for mounting indoors or under a protective cover. Fortunately, its great looks do not affect its performance—the SMISMCY12 can really perform. This antenna is suitable for creating and linking wireless networks, and you should consider purchasing it.
Homepage: http://www.technolab-inc.com
This Yagi antenna from TechnoLab is truly one of a kind. Its low profile and small design make it a great indoor directional antenna. In addition, by placing this antenna on the outer perimeter of a building, you can easily create building-to-building links.
Our tests revealed that this little antenna is quite capable of getting the job done. For our tests we connected the Yagi antenna directly to our test access point and attempted to connect to it using a standard ORiNOCO PCMCIA card. We found that the antenna was fairly selective and offered good improvement in signal strength in the desired direction.
We also tested the access point with a combination of one stock antenna and one TechnoLab Yagi antenna, and detected no performance degradation. This is important because there are many instances where an access point will not only be providing remote user connectivity, but also local connectivity to the network. In addition to its small size and light weight, its frequency range will enable you to use it for other applications in addition to wireless networking. Overall, the Yagi from TechnoLab is a useful antenna to add to your wireless office or campus network configuration.
Wireless Network Interface Cards (WNICs) are basic yet essential components of your wireless hardware setup. In this section, we review the ORiNOCO brands alone, as they stand out head and shoulders above any competitors.
Homepage: http://www.orinocowireless.com
Hands down, the ORiNOCO wireless PCMCIA cards by Agere Systems are the best on the market. The cards are standard PCMCIA and will fit into one Type II slot on a laptop or portable computer. There are two models of the card, Silver and Gold. The Silver card offers 64-bit WEP protection, whereas the Gold offers 128-bit. Both cards offer connection speeds of up to 11Mbps and are Wi-Fi-compliant, making them compatible with other systems. One of the better features of both the Gold and Silver cards is the capability to connect an external antenna. This capability, while not unique, is fairly uncommon among other manufacturers, and is a crucial feature for wireless auditing and network management. In addition, the cards are widely supported across multiple operating systems such as Mac, Novell, Windows, and Linux.
The ORiNOCO cards can be configured to work in peer-to-peer (ad hoc) or infrastructure modes. Peer-to-peer mode allows you to form a small network in which the cards communicate without the use of an access point. When in infrastructure mode, the card will associate with larger corporate networks that use access points to help relay information onto the wired network.
The Gold and Silver ORiNOCO cards by Agere Systems should be your first choice when outfitting your office. Their solid construction, capability to connect an external antenna, and support for multiple systems make them our favorite.
Handheld computing devices, or personal data assistants (PDAs), are rapidly growing in popularity. Along with the growing use of PDAs has come a corresponding growth in the demand for wireless network connectivity, auditing, and management. Consider the advantages of being able to check your email anywhere in your house or office with only a few taps of a stylus—and no boot-up time.
Many companies are already developing high-end productivity applications for the PDA market. For example, the PocketPC (which uses Microsoft’s embedded operating system, Windows CE) ships with a Microsoft Terminal Server Client, allowing you to connect to servers virtually anywhere on your network. Medical students are even using PDAs connected to wireless networks to watch surgeries via streaming video. Thus, the potential for growth in this market is tremendous.
Traditionally, the two main competitors in the PDA operating system market have been Palm (using Palm OS) and the PocketPC (using Windows CE).
At the time of this writing, the Palm has not shown much in the way of 802.11b connectivity, but the PocketPC, on the other hand, has shown tremendous capabilities. Many manufacturers are writing PocketPC drivers for their hardware, thus expanding the capabilities of this already very functional product. Just as with desktop or laptop computers, there are many models of hardware that will support and run the PocketPC operating system. Each device is unique and offers its own features and benefits. Features such as increased memory, higher resolution screens, and the capability to work with external hardware such as PCMCIA and compact flash cards are all factors to consider in your purchasing decision.
One device that we have found more than equal to the task is the Compaq iPAQ. When it comes to wireless connectivity and features, iPAQ is the hands-down leader in the PDA market. Companies such as ORiNOCO, Network Associates, and Cisco are aggressively pursuing the iPAQ as a key player in the wireless realm. Vendors are targeting software applications specifically toward the iPAQ and its capability to support a wide range of external hardware devices.
Although not yet as powerful as their desktop forefathers, PDAs are a useful extension to a home or business network. With wider deployment of 802.11b networks and the increase of free public networks, handheld devices will soon be ubiquitous among casual users. In addition, the number of corporate employees telecommuting from their PDAs through Virtual Private Networks (VPNs) is expected to grow rapidly.
Homepage: http://www.compaq.com
The iPAQ from Compaq is the leader among handheld devices with wireless functionality. In fact, the iPAQ is of such a superior quality to its competitors that we do not recommend (or review here) any other PDAs.
Although the base unit is more than adequate, you also have the capability to add expansion packs, or sleeves. These sleeves are add-ons that enhance the overall functionality of the iPAQ. There are many different sleeves available on the market today, which allows the iPAQ to make use of everything from PCMCIA and compact flash cards to IBM Micro drives and GPS devices. By using a sleeve, you can take the standard iPAQ and turn it into a wireless workstation. Because many devices use the PCMCIA standard, the PCMCIA sleeve (part number 173396-001) is probably the most functional one to own.
The iPAQ can be used with the PCMCIA sleeve connected and a wireless card inserted into the sleeve. This setup will enable you to connect to various 802.11b networks and perform many functions, such as browsing Web pages (using the built-in version of Internet Explorer) or managing your remote network (using the Terminal Server application). With the addition of software such as NetForce by Ruksun or CENiffer by Epiphan Consulting, you can dramatically increase the overall functionality and usefulness of your iPAQ. Other software developers such as NetStumbler and Network Associates have created products with the iPAQ in mind. With its growing base of hardware and software add-ons, along with the increasing availability of wireless networks, the Compaq iPAQ will be a dominant force well into the future.
Prior to deploying any live wireless equipment in your enterprise, we recommend that you create a lab and test everything. Similarly, a wireless security expert will need a test lab of her own for research and development. A wireless test lab is completely different from your ordinary computer lab. Your wireless lab cannot be confined to a specific space. It needs to be mobile, just like your users will be.
When testing for access point placement in your environment, there are several factors you need to consider. These factors are as follows:
Coverage area—. Where can you get the most coverage without causing interference to other access points?
Mounting—. How will the access point be mounted?
Network connection—. How will the access point connect to the network? This can also be affected by your topology and security setup.
Power—. This may sound simple, but can often become a major dilemma.
Testing for coverage areas and deciding on placement locations can be a bit difficult, as it is difficult to bolt an access point to the ceiling and then constantly move it. Fortunately, we have come up with a better solution. Take a cart similar to those found in libraries and mount a telescoping pole to one of the sides. At the top of the pole, attach a flat piece of wood or plastic (not metal) that is big enough to hold the access point like a “ceiling,” perpendicular to the ground. Offset the wood so that the access point can hang down without hitting the cart. Next, attach the access point upside down to the wood or plastic piece on the top of the pole. By raising the pole with the access point on top, you will place the access point at ceiling height and still be able to move it by pushing the cart.
On the cart should be a battery connected to an inverter, giving you a power source in which to plug the access point. By walking the floor with a laptop or PDA, you can test connectivity to the access point. We also recommend that you test not only the area you are attempting to cover, but also the surrounding areas. This will enable you to map wireless coverage that inadvertently “bleeds” beyond your perimeter.
The best type of lab configuration is one that will closely resemble your production environment. In addition, the lab should be flexible enough to allow you to test new products, and allow for future network expansions. Once your test lab is in place, you can start practical wireless security testing for yourself. The following section will introduce wireless attacks from a hacker’s perspective. Armed with this knowledge, you will be able to “attack” your own networks as a wireless auditor, before someone else does it for you.
The techniques for wireless attacks are not new. Indeed, they are based on the ancient attacks that have been used on wired networks from time immemorial, with only minor updates. In fact, the goal of attacking a wireless network is usually not to compromise the wireless network itself, but rather to gain a foothold into the wired network within.
Because traditional wired networks have been hardened from repeated attacks for more than thirty years, many are beginning to evolve formidable defenses. For example, a properly configured firewall can provide much security. However, consider what happens when you have an unsecured wireless access point sitting within the firewall—you have just effectively opened a back door right through your firewall. Thus, the proliferation of wireless networks has set the state of information security back more than a decade…almost to the 1980s, when computer systems were wide open to attack via modems and war dialing.
In time, most wireless networks will fall victim to at least one type of wireless attack. These attacks are not limited to just the corporate world, either. One of the largest consumers of wireless networks is the residential customer. These consumers are typically looking for a way to use their broadband connection in any room of the house. Worse, the vast majority of consumers are not aware of security issues. You can now buy access points from the local electronic store for less than $200, but many of these do not have the same security features of the Corporate or Professional models that run $800 and up. With more users installing these low-end access points, both on personal networks and within small businesses, the number of easy targets is growing exponentially.
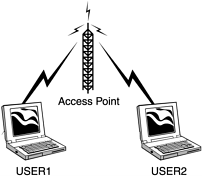
There are many different models of 802.11b Wireless Network Interface Cards. One thing common to them all is the capability to put them into Infrastructure and Peer-to-Peer Mode. The IEEE defines Infrastructure Mode as Basic Service Set (BSS). It is used to connect a client to an access point on an established network (Figure 27.1). Peer-to-Peer Mode, also known as ad-hoc mode, is known as Independent Basic Service Set (IBSS). This mode is used to connect two or more wireless devices to form a small close range network, much like peer-to-peer networking on wired networks (Figure 27.2).

One of the major disadvantages of this type of wireless network is that there is no central security control; in fact, there is very little security at all. The most difficult part of launching an attack on this type of network is finding one to attack. Because they are informally deployed, they can pop up and disappear overnight. Examples of such networks can be found at conventions and coffee shops, as well as any situation that requires Internet connection sharing (that is, splitting a single Internet connection among several users).
There are several approaches to locating a wireless network. The most basic method is a surveillance attack. You can use this technique on the spur of the moment, as it requires no special hardware or preparation. Most significantly, it is difficult, if not impossible, to detect. How is this type of attack launched? You simply observe the environment around you.
Here’s an exercise: Whenever you enter a location, whether it’s new or very familiar to you, simply open your eyes and search for signs of wireless devices. Also, just because there were not any devices there last week doesn’t mean there won’t be any today or tomorrow. Table 27.2 gives some suggestions for performing wireless security reconnaissance.
Table 27.2. Wireless Security Reconnaissance
Things to Look For | Potential Locations |
|---|---|
Antennas | Walls, ceilings, hallways, roofs, windows |
Access points | Ceilings, walls, support beams, shelves |
Network cable | Traveling up walls or shelves, or across a ceiling |
Newly-installed platforms | Walls, hallways and support beams |
Devices—Scanners/PDAs | Employees, reception or checkout areas |
This might sound basic, but it is still an effective method of reconnaissance. In some cases, you can even find out what type of access point is being used, because many companies place devices in clear view. You can even talk to employees that are using the wireless devices and ask a few simple questions about them. They probably will not be able to give you much usable information, but they might be able to confirm the existence of a wireless network. Be careful when talking to employees and asking questions, as you do not want to tip anybody off to a potential attack.
CAUTION
Even when performing a legitimate security audit of your own network, you still must have prior written permission from your company’s management, and you must always obey all local and regional laws.
For example, we took the accompanying pictures (Figures 27.3–27.10) during one such surveillance attack.
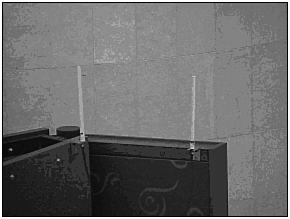
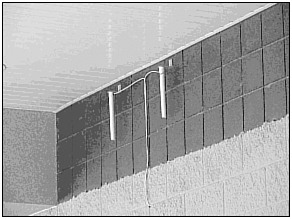
We took the pictures in Figures 27.3, 27.4, and 27.5 at a nationwide coffee shop chain. In Figure 27.3, you can see a clear shot of the two antennas and the access point. Figures 27.3 and 27.5 demonstrate antenna installations at two different locations. From these pictures, based on our experience we know that they are using an approximately 8-dBi omni-directional antenna for their various installations.
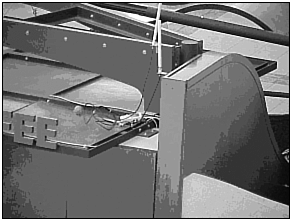
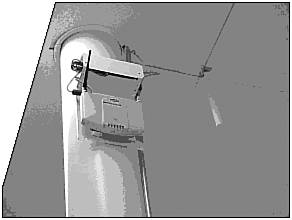
We took Figure 27.6 at a nationwide discount shoe store chain. All of their locations across the nation are set up with similar configurations. In this picture, you can clearly see the access point, as well as both antennas. Here the company has only chosen to install one 8-dBi antenna and left the other one attached to the access point.
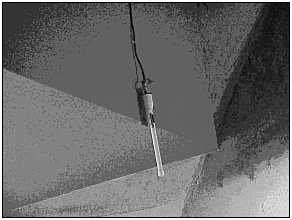
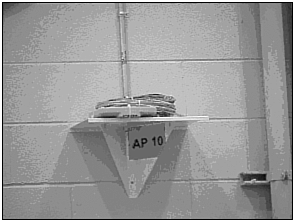
We took Figures 27.7 and 27.8 at a nationwide hardware store chain. The antennas in Figure 27.7 are located outside and are connected to the access point in Figure 27.8 inside. This access point was difficult to miss because of the large orange label that says “AP 10.”
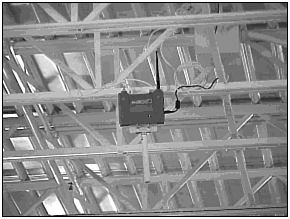
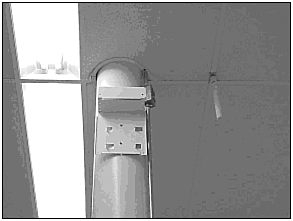
Figures 27.9 and 27.10 were taken in a nationwide grocery store chain. You can see in Figure 27.10 the mounting bracket where an access point will be placed; it looks like the antenna is already installed just to the right.
As you can see, the business use of access points is proliferating. APs are routinely found not only in small businesses and homes, but also in large retail chains. However, the fact that you can see a company’s access point does not necessarily mean that an attacker will be able to connect to it. He must obtain additional information before he will be able to gain access to the network. In addition, a surveillance attack is not always the best option for discovering a wireless network. Because a surveillance attack is extremely targeted, attackers can go days without seeing anything. In addition, this type of attack is unavailable if an attacker does not have physical access to the premises. Because of this, hackers developed a new method of discovery—war driving.
When a surveillance attack is either impossible or too difficult, war driving is an effective alternative. In many situations, war driving follows and adds information to a prior surveillance attack. Conversely, the information obtained from random war driving often leads to a surveillance attack on a discovered location.
The term war driving is derived from the 1980s phone hacking tactic known as war dialing. War dialing involves dialing all the phone numbers in a given sequence to search for modems. In fact, this method of finding modems is so effective that it’s still in use today by many hackers and security professionals. Similarly, war driving, which is in now its infancy, will most likely be used for years to come, both to hack and to help secure wireless networks.
War driving first became popular in 2001. At that point, tools for scanning wireless networks became widely available. The original tools used by war drivers included the basic configuration software that comes with the Wireless Network Interface Card (WNIC). However, this software was not designed with war drivers or security professionals in mind, and thus was not very effective. This created the need for better software. Nevertheless, war drivers have not abandoned the use of WNIC software altogether—in fact, it still serves as a useful complement to modern advanced software.
Why do we need ethical war drivers? Many large corporations have stated that they are not worried about their wireless networks because they would be able to see the attacker in the parking lot and have onsite security pick them up. The problem with this line of thinking is that the wireless networks can, and usually do, extend well past the parking lot. Keep in mind that this is a wireless technology, and unlike standard wired networks, the wireless data packets are not limited by the reach of Cat5 cable. In fact, wireless networks using standard devices and aftermarket antennas have been known to extend over twenty-five miles. Knowing this, an attacker can be much farther away than your parking lot and still access your network.
War driving itself does not constitute an attack on the network, and many authorities feel that it does not violate any law. However, this assumption has yet to be tested in the United States court system, and if it ever is, it will be difficult to rule against the war driver.
Specifically, when an attacker (or an honest administrator) is war driving, she is usually on some type of public property, and could even be mobile in some type of car or bus. The software on her computer allows her to capture the beacon frames sent by access points about every 10 milliseconds. Access points use this beacon to broadcast their presence and to detect the presence of other access points in the area. Clients also use the beacon frames to help them determine the available networks in their office. In fact, Microsoft’s Windows XP can give you a list of wireless networks using these beacon packets. Thus, war driving per se is legal, since the access points are actually reaching out and broadcasting to you, rather than vice versa. You are merely a passive recipient, whether you like it or not.
One of the best-known war driving software packages is called NetStumbler, and it’s available free from its kind author Marius Milner at http://www.netstumbler.com. NetStumbler examines the beacon frames and then formats them for display.
Significantly, it takes care not to make the raw beacon frames available to the user. The following list shows some of the information that’s gathered by NetStumbler and made available based on the beacon frames:
Basic Service Set ID (BSSID)
Note: The BSSID (SSID) is a 6-byte hexadecimal number of the access point or base station where the traffic being monitored belongs.
WEP-enabled or not
Type of device (AP or peer)
MAC address of wireless device
Channel device was heard on
Signal strength of device
Longitude and Latitude (if using a GPS)
At no time are actual data frames or any management frames captured or made available to the user of the software. Many access points have the capability to be configured in a stealth mode, thus “disabling the beacon” as one of their options. In reality, the beacon frame is still sent every 10 milliseconds—only the SSID has been removed. If a Network Administrator has done this, NetStumbler will not detect the presence of the network. To review, when using NetStumbler, the following conditions apply:
A war driver receives a broadcast frame sent by an access point or a peer.
Only the broadcast frame header is formatted and displayed to the war driver.
No data or management frames are captured or displayed to the war driver.
Some would question how is this different from wired sniffers that enable you to capture any packets on a network as long as only the header is read. The FCC and the laws regarding the reception of transmitted signals have been amended several times to include new technologies. If you are interested in the legal aspects, make sure to read the Electronic Communications Privacy Act (ECPA). Grove Enterprises Inc has created an easy-to-read, layperson’s version called the Listener’s Lawbook (http://www.grove-ent.com/LLawbook.html). Prior to starting your career in ethical war driving, make sure you brush up on all the relevant laws in your area.
War driving is typically performed while mobile in cars or buses. One very effective way to war drive a new city is to use public transportation or even a tour bus. Both offer a safe opportunity for you to work the computer and observe what’s around you—leaving the driving to someone else. Alternatively, many war drivers are outfitting their vehicles with various setups and antennas to allow for constant war driving (CAUTION: Not recommended while moving).
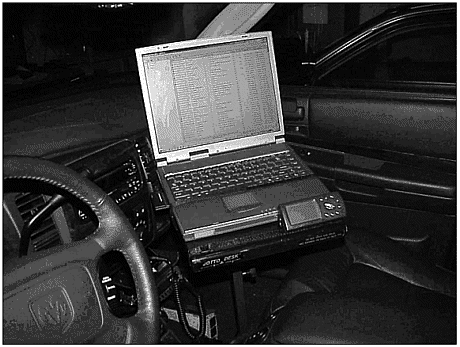
These types of setups are becoming more common as mobile electronics are falling in price and becoming popular. The following is a list of items commonly used for war driving:
Wireless Network Interface Card (Lucent ORiNOCO cards recommended)
Computer (laptops or PDAs work best)
Copy of NetStumbler or ORiNOCO NIC software
Power inverter
External antenna
GPS
The last three items are optional, and are not required for war driving. However, we do recommend them for academic researchers, law enforcement, and the military, as they will significantly improve the sensitivity and specificity of your research results.
After obtaining the necessary equipment, a hacker can start searching for wireless networks. You can do this simply by driving the streets of your neighborhood or local business park. Heavily populated metropolitan areas are usually a good place to find several networks. Some of the networks you find might belong to individuals who might be connected to their local DSL or cable modem, whereas others might belong to major corporations. For example, while driving on one normal commute with our equipment inadvertently left on, we found that eight access points—none of which were running encryption—were broadcasting an open invitation to the world. The worst part was that all eight access points were coming from the headquarters of a major financial institution.
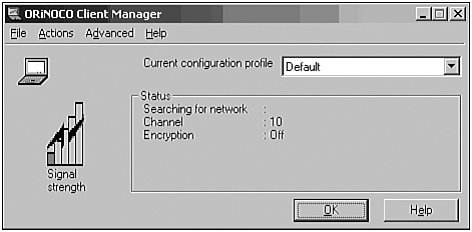
To begin war driving using your vender-provided ORiNOCO software, perform the following steps:
On a Windows-based computer, install and configure your Lucent WNIC.
Launch the ORiNOCO Client Manager (Figure 27.12).
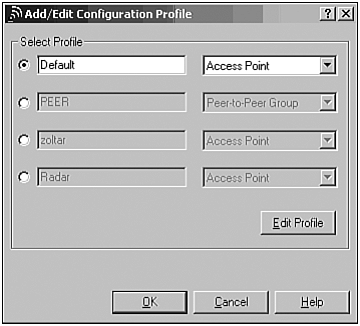
From the Actions menu, select Add/Edit Configuration Profile (Figure 27.13).
Select the Default profile and click Edit Profile.
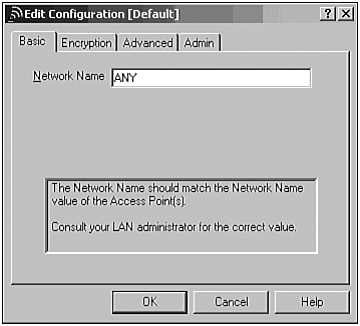
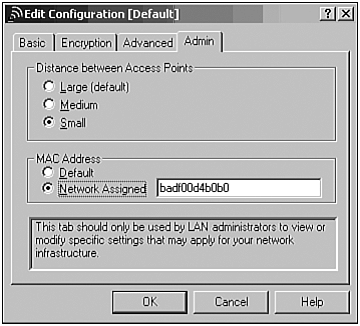
Set your Network Name (equivalent to the SSID) to
ANY. This is a reserved name that tells the WNIC to associate with any SSID (Figure 27.14).Now click on the Admin tab and select Network Assigned MAC Address. This setting allows you to spoof or modify your WNIC’s MAC address. This way, when your WNIC registers with an access point, your real MAC address will not be seen. This is also handy if you are attempting to connect to a system that has restricted access based on the MAC address (please see “Client-to-Client Hacking” later in this chapter for more information). Be creative with your MAC address, as in the example in Figure 27.15 using the MAC address
badf00d4b0b0.
With these settings, you will be able to detect the presence of various wireless networks, as demonstrated in Figure 27.16. After you establish an association, you will see the SSID (zoolander) and the MAC address of the access point. For more information about the association process, please see the “Client-to-Client Hacking” section later in this chapter.
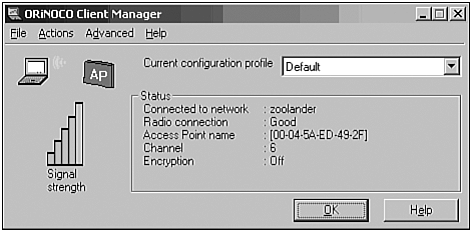
If a Dynamic Host Configuration Protocol (DHCP) server is running on the access point, or requests are being forwarded onto the wired network, the target network might even assign you a valid IP address! For this to work, your computer must be configured for DHCP for both the IP address and domain name service (DNS) settings. As you will quickly find, the capability to detect and log wireless networks using the ORiNOCO Client Manager is very limited; hence, additional capabilities are necessary. As mentioned previously, NetStumbler is one such product that has more powerful features.
Now let’s get NetStumbler up and running:
1. Install and configure your WNIC using the vendor-provided software.
2. From a Windows-based computer, download and install the latest version of NetStumbler from http://www.netstumbler.com.
3. Connect your GPS to your COM port (optional).
4. Launch NetStumbler and click the green Play button at the top of the window.
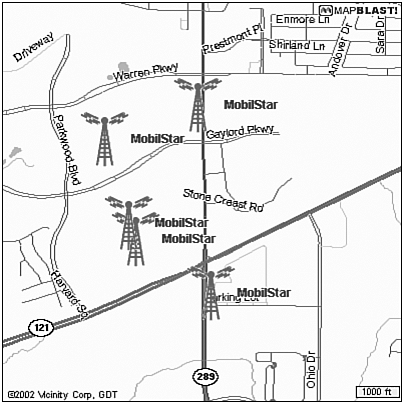
At this point you can start driving around various residential and business areas. Remember that wireless networks are becoming ubiquitous, so there really is no limit as to where you can search. For example, several national hotel chains have open access points in their lobbies for guests to use. Similarly, national coffee shop chains and airports have Mobile Star access points installed. If you have connected a GPS to your computer, you will also log the location of where you found the access point. Researchers can then output this data to a map, as seen in Figure 27.17, to help track the locations of the networks they have found.
Sometimes larger buildings, such as corporate headquarters, sit so far back on the property and are so large, that even if you are using an external antenna, you will have a difficult time detecting the presence of the networks. In this type of situation, it’s nice to have a handheld device such as the Compaq iPAQ with a wireless card in it. Using the iPAQ and a copy of miniStumbler (available from http://www.netstumbler.com), you can put the device in a jacket pocket and enter the building, walking through it floor by floor. As you are walking, miniStumbler is capturing the beacon frames from wireless networks that you might not be able to detect from the street. This is especially effective if you have access to the inside of a specific target office, say for a meeting or interview that you have previously scheduled. This method allows you to conceal the audit, and is a bit less distracting to your staff than walking around with a laptop and an antenna.
Think about the last time you saw somebody on an elevator or in a hallway working on a PDA. Did you guess that he might be war driving, or did you just assume he was checking to see when his next appointment was?
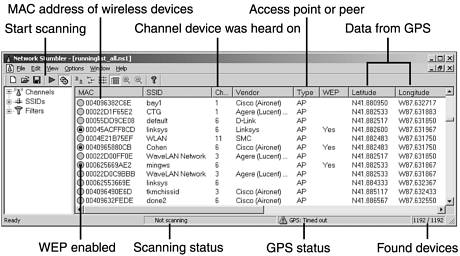
Once you have gathered the information in NetStumber or miniStumbler, you need to analyze and interpret the data you have received. Figure 27.18 is an annotated screenshot of NetStumbler.
War driving is performed by all sorts of people. The various war drivers we have met are not the types of people you might expect to be checking out your networks. Most would picture high school kids out on the weekend searching for networks to hack. Granted, these types of people are out there, but the vast majority are older professionals who war drive as part of their legitimate network auditing duties. Over the next few years, more security professionals will add war driving to their regular network maintenance schedule. Unfortunately, more attackers will likewise use this method to detect your wireless network. Thus, it pays to be prepared.
Now that we have found our target wireless network, the actual attack begins.
Clients exist on both wireless and wired networks. A client can range from anything such as a Network Attached Storage (NAS) device, to a printer, or even a server. In a typical ad hoc network, there are no servers or printers—just other individuals’ computers. Because the majority of consumer operating systems are Microsoft-based, and because the majority of users do not know to how to secure their computers, there is plenty of room to play here.
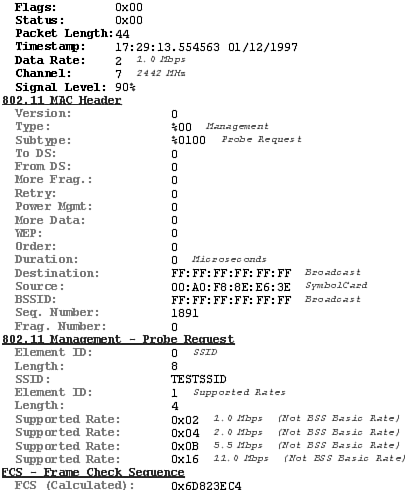
For example, an attacker can strike at a laptop that uses a wireless connection. Even though the office has not deployed a wireless connection, a laptop that is connected to the Ethernet could still have its Wireless Network Interface Card installed and configured in PEER mode. Wireless Network Interface Cards running in PEER mode also send out the Probe Request Frames discussed in the war driving section. These Probe Request Frames are sent out at regular intervals in an attempt to connect with another device that has the same SSID. Thus, using a wireless sniffer or NetStumbler, we are able to find wireless devices configured in PEER mode. Figure 27.19 shows a Probe Request Frame that was captured with a wireless sniffer.
This would enable an attacker to connect to the laptop, upon which he could exploit any number of operating system vulnerabilities, thus gaining root access to the laptop. Once an attacker has gained root access to a system, a well-placed Trojan horse or a key logger will enable him to further compromise your various network systems. This type of attack can even take place when the target user is traveling and using her laptop in a hotel lobby or airport, regardless of whether she is actively using her Wireless Network Interface Card.
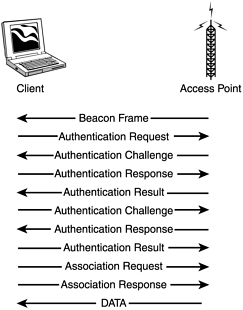
For a wireless client to send data on a network, the client must create a relationship called an association with an access point. During the association process, the client will go through three different states:
Unassociated and unauthenticated
Unassociated and authenticated
Associated and authenticated
To begin, a client first has to receive the beacon management frame (packet) from an access point within range. If beacons from more than one access point are received, the client will pick which Basic Service Set to join. For example, the ORiNOCO Client Manager associates with the first BSS heard, but a list of available SSIDs and the capability to switch is available. Those who use Windows XP will be presented with a list of SSIDs, and will be asked to choose what network to join. In addition, the client can broadcast a probe request management frame to any access point.
After an access point has been located, several management frames are exchanged as part of the mutual authentication. There are two standard methods to perform this mutual authentication. The first method is known as open system authentication. The majority of access points, especially if left with their default settings, use this method. As the name implies, this is an open system, and all authentication requests are serviced.
The second method is called shared key authentication, and it uses a shared secret along with a standard challenge and response. For this to work, the client sends an authentication request management frame stating that it wants to use shared key authentication. When an access point receives the request, it responds to the client by sending an authentication management frame, which contains 128 octets of challenge text. The WEP pseudo-random number generator (PRNG) is used to generate the challenge text with the shared secret and a random initialization vector (IV)2. The client then receives the authentication management frame and copies the challenge text into a new frame. A new IV is selected by the client and then included in the frame with the copied challenge text. The entire frame is then WEP-encrypted (using the shared secret) and transmitted to the access point.
When the frame is received, the access point decrypts it and looks at the 32-bit CRC integrity check value (ICV) to verify that it is valid. This is done by comparing the challenge text to that of the first message that was sent. If the text matches, then the authentication is considered successful, but it is only halfway done. At this point, the client and the access point swap roles, and the entire process is repeated. This is done to guarantee mutual authentication. Once completed, the client is considered to be in the second state, Unassociated and Authenticated. Once in this state, a client will send an association request frame to the access point. The access point will respond with an association response frame and send it to the client. When received, the client is then considered to be in the third state, Associated and Authenticated. At this point, the client becomes a PEER and is able to transmit and receive data frames on the network. Figure 27.20 shows the format of an authentication management frame, and Figure 27.21 shows a breakdown of the authentication and association process.

After your client has been associated and authenticated, you are on the network. However, in most cases, an IP address is required to actually communicate with other clients or servers on the network. Many access points are configured by default to act as a DHCP server. If this is the case, you will be given a valid IP address for that network. If DHCP is not enabled, you will have to assign one to yourself.
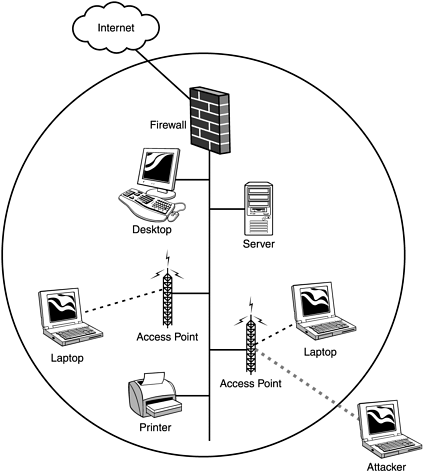
Figure 27.22 shows how a typical corporate network might be set up. The firewall offers protection to the internal users and servers, and all wireless devices are inside the firewall. All inbound and outbound Internet traffic is filtered through the firewall. Unfortunately, an attacker that has been associated and authenticated by an access point can suddenly gain access to all internal servers and computers. In addition, the Internet connection can now be exploited to launch an attack on someone else’s network.
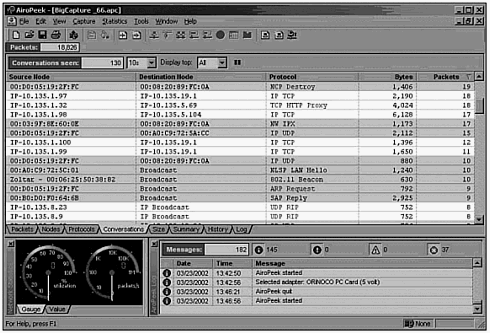
More advanced access points have a feature called Access Control Lists (ACLs). This allows an administrator to pre-define the Ethernet MAC addresses of each client allowed to associate and authenticate. When a client attempts to authenticate, if its MAC address is not contained within the ACL, the client is denied access to the network. As we saw in the war driving section of this chapter, Figure 27.15 showed how it is possible to change the MAC address of our wireless network interface cards. With this functionality, and with a wireless sniffer such as AiroPeek (http://www.wildpackets.com), you can capture a list of MAC addresses that are in use on the network (Figure 27.23). Having gathered this information, you are then able to spoof the Ethernet MAC address of a client listed in the ACL, thus allowing you to associate and authenticate.

After an attacker has been associated and authenticated, his abilities are only limited by your internal network security. For example, suppose you have a network configuration similar to the one in Figure 27.22. This could be your personal home network, or a corporate network with or without all of the components shown. Once the attacker has been associated, his next step will be to gain a valid IP address on the network. Using AiroPeek to sniff wireless frames, the attacker can see a listing of IP addresses currently communicating on the network, and he can get a good idea of how the network IP addressing is configured (Figure 27.24).
Now that the attacker has a valid IP address on your network, it is time for him to find his target and get more information about your setup. The various methods of doing this are no different than those an attacker uses on a standard Ethernet network. Recall when a WNIC associates with an access point, it is as if it is plugging directly into your Ethernet LAN. Hence, general types of information gathering techniques such as port scans and ping sweeps all apply. These various methods will supply the attacker with a list of available resources on your network, such as your printer.
In this example, let’s assume the printer has its own built-in TCP spooler and is configurable via a Web interface (a common setup for today’s enterprise printers). The attacker finds the printer, and while checking out the Web interface, he spots the capability to put the printer into a test page loop, causing it to print test page after test page. Meanwhile, you are unable to print because the queue is full of these test pages, and your printer is running out of toner quite fast. This is just one example of a fairly harmless yet highly annoying type of attack.
Printer attacks are fairly benign. However, consider how vulnerable this makes your critical data stored on the computers and servers in your network. Consider this paradox: Many companies do not feel it is necessary to protect their internal networks from attacks generated on the inside. Why, then, do they lock their building doors at night, yet not supply every employee with a key?
Rogue access points are those connected to a network without planning or permission from the network administrator. For example, we know one administrator in Dallas who just did his first wireless security scan (war driving) on his eight-building office campus. To his surprise, he found more than thirty access points. Worse, only four of them had authorization to be connected to the network. Needless to say, heads rolled.
Rogue access points are becoming a major headache in the security industry. With the price of low-end access points dropping to just over one hundred dollars, they are becoming ubiquitous. Furthermore, many access points feature settings that make them next to transparent on the actual network, so their presence cannot be easily detected.
Many rogue access points are placed by employees looking for additional freedom to move about at work. The employees simply bring their access points from home and plug them directly into the corporate LAN without authorization from the IT staff. These types of rogue access points can be very dangerous, as most users are not aware of all the security issues with wireless devices, let alone the security issues with the wired network they use each day.
In addition, it is not always well-intentioned employees who deploy rogue access points. Disgruntled employees, or even attackers, can deploy an access point on your network in seconds, and they can then connect to it later that night. In addition, if the access point has DHCP enabled, you now have a rogue DHCP server in addition to a wireless hole in your perimeter.
The following are seven key points to successfully placing a rogue access point:
Determine what benefit can be gained from placing the access point.
Plan for the future. Pick a location that will allow you the ability to work on a laptop or PDA without looking suspicious.
Place the access point in a discreet location that allows for maximum coverage from your connection point.
Disable the SSID Broadcast (silent mode). This will further complicate the process of detecting the access point, as it will now require a wireless sniffer to detect the rogue access point.
Disable any management features. Many access points have the ability to send out SNMP traps on both the wired and wireless networks.
Whenever possible, place the access point behind some type of firewall, thus blocking the MAC address from the LAN and the ARP tables of routers. There are several programs on the market that scan wired networks looking for the MAC addresses of access points.
Do not get greedy! Leave the access point deployed for short periods of time only. The longer it is deployed, the more likely you are to get caught.
CAUTION
The preceding steps should only be used when experimenting on your own personal test network.
If you already have a wireless network deployed and someone places a rogue access point on your network using your existing SSID, you might have additional problems. This type of access point can extend your network well beyond the bounds of your office. In some cases, the rogue access point can be set up as a link broadcasting your network traffic across town. They can even be made to appear as if they are part of your network, thus causing clients on your network to use them for connectivity. When a client connects to the rogue access point and attempts to access a server, the username and password could be captured and used later to launch an attack on the network.
Denial-of-service (DoS) attacks, as you learned earlier in this book, are those that prevent the proper use of functions or services. Such attacks can also be extrapolated to wireless networks. To understand this, we must first consider how wireless 802.11b networks operate and upon what frequencies they run.
Effectively attacking (or securing) a wireless network requires a certain level of knowledge about how radio transmitters, frequencies, and wavelengths work and relate to each other. In the United States, the Federal Communication Commission (FCC) governs frequencies and their allocation. Devices such as police radios, garage door openers, cordless phones, GPS receivers, microwave ovens, and cell phones use various frequencies to operate. In fact, millions of such devices are capable of operating simultaneously on the various frequencies of the radio spectrum (see Table 27.3).
Table 27.3. The Radio Spectrum as Defined by the FCC
Band Name | Range | Usage |
|---|---|---|
Very Low Frequency (VLF) | 10kHz to 30kHz | Cable locating equipment |
Low Frequency (LF) | 30kHz to 300kHz | Maritime mobile service |
Medium Frequency (MF) | 300kHz to 3MHz | Avalanche transceivers, aircraft navigation, ham radio |
High Frequency (HF) | 3MHz to 30MHz | Radio astronomy, Radio telephone, Civil Air Patrol, CB radios |
Very High Frequency (VHF) | 30MHz to 328.6MHz | Cordless phones, television, RC cars, aircraft/police/business radios |
Ultra High Frequency (UHF) | 328.6MHz to 2.9GHz | Police/fire radios, business radios, cellular phones, GPS, paging, wireless networks, cordless phones |
Super High Frequency (SHF) | 2.9GHz to 30GHz | Terminal doppler weather radar, various satellite communications |
Extremely High Frequency (EHF) | 30GHz and above | Government radio, astronomy, military, vehicle radar systems, ham radio |
Radio waves are very easy to create; in fact, you can demonstrate this right now. The following list illustrates how to create and hear your own radio waves.
Items needed: 9-volt battery, quarter, AM radio
Tune the AM radio to a spot between radio stations, so that you hear static.
Place the battery near the antenna of the AM radio.
Quickly tap the quarter onto the two terminals of the battery, making sure the quarter comes in contact with both terminals simultaneously.
Each time the quarter comes in contact with the battery terminals, it will generate a small radio wave, causing a crackle in the radio.
The circuit you create produces circular waves of electromagnetic interference, perpendicular to the direction of electrical flow.
When an 802.11b device is sending data, it is not just transmitting on a single frequency. A technology called Direct Sequence Spread Spectrum (DSSS) is used to spread the transmission over multiple frequencies. DSSS is designed to maximize the effectiveness of the radio transmission, while minimizing the potential for interference. In DSSS, a Channel refers to a specific ruleset rather than a particular frequency. These rulesets define how the radio will spread the signal across multiple frequencies, also identified as channels. It is much like having a party at your house at which there are people in eleven different rooms. In each of the eleven rooms, the guests are having a different conversation, and the sound is traveling from room to room. While you are in room one, you can hear the conversations of rooms one, two, three, four, and five. Guests in room six can hear the conversations in rooms two, three, four, five, six, seven, eight, nine, and ten, but they cannot hear anything from room one because of a wall, or ruleset. Table 27.5 illustrates the channel layout and shows what can be heard by each channel ruleset. In the entire eleven rulesets, there are only three that do not overlap—CH1, CH6, and CH11.
Conversations governed by ruleset 6 (Channel 6) cannot be heard by a station operating according to ruleset 1 or 11. Thus, in large infrastructure environments, there are really only three rulesets available. For an attacker building some type of jamming device, this is important. Based on the chart in Table 27.5, you can see that by targeting channels 5, 6, and 7, the jammer can cause the maximum amount of interference.
Jamming or causing interference to an 802.11b network can be fairly simple. There are several commercially available devices that that will bring a wireless network to its knees. For example, a Bluetooth-enabled device is one such item that can cause headaches for 802.11b networks. We have found that when a Bluetooth device is located within approximately ten meters of 802.11b devices, the Bluetooth device will cause a jamming type of denial-of-service attack. The same is true of several 2.4GHz cordless phones that are currently available. This is because the 2.4GHz band is becoming widely used and is considered shared, thus allowing all kinds of devices to use it.
The signals generated by these devices can appear to be an 802.11 transmission to other stations on the wireless network, thus causing them to hold their transmissions until the signal has gone, or until you have hung up the cordless phone. The other possibility is that the devices will just cause an increase in RF noise, which could cause the 802.11b devices to switch to a slower data rate. Devices re-send frames over and over again to increase the odds of the other station receiving it. Normally, data is transmitted at 11Mbps when sending one copy of each frame. If it were to drop to 50% efficiency, the device would still be transmitting at 11Mbps, but it would be sending a duplicate of each frame, making the effective speed 5.5Mbps. Thus you will have a significant decrease in network performance because of re-sending duplicate frames. In addition, with a high level of RF noise, you can expect to see an increase in corrupt frames, which also requires a full retransmission of the packet.
Unfortunately, WEP is fundamentally flawed, allowing you to crack it. However, even though it is possible to crack WEP encryption, we still highly recommend that you use it on all of your wireless networks. This will thwart the casual drive-by hacker, and it also enables another layer of legal protection that prohibits the cracking of transmitted, encrypted signals. With that in mind, let’s look at the practical process of cracking WEP.
The most important tool that you’ll need to crack a WEP-encrypted signal is time. The longer you capture data, the more likely you are to receive a frame that will leak a key byte. There is only about a 5% chance, in some cases a 13% chance, of this happening. On average, you will need to receive about 5,000,000 frames to crack a WEP-encrypted signal. To actually capture the encrypted data, you will need a wireless sniffer such as AirSnort (available at http://airsnort.shmoo.com/). In addition to the wireless sniffer, you will also need a series of Perl scripts, which are called (appropriately) WEPCRACK. These scripts are available online at the following URL:
http://sourceforge.net/projects/wepcrack/
After you have acquired the necessary tools, please refer to the following list for a step-by-step guide to cracking a WEP-encrypted signal.
Using your wireless sniffer, capture the WEP encrypted signal. As previously mentioned, you will need to capture about 5,000,000 frames.
From a command prompt, execute the
prism-getIV.plscript using the following syntax:prism-getIV.pl capturefile_namewhere
capturefile_nameis the name of your capture file from step 1. When a weak IV is found, a file namedIVFile.logis created for later use.Now that the
IVfile.logfile has been created, you need to runWEPcrack.pl. This file will use theIVfile.logto look at the IVs and attempt to guess the WEP key.When you run
WEPcrack.pl, the output is in decimal format. So blow the dust off your favorite decimal-to-hex conversion chart and start converting to hex.The following shows the decimal-to-hex conversion data.
95 = 5F
211 = D3
124 = 7C
211 = D3
232 = E8
27 = 1B
211 = D3
44 = 2C
42 = 2A
53 = 35
47 = 2F
185 = B9
48 = 30
95:211:211:53:185:211:232:44:47:48:124:27:42 (Decimal)
5F:D3:D3:35:B9:D3:E8:2C:2F:30:7C:1B:2A (HEX)
Take the hex version of the key and enter it into your Client Manager.
With the recent explosion in the use of 802.11b networks, the state of network security has been set back over a decade. In many cases, the goal of the attacker is not just to connect to and exploit the wireless network, but also to gain free Internet access or a foothold into the wired network beyond. If you are planning to deploy a wireless network, always put security first. In addition, security managers must implement measures to detect and combat rogue access points and unauthorized clients.
There are many 802.11b hardware vendors, and as the popularity of wireless networks increases, there are sure to be more. The products that we have tested and included in this chapter are a tiny selection of the vast array of products on the market. However, each of the products reviewed herein has exceeded our expectations, and you have our personal recommendation on each of them. Of course, each person and network is unique. You should consider specific environment and application requirements when you decide to purchase one product over another.
Wired Equivalent Privacy (WEP) should be used on all deployments of 802.11b networks. This technology, although flawed, will prevent casual interpretation of your network traffic and will help reduce the number of attacks against it. Although it is possible to crack WEP, the amount of time required to do so, combined with the sheer number of easier-to-crack access points that are not running it usually causes an attacker to look elsewhere. However, you should not rely on WEP as your sole measure of security. As always, a traditional, layered approach to security is best.
Wireless attacks can be launched by virtually anyone, from virtually anywhere. From the person next to you in the elevator working on her PDA to the occupants of the car driving next to you at 70 MPH on the freeway, all can be hacking your wireless networks at this very moment. If you do not take the necessary precautions to protect yourself, you might as well just give them a key to your office.