5 
Structuring
MEETING DESIGN MADE EASY
No group wants the leader to ask group members how they want to proceed. They need a meeting leader prepared with the right approach and tools who will tell them how to proceed, keep them focused on the right questions, and explain how their responses support the deliverable (getting DONE).
Two Types of Agendas
Successful meetings demand a clear purpose (beginning), a meaningful Meeting Approach (middle), and a consensual review and wrap (end). Throwing together a Basic Agenda and then relying on your speaking skills and charm may let you skate by as a person, but do not qualify as exhibiting competent meeting leadership skills. Professionals require a fully Annotated Agenda to supplement the Basic Agenda.
NOTE: Here’s why most people would rather attend a movie than a meeting: even a lousy movie has a beginning, a middle, and an end.
This chapter describes how to build two complementary types of agenda: a Basic Agenda, which simply lists the Agenda Steps (topics to be covered) and is used by participants to track progress, and a detailed Annotated Agenda, which describes in detail how the facilitator will lead the group to get DONE. The Basic Agenda is a simple list, usually 6 to 18 items. The Annotated Agenda, a playscript for the facilitator, may run 20 pages or more for a lengthy workshop. For example, the annotation support for the Planning Approach in this book runs around 50 pages.
Each Annotated Agenda includes a Basic Agenda but more closely resembles a playscript because the Annotated Agenda details and explains the Tools used during each Agenda Step. Each Tool uses procedures that a meeting facilitator unveils at appropriate times as discrete activities, questions, tasks, and visual prompts.
- By using Tools, each Agenda Step produces its own deliverable, such as prioritized criteria or a decision or assignments.
- Tools are determined by the type of question or deliverable each Agenda Step demands.
- Some Tools require other Tools. For example, the PowerBalls (chapter 7) might rely on Definition (chapter 6) and Bookend Rhetoric (chapter 7) to deliver a clear set of priorities.
START WITH THE END IN MIND
Leadership consciousness begins by knowing what the end looks like. Yet describing the end of a successful meeting is not enough. The name for each Agenda Step needs to describe its result or deliverable. Remember, the objective for each Agenda Step is an object—a noun. You cannot deliver up a verb. Agenda Steps are best described by answering the question, “What does DONE look like?”
Describe your Basic Agenda Steps with nouns because verbs like “identify” and “define” add little value. Verbs involve work. Verbs only help facilitators, who need to know what they are going to do. So put the verbs (and everything else) in your Annotated Agenda and spare your participants the burden of doing your work. They simply want to get DONE.
THREE PHASES OF ALL MEETING AGENDAS
Meetings and workshops should have . . .
- A beginning,
- A middle, and
- An end.
Have you ever been in a meeting without one of these phases? Of course, you have. Many meetings fail because the leader ignores the importance of a strong start and clear wrap-up. Because every meeting you ever lead must have a beginning, a middle, and an end, we begin by explaining seven activities that you should command for every Launch (Introduction) and then explaining four activities that you should command for every Review and Wrap (Conclusion).
Then, the rest of this chapter will explain building an Annotated Agenda. The balance of the book will unveil various Meeting Approaches, Agenda Steps, and Tools for everything you need to facilitate the meeting between your Launch and Wrap.
Launch (Introduction) Agenda Step
Your beginning sets the tone, confirms the roles, clarifies the boundaries (scope), and describes what happens during the middle of the meeting. Your meeting launch should last no longer than 5 minutes—no longer than 10 minutes for workshops—excluding icebreakers or other special activities such as an executive kickoff or a product or project update.
SET-UP
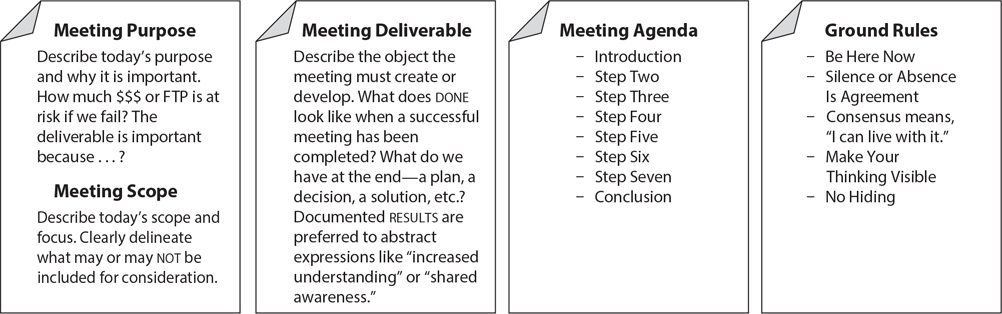
Before you begin your meeting Launch, have a document or screen prepared or your room set up with visuals ready to share, in person or online. Somehow, visually display the meeting purpose, meeting scope, and meeting deliverable, preferably unveiling one display at a time. If you do not know what your meeting deliverable looks like, then you are not prepared to lead a working session.
If you cannot convert the meeting purpose, meeting scope, and meeting deliverable into 50 words or less (for each), then you are not ready yet to launch your meeting.
For in-person workshops, use large-format paper (see the example of four sheets in figure 5.1), mounted on a side or rear wall. For a 50-minute meeting, provide the same content printed on an 8.5-by-11-inch or A4 sheet of paper. Use an arrow or indicator (like “you are here”) on your agenda to consistently show where the group is in the agenda.
For online meetings, consider writing “artifacts” by hand, such as 4-by-6-inch cards that have the same content.1 As explained by online expert Daniel Mezick, the feel and sense of handwritten materials (artifacts) when brought closely into the camera adds to the texture of an online meeting, making it more vibrant.2 You may use both sides of the cards and flip them over in front of the camera. Or use an even larger sheet and unfold it in front of the camera, revealing a separate item each time you flip or turn a page.
Use the following Launch procedure and follow the exact sequence of the seven activities to launch every session, even a 50-minute meeting. Your Launch is not an appropriate time to experiment. These seven activities, in this sequence, have been stress-tested and proven to be most effective.
- Introduce yourself in the role of meeting facilitator as neutral and unbiased. Stress the roles of participants as equals. Remind them to leave egos and titles in the hallway. Stipulate how much money or time (FTP) is wasted or at risk if the meeting and thus the organization, product, or project fails. Complete this activity within 30 seconds (figure 5.2).
Figure 5.1. Large-Format Paper or Screen—Always Make This Content Visually Accessible
Figure 5.2. Launching Script
- Meeting purpose: Describe the meeting purpose, either on large-format paper, a handout, or a screen. Stress again that this session is important because . . . and seek audible assent from your participants. Frequently, for this first request, put hands to your ears while saying “I can’t hear you” to force a louder audible response. Professional facilitators constantly strive to shift “airtime” to their participants, and participants’ vocal affirmation transfers ownership.
- Meeting scope: Describe the meeting scope, either on large-format paper, a handout, or a screen. The meeting scope is either the entire organization, department, product, or project, or part of them, but never more. Again, secure an audible assent from your participants that builds consensus and transfers ownership.
- Meeting deliverables: Describe what DONE looks like by using your prepared statement. After securing audible assent here, you will have facilitated audible agreement three times within two minutes. If participants cannot agree on the meeting purpose, meeting scope, and meeting deliverable, then your Agenda is at risk, and you have even more serious problems to address.
NOTE: This meeting purpose, scope, and deliverable should be provided to participants before the meeting as part of an invitation, preread, or read ahead. Those statements should not change at this point. If they do, the meeting may be challenged, and the Agenda may no longer be valid. I have been asked to modify the scope a few times, but it was always sharpening and not broadening the prepared statement (I now know that Greenland and parts of Iceland are in North America).
- Administrivia: Explain that “administrivia” is any noise that might be causing a distraction. You want to clear participants’ heads from thinking about themselves, especially their creature comforts. For brief meetings, you might include where to locate emergency exits, fire extinguishers, lavatories, or coffee and tea. For workshops and longer meetings, you would also cover the frequency of breaks, break times for responding to email, lunch arrangements, and any other “noise” that might prevent participants from staying focused. You may also conduct Icebreakers here, or after presenting the Ground Rules (chapter 4) in the seventh activity in this sequence.
- Today’s agenda: Describe each Agenda Step, including the reason for the sequence of the Agenda Steps and flow. Explain how the Agenda Steps relate to one another. Do not read them. Rather, explain why the Agenda Steps help us get DONE and why they are listed in the sequence provided. Link Agenda Steps back to the deliverable so that participants see how completing each Agenda Step helps us get DONE.
Fully explaining the Agenda Steps helps groups move out of “storming,” Stage 1 of the group life cycle. Again, do not read the Agenda Steps—explain them! Optimally, use a nonprofessional analogy to explain your Agenda Steps (chapter 6).3 You have heard that a picture is worth a thousand words; well, an analogy is worth a thousand pictures (and a story is worth a thousand analogies).
- Ground Rules: Share appropriate Ground Rules (chapter 4). Supplement your narrative posting of Ground Rules with audiovisual support, including humorous clips, but keep it brief. After presenting your essential Ground Rules, solicit any additional ones from the group, if desired.

OPTIONAL OR OCCASIONAL TOPICS
Have everyone introduce themselves by providing a structured Icebreaker. Complete Icebreakers before moving out of your Launch Step. If you expect Icebreakers or Check-ins to take up a significant amount of time, more than a half-hour, consider sequencing this activity sooner and move it up within the fifth activity (“administrivia”). Next you will find some Icebreaker examples that I have successfully used at least once.
Icebreakers Tool
WHY?
To get your subject matter experts participatory sooner by having them introduce themselves beyond names and titles. Always use Icebreakers during online meetings, providing participants with a way of connecting with one another.
PROCEDURE
Have participants share their responses with the group.
- An undemanding yet effective method begins, “If I were a . . .”—for example, “If I were a gem, I would be a ________,” or “If I were a bird, I would be a ________.”
- Describe your dream career as a child.
- Explain how you got one of your scars (and where it is).
- If you could change anything about your childhood, what would it be?
- If you could wake up tomorrow having gained any one quality or ability, what would it be?
- If you were an animal, you would be a ______.
- If you had a yacht, what would you name it?
- “My hero is . . .”; “My collection is. . .”
- If limited to five items, what would you bring with you on a desert island?
- Name a talent that you have that no one here knows about.
- Name your favorite James Bond or Elizabeth Bennet actor and explain why.
- Tell two truths and a lie—participants guess the lie.
- What is the one word you would use to describe where you are at?
- What is your favorite sport to play? Why?
- What kitchen appliance or tool would you be and why?
- What was the first concert you attended?
- What was your strangest paying job or chore?
- What would be the title of your autobiography?
- What’s on your reading list or nightstand?
- Who is your most fascinating person in history?
- “Would you rather?” questions: Would you rather be invisible or be able to read minds? Would you rather live without music or live without television? Would you rather be four feet tall or eight feet tall? (see http://www.teampedia.net/)
OR MEETING SPARKS
- Start with a “fun fact”: everyone shares something previously unknown about themselves to all the others.
- Based on a project theme, create new surnames for participants—for example, Anna Aconcagua (highest mountain in South America).
- On a rotating basis, have participants bring in some fun trivia or jokes.
CHECK-IN: MAD, SAD, AND GLAD
Used commonly in frameworks supporting Agile, begin and end meetings with three questions that require participants to state they are checking in, along with sharing something about which they are mad, sad, or glad.
- “I am mad about . . .”
- “I am sad about . . .”
- “I am glad about . . .”
- “I am fully checked in.”
Have participants pass the turn on to someone else by calling out his or her name.
Other Considerations
As your Launch sequence continues, you may need to address some particular situations.
EXECUTIVE KICKOFF
For a kickoff or significant event launch, have your executive sponsor explain the importance of the participants’ contributions and what management intends to accomplish. Consider a quick program update. However, do not allow the update or executive sponsor to take more than five minutes. Your meeting is not a mini town hall (unless it is).
Do not modify the seven activities of the Launch sequence except for the executive sponsor activity. As soon as the sponsor enters the room, if the meeting has begun, stop and introduce that person. If the sponsor is present at the start, introduce him or her immediately. Have the sponsor up front and out of the room as soon as possible or practical, preferably without letting him or her sit down. If the sponsor insists on staying, seat him or her in the back or on the side as an observer, unless the sponsor is going to be an equal participant, like everyone else.
Script talking points for the executive sponsor. Provide him or her with a written paragraph that makes these points:
- What the session is about
- What management hopes to accomplish
- Why this time things are different (if a repeat effort)
- Why these people were chosen
- Executive support for the Meeting Approach and people in the room
NOTE: Kickoffs are rare compared with most meetings. The executive will not follow your script, but your scripting has set levels and managed expectations. The executive knows you are expecting 45 seconds from him or her, even 4 or 5 minutes, but not 45 minutes.
PROJECT TEAM
Product owners and project managers or sponsors may provide updates about progress or changes that have occurred since a prior session. Have them remain brief by sticking to the vital information affecting the participants. Do not let them go too far “into the weeds,” providing details that bore everyone else. Keep them focused on what has transpired (abstract), not how it is being done (concrete).
OPEN ITEMS
You may need to conduct a review of open items from prior meetings. Preferably, have the product or project manager or sponsor read open items and share a status update while you document or record participants’ comments, if needed.
DAILY LAUNCH DURING MULTIPLE SESSION WORKSHOPS
Each morning (or each week for a string of sessions), begin by reviewing and reconfirming the meeting purpose, scope, and deliverables, along with progress made and where the group is in the Agenda. Repeat and reinforce Ground Rules (chapter 4). This is an appropriate time for using audiovisual reinforcement, especially brief clips on safety moments or quick and humorous television advertisements with an appropriate message (such as “trust one another”). Quickly review output completed previously and Agenda Steps planned for the current session. Optimally, return to your analogy to link the Agenda Steps to one another and back to the deliverable.
NOTE: During the Launch of multiple-day workshops, complete the same seven activities at the start of each day (except kickoff). Additionally, review content that was built or agreed on in prior session(s) and how it relates to the overall progress being made toward completing the deliverable.
TRANSITION REMINDER
As we learned with the group life cycle model, transitions are risky. You are more likely to cause confusion during a transition than during the middle of Agenda Steps. Therefore, take the following steps during transitions:
- Slow down.
- Move forward (lean forward for video).
- Lower your rate of speech and volume.
- Connect where you were to where you are going (connect the dots).
CAUTION: Have you been in a meeting when someone, usually an outlier, asks “Now why are we doing this?” Feel the oxygen get sucked out of the room? An effective meeting facilitator anticipates confusion and slows down during transitions. This approach is counterintuitive, because most say, “Let me review this quickly.”
The group life cycle model (chapter 4) suggests that groups, even high-performance teams, are subject to regression when transitioning from one step in an agenda to another. Be forewarned: transitions are the best time to slow down and carefully explain the white space, the why behind the what.
As your meeting progresses beyond the Launch, continue to treat your transitions carefully:
- Why are the Agenda Steps in the sequence provided?
- Why did we need the output from the prior Agenda Step?
- How does this Agenda Step help us get out of this meeting faster—how does it support or partly fulfill the meeting deliverable?
- What are we going to do next? Why?
Carefully explain the white space by answering these questions. You will discover that, when you provide clear context, your meetings finish faster than ever, because participants trust that you know where you are going. It’s easy to trust and follow a leader who has clear line of site.
Review and Wrap (Conclusion) Agenda Step
An effective Review and Wrap requires four activities. None of the following should ever be skipped, so expand and contract based on your situation and constraints:
- Review and confirm what has been DONE.
- Manage the Parking Lot.
- Agree on a communications plan.
- Assess the effectiveness of your leadership and the session.
Review and Wrap Activity 1: Review Deliverable
Do not relive the session, but do review the outputs, decisions, assignments, and so on. Focus on the results and deliverable from each Agenda Step, not on how you got there. Participants do not need a transcript. They need to be reminded about significant takeaways and offered the opportunity to ask for additional information or clarification before the session ends.
If possible and practical, use the documentation generated during the session to structure a quick walk-through. During the walk-through, include real-life examples for participants to see how well the deliverable performs.
REVIEW ACTIONS
Add an action review to planning or problem-solving meetings. Have the group confirm action items they have already agreed to or will undertake—starting with actions for the next day. List the actions, clarify them, have someone take responsibility, and have the group assign a deadline (month, day, year) for the action to have been completed. Consider applying the RASI Tool (chapter 6) to convert complex action items into assignments, called Roles and Responsibilities.
Absence or silence is unacceptable during assignments. Do not permit actions to be assigned to anyone not attending the session, either live or online.
Review and Wrap Activity 2: Manage Open Issues Using the Parking Lot Tool
Most organizations use the term “Parking Lot” to describe open issues. Regardless of the term or phrase embraced by your organization, open issues need to be managed properly and not left unattended. So, during your meetings, record open issues as they arise. During the Review and Wrap, use one of the following three Tools to manage them.
WHY?
There are numerous terms people use to describe open issues that develop during meetings. Besides “Parking Lot,” other terms used include “Issue Bin,” “Popcorn,” and my favorite, “Refrigerator,” a term used in the Middle East.4 Here are three different procedures for facilitating standard, quick, and complex open issues.
STANDARD PARKING LOT PROCEDURE
During meetings, record open issues as they arise. Now review each open issue. First make sure the open issue remains valid.
NOTE: Ever turn to a Parking Lot item and no one could remember what it meant? Ever look at your to-do list on a Saturday morning and draw the same blank? The secret to effectively capturing open issues and action items is to always include a verb-noun pairing, at minimum. Do not write down your open issue so quickly or illegibly that you will not remember what it was. For example, do not write down “Policy,” write down “Update Inspection Policy.”
Over the course of meetings, some open issues are no longer “open” and can be deleted or marked accordingly (for example, “OBE” for “overcome by events,” or taken care of). Append each valid open issue with the following:
- The issue status—along with a complete, coherent expression or description (consider using the Definition Tool (chapter 6).
- Who is responsible for communicating back to the group on the status of the open issue (frequently worded as who will do or complete the open issue)?
- When this group may expect a status update (frequently worded as when completion may be expected)? Confirm that the group can wait until the date requested for the update.
- How will progress or completion be communicated back to this group (for example, where the file will be located)? Consider email size limitations, file-naming conventions, SharePoint passwords, and file-server security restrictions.
NOTE: I carefully ask, “Who will be responsible for reporting back to the group on the status of this issue?” I do not ask “Who will do this?” Frequently, when they return to their office, the volunteer assigns the work to some of their employees.
We don’t care who is going to do it. We need to know whom to call if there are questions. Be kind and allow one and only one volunteer. Do not be nice and allow two people to share the responsibility. If you are nice you risk having them point fingers at each other when asked for a progress report.
QUICK AND EASY 2-BY-4 PROCEDURE
An uncomplicated method for managing open issues is called the “2-by-4.” Meant to connote a standard piece of lumber, the method suggests three quick questions—namely:
To . . . do what?
By . . . whom and when?
For . . . what purpose or benefit?
COMPLEX BHAG PROCEDURE
For complex open issues, or big hairy audacious goals (BHAG) that might constitute major or multiple new products or projects and cannot simply be assigned to someone, use the Content Management Tool (chapter 9). Use the output from this meeting (what) as input for a future meeting when the time, place, and people are available to conduct further analysis and make appropriate decisions or assignments. In that next meeting, begin with this open issue as input by asking “So what?” or “Why do we care?
CLOSED ITEMS
Separately capture “acorns” or other nuggets of value such as decision points and resolutions or assigned actions that are agreed upon. Acorns represent ideas that need to be nourished after the meeting before they grow into something substantial and sturdy, like an oak tree.
Review and Wrap Activity 3: Create a Communications Plan
Because it is a clever idea (in other words, important) to sound like we were all in the same meeting together, build a communications plan for the meeting results. The purpose is to get your participants to agree on what they will tell other stakeholders was accomplished during the meeting so that participants sound like they all attended the same meeting.
Minimally consider two audiences, such as superiors and other stakeholders, and record the bullets or sound bites for each. I normally use a simple T-Chart with two columns, for example for Superior and Stakeholders. Next, ask for participants’ “elevator speech,” “coffeepot” description, or “water cooler” summary.
For more complex riffs and variations, see the Communications Plan (chapter 6). You may be shocked how often participants argue about using specific words such as “complete” versus “progress.” The more times you conduct a Communications Plan, the more you will come to realize what a powerful quality control activity it provides by ensuring that everyone agrees on the same messaging.
A communications plan for meeting results offers exceptional value when there are translation or transliteration issues because it helps everyone homogenize the rhetoric and specific terms that should or should not be used to describe meeting results.
Review and Wrap Activity 4: Assessment Tool, with Four Options
Evaluation at the conclusion of meetings provides insight about how well you performed and what you can do to be better. General areas to seek feedback about include these:
- Facilitator effectiveness (or not)
- Session success (or not)
- What else might you have changed for the better?
The following are four assessment procedures, ranging from simple through complex. Adapt one to your situation.
OPTION 1: PLUS-DELTA PROCEDURE
Gather participants’ comments at the end of your meetings by building a T-Chart called Plus-Delta. On one side list what went well, a Plus. On the other side, list what could be improved, a Delta (the Greek letter Δ, which stands for “change”).5 When conducted openly, however, participants mostly mention “creature comfort” concerns and do not provide the substantive critique you need to improve your facilitation.
Therefore, Better Yet
Get feedback on the session context, including how well (or not) you did. Set up an easel or a whiteboard by the exit door, or provide a screen link that can be annotated. Have each participant contribute at least one thing he or she liked about the meeting (+) and one thing he or she would change (Δ). Ask participants to mount each note in its respective column before they depart.
Workshops
Use Plus-Delta at the end of each day of a multiple-day session to correct problems before the next day. Comments made during your meetings enable you to monitor context so that you can make quick fixes such as issues with picture quality, lighting, sound, and so on.
OPTION 2: SCALE IT
Scale It provides numerical feedback on a few questions along with some limited, anecdotal comments. Modify the questions shown in figure 5.3 for the specific feedback that you seek, using a scalable technique. With Scale It, print three or four per page, reducing the “visual burden” on your participants as you hand them a small slip of paper rather than a full-size sheet.
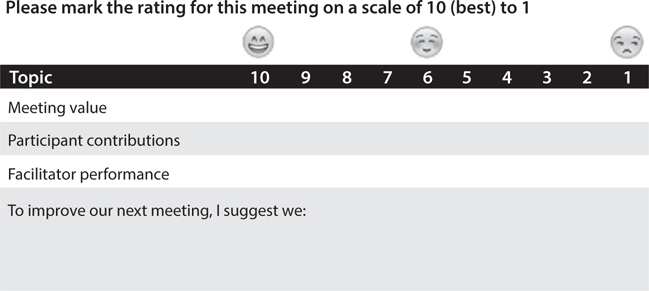
Figure 5.3. Scaled Assessment
OPTION 3: WHERE ARE YOU NOW?
Have each participant offer one, two, or three words to describe “How do you feel right now?” or “Where are you at?” You might contrast the participant’s response with the one provided in the Launch during the Icebreaker. Participants’ responses provide leading indication about the level of ownership and follow-through the team might expect.
OPTION 4: DETAILED EVALUATION FORM
At the conclusion of noteworthy events and multiple-day workshops, obtain extensive feedback. Modify the eleven questions in figure 5.4. Note the importance and value of question 10, about improving your own performance.
Structuring with Mindful Conversations
Preparing the Agenda Steps between Launch and Wrap takes longer than the meeting itself. Plan on a ratio of preparation time to meeting time of 2:1 or 3:1 (or more) to thoroughly prepare yourself and others. For online meetings, experts are telling people to double that amount of time, because the planning must be detailed and explicit, sometimes down to the level of specific keystrokes. For standard 50-minute meetings, you would be wise to allow at least another 50 minutes to organize, invite, and prepare—although a few hours may be more prudent if you are seeking exceptional results.
CONVERSATIONS WITH PARTICIPANTS
Speak with participants in advance to learn about them, the people they work with, and their pain points. For workshops, allow 15 to 30 minutes for one-on-ones. Meet face-to-face when permitted, or at least by videoconference, so that you establish eye contact before facilitating the meeting.
SEQUENCE OF CONVERSATIONS
Optimally, meet the executive sponsor, business partners, project team, stakeholders, and meeting participants. Conduct conversations privately and assure participants that their responses will be kept confidential.
OBJECTIVES OF CONVERSATIONS
These conversations have the following aims:
- To become familiar with their role and their competencies
- To confirm who should, or should not, attend and why
- To help participants show up better prepared to contribute
- To identify potential issues, hidden agendas, and other obstacles
- To transfer ownership of the purpose, scope, and deliverables
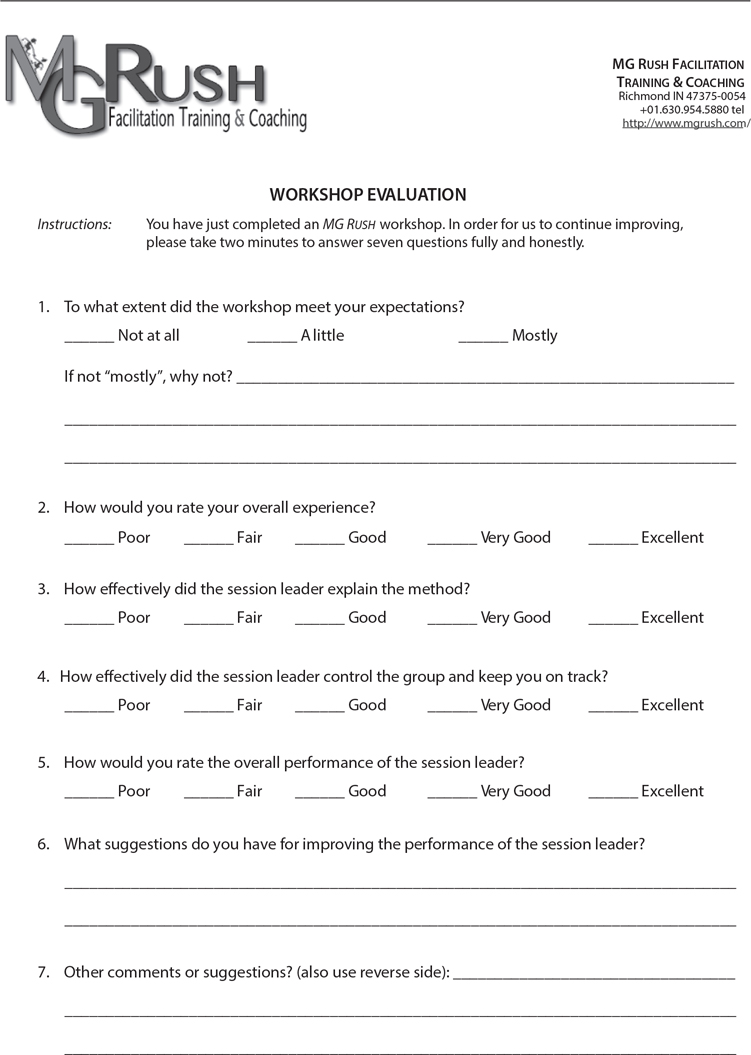
Figure 5.4. Detailed Evaluation Form
MINDFUL QUESTIONS TO ASK
The questions below are structured, stress-tested, and well-sequenced. Begin by explaining your role and ask for permission to take notes.6 Use the following open-ended questions, sit back, and listen—discover the participant’s value and the value added by the participant to the initiative you are supporting.
Get to know participants’ subject matter expertise and attitude toward workshops with openers like “Tell me, what do you do?” and “What has worked for you in the past?” Then continue with questions like these:
- What do you expect from the session?
- What will make the meeting a complete failure?
- What should the output look like?
- What problems do you foresee?
- Who should attend the meeting? Who should not? Why?
- What is going to be my biggest obstacle?
- Does the deliverable and agenda make sense to you?
- Is the “electronic leashes” ground rule acceptable?
- What questions do you think we should answer?
- What should I have asked that I didn’t ask?
PARTICIPANTS’ PACKAGE
After structured conversations, send participants a pre-read package, especially at the kickoff of major events. If you happen to provide printed packages, place the spiral edging across the top to make the package both unique and easier for left-handed notetakers. Try to include the first five items listed here in every package. The other suggestions are supplemental:
- An articulate workshop purpose, scope, and deliverables along with the Basic Agenda Steps
- Glossary for terms used in the workshop purpose, scope, deliverables, and Basic Agenda Steps
- Organizational and business unit strategic planning support—especially Mission, Values, Vision, and performance Measures
- Product, project, or team charter and detail about the value supported by the session
- List of questions to be asked during the session
- Relevant reading materials gathered during conversations7
- Responsibilities of the participants, including any overnight assignments, reading, or exercises that may be included in a multiple-day workshop
- Sponsor’s letter of invitation—organizational strategic plan
- Team members’ contact information
COMPLETION
If you can answer yes to the following questions, you are ready to proceed:
- Can the participants answer the questions for each Agenda Step?
- Can you describe a potential deliverable from each Agenda Step?
- Does a walk-through of your Annotated Agenda provide the right deliverable?
- Have you had conversations with stakeholders?
- Is your Annotated Agenda comprehensive and printed?
Annotated Agenda Development
Methods such as strategic planning, decision-making, and problem solving determine the Meeting Approach. Each Meeting Approach requires clear and detailed Agenda Steps.
METHOD DICTATES MEETING APPROACH DICTATES AGENDA STEPS DICTATES TOOLS REQUIRED
For example, Launch (Introduction) represents one clear Agenda Step. Each Agenda Step requires a procedure that relies on answering questions and conducting activities that are supported through a variety of Tools. During the Launch, for example, we might use Icebreakers. Or, during a Prioritization Agenda Step, we might use PowerBalls (chapter 7). For most Agenda Steps, there is more than one Tool that might be used.
TOOLING FOR EACH AGENDA STEP REQUIRES SCRIPTING
Scripting furnishes an anchor during workshops by telling you precisely what to say to be clear, helping you when you forget where you are going, and providing additional support when you have trouble getting there. We all need help at one time or another. Therefore, for every Agenda Step, in every agenda, a well-scripted Annotated Agenda compels you to anticipate and visualize the tools, activities, and procedures you need.
An Annotated Agenda provides tremendous predictive power. From reviewing the rigor and thoroughness of an Annotated Agenda, I can easily predict how well your session will move forward, regardless of your talents and skills (or lack thereof, because someone not highly skilled but thoroughly scripted will outperform anyone not well-scripted but relying on their “natural” talent).
Annotated Agendas begin each Agenda Step on a new page. Printed versions are preferred, even for online meetings, because they are faster and more reliable. For each Agenda Step write down the following:
- Agenda Step name: Write down the name of each Agenda Step as shown exactly on the Basic Agenda that you distribute and post.
- Estimated time: Estimate a range for how much time this Agenda Step requires—consider best and worst case scenarios for your low and high estimates.
- Purpose and closure: Write down a one- or two-line description (to launch and wrap up each Agenda Step) describing the reason for the Agenda Step and how it contributes toward completing the deliverable. Never be afraid to read from your printed Annotated Agenda. Chances are, if you go rogue (extemporaneous), you will use more words and leave people a bit confused.
- Procedure: Stipulate precisely what activities, tools, and tasks will complete this Agenda Step. Include specific questions, examples, desired output format, and other notes. Detailing your procedure for each Agenda Step takes anywhere from one-half page to three pages or more of notes. An Agenda Step will frequently require more than one Tool at once, or in sequence. Script how you are going to facilitate each Agenda Step, what you are going to ask, and the precise words you will or will not use.
- Document output: Write down instructions to yourself about what to document (for example, list, paragraph, matrix) and perhaps where to post in the room or how to post online, including output title.
- Media support: Identify slides or posters for definitions, legends, tables, and other technological support for online meetings that you will need to complete the procedure for each Agenda Step.
Do not rush your effort. Skimping on the Annotated Agenda ensures suboptimal performance. Next—please use it. Do not build it, set it down, and forget about it. We prefer a leader who is holding a piece of paper, reading to us, and being clear over one who speaks extemporaneously and leaves us a bit confused.
NOTE—Some facilitators add information about real estate management (where they are mounting their large-format paper, legends, ground rules, and so on) and online technology instructions such as which type of screen share to use. The sequence of the items in the Annotated Agenda is arbitrary, so create a template that works for you.
Three phases convert your Basic Agenda into a fully Annotated Agenda.
PHASE 1: DEVELOP THE BASIS
NOTE: While reviewing details for each phase in this section, remember that you are also responsible for managing group dysfunction or problems. As you identify and modify Agenda Steps, think about what may need to be done to correct potential problems with people. Interventions (such as team-building activities and trust generators) may be needed during other activities or as Agenda Steps by themselves. Some activities are planned but not used. Always keep them in your “hip pocket,” ready to use if required.
Procedure
- Write down your deliverable and get examples! Deliverables illustrate the required documentation and needed information. What outputs are we producing? What do they look like in printed form?
- Quantify the impact from the meeting, measured in local currency and FTP, and articulate the project or product scope for your meeting. Understand what might be excluded (because of scope), or what the purpose and scope of the session are not.
- Identify the Basic Agenda Steps that enable the team to produce the deliverable. Apply your organization’s glossary, life cycle, and methodology (if available). The best sources for identifying draft Agenda Steps are these (in order of preference):
- Your organization’s own methodology or in-house meeting design, which may include cultural expectations, examples, and templates
- The three upcoming Meeting Approaches and numerous Tools in the next three chapters, adapted and modified for your purposes
- Experience—look at past meetings and note what specific questions need to be answered to deliver the meeting objectives
- The stakeholders—speak with the executive sponsor, product owner, program manager, project manager, and subject matter experts
- The team or product charter—look at them to identify gaps the meeting output needs to fill, and supplement with secondary research, but do not rely solely on Google or Wikipedia, because some of the best methods remain protected by intellectual property rights
- Identify the subject matter experts. Understand what knowledge or expertise each needs to bring to the session. Understand the political atmosphere—do the experts need trust building? Ask them for questions that they would like to see answered during the session. Their questions will either fortify your Meeting Approach or help you manage expectations by letting the subject matter experts know that we will not have time to address some of the questions they want answered.
Walk through the Basic Agenda Steps to ensure you can produce the deliverable. Do the Agenda Steps allow the group to advance without jumping around? Are the Agenda Steps sequenced properly? Will the deliverable provide the necessary detail required?8
PHASE 2: DRAFT YOUR TOOLS AND PROCEDURES
Now convert the Basic Agenda Steps into scripted activities while socializing (that is, sharing) the meeting purpose, scope, and deliverable with your participants. Output from this phase should include a consensually agreed-on purpose, scope, and deliverables, and your draft Annotated Agenda, replete with scripted activities and transitions for the meeting.
- With each Basic Agenda Step determine your primary and backup activities, tools, and procedures that will create the required information. Review each activity considering the capacity of your participants and the limitations of your online technology or time. Begin to script your Annotated Agenda around the following components:
- – Define terms used in the purpose, scope, deliverables, and Basic Agenda. Update your glossary that should be shared with others.
- – Identify the activities (think Tools) you deem appropriate for each Agenda Step. Time permitting, write down backup options as well.
- – Determine if you need to add team-building, creativity, or other “groupthink prevention” exercises. Insert as appropriate—each just in time (just before the effect is required).
- – Design Breakout Team (chapter 6) activities and the precise questions you will assign the teams. Create team names and appoint CEOs (chief easel officers) and team members for each. Rotate CEOs and members across the entire session.
NOTE: The Annotated Agenda provides a script for you to hold and use. It details every activity and assignment. It provides contextual understanding of the entire session—where you are, what you are asking, and what you need to support your explanations (such as a legend).
Build a rigorous annotated agenda, and use it.
PHASE 3: PREPARE TO FACILITATE
Refine and “beautify” your handouts, legends, slides, posters, screens, and other visual or video support so that you are fully prepared. This output represents your final and fully scripted Annotated Agenda with all the print and screen support you need to lead your session.
- Complete preparation, rehearsal, coordination, and any final conversations with stakeholders, especially participants. Create and distribute in advance (as appropriate) support materials such as the following:
- – Glossary
- – Organizational Mission, Values, and Vision
- – Participant pre-read package
- – Presentation slides and handouts
- – Video supplements and graphic support and legends
NOTE: With these three phases complete, you are not guaranteed that your Meeting Approach will work. However, Annotated Agendas dramatically improve confidence, which influences competence.
Meeting or Workshop?
Sessions include meetings and workshops. The meaning behind the term “workshop” is similar to the meaning of the term “meeting.” However, a few differences include the following:
- Agenda Steps in meetings are frequently boxed in time. Workshop procedures are not boxed in time, but front-end loading (getting more done sooner) makes it easier to complete the back-end activities and tasks.
- Leaders in meetings may not be expected to be entirely neutral. Some leaders learn to embrace the importance of meeting neutrality and active listening, but when required they must render an opinion or a decision. On the other hand, workshop facilitators risk total failure if they violate neutrality by offering up or evaluating content.
- Regularly held meetings (staff meetings or board meetings) conclude when time runs out, usually with an understanding that unfinished items will be picked up in the next meeting. When groups build toward a workshop deliverable, the sequence of the Agenda Steps is critical, and participants cannot leap ahead or advance until foundation work is completed.
- Roughly speaking, meetings deliver up outcomes or conditions, such as “increased awareness,” while workshops document outputs such as strategic plans, decisions, and detailed solutions.
MEETINGS: WHERE MINUTES ARE KEPT, AND HOURS ARE LOST
As a result of timing, participant availability, and physical space constraints, many workshops may be spread across multiple weeks, turning full-day or multiple-day workshops into weekly “meetings.” The main structural difference between contiguous-day and multiple-week workshops is that break periods between sessions are longer in duration.
Commonly, given the way the two terms “meeting” and “workshop” are used, the primary difference is duration. Sessions that last an hour or two are commonly called meetings, while sessions that run three hours through three days or more are commonly called workshops.
AGENDA STEP OPTIONS
For either, with each Agenda Step, you will be facing one of three conditions:
- DONE—Content was developed before the session at a different time. Most of the group has previously indicated that the existing version of something appears acceptable. You need to review and confirm for consensual support. Carefully document any minor edits or word changes.
- WIP (Work in progress)—A draft has been sketched or begun and needs to be completed. If you already started the effort and have built an initial framework, you should be able to complete your effort and surround the framework with supporting details.
- BLANK—The procedures and activities I provide in upcoming chapters always assume that you are starting with a blank sheet of paper, and thus I explain procedures from start to finish.
Three Meeting Approaches
Some mindsets other than servant leadership do not need structure. For example, an autocrat may simply shout “do this” or “do that,” and employees carry out that person’s wishes.
BIAS TOWARD STRUCTURE
Today, however, especially since no one is as smart as everyone, we rely on groups for higher-quality, innovative solutions. Therefore, we should walk the talk and galvanize consensus by using structure to get DONE quicker.
My servant leadership mindset remains “technique agnostic.” Servant leadership fully integrates across any consensus-based mindset such as board meetings and staff meetings, as well as more structured disciplines such as Agile and Waterfall, along with associated frameworks like Design Sprints, Failure Mode Effect Analysis, Lean Sigma, Organizational Design, Peer Review, Scrum, Strategic Planning, and so on.9 But one thing is certain: you better have a Meeting Approach before your meeting starts.
WHAT IS A MEETING APPROACH?
My Meeting Approaches have integrated the Agenda Steps, Tools, and scripting for immediate use with your most significant or frequent meeting challenges. I have built, used, and refined more than 30 significant Meeting Approaches ranging from simple decision-making through complex organizational design. My annotated agendas on average run around 20 pages per Meeting Approach. I don’t have time or space to explore them all, so I have selected the most frequent situations—those causing the most pain, yielding the most gain, and used most frequently. Specifically, chapters 6, 7, and 8 guide you through experiences about the following:
- Chapter 6—planning for any group
- Chapter 7—deciding on anything
- Chapter 8—creative problem solving
TOOL SELECTION
The Meeting Approaches provide you with Tool options. Select optimal Tools by understanding your desired output. Avoid becoming so comfortable with one or two Tools that they become the only Tools you use. To help decide on your Meeting Approach, Agenda Steps, and Tools:
- First define your desired output (or outcome).
- Engage in conversations with stakeholders to secure their input and begin to transfer ownership.
- Always apply the seven-activity Launch and four-activity Review and Wrap to every session, from 50-minute meetings through five-day workshops.
- Review the forthcoming planning, deciding, and problem solving sections to determine which Meeting Approach best coordinates with your session’s deliverable.
NOTE: The best way to learn my Tools is to use them. For a solution where everyone benefits, promote yourself among not-for-profit groups who desperately need facilitation help and better meeting design. They won’t care in the least if you are using a Tool for the first time.
TOOL GUIDELINES
Detailed procedures for dozens of Tools are provided in the rest of this book. You will find Tools you knew about (such as Brainstorming, chapter 6) and Tools you never heard about before (for example, Bookend Rhetoric, chapter 7). When planning which Tools to use, consider the following:
- Build contingencies—plan to use a specific Tool but if something unexpected arises, do not be afraid to substitute something more appropriate.
- Do not ask your group for permission to use a Tool. You do not need participants’ permission—so do it.
- Do not be afraid to use a new Tool—mine have all been field-tested, numerous times, and work well when used appropriately.
- Do not be inflexible like some gurus—there is more than one right answer.
- Explain the deliverable from each Tool and how using it supports getting DONE.
- For Tools designed to correct team dysfunction, remember that most groups did not become dysfunctional in 10 minutes, and their situation will not be corrected with a 10-minute exercise.
- Never present your Tool as a game or a gimmick.
- Scripting rigorous Annotated Agendas help you rehearse the Tool in your mind.
ADDITIONAL TOOLS
There are hundreds of team-building and trust-enhancing Tools not included in this book. Many are available from the Best Practices material available through my website at mgrush.com/blog. Continue to add to your arsenal. Build a Community of Practice (CoP) that archives activities, procedures, and graphical support so that you can make a quick decision about which Tool to use and rely on material that others have built.
I’ve taken a “just in time” approach to introduce Tools within agendas where you will need them. What if you’re not deciding, planning, or solving and building something else? Figure 5.5 illustrates when and where the Tools fit most frequently. Since “one size does fit all,” please call or write about your situation and we can discuss your options.

Figure 5.5. Tool Selection Guide
Quick Summary on Structuring
Use the following guidelines for every significant meeting you lead.
- Codify the purpose and scope of the meeting: What project or product are you supporting? Stipulate what it is worth in currency and FTP (Why is it important? How much is at risk if we fail?).
- Articulate the deliverables: What specific content represents the output of the meeting and satisfies what DONE looks like. What is my analogy for explaining it? Who will use it after the meeting?
- Identify known and unknown information: What is already known about the organization, business unit, department, program, product, or project? What information is needed to fill the gaps?
- Draft Basic Agenda Steps: Compose a series of steps from experience or other proven approaches that would be used by experts to build the plan, make the decision, solve the problem, or develop the information and consensus necessary to complete the deliverable and get DONE.
- Review Basic Agenda for logical flow: Walk through the Agenda Steps with others to confirm that they will produce the desired results. Link your analogy to each of the Agenda Steps. Rehearse your explanation of the white space.
- Identify meeting participants: Determine the optimal subject matter expertise you require or the meeting participants who can provide the information required.
- Detail the procedures to capture information required: Gather and assemble specific questions that need to be addressed, even questions for which subject matter experts are seeking answers. Sequence the questions optimally. Build your Annotated Agenda including the appropriate Tools and activities to produce the information.
- Perform a walk-through with business experts, the executive sponsor, project team members, and anyone else who will listen to you (grandmothers are good for this, and you might get a delicious, home-cooked meal in the bargain).
- Refine: Make changes identified in the walk-through, edit your final Annotated Agenda, firm up your artifacts, fill out your glossary, complete your slides, distribute your handouts, and rehearse.
1 As the term is used in this book, an artifact could be a printed poster, a screen-shared item, a digital wallpaper poster (like a weather person on television), a digital emoji, or preferably a handwritten or hand-drawn card held up closely to the camera.
2 I am certified by Daniel Mezick’s HTTO Level 1, Open Leadership Network, “Connect & Communicate: How to Teach Online,” http://newtechusa.net/danielmezick/.
3 For an example, see the section “Explanation via Analogy” in the Planning Approach (chapter 6).
4 Vehicles rust while sitting in a parking lot, but open issues temporarily stored in a refrigerator can be preserved and even used later to cook up a whole new meal.
5 This method is also called “Benefits and Concerns (Bs and Cs),” “Star-Delta,” and other names.
6 Please do not tell someone that your conversation is confidential and then take copious notes without asking. I have only had two people say no, they would rather I not take any notes. I’ve had dozens compliment me on the question itself because rarely have others extended the courtesy to ask for permission to take notes.
7 The less important terms are “grayed out” because they signify or trigger meaning about the more important questions in black that should be the focus of the Agenda Step. This convention is also used elsewhere in this book.
8 For a downloadable infographic, see https://mgrush.com/wp-content/uploads/2019/07/Meeting-Pathway_MGRush-Facilitation_Poster-11x17.pdf.
9 Further details on other meeting types such as Organizational Design, FMEA (Failure Mode Effect Analysis), Peer Review, Risk Analysis, and so on may be found on my website: https://mgrush.com/.