
The Contacts window
Customizing the contacts view
Finding contacts
Adding contacts to the Address Book
Working with distribution lists
Understanding the contacts form
Using your contacts
Editing business cards
Sending contact information by email
Working with multiple address books
Setting contact options
Outlook's contacts feature is much more than a simple address book. It provides you with powerful tools to not only store but to find and use information about your business and personal contacts.
Outlook's contacts are one of its most powerful features. At heart, it is just an address book, but what an address book! Of course it covers the basics of organizing names, addresses, and phone numbers, but it can do so much more. Many people use contacts primarily as a way to store people's email addresses for ease of sending emails. This is important, but if that's all you use contacts for you are really missing out. For example, did you know that you can use Outlook contacts to do the following?
Create electronic business cards so you can send your or other people's contact information by email.
Store multiple phone numbers, email addresses, and postal address for an individual.
Perform an automated mail merge, creating a mailing to some or all your contacts.
Automatically dial a contact's phone number (if your computer is equipped with a modem).
Store a photograph as part of a contact's information.
Define custom fields to store whatever information you need as part of a contact.
View a map of the location of a contact's address.
Once you understand all the power of Outlook contacts, you can use as many or as few of its features as you like.
Note that Personal Address Books, a feature available in earlier versions of Outlook, are no longer supported.
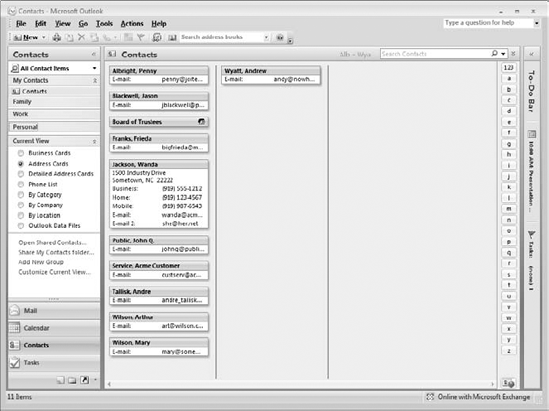
When you select Contacts in the navigation pane, the top part of the pane displays the name of your address book. Usually this is Contacts. If you have more than one address book, they will all be displayed here. Using multiple address books is covered later in this chapter — most people have and need only one.
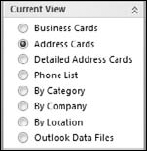
Below the address book name is a section titled Current View (see Figure 10.1). Here you can select the way that information will be displayed in the Contacts window. There are several options, including business cards, phone list, by company, and by location. Simply click the view you want and the Contacts window changes immediately.
At the bottom of the Current View section — you may need to scroll to bring these into view — are two commands: Add New Group and Customize Current View. The following sections look at these in turn.
By default an address book is not subdivided. As the number of contacts grows, you may find it useful to define groups to organize contacts in a way that makes them easier to find and use. You might have Work, Personal, and Family groups, for example. To define a group, follow these steps:
Make sure that Contacts is selected in the navigation pane.
At the bottom of the Current View list, click the Add New Group link. Outlook adds a group called New Group under My Contacts (see Figure 10.2).
Type in the group name and press Enter.
Repeat steps 2 and3 as needed to create more groups.
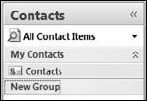
Figure 10.3 shows how the navigation pane will look after you create three new groups.

After you have created one or more additional groups, you can simply drag a contact from its current group to the group that you want it in. For example, Figure 10.4 shows how you would move Wanda Jackson from the Contacts group to the Work Contacts group. If you want a given contact to be in more than one group, follow these steps:
Select the contact.
Press Ctrl+C to copy the contact to the Clipboard.
Display the destination group.
Press Ctrl+V to paste the contact.
The different views that Outlook provides for contacts can be customized to suit your needs. You cannot, however, create a new view from scratch. To customize a view:
Select the view that you want to customize in the Current View list.
At the bottom of the Current View list, click the Customize Current View link. Outlook displays the Customize View dialog box (see Figure 10.5).
Click one of the buttons to change related view settings (explained in more detail in the text). The text next to each button describes the purpose of each.
If necessary, click Reset Current View to return the view to its original default settings.
Click OK to save your changes and close the dialog box.
Depending on the view you are customizing, you may have only some of the buttons in the Customize View dialog box available. This is because certain aspects of a view are not relevant to some views. The aspects of the view that you change with the different buttons are described in Table 10-1.
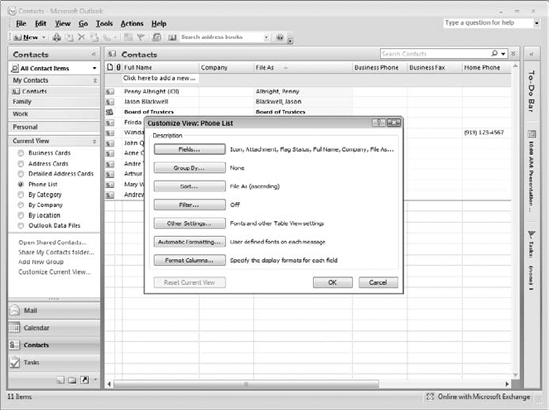
Table 10.1. Components of Customizing a Contacts View
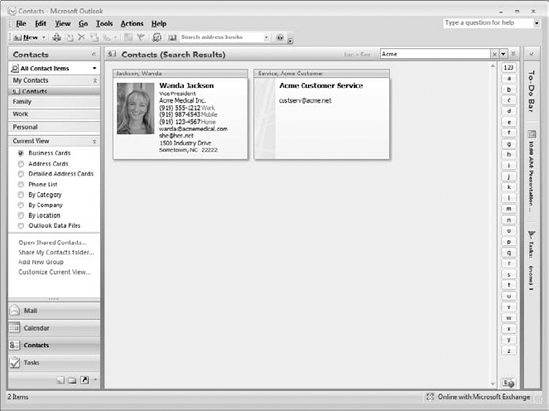
As your contact list grows in size, you may find it helpful to search for contacts rather than simply look through the list hoping to find what you are looking for. At the top right of the Contacts window is a search field where you type the text you are looking for. Outlook automatically filters the contacts to show only those that match what you have entered. An example is shown in Figure 10.6. If there are no matches, a message to that effect is displayed.
After conducting a search, click the X next to the search box to clear the search and return to displaying all contacts.
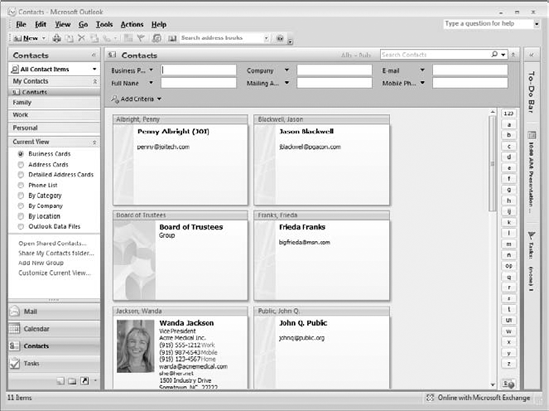
The search I have just described searches all the contact fields for the text you entered. If you want to search in specific fields, you can perform an advanced search by clicking the double down arrow to the right of the search box. Outlook displays the advanced search tools as shown in Figure 10.7 (your screen may show different fields than are shown in the figure). To use these tools:
Type in any of the search fields to search in that field only.
Type in two or more search fields to display records that meet all your criteria.
To include more fields in the search, click the Add Criteria button and then select the desired fields from the menu.
To clear each criteria and return to display of all contacts, click the X next to the search box.
To close the advanced search tools (while keeping the search active), click the double up arrow to the right of the search field.
Outlook provides you with several ways to add information to an address book.
To add a new contact to the address book:
If Contacts are active in Outlook, click the New button on the toolbar or press Ctrl+N.
If Contacts are not active in Outlook, click the arrow next to the New button on the toolbar and select Contact from the menu.
In either case, Outlook displays a new, blank contact form as shown in Figure 10.8. Type in the information — only a name is required and you can use or not use the other fields as you desire — and then click Save and Close on the ribbon. If you want to save this contact and enter another, click Save and New. Most of the fields on the contact form are self-explanatory, but I provide full details about the form later in this chapter.

When you have opened a received email, the From field displays the name and/or the email address of the sender. It also displays any other recipients — other than you, that is — in the To and Cc fields. You can add the From person or any of the other To or Cc people to your contacts list by right-clicking the name and selecting Add to Outlook Contacts from the context menu. Outlook opens a new contact form with the available information filled in. This is only the person's email address and perhaps their name. You can add additional information to the contact, if desired, then click Save and Close.
The heading of this section may seem confusing but it makes more sense when you understand that an Outlook user can send a contact as an attachment to an email message. The technique for doing this is covered later in this chapter in the section "Sending Contact Information by Email."
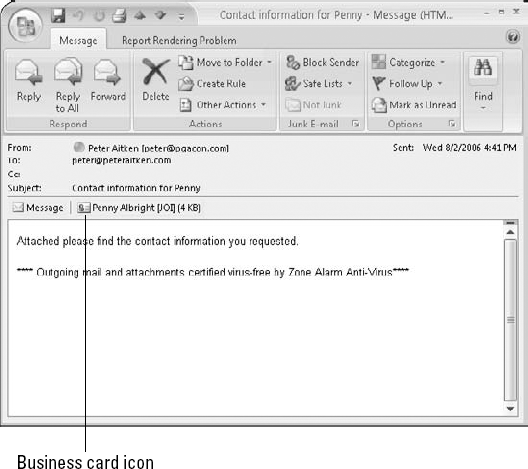
If you receive a contact in an email message, it will appear as an attachment identified by a small business card icon and the contact's name, as shown in Figure 10.9. If you double-click the attachment, Outlook will open a new contact form with the contact's information entered. You can edit the information if needed and then save it to your address book.
A vCard file is a special file format designed to send contact information. Although this is not Outlook's native format for sending and receiving contact information, Outlook can read vCard files that you may receive from people using other email software. They work the same way as Outlook contacts that were described in the previous section — double-click the attachment to add the information to your address book. Outlook users can also send vCards to other people — this is explained later in the chapter in the section "Sending Contact Information by Email."
A distribution list is a collection of two or more contacts. You can easily send an email message to everyone on the list simply by selecting the list from your address book when addressing the message — there's no need to add each person individually to the message's To field.
To create a distribution list, click the down arrow next to the New button on the toolbar and select Distribution List from the menu. Outlook will open a distribution list form as shown in Figure 10.10. The form is initially empty, of course — this example shows some names that have been added.
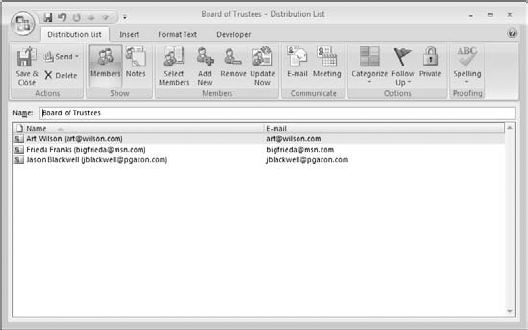
To add contacts that are already in your address book, click the Select Members button. Outlook displays the Select Members dialog box as shown in Figure 10.11. If you have more than one address book you have to select the desired one in the Address Book list. Then select individual contacts by clicking (Ctrl+Click to select more than one) and click the Members button followed by the OK button. You can also select existing distribution lists to add to the new list.

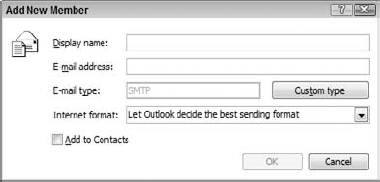
To add a contact that is not in your address book to the list, click the Add New button. Outlook displays the Add New Member dialog box (see Figure 10.12). Enter the new contact's name and email address and select the Add to Contacts option if you want the person added as an individual entry to your contacts list as well as to this distribution list. Then, click OK.
In many ways, a distribution list is like an individual entry in your address book. When a distribution list is open, you can use the various buttons on the ribbon (E-mail, Meeting, Categorize, and so on) just like you do for an individual contact (these are described elsewhere in this chapter). You can also send a distribution list as an attachment to an email message as described in this chapter in the section "Sending Contact Information by Email."
When you address an email message to a distribution list, the list name is displayed in the To or Cc field of the message with an adjacent + sign, as shown in Figure 10.13. If you click this + sign, the list will be expanded to its individual members just as if you had added them individually to the To or Cc field. This can be useful if you want to send a message to everyone on the list except one or two people — you can expand the distribution list and delete those few individuals from the To or Cc field of the message.
Outlook contacts are much more than a simple address book. This section covers additional details and capabilities of Outlook contacts.
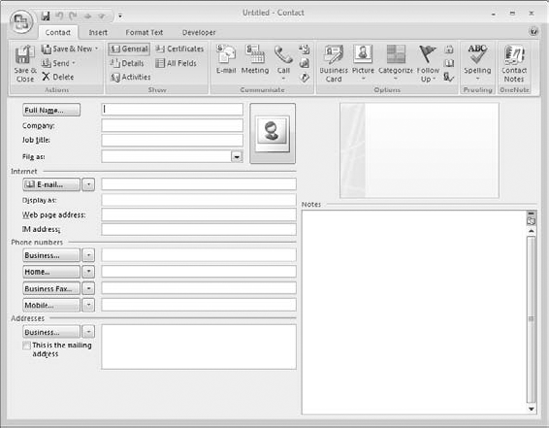
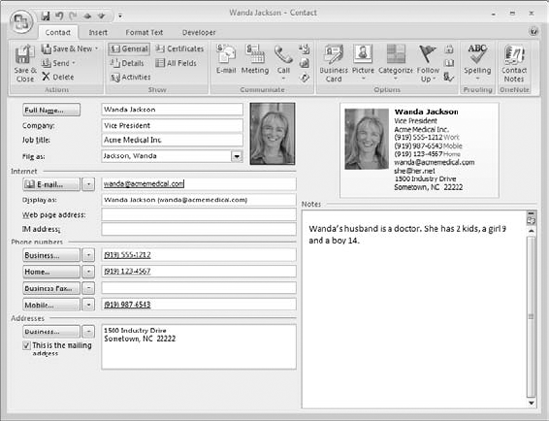
The contact form, shown in Figure 10.14, provides places for you to enter many different kinds of information about a contact. The only field that is required is the name — you can use all, some, or none of the other fields as required. Some of the elements on the contact form may benefit from an explanation.
You can simply enter a contact's name in the Full Name field in the usual way, for example John Q. Public. You can also click the adjacent Full Name button to bring up the Check Full Name dialog box as shown in Figure 10.15. Here you can specify a title such as Dr. or Mrs. and a suffix such as Jr. or Sr.

Note the option in this dialog box: Show This Again When a Name Is Incomplete or Unclear. When this option is on (the default), Outlook will open this dialog box automatically when you enter an unclear name such as "Fred" in the Full Name field.
The File As field determines how a contact will be filed in the address book. The default is last name first (Public, John Q.) but you can also choose to file a contact first name first.
The Phone Numbers section of the contact form provides spaces for four numbers. By default these are labeled as Business, Home, Business Fax, and Mobile, but you can change which numbers are displayed in a particular phone number field by clicking the adjacent down arrow and selecting from the list. Some of the choices available are Home Fax, Pager, and Assistant. Outlook will save a phone number for each designation but only four numbers will be displayed on the contact form at one time. When you open the list of designations, those for which you have entered a phone number will be checked.
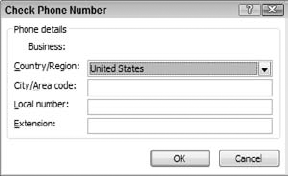
Next to each phone number field is a button with the field's designation on it. If you click one of these buttons, Outlook opens the Check Phone Number dialog box as shown in Figure 10.16. Here you can enter additional details for the phone number if desired.
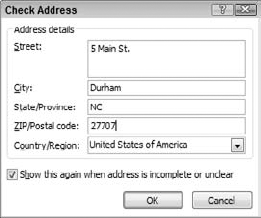
The Addresses section of the contact form can store up to three addresses designated as Home, Business, and Other. Select the one to display by clicking the down arrow adjacent to the address box. Click the adjacent button to open the Check Address dialog box (see Figure 10.17) where you can enter or edit address details. By default, Outlook will display this dialog box automatically if you enter an address that appears to be incomplete or unclear.
One of the addresses for a contact can be designated as the mailing address by selecting the corresponding option. Outlook uses this address when you are doing a mail merge using Outlook contact data. Mail Merge is discussed later in this chapter.
You can associate a picture with a contact by clicking the Picture button on the contact form. Outlook displays a dialog box that lets you browse for the picture file. When you have associated a picture with a contact, it displays on the picture button and also on the contact's business card, as shown in Figure 10.18. To remove or change the picture, right-click it and choose from the context menu.
Outlook can store as many as three email addresses for a contact, designated as E-Mail, E-Mail 2, and E-Mail 3. You select which one to display on the contact form using the arrow adjacent to the E-mail field.
If you create an email message to a contact by clicking the E-mail button on the ribbon on a contact form, Outlook will create a message addressed to all the email addresses for that contact. If you click the To button on an email message, the list of contacts will display each email separately and you can choose the one to use.
The Display As field determines how the contact is displayed in a message's To or Cc field. By default Outlook displays the contact's name followed by the email address in parentheses, but you can edit this to display as desired — for example, just the person's name.
The default contact display, called General, has been shown in the figures throughout this chapter so far. This is the display that you will probably use most often. There are several other displays, or views, available — you select the display to view from the Show section of the Contact ribbon.
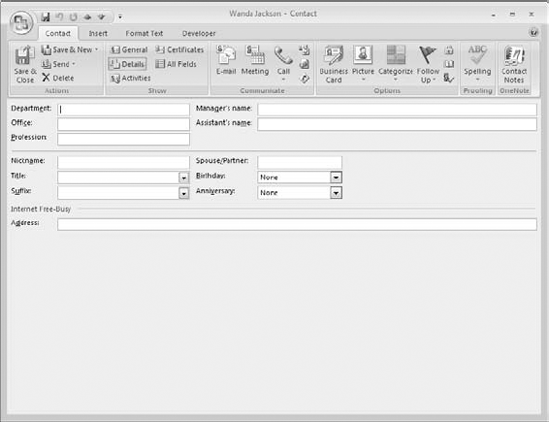
The Details view gives you access to secondary information about a contact. This display is shown in Figure 10.19. This information includes fields such as Department, Office, Nickname, Spouse/Partner, as well as details for the person's NetMeeting settings. You may never use this view but it's available if you need it.
One of the security features available in Outlook is digital certificates. A contact can send you a certificate. You can then use this certificate to send encrypted mail to that person. The Certificates display lets you view and work with the certificate(s) that you have for a contact. Digital certificates are covered in detail in the chapter on security (Chapter 20).
The All Fields display lets you view all or selected subsets of the data associated with a contact. The amount of information — number of fields — that an individual contact can hold is quite impressive, way too much to display fully in any other contact view. The All Fields display also lets you define your own custom fields for a contact and to change the properties of some fields.
The All Fields display is shown in Figure 10.20. Near the top is the Select From list where you choose which fields to display in the window. You can display all fields and can also display one of several defined subsets such as All Contact Fields or All Mail Fields.
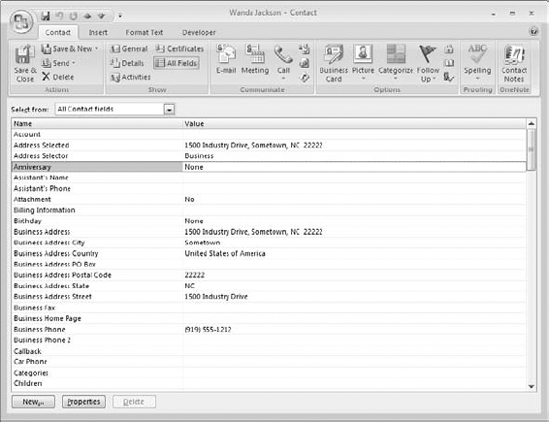
Some fields can be edited in this view by clicking in the Value column and making the desired changes. Other fields are generated internally by Outlook and cannot be edited.
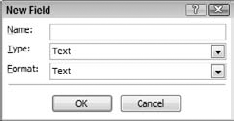
You can add a custom field to the contact by clicking the New button at the bottom of the window. Outlook displays the New Field dialog box (see Figure 10.21) where you enter a name for the field (which cannot duplicate an existing field name). You also select the data type for the field. Your choices are Text, Number, Percent, Currency, Yes/No, and Date/Time. For certain data types you can also select a format from the Format list. When you are finished, click OK and the custom field will be added to the All Fields display.
You can change the properties of a field by clicking it in the list and then clicking the Properties button. This is relevant only for user-defined fields — the properties of Outlook's built-in fields are locked.
Outlook creates a business card for each contact based on a default template. As you can see in Figure 10.22, this template includes name, company, title, phone numbers, email and postal addresses, and a photo (assuming these elements are part of the contact).

To edit the business card for a contact, click the Business Card button on the Contact ribbon. Outlook opens the Edit Business Card dialog box, shown in Figure 10.23.
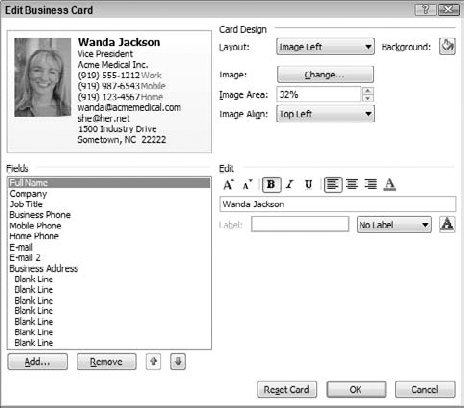
The top-left section of this dialog previews how the business card will look with your edits. The top-right section defines the overall layout of the card:
Layout: Specifies the image location. You can also omit the image or use it as the card background.
Background: Lets you select a background color for the card.
Image: Click the Change button to specify a different image.
Image Area: Determines how much of the card is occupied by the image. The maximum is 50%.
Image Align: Determines how the image is positioned within the image area.
The lower-left section of the Edit Business Card dialog box lets you specify the data fields that are included on the card and their order. You can:
Click Add, then select from the menu to add a field to the card.
Click Remove to remove the selected field from the card.
Click the up or down arrow to change the position of the selected field.
The lower-right section of this dialog box is for text formatting. When a field is selected in the Fields list, use the tools here to:
Increase or decrease font size.
Make font bold, italic, or underlined.
Align text left, center, or right.
Change font color.
Oddly enough, you cannot change the font used on a business card, just its size.
The Label section lets you add a label to any data field. You can specify the text of the label, its color, and whether it is displayed to the left or right of the item.
Click the Reset Card button to undo any edits you have made and return the card to the default appearance. Click OK to save your changes and close the dialog box.
If your computer is equipped with a modem, you can have Outlook dial the phone for you based on the number associated with a contact. Then you can pick up your handset and complete the call as usual. This requires that the modem and handset be on the same line, which can be inconvenient if you use the modem to access the Internet. If your Internet connection is via cable modem or DSL, or via a second telephone line, you may want to use an old modem as a dedicated dialer on your voice line. The speed of the modem is not relevant in this application.
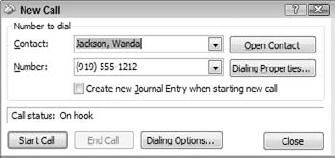
When a contact is open, click the arrow on the Call button to display the menu shown in Figure 10.24. This menu lists all the phone numbers for the current contact. Select the one to dial and Outlook opens the New Call dialog box (see Figure 10.25) with the selected phone number entered. The settings and commands in this dialog box are
Dialing Properties: Opens the dialing properties where you define rules for dialing from your computer. You should not have to change these because they are set up when you install and configure your modem.
Create New Journal Entry...: Creates an Outlook journal entry for the call, noting the number called and the time and date of the call.
Dialing Options: Lets you set speed dialer options and add names and numbers to the speed-dial list.
Start Call: Dial the number.
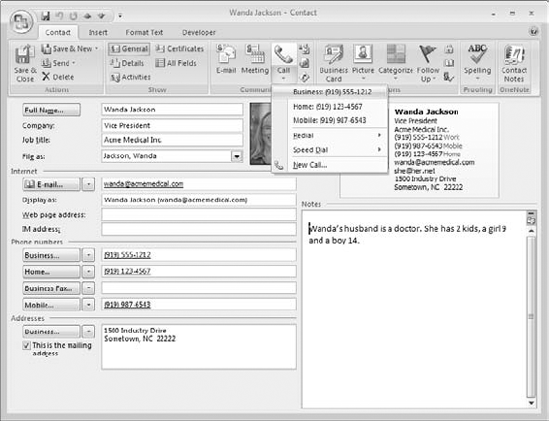
The Call menu has several other commands:
Outlook can also make Instant Messenger calls. If you have specified an Instant Messenger address for the contact, this option will appear on the Call menu.
It can be very useful to send contact information attached to an email message. This lets recipients enter the information in their address book quickly and without errors. If you keep an entry for yourself in your address book, you can easily send your own information as well.
Outlook offers two formats for sending contact information. Outlook's native format is to send the information as an Outlook item. You can send individual contacts and distribution lists this way. Information sent this way can be used by other Outlook users and possibly by users of other email programs that support this format. To send contact information as an Outlook item:
Create and address the email message as usual.
On the Insert ribbon, click the Insert Item button. Outlook displays the Insert Item dialog box (see Figure 10.26).
In the Look In list at the top of the dialog box, click the Contacts folder.
In the Items list at the bottom of the dialog box, click the contact or distribution list to send. Hold down the Ctrl key while clicking to select more than one contact.
Make sure the Attachment option is selected. If you select the Text Only option, the information will be added to the body of the message but the recipient will not be able to automatically add it to their address book.
Click OK. The item, with a small business card icon, will be added to the message's attachment list.

The second format for sending contact information is vCard, a widely supported format for contact information. Most email programs support this format and you may want to use it when you are not sure that all the intended recipients use an email program that supports Outlook items. You can send only individual contacts using a vCard, not distribution lists. To send a vCard:
Open the contact that you want to send.
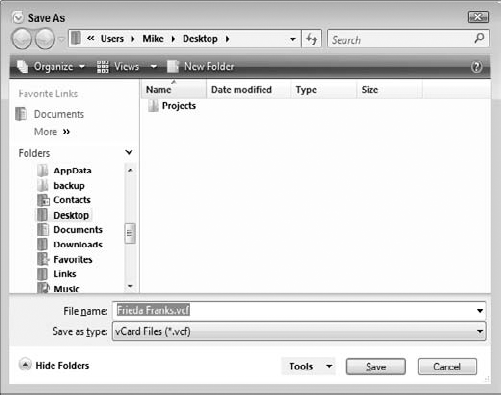
In the Contact window, click the File button and select Save As from the File menu. Outlook displays the Save As dialog box (see Figure 10.27).
Use the dialog box tools to navigate to the location where you want to save the vCard file.
In the Save as Type list, select vCard Files (*.vcf).
The default name for the file is the contact name. You can edit this if desired.
Click Save.
Create an email message and attach the vCard file that you just saved.
When you have a contact open, the Actions section of the ribbon includes a Send button. You can use this button to send the open contact in one of three ways by selecting the desired command from the associated menu:
Send as Business Card: Outlook creates a new message with the contact inserted in the message body as a business card and attached to the message as a vCard file.
In Internet Format (vCard): Outlook creates a new message with the contact attached to the message as a vCard file.
In Outlook Format: Outlook creates a new message with the contact attached to the message as an Outlook item.
This section describes some of the other actions you can perform with contacts.
If a contact has a valid address entered, you can click the Map button on the Contact ribbon to open a web browser and view a map of the specified location. This feature is powered by the Windows Live Local web site, which provides other services such as driving directions and business search.
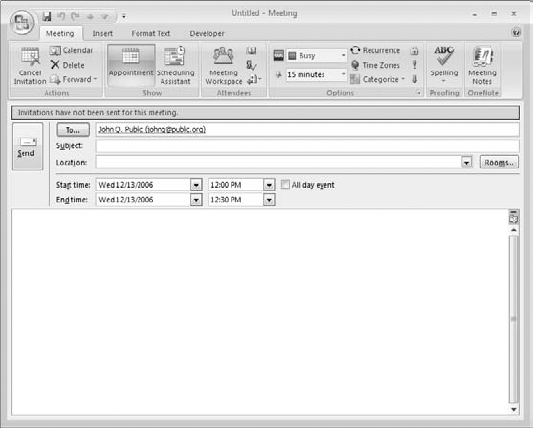
To invite the contact to a meeting, click the Meeting button on the Contact ribbon. Outlook creates a new meeting request addressed to the contact, as shown in Figure 10.28. You can specify the subject and location, enter the date, start and end times, and include a message. You can also add other recipients to the request. You learn all about meeting requests in Chapter 12.
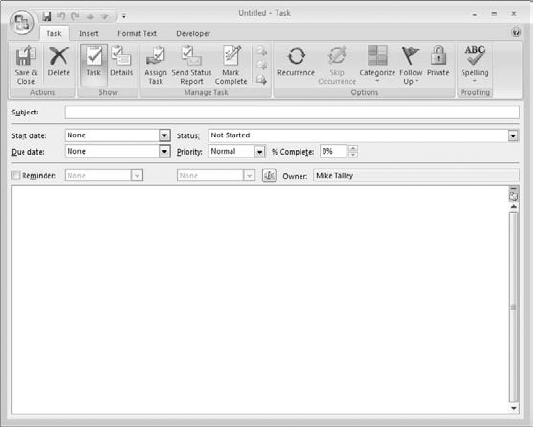
To assign a new task to a contact, click the Assign Task button on the Contact ribbon. Outlook opens a task window, as shown in Figure 10.29, where you can enter details of the task and save it. You learn more about tasks, including assigning an existing task to a contact, in Chapter 15.
If you have entered a web page URL for a contact, clicking the Web Page button on the Contact ribbon launches your default web browser and displays the web page.
Mail merge is a technique that lets a form letter be addressed and sent to many different individuals. It can also be used to create mailing labels, envelopes, and catalogs such as a mailing list. Microsoft Office has merge tools built in to several of its applications, most notably Word, and Outlook is included in this list.
When would you use Outlook to perform a mail merge? Only when the names and addresses that you want to use are in your Outlook address book. In this situation, using Outlook is often the simplest approach. Even so, there are some factors that may mitigate against using Outlook for a merge and instead using the more advanced mail merge tools available in other Office applications. For example, Outlook cannot separate documents by ZIP code to get reduced mailing rates, and it would not be a good choice for a large merge that will create thousands of documents. You need to have Microsoft Word installed on your system to perform a mail merge.
The first step in performing a mail merge is usually to filter your contacts so that only the ones you want included are shown. You can do this by using Outlook's search capability or by customizing the Contacts view, both of which were covered earlier in this chapter. However, you can skip this step and select the contacts to include later. Then:
Make sure Contacts are active.
Select Mail Merge from the Tools menu. Outlook displays the Mail Merge dialog box as shown in Figure 10.30.
Make entries in this dialog box as described in the following list.
Click OK to open Word to complete the merge.
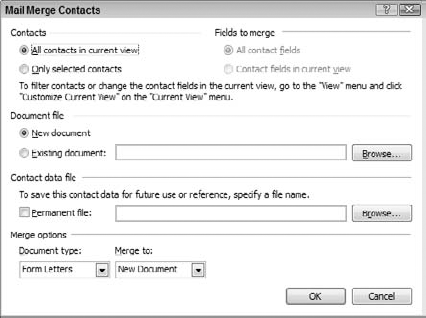
The options in the Mail Merge dialog box are as follows:
Contacts: Select All Contacts in Current View to include all displayed contacts in the merge. Select Only Selected Contacts to select contacts to include later.
Fields to Merge: Specifies whether only visible contact fields or all contact fields will be available for the merge. These options may or may not be available depending on the current Contacts view.
Document File: Specifies whether the merge will use a new or an existing Word document. If you choose the latter option, use the Browse button to locate the document to use.
Contact Data File: You can select this option to save the merge contact data in a separate Word document. Typically this option is used to create a record of the people who were included in the mailing.
Document Type: You can merge to form letters, mailing labels, envelopes, or a catalog.
Merge To: Specify whether the merge output goes to a Word document, to the printer, or to email:
New Document: Merge creates a Word document that you can edit as needed before creating the final output.
Printer: The merged document is created and sent directly to the default printer.
E-mail: The merged documents are created as email messages and placed in your Outbox.
In most situations the remainder of the merge process is carried out in Word. Please consult your Word documentation for information on how to do this.
The majority of Outlook users will have only a single address book. This is all that most people need, in fact. In some situations you may have two or more address books. This can happen if you create more than one Outlook data file. Each data file will have its own address book, and you will have access to the one in whichever Outlook data file is open. You might want to use more than one Outlook data file if you want to keep your personal email completely separate from your work email. You learn more about working with Outlook data files in Chapter 18.
Another situation where you will have more than one address book is if you have both a regular (that is, SMTP/POP) email account and a Microsoft Exchange account set up in Outlook. The regular account will have its own address book and the Exchange account will have another, separate one. You will have both available to you at the same time in Outlook — they will be listed at the top of the navigation pane when Contacts are active, and you can choose to view one or the other. When you add a contact it will be added to whichever address book is active. Exchange address books have some additional capabilities such as sharing — this is covered in Chapter 28.
Outlook has some global options that affect the way contacts work. To view and change these options:
Select Options from the Tools menu to display the Options dialog box.
If necessary, click the Preferences tab.
Click the Contact Options button to display the Contact Options dialog box (see Figure 10.31).
Set options as described in the following list.
Click OK twice to exit all dialog boxes.
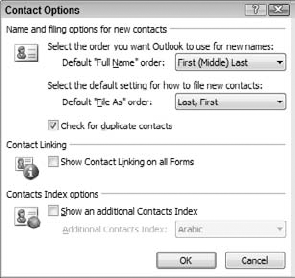
The options that are available for contacts are described here:
Default "Full Name" Order: Specifies how contacts are sorted when you order them based on full name. You can choose First Middle Last, Last First, or First Last1 Last2.
Default "File As" Order: Specifies how contacts are sorted when you order them based on the File As field. Your choices are Last First, First Last, Company, Last First (Company), Company (Last, First).
Check for Duplicate Contacts: If this option is selected, Outlook will warn you if you try to enter a new contact with the same name as an existing contact.
Show Contact Linking on All Forms: Controls whether all information linked to a contact (tasks, for example) is displayed.
Show an Additional Contacts Index: If this option is selected, Outlook will display a second set of index buttons at the right edge of the Contacts window using the language you select from the list.
Outlook contacts is a powerful tool for managing and using information about people. It goes way beyond the basic address book to store just about any kind of information about a person you can imagine. What's more, it makes it easy to find and use that information in various ways. Many people find contacts to be one of Outlook's most useful tools.