Learning about the Outlook Calendar
Working with Calendar views
Creating one-time and recurring appointments
Forwarding appointments
Searching your calendar
Sharing your calendar
Subscribing to Internet calendars
Using Calendar options
A calendar is something you hang on the wall, right? It has a page for each month and a picture of a puppy, lighthouse, or famous painting. If that's what you think, then you haven't used the Outlook Calendar! Outlook provides a sophisticated calendar that helps you manage your time efficiently. It can even do things such as remind you of an upcoming appointment, help you set up meetings, and let you share your calendar with others.
This chapter covers the Outlook Calendar itself. Some other Outlook tools related to the Calendar are covered in other chapters: scheduling and meetings in Chapter 12 and tasks in Chapter 15.
At its heart, the Outlook Calendar stores and displays appointments. An appointment is just what it sounds like—a scheduled event with a title and a time/date specified for the beginning and end of the appointment. Outlook distinguishes between two types of appointments:
A regular appointment has a specific start time and stop time. They are usually on the same day but do not have to be.
An all-day event does not have specific start and stop times but rather takes up all of one or more days.
Scheduling appointments may not sound so special, and in fact it's not. But it's the way that Outlook lets you organize, use, and share your appointments that makes the Calendar so useful.
To show the Calendar, click the Calendar button in the navigation pane. The view window shows the Calendar itself, and you'll get to that in a moment. The top section of the navigation pane shows a small calendar of the current month, called the Date Navigator, which has several useful features, as shown in Figure 11.1.
Today's date is enclosed in a box—the 22nd in the figure.
The days displayed in the larger Calendar view are highlighted in the small calendar. In the figure, this is the 21st through the 25th.
Days on which there is at least one appointment are in bold.
The arrows to the left and right of the month and year can be clicked to move to the previous or next month, updating the Calendar view as well.
Click any day number to change the Calendar view accordingly.
When the Calendar is displayed, you can choose between viewing a single day, a week, or an entire month. In Week view, you can also choose to view the entire week or just the work week (Monday-Friday), and in Month view you can set the level of detail display to low, medium, or high. You select your view using the buttons at the top of the Calendar. In this area, Outlook also displays the date or date range displayed as well as buttons that move the calendar forward or back by one of whatever unit (day, week, or month) is displayed. This is shown in Figure 11.2.
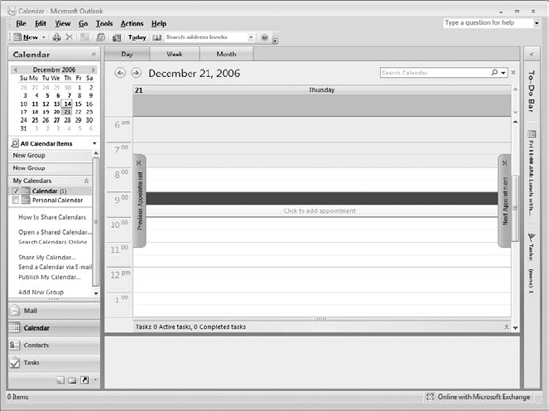
When the Calendar is displaying a single day, it looks as shown in Figure 11.3. Times of the day are listed at the left edge of the window, and each appointment is displayed in its assigned time slot. Use the scroll bar to bring different times into view. Any all-day events for the day will be displayed at the top of the window.
Click an appointment to select it—it will display with a black border and small handles (boxes) on the top and bottom border. You can:
Point at the appointment and drag to move it to a different time slot.
Point at one of the handles and drag it to change either the start or stop time.
If you double-click an appointment, it will open for editing, as explained later in this chapter.
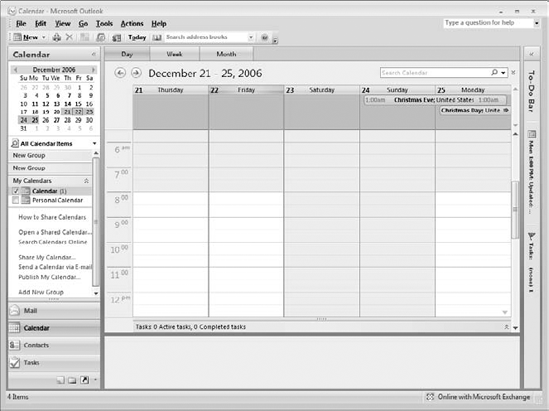
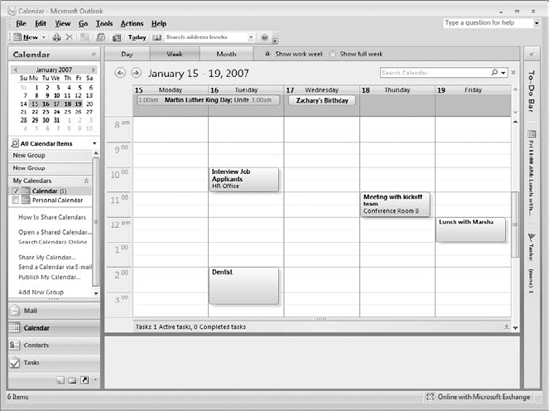
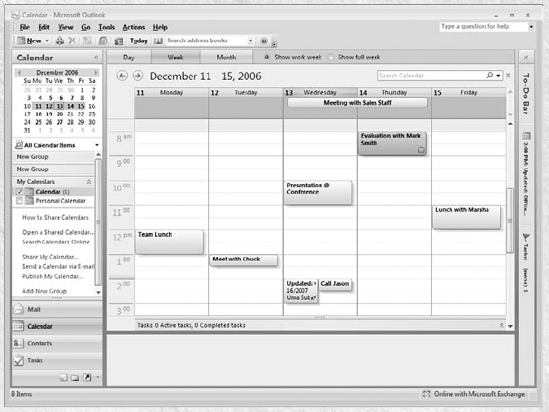
The Calendar Week view is shown in Figure 11.4. This example shows only the work week—you can display the full seven-day week by selecting the Show Full Week option at the top of the window.
In essence, the Week view is five or seven single-day views side-by-side and you can perform the same actions as described for the Day view. You can also drag an appointment to a different day.
Note
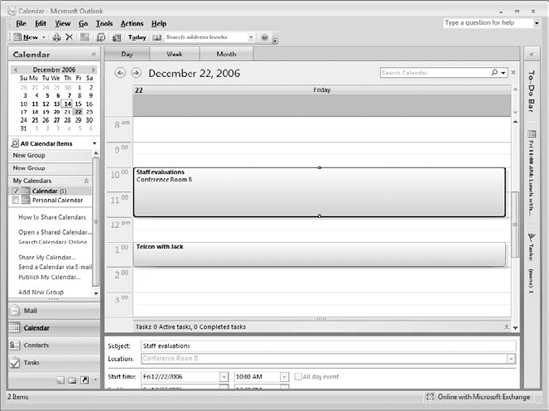
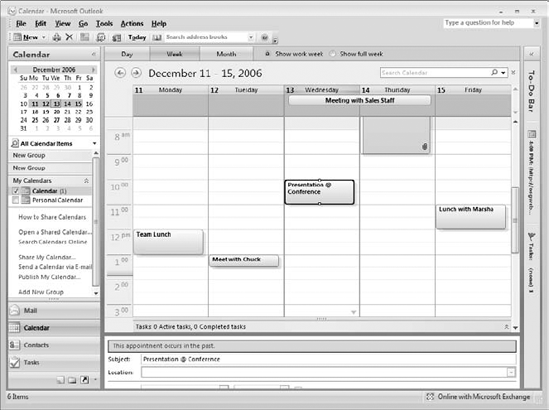
You'll note in the figure that when an appointment is selected, its details are displayed at the bottom of the window in the reading pane. This can be useful when the Calendar itself is too crowded to show these details for each appointment.
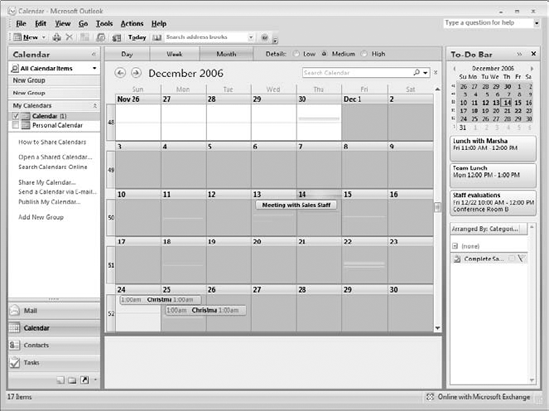
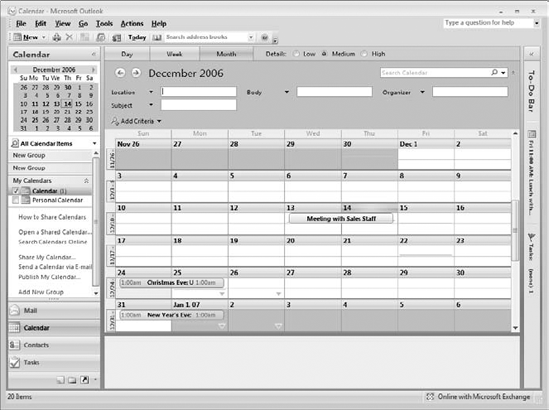
Month view shows an entire month of appointments, as shown in Figure 11.5. Appointments for each day are displayed in order but without time details. If an all-day event exists for the day, it is displayed at the top with a line around it—for example, the "Meeting with Sales Staff" appointment in the figure on the 13th and 14th. If there are more appointments for a day than can be shown, a small down arrow is displayed. Click the arrow to open the single day display where you can view all appointments for that date.
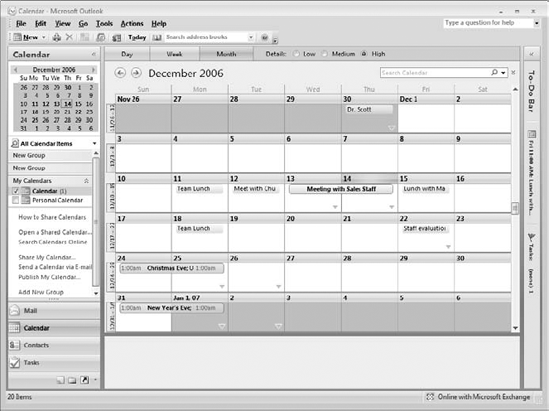
The figure shows the month display with the High option selected for details. You can also select Low or Medium details:
Low: Shows only all-day events. Appointments with specific start and stop times are not displayed.
Medium: All-day events are displayed as usual. Appointments with specific start and stop times are displayed as shaded lines or rectangles with the position and thickness of the line or rectangle indicating the approximate time and duration of the appointment.
Outlook's To-Do Bar can be useful for working with Calendar items. To display the To-Do Bar, select To-Do Bar from the View menu and then select Normal. The To-Do Bar is shown in Figure 11.6.
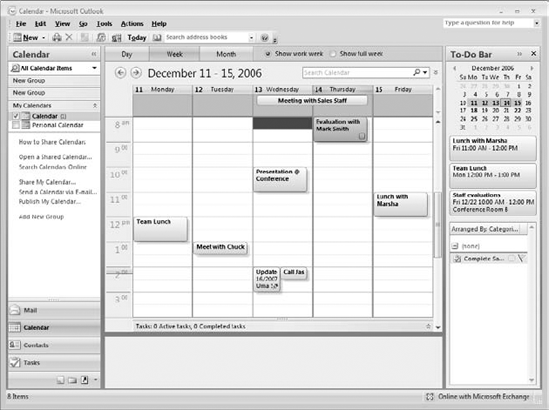
The To-Do Bar can display three items:
The Date Navigator, a small monthly calendar whose features were explained earlier in this chapter. If the Date Navigator is displayed in the To-Do Bar it will not be displayed in the navigation pane.
A list of appointments for the current week.
A list of tasks. Tasks are not directly related to the Calendar and are explained in Chapter 15.
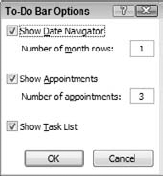
You can control what is displayed on the To-Do Bar. You can display all, two, or one of the items in the preceding list. To change the To-Do Bar display, select To-Do Bar from the View menu and then check or uncheck the individual items—Date Navigator, Appointments, and Task List—on the next menu. You can also select Options from this menu to display the To-Do Bar Options dialog box, shown in Figure 11.7. Here you can turn the display of individual items on or off as well as specify how many months are displayed in the Date Navigator and how many appointments are displayed.
An Outlook appointment can be very simple, or you can use Outlook's tools to add various features and options to an appointment. Start with the basics of creating a simple appointment and then look at the various options.
To create a simple appointment, make sure that Outlook is displaying the Calendar. Then you do either of the following:
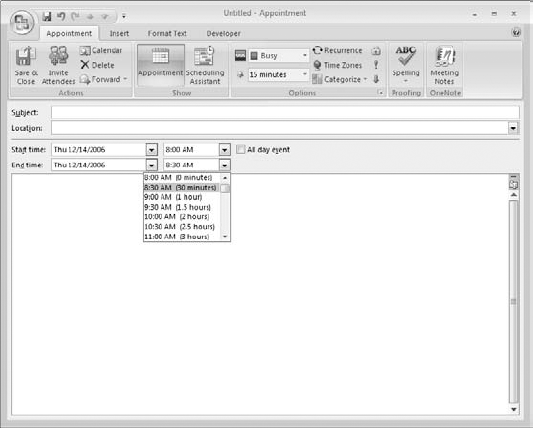
The appointment form is shown in Figure 11.8 before any information has been entered. Then:

At a minimum, you must enter a subject for the appointment. This is the title of the appointment and is displayed in the Calendar—or at least part of it is, depending on the length.
Optionally, enter a location for the appointment. If you click the arrow adjacent to the Location field, Outlook will display a list of previously used locations from which you can select. Otherwise, just type the location into the field. Space allowing, the location displays along with the appointment subject in the Calendar.
If necessary, adjust the start and/or stop date by clicking the arrow next to the displayed date and selecting from the calendar that Outlook displays. An appointment could span two or more days, if needed.
If the appointment is an all-day event, make sure the All Day Event option is selected. An all-day event marks one or more entire days as busy with no specific start and stop times.
If the appointment is not an all-day event, make sure the All Day Event option is not checked. Outlook will display fields for the start and stop times.
To select a start or stop time, click the adjacent arrow and select from the list displayed (see Figure 11.9).
Optionally, enter any desired notes in the field provided.
Click the Save & Close button on the ribbon.
Warning
When you create an appointment that is an all-day event, Outlook does not mark the time as "busy" but rather keeps it marked as "free." If you want an all-day event to display on the Scheduling Page as either "tentative" or "busy" you must explicitly select this option in the Options section of the Event ribbon.
To edit an appointment, double-click it in Calendar view to open the appointment form. Make any needed changes and click the Save & Close button on the ribbon.
Dealing with Conflicts
Outlook does not specifically warn you of potential conflicts—you are free to schedule overlapping appointments if you wish. When there's an overlap, Outlook displays a striped bar between the appointments in Week view and also in Day view.
Outlook displays a striped bar between conflicting appointments.
To delete an appointment, click it in Calendar view to select it and press Del.
If you simply want to change the duration of an appointment, you can do so without opening the appointment form. When you select the appointment in the Calendar by clicking it, it will display small square handles on its border as shown in Figure 11.10. For a regular appointment, the handles will be at the top and bottom, as in the figure. Drag the top or bottom handle to change the appointment's start or stop time, respectively. For an all-day event the handles will be on the left and right edges, and can be dragged to change the start or stop time.
You can also change an appointment's time and/or date, without changing its duration, by pointing at the appointment and dragging it the new position on the Calendar.
When you create an appointment, there are several optional features you may want to use. They are described here.
Some events occur on a regular basis. Perhaps you have a chiropractor appointment at 10:00 AM every Monday, or a company strategy meeting on the first Tuesday of each month. You can enter such appointments only once and have Outlook create all the recurrences automatically. Here's how:
Use the techniques that you learned earlier in this chapter to create an appointment for the first instance, but do not save and close it.
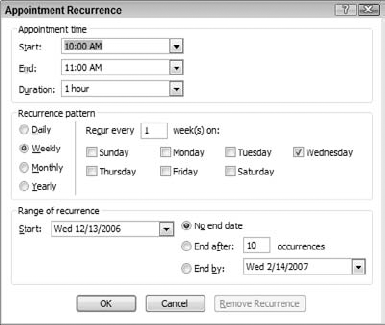
In the appointment form, click the Recurrence button on the Appointment ribbon. Outlook displays the Appointment Recurrence dialog box as shown in Figure 11.11.
In the Appointment Time section of the dialog box, make sure that the start time and stop time are correct.
In the Recurrence Pattern section, select Daily, Weekly, Monthly, or Yearly.
Depending on the option selected in the previous step, enter other recurrence details:
Daily: Specify how often the appointment recurs (for example, every two days) or that it occurs every weekday.
Weekly: Specify how often the appointment recurs (for example, every week) and then on which day or days.
Monthly: Specify how often the appointment recurs (for example, every three months) and on which day. You can select a day by number, such as the 15th of every month. You can also select a day by day of week, such as the second Tuesday of the month.
Under Range of Recurrence, enter the starting date and then specify when the recurrences end. Your choices are
No end date.
End after a certain number of occurrences.
End by a specified date.
Click OK to return to the appointment form.
Complete any additional appointment details, as needed.
Click Save & Close.
When you open an existing recurring appointment for editing, you can click the Recurrence button to open the Appointment Recurrence dialog box to modify the recurrence pattern. You can also remove the recurrence by clicking the Remove Recurrence button in this dialog box. Outlook will remove all instances of the appointment from the Calendar except the next one.
If you try to delete a recurring appointment, Outlook will give you the option of deleting all occurrences of the appointment or just the current one.
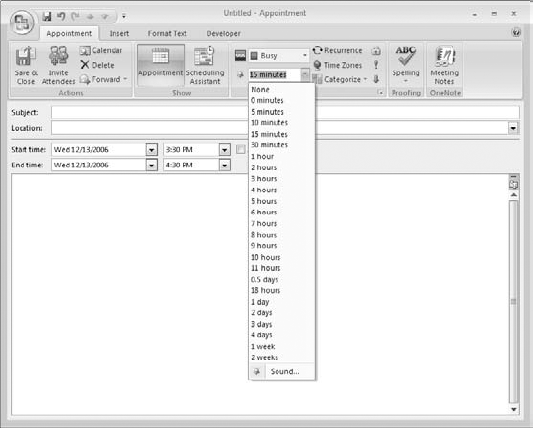
Outlook can remind you of an appointment by displaying a dialog box and playing a sound. You can specify how much advance notice you get and also change the sound that is played. You can also turn reminders off. To set a reminder:
Create the appointment, or open an existing one for editing.
Click the Reminder list on the Appointment ribbon (see Figure 11.12).
Select the desired duration of the advance warning, from 0 minutes to 2 weeks. The default is 15 minutes before the start time, although you can change this in Calendar Options (covered later in this chapter). Select None for no reminder.
Select Sound to specify the sound played when a reminder is displayed. Turn off the Play This Sound option if you do not want a sound played (a dialog box is displayed).
Click OK to return to the appointment form.
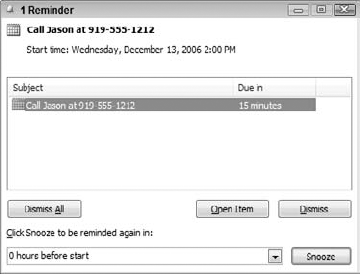
When a reminder comes due, Outlook plays the sound (if one was specified for the appointment) and displays the dialog box shown in Figure 11.13. If there is more than one reminder due, they will all be listed. The actions you can take are
If more than one reminder is listed, click Dismiss All to dismiss all the listed reminders.
Click Open Item to open the corresponding appointment.
Click Snooze to be reminded again in the specified time, selected from the adjacent list. You could, for example, choose to be reminded 5 minutes before the appointment's start time, or in 10 minutes from the current time.
Note
When you dismiss a reminder, it does not affect the appointment itself, which will remain in your calendar.
Outlook lets you invite other people to a meeting via email, and handle their responses automatically. Because this is a complex topic, it is covered in its own chapter along with tasks (Chapter 12).
By default, Outlook appointments use the time zone that your system is set up to use. At times you may want to use another time zone, for example if you are in New York and your client says "Call me at 8:00 AM, my time." You may not know the number of hours' difference, but as long as you know his time zone you are all set.
When you have the appointment form open, click the Time Zones button on the ribbon to display time zone selectors next to the start and stop time fields (see Figure 11.14). Change either the start or stop time zone to the desired setting; the other changes to the same thing. Now the start and stop times you enter are interpreted as being in the selected time zone, and the appointment is displayed in the correct local time slot. For example, if you are in the Eastern time zone and enter an appointment from 8:00 AM to 9:00 AM in the Pacific time zone, the appointment will display between 11:00 AM and 12:00 PM on your calendar because the Pacific zone is three hours behind the Eastern zone.

Outlook lets you forward an appointment to an email recipient. Forwarding is different from inviting an attendee to a meeting (covered elsewhere in the next chapter). There are two ways to forward an Outlook appointment:
Open the appointment and click the Forward button on the Appointment ribbon.
Right-click the appointment in the Calendar and select Forward from the Context menu.
In either case, Outlook creates a new email message with the appointment attached as an Outlook item and the title of the appointment inserted in the Subject field. You then address and complete the email message as usual. If you are using Outlook with an Exchange Server account, the appointment itself is forwarded without being attached to an email message.
When the recipient receives a forwarded appointment, he or she can double-click the attachment to open it. It will open in an appointment window, and the user can save it to his or her calendar or discard it as desired. Of course, the recipient must be using Outlook or another program that supports the Outlook appointment format.
Another forwarding option for appointments is the iCalendar format. This is a widely supported format for calendar information and is supported by Outlook as well as many other scheduling programs. If you are not sure that all your recipients are using Outlook, it may be a good idea to use this format when forwarding an appointment. To do so:
In an open appointment, click the arrow next to the Forward button.
Select Forward as iCalendar from the menu. Outlook creates a new email message with the iCalendar attached.
Complete and send the message as usual.
As with most Outlook items, an appointment can be assigned to a category. Outlook comes with six predefined and color-coded categories. Initially they are named according to their color, but you can change this to more meaningful names such as "Work" or "Personal." You learn more about Outlook categories in Chapter 17.
There are two ways to assign an appointment to a category:
With the appointment open, click the Categorize button and select the desired category from the list displayed. Select Clear All Categories to remove any assigned categories from the appointment.
In the Calendar, right-click the appointment and select Categorize from the context menu. Then, select the desired category.
An appointment, like other Outlook items, can be assigned to more than one category. In the Calendar, a categorized appointment is displayed in the color of the assigned category.
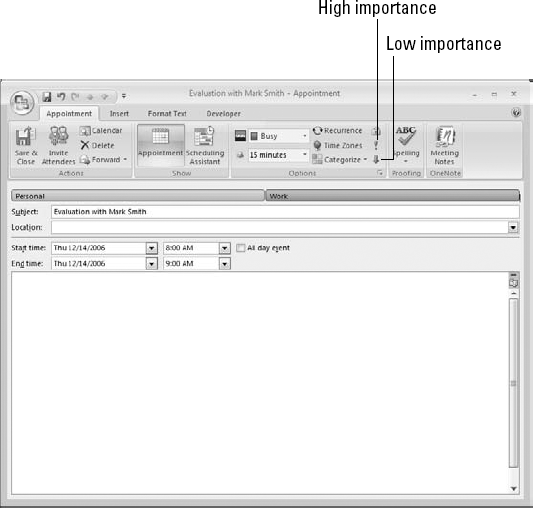
By default, all appointments you create are assigned normal importance. You can assign either low or high importance to an open appointment by clicking the corresponding button on the ribbon, as shown in Figure 11.15. Then you can use this importance level as a criterion when using the search feature in your Calendar, as discussed elsewhere in this chapter.
Outlook gives you the ability to publish your calendar so that other people can view your schedule. This topic is covered elsewhere in this chapter. You may at times want to mark an appointment as private so that other people viewing your calendar cannot see the details. They will still be able to see that you are busy during the period of the appointment but will not have access to details about the appointment.
To mark an open appointment as private, click the padlock button on the Appointment ribbon (see Figure 11.16).

Outlook's Scheduling Page provides a quick visual view of your schedule and the schedules of other people whose calendars you have imported. It is a very useful tool for finding time that is free for all the people you want to attend a meeting. Using the Scheduling Page is covered in detail in the next chapter.
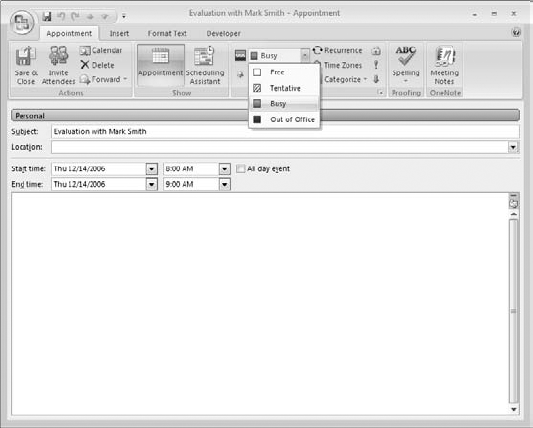
An appointment in your calendar can display in one of several ways on the Scheduling Page—Busy, Tentative, Out of Office, or Free. This affects both your own Scheduling Page as well as that of other people with whom you are sharing your calendar. When you create an appointment, you can specify how it will display. The default is "busy" (except for all-day events as mentioned earlier in this chapter). To do so, click the Show As list on the Appointment ribbon and select from the list (see Figure 11.17).
As your calendar becomes filled with appointments past and future, it will become difficult if not impossible to find information by simply scrolling through the Calendar. You can use the search feature to filter the Calendar to show just the information you want. For example, you could filter to show only appointments within a certain month assigned to a specific category.
For a basic search, enter your search term in the Search Calendar box at the top right of the Calendar display (see Figure 11.18). You can also click the down arrow to select from previously used search terms. Outlook automatically searches as you enter the term and displays only matching appointments (or a message if there are no matching entries). Click the X adjacent to the Search box to cancel the search and return to displaying all Calendar items.
If you need more control over the search, click the double down arrow at the top-right corner of the Calendar display. Outlook displays additional criterion fields as shown in Figure 11.19. Each field lets you enter a search term or select from a drop-down list. As you make entries, the Calendar display is automatically filtered to show only matching entries. You can also take the following actions:
To change a displayed criterion field—for example, from Categories to Sensitivity—click the arrow adjacent to the field name and select from the list displayed.
To remove a criterion field, click the arrow adjacent to the field name and select Remove.
To add a new criterion field, click Add Criteria and select from the list.
To cancel the search and display all Calendar entries, click the X to the right of the Search Calendar box.
To hide the additional criterion fields, click the double up arrow at the top-right corner of the Calendar display.

Outlook lets you publish your calendar so other people can have access to the information it contains. For example, if you manage a bowling team you can keep the team schedule in an Outlook calendar and publish it so team members can access it on the Internet.
You have two options as to how your calendar is shared:
A calendar snapshot that is a static copy of your calendar at the time it is published.
A dynamic calendar that can be automatically updated with changes you make to your calendar.
You also have two options as to where the calendar is published (these are applicable only to dynamic calendar sharing):
A calendar snapshot is sent as part of an email message. To send a calendar snapshot, make sure that you are in Calendar view. Then, click the Send a Calendar via E-Mail link on the navigation pane. Outlook will create a new email message and display the Send a Calendar via E-mail dialog box (Figure 11.20). Make entries in this dialog box as follows:
In the Calendar list, select the calendar to use. This is relevant only if you have more than one calendar.
In the Date Range list, select the range of dates to include.
In the Detail list, specify how much detail should be included. You can select Availability Only, Limited Details, or Full Details.
Select the Show Time Within My Working Hours Only option to limit the published information to the times defined in Outlook as working hours.
Click OK.
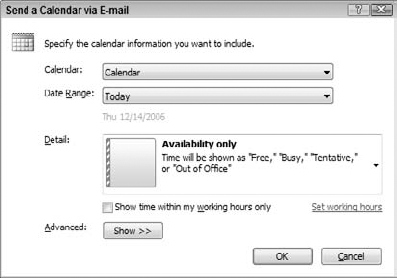
After you close this dialog box, you are returned to the new email message. The calendar will have been inserted into the body of the message and also added as an attachment. You can then address and send the message as usual. When the recipient gets the message, he can either view the calendar in the message or open the attached file to get information about your schedule.
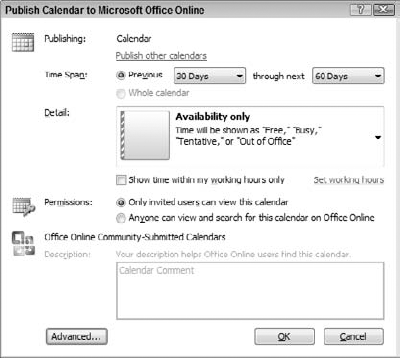
Microsoft Office Online is a free service offered to Office users. One of its features is the capability to publish your Outlook Calendar so that other people can view it. To use Microsoft Office Online you need an account. If you already have a Microsoft Passport account you can use that login. If not, you will be prompted to create your account when you first publish your calendar.
To publish your calendar, you must be in Calendar view. Then, click the Publish My Calendar link in the navigation pane. Outlook will take you through the steps of signing into Office Online (or creating an account if needed) and will then display the dialog box shown in Figure 11.21. Fill in this dialog box as follows:
Time Span: Select the span of time to be published.
Detail: Specify how much detail should be included. You can select Availability Only, Limited Details, or Complete Details.
Show Time Within My Working Hours Only: Select this option to limit the published information to the times defined in Outlook as working hours. Click the adjacent Set Working Hours link if you want to view or modify the working hours.
Permissions: Select whether the calendar will be restricted to people you invite or accessible by anyone.
Description: Depending on where you are publishing to, you may be able to enter a description of the calendar that will help other people to find it.
Advanced: Click this button to specify the upload method. You can specify whether or not changes to your calendar will be uploaded automatically. Automatic is the default and is suitable for most situations. If you do not select automatic updating, you will have to publish the calendar again to make changes available.
When you click OK, Outlook publishes your calendar and asks you whether you want to invite others to share the calendar. If you select Yes, Outlook will create an email message that contains a link to the just-published calendar. Send the message to the people you want to invite to share your calendar. If you published the calendar with restricted access, people will need a Microsoft Passport account associated with the email address you sent the invitation to in order to view the calendar.
Another way to make your calendar available to others is to publish it to a web server. Then, anyone with access to that server can view your schedule using a web browser such as Internet Explorer. You cannot publish a calendar to just any web server but only to one that supports the WebDAV protocol (World Wide Web Distributed Authoring and Versioning). If a server is available to you, your IT department will provide you with its location (URL) and your login information. Once you have this information, you can publish your calendar as follows:
Make sure that you are in Calendar view.
In the navigation pane, right-click the calendar that you want to publish.
From the menu, select Publish to Internet.
From the next menu, select Publish to WebDAV Server. Outlook displays the Publish Calendar to Custom Server dialog box as shown in Figure 11.22.
In the Location box, enter the location (URL) of the server.
Under Time Span, select the span of time that you want to be published.
From the Detail list, select the amount of detail to be included in the published calendar. You can select Availability Only, Limited Details, or Full Details.
Select the Show Time Within My Working Hours Only option to limit the published information to the times defined in Outlook as working hours.
Click the Advanced button to specify whether changes to your calendar will be uploaded automatically.
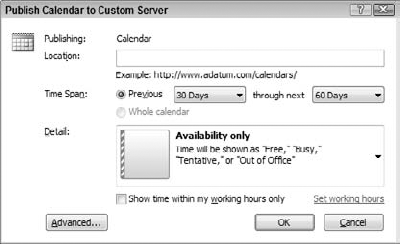
At this point, depending on how the server is set up, you may be asked for your login and password. Once you have entered this information correctly, the calendar will be published and will be available for others to view.
Warning
When you publish a calendar to a web server, you do not have any control over who can view it. Rather, restrictions (if any) are set by the web site administrator.
Once you have published your calendar to a web server, you need to let your colleagues and friends know about it so they can view it. When publishing to Microsoft Office Online, you can do this as the last step of the publishing process, as described earlier. You can also invite people at a later time, whether for a calendar published on Office Online or on a web server. Here's how:
In the navigation pane, right-click the calendar.
From the menu, select Share Calendar (or whatever the name of the calendar is). Outlook creates an email message containing a link to the calendar. Note: The Share Calendar command will be available only if the calendar has been published.
Address the message to the people you want to invite.
If desired, add text to the body of the message.
Click Send.
Once you have published a calendar, there are several other actions you can take with it. These commands are all accessed by right-clicking the calendar in the navigation pane and selecting Publish to Internet from the menu. Then, on the next menu:
Select Change Publishing Options if you want to change access restrictions, upload method, or any other detail of how the calendar is published.
Select Stop Sharing to make the calendar unavailable. It will remain on the server and sharing can be re-enabled at a later date.
Select Change Sharing Permissions if you want to change who can access the published calendar.
Select Remove from Server to delete the calendar from the server.
Outlook supports Internet calendars, a way for people and organizations to publish a calendar you can subscribe to in Outlook. For example, your employer might publish a calendar of company holidays, or the local soccer team can publish its game schedule. By subscribing to an Internet calendar you can view the information in Outlook—and, it will be updated automatically as needed.
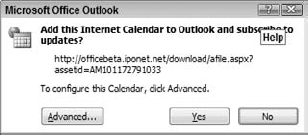
When an Internet calendar is made available, you will be informed of its location by the publisher. Navigate to that location in your web browser and you'll see a link for each published calendar. Click the link and Outlook displays the dialog box shown in Figure 11.23. If you want to change the name that Outlook will display for the calendar, click the Advanced button and make the change. Then click Yes to complete the subscription process.
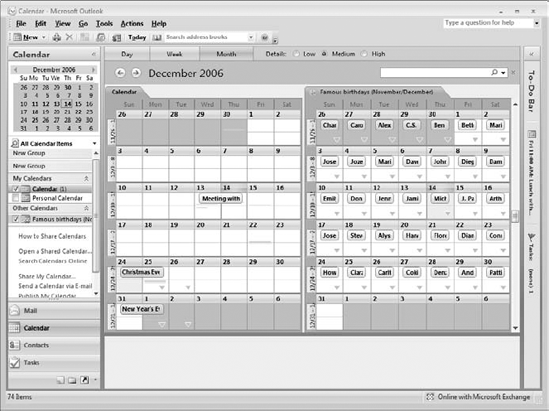
When you have subscribed to one or more Internet calendars, they will be displayed in the navigation pane under Other Calendars, as shown in Figure 11.24. Click a calendar name to display or hide it (as indicated by the adjacent checkmark).
If you right-click a subscribed calendar in the navigation pane, Outlook displays a menu with various commands, including renaming the calendar and deleting it—which also unsubscribes you from the calendar.
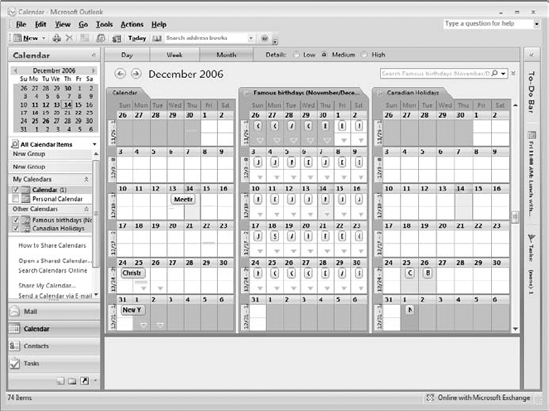
When you have two or more calendars displayed, they are normally displayed side-by-side as shown in Figure 11.25. Outlook also offers Overlay mode, which can be very useful. In Overlay mode, the two calendars are overlapped so that events from both calendars are displayed together, as shown in Figure 11.26. This makes it easy to locate potential conflicts between the two calendars.
To switch Calendar View mode, open the View menu and select View in Side-By-Side Mode or View in Overlay Mode.

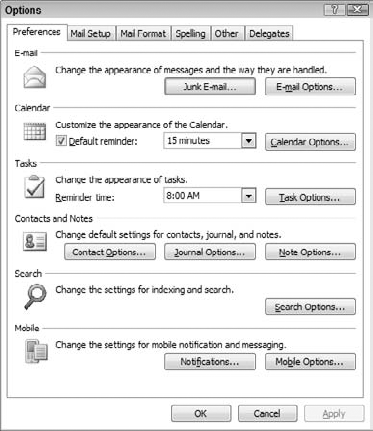
The Outlook Calendar comes with default settings for many aspects of its operation. As you become familiar with the Calendar you may want to make changes to these settings to customize the Calendar for the way you work. You access Calendar options by selecting Options from the Tools menu and then, in the Options dialog box, clicking the Preferences tab. The Calendar section of this tab is shown in Figure 11.27.
The one option shown here has to do with reminders for appointments. By default, Outlook reminds you of appointments 15 minutes before the start time (you can change this for individual appointments, of course). To change the default lead time, select it from the drop-down list. You can select any time from 0 minutes to 2 weeks. If you do not want a default reminder for messages, uncheck the Default Reminder option.
Other Calendar options are accessed by clicking the Calendar Options button to display the Calendar Options dialog box, shown in Figure 11.28. The various options available here are divided into several sections. The first section has to do with how Outlook defines the work week:
Calendar Work Week: Check those days that you want to be considered part of the work week, and uncheck those that you do not.
First Day of Week: Select the day that Outlook will use as the first day of the week for calendar displays.
Start Time/End Time: Select the times of day that Outlook will use for the start and stop of the work day.
First Week of Year: Select how Outlook will determine the first week of the year. The options are Starts on Jan 1 (the week that contains Jan 1), the first week with four days in the new year, and the first week that is entirely in the new year.
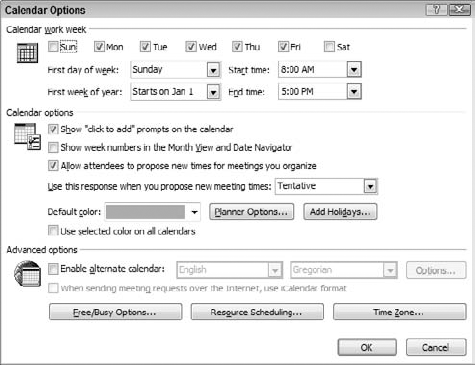
The next section of the Calendar Options dialog box includes options for a variety of things:
Show "Click to Add" Prompts on the Calendar: If this option is selected, Outlook will display prompts on the calendar where you can click to add an appointment.
Show Week Numbers...: If this option is selected, Outlook will display week numbers (the week of the year) where indicated. An example is shown in Figure 11.29.
Allow Attendees to Propose...: If this option is selected, people whom you invite to meetings are allowed to respond by proposing a new time for the meeting.
Use This Response...: Select from the list to specify whether new meeting times that you propose are marked as Tentative, Accept, or Decline.
Default Color: Select the color to use for the calendar display.
Use Selected Color...: If this option is selected, the color you choose will be used for all calendars you view, not just your own calendar.
Planner Options: Click this button to display the Planner Options dialog box where you can set options for the Meeting Planner and Group Schedule features. These options were discussed earlier in this chapter.
Add Holidays: Lets you copy holidays for one or more specific countries onto your calendar. You select the country or countries from a list.
Finally there are a few advanced options in this dialog box:
Enable Alternate Calendar: Lets you display an alternate calendar in parallel with the default one using the language and calendar structure you select.
When Sending Meeting Requests...: Sends meeting requests in the more widely supported iCalendar format instead of Outlook's proprietary format.
Free/Busy Options: Sets options for publishing your calendar. These options were covered earlier in the chapter.
Resource Scheduling: Sets options for working with meeting requests. These options were covered earlier in the chapter.
Time Zone: Sets the default time zone for your calendar and also permits you to display a second, alternate time zone in the Calendar.