You can integrate information between Project 2010 and Excel by embedding a source file from one application as an embedded object in a file in the destination application. When you embed an object in an application, you’re basically inserting an entire file, along with all of its source application’s capabilities, into the destination application file. Embedding an object is ideal when you want to send a file to someone who does not have access to the source file or the source application, for example, a team lead for a subcontractor who does not have Project 2010 or access to your file server.
With an embedded object, not only can you have a picture of a Gantt chart in an Excel worksheet, but you can double-click that picture of the Gantt chart to access Project 2010 commands and change the Gantt chart data. You can even switch to a different Project 2010 view, such as the Resource Sheet, and change information there, as well. Likewise, in Project 2010, you can have a picture of an S-curve graph generated by Excel and also double-click it to launch Excel and edit the format of the graph or even the underlying data for the graph.
Whether you insert all or part of an Excel worksheet or chart into Project 2010 as an embedded object, when you double-click the object, you can access the entire Excel workbook. The benefit of inserting a portion of an Excel worksheet or chart is that the portion you select is what appears in the embedded object. If you insert an entire file, you can drag its edges to change the portion of the embedded object that’s visible.
To copy and paste selected Excel information as an embedded object, follow these steps:
In Excel, select the data or chart you want to insert as an embedded object in Project 2010.
On the Home tab, in the Clipboard group, click Copy.
In your Project 2010 file, display the location where you want to place the object.
Only the chart area of a Gantt view and the Objects box in the Task Form or Resource Form can accept a chart or worksheet fragment as an embedded object.
To display the Objects box in the Task Form or Resource Form, click in the form area to make it active (if it’s part of a combination view such as the Task Entry view). On the Format tab, in the Details group, click Objects. You can also right-click the form and then choose Objects from the shortcut menu.
On the Task tab, in the Clipboard group, click the arrow below the Paste button, and then click Paste Special.
In the Paste Special dialog box, select the Paste option.
In the As box, click Microsoft Excel Worksheet or Microsoft Excel Chart.
Click OK.
The data or chart is embedded in Project 2010.
To embed an entire Excel file into a Project 2010 file, follow these steps:
In Project 2010, open the project plan in which you want to embed the Excel file.
Display the location at which you want to insert the file.
Only the chart area of a Gantt chart, the Objects box in the Task Form or Resource Form, and the Notes tab in the Task Information, Resource Information, or Assignment Information dialog box can accept an Excel file as an embedded object.
To insert an object into the Notes tab in one of the Information dialog boxes, click the Insert Object button above the Notes area in the dialog box.
The Insert Object command is not available in the Project 2010 ribbon, so to insert an object into the Objects box in the Task Form, Resource Form, or into the chart area of a Gantt chart, you must first add the Insert Object command to the Quick Access Toolbar. To add the Insert Object command to the Quick Access Toolbar, click the arrow next to the Quick Access Toolbar, and then click More Commands. In the Choose Commands From box, click Commands Not In The Ribbon. Click Insert Object, and then click the Add button. Click OK, and the Insert Object button is added to the Quick Access Toolbar.
Note
You can also add the Insert Object button to a custom group in the ribbon. For information on how to do this, see Customizing the Project 2010 Ribbon.
In the Insert Object dialog box, select the Create From File option.
To embed the Excel file, be sure to clear the Link check box.
By embedding the object, you’re essentially making a copy of the original object, and it becomes a separate entity from the original. You can change information in the embedded version without affecting the source data.
If you select the Link check box, Project 2010 inserts a link to the source file and any changes to the file in Excel update the linked object in Project 2010, as described in section Linking from Excel to Project 2010.
If you want the embedded object to be displayed as an Excel icon in your project, rather than be shown as part of the worksheet, select the Display As Icon check box.
Click the Browse button, and browse to the location of the Excel file you want to insert. Click the file name, and then click Insert.
The file’s name appears in the File box in the Insert Object dialog box.
In the Insert Object dialog box, click OK.
The Excel file appears in the area you selected. Drag to move or resize the object as needed. (See Figure 18-7.)

Note
You can embed an Excel file in a note associated with the project as a whole. First display the project summary task. On the Format tab, in the Show/Hide group, select the Project Summary Task check box.
Double-click the project summary task. In the Summary Task Information dialog box, click the Notes tab. Click the Insert Object button, and then add the Excel file.
You can create a new Excel workbook or chart as an embedded object in your project. In this case, the Excel object exists only within your project file.
Note
If you think you might sometime want to work on the Excel file outside Project 2010, you should instead create the file in Excel and embed or link it within Project 2010.
To create an embedded Excel file within Project 2010, follow these steps:
In your project plan, display the location at which you want to embed the object.
Only the chart area of a Gantt chart, the Objects box in the Task Form or Resource Form, and the Notes tab in the Task Information, Resource Information, or Assignment Information dialog box can accept an Excel file as an embedded object.
To insert an object onto the Notes tab in one of the Information dialog boxes, click the Insert Object button above the Notes area in the dialog box.
If you added the Insert Object button to the Quick Access Toolbar, click it to add an object to the chart area of a Gantt chart or to the Objects box in the Task Form or Resource Form.
In the Insert Object dialog box, select the Create New option.
In the Object Type box, click Microsoft Excel Chart or Microsoft Excel Worksheet.
If you want the new object to be displayed as an icon in the project, select the Display As Icon check box.
Click OK.
An Excel worksheet or chart appears in the location you selected. Excel launches if it is not already running and opens the file. The title of the file is Worksheet In <project name>, where <project name> is the name of the file in which you created the object. Start adding your information. On the File tab, click Exit when you are done.
To open and work with an embedded Excel object, simply double-click the object. Excel launches and opens the object. When you finish editing the Excel object, on the File tab, click Exit. The Excel window closes, and the modified Excel object appears in Project 2010.
You can embed a new or existing Project 2010 file as an object in an Excel worksheet. When you double-click the Project 2010 object in Excel, Project 2010 menus and commands temporarily replace those of Excel so that you can create or edit project information without leaving the Excel file.
To embed an existing Project 2010 file in Excel, follow these steps:
Open the Excel file in which you want to embed the existing Project 2010 file.
Select the location at which you want the Project 2010 object to be embedded.
On the Insert tab, in the Text group, click Object.
In the Object dialog box, click the Create From File tab.
Click the Browse button to open the Browse window. Browse through your computer’s filing system (and onto your network if applicable) to find the drive and folder where the project file is located.
Double-click the file.
The file’s path and name appear in the File Name box in the Object dialog box.
To embed the Project 2010 object, make sure that the Link To File check box is cleared.
If you don’t link the object, you’re making a copy of the original object, which becomes a separate entity from the original. You can change the embedded project without affecting information in the original project.
If you select the Link To File check box, the object is linked to the source project plan, as described in Linking from Project 2010 to Excel.
If you want the embedded project to be displayed as a Project 2010 icon in Excel, rather than be shown as a part of the Gantt Chart or other view, select the Display As Icon check box.
Click OK.
Part of a view of the selected project file appears in the location you selected. If you selected the Display As Icon check box, the embedded project file appears as the Project 2010 icon (by default) in the selected location. This is particularly useful when your Excel worksheet does not have much empty space.
Although you can create a new Project 2010 file as an embedded object in Excel, you should avoid doing so because the Project 2010 object would exist only within the Excel file. Opening Excel to access a Project 2010 object would quickly grow tiresome as you work with your schedule throughout the life of the project. However, if you do decide to create a new Project 2010 file within Excel, follow these steps:
Open the Excel file in which you want to create a new Project 2010 file as an embedded object.
Select the location at which you want the new Project 2010 object to be embedded.
On the Insert tab, in the Text group, click Object.
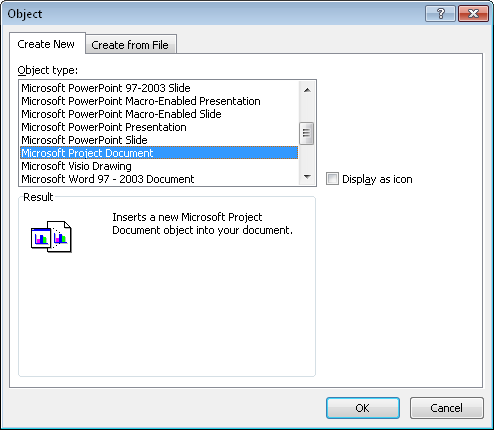
In the Object dialog box, click the Create New tab, if necessary.
In the Object Type box, click Microsoft Project Document, as shown in Figure 18-8.
If you want the embedded project to be displayed as an icon in Excel, rather than be shown as a part of the Gantt Chart or other view, select the Display As Icon check box.
Part of a view of the new project file appears.
If you selected the Display As Icon check box, the embedded project file appears as the Microsoft Project icon (by default) in the selected location.
Double-click the new project to add information to it on the spot.
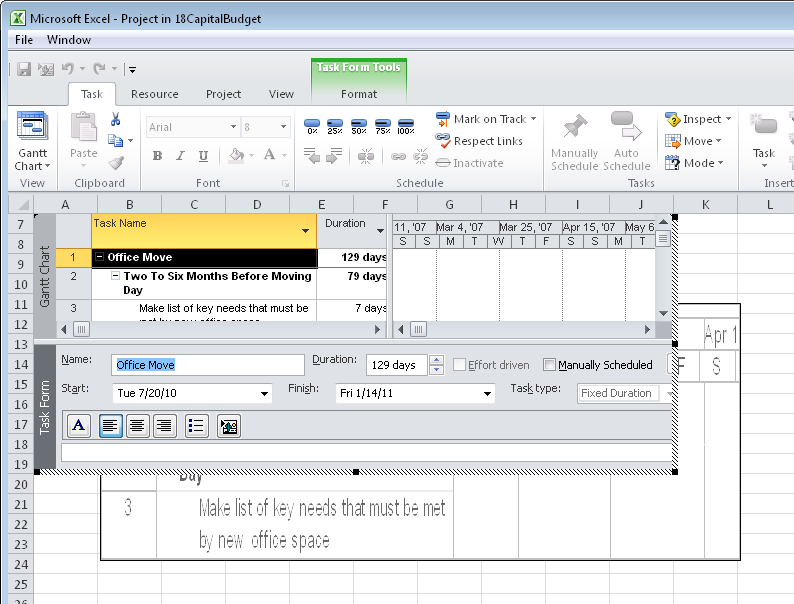
Whenever you want to work with the embedded project file, just double-click the object. The Excel menus change to reflect the relevant Project 2010 menus. (See Figure 18-9.) You can use Project 2010 in the usual way: switch views, apply tables and filters, change data, run calculations, and so on. When you are done working with the embedded Project 2010 file, click File, and then click Save.