AS a project manager using Microsoft Project 2010 or the earlier versions, you have probably created projects, assigned resources, tracked progress, and generated your fair share of reports. If you are working with enterprise project management and collaborating with your project team through Microsoft Project Server 2010, there are differences in how you work with your projects and resources.
This chapter is designed especially for the project manager working in an enterprise project management environment. You’ll learn how you can best make use of the Microsoft enterprise project management (EPM) solution as a project manager, so that you can maximize the probability of delivering successful projects and spend the right amount of time at each project stage.
Note
Project server administrators and portfolio managers should see Chapter 23. Team members can refer to Chapter 25. Executives and project sponsors can find pertinent information in Chapter 26. Portfolio managers or the project management office (PMO) can refer to Chapter 27 for information about demand management and optimizing the portfolio.
The Microsoft enterprise project management solution is a framework of project management processes and collaboration tools that with which project managers can manage and coordinate a great number of projects and resources. All project stakeholders can connect to the project server and obtain the information they need very quickly, as follows:
Portfolio managers and executives can revise the project portfolio and can notify project managers of approved projects.
Project managers can create and maintain their project plans.
Team members and team leaders can see assigned tasks and provide status updates and timesheet information.
Through Project Server 2010, the collaboration between the project manager and all other project stakeholders is structured and easy to manage.
For you as the project manager, Project Server 2010 and the enterprise project management features include the following:
Demand management. In Project Server 2010, you get an unified view of all projects being undertaken by the organization, including the projects that you manage. You can group projects by the phase they are in, see the status of all the projects in one glimpse, and drill down to see the details of the projects you manage. You can add new projects by specifying the project details.
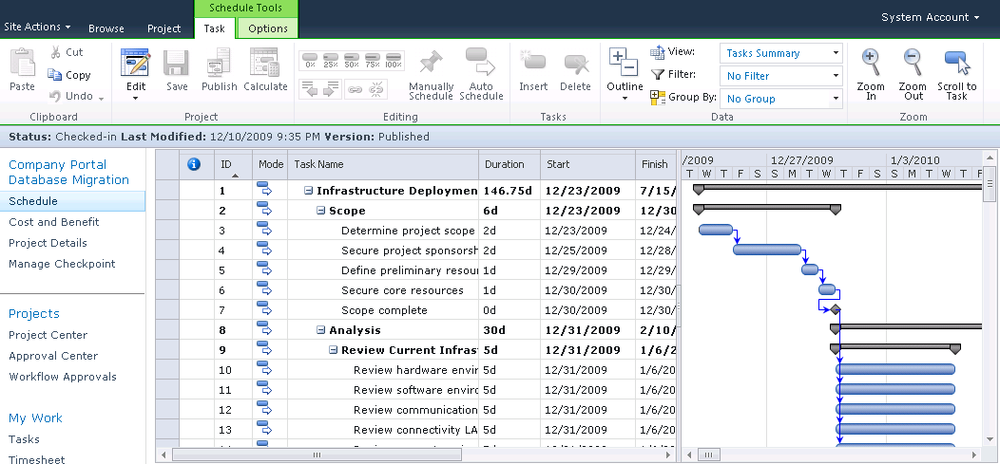
Schedule management. With Microsoft Project Web App, you can create your project plan directly in the web browser and display the schedule as a Gantt chart. You can enter tasks in Project Web App, create outlines, link tasks, and set the Manually Schedule or Auto Schedule task modes just as you can in Microsoft Project Professional 2010.
Resource management. You can add resources to your project using the enterprise resource pool. You can check resource availability and assignments, directly from Project Web App.
Issues and risk management. In Project Server 2010, you can leverage the full power of Microsoft SharePoint Server 2010 to create project workspaces to which you can upload all relevant project files, specify issues and risks.
Financial management. Project Web App gives you the option to enter cost and benefit information for your projects, and using Microsoft Excel Web App or InfoPath Forms Services.
Team communication and status updates. Through the use of the Tasks and Timesheet pages, team members can report on the status of their assigned tasks and submit these updates to you on a regular basis. As the project manager, you can approve or reject these updates. Upon approval, the status updates are incorporated into the project, thereby automating your progress tracking efforts. Also through Project Web App, you can request regular text-based status reports from team members that you can compile into a periodic status report.
Business intelligence. The new business intelligence functionality in Project Server can help your organization see both standardized reports and views in your project pages as well as configure on-demand reports.
After your project server administrator adds you as a user with project manager permissions in the project server, you can configure Project Professional to connect to the server. Then you have all the allowed enterprise project management features at your disposal.
In this section, you’ll learn how to set up Project Professional to connect with your project server. You’ll learn how to sign in to your project server from Project Professional and Project Web App. You’ll also learn the basics of navigating around Project Web App to carry out your project management activities.
To get started with enterprise project management, you need to be sure that the project server administrator has added you as a project server user. You’ll be provided with the project server web address, and possibly with a project server user name and password.
To set up your project server account in Project Professional, follow these steps:
Start Project Professional.
On the File tab, click Info, and then click the Manage Accounts button, as shown in Figure 24-1.
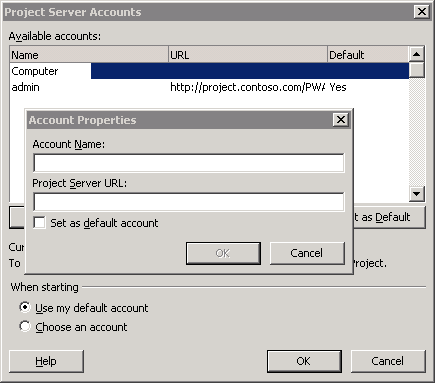
In the Project Server Accounts dialog box, click Add.
The Account Properties dialog box appears, as shown in Figure 24-2.
In the Account Name box, enter any name you want to identify the project server for yourself.
In the Project Server URL field, enter the web address of your organization’s project server in the format http://servername/PWA. Your project server administrator can provide this information.
Click OK.
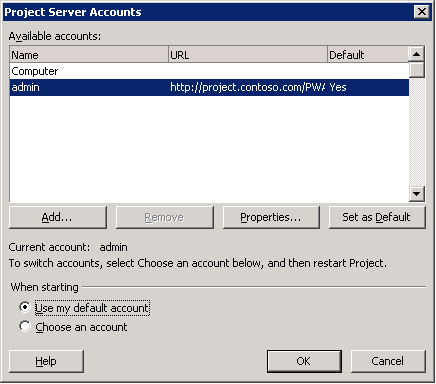
The Project Server Accounts dialog box is updated with the new information, as shown in Figure 24-3.
Under When Starting, select Use My Default Account if you want Project Professional to always connect to the account you designate as the default. To set an account as the default, click its name in the Available Accounts box, and then click Set As Default.
If you instead prefer to choose the account or sometimes work offline when starting up Project Professional, select Choose An Account.
With this option, every time you open Project Professional, the system will prompt you to select the account.
Click OK.
You are now set up to log on to your project server through Project Professional. If you want to log on immediately, exit Project Professional, and then start it up again.

If you specified in the Project Server Accounts dialog box that you want to automatically connect to your project server, all you need to do to log on to your project server from Project Professional is to start Project Professional. The specified project server location is found, and Project Professional logs you on immediately. Depending on your configuration, you might be prompted for a user name and password.
The project server administrator must set up your user account before you can successfully log on to the project server. If you have problems logging on, check with your project server administrator.
Note
For more information on adding user accounts see Creating a User Account.
If you specified that you want to manually connect to the project server, follow these steps:
Start Project Professional.
In the Login dialog box that appears, click in the Profile box, and then click the project server account name.
If instead you want to work offline, click Computer.
Click OK.
If you are prompted for a user name and password, enter them, and then click OK.
Many of your project management responsibilities are best carried out from within your familiar Project Professional window. Nevertheless, other responsibilities are best performed from within Project Web App. Many tasks can be done in either place, and it is just a matter of which application is more convenient at the time or which method you find more efficient.
To sign in to Project Web App, follow these steps:
Start Internet Explorer.
In the address box, type the URL of your project server, and then press Enter.
This URL is the one you enter in the Account Properties dialog box in Project Professional. However, you do not need to have the account set up in Project Professional to sign in to Project Web App directly using Internet Explorer.
Depending on your server configuration, Project Web App might prompt you for your user name and password, as shown in Figure 24-4.
If necessary, enter your user name and password, and then click OK.

Note
If single sign-on (SSO) is enabled in your environment, the system does not prompt you for a user name and password. Once you enter the Project Web App URL in the address bar, you are automatically signed in.
Your Project Web App Home page appears. (See Figure 24-5.)

To sign out of Project Web App, follow these steps:
In the upper-right corner of any Project Web App window, click your account name.
In the drop-down menu that appears, click Sign Out.
Once you sign in to Project Web App, take a moment to click around and orient yourself to the content and controls. If you have used previous versions of Microsoft Project Server or Microsoft SharePoint, much of Project Web App will feel familiar to you.
Most pages throughout Project Web App show the Quick Launch pane on the left side of the window. (See Figure 24-6.) The Quick Launch includes all relevant groupings for each user type, including the project manager user type. This means you only see Quick Launch items that you, as a project manager, are likely to find applicable to your needs.
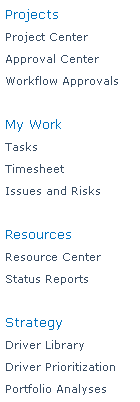
Figure 24-6. The Quick Launch is your command center to all the areas of Project Web App to which you have access.
The Quick Launch includes the following items:
Projects. Includes links for reviewing project information. Using this section, you can see all enterprise projects and drill down to a specific project and review and update information regarding the schedule, resources, costs, and more.
My Work. Displays current tasks assigned to you. This section also includes your current timesheet and the issues and risks assigned to you.
Resources. Focuses on the enterprise resource pool. In this area, you can add new resources and manage existing ones. You can check resource assignment and availability.
Strategy. Designed for executives and the portfolio manager, this section is used to define the organizational strategy and analyze the portfolio of projects in relation to that strategy.
Business Intelligence. Provides tools for generating reports and viewing dashboards that provide insights into key performance indicators for projects and the portfolio.
Settings. Lets you modify your personal settings in Project Web App. If you have certain access permissions, you might also be able to update server settings.
Lists. Shows any SharePoint lists that you create, including tasks lists.
Documents. Contains links to project-related document libraries and risk-tracking forms and lists.
The Home page is the first Project Web App page you see when you sign in. By default, it includes a list of items that need your attention—for example, approvals you need to process or status reports that are coming due. Your project server administrator can set up your Home page to include the content most appropriate for your organization.
Most Project Web App pages include the ribbon of commands rather than toolbars or menus. (See Figure 24-7.) The commands on the ribbon are organized on multiple tabs and groups.
All pages throughout Project Web App have certain standard controls, as follows:
User account controls. Your account name appears in the upper-right corner of the Project Web App page. Click your account name to display a drop-down menu that includes the commands My Settings, My Profile, Sign In As A Different User, Sign Out, and Personalize This Page.
Browse tab. Every page includes a Browse tab that contains standard controls, as shown previously in Figure 24-7. While other context-sensitive tabs are often present, you can always count on the Browse tab to be there to provide standard controls to help you navigate the site or find content. The Browse tab includes:
Project Web App. This button is a link to the Project Web App Home page.
Home. This button is a link to the site’s Home page, which can be the same or different from your Project Web App Home page, depending on your configuration.
Search. In the Search box, type a word or phrase you want to find throughout this site, and then click the Search button.
Help. Click the Help button to get assistance while using Project Web App. The Project Server Help window appears. A Help topic pertaining to the current page appears, but you can find other Help topics by typing a phrase or question in the Search For box. You can also click the Home button in the Help window and browse through the table of contents.
I Like It. This button is a SharePoint 2010 social media feature. Use the I Like It button to tag a Project Web App or SharePoint page. The page is bookmarked so that you can easily find it, and you can receive newsfeed updates about the page.
Tags & Notes. Another SharePoint social feature, use Tags & Notes to add a name or keyword and description to a page that becomes visible to other users. The system can create tag clouds so that you can view all the pages that have a particular tag.
Site Actions. Like the Browse tab, the Site Actions tab is visible on every page. Click the Site Actions tab to access a menu for creating or editing web pages or managing settings on the Project Web App site. Project server administrators and portfolio managers typically use this menu to customize Project Web App.
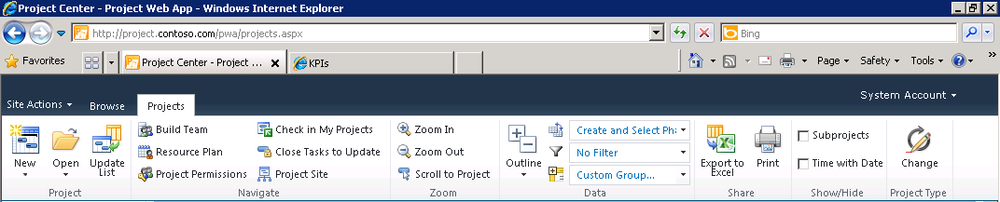
Most major Project Web App pages, such as the Project Center and Resource Center, include standard controls on their ribbon, including the following:
Filtering. Some predefined filters are available, but you can also create custom filters.
Share options. Use options to export data to Excel and to print.
Zoom options. You can zoom in and out of a Gantt chart and other views.
Note
You can customize the version of pages you use throughout Project Web App. To do this, click your account name in the upper-right corner of the page, and then in the drop-down menu, click Personalize This Page. You can also ask your project server administrator to customize elements of pages that are available for your role.
Several pages in Project Web App include a grid, or table, that lists information such as projects, tasks, or resources. (See Figure 24-8.)
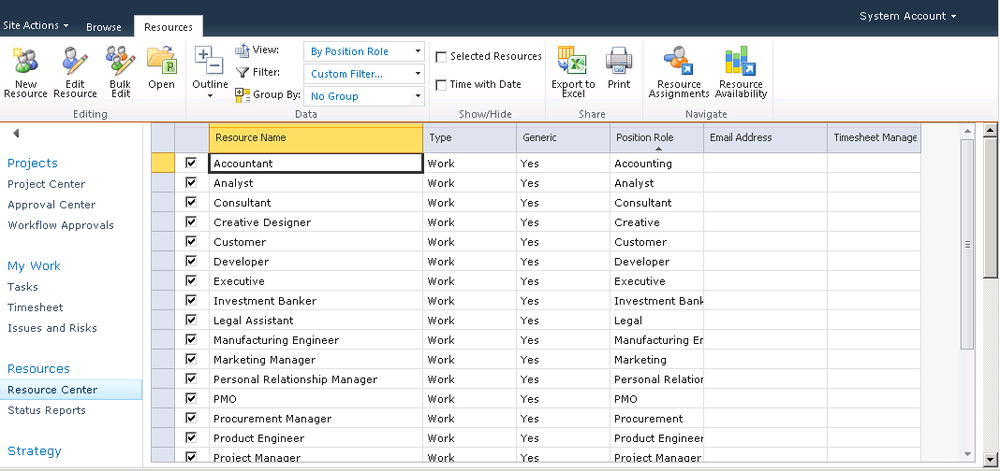
Figure 24-8. You use tables throughout Project Web App to view and edit information related to project, tasks, resources, and more.
The following elements are present for most tables:
List items. The main feature of a table is the list of items. In most cases, you can click an item to drill down to see more information, be it project or task details or resource information. For example, in the Project Center, you can click the name of the project; you can see the workflow status, project plan, and so on.
Check boxes. Some tables include check boxes next to each listed item. Clicking the check box selects the item for further action, such as editing or deleting. Selecting multiple items allows you to perform bulk or multiple operations at the same time.
Ribbon. One or more tabs are typically available on the ribbon above the table. For example, when you are editing a project schedule, the ribbon includes the Project, Task, and Options tabs. (See Figure 24-9.)
Status bar. Before editing a project, the project manager checks out the project. The status bar indicates that the project is checked out, when it was last modified, and the version.