
New in Project Server 2010 is a powerful portfolio management module, replacing what used to be the separate functionality in Microsoft Office Project Portfolio Server 2007. With the integrated portfolio management features, including demand management, workflow, and business drivers, your organization can be more focused on project management governance, standardization, and approvals.
The project workflow steps refer to the project life cycle or the phases and stages a project should go through to reach completion. Project Server includes a predefined project workflow, which consists of the phases of Create, Select, Plan, Manage, and Close. Your portfolio manager can create other workflows for various types of projects for your organization.
The use of the project workflow affects how you manage projects from start to finish. With checkpoints at various stages in the workflow, projects can have a closer and more standardized means for governance and control. In addition, the workflow ensures that the right projects are selected for the strategic benefit to the organization.
A project life cycle, or workflow, typically starts with the creation of a project proposal based on an established template, or enterprise project type. Depending on the enterprise project type, a workflow is automatically integrated with the new proposal. As the project manager, you’ll be prompted for various approvals at specific checkpoints along the way. If the proposal is approved, you convert the proposal into a project.
One of the key checkpoints is for you to enter a structured business case for the project, which includes the schedule, resource estimates, risks, and strategic impact of the project on established business drivers for the organization.
Based on this information, the portfolio manager and other managing stakeholders determine whether this project has a place in the organization’s optimal portfolio of projects. If the project is selected, you get the “green light” to move forward with planning and executing the project. Throughout the rest of the project’s life cycle, other checkpoints in the project workflow ensure that the project is continuing to fulfill its expected benefit to the organization, and this project governance continues until the project is complete and closed.
This process of gathering and managing all projects, from proposal creation to project closure, is called demand management.
Note
For more information about project workflows, phases, stages, and enterprise project types, see Setting Up Project Workflows.
A proposal is a simple way to define some basic project details for a potential project without investing a lot of time in it. If the project is approved, you can convert it into a real project plan that can be opened in Project Professional with the groundwork already done. You do not need to do any converting or importing; you just need to add detail.
Submitting the proposal is part of the Create phase in the project workflow.
To create a proposal, follow these steps:
On the Quick Launch, under Projects, click Project Center.
On the Projects tab, in the Project group, click New, and then select Sample Proposal.
The Project Information page appears, as shown in Figure 24-20.
Complete the information on the page.
On the Project tab, in the Project group, click Save.
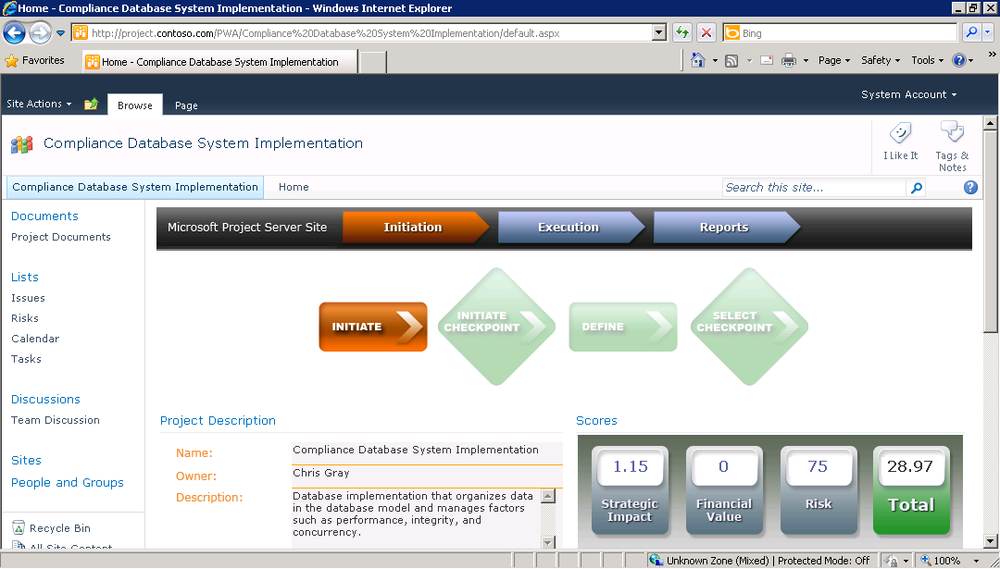
The proposal file is created and saved. Your proposal name appears at the top of the Quick Launch. On the project detail page that appears, you can see the workflow step the proposal is in along with additional information about the next steps. Figure 24-21 shows an example.
Scroll down and click All Workflow Stages.
This shows the next workflow steps your project has to go through.
After you enter the necessary information for the Initiate phase, on the Project tab, in the Workflow group, click Submit. Read the message that appears, and then click OK.
According to the workflow, the proposal is evaluated by the portfolio manager and possibly by executive stakeholders. If your project is approved, it moves from the Initiate phase it to the Define phase.
When a proposal reaches the Define phase of the project, you need to enter more details about the project. Such details include weighing the project against the organization’s business drivers so that the strategic impact of the project can be measured. You’ll also be prompted to enter information about cost, benefit, and risks.
To fulfill the default workflow steps in the Define phase, follow these steps:
On the Quick Launch, under Projects, click Project Center.
On the Projects tab, in the Project group, click the name of your proposal.
The project detail page for your proposal appears.
At the top of the Quick Launch, under the proposal name, click Strategic Impact.
The Strategic Impact page is displayed.
On the Project tab, in the Project group, click Edit.
As shown in Figure 24-22, select the rating of each business driver for this project.
Note
For more information about business drivers, see Reflecting Strategy by Defining Business Drivers.
On the Project tab, in the Project group, click Save.
On the Project tab, in the Page group, click Next.
The Cost And Benefit page appears.
Enter the necessary information, including the cost, benefit, and cash flow information for the next five years.
This information gives the portfolio manager the information needed to determine whether the project should be included in the portfolio.
On the Project tab, in the Project group, click Save.
On the Project tab, in the Page group, click Next.
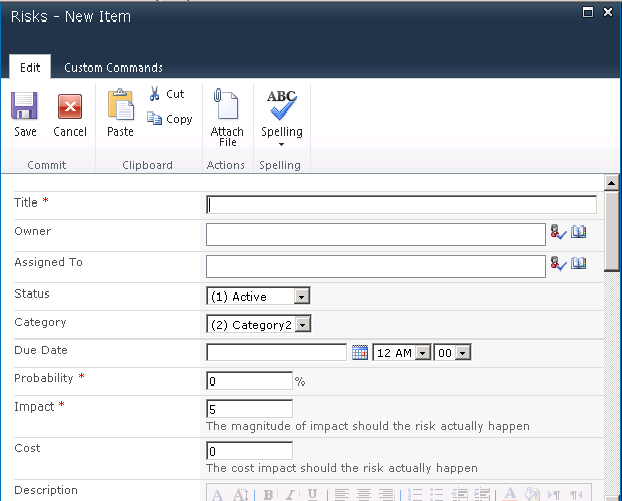
The Risk Evaluation page appears.
Enter the necessary risk information.
On the Project tab, in the Project group, click Save.
After you enter the necessary information for the Define phase, on the Project tab, in the Workflow group, click Submit. Read the message that appears, and then click OK.
According to the default workflow, the project is evaluated further by the portfolio manager. If your project is approved again, it moves to the Select phase. At this checkpoint, the portfolio manager and executives make the decision whether to include the project in the portfolio. The analysis they make can be based on costs, resource constraints, risks, and strategic impact.
If the project passes the Select checkpoint, it enters the Plan phase. At this point, you can start to enter the schedule in Project Web App or in Project Professional.

If your project makes it through the Select phase, then you enter the Plan phase. Here’s where you convert your proposal to a full-fledged project.
Note
For more information about creating a project, see Creating an Enterprise Project by Using Project Web App.
After you save and publish the project plan, the project might be submitted for a planning checkpoint. The portfolio manager reviews your project plan to see whether it adheres to the project management standards and follows the costs and schedule specified at the project proposal initiation.
Should the project pass the planning checkpoint, it proceeds to the Manage phase. In this phase, project execution actually begins. Resources carry out their assigned tasks and submit task updates for incorporation and tracking in the project plan. When the project is completed, the project enters the Close phase.