
A project plan might make an impressive report or boardroom presentation, but without resources to implement the tasks, that lovely project plan is nothing more than fiction. As a project team member, you know that it falls to you to help achieve the goals of the project. You also know that you must regularly inform the project managers about your progress so that they understand how the projects are coming along.
This is where you and Microsoft Project Web App come on the scene. You use Project Web App, the web-based application for all project stakeholders, to view the tasks allocated to you and to update the status of the tasks in a timely manner, but also to see overall project information, giving you a bigger picture of the project’s purpose and status.
Project Web App doesn’t limit you to just one project either; you can use it for as many projects as you’re contributing to. And if you’re working for two or three project managers at a time on these multiple projects, you can use Project Web App to keep all this information straight and keep all project managers well informed.
You can use Project Web App to log the time you’re spending on project tasks, as well as time for nonproject or nonbillable tasks such as meetings, training, vacation, and sick leave.
With project management automated like this, you can spend more time working on your tasks and less time worrying about keeping management up to date. In situations where project execution can be done by geographically distributed teams, the Microsoft Project Server 2010 collaboration features, such as task updates, timesheets, project workspaces, issues, and risk tracking are vital for sharing project information and files to ensure that everyone is on the same page.
This chapter is designed for project team members, team leads, and resource managers—all of whom use Project Web App to carry out their project-related responsibilities.
Note
If you’re curious about the structure and flow of information in Project Server 2010 and how Project Web App and Microsoft Project Professional 2010 work together, see Chapter 22.
To start using the Project enterprise and team collaboration features, use your web browser to connect to your organization’s installation of Project Server 2010. You can then sign in to Project Web App.
After the project manager publishes a project to the project server, you use Project Web App to see and update the list of tasks to which you’re assigned. Depending on the security permissions that have been set up for you, you can add more tasks and assign yourself to existing tasks as needed. Project Web App is the central location for all your project tracking activities.
With your assignments in place, your way is set to start working on those assignments, according to the established start and finish dates. While you work, you can record how far along you are on each assignment or even how much time you’re spending on each assignment. You can make notes about any potential problems, significant accomplishments, issues, or changes. In this way, all pertinent information about your tasks is in one central location when your project managers ask for a progress update or status report. You can work on assignments from different projects and update them in one single view.
The microcosm of your own tasks draws your focus most of the time. But sometimes it helps to see the tasks that others on the project team are working on at the same time. Depending on your security settings, you can use Project Web App to review the full project schedule, which shows who’s doing what, when. You have access to collections of project-related documents, issues, and risks, as well.
In addition to everything else you do, you might have resource management responsibilities. This might be something as simple as reassigning a few tasks to peers on your project team, or as involved as being the team lead or supervisor over a larger group of project resources. You might be a resource manager responsible for building teams and managing all resources on one, two, or many projects in your organization. Resource management features in Project Web App make sure that you have the tools you need.
You use your web browser (Internet Explorer version 7 or later) to connect to your organization’s installation of Project Server. You then sign in to the project server from Project Web App with the user name and password that has been set up for you by your project server administrator.
After you’re signed in, browse around to orient yourself to the layout of Project Web App. This will give you some idea of how you can use Project Web App as a partner in your project assignment and time-tracking activities.
Note
Project server administrators and portfolio managers should read Chapter 23. Project managers can refer to Chapter 24. Executives and other managing stakeholders can find pertinent information in Chapter 26. Portfolio managers can refer to Chapter 27.
To sign in to Project Web App, follow these steps:
Start Windows Internet Explorer (version 7.0 or later).
In the address box, type the URL for your organization’s project server, and then press Enter.
Your project manager or project server administrator provides you with the URL you need.
Depending on the project server settings, the system might display a dialog box for entering your project server user name and password, as shown in Figure 25-1.
If necessary, enter your user name and password, and then click OK.
If single sign-on is enabled, you are signed in to the application without needing to enter a user name or password.
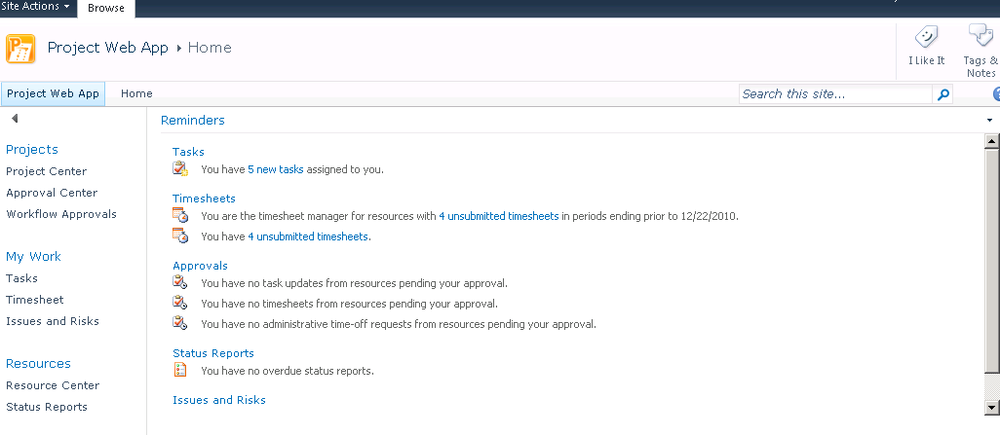
Your Project Web App Home page appears. (See Figure 25-2.)

To sign out of Project Web App, follow these steps:
In the upper-right corner of any Project Web App window, click your account name.
In the menu that appears, click Sign Out.
Once you are signed in to Project Web App, take a moment to click around and orient yourself to the content and controls. If you have used previous versions of Microsoft Project Server or Microsoft SharePoint, much of Project Web App will seem familiar.
The Project Web App Home page and other major pages show the Quick Launch on the left side of the screen. The Quick Launch includes relevant groupings for each user type, including the team member or team lead user type. This means you only see Quick Launch items that you are likely to find applicable to your needs.
Depending on your user security, you might be able to see one or more of the items described in the following list or shown in Figure 25-3.
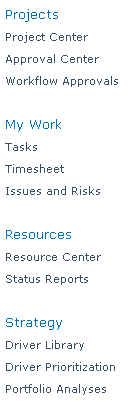
The most relevant items on the Quick Launch for team members and team leads are the My Work, Lists, and Documents sections. You might also find the Projects and Settings sections useful on occasion. The sections on the Quick Launch include:
Projects. Includes links for reviewing project information. This section is used most by project managers. However, as a team member, you can click Project Center to get a high-level overview of all the company’s projects and also to see details about projects to which you’re assigned.
My Work. Displays current tasks assigned to you. This section also includes your timesheet and the issues and risks assigned to you.
Resources. Focuses on the enterprise resource pool. This section is used mostly by project managers, resource managers, portfolio managers, and the project server administrator to add, view, or modify resource information.
Strategy. Designed for executives and portfolio managers, this section is used to define the organizational strategy and analyze the portfolio of projects for the organization.
Business Intelligence. Designed for executives and portfolio managers, this section provides tools for generating reports and dashboards that provide information and insights about projects.
Settings. You can use this section to modify your personal settings in Project Web App.
Lists. Shows any SharePoint lists associated with projects to which you are assigned.
Documents. Contains links to project-related document libraries and risk-tracking forms and lists.
The Home page is the first Project Web App page you see when you sign in. By default, it includes a list of items that need your attention—for example, tasks that have been recently assigned to you or status reports that are coming due. Your project server administrator can set up your Home page to include the content most appropriate for your organization.
Most Project Web App pages include the ribbon of commands rather than menus and toolbars. (See Figure 25-4.) The commands on the ribbon are organized on multiple tabs and groups.

All pages throughout Project Web App have certain standard controls you can use to browse, find content, or personalize your pages. The following list highlights some of the most useful control:
User account controls. Your account name appears in the upper-right corner of the Project Web App page. Click your account name to display a drop-down menu that includes the commands My Settings, My Profile, Sign Out, and Personalize This Page.
Browse tab. Every page includes a Browse tab. While other context-sensitive tabs are often present, you can always count on the Browse tab to be there to help you browse the site or find content. The Browse tab includes:
Project Web App. This button is a link to the Project Web App Home page.
Home. This button is a link to the site’s Home page, which can be the same or different from your Project Web App Home page, depending on your configuration.
Search. In the Search box, type a word or phrase you want to find throughout this site, and then click the Search button.
Help. Click the Help button to get assistance while using Project Web App. The Project Server Help window appears. A Help topic pertaining to the current page appears, but you can find other Help topics by typing a phrase or question in the Search For box. You can also click the Home button in the Help window and browse through the table of contents.
Several pages throughout Project Web App include a grid, or table, that lists information such as tasks and timesheets. (See Figure 25-5.)
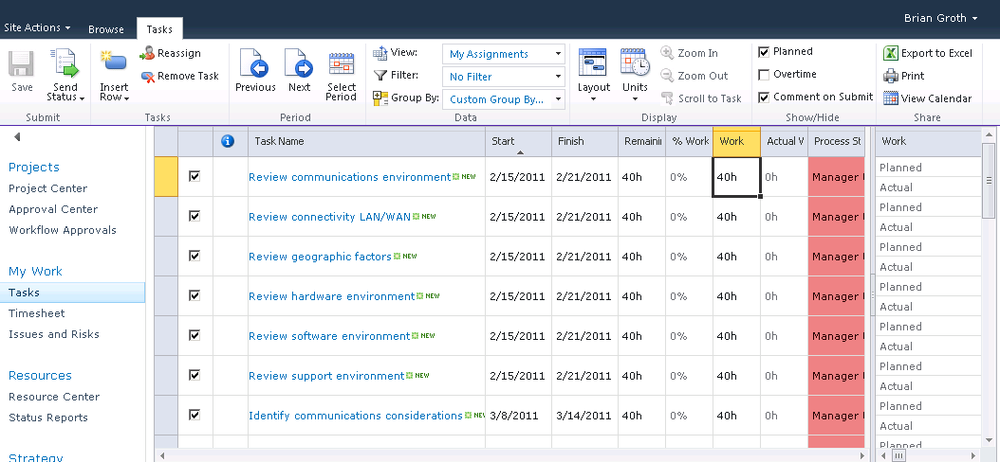
The following elements are present for most tables:
List items. The main feature of a table is the list of items. In most cases, you can click an item to drill down to see more information, whether it is project or task details or resource information. For example, you can click the name of the task to see the details of the task.
Check boxes. Some tables include check boxes next to each listed item. Clicking the check box selects the item for further action, typically by using a tab item on the ribbon. Selecting multiple items allows for bulk or multiple operations. For example, after you select multiple tasks, you can click Reassign. This operation applies to all selected tasks.
Ribbon. One or more tabs are typically available on the ribbon above the table. When you’re working on your assignments in the Tasks page, the ribbon includes the Tasks tab containing a variety of commands for your assignments. (See Figure 25-5).
Status bar. When you save or submit changes to your tasks and timesheets, the status bar, which appears above the current table, notifies you when the action is complete. The status bar might show a message such as “Saving,” “Updates have been saved,” or “There are unsaved updates.”