
When the project plan is developed and tasks are assigned to resources, the project manager publishes the project plan to the project server.
Then, when you sign in to Project Web App, you see project tasks that have been specifically assigned to you. These are your assignments.
When working with your assignments, you can:
Review your new assignments and any changes to existing assignments.
Assign yourself to team tasks or reassign your tasks to other resources.
View the full project plan to see the context of your work.
Enter and submit progress information about your assignments.
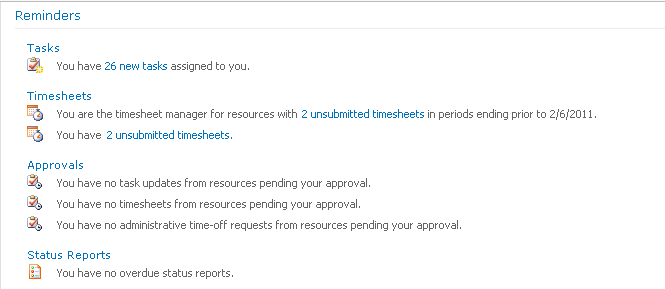
As soon as you sign in to Project Web App, your Home page lists any new notifications that require your attention. Notifications come from new or changed assignments or progress requests published to the project server for you by the project manager. The following are examples of notifications or reminders you might see in the Project Web App Home page. (See Figure 25-6.)
New tasks have been assigned to you.
Task information on an existing assignment has changed.
The project manager is requesting a progress update on your assignments.
A status report is coming due.
When you want to see more details about one of the notifications, simply click the notification link. The page containing the details of the notification appears.
The Home page always includes notifications when a new task has been assigned to you. Click the notification link (for example the “26 new tasks” link in Figure 25-6), and the Tasks page appears. Or, on the Quick Launch, under My Work, click Tasks.
The Tasks page shows your list of assignments along with the fields appropriate to the progress-tracking method that has been chosen by the project server administrator and your project manager. Typical fields might include the amount of scheduled work for each assignment, scheduled start date, scheduled finish date, and percentage complete.
When you receive a new task assignment, it is marked with the New icon next to the task name. You don’t need to take any further action to accept your new assignments. You can review the summary information on the page, or you can click the task name and review additional assignment details, such as other resources assigned, predecessor and successor tasks, and notes. (See Figure 25-7.)

All assignments you are working on, even those owned by different project managers, are shown on your Tasks page. By default, all your assignments are grouped by project. If you prefer, you can group tasks by status. On the Tasks tab, in the Data group, click in the Group By box, and then click Status. You can also click Custom Group By to create a different grouping.
On occasion, you might find it necessary to reject an assignment. Maybe the assignment is a duplicate of another one you already have. Maybe you feel you’re not qualified to carry out the assignment. Maybe you have a scheduling conflict and cannot do it during the required time. Whatever the reason, if you need to reject an assignment, follow these steps:
On the Quick Launch, under My Work, click Tasks.
On the Tasks page, select the check box next to the assignment(s) you need to reject.
On the Tasks tab, in the Tasks group, click Remove Task, and then click OK in the message that appears.
A strikethrough line appears in the task row.
The status bar shows the message, “There are unsaved updates.”
If necessary, select the check box next to the task name, and then on the Tasks tab, in the Submit group, click Send Status, and then click Selected Tasks.
Submitting the task update ensures that your project manager or team lead will be notified of your request to be removed from this assignment.
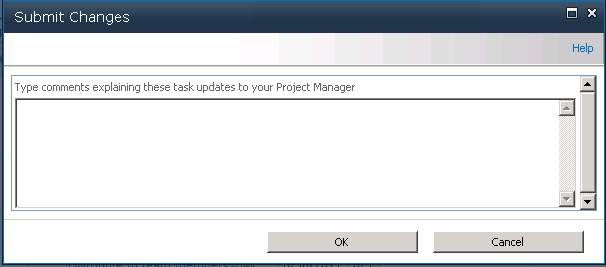
The Submit Changes dialog box appears, as shown in Figure 25-8.
In the Submit Changes dialog box, enter a comment to explain why you need to be removed from this assignment, and then click OK.
Entering a comment is not required to reject an assignment; however, it is a good communications practice.
This comment will be stored as a transaction comment with the assignment and can be seen on your Assignment Details page in the Recent Task Changes And Notes section.
This task update and your comment appear on the project manager’s Approval Center page. If the project manager approves your update, the project plan is changed to remove you as an assigned resource on the task. At that point, the task is removed from your task list. The project manager will then likely assign another resource to the task.
However, if the project manager rejects your update, the assignment comes back to you. In this case, the project manager is, in effect, rejecting your rejection of the assignment, and the project plan remains unchanged in this regard. The strikethrough line is removed from the assignment on your Tasks page, and the assignment is marked with the Update Rejected icon and remains in your task list.
During the course of a project, task information often changes. New tasks are added, durations change, and then there is a ripple effect for related tasks throughout the project.
When the project manager publishes the project with the changed tasks, if any of your assignments are affected, they are marked with the Assignment Updated icon next to the task name, on the Tasks page.
Review the assignment information in the table—the cells which contain changed information are highlighted with another color. You can also click the assignment name to review the details.
By default, resources can transfer an assignment to another resource. This can be useful in groups that are used to shifting workload according to the skills, availability, and preferences of members in the group. This can also be useful in organizations in which a team lead or resource manager decides who should handle a particular assignment. In such a case, the project manager can assign the task to the team lead or resource manager, and that individual then reassigns the task to the right person.
The ability to reassign tasks to other resources is made possible by permissions set by the project server administrator.
If you have the capability to reassign tasks, do so by following these steps:
On the Quick Launch, under My Work, click Tasks.
Select the check boxes next to the task(s) you want to reassign.
If you do not select any check boxes, all your assignments will be available for reassignment.
On the Tasks tab, in the Tasks group, click Reassign.
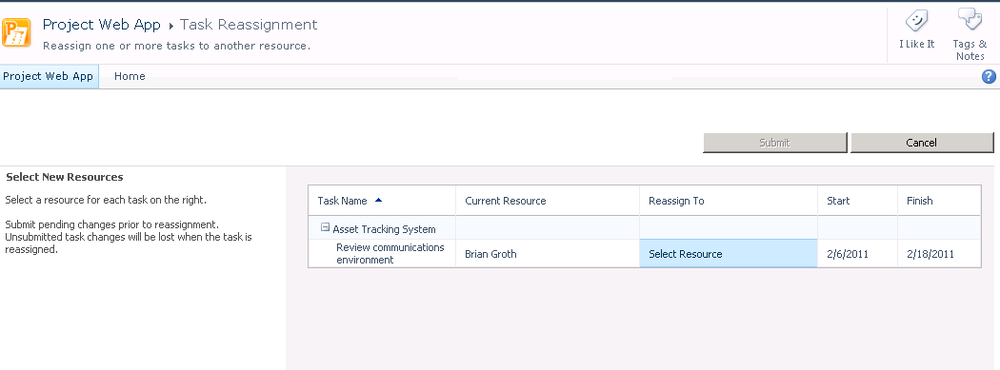
The Task Reassignment page appears, as shown in Figure 25-9.
On the Task Reassignment page, in the table in the Select New Resources section, find the task you want to reassign.
If you selected tasks, only those tasks are listed in the table.
If you had not selected tasks, all your assigned tasks are listed.
Double-click the Select Resource cell to see the list of resources assigned to this project. Click the name of the resource to whom you want to reassign this task.
If necessary, in the Start Date section, enter the date on which you want the reassigned resource(s) to start working on these tasks.
In the Comments section, enter a note about the reassignment.
The project manager sees your comment when he or she reviews the task update reflecting this reassignment. Unless the reassignment is routine, it’s a good idea to explain your reason for the reassignment.
Click Submit to save and publish the reassignment.
This task update, including your comment, appears on the project manager’s Approval Center page as a task reassignment request. If the project manager accepts the update, the project plan is changed to show the reassigned resource on the task. If the project manager rejects the update, the assignment returns to you, and the project plan remains unchanged.
You can assign yourself to existing tasks that you want to work on in the project. If you’re a member of a team assignment pool, you can assign yourself to a task assigned to that pool.
You can also propose an entirely new task for a project you’re working on and assign yourself to it.
Your project manager might have published project information without assigning tasks to resources. By default, you can assign yourself to tasks in a published project for which you are a resource.
To see all the tasks in a project, on the Quick Launch, under Projects, click Project Center. Click the name of the project. The project detail page appears, showing all project tasks. If necessary, at the top of the Quick Launch, under the project name, click Schedule.
Take note of the summary task that contains the task to which you want to assign yourself. Once you have this information, you can assign yourself to the task by following these steps:
On the Quick Launch, under My Work, click Tasks.
On the Tasks tab, in the Tasks group, click Insert Row, and then click Add Yourself To A Task.
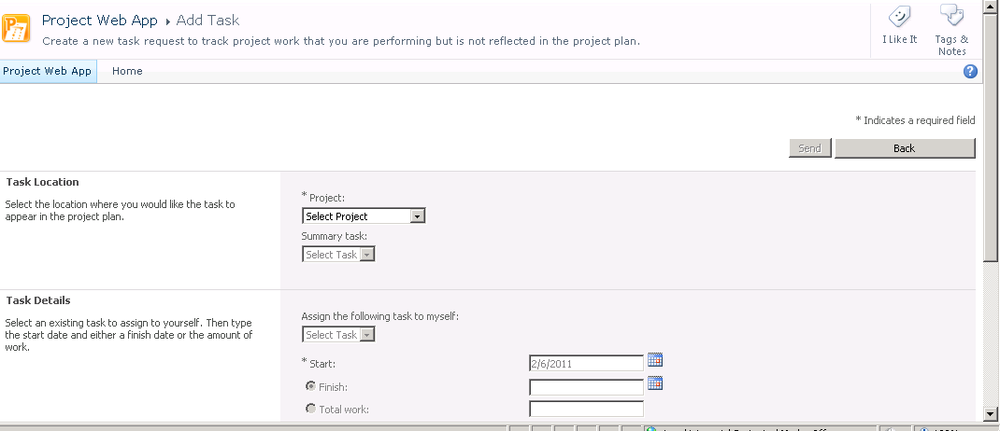
The Add Task page appears. (See Figure 25-10.)
In the Task Location section, click in the Project box, and then click the name of the project that contains the task.
Only the projects to which you are assigned are listed in the Project box.
Click in the Summary Task box, and then click the summary task that contains the task to which you want to assign yourself.
In the Task Details section, click in the Select Task box, and then click the task to which you want to assign yourself.
Update the start and finish dates if needed.
In the Comments box, add a note.
Your request appears in the project manager’s Approval Center as a new assignment request. If the project manager approves your request, the project plan is changed to show you as an assigned resource on the task.
Instead of selecting and assigning an individual to a task, sometimes a project manager prefers to specify that a particular department or group be responsible for the task. Members of that group can then decide for themselves who will actually carry out the assignment.
A team assignment pool might be a department, such as Business Development, or a group of individuals doing the same job, such as Analysts. When a project manager assigns a task to a member of the team assignment pool, or team resource, that task is considered a team task.
Note
For you and your project manager to use team resources, your project server administrator needs to define the team assignment pool in the enterprise resource pool. The project server administrator also needs to identify you as a member of the team assignment pool.
To assign yourself to a team task, follow these steps:
Display the Tasks page.
On the Tasks tab, in the Tasks group, click Insert Row, and then click Insert Team Tasks.
The Team Tasks page appears.
Any tasks that are assigned to the team to which you belong are listed in the table on the Team Tasks page.
Select the check box next to the team task you want to assign yourself to.
On the Tasks tab, in the Tasks group, click Assign To Me.
To return to the Tasks page, on the Tasks tab, in the Navigate group, click Tasks.
The team task is now listed as one of your assignments. The project manager is notified in the Approval Center page.
Suppose that you’re working on a project and you see that a task should be added. To propose the task to your project manager and to ensure that your work on the project is accounted for, you can create and submit a new task to the project manager.
To propose a new project task, do the following:
Identify where the new task might belong in the context of the whole project. On the Quick Launch, under Projects, click Project Center. In the Project Center, click the name of the project. The project detail page appears, showing all project tasks. Take note of the summary task that should contain the new task you are proposing.
On the Quick Launch, under My Work, click Tasks.
On the Tasks tab, in the Tasks group, click Insert Row, and then click Create a New Task.
The New Task page appears.
In the Task Location section, click in the Project box, and then click the name of the project to which you want to add the task.
Click in the Summary Task box, and then click the summary task under which you want to add the new task.
In the Task Details section, enter the task name in the Task Name box.
Enter the task start and finish dates in the appropriate fields.
In the Comments box, add a note about the new task.
Click Send.
The new task appears in your task list. Your request also appears on the project manager’s Approval Center page as a new task request. If the project manager approves your request, the new task is added to the project plan with you as the assigned resource.
The Tasks page is the hub for your project assignment information and is likely the place where you spend the most time when working in Project Web App.
On the Tasks page, you can view and arrange your assignments in different layouts, different views, or with an assortment of filters or groups applied. You can view and update information about the assignment, including your progress toward completion.
You can view your tasks in one of three predefined layouts. To do this, follow these steps:
On the Quick Launch, under My Work, click Tasks.
On the Tasks tab, in the Display group, click Layout, and then click the layout you want—Gantt Chart, Timephased Data, or Sheet, as follows:
Gantt Chart. Displays your assigned tasks in a Gantt chart view, with the sheet area listing the task names and other field information and the chart area showing Gantt bars indicating the start date, duration, and finish date for each task.
Timephased Data. Displays your assigned tasks in a timephased view. The sheet area on the left lists the task names and other field information. The timephased area on the right displays certain task fields—such as planned and actual work—by day, by week, or other time increment. You can use the timephased area to update your task progress for the defined time period.
Sheet. Displays your task information in a simple table format. You can directly update the Remaining Work, % Work Complete, and Actual Work fields, and you can see the current status.
In addition to choosing your preferred page layout, you can also customize the Tasks page to show, hide, group, or sort information as follows:
Filter. You can apply a filter to see only those tasks that meet certain criteria. On the Tasks tab, in the Data group, click in the Filter box, and then click the filter you want. For example, you can apply a filter to see only your incomplete tasks, overdue tasks, newly assigned tasks, or completed tasks. To see all tasks again, click Tasks, Data, click in the Filter box, and then click No Filter.
Time Period. When working in the Timephased Data layout, you can specify the time period for which you want to see your task information. On the Tasks tab, in the Period group, click Select Period. In the Timesheet Period box, select a predefined time period. If you want to enter a custom time period, enter the dates in the From and To boxes.
Group. By default, your assignments are grouped by project. If you prefer, you can group tasks by status. On the Tasks tab, in the Data group, click in the Group By box, and then click Status. You can also click Custom Group By to create a different grouping.
Sort. By default, tasks are sorted by their start dates. You can also sort by any column in the table. Simply click in the heading of the column you want to sort by, click the arrow that appears, and then click Sort Ascending or Sort Descending. For example, you can sort start dates of your task from earliest to latest. You can also sort by remaining work, from highest to lowest. To return to the original order, click Sort Ascending in the Start column heading.
You can see and update task fields in two ways: from the Tasks page directly by double-clicking a column such as Remaining Work and entering the information, or by clicking the task name and displaying the task details page.
To update a task field on the Tasks page, simply double-click in the table cell for the task, and then make your change. You can update any field that is not dimmed. If you’re working in the Timephased Data or Gantt Chart page layout, you can drag the split bar to the right to view and update more fields.
You can add, remove, and rearrange the columns. Move your mouse pointer over any column heading until the arrow appears. Click the arrow, and then click Configure Columns. In the Configure Columns dialog box, select the check boxes for the columns you want to show and clear the check boxes for the columns you want to hide. Select a column and click Move Up or Move Down to change its position in the table. Click OK. The changes you made apply to all layouts: Gantt Chart, Timephased Data, or Sheet.
On this page you can do the following:
Update progress information
Review the history of communications on this assignment between you and the project manager
Review any issues, risks, or documents associated with this task
See the project manager contact and the team’s components
Review this task’s predecessors and successors
Read and respond to task notes stored together with the task in the project plan
Certain types of custom fields might have been created and added to your Task page by the project manager or project server administrator. If this is the case, you see the custom fields on the task details page, and probably also directly on the Tasks page.
Some of these custom fields can contain a value list from which you can choose an appropriate option. If such a custom field is part of your Tasks list, and if you have read-write permission for the field, click in the field. A drop-down list shows all the choices. Click a choice, and that value now appears in the field. This procedure makes it easy for you to enter the correct form of information while maintaining project data integrity.
When you finish changing the task details page, click Save to save your changes and return to the Tasks page. If you want to save your changes and immediately publish them to the project server so your project manager will see your changes right away, click Send.
By default, you can review complete project information for all the published projects for which you’re a resource. This is helpful to see the overall context of your assignments.
To review information about projects you’re working on, follow these steps:
On the Quick Launch, under Projects, click Project Center.
The Project Center page appears, listing all enterprise projects.
Click the name of the project whose tasks you want to review.
The project detail page appears. If the project is not already showing as a task listing and schedule, at the top of the Quick Launch, under the project name, click Schedule.
The tasks are listed along with their durations, start and finish dates, and current progress.
Depending on your user permissions and how your project server administrator has set up views, you might be able to apply different views to the project schedule page. On the Task tab, in the Data group, click in the View box, and then click the view you want.
The Tasks Summary view presents the project schedule as a Gantt chart showing summary information. Experiment with other views to see which ones are most useful to you.
After your assignments are established, you’re ready to work on them. Of course, your project manager wants to be informed periodically of what you’re accomplishing as well as of any snags you might be running into. You will provide up to three categories of progress information, depending on your organization’s requirements for time and status tracking:
Specific work hours or percentage complete on your individual assignments, also known as actual work, or just actuals
Text-based status reports in a format set up by your project manager
Hours or days spent on different categories, such as billable and nonbillable time, nonproject administrative time, nonworking time, and so on
While you work on your assignments, its good practice to keep your Tasks page updated. At the end of each day, for example, you can log the percentage complete, the remaining time on an assignment, or the number of hours worked on each task. Which of these three you update depends on how your Tasks page has been set up by your project server administrator.
If all the fields you need to update are showing on the Tasks page, you can double-click the value in a particular field and type the new value. You can also click the task name to open the task details page. In the General Details section, update the appropriate fields. When you are finished, on the Tasks tab, in the Submit group, click Save. This saves your information without submitting it for review by your project manager just yet.
Keeping your assignment progress information up to date each day makes it all the easier for you to quickly send a progress update when your project manager asks for it.
As soon as you have assignments on your Tasks page, you have the ability to submit progress updates. Your project manager and the rest of the project team might have agreed on when progress updates should be submitted—for example, every Friday at noon or the last day of each month. Your project manager might submit a project update request at those times or just expect you to submit a project update without a reminder.
Your project manager can also explicitly request progress updates at any time. Either way, such requests appear as a reminder on your Project Web App Home page, and you might also receive an automated notification via e-mail.
Whenever your project manager submits a progress update request, a question mark icon appears next to the assignment on the Tasks page.
Note
The project manager who created the project is typically the project owner. By default, this project manager is also the status manager. A status manager different from the project manager can be designated for a project. This person is responsible for reviewing and accepting or rejecting progress updates and status reports for a project. You can see who the project manager and status manager are in the Contacts section of the task details page.
Submitting your progress updates, or actuals, on your individual tasks is the heart of the Project Web App functions. Submitting your assignment actuals ensures that your project manager is well informed about how you’re doing on your tasks and knows whether you have too much work or whether you need more time or assistance.
In addition, the actuals you submit help everyone on the project team anticipate potential problems or bottlenecks and come up with solutions before they become crises.
You’ve already seen how you submit changes to your assignments, such as when you reassign a task to another resource or when you create a new task for the project. The project manager is notified of your task update and decides whether to reject your change or accept it for incorporation into the project plan.
Submitting progress updates containing your actuals works the same way. You enter your actuals on your assignments and then submit them to the project server. Your project manager reviews your actuals and accepts them. This acceptance then updates the progress information in the project plan.
You can update the assignment status all at once in the Tasks page or individually by opening each task. When you’ve updated your assignment information, you can save and submit them to your project manager.
Directly updating progress information in the Tasks page is the fastest and easiest approach. To do this, simply double-click in the table cell for the task you want to update. If you’re working in the Timephased Data or Gantt Chart page layout, you can drag the split bar if necessary to view and update fields. (See Figure 25-11.)
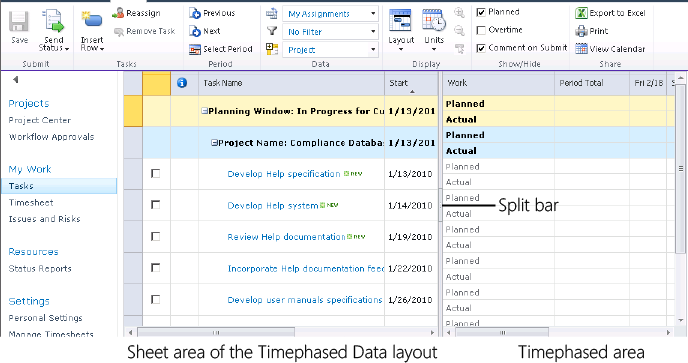
Figure 25-11. Double-click in the cell in which you want to update information. If you’re working in the Timephased Data or Gantt Chart layout, you can drag the split bar to see the columns you need.
Depending on how you’re asked to report progress, you might update the Actual Work and Remaining Work fields, or the % Work field. You might need to change the Start and Finish fields. You can update any fields in the table that are not dimmed. The same fields are available in any of the three layouts: Gantt Chart, Timephased Data, or Sheet.
If you’re asked to report the number of hours worked on a task per day, per week, or other time period, apply the Timephased Data layout, and then enter your hours in the timephased area of the page in the Actual field for the task and the time period. If you enter hours in each individual time increment (for example, each day), the total hours are updated in the Period Total field. If you enter a value in the Total Period field, the work amount is divided across each individual time increment.
Although not as efficient as updating progress on the Tasks page, you can use the task details page to enter progress information. This is useful when you need to review details about the assignment at the same time.
To enter progress information about an individual assignment using the task details page, follow these steps:
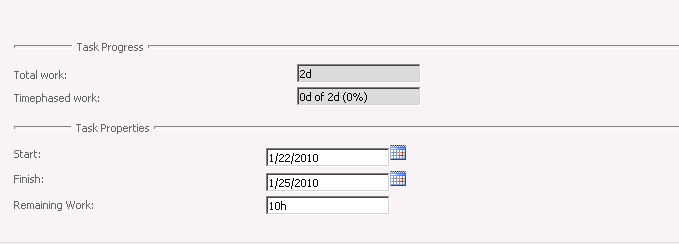
On the Tasks page, click the assignment name to open the task details page.
In the General Details section, under Task Progress or Task Properties, enter actuals for your assignments in the fields designated for this purpose. (See Figure 25-12.)
If your project tracks work amounts, the Task Progress section includes the Total Work and Timephased Work fields. If your project tracks percentage of work complete, the Task Progress section includes the Percent Complete field. Use this field to report percentage complete on each of your assignments at this point—for example, 15%, 50%, or 100%.
If your project tracks total actual work and remaining work for the reporting time period, the section includes the Actual Work and Remaining Work fields. In the Actual Work field, enter the amount of time you spent on each assignment. In the Remaining Work field, enter the estimated number of hours needed to complete the assignment.
If your project tracks hours of work done per time period, time periods such as days or weeks are provided. In the timephased fields for each time period (day or week), type the amount of time you spent on each assignment.
As you make changes to your task information, remember to periodically save your work. The status bar indicates “There are unsaved updates” if you have changes that have not been saved. To save changes, on the Tasks tab, in the Submit group, click Save.
You can submit your progress information to the project server and your project manager for all your changed assignments or for just those assignments marked with the question mark update request icon. It’s perfectly fine to report on more assignments than the project manager requested. In fact, it’s good practice to submit an update whenever there is a significant change or accomplishment on an assignment.
When working on the task details page, you can click Save to save your changes and submit them later, or you can click Send to submit them immediately to the project server and your project manager.
When working on the Tasks page, you can submit your changes to the project server and your project manager by following these steps:
On the Tasks page, select the check boxes for all the tasks you want to submit.
If you want to submit changes to all tasks, you don’t need to select any check boxes.
On the Tasks tab, in the Submit group, click Send Status, and then click Selected Tasks.
In the Submit Changes dialog box, type a comment regarding the task update of all assignments in the group you’re submitting.
The progress updates for your selected assignments are submitted to the project server and your project manager. When your project manager reviews and accepts your update, your actuals update the task progress information in the project schedule.
Note
If you’re updating assignments from multiple projects or multiple project managers, you don’t need to do anything special. When you submit updates from multiple projects or for different project managers, the project server makes sure that the information is distributed to the correct managers and ultimately updates the correct project schedules.