
Although business drivers and portfolio analysis information alone might be sufficient for you to make business decisions as an executive, sometime you might want also to become involved in the task progress and resource details of the project. You might even want to propose a new project yourself.
The Project Center is your hub of information for your project portfolio. This is where you can inspect the details of an individual project or analyze aspects of multiple projects to get the high-level and low-level pictures you need of projects.
You can see the projects that are taking the bulk of your resources’ time. This can help you determine whether you need to shift resource allocation and to ramp up or ramp down on hiring or the use of vendors.
You can use specialized views to look at overall costs of entire projects. You can combine projects in different ways to see those costs from various angles.
Most importantly, you can get that vital “view from 30,000 feet” into the collection of your organization’s projects and gain insight into the key scope and activities of the organization. This can help you understand where your organization is now so that you can make strategic decisions about where you want it to go.
As an executive, you are required to make decisions at all project phases and stages and to make sure you have a balanced portfolio of projects that does not exceed the budgeted costs and can be fulfilled with the budgeted resources. It is important that you have the ability to make data-based decisions regarding projects at any point along a project’s life cycle.
To this end, Project Server 2010 introduces the concept of the project workflow, which reflects phases, stages, and checkpoints along a project’s life cycle. The phases of the workflow can be configured with the help of your project server administrator or portfolio manager. For example, you can establish that projects that require minimal effort in terms of costs and resources move directly to the planning stage, while projects that require a budget above a threshold you determine need to go through an initial approval process.
It is important that an executive, together with the portfolio manager, define the right project phases, depending on project type or department. It is also important to decide when review and approval stages in the process are required. Approval checkpoints are important to ensure that:
Only the right projects are selected.
Due diligence is performed for projects that have significant increases in cost or scope, delays in schedule, or are not meeting customer needs. Such projects need to be reworked or possibly even canceled before going any further and increasing company costs with little to no return.
Projects with significant risks are reviewed regularly and that those risks are mitigated or eliminated.
Governance over project performance is established and that the right level of quality is built in to the projects.
The following list explains Project Server’s default phases in the project workflow. Each phase consists of multiple stages. Stages are steps that define the activities for that phase. (See Figure 26-5.)
Initiation. The project requestor defines the high-level details of the project, which might be project name, project manager, cost, and start date. After the project proposal is added, the proposal is sent to the portfolio manager and possibly to executives for approval. If the proposal is approved, it goes to the next phase; otherwise, the project is rejected.
Define. The project is defined in more detail. After more details are entered, the project is sent again to the portfolio manager and possibly to executives for selection. If the project is selected, it moves to the Plan and Manage phases. If not, the project is rejected.
Plan. During planning, the project manager enters the detailed schedule of tasks, selects the resources for the project, assigns them to tasks, and puts together the overall plan. The project manager also enters detailed costs based on the resource selection. After planning, the project can be sent for another review. If approved, the project goes to execution (the Manage phase).
Manage. In the Manage phase, the project is being executed. Team members and team managers report progress on current tasks and update their timesheets. The project manager tracks the schedule and costs. At certain checkpoints during the Manage phase, the project can be sent for review to ensure that it’s meeting the initial criteria for cost, scope, and time and that it’s following the internal project management standards.
Close. The final phase in the project workflow is project closure. In the Close phase, documents are archived and the lessons learned report can be drafted and posted on the project SharePoint site.
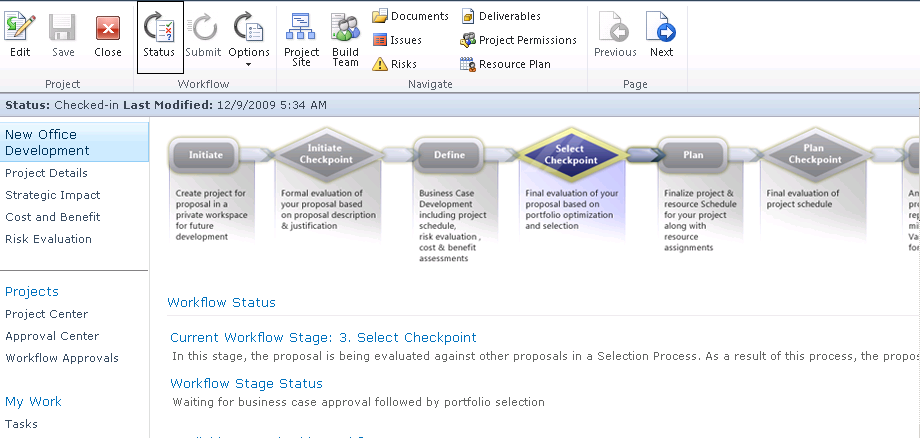
Figure 26-5. On the Stage Status page, you can see details about the current stage and the upcoming stages in the project workflow. In this example, the project is in the Define phase at stage 3, awaiting approval of the business case.
Note
To learn more about portfolio analysis and demand management, see Chapter 27.
You can see the summary list of all published enterprise projects and then drill down to examine the details of an individual project. To see the summary of enterprise projects, follow these steps:
On the Quick Launch, under Projects, click Project Center.
The Project Center appears. The table lists all enterprise projects, with each project occupying a single row and showing summary data for that project in the table and in the Gantt chart area.
If proposals are configured in your installation of Project Server, the Project Center also lists any published project proposals.
Arrange the Project Center table to see the information you want. To do this, on the Projects tab, in the Data group, click in the View box.
In the View drop-down menu, click the view that reflects the type of information you want to see.
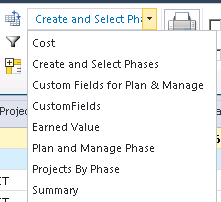
The views available on this list depend on how your project server administrator has configured Project Server for your organization. The following list highlights the available default views:
Cost. Shows scheduled costs, baseline costs, fixed and variable costs, actual costs, and remaining costs. This is a good view for keeping a close eye on the budget.
Earned Value. Shows the calculated earned value indicators such as BCWP (Budgeted Cost of Work Performed), BCWS (Budgeted Cost of Work Scheduled), SV (Schedule Variance), CV (Cost Variance), and more. From this view, you can see how well a project is performing against its planned schedule or budget.
Summary. Shows an invaluable high-level overview of all projects, which can be an excellent starting place for monitoring the status of all projects in the portfolio. The view includes project start and finish dates, percentage complete, progress indicators, project owner, and the enterprise project type on which it is based.
Work. Shows the amount of work scheduled, baseline work, actual work, remaining work, and more. This is a good view for keeping an eye on resource requirements.
Create And Select Phases. Shows all projects in the Create and Select phases of the workflow. The view groups the projects by the phases and stages they’re in. Fields include the project cost and estimated benefit. This view is helpful for seeing the projects in the portfolio pipeline coming up for consideration.
Plan And Manage Phase. Shows all projects in the Plan and Manage phases of the workflow. The view groups the projects by the phases and stages they’re in. In addition to the project cost and estimated benefit, this view includes a series of graphic indicators for the project cost, health, quality, resources, and schedule. Another field indicates the probability of success for this project.
Projects By Phase. Shows all projects grouped by the workflow phases and stages they’re in, from Create through Manage. This view also shows the project cost and estimated benefit, the project department, and risk indicator.
You can sort, filter, or group information from different points of view. You can move the split bar between the table and chart to show more of one side or the other. Scroll through the table or chart. Compare values in a field of information among the various projects.
As needed, the project server administrator or portfolio manager can create and add custom views to the Project Center.
To see detailed information for any one of your enterprise projects, follow these steps:
On the Quick Launch, under Projects, click Project Center.
The Project Center appears, showing a list of all published enterprise projects for your organization.
In the Project Center, click the name of the project you want to review.
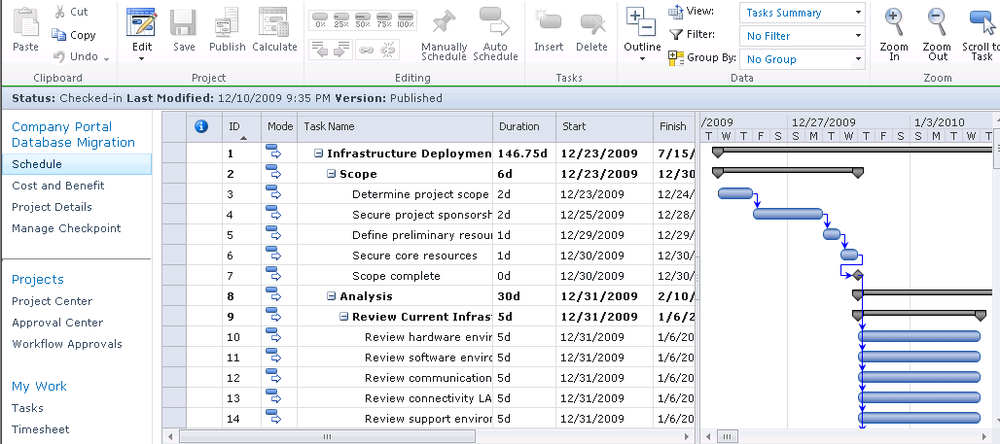
A page appears for the selected project. Which page appears depends on which workflow the project is following. For projects in the Plan and Manage phases, Project Web App displays the project schedule in the form of a Gantt chart, as shown in Figure 26-6.
For projects in the Initiate phase, Project Web App shows the workflow stage the project is in and a graphical representation of the next steps.
Whether you’re working on the Project Center page or the Schedule page, the default view is a Gantt chart. In a Gantt chart, the left side of the view displays a table, and the right side displays the Gantt bars showing the start, duration, and finish of each item (project, task, or assignment) across the timescale. The current date is shown as a dashed vertical line. You can see more or less timescale detail in the chart area by zooming. On the Tasks tab, in the Zoom group, click Zoom In or Zoom Out.
Documents, issues, and risks can be added, tracked, linked with tasks, assigned responsibility, and eventually closed. They all become an important aspect of seeing the project through to a successful completion. They are also instrumental in capturing project archival information for use in planning future projects.
The lists of documents, issues, and risks associated with a project are maintained in the project workspace, which is essentially a SharePoint site for the project. You can create a project workspace when a project is created or anytime afterward. In addition to documents, issues, and risks, the site can include announcements from team members, a calendar of upcoming events, a list of deliverables between related projects, and team discussions.
To open the workspace for a project, follow these steps:
On the Quick Launch, under Projects, click Project Center.
If there is a folder icon next to the name of a project, this indicates that the project has an associated project workspace.
Click the folder.
The project workspace appears in a separate window.
Note
For details about creating project workspaces and viewing documents, risks, and issues in a project SharePoint site, see Managing Documents, Risks, and Issues.
In addition to reviewing and editing existing projects, you can create new projects. This can be helpful if you want to share project ideas with your staff or set up the vision of a new program that portfolio managers and project managers can then implement.
To create a new project, follow these steps:
On the Quick Launch, under Projects, click Project Center.
On the Project tab, in the Project group, click New.
In the drop-down menu that appears, click the project type—for example, Basic Project Plan or New Product Development Proposal.
The project types will differ depending on how your project server administrator has configured Project Server for your organization.
A page appears in which you can start entering the project details.
Note
For more information about creating a new project in Project Web App, see Creating a New Enterprise Project. To learn how to save, publish, and check in your new project, see Managing Your Files on the Project Server.