
By default, the task outline delineates a hierarchy of tasks. A work breakdown structure (WBS) is a special hierarchy that divides the work for your project into manageable pieces that you can assign to project resources. But you might need to structure your tasks according to different hierarchies. For example, the accounting department might have a set of codes for tracking income and expenses by business unit.
In addition, your organization might need one, two, or several ways of looking at resource hierarchies. For example, your organization’s resource manager might want to review the resource breakdown structure, whereas the procurement manager might require a bill that itemizes the materials for the project.
Using custom outline code fields in Project 2010, you can create up to 10 sets of custom task codes and 10 sets of resource codes, in much the same way you set up WBS codes. You can then sort, group, or filter your tasks or resources by any of these outline codes to see the tasks or resources displayed in that structure.
Note
For information about setting up a task outline of summary tasks and subtasks, see Sequencing and Organizing Tasks. To set up and apply work breakdown structure codes, see Setting Up Work Breakdown Structure Codes.
Outline codes are customizable alphanumeric codes that are helpful for categorizing project tasks and resources in numerous ways. Project 2010 does not recalculate custom outline codes as you modify the location or indentation of a task or resource because only you know the structure of tasks or resources you want to represent. To help others use your custom outline codes properly, you can create a lookup table so that users can choose values from a list. You can eliminate invalid codes by restricting users to choosing only the predefined values.
An outline code can consist of several levels of uppercase or lowercase letters, numbers, or characters, along with a symbol to separate the levels of the code. The maximum length for an outline code is 255 characters.
Follow these steps to select the custom outline code you want to start defining:
On the Project tab, in the Properties group, click Custom Fields.
Select the Task or Resource option to specify whether you’re creating a task or resource outline code.
In the Type box, click Outline Code.
Click the name of the outline code that you want to modify in the field list—for example, Outline Code1 or Outline Code8.
To rename the custom outline code, click the Rename button, and then type the new name in the Rename Field dialog box.
This name and the original field name appear in lists where the outline code appears.
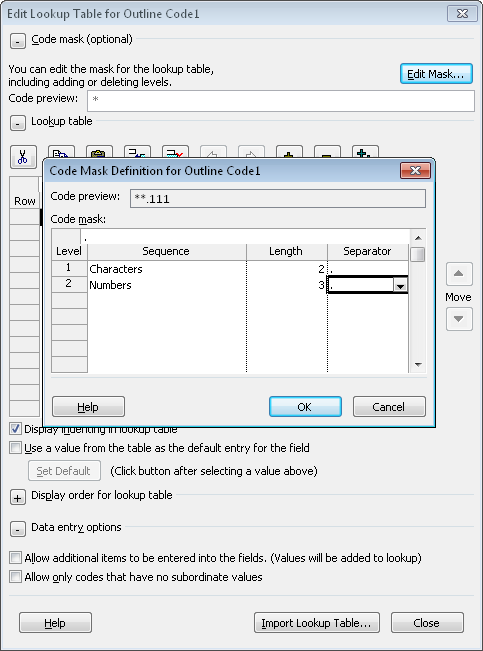
The code mask is the template that delineates the format and length of each level of the outline code as well as the separators between each level. For example, if your building name standard is a two character identifier followed by a hyphen and then a three digit number, the code mask identifies those criteria. To define the code mask, do the following:
In the Custom Fields dialog box, click the outline code for which you want to define a code mask.
Click the Lookup button.
The Edit Lookup Table dialog box appears.
Click the plus sign to the left of the Code Mask label to display the code mask options.
Click Edit Mask.
The Code Mask Definition dialog box appears.
In the first row of the Sequence column, choose whether the first level of the code (or hierarchy) is a number, uppercase letters, lowercase letters, or alphanumeric characters.
In the Length field of the first row, specify the length of the first level of the code.
A number in the Length cell indicates a fixed length for that level. For example, if you choose 3, the values at that level must be three characters. If the level can contain any number of characters, click Any in the list.
In the Separator field of the first row, specify the character that separates the first and second levels of the code.
You can use a comma, hyphen, plus sign, or forward slash as a separator.
Repeat steps 5 through 7 until all the levels of your custom outline code are set up. (See Figure 28-22.)
As you enter the code mask for each succeeding level, the Code Preview box shows an example of the code.
With the code mask defined, your custom outline code is ready to use. If you click OK and then save the custom outline code, any sequence of characters that fits your code mask can be entered as a valid value for that outline code field.
To obtain the best results, you should provide users with some hints about the correct values and format for outline codes. And, if your custom outline code has specific valid values, you can ensure that users enter only those values. To do this, follow these steps:
Be sure that the Edit Lookup Table dialog box is open and that the code mask is defined for the selected outline code.
In the Edit Lookup Table dialog box, the Code Preview box shows a sample of the code mask set up for the field.
You don’t have to do anything to restrict codes to only those listed in the lookup table. If you want to allow other values, select the Allow Additional Items To Be Entered Into The Fields check box.
To restrict codes to the ones with all levels specified—for example, both building ID and number—select the Allow Only Codes That Have No Subordinate Values check box.
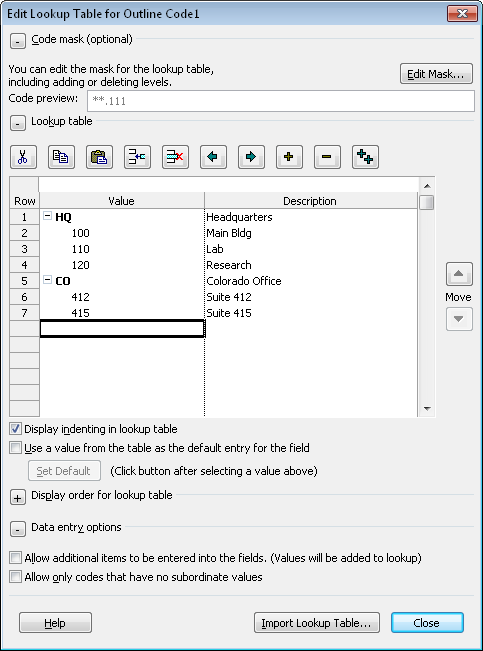
If you want more control over the values that you or other users enter in the outline code fields, you can set up a lookup table for the outline code values. A lookup table comprises a list of values for the outline code. To define a lookup table, do the following:
In the Custom Fields dialog box, click the outline code for which you want to create a lookup table.
Click the Lookup button.
Be sure that the code mask is defined for the selected outline code.
Note
See the section Defining a Code Mask for instructions on setting up the code mask.
To make the hierarchy levels more apparent as you define lookup values, select the Display Indenting In Lookup Table check box.
With this check box selected, the values you enter are indented according to their level in the hierarchy.
Click the first blank cell in the Value column.
Type a value in the Outline Code cell.
The format and length of this value must match the first level of your defined code mask. For example, if you specified that the first level in the outline code’s hierarchy must be two characters in length and then enter a three-character code, the entry appears in red.
Click the Description cell and type a meaningful description of the entry.
In the Value cell in the second row, enter a value that conforms to the second level in the code mask. Click the Indent button to demote the entry to the next level of the code.
The character types (number, uppercase letters, and so on) and length of each entry must match your code mask for the level. If the value you enter doesn’t conform to the code mask defined for the outline level, the entry appears in red.
If you want to promote the entry one level higher in the code, click the Outdent button.
Repeat steps 5 through 8 to define additional values in the lookup table. (See Figure 28-23.)
To expand or collapse the outline levels, click the plus and minus signs that precede higher-level values.
When you are finished defining the lookup table, click Close.
The lookup table is saved with the outline code definition and code mask.
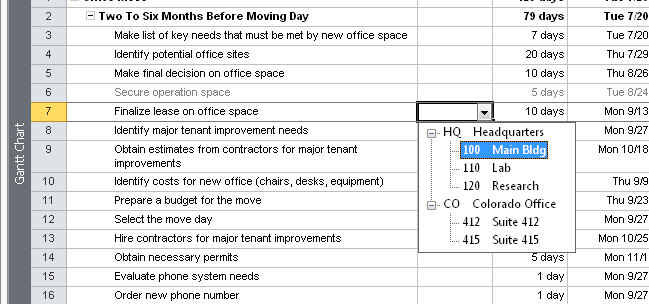
You can assign outline code values to tasks and resources in the same manner as you enter values for any other fields in Project 2010. You can type the values or, if you created a lookup table, choose the values from a list.
To assign values for a custom outline code, follow these steps:
If your custom outline code doesn’t appear in the current table, right-click a column heading and then click Insert Column on the shortcut menu.
In the Field Name list, click the outline code field (for example, Outline Code1), and then click OK.
If you renamed the outline code in the Custom Fields dialog box, you’ll see the field listed both by its new name and its underlying custom field name.
Click a cell in the custom outline code column.
If no lookup table exists, type the value in the cell.
When a lookup table exists, click the arrow in the cell, and then click an entry in the list, as shown in Figure 28-24.
Grouping, filtering, and sorting by outline codes is similar to processing tasks and resources based on values in other fields. You simply apply a group, filter, or sort criterion that uses the custom outline code.
To quickly use a custom outline code to group tasks or resources, do the following:
On the View tab, in the Data group, click the arrow next to the Group box, and then click New Group By.
If the outline code appears in the table, click the arrow next to the column heading, and then click Group On This Field.
In the Group Definition dialog box, click the arrow in the Field Name cell, and then click the name of the outline code.
If necessary, change the value in the Order cell, the color and pattern of the group, and other group settings.
Click Apply.
Note
For information about customizing a group, see Modifying a Group.
To quickly use a custom outline code to filter tasks or resources, follow these steps:
Display the sheet view whose rows you want to filter.
Click the arrow next to the column heading for the outline code.
In the drop-down menu, select the check box for the value by which you want to filter and clear the check boxes for values you want to hide.
If you want to create a custom filter based on the outline code, on the drop-down menu, point to Filters, and then click Custom.
Note
To turn off the AutoFilter arrows, on the View tab, click the arrow next to the Filter box, and then click Display AutoFilter.
Note
For information about customizing a filter, see Customizing Filters.
To use an outline code to sort your tasks or resources, do the following: