As you work hard creating, updating, and tracking your project file, you want to make the file as secure as possible. The further you travel through the life cycle of the project, the more valuable is the information you have in the project plan, and therefore, the more devastating a file loss can be.
This section discusses various methods for protecting your files from different types of loss or corruption.
It’s always a good policy to have at least two copies of any important computer file. This way, if the file is inadvertently deleted or somehow is corrupted (or if you get a little crazy with your what-if scenarios), you have another file to return to.
To specify that automatic backups be saved for all your project files, follow these steps:
With any project file open, on the File tab, click Save As.
In the Save As dialog box, click Tools (next to the Save button), and then click General Options.
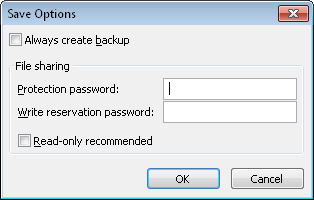
The Save Options dialog box appears, as shown in Figure 32-9.
Select the Always Create Backup check box.
Click OK in the Save Options dialog box. Click Save in the Save As dialog box.
Click OK in the message to confirm that you’re saving changes in the active file.
A backup file of the active project is saved. The backup copy adopts the same file name as the original, but it has an extension of BAK. For example, the backup file for deployment.mpp is deployment.BAK.
The backup file is not identical to the active file; rather, it lags by one Save operation. That is, when you save the active file, the previous version is saved as the backup file.
From now on, as long as the Always Create Backup check box is set, whenever you save any project, a backup of that file is created.
To restore a backup file as a regular project file, follow these steps:
On the File tab, click Open.
In the Open dialog box, browse to the drive and folder where the backup file is located.
Click the arrow in the file type button next to the File Name box, and then click All Files (*.*).
This ensures that files ending in .BAK are shown in the list.
Double-click the backup file you want to restore as a regular project file.
The backup file opens.
On the File tab, click Save As.
If necessary, browse to the location where you want to save the restored project file.
In the File Name box, enter a new file name for the restored backup file.
Note that by default, the file name appends .BAK.mpp. It’s a good idea to remove the .BAK from the file name.
Be sure that Project (*.mpp) is selected in the Save As Type box.
Click Save.
Note
Your project BAK file is a great contingency in case your project file is accidentally deleted or corrupted. However, if both the project and the backup are saved on the same drive and that drive crashes, your backup will be lost as well. Remember to periodically save your files to an alternate drive.
If you are not working in an enterprise project management environment that uses a project server as a central location for your company’s project files, saving your project files to a public network folder is one way to have centralized project files. This enables your company to back up critical files more regularly and reliably. It also provides a convenient location for your coworkers to collaborate on projects.
However, storing your project files on the network can also enable unauthorized individuals to access files that contain sensitive or confidential information. Perhaps your project is in its initial phase, and you aren’t ready to share it with the rest of the company. Or maybe a project has information that should be seen only by a small group of people in your organization. In this case, assigning a protection password is a great idea. With a protection password, no one can open and view the project file unless he or she knows the password.
On the other hand, maybe you don’t mind who sees the project, but you want to be sure that only a select few ever change the file. In this case, you can assign a write reservation password.
To assign a password to a project, follow these steps:
Open the project file for which you want to set a password.
On the File tab, click Save As.
In the Save As dialog box, click Tools, and then click General Options.
To set a password for opening and viewing the project file, type the password in the Protection Password box.
To set a password for editing the project file, type the password in the Write Reservation Password box.
You can set both passwords on the same file if you want.
Click OK.
In the Confirm Password dialog box, type the password again.
If you set both kinds of passwords, the first Confirm Password dialog box is for the protection password, and the second is for the write reservation password.
In the Save As dialog box, click Save, and then click OK.
Note
If you want to remind users to open the project as read-only without locking out users who might have forgotten the password, consider selecting the Read-Only Recommended check box. If you select this check box, the next time a user begins to open this file, a message suggests that the user open the file as read-only unless they need to change the file. It then provides the option of opening the file as read-only.
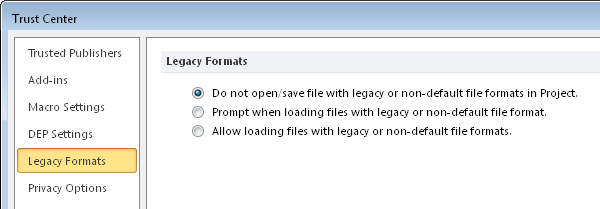
Project 2010 includes a set of security options related to opening files from older file formats. By default, files from older file formats or nondefault file formats are not opened. If you need to open such a file—for example, when you’re bringing older project files into Project 2010 or when you’re importing an Excel file—you must change this security setting.
To change the security setting for legacy files, follow these steps:
On the File tab, click Options, and then click Trust Center in the left pane.
Click the Trust Center Settings button.
In the left pane, click Legacy Format.
Select the option labeled Prompt When Loading Files With Legacy Or Non-Default File Formats In Project or the option labeled Allow Loading Files With Legacy Or Non-Default File Formats.
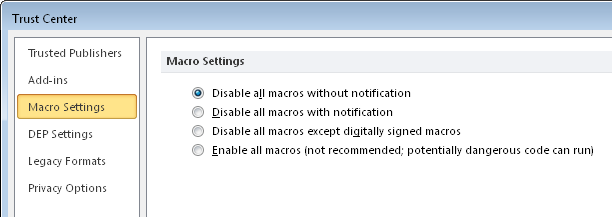
You can also set the security level for opening files that contain macros. Still in the Trust Center, click Macro Settings in the left pane. Select the security option you want.