
As mentioned earlier in this chapter, many project managers and organizations use a work breakdown structure (WBS) as an essential element of their project management methodology. Similar to the outline structure of your project task list, the WBS is a hierarchical chart view of deliverables in a project in which each level represents an increasingly detailed description of the deliverables.
WBS levels can be associated with a particular code set, such as 2.1.3.a. Levels in the hierarchy represent summary tasks, subtasks, work packages, and deliverables. You can define a project’s scope and develop its task lists with the WBS.
Industries, application areas, and organizations experienced with a particular type of project tend to develop WBSs to represent the life cycles of their typical types of projects—for example, the design of a new vehicle or the construction of an office building.
Each item and level in a WBS is described by a unique WBS code. Each digit in the code typically represents a level in the structure’s hierarchy, such as 2.1.4.3 or 5.B.c.3. A WBS code such as 1.2.3 might represent the third deliverable for the second activity in the first phase of the project.
Note
In some industries or application areas, the work breakdown structure is also known as the project breakdown structure, or PBS.
In Project 2010, any outline structure you set up for your tasks is assigned a set of unique outline numbers. The outline number for the first summary task is 1; the outline number for the first subtask under the first summary task is 1.1, as you can see in Figure 3-25.
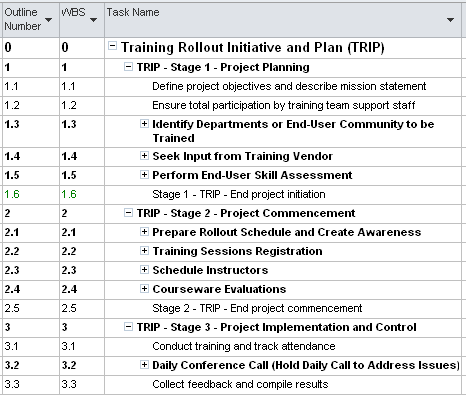
Figure 3-25. The outline number specifies the task’s position in your project plan’s task outline hierarchy.
As seen in this example, if no other WBS code pattern, or mask, is set for the project, the WBS code is the same as the outline numbers. If the outline numbers are enough of a WBS code for you, you can display them in their own column, or you can make the outline number the prefix to the task name.
Follow these steps to display the outline numbers in their own column:
Show the view and table to which you want to add the outline number column; for example, the default Entry table in the Gantt Chart.
Note
For more information about switching views and tables, see Accessing Your Project Information.
Click anywhere in the column to the left of which you want to insert the new outline number column.
On the Format tab, in the Columns group, click Insert Column.
A new column is inserted to the left of the selected column, along with a long drop-down menu of all available fields.
Type o to move quickly to the fields that start with the letter O, and then click Outline Number.
The inserted column is defined as the Outline Number field, and the outline numbers generated by Project 2010 are filled in.
It’s much quicker to append the outline number as a prefix to the task name. On the Format tab, in the Show/Hide group, select the Outline Number check box. The outline numbers are added to the beginning of each task name, as shown in Figure 3-26.

By default, Project 2010 creates WBS codes that are derived from the automatically generated outline numbers, and you can’t change the code scheme of the outline numbers. However, if you and your organization have a specific WBS coding scheme, you can change the WBS numbering. When working with WBS codes, keep the following in mind:
You can have only one set of WBS codes. However, if you use additional coding schemes, you can create up to 10 sets of outline codes and then sort or group your tasks by those codes.
Note
Certain project management methodologies use other structured and hierarchical codes that can describe your project from different viewpoints. Examples include the organizational breakdown structure (OBS), the resource breakdown structure (RBS), and the bill of materials (BOM).
Note
For more information about outline codes, see Working with Outline Codes.
You can include ordered numbers, uppercase letters, and lowercase letters as part of your custom WBS code format. You can also include unordered characters in the code format.
You can automatically generate your custom WBS codes for tasks as you add them.
To set up your custom WBS code scheme, including any prefix and code mask, follow these steps:
On the Project tab, in the Properties group, click WBS, and then click Define Code.
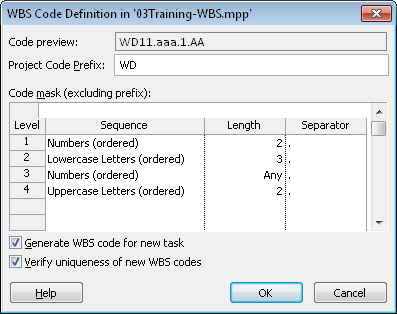
If you use a prefix for the project in front of the WBS code to distinguish it from other projects using the same code format, enter that prefix in the Project Code Prefix box.
In the Sequence field in the first row, select whether the first digit of the code (representing the first level of the hierarchy) is an ordered number, ordered uppercase letter, ordered lowercase letter, or unordered character.
In the Length field in the first row, specify whether there is a length limit for the first code.
In the Separator field in the first row, specify the character that separates the first and second code—for example, a period or a dash.
Repeat the procedure in the Sequence field in the second row.
Continue these steps until all the levels of your custom WBS code are set up. (See Figure 3-27.) As you enter the code mask for each succeeding level, the Code Preview box shows an example of the code.
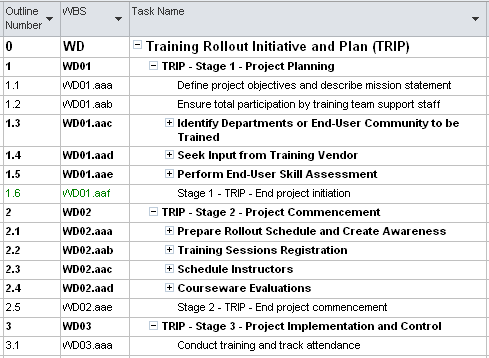
When you finish, click OK. The WBS codes for your tasks are reset to conform to your custom structure, as shown in Figure 3-28.
Follow these steps to display the WBS column:
Show the view and table to which you want to add the WBS column.
Click anywhere in the column to the left of which you want to insert the new WBS column.
On the Format tab, in the Columns group, click Insert Column.
A new column is inserted to the left of the selected column, along with a long drop-down menu of all available fields.
Type w to move quickly to the fields that start with the letter W, and then click WBS.
The inserted column is defined as the WBS field, and the WBS codes for your tasks are filled in according to the code mask you created.