
YOU have tasks. You have resources. Now you need to get them together. Tasks + resources = assignments. With human and equipment resources assigned to tasks, Microsoft Project 2010 can create a project schedule that reflects not only the project calendar, task durations, dependencies, and constraints, but also the calendars and availability of assigned resources. With material and cost resources assigned to tasks, you can track the depletion of project-related inventory as well as specific cost items to ensure that you have what you need to accomplish tasks when needed.
When you assign a work resource, you are attaching the resource name to a task and then indicating how much of the resource’s total availability is to be devoted to this task.
When you first add a resource to the project plan, through the use of max units (you might also think of them as resource units), you specify how available this resource will be to this project. For example, if the resource is available full time on the project—say, 40 hours per week—you would probably specify that the resource has 100% max units. If another resource is available 20 hours per week, you would probably specify that this resource has 50% max units. If you have three of the same type of resource (for example, three graphic designers), you could indicate that they have a total of 300% max units.
When you assign these resources to tasks, you take the idea of availability a step further by using assignment units. With max units, you specify resource availability to the project as a whole. With assignment units, you specify resource allocation to the specific task to which the resource is assigned.
For example, one resource might be available full time to perform one task. When that’s finished, she’ll be assigned full time to the next task, and so on. Upon assigning this resource to the task, you indicate 100% assignment units for this resource.
On the other hand, you might have another full-time resource who is spending 40 percent of his time on one task and 60 percent of his time on another task that takes place during the same period. For the first task you specify 40% assignment units; and for the second task, 60%. The assignment units specify the percentage of the full 100% max units being used for the task in question.
Now, take the case of a half-time resource (50% max units) who is spending all available time on one task. If you specify assignment units greater than 50% for this resource, the resource will be marked as overallocated because of that task. If this resource is spending half her time on one task and half on another, the assignment units are 25% for each task.
Note
If this resource is assigned to other tasks at the same time, Project 2010 allows it but flags the resource and the assignment as overallocated—that is, having more work than there is time, or availability, to do the tasks.
Project 2010 does not flag overallocations on resources assigned to placeholder tasks—that is, manually scheduled tasks that don’t have enough scheduling information (two out of three of duration, start date, or finish date) entered yet.
Finally, let’s look at the case of the three graphic designers whose max units are 300%. When you start to assign tasks to a consolidated resource such as this one, by default Project 2010 does not assume that you want to use all three on one task. You can, but the default assignment units are 100%. You can change those units to any increment up to 300%.
By creating an assignment, you specify both the resources assigned to a task as well as their associated assignment units. Using the Assign Resources dialog box, you can assign one resource to a task, multiple resources to a task, or multiple resources to multiple tasks. To assign a work resource to a task, follow these steps:
In the Gantt Chart or other task sheet, click the task to which you want to assign resources.
On the Resource tab, in the Assignments group, click Assign Resources.
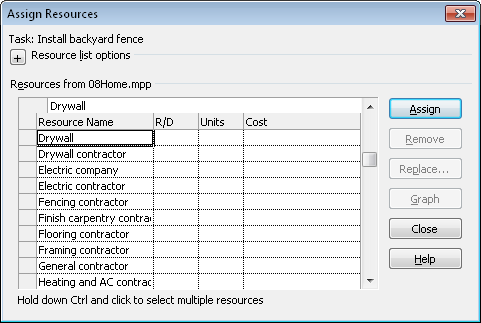
The Assign Resources dialog box appears, as shown in Figure 8-1.
Note
Max units and assignment units can be expressed in either percentages or decimals. The default is to express them as percentages.
To change the units to decimals, on the File tab, click Options, and then click Schedule in the left pane. Under Schedule, in the box labeled Show Assignment Units As A, click Decimal.
A resource working full time on an assignment is shown as having 1 assignment unit instead of 100%. A resource that has 450% max units in the Resource Sheet is shown as having 4.5 max units.
In the dialog box, click the name of the work resource you want to assign to the selected task, and then click the Assign button.
The resource name moves to the top of the Resources list in the table, and a default percentage appears in the Units field for the resource. For individual resources, the default assignment units are the same as the resource’s max units. For consolidated resources with more than 100% max units, the default assignment units are 100%.
If you want to assign a second resource, click that resource’s name, and then click the Assign button.
Modify the Units field for any assigned resources as necessary.
Repeat steps 4 and 5 for all resources you want to assign to the selected task.
To assign resources to a different task, click the next task for which you want to make assignments.
You don’t have to close the Assign Resources dialog box to select a different task.
Repeat steps 3 through 6 to assign resources to all tasks as necessary.
When you are finished assigning resources to tasks, click the Close button.
Suppose that you want to assign a specific resource to a task, but that resource isn’t listed in the Assign Resources dialog box because you haven’t added her to your Resource Sheet yet. You can add new resources to your project plan while working in the Assign Resources dialog box and then immediately assign the resource to tasks. You can then go to the Resource Sheet and complete any detailed resource information you want. To add new resources in the Assign Resources dialog box, follow these steps:
In the Gantt Chart or other task sheet, click the task to which you want to assign resources.
On the Resource tab, in the Assignments group, click Assign Resources to display the Assign Resources dialog box.
In the Resources table, type the new resource name in the first blank Resource Name field, and then press Tab to enter the name and stay in the same field.
Click the Assign button.
The resource name moves to the top of the Resources list in the table, and 100% appears in the Units field for the resource.
Adjust the assignment units if necessary. Assign any additional tasks you want.
When you are finished, click the Close button.
Switch to the Resource Sheet. The quickest way is to click the Resource Sheet shortcut in the lower-right corner of the status bar (next to the Zoom slider).
The new resource you added in the Assign Resources dialog box is listed. Modify any resource fields as necessary; for example, Max. Units, Calendar, or Group.
Note
If you double-click any resource name in the Assign Resources dialog box, and the Resource Information dialog box appears for that resource. You can then enter detailed resource information as needed.
You can add an entire group of resources from your e-mail address book, Microsoft Project Server 2010, or your network’s Active Directory listings to the Assign Resources dialog box, just as you can in the Resource Sheet. To add resources from a server, follow these steps:
With any task sheet open, on the Resource tab, in the Assignments group, click Assign Resources.
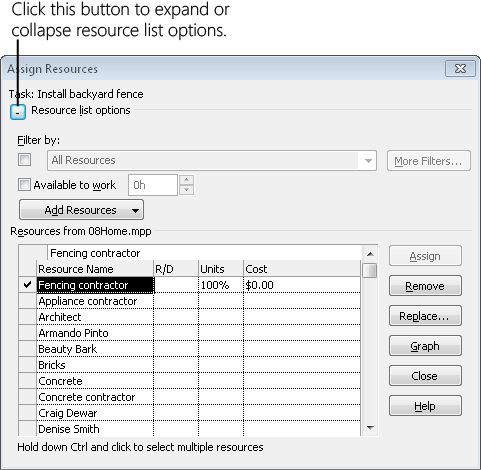
If necessary, click the + button next to Resource List Options to expand the dialog box, as shown in Figure 8-2.
Click the Add Resources button.
Click From Active Directory if you are working with Windows Server and want to add resources from the Active Directory service.
Click From Address Book if you want to add resources from your e-mail program’s address book.
Click From Project Server if you want to add the resources who are listed as Project Server 2010 users.
Click the resources you want from the source you choose, and then click the Add button to add the selected resources to the Assign Resources dialog box.
After the resources are added, you can immediately assign them to tasks.
You can use the Assign Resources dialog box to narrow your list of resources to only those who meet the criteria needed for the tasks you’re assigning. For example, you can filter the resource list to show only those resources who belong to the marketing department or only those resources who have a particular job code or skills definition. Using resource fields such as Group or Code comes in handy in these scenarios.
If you create and apply resource outline codes, you can also filter for a particular outline code level.
To find resources that meet certain criteria, follow these steps:
With any task sheet displayed, on the Resource tab, in the Assignments group, click Assign Resources.
If necessary, click the + button next to Resource List Options.
The Assign Resources dialog box expands to show the Filter By box.
Select the check box immediately under Filter By.
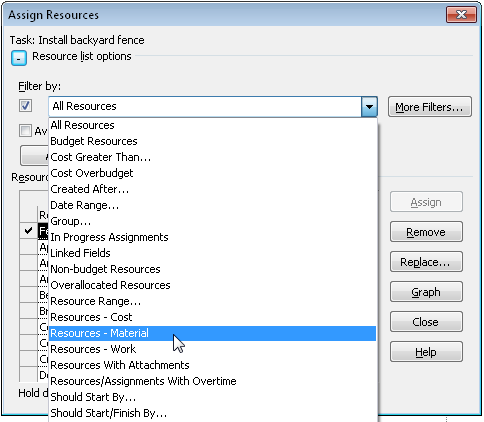
Click the arrow in the All Resources box, and then scroll to and click the filter that applies to the type of resource you want to find—for example, Group or Resources–Material, as shown in Figure 8-3.
Figure 8-3. Select the check box under Filter By, and then click the name of filter that describes the type of resource you’re seeking.
Any filter that requires additional information includes an ellipsis (...) after its name. Click the filter, enter the requested information in the dialog box that appears, and then click OK.
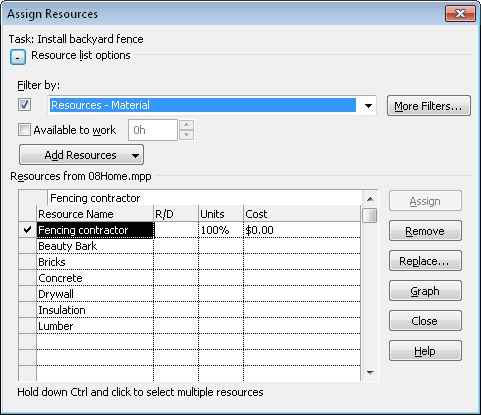
As soon as you select a filter, the list in the Resources table changes to show only those resources that meet the filter’s criteria, as shown in Figure 8-4.
When you want to review the full list of resources again, click All Resources in the Filter By list, or simply clear the Filter By check box.
You can filter to see only those resources who have time to take on more work. For example, suppose that you assigned all your resources to tasks. Then you add several more tasks, and you want to assign only resources who have time for them. To filter for resources with a certain amount of available time, do the following:
With any task sheet open, select the task to which you want to assign resources with available time.
On the Resource tab, in the Assignments group, click Assign Resources.
If necessary, click the + button next to Resource List Options to expand the Assign Resources dialog box.
Select the Available To Work check box.
In the Available To Work box, enter the amount of time needed for the task you’re about to assign. For example, if you need a resource with 4 days of available time, enter 4d in the box. As soon as you enter the amount of time, the list in the Resources table changes to show only those resources who have the specified availability.
Assign resources to the selected task as usual.
If you click another task, the filter is applied to that task as well. The list of resources available to work for the specified amount of time might change, depending on the task dates and the resource availability during those dates.
When you want to see the full list of resources again, simply clear the Available To Work check box.
Note
You can find resources in the category you want who have the right amount of available time for your assignments. Under Resource List Options in the Assign Resources dialog box, select both check boxes under Filter By. Select the resource filter you want to use in the first box, and then enter the amount of time in the Available To Work box.
You can review graphs of resource availability from within the Assign Resources dialog box. This can help you decide which work resource should be assigned to a task. To review the resource availability graph, follow these steps:
With any task sheet displayed, on the Resource tab, in the Assignments group, click Assign Resources.
In the Assign Resources dialog box, click the work resource whose availability graph you want to view. Note that availability applies only to work resources, not to material or cost resources.
Click the Graph button.
The view changes to a combination view with the task sheet in the upper pane and the Resource Graph in the lower pane, as shown in Figure 8-5. If necessary, move the Assign Resource dialog box out of the way.
To change the field on which the graph is based, on the Format tab, in the Data group, click the arrow in the Graph box, and then click another field—for example, Remaining Availability or Work.
The Remaining Availability graph shows when the selected resource has any available time for more assignments. The Work graph shows the total work for all the selected resource’s assignments.
If you want to zoom the graph up or down, you need to click in the task sheet in the upper pane. Then use the Zoom slider or, click View, Zoom, click the arrow in the Timescale box, and then select the timescale zoom level you want. The zoom level in the task sheet is adopted by the Resource Graph in the lower pane.
To switch the graph to other resources assigned to the same task, click Format, Navigate, and then click Previous Resource or Next Resource.
You cannot switch the graph to a different resource by clicking another name in the Assign Resources dialog box.
When you’re finished with the Assign Resources dialog box, click Close.
To restore your task sheet to the full screen again, double-click the pane divider.

Note
For more information about the Resource Graph, see Charting Team Availability with the Resource Graph, Viewing Resource Workloads, and Modifying the Resource Graph.
The Team Planner is a new view in Project Professional 2010 that you can use to interactively arrange the scheduling of tasks along a graphical timeline.
To assign resources using the Team Planner, follow these steps.
On the View tab, in the Resource Views group, click Team Planner.
You can also click the Team Planner view shortcut in the lower-right corner of the screen, next to the Zoom slider.
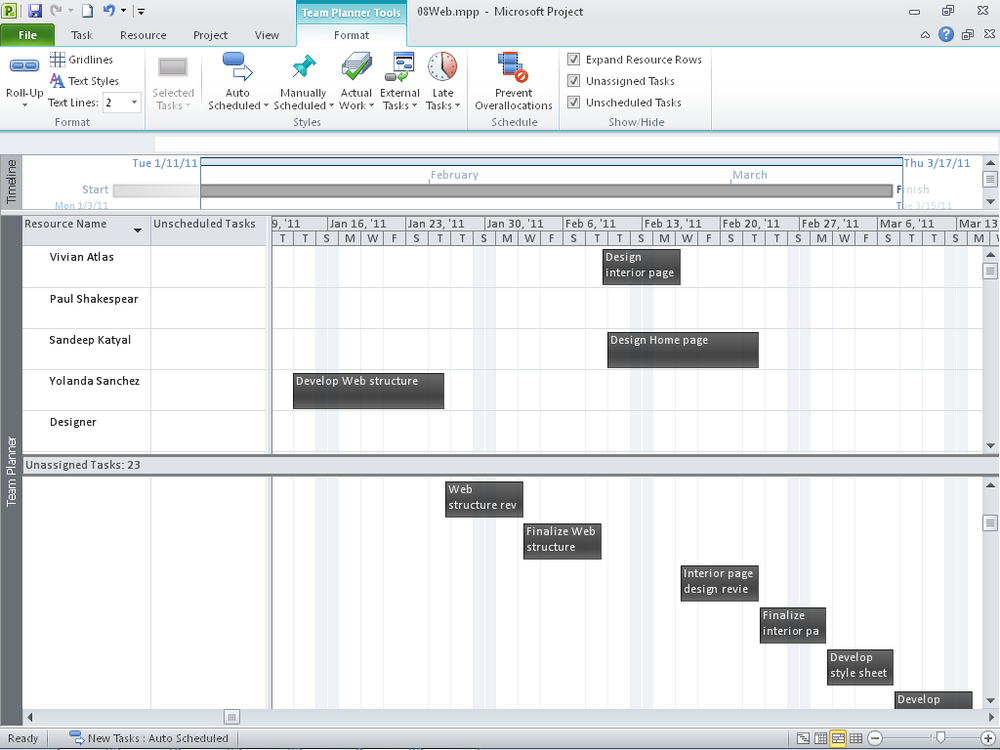
As shown in Figure 8-6, the resources are listed along the left side, with the project timeline stretching out horizontally from there. Unassigned tasks are listed in the Unassigned Tasks pane that appears at the bottom of the view.
Drag an unassigned task to the place along a resource’s timeline to assign it to that person. Where you place it along the timeline specifies when the assignment is scheduled.
If you drag a manually scheduled task to a different place on the timeline, its manual scheduling is adjusted accordingly. If you drag an automatically scheduled task to a different place, you set a date constraint, such as Start No Earlier Than.
After you’ve assigned all the unassigned tasks, or if you don’t want to see them, you can hide the Unassigned Tasks pane. On the Format tab, in the Show/Hide group, clear the Unassigned Tasks check box.
In addition to assigning tasks, you can schedule unscheduled tasks by dragging them into place in the Team Planner. An unscheduled task is a manually scheduled placeholder task that doesn’t have a start and finish date yet. Such tasks are also known as placeholder tasks.
In the Team Planner, unscheduled tasks are shown in the Unscheduled Tasks column. To schedule an unscheduled task, drag the task bar to the location along the assigned resource’s timeline to specify when the task should be performed. When you drag an unscheduled task onto the timeline, it adopts the start and finish date accordingly.
After you’ve scheduled all unscheduled tasks, or if you just don’t want to see them, you can hide the Unscheduled Tasks column. On the Format tab, in the Show/Hide group, clear the Unscheduled Tasks check box.
When reviewing the Team Planner, you can easily see when resources are overallocated or underallocated. You can also easily see when tasks are scheduled, and you can adjust their scheduling simply by dragging the task bar. You can reschedule a task on the same resource by dragging the task bar to a time when that resource is not overallocated. You can reassign a task to another resource by dragging the task to the other resource.
Overallocations happen when you assign a resource to more than one task at the same time. An overallocation is a situation in which a resource is assigned to more tasks in a time period than she has time available. In the Team Planner, if you see multiple tasks assigned to the same resource assigned in the same time period, that resource is overallocated, and her name shows in red, as shown in Figure 8-7.
Caution
You’ll get better results if you just note the resources who are flagged as overallocated and then take more controlled steps to review and resolve the overallocations. If you leave the Prevent Overallocations mode set, you could cause unintended rescheduling that is difficult to undo. The mode is best used in a what-if scenario to see how Project 2010 might resolve overallocations. Always turn the Prevent Overallocations mode off before leaving the Team Planner for another view.
You can use the Team Planner to prevent overallocations. To do this, follow these steps:
Be sure the Team Planner is displayed.
On the Format tab, in the Schedule group, click Prevent Overallocations.
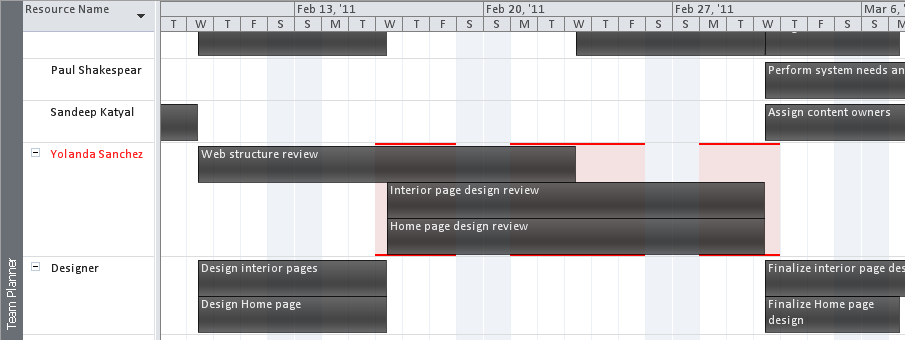
The button changes color to indicate that Team Planner is in the prevent overallocations mode. Any tasks causing overallocations are rescheduled for later times when the assigned resource has time for them, as shown in Figure 8-8. This is true for manually scheduled tasks as well as automatically scheduled tasks.
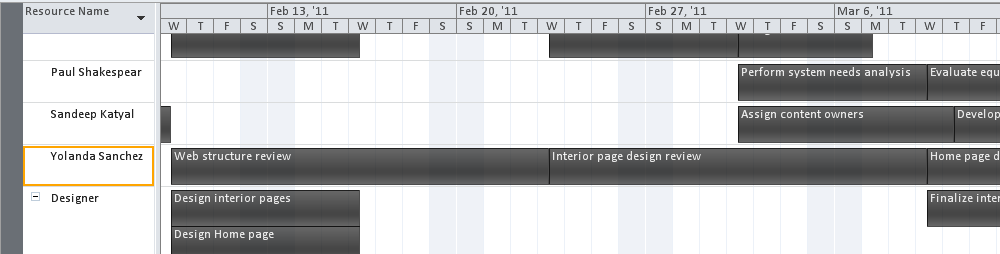
Figure 8-8. The tasks assigned to Yolanda Sanchez that were causing the overallocation are now rescheduled to other times.
As long as you have the Prevent Overallocations button set, whenever you review your schedule in Team Planner, Project 2010 automatically reschedules tasks so that there are no overallocations. This rescheduling happens as soon as you display the Team Planner. Because of this, it’s best to turn Prevent Overallocations off before leaving the Team Planner for another view.
Note
For more information about resolving resource overallocations, see Balancing Resource Workloads.
To see scheduling details about a task, rest your mouse pointer over the task bar in the timesheet area. A pop-up window indicates whether the task is manually or automatically scheduled, its duration, start and finish dates, and more.
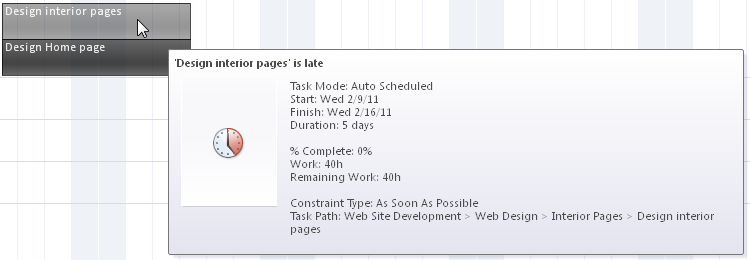
To see even more information, double-click the task bar, and the Task Information dialog box opens, showing all information about the task. You can also change task information in the dialog box as usual. For example, you can change the duration of a task or assign additional resources.
You can change properties of a task by right-clicking its task bar in the Team Planner. Using the drop-down menu that appears, you can switch between automatic and manual scheduling, reassign the task to another resource, add it to the Timeline, and more.
Note
For information about working with the Team Planner, see Highlighting Tasks with the Timeline. For more information about customizing the Team Planner, see Modifying the Team Planner.
Work is the amount of effort it takes to complete a task. As soon as you assign a resource to a task, the duration is translated into work. A simple example: If you have a task with a 3-day duration, and you assign a single full-time resource to it, that resource now has an assignment with 24 hours of work spread across three days (assuming default calendar settings).
You can see how duration is used to calculate work amounts by adding the Work field to the Gantt Chart or other task sheet, as follows:
Display the Gantt Chart or other task sheet that contains the Duration field.
Click the heading of the column to the right of the Duration field. For example, if you are working with the default Gantt Chart with the default Entry table applied, click the Start column heading.
On the Format tab, in the Columns group, click Insert Column.
In the drop-down menu that appears in the newly inserted column, type w to move quickly to the fields that begin with W, and then click Work.
As shown in Figure 8-9, the Work field appears next to the Duration field, and you can now compare the two.
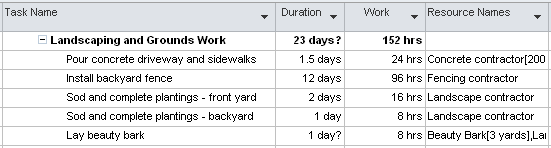
Figure 8-9. Adding the Work field to a task sheet shows the relationship of task duration to task work, based on how tasks are assigned to resources.
That task with a 3-day duration and a single full-time resource assigned translates (by default) to 24 hours of work. Another task with a 3-day duration and two full-time resources assigned translates to 48 hours of work. Another task with a 3-day duration and three full-time resources assigned translates to 72 hours of work.
Duration is the length of time it takes from the start to the finish of the task, but work equates to person-hours for the resources assigned.
Note
Duration is used to calculate work amounts for both manually and automatically scheduled tasks. This is even true for placeholder tasks that have only duration entered.
If you assign a resource to a placeholder task that has no duration entered, Project 2010 enters an 8-hour work amount. This is based on the premise that placeholder tasks have a default duration of 1 day, and by default, 1 day equals 8 hours.
These calculations are based on the initial assignment; that is, assigning one, two, or six resources at one time to a task that previously had no assigned resources. In other words, if you assign two full-time resources to that same 3-day task, both resources are assigned 24 hours of work, also spread across 3 days. You can see how the assignment work is spread across the days by reviewing the Task Usage view as shown in Figure 8-10. When you assign multiple resources initially, Project 2010 assumes that you intend for the resources to have the same amount of work across the original task duration. You can also see assignment work over a time period by using the Resource Usage view.

Figure 8-10. In the first task with a single resource assigned, the total work is 24 hours. In the second task with two resources assigned, the total work is 96 hours, split into 48 hours for each of the two assigned resources.
Note
Instead of entering duration and having Project 2010 calculate work amounts when you assign tasks, you can do this the other way around. You can enter tasks, assign resources, and then enter work amounts from estimates those resources provide. From those work amounts, Project 2010 can calculate duration.
Just as work is calculated from the duration and assigned resource availability, duration can be calculated from work amounts and assigned resource availability.
Note
If you don’t specify a work unit, Project 2010 by default assumes the unit to be hours and automatically enters hrs after your work amount. You can change the default work unit if you like. On the File tab, click Options, and then click Schedule in the left pane. Under Scheduling Options For This Project, in the Work Is Entered In box, select the time unit you want as the default for this project.