 Sharing Project Reports Electronically
by Teresa S. Stover, Bonnie Biafore, and Andreea Marinescu
Microsoft® Project 2010 Inside Out
- Microsoft® Project 2010 Inside Out
- SPECIAL OFFER: Upgrade this ebook with O’Reilly
- A Note Regarding Supplemental Files
- Introduction
- I. Project Fundamentals
- 1. Introducing Microsoft Project 2010
- 2. Understanding Projects and Project Management
- II. Developing the Project Plan
- 3. Starting a New Project
- Getting from Idea to Proposal to Project
- Focusing the Project Vision
- Creating a New Project Plan
- Entering Tasks
- Sequencing and Organizing Tasks
- Organizing Tasks into an Outline
- Setting Up Your Work Breakdown Structure
- Adding Supplementary Information to Tasks
- 4. Viewing Project Information
- Understanding Project Information Categories
- Accessing Your Project Information
- Switching Between Views
- Using Views
- Scheduling with Gantt Charts
- Highlighting Tasks with the Timeline
- Flowcharting with Network Diagrams
- Visualizing the Project with the Calendar
- Reviewing Assignments with the Team Planner
- Charting Team Availability with the Resource Graph
- Tabling with Sheet Views
- Timesheeting with Usage Views
- Seeing Details with Forms
- Cross-Referencing with Combination Views
- Using Tables
- Using Fields
- Arranging Your Project 2010 Window
- Navigating to a Specific Location in a View
- Rearranging Your Project Information
- 5. Scheduling Tasks Manually or Automatically
- 6. Building Your Schedule
- 7. Setting Up Resources in the Project
- Understanding the Impact of Resources in the Plan
- Adding Resources to the Project
- Removing a Resource from the Project
- Identifying Tentative, Generic, or Budget Resources
- Setting When Resources Are Available for Work
- Adding Detailed Resource Information
- 8. Assigning Resources to Tasks
- Assigning Work Resources to Tasks
- Assigning Material Resources to Tasks
- Assigning Cost Resources to Tasks
- Reviewing Assignment Information
- Changing Resource Assignments
- Contouring Resource Assignments
- 9. Planning Resource and Task Costs
- 10. Checking and Adjusting the Project Plan
- Working with the Critical Path and Critical Tasks
- Controlling Schedule Changes with Task Types
- Bringing in the Project Finish Date
- Reducing Project Costs
- Balancing Resource Workloads
- Changing Project Scope
- Reviewing the Impact of Changes
- Obtaining Buyoff on the Project Plan
- 3. Starting a New Project
- III. Tracking Progress
- 11. Setting a Baseline and Updating Progress
- Saving Original Plan Information Using a Baseline
- Updating Task Progress
- Updating Actual Costs
- 12. Responding to Changes in Your Project
- 11. Setting a Baseline and Updating Progress
- IV. Reporting and Analyzing Project Information
- 13. Reporting Project Information
- Establishing Your Communications Plan
- Using Views to Report Project Information
- Generating Text and Visual Reports
- Generating the Right Reports
- Summarizing with Overview Reports
- Focusing on Tasks with Schedule Progress Reports
- Using the Unstarted Tasks Report
- Using the Tasks Starting Soon Report
- Using the Tasks In Progress Report
- Using the Completed Tasks Report
- Using the Should Have Started Tasks Report
- Using the Slipping Tasks Report
- Using the Baseline Report in Visio
- Using the Baseline Work Report in Excel
- Using the Task Status Report in Visio
- Using the Budget Work Report in Excel
- Analyzing Budget Status with Cost Reports
- Using the Cash Flow Report
- Using the Cash Flow Report in Excel
- Using the Cash Flow Report in Visio
- Using the Baseline Cost Report in Excel
- Using the Budget Report
- Using the Budget Cost Report in Excel
- Using the Resource Cost Summary Report in Excel
- Using the Overbudget Tasks Report
- Using the Overbudget Resources Report
- Using the Earned Value Report
- Using the Earned Value Over Time Report in Excel
- Evaluating Resource Allocation with Assignment Reports
- Using the Who Does What Report
- Using the Who Does What When Report
- Using the To-Do List
- Using the Overallocated Resources Report
- Using the Resource Availability Report in Visio
- Using the Resource Work Availability Report in Excel
- Using the Task Usage Report
- Using the Resource Usage Report
- Using the Resource Work Summary Report in Excel
- Using the Resource Remaining Work Report in Excel
- Using the Resource Status Report in Visio
- Revising a Built-In Report
- Building a Custom Report
- Saving Project Data Fields
- Sharing Project Reports Electronically
- 14. Analyzing Progress Using Earned Value
- 13. Reporting Project Information
- V. Managing Multiple Projects
- 15. Managing Master Projects and Resource Pools
- Structuring Master Projects with Subprojects
- Consolidating Project Information
- Opening Multiple Project Files as a Set
- Sharing Resources by Using a Resource Pool
- 16. Exchanging Information Between Project Plans
- 15. Managing Master Projects and Resource Pools
- VI. Integrating Project 2010 with Other Programs
- 17. Exchanging Information with Other Applications
- 18. Integrating Project 2010 with Excel
- 19. Integrating Project 2010 with Visio
- 20. Integrating Project 2010 with Outlook
- 21. Collaborating as a Team by Using SharePoint
- Creating a Project Tasks List on a SharePoint Site
- Exchanging Project Information with SharePoint
- Synchronizing Changes Between Project and SharePoint
- Opening and Viewing Connected Project Information
- Collaborating with Team Members on Task Updates
- Assigning Tasks to Team Members
- Updating Task Progress
- Updating Task Progress in SharePoint
- Updating Task Progress in Project
- VII. Managing Projects Across Your Enterprise
- 22. Understanding Enterprise Project Management
- 23. Administering Your Enterprise Project Management Solution
- Signing In and Out
- Configuring Project Server Security
- Administering the Enterprise Resource Pool
- Establishing the Enterprise Portfolio
- Setting Up Project Workflows
- Standardizing Enterprise Project Elements
- Setting Up Team Member Work Pages
- Managing Pages, Views, and Reports
- 24. Managing Enterprise Projects and Resources
- Connecting to Your Project Server
- Working with Enterprise Projects
- Following a Project Workflow
- Building Your Enterprise Project Team
- Finding Resources to Meet Your Needs
- Building Your Project Team in Project Professional
- Building Your Project Team in Project Web App
- Identifying Resource Attributes by Using Custom Enterprise Fields
- Using Generic Resources as Placeholders
- Adding a Team Assignment Pool to Your Project Resource List
- Finding Enterprise Resources That Meet Specific Criteria
- Review Resource Assignments and Availability
- Replacing an Existing Project Resource with an Enterprise Resource
- Matching an Existing Project Resource
- Matching and Replacing Generic Resources
- Proposing Tentative Resources
- Assigning Tasks to Enterprise Resources
- Finding Resources to Meet Your Needs
- Collaborating with Your Project Team
- 25. Participating on a Team Using Project Web App
- Getting Started with Project Web App
- Working with Your Assignments
- Submitting Text-Based Status Reports
- Logging Time by Using Timesheets
- Working with Issues and Risks
- Setting Up E-Mail Reminders and Outlook Tasks
- Managing Resources in Project Web App
- 26. Making Executive Decisions Using Project Web App
- 27. Managing and Analyzing Project Portfolios
- VIII. Customizing and Managing Project Files
- 28. Customizing Your View of Project Information
- Customizing Views
- Changing the Content of a View
- Creating a New View
- Saving a View
- Changing Text Formatting in Views
- Formatting a Gantt Chart View
- Modifying the Timescale
- Modifying a Network Diagram
- Modifying the Timeline
- Modifying the Team Planner
- Modifying the Resource Graph
- Modifying the Calendar
- Modifying a Sheet View
- Modifying a Usage View
- Customizing Tables
- Customizing Fields
- Working with Outline Codes
- Customizing Groups
- Customizing Filters
- Sharing Customized Elements Among Projects
- Customizing Views
- 29. Customizing the Project 2010 Interface
- 30. Automating Your Work with Macros
- 31. Standardizing Projects by Using Templates
- 32. Managing Project Files
- Saving Project Files
- Opening Project Files
- Saving and Opening with Different File Formats
- Comparing Project Plans Side by Side
- Safeguarding Your Project Files
- 28. Customizing Your View of Project Information
- IX. Appendixes
- D. Index to Troubleshooting Topics
- E. About the Authors
- Index
- About the Authors
- SPECIAL OFFER: Upgrade this ebook with O’Reilly
Project 2010 provides a variety of ways to share views and reports electronically. You can save a view or report as a PDF file and then send it as an e-mail attachment or post it on a SharePoint site or other website. You can save your project as an XML file or save a view as a graphics file and post it to a website.
Share Reports by Using Project Server and SharePoint
If your organization is set up with Project Server and Project Web App, you have a more structured and robust means of sharing reports with team members and stakeholders, not to mention the availability of more reports themselves.
Note
For more information, see Managing Pages, Views, and Reports, Controlling Project Documents, and Analyzing and Reporting on Project Information.
If your organization manages project workgroup collaboration through SharePoint Foundation or SharePoint Server, you can share reports through the Document Library on your SharePoint site.
You can save a particular view as a PDF (portable document format) file, which you can then save, send, post, or print. To save a view as a PDF file, follow these steps:
Open the view and arrange the data as you want it to appear when printed.
Note
For more information about available views and arranging information in those views, see Chapter 4.
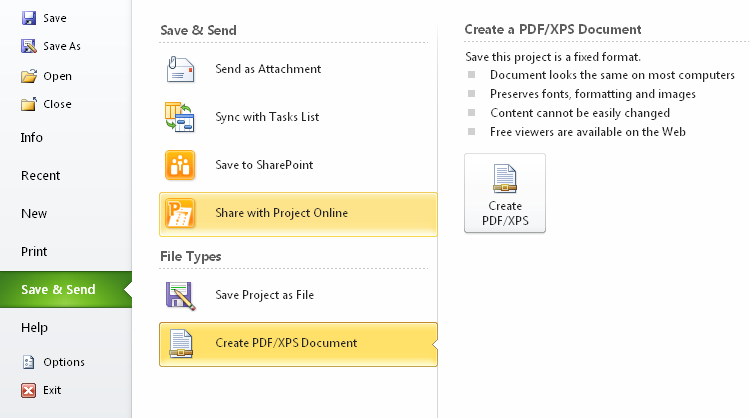
On the File tab, click Save & Send.
In the Save & Send Backstage view, click Create PDF/XPS Document.
The right pane shows information about PDF/XPS documents.
Browse to the location where you want to save the PDF file. Give the PDF file a name, and then click OK.
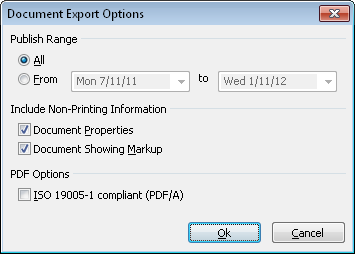
Make any necessary changes in the Document Export Options dialog box, and then click OK.
You can save a text report you have generated as a PDF file. In addition to letting you share the report electronically, saving a report as a PDF file is a good way to save snapshots of project information over time. To save a Project 2010 report as a PDF file, follow these steps:
On the Project tab, in the Reports group, click Reports.
Select and run the report so that it’s showing in the Print Backstage view.
Note
For more information, see Working with Text-Based Reports.
In the middle pane of the Print Backstage view, click the arrow next to the name of the currently selected printer.
All available printers, including Adobe PDF, are listed.
Click Adobe PDF.
Click Print.
In the Save PDF File As dialog box, browse to the location where you want to save the PDF file. Change the file name if you want, and then click OK.
You can also save a visual report you’ve generated as a PDF file by using the PDF printing feature in Excel or Visio.
As described in the previous sections, you can create a PDF file from a particular project view or report. You can then post that PDF to an intranet site, SharePoint site, or other web-based project information system for team members and other stakeholders to review.
If you want to post project information directly on a web page, though, you can save it as an XML file or save a view as a graphics file.
To do this, follow these steps.
Open the project plan you want to save as an XML file.
Click File, Save As.
In the Save As Type box, click XML Format (*.xml).
Navigate to the location where you want to save the new XML file.
In the File Name box, type the name for your new XML file.
Click Save.
The file is saved. You can now open it in a markup language editor, apply style sheets, and prepare the information for publication on the web.
Copy Picture is a simple option if you just want to publish a graphic image of a particular view to the web. To use Copy Picture, follow these steps:
In your project plan, display the view you want to copy to the other application.
Manipulate the view to show the information the way you want it to appear in the destination application.
On the Task tab, in the Clipboard group, click the arrow next to Copy, and then click Copy Picture.
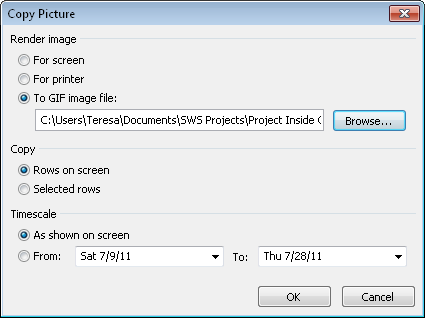
The Copy Picture dialog box appears.
In the Render Image section, click the To GIF Image option, as shown in Figure 13-34. Then click the Browse button to specify the new file’s location and name.
In the Copy section, click the Rows On Screen option (the default) if you want the rows currently showing on the screen to be included in the image. Click the Selected Rows option if only selected rows should be included.
In the Timescale section, click the As Shown On Screen option (the default) if you want the timescale to be represented as set in the current view.
Click the From and To option and enter dates in the boxes if you want to specify the timescale and date range to be included in the image.
When you are finished setting the Copy Picture options, click OK.
The view is saved as a GIF image. You can now manipulate it in a graphics program, perhaps to crop the image or add labels. If necessary, you can convert it to another graphics file format, such as JPG, if that makes it easier to post to the website.
-
No Comment


