
Allowing for Multiple Selections
In many situations, you want to have the user choose a value from a series of possible choices. The .NET framework supplies several controls that make it quite easy to add such features to your programs.
Choosing a Font with Selection Controls
The Font Chooser program, featured in Figures 6.16 and 6.17, demonstrates potentially useful selection tools. As a user, you’ve encountered radio buttons, check boxes, and list boxes. They are frequently used to allow the user to choose from a limited set of options. The Font Chooser program uses all these types of components to set the characteristics of a Font.
Figure 6.16. The user has used familiar interface tools to specify a 10-point Arial font with italic style.
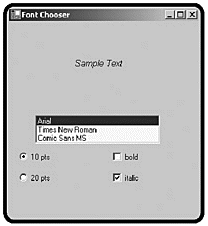
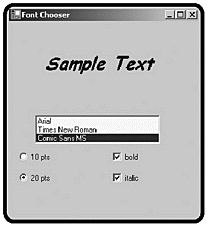
Figure 6.17. The user has selected a different font. Notice that the font can be both bold and italic but can have only one size.
Although more selection components are available to you, you will have no problems creating your own after you learn how the ones in this program work.
Creating the User Interface
Creating the visual interface is a logical starting point for any visual program, so that’s where I began. Figure 6.18 illustrates the controls I used in this program. The form contains the following components:
Figure 6.18. Sketch out the types and names of objects in your form.

Start your programs by drawing up the forms and naming all the components. This step is often done best on paper when you aren’t near a computer; then you can concentrate on the design itself. Give names to each element on the form, including the form itself. Also, the object names begin with a three-character abbreviation indicating the kind of control the object is. This is Hungarian notation and is widely used in GUI programming. Hungarian notation helps you remember what kind of control a variable name refers to. This eliminates the possibility of mistakes.
Try to create your entire form before you begin adding code. Most importantly, change the names of all your components before you begin to write event handlers. If you change an object’s name after you have written the event handler for that object, the event logic will no longer be associated with that control.
The Visual Designer writes sloppy code for you if you let it. Be sure to name all objects before you write event handlers. Also, the Visual Designer sometimes crashes if you change the main form’s name. It fails to change the Application.Run() line to the new form name, so you must make this change manually. Also, the file name of the form retains the old name, so you’ll probably want to use the Save Form1.cs As option from the File menu to rename the actual file on the disk. I hope that these issues are simply problems with the beta version of C# that I had as I wrote this book and that Microsoft has corrected these errors by the time you write the programs. Still, this situation illustrates why you shouldn’t trust the Visual Designer to build correct code for you. You need to know how the underlying code works because the Designer will make mistakes.
Examining Selection Tools
The .NET environment provides great interface tools for allowing multiple selections. I used three distinct tools–the list box, radio buttons, and checkboxes– that allow the user to select from a list of choices. Each has slightly different characteristics.
The List Box
A list box is a box that shows a list of strings. The list box is terrific when you have a large number of strings that you want the user to choose from. The list box is closely related to the combo box, which allows you to make a drop-down menu, instead of a list, where all elements are visible. Both the list box and the combo box feature the items property, which holds all the strings in the list box. If you highlight the items property in the Properties window when a list box or combo box is visible, a small button with an ellipsis (…) appears inside the Properties window. You can select this button to bring up an editor that allows you to enter the elements you want stored in the list box. Figure 6.18 illustrates editing the contents of a list box.
Radio Buttons
Radio buttons get their name from the old car radios that had pushbuttons. When you pushed one button to select a radio station, no other button could be
NOTE
IN THE REAL WORLD
Entire books have been written about effective user interface design. The design of interfaces is a complex field that touches on the disciplines of computer science, human factors engineering, cognitive psychology, design, and art. There is some debate about what goes into a good user interface design, but a few questions are clearly important in any design:
Does the user interface help the user?
Does the interface prevent illegal input?
How well does the interface utilize the available space?
Does the interface add to the theme and spirit of the software?
If you keep these questions in mind as you choose the types of components you put in your forms, you will build an appropriate interface for your program. If you are working on professional software, you can consult an expert on user interface design and usability testing. This ensures that the user interface of your software will help your program communicate clearly with your users.
Check Boxes
The font style is controlled by check boxes. You can set as many check boxes to true as you like. Check boxes are a good choice for the font style because a font can have any combination of bold and italic (or neither).
Creating Instance Variables in the Font Chooser
To write the Font Chooser program, I created the form design illustrated in Figure 6.18 and modified the program. Realizing that the key part of the program would be the creation of a font, I looked up the font object in the .NET documentation. Figure 6.19 shows the initial help screen for the font object.
Figure 6.19. The Font class has a three-parameter constructor that builds a font based on exactly the information the form generates.

I found the class in the System.Drawing package. The font object has several constructors, but I was interested in creating a font based on the font’s name, size, and style. Fortunately, I found a constructor that creates a font using exactly those parameters. I let the Designer build the initial code. Then I added some local instance variables for each part of the font. The following code generates my private instance variables for the font:
public class myForm : System.Windows.Forms.Form
{
   //Here's my own variables
   private System.Drawing.Font myFont;
   private string fontName = "Arial";
   private int fontSize = 20;
   private FontStyle myStyle = FontStyle.Regular;

   //these variables were created by the designer
   private System.Windows.Forms.ListBox lstFontName;
   private System.Windows.Forms.Label lblOutput;
   private System.Windows.Forms.CheckBox chkBold;
   private System.Windows.Forms.CheckBox chkItalic;
   private System.Windows.Forms.RadioButton rad20;
   private System.Windows.Forms.RadioButton rad10;
Note that I also included the instance variable declarations inserted by the Designer. Putting your own variables at the top of the class definition is better because the Designer always adds new variables at the end of the instance variables list. You’ll probably want to separate the variables you have created from those made by the Designer software. Notice, also, how I commented the variables to track which ones I created.
I knew that I would eventually create a style based on a string for the font’s name, a number for its size, and an instance of the FontStyle object (whatever that is) for the style. Of course, I then looked up FontStyle and found out that it is a simple code listing all the legal styles of fonts.
NOTE
IN THE REAL WORLD
Technically, FontStyle is an enumeration, which is a fixed list of values with names. However, you don’t have to know this to use it. When you need it, you can do as I did and look it up to learn the special characteristics that make it useful. In the section “ Getting the Style from the Check Boxes,” I’ll describe more fully how I used FontStyle.
Writing the AssignFont() Method
Whatever actions the user takes in this form will result in creating a new font object and assigning it to the Font property of lblOutput. I wrote a method named AssignFont() to handle this duty:
private void AssignFont(){
  // uses the variables to assign a font

  //check the list box for a font name
  fontName = lstFontName.Text;

  //look at check boxes for styles
  myStyle = FontStyle.Regular;
  if (chkBold.Checked){
    myStyle = myStyle | FontStyle.Bold;
  } // end if
  if (chkItalic.Checked){
    myStyle = myStyle | FontStyle.Italic;
  } // end if
  //create the new font and attach to the label
  myFont = new Font(fontName, fontSize, myStyle);
  lblOutput.Font = myFont;
} // end AssignFont
To write a method that isn’t associated with an event, write the method just as you do in ordinary classes. However, you might want to put your custom methods right after the instance variable declarations. All event methods created by the editor are placed at the end of the class automatically. Many programmers prefer to keep custom methods and automatically generated methods (the event handlers) in distinct segments of the file.
The key to the AssignFont() method is in the last two lines. These code lines create a new font based on the fontName, fontSize, and myStyle variables and copy that font to the Font property of lblOutput. The beginning part of the method gets the values from the various selection elements on the screen.
Getting the Font Name from the List Box
By the time the user sees the list box, it has a set of legal font names in place. When the user clicks a font name, the Text property of the list box reflects the currently selected value. A list box is perfect for a situation like this because font names are very specific. If you were to allow the user to type in a font name, you would have to do all kinds of error trapping in case the user either asks for a font that does not exist or makes a typing error. If you have more items in the list than can fit on the area allocated on the screen, the list box automatically adds a scroll bar. To retrieve the font name from the list box is a very straightforward affair:
fontName = lstFontName.Text;
This copies the currently selected text in the list box to the fontName variable.
Getting the Style from the Check Boxes
The font style is more complicated because there are several possible combinations of styles. Here’s the code that generates a font style:
//look at check boxes for styles
myStyle = FontStyle.Regular;
if (chkBold.Checked)
 {myStyle = myStyle | FontStyle.Bold;
} // end if
if (chkItalic.Checked){
  myStyle = myStyle | FontStyle.Italic;
} // end if
The segment begins by assigning the value Regular to myStyle. Check boxes have a Boolean property named Checked that returns true if the box has been checked by the user and false, otherwise.
If the chkBold check box’s Checked property is true, the Bold style is incorporated into the style object. If the chkItalic is checked, the Italic style is incorporated into the style object. I incorporated the styles by using a little binary magic. The pipe symbol (|) indicates a bitwise or operation. The values of the various styles are set up so that you can use this operator to combine any number of values. You can check with your friendly neighborhood computer scientist to discover what a bitwise or operator does and why it is used here, or you can simply trust the documentation that comes with the FontStyle entry in .NET (as I did) and move on. (Okay, I am a friendly neighborhood computer scientist, but you really can live without all those details right now.)
The end result of this code fragment is that myStyle will be bold if chkBold is checked, italic if chkItalic is checked, bold and italic if both check boxes are selected, and neither bold nor italic if neither box is checked.
Finding the Font Size Code
You might be surprised that there is no code in the AssignFont() method for dealing with setting the font size. It turned out to be more convenient to assign the size when the option button is pressed. You’ll see the code when I show you the event handlers (next). I’ll also explain why I didn’t put that code in AssignFont().
Writing the Event Handlers
The event handlers for the Font Chooser are very simple. Essentially, all of them defer control to the AssignFont() method:
    private void lstFontName_SelectedIndexChanged(object sender,
System.EventArgs e) {
       AssignFont();
     }

     private void chkBold_CheckedChanged(object sender, System.EventArgs e) {
       AssignFont();
     }
    private void chkItalic_CheckedChanged(object sender, System.EventArgs e) {
      AssignFont();
    }

    private void rad10_CheckedChanged(object sender, System.EventArgs e) {
        fontSize = 10;
        AssignFont();
    }

    private void rad20_CheckedChanged(object sender, System.EventArgs e) {
      fontSize = 20;
      AssignFont();
    } // end AssignFont
I started to write complete code for each event, until it became clear that the event methods would be almost identical. Any time you find yourself writing repetitive code is a good time to consider encapsulation, so I moved all the code that is common to all the methods to the AssignFont() method and had each event handler call that method. If I decide later to change my logic, I’ll have to change it in only one place. The radio buttons are the only event handlers that have additional code. If a radio button is pressed (which is what causes the CheckChanged event to trigger), that button’s checked property is true, and all the others are false. I set the fontSize variable in the event handler because in the event handler you know what the correct size will be. If you wait for the AssignFont() method to check for the font size, you have to check each radio button to see which was pressed.
I could not use this technique in the check boxes because the state of the font style depends on all the checkboxes, not just the currently selected one.