Chapter 5. Threat hunting
Until now, you’ve learned important Azure Sentinel capabilities that can be used during the incident response lifecycle, such as analytics and case management. However, organizations that have a more mature Security Operations Center (SOC) are starting to invest more in proactive investigation to identify indications of attack (IOA). This process is usually called “proactive hunting” or “proactive threat hunting.”
Azure Sentinel provides a platform for proactive threat hunting that can help to identify sophisticated threat behaviors used by threat actors, even when they are still in the early stages of the attack. The goal is to be able to disrupt the cyber kill chain during the initial phases to avoid exploitations.
In this chapter, you will learn how to use threat hunting in Azure Sentinel and how to leverage Microsoft Security Researcher’s expertise to create your own hunting queries.
Introduction to threat hunting
Threat hunting is the process of iteratively searching through a variety of data with the objective to identify threats in the systems. Threat hunting involves creating hypotheses about the attackers’ behavior and researching the hypotheses and techniques that were used to determine the artifacts that were left behind.
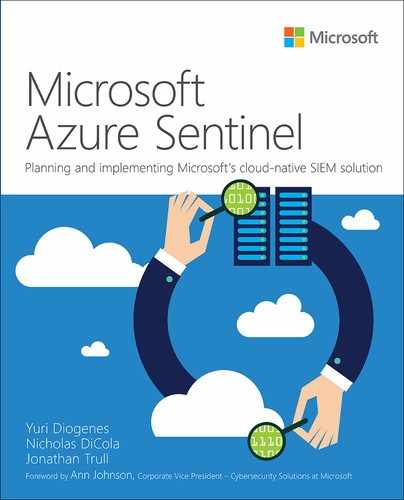
When a SOC is organized in specialized teams, they are usually divided in different tiers. The diagram shown in Figure 5-1 is an example of a SOC operating in a three-tier approach.
As you can see in Figure 5-1, Tier 3 is responsible for performing proactive hunting and advanced forensics. The goal of this team is to perform an analysis to identify anomalies that may indicate advanced adversaries. While most incidents are remediated at Tiers 1 and 2, only unprecedented findings or deviations from the norm are escalated to Tier 3 teams.
While escalations are usually sent to this team, they don’t operate only in reactive cases; they also do proactive hunting, which entails performing investigations without a formal ongoing incident. Azure Sentinel has a series of pre-defined threat-hunting queries that can help identify suspicious activities. The following sections cover this topic in more detail.
Hunting threats in Azure Sentinel
Azure Sentinel has a dedicated threat-hunting capability designed specifically for hunt teams and Tier 3 analysts. Within Azure Sentinel, an analyst can create a new query; modify existing queries; bookmark, annotate, and tag interesting findings; and launch a more detailed investigation. To access the Hunting dashboard, follow the steps below:
Open the Azure Portal and sign in as a user who has either contributor or read permissions on the resource group to which the Azure Sentinel workspace belongs.
In the search pane, type Azure Sentinel and click the Azure Sentinel icon when it appears.
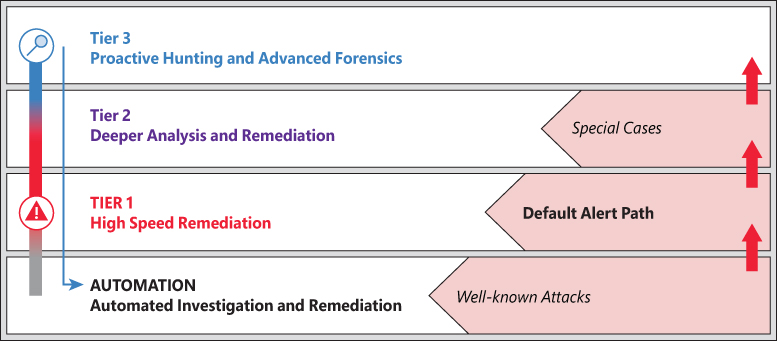
Select the workspace on which Azure Sentinel is enabled. In the left navigation pane, click Hunting. The Azure Sentinel – Hunting dashboard appears, as shown below in Figure 5-2.
Moved this para here to ba;ance sprea
In the Hunting blade, there are several components for executing specific actions or configuring other components within the blade. As shown in Figure 5-3, the first component is the Refresh button, which is used to refresh the data visible within the Hunting blade. The button resembling a clock is used to adjust the timeframe for the data appearing within the Hunting blade. Next, the New Query button is used to create a new hunting query. We will cover the details of creating a new hunting query in the next section. The Run All Queries button is used to execute all the Kusto Query Language (KQL) queries in the Hunting blade.

As shown in Figure 5-4, the middle pane provides summaries of key details for the hunting team and security leaders, including the total number of hunting queries and bookmarks that have been created by analysts. Next is an interactive widget that shows the number of hunting queries that are aligned to the MITRE ATT&CK framework. Clicking any one of the individual icons will filter the available queries for that specific attacker technique.

The MITRE ATT&CK framework is an important tool for hunting teams. According to https://attack.mitre.org/, MITRE ATT&CK is “a globally-accessible knowledge base of adversary tactics and techniques based on real-world observations.” These adversary tactics and techniques are grouped within a matrix that can be used for forming hunting hypotheses and writing the supporting queries. The ATT&CK Matrix includes the following categories:
Initial Access These are techniques used by the adversary to obtain a foothold within a network and includes techniques such as targeted spear-phishing and exploiting vulnerabilities or configuration weaknesses in public-facing systems.
Execution These are techniques that result in adversaries running their code on a target system. For example, an attacker may run a PowerShell script to download additional attacker tools and/or to scan other systems.
Persistence These are techniques that allow an adversary to maintain access to a target system, even following reboots and credential changes. An example of a persistence technique would be an attacker creating a scheduled task that runs their code at a specific time or on reboot.
Privilege Escalation These are techniques leveraged by an adversary to gain higher-level privileges on a system, such as local administrator or root.
Defense Evasion These are techniques used by attackers to avoid detection. Evasion techniques include hiding malicious code within trusted processes and folders, encrypting or obfuscating adversary code, and disabling security software.
Credential Access These are techniques deployed on systems and networks to steal usernames and credentials for re-use.
Discovery These are techniques used by adversaries to obtain information about systems and networks that they are looking to exploit or use for their tactical advantage.
Lateral Movement These are techniques that allow an attacker to move from one system to another within a network. Common techniques include pass-the-hash methods of authenticating users and the abuse of the remote desktop protocol.
Collection These are techniques used by an adversary to gather and consolidate the information they were targeting as part of their objectives.
Command And Control These are techniques leveraged by an attacker to communicate with a system under their control. One example is that an attacker may communicate with a system over an uncommon or high-numbered port to evade detection by security appliances or proxies.
Exfiltration These are techniques used to move data from the compromised network to a system or network fully under the control of the attacker.
Impact These are techniques used by an attacker to impact the availability of systems, networks, and data. Methods in this category would include denial-of-service attacks and disk- or data-wiping software.
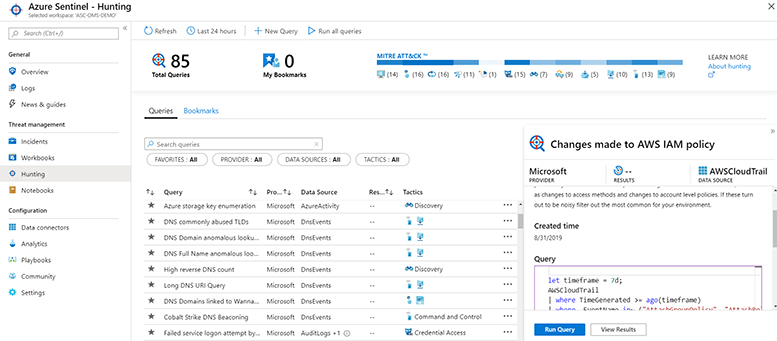
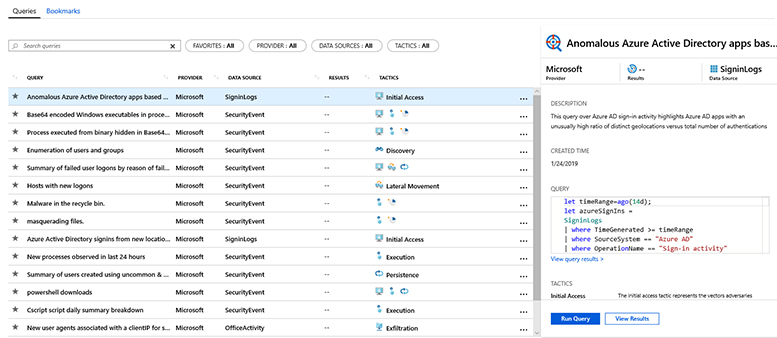
The bottom pane of the Azure Sentinel Hunting dashboard includes two tables. One table shows the active hunting queries and the other shows the details related to a specific query selected in the active hunting queries table. Figure 5-5 shows the two tables in the bottom pane. Analysts will spend a significant amount of their time reviewing and acting on the information contained in these two tables.
You can also toggle to the hunting Bookmarks view by selecting Bookmarks at the top of the bottom pane, as shown in Figure 5-6.
In the bottom pane, select Queries to ensure you are in the hunting queries table. As you can see in Figure 5-5, there are five columns within the first table including Query, Provider, Data Source, Results, and Tactics. These columns provide the analyst with the following information:
Query This column provides the name of the KQL hunting query.
Provider This column lists the entity that created the KQL hunting query. Currently, the two value options for this column will either be Microsoft for the built-in queries that ship with the product or Custom Query for those written by you.
Data Source This is the Log Analytics data table from which the results are retrieved.
Results This shows the total number of results for the last execution of the query.
Tactics This shows the MITRE ATT&CK tactics the specific hunting query is designed to discover.
Finally, for each hunting query—and as shown in Figure 5-7—there is an ellipsis (“…”) at the end of the table, which provides additional options. The options include Run query, Add to favorites, Edit Query, Clone Query, and Delete Query. These options are self-explanatory, and we will cover them in greater detail in the next section.

The right-hand table within the bottom pane of the Hunting dashboard contains specific details on the hunting query selected by the analyst in the left-hand table. In Figure 5-8, the details for the Enumeration of users and groups hunting query are shown. Within this window, an analyst can quickly view the KQL query, description of the query, log sources searched, and MITRE ATT&CK tactics covered, and the analyst can take action to run the query or view the results.

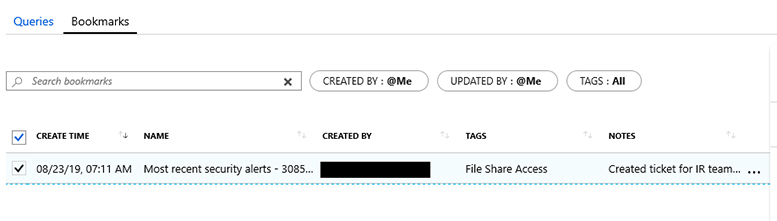
The Azure Sentinel Hunting dashboard also has a Bookmarks view. Bookmarks allow threat hunters to save, tag, and annotate the results they want to return to during a hunting operation. Tags are custom labels that can be applied to the bookmarked data by an analyst to make it easier and more intuitive to search and find hunting results. As you can see in Figure 5-9, the Bookmarks view contains the details associated with each bookmark including the creation time, name of the bookmark, person creating the bookmark, and any associated tags and notes for the returned results. Also, each bookmark has an ellipsis that provides an analyst with an option to delete the bookmark.
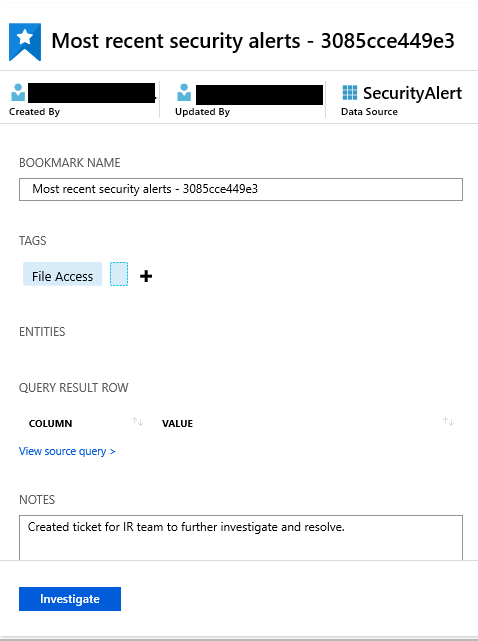
Like the Queries window, once you select a specific bookmark within the Bookmarks window, you get additional details related to the bookmark. As shown in Figure 5-10, the details are listed in a separate window in the rightmost pane of the Bookmarks window.
Azure Sentinel ships with built-in hunting queries that have been written and tested by Microsoft security researchers and engineers. At the time this book was written, the following 16 hunting queries were provided by Microsoft:
Anomalous Azure Active Directory apps based on authentication location
Windows executables with Base64-encoding in process command lines
Process executed from binary hidden in Base64-encoded file
Enumeration of users and groups
Summary of failed user logons by reason of failure
Host with new logons
Malware in Recycle Bin
Masquerading files
Azure Active Directory sign-ins from new locations
New processes observed in last 24 hours
Summary of users created using uncommon and undocumented command-line switches
PowerShell downloads
Cscript daily summary breakdown
New user agents associated with clientIP for SharePoint uploads and downloads
Uncommon processes (bottom 5 percent)
Summary of user logons by logon type
As discussed previously, Microsoft has also created a GitHub repository (https://aka.ms/asb/sentinelcommunity) to which Microsoft researchers, internal security teams, and partners contribute hunting queries. At the time this book was written, the Azure Sentinel GitHub repository contained the following hunting queries:
AWS CloudTrail
AWS IAM policy change
Audit Logs
Consent to application discovery
Rare audit activity by app
Rare audit activity by user
Azure Activity
Anomalous listing of storage keys
Common deployed resources
Creating anomalous number of resources
Granting permissions to account
DNS Events
DNS commonly abused TLDs
DNS domain anomalous lookup increase
DNS full name anomalous lookup increase
DNS high NX domain count
DNS high reverse DNS count
DNS long URI lookup
DNS WannaCry
Multiple Data Sources
Cobalt DNS beacon
Failed Sign-ins with audit details
Logon with expired account
Multiple password resets by user
Permutations on logon names
Rare DNS lookup with data transfer
Rare domains in cloud logs
Strontium IOC retro hunt
Tracking privileged accounts
Traffic to know bad IPs
User agent exploit pentest
Office 365 Activity
Office mail forwarding hunting
New admin account activity
New SharePoint downloads by IP
New SharePoint downloads by user agent
Non-owner mailbox login
PowerShell or non-browser mailbox login
SharePoint downloads
Security Alert
Alerts for IP
Alerts for user
Alerts on host
Alerts with file
Alerts with process
Security Event
Customer user list failed logons
Failed user logons
Group added to privilege group
Hosts with new logons
Least common parent child process
Least common process command lines
Least common process with depth
Process entropy
Rare processes by service account
User logons by logon type
User account added to privilege group
User account created / deleted
User added / removed to group by unauthorized user
User created by unauthorized user
VIP account failed logons
Cscript summary
Enumeration of users and groups
Masquerading files
New processes
Persistence create account
PowerShell downloads
PowerShell new encoded scripts
Uncommon processes
Sign-in Logs
Anomalous user app sign-in location increase
Anomalous user app sign-in location increase detail
Disabled account sign-in attempts
Disabled account sign-in attempts by IP
Inactive accounts
Legacy authentication attempts
Sign-in logs with expanded policies
Success then fail / same user but different app
Unauthorized user / Azure Portal
Anomalous app Azure Active Directory sign-in
New locations Azure Active Directory sign-in
Sign-in Burst from multiple locations
Syslog
Scheduled task aggregation
Scheduled task edit via Contab
Disabled account squid usage
Squid abused TLDs
Squid malformed requests
Squid volume anomalies
Threat Intelligence Indicator
DNS events match to threat intel
W3C IIS Log
Client IP with many user agents
Potential webshell
Potential IIS brute force
Potential IIS code injection
Rare user agent strings
Wire Data
Wire data beacon
In the next section, we will cover the details of how to leverage these community-based queries in your hunting operations. I highly recommend that you take time to review these hunting queries to both generate ideas for your environment and to quickly learn KQL.
Creating new hunting queries and bookmarks
Now that you have a feel for the Azure Sentinel Hunting dashboard and capabilities, it’s time to create your first hunting query. For the best results, I suggest setting up a lab environment and connecting a few data sources. To create a new hunting query from scratch, follow these steps:
Open the Azure Portal and sign in as a user who has either contributor or read permissions on the resource group on which the Azure Sentinel workspace belongs.
In the search pane, type Azure Sentinel and click the Azure Sentinel icon when it appears.
Select the workspace on which Azure Sentinel is enabled.
In the left navigation pane, click Hunting.
At the top of the Hunting window, click the New Query icon, which will take you to the Create custom query pane. As shown in Figure 5-11, you need to complete the following actions:
Provide a name for the query
Provide a description
Write the query using the KQL language
Map the relevant fields in the query results to the entities that Azure Sentinel recognizes
Select the MITRE ATT&CK tactics associated with the query. Azure Sentinel currently recognizes Account, Host, IP Address, and Timestamp entity types.

Now that you understand how the interface works, let’s create your first hunting query. First, we will start with a hypothesis on which we will execute our hunting operation. For this specific scenario, we believe that the threat actor group may be targeting our organization to gain access to sensitive data aligned with this group’s motives and objectives. Based on Microsoft’s Security Intelligence Report, we know that this threat actor will typically launch a spear phishing attack against specific individuals within our organization. These emails commonly include a link to a website that hosts malicious software that is then downloaded on the victims’ computers allowing the attacker to establish control over the infected computers. Once a foothold is established, this specific actor will evaluate the local accounts to determine whether they are part of a group with elevated privileges, which will help the actor to extend the attack.
For this hunting sample, assume that the attacker was able to evade other controls and execute malicious code on local computers within your company’s network. The fictitious scenario here is that the threat actor followed his or her normal tactics and leveraged Microsoft PowerShell to determine whether the local account belonged to an administrative group. Now that you understand the scenario, it is time to go hunting.
Follow the previous steps in this chapter and return to the main Azure Sentinel Hunting dashboard.
Select New Query.
In the Create Custom Query window, provide a descriptive name for the query, such as “Enumeration of local groups with PowerShell.”
In the Description window, add a description that is specific to the query and makes it easy for others within your organization to understand. For this specific scenario, enter the following: Query to determine if a malicious actor who gained remote access to a corporate computer began further discovery operations by using Microsoft PowerShell to determine the group membership of the local account.
In the Custom Query window, you need to add the KQL query that will search for evidence to support or disprove our hypothesis. Windows event with ID 4798 would be generated if a user’s local group membership was enumerated. For more details, see https://docs.microsoft.com/en-us/windows/security/threat-protection/auditing/event-4798. Enter the following KQL code in the window:
SecurityEvent
| where EventID == 4798
| where TimeGenerated > ago(180d)
| where CallerProcessName contains “powershell”
The preceding KQL code searches within the SecurityEvent table and filters on logs where the Windows Event ID equals 4798 and the log was generated between today and the last 180 days—or six months. Finally, the returned results are further filtered to only those logs where the process responsible for triggering the event contained the string powershell. Contains is not case sensitive so it would return results where the caller process contained PowerShell, powershell, POWERSHELL, or any other derivative.
Just below the Custom Query window is where you can map the entities that Azure Sentinel recognizes to the appropriate data fields in the returned search results. Select IpAddress from the IP Address drop-down menu. Select TimeGenerated from the Timestamp drop-down menu. The following code will be added to your query:
| extend IPCustomEntity = IpAddress
| extend TimestampCustomEntity = TimeGenerated
In the Tactics drop-down menu, select Discovery because this is the associated technique, according to the MITRE ATT&CK framework available at https://attack.mitre.org/techniques/T1087/. You can also search on the Mitre techniques webpage at https://attack.mitre.org/techniques/ to see examples and definitions of different attacker techniques to select the right tactic—or tactics—from the Azure Sentinel drop-down menu.
The input fields for your new hunting query should match those in Figure 5-12. To finish creating this Hunting query, press Save.

FIGURE 5-12 Azure Sentinel New Custom Query to identify an attacker who is enumerating group memberships of a local account After saving, you will be taken back to the main Azure Sentinel Hunting dashboard. Your new query will now be visible within the Queries view. From here, you can run your query by using the ellipsis next to the query or by using the Run Query button.
Leverage community-based hunting queries
As discussed previously in this chapter, Microsoft researchers and partners have contributed hunting queries that you can leverage with Azure Sentinel. This makes it faster for you and your company to get started. Now, let’s see how we can leverage one of these community-based hunting queries to find attackers in your environment.
Like the previous scenario, we believe attackers have established a foothold within our corporate network. We want to use a statistical-based hunt to summarize the number of failed user logons by reason for the failure. By analyzing the data, we can infer lateral movement. Use the following steps to leverage the power of the Azure Sentinel community:
Visit the Azure Sentinel community at https://aka.ms/asb/sentinelcommunity and click Hunting Queries, SecurityEvent, and FailedUserLogons.yaml. Review the details of the query to ensure it supports the hypothesis you are evaluating. See Figure 5-13 below for a description of the community-based hunting query.

FIGURE 5-13 Azure Sentinel community-based query that summarizes the number of failed logons by reason for the failure Next, sign-in to Azure Sentinel and navigate to the Hunting dashboard. Refer to the beginning of the chapter if you need step-by-step directions.
Click the New Query action button. Using the details from the community page shown in Figure 5-13, fill in the required fields for a new hunting query. I recommend that you copy and paste the KQL query into the Custom Query pane. For this example, you will need to delete the top description so that the syntax is correct. Your new query should resemble the query shown in Figure 5-14.
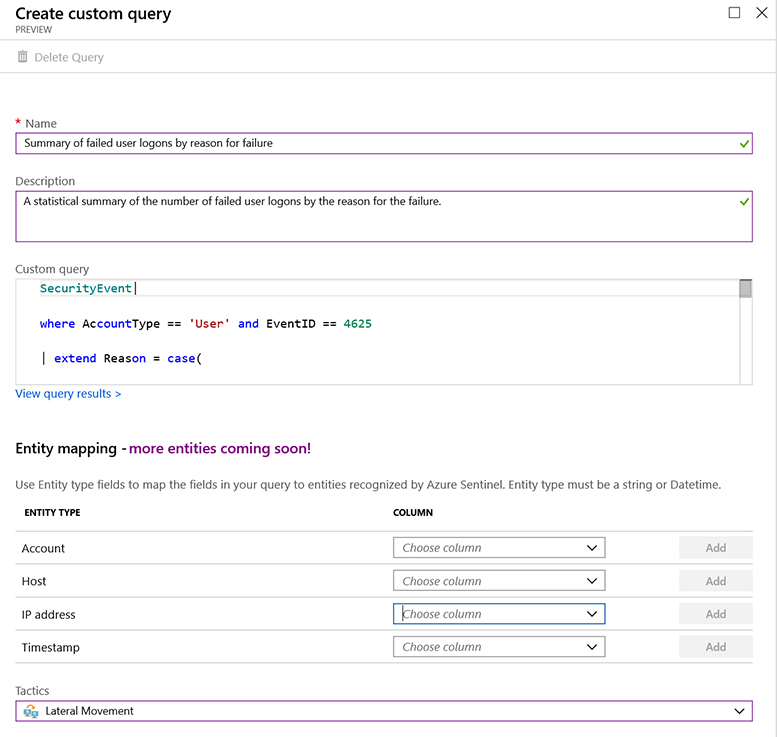
FIGURE 5-14 Azure Sentinel Create Custom Query window containing the details from the community-based query Click Create. You will be returned to the main Azure Sentinel Hunting dashboard. From here, you can run the query.