
Performance, Scalability, and Availability are three key design elements that are considered while designing enterprise-class applications. Judicious use of caching techniques goes a long way in improving and strengthening these elements. Caching is not rocket science but judiciously caching data involves some thoughtfulness. Data involving enormous processing/computation, expensive-to-retrieve data, and data that changes infrequently and/or is consumed quite often are great candidates for caching. Caching helps in improving performance by storing data either in-memory or to some persistent storage for quicker retrieval compared to the original source.
Caching is an important aspect of any enterprise application but it is a daunting task to develop a caching library that satisfies the requirements of different projects. The Caching Application Block fills that gap by providing a ready-to-use infrastructure for caching. It supports both in-memory caching as well as backing storage (Database or Isolated Storage); customization is also possible through extension points. The Caching block provides all the common functionality to add, retrieve, remove, and flush cached data. Also, cache expiration and scavenging policy can be controlled through configuration.
The following are the key features of the Caching Application Block:
- Manage configuration settings through Enterprise Library configuration tool
- In-memory, isolated, or database persistent cache storage location can be configured
- Policy-based expiration and scavenging, both configurable
- Support for custom expiration policies and storage location
- Extensibility points to implement custom backing store, expiration policy, storage encryption provider, and cache manager
Note
The Enterprise Library Caching Application Block will be deprecated in future releases. Caching functionality is available in .NET 4.0 as part of System.Runtime.Caching namespace; this implementation is not dependent on the System.Web assembly and it can be used by other .NET applications, not just ASP.NET.
The Caching Application Block can be used with any of the following application types:
The Caching Application Block can be leveraged for several different scenarios. The key scenarios for the Caching block are as follows:
- Consistent approach to caching across different application environments. Basically, it doesn't matter whether it's a Web application, Windows Forms application, WCF, WPF, and so on.
- Requires a configuration-based caching where the key elements can be modified during production deployment if required.
- Option to cache in a persistent backing store: The Caching Application Block provides support to store the cache data to both database and isolated storage. Additionally, cached data can be encrypted before persisting into a backing store. The backing store can be extended by creating a custom backing store provider.
In this chapter, you will:
- Be introduced to the Caching Application Block
- Understand the scenarios for the Caching Application Block
- Understand the concepts behind the Caching Application Block
- Learn about different backing stores such as
NullBackingStore, IsolatedStorageBackingStore, andDataBackingStore - Learn about referencing the required assemblies
- Learn to set up the initial infrastructure configuration using the configuration editor
- Learn to cache, retrieve, remove, and flush cached data using the Caching Application Block
- Understand and implement the cache item refresh action using
ICacheItemRefreshAction - Learn to configure
IsolatedStorageBackingStoreandDataBackingStore - Learn to configure an encryption provider to encrypt cached data
Before we dig deeper into individual features of the Caching block, we will touch upon the basic elements by creating a sample Windows Forms Application project. This will help us to get up-to-speed with the basics; in this section, we will do the following:
- Reference the Caching block assemblies
- Set up the initial configuration
- Write code to add items to the cache
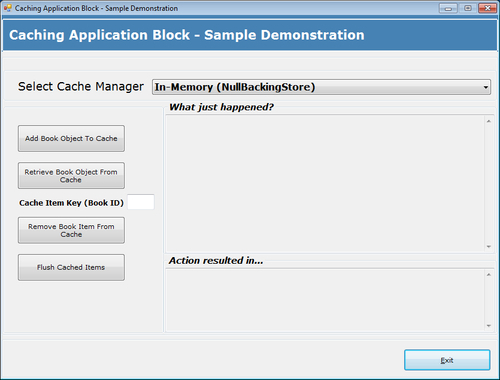
To complement the concepts and sample code of this book and allow you to gain quick hands-on experience of different features of the Caching Application Block, we have created a sample demonstration application, which provides implementation of Add/Retrieve/Remove/Flush operations utilizing an in-memory and Isolated Storage Cache Manager (configured to encrypt cached data).
The following is a screenshot of the sample application:
For the purposes of this demonstration, we will be referencing non-strong-named assemblies but based on individual requirements, Microsoft strong-named assemblies, or a modified set of custom assemblies can be referenced as well. Since we will also be exploring storage of cached items to a database and encryption of cached items feature in this chapter, we need to include references to the database and cryptography-related assemblies in the project.
The following table lists the required/optional assemblies.
|
Assembly |
Required/Optional |
|---|---|
|
|
Required |
|
|
Required |
|
|
Required |
|
|
Required |
|
|
Required |
|
|
Optional. Only if database caching is required. |
|
|
Optional. Only if data encryption is required for cached data. |
Before we can leverage the features of the Caching Application Block we have to add the initial Caching Settings to the configuration. The following steps will add the settings to the configuration file:
- Open the Enterprise Library configuration editor either using the shortcut available in Start | All Programs | Microsoft patterns & practices | Enterprise Library 5.0 | Enterprise Library Configuration or just by right-click-the configuration file in the Solution Explorer window of Visual Studio IDE.
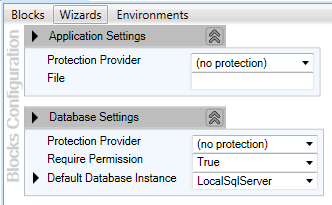
- Next, click on Edit Enterprise Library V5 Configuration. Initially, we will have a blank configuration file with default Application Settings and Database Settings.
The following screenshot shows the default configuration settings:
- Now let us add the Caching Settings in the configuration file. Select the menu option Blocks, which lists many different settings to be added to the configuration, and click on the Add Caching Settings menu item to add the caching configuration settings.
The following screenshot shows the Add Caching Settings menu item in the Blocks menu:

- Once we click on Add Caching Settings, the configuration editor will display the default Caching Settings as shown in the following screenshot:
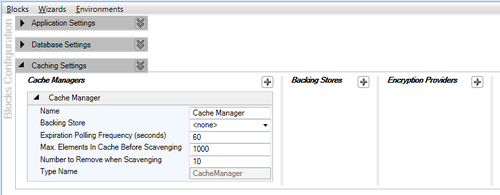
Notice that the settings consist of three parts: Cache Managers, Backing Stores, and Encryption Providers. By default, the setting is configured to use the default CacheManager provider and also the other attributes are set with the default values. We will change the default configuration further but for now, we are in good shape with regards to the initial infrastructure configuration.
We definitely don't want to get bored by fully qualifying the type on every instance of its usage, so to make our life easy we can add the given namespaces to the Windows Form's source code file to use the Caching block elements without fully qualifying the reference. Although we will be using EnterpriseLibraryContainer to instantiate objects (so we will also add Microsoft.Practices.EnterpriseLibrary.Common.Configuration namespace to the source file), the Unity Namespace section is listed to make you aware of the availability of the alternative approach of instantiating objects.
Microsoft.Practices.EnterpriseLibrary.CachingMicrosoft.Practices.EnterpriseLibrary.Caching.Expirations
Configuration Namespace (Optional): Required while using the EnterpriseLibraryContainer to instantiate objects.
Microsoft.Practices.EnterpriseLibrary.Common.Configuration
Unity Namespace (Optional): Required while instantiating objects using UnityContainer.
System.ConfigurationMicrosoft.Practices.UnityMicrosoft.Practices.Unity.Configuration
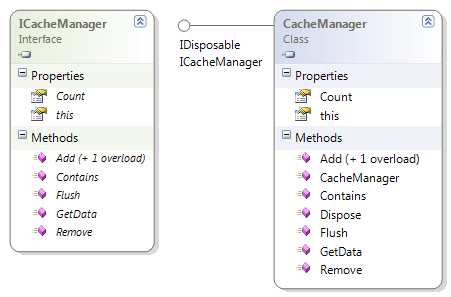
The CacheManager class is the default implementation of the ICacheManager interface, which resides in the Microsoft.Practices.EnterpriseLibrary.Caching namespace. As the name implies, it acts as a manager and manages all the caching operations. CacheManager internally creates a Cache object during initialization and this Cache object holds the real cache; all the requests (add, retrieve, remove, and so on) are forwarded to the Cache object.
The following diagram shows the definitions of the ICacheManager interface and of the CacheManager class.
We have several options at hand while creating a CacheManager object such as using the static CacheFactory class, using Unity service locator and using Unity container directly. A few approaches such as configuring the container through a configuration file or code are not listed here but the recommended approach is either to use the Unity service locator for applications with few dependencies or create objects using Unity container directly to leverage the benefits of this approach. Use of the static factory class is not recommended.
Static factory classes were the default approach to creating objects with versions prior to 5.0. This approach is no longer recommended and is still available for backwards compatibility. The Caching Application Block provides a static class called CacheFactory available in the Microsoft.Practices.EnterpriseLibrary.Caching namespace. Once the CacheManager object is created it in turn creates a CacheManagerFactory object, which in turn creates a Cache object.
The following is the syntax to create a deafult CacheManager instance using the static factory class:
ICacheManager cacheManager = CacheFactory.GetCacheManager();
The following is the syntax to create a named CacheManager instance using the static factory class:
This approach is recommended for applications with few dependencies. The EnterpriseLibraryContainer class exposes a static property called Current of type IServiceLocator, which resolves and gets an instance of the specified type.
The following is the syntax to create a default CacheManager instance using Unity Service Locator:
ICacheManager cacheManager = EnterpriseLibraryContainer.Current.GetInstance<ICacheManager>();
The following is the syntax to create a named CacheManager instance using Unity Service Locator:
ICacheManager cacheManager = EnterpriseLibraryContainer.Current.GetInstance<ICacheManager>("Isolated Storage Cache Manager");
Larger complex applications demand looser coupling; this approach leverages the dependency injection mechanism to create objects instead of explicitly creating instances of concrete implementations. Unity container resolves objects using type registrations and mappings; these can configured programmatically or through a configuration file. Based on the configuration, it resolves the appropriate type whenever requested. The following example instantiates a new Unity container object and adds the Enterprise Library Core Extension. This loads the configuration and makes registrations and mappings of Enterprise Library available.
The following is the syntax to create a default CacheManager instance directly using Unity container:
var container = new UnityContainer();
container.AddNewExtension<EnterpriseLibraryCoreExtension>();
ICacheManager cacheManager = container.Resolve<ICacheManager>();
The following is the syntax to create a named CacheManager instance directly using Unity container:
Cache manager stores the cached data in-memory and optionally it can also store the data in a configured persistent storage. The Caching block provides three backing stores out of the box and a custom backing store can be implemented using either the IBackingStore interface or BaseBackingStore class. The IBackingStore interface is part of the Microsoft.Practices.EnterpriseLibrary.Caching namespace; this interface provides the contract for backing store implementation. The BaseBackingStore class is part of the Microsoft.Practices.EnterpriseLibrary.Caching.BackingStoreImplementations namespace; this class provides implementation of common policies and utilities such as argument validations, which are useful to all backing store implementations.
The following diagram shows the members and inheritance hierarchy of the respective class and interface:
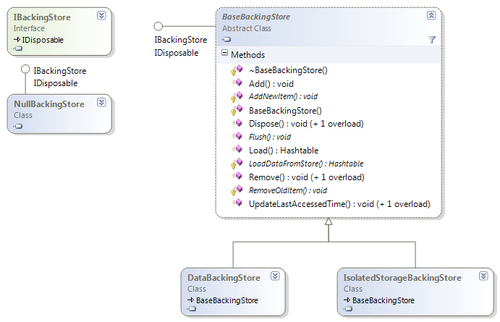
NullBackingStore is the default backing store, which is used by the Caching block while no backing store is configured. This implementation of the backing store inherits the IBackingStore interface but the implementation does nothing. It is surprising but the reason is pretty clear, this backing store allows the Cache class to store the data in-memory only. NullBackingStore is part of the Microsoft.Practices.EnterpriseLibrary.Caching.BackingStoreImplementations namespace. As discussed previously, in-memory is ideally a cache manager configuration without any backing store; in other words, a dummy implementation (NullBackingStore) is used as default backing store. This ideally means that the caching will be in-memory only.
The following screenshot shows the configuration options of the cache manager:

CacheManager provides two overloaded methods to add items to cache; the simplest overload accepts a key and a value of the cached item. This method sets the cache item priority to Normal and it also sets the refresh action and expiration policy to null. The other overloaded Add method provides finer control over the cached item. It not only allows setting the cache item priority for scavenging but it also allows setting the refresh action and multiple expiration policies. Both methods will throw an ArgumentNullException if the key is null or an ArgumentException if the key is an empty string. Apart from the above-mentioned exceptions, specific exceptions might be thrown by the configured BackingStore implementation.
The following is the syntax for caching an item with default settings:
this.cacheManager.Add(book.ID.ToString(), book);
The following is the syntax for setting priority and expiration policy for the cache item:
//Cache Item Priority = High
//Cache Refresh Action is not set
//Cache Expiration Policy is set to sliding time of 2 minutes
this.cacheManager.Add(book.ID.ToString(), book, CacheItemPriority.High, null, new SlidingTime(TimeSpan.FromMinutes(2)));
Cached data often needs a configurable expiration mechanism, which removes the cached item after a specified interval; this can be easily achieved by associating an expiration policy with the cached item. The Caching Application Block periodically evaluates the internal hash table to identify the expired cached items. The BackgroundScheduler class performs the expiration process based on the Expiration Polling Frequency (seconds) configured in the Cache Manager configuration settings.
The following diagram shows the members and inheritance relationship of the respective classes related to the expiration process:
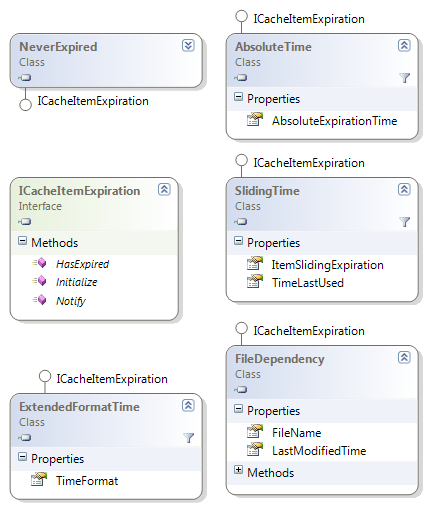
Expiration policy dictates when the cached item expires; we have three types of expiration policies:
The following is the list of available expiration policies:
- NeverExpired: Cache item never expires but may be removed by the block if lack of memory is detected. This falls under the "No Expiration" category.
- AbsoluteTime: Cache item expires at a specified absolute time as specified in the AsoluteExpirationTime property. This falls under the "Time-based Expiration" category.
- SlidingTime: Cache item expires after the specified time has elapsed from when the item was last accessed. By default it is 2 minutes. This falls under the "Time-based Expiration" category.
- ExtendedFormatTime: Provides the ability to specify detailed expiration conditions like cache item expires every day at 5:00 PM or on Friday of each week. This falls under the "Time-based Expiration" category.
- FileDependency: Cache item expires when the specified file is modified. This falls under "Notification-based Expiration" category.
Note
NeverExpired is the default expiration policy that will be assigned while using the given method of CacheManager:
public void Add(string key, object value);
The expiration process performs marking and sweeping as a two-part process.
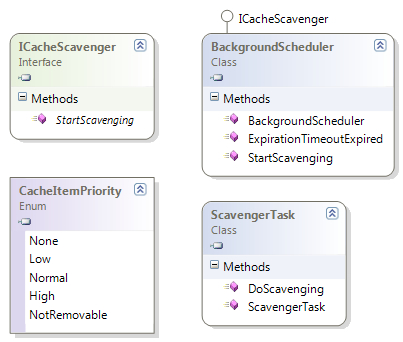
Every time an item is added to the cache, the BackgroundScheduler object checks whether the total items in the cache have reached the configured limit (Maximum Elements in Cache before Scavenging) provided in the Cache Manager configuration settings. Also, another setting, Number to remove when scavenging, determines the number of cached items removed from the cache after scavenging begins. Cached items are removed based on the priority (Low, Normal, High or NotRemovable) specified while adding the cached item; the default value is Normal.
The following diagram shows the members of the Interface, Class, and Enum related to scavenging:
CacheManager exposes a method called GetData, which accepts the key of a cached item; this operation will return null if the cached item does not exist. It will throw an ArgumentNullException if the key is null or ArgumentException if the key is an empty string. Apart from the above-mentioned exceptions, specific exceptions might be thrown by the configured BackingStore implementation.
The following syntax gets the cached item using the key:
Book book = this.cacheManager.GetData("1") as Book;
Note
Never use the Contains method of the cache manager as this method might not return an accurate result. The Contains method might return true indicating the cache item with the specified key exists but the GetData method may not fetch the item as the cached item might be expired, removed, or marked for removal.
Removing cached items is a very simple affair; CacheManager exposes a method called Remove, which accepts a string representing the key of a cached item. It does nothing if no item exists with that key. It will throw an ArgumentNullException if the key is null or ArgumentException if the key is an empty string. Apart from the above-mentioned exceptions, specific exceptions might be thrown by the configured BackingStore implementation.
The following syntax removes the cached item with the specified key:
this.cacheManager.Remove("1");
Flushing removes all items from the cache and the cache items are left unchanged if an error is encountered during the removal process. If the CacheManager is configured to use either the out-of-the-box or a custom BackingStore, then an exception might be thrown by the configured BackingStore implementation.
The following syntax removes all cached items from the cache manager:
this.cacheManager.Flush();