We spend a lot of time and effort to develop world-class applications; it's as if we are painstakingly creating a virtual life. Unfortunately, this virtual living being (application) cannot send a distress signal to seek help during unforeseen circumstances. Developers have a responsibility to empower the application so that it can leave us a message with enough information to track and resolve the issue. Let's face it, there are millions of things that can go wrong during development, or while the application is in production. While in development, we have the luxury to debug the application and fix the bugs, in production we need a mechanism to flip a switch and make the application tell us "what happened", "when it happened", and so on. Such logging of information is crucial to understand the root cause of an issue and helps in quickly resolving it. Also, logging is not just limited to persisting exception/error messages; it can also be useful for auditing purposes too.
The Logging Application Block provides developers with a flexible library that satisfies simple to complex logging requirements. The simple task of logging to a file using the Logging block requires just two lines of code and a simple three or four-click configuration. Developers can categorize log entries (and log them to one or more logging targets) and format them using the available formatters. Logging filters allow developers to enable or disable logging based on category, priority, or if required, disable logging completely. It also provides a mechanism for tracing application activities. Although the Logging block provides lot of options, if required we can leverage extension points to write custom logging targets, log entry formatters, and logging filters to meet specific requirements. The way it works is that our application code sends the logging information (LogEntry) using LogWriter or a static façade Logger class. The log entry consists of a log message and may also contain category, priority, event ID, severity, title, and other additional context information. On the configuration side, we can add categories and associate these categories to one or more destinations called Logging Target Listeners (file, database, and so on). Additionally, these listeners can be configured to use a formatter to format the log entry. Before writing the log entry, the Logging block checks whether there are any filter conditions, generally called Logging Filters. This helps in controlling logging through configuration file.
In this chapter, you will:
- Be introduced to the Logging Application Block
- Understand the concepts behind the Logging Application Block
- Learn about referencing the required and optional assemblies
- Learn to set up the initial infrastructure configuration using the configuration editor
- Learn about the required and optional namespaces to avoid fully qualifying types
- Explore the design elements of the Logging block
- Learn to leverage the
LogEntryclass - Learn to use
LoggerandLogWriterto write log messages - Learn to configure Special Categories
- Learn to add and configure Log Categories
- Learn to log messages to the Event Log
- Learn to configure to log messages to a flat file
- Learn to configure to log messages to a series of flat files
- Learn to configure to log messages to a text file in XML format
- Learn to configure to log messages to a database
- Learn to configure to send log messages to an e-mail address
- Learn to configure System Diagnostics Trace Listener
- Learn to configure to send log messages to a Message Queue
- Learn to configure to send log messages to WMI
- Learn to configure Log Message Formatters
- Understand and learn to configure Logging Filters such as Category Filter, Logging Enabled Filter, and Priority Filter
- Learn to implement custom trace listeners, log formatters, and log filters
Before we dig deeper in to individual features of the Logging block, we will touch upon the basic elements by creating a sample application. This will help us to get up-to-speed with the basics. In this section, we will do the following:
For the purposes of this demonstration, we will be referencing non-strong-named assemblies but based on individual requirements Microsoft strong-named assemblies, or a modified set of custom assemblies can be referenced as well. Since we will also be exploring the configuration of database logging features in this chapter, we will include references to the database logging-related assemblies to the project.
The following table lists the required/optional assemblies.
|
Assembly |
Required/Optional |
|---|---|
|
|
Required |
|
|
Required |
|
|
Required |
|
|
Required |
|
|
Required |
|
|
Optional |
|
|
Only if database logging is required |
Open Visual Studio 2008/2010 and create a new sample Windows Forms Application by selecting File | New | Project
|
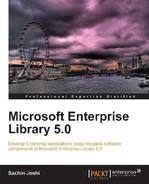
Windows Forms Application, and provide the appropriate name for the solution and the desired project location. Currently, the application will have a default form and assembly references. In the Solution Explorer right-click on the References section and click on Add Reference and go to the Browse tab. Next, navigate to the Enterprise Library 5.0 installation location; the default install location is %Program Files%Microsoft Enterprise Library 5.0Bin. Now, select all the assemblies listed in the previous table. The final assembly selection will look similar to the following screenshot; note that the assemblies have been moved together for your reference.

After clicking on OK, the following screenshot displays the Solution Explorer listing all the added assemblies.
The next step is to add a configuration file to the project. Right-click on the project and navigate and click on the menu Add | New Item; this will display the Add New Item dialog. Select Application Configuration File and click on Add. This action will add a configuration file named App.config to the project. We can now add the Logging settings to the configuration file.
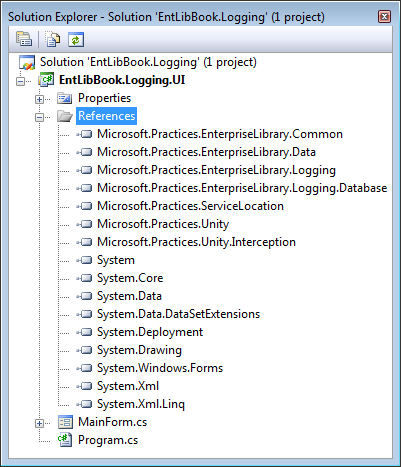
Before we can leverage the features of the Logging Application Block, we have to add the initial Logging Settings to the configuration file. Open the Enterprise Library configuration editor either using the shortcut available in Start | All Programs | Microsoft patterns & practices | Enterprise Library 5.0 | Enterprise Library Configuration or by just right-clicking the configuration file in the Solution Explorer window of Visual Studio IDE and clicking on Edit Enterprise Library V5 Configuration. Initially, Enterprise Library configuration editor will display two default sections: Application Settings and Database Settings.
The following screenshot displays the default settings displayed in the configuration editor:
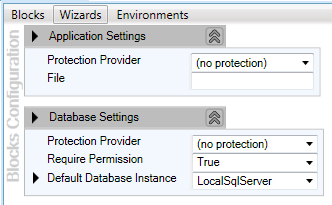
Let us go ahead and add the Logging Settings in the configuration file. Select the menu option Blocks, which lists several application block settings to be added to the configuration. Click on the Add Logging Settings menu item to add the Logging configuration settings.
The following screenshot displays the Logging Settings section added to the configuration editor:

Notice the Logging Settings are grouped in to five headings, namely Categories, Special Categories, Logging Filters, Logging Target Listeners and Log Message Formatters. By default, the settings are configured with a category called General, Logging Target Listener as Event Log Listener and Log Message Formatter as Text Formatter. We will change the default configuration further; but for now, we are in good shape to leverage the Logging block and write our first log message.
Instead of fully qualifying the type on every instance of its usage, we can add the namespaces given below to the source code file to use the Logging block elements without fully qualifying the references. Although we will be using EnterpriseLibraryContainer to instantiate objects (so we will also add the Microsoft.Practices.EnterpriseLibrary.Common.Configuration namespace to the source file), the Unity Namespace section is listed to make you aware of the availability of the alternative approach to instantiating objects.
System.DiagnosticsMicrosoft.Practices.EnterpriseLibrary.Logging
Configuration Namespace (Optional): Required while using the EnterpriseLibraryContainer to instantiate objects
Microsoft.Practices.EnterpriseLibrary.Common.Configuration
Unity Namespaces (Optional): Required while instantiating objects using UnityContainer
System.ConfigurationMicrosoft.Practices.UnityMicrosoft.Practices.Unity.Configuration
We are now ready to write our first log message. Since we are using the default configuration, the log message will use the default category General, the log entry will be written to the Windows Event Log, and the message will be formatted using the Text Formatter. The first step in writing the log message is to create an instance of LogWriter. LogWriter is an abstract class and is the primary interface in this release for creating log entries; this abstract class belongs to the Microsoft.Practices.EnterpriseLibrary.Logging namespace.
The following code snippet creates the LogWriter instance using the EnterpriseLibraryContainer class.
//Create a LogWriter instance using the EnterpriseLibraryContainer
LogWriter logWriter = EnterpriseLibraryContainer.Current.GetInstance<LogWriter>();
So now we have an instance of LogWriter (from this point on we will be using the variable logWriter to log the messages), the following code snippet calls the Write method of the LogWriter instance. The simplest overloaded Write method accepts a single parameter of type System.String representing the log message.
//Writes a new log entry to the default category
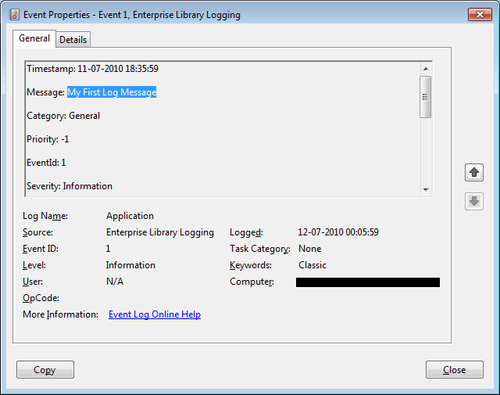
logWriter.Write("My First Log Message");
In the given code snippet, we are using the simplest overload of the Write method of the LogWriter class, this method uses the default category and the configured log destination and formatter. Execution of this code will result in creation of a log entry in the Windows Event Log. To view the result, open the Windows Event Viewer and check the log message in the Application section.
Note
By default, the Enterprise Library Logging source name is used while writing to the Windows Event Log. Since creation of event sources requires administrator privilege, we will have to run the sample application with administrator privilege for the first time to successfully write the log entry. During deployment, the application installer should take care of creating the appropriate event source.
The following screenshot displays the log message written to the Windows Event Log.
We have successfully written our first log message, in hindsight we have also completed one cycle of the logging process by adding the assembly references, configuring the Logging block settings, adding the namespace, and writing the code to log the message. We will now pick each individual configuration and code elements and learn to understand them in detail.