Security is of prime importance for any application, especially enterprise applications where the business impact is potentially high. At the very core, security is a two step mechanism. The first step is the process of validating an identity against a store (Active Directory, Database, and so on); this is commonly called as Authentication. The second step is the process of verifying whether the validated identity is allowed to perform certain actions; this is commonly known Authorization. These two security mechanisms take care of allowing only known identities to access the application and perform their respective actions. Although, with the advent of new tools and technologies, it is not difficult to safeguard the application, utilizing these authentication and authorization mechanisms and implementing security correctly across different types of applications, or across different layers and in a consistent manner is pretty challenging for developers. Also, while security is an important factor, it's of no use if the application's performance is dismal. So, a good design should also consider performance and cache the outcome of authentication and authorization for repeated use.
The Security Application Block provides a very simple and consistent way to implement authorization and credential caching functionality in our applications. Authorization doesn't belong to one particular layer; it is a best practice to authorize user action not only in the UI layer but also in the business logic layer. As Enterprise Library application blocks are layer-agnostic, we can leverage the same authorization rules and expect the same outcome across different layers bringing consistency. Authorization of user actions can be performed using an Authorization Provider; the block provides Authorization Rule Provider or AzMan Authorization Provider; it also provides the flexibility of implementing a custom authorization provider. Caching of security credentials is provided by the SecurityCacheProvider by leveraging the Caching Application Block and a custom caching provider can also be implemented using extension points. Both Authorization and Security cache providers are configured in the configuration file; this allows changing of provider any time without re-compilation.
The following are the key features of the Security block:
- The Security Application Block provides a simple and consistent API to implement authorization.
- It abstracts the application code from security providers through configuration.
- It provides the Authorization Rule Provider to store rules in a configuration file and Windows Authorization Manager (AzMan) Authorization Provider to authorize against Active Directory, XML file, or database.
- Flexibility to implement custom Authorization Providers.
- It provides token generation and caching of authenticated IIdentity, IPrincipal and Profile objects.
- It provides User identity cache management, which improves performance while repeatedly authenticating users using cached security credentials.
- Flexibility to extend and implement custom Security Cache Providers.
In this chapter, you will:
- Be introduced to the Security Application Block
- Be introduced to Authorization Providers such as Authorization Rule Provider and AzMan Authorization Provider
- Be introduced to the Security Cache Provider
- Learn about referencing the required assemblies
- Learn about the required and optional namespaces to avoid fully qualifying types
- Learn to authorize user actions based on rules
- Learn to save user Identity in cache and obtain a temporary token for an Authenticated User
- Learn to retrieve a token from cache and authenticate user
- Learn to terminate a User session by expiring cached identity
- Learn to implement a custom authorization provider
We will explore each individual Security block feature and along the way we will understand the concepts behind the individual elements. This will help us to get up to speed with the basics. To get started, we will do the following:
- Reference the Validation block assemblies
- Add the required Namespaces
- Set up the initial configuration
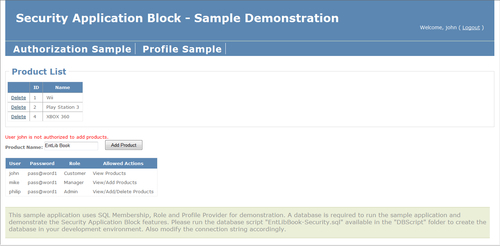
To complement the concepts and sample code of this book and allow you to gain quick hands-on experience of different features of the Security Application Block, we have created a sample web application project with three additional projects, DataProvider, BusinessLayer, and BusinessEntities, to demonstrate the features. The application leverages SQL Membership, Role, and Profile provider for authentication, role management, and profiling needs. Before running the web application you will have to run the database generation script provided in the DBScript folder of the solution, and update the connection string in web.config appropriately. You might have to open the solution in "Administrator" mode based on your development environment. Also, create an application pool with an identity that has the required privileges to access the development SQL Server database, and map the application pool to the website. A screenshot of the sample application is shown as follows:
For the purposes of this demonstration we will be referencing non-strong-named assemblies but based on individual requirements Microsoft strong-named assemblies, or a modified set of custom assemblies can be referenced as well. The list of Enterprise Library assemblies that are required to leverage the Security Application Block functionality is given next. A few assemblies are optional based on the Authorization Provider and cache storage mechanism used. Use the Microsoft strong-named, or the non-strong-named, or a modified set of custom assemblies based on your referencing needs.
The following table lists the required/optional assemblies:
|
Assembly |
Required/Optional |
|---|---|
|
|
Required |
|
|
Required |
|
|
Required |
|
|
Required |
|
|
Optional Useful while utilizing Unity configuration classes in our code |
|
|
Required |
|
|
Optional Used for Windows Authorization Manager Provider |
|
|
Optional Used for caching the User identity |
|
|
Optional Used for caching in Database Cache Storage |
Open Visual Studio 2008/2010 and create a new ASP.NET Web Application Project by selecting File
|
New
|
Project
|
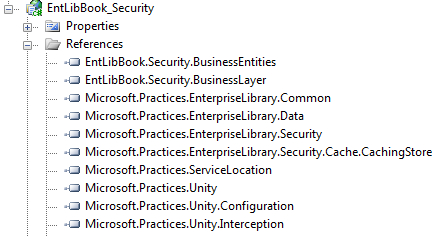
ASP.NET Web Application; provide the appropriate name for the solution and the desired project location. Currently, the application will have a default web form and assembly references. In the Solution Explorer, right-click on the References section and click on Add Reference and go to the Browse tab. Next, navigate to the Enterprise Library 5.0 installation location; the default install location is %Program Files%Microsoft Enterprise Library 5.0Bin. Now select all the assemblies listed in the previous table, excluding the AzMan-related assembly (Microsoft.Practices.EnterpriseLibrary.Security.AzMan.dll).
The final assembly selection will look similar to the following screenshot:
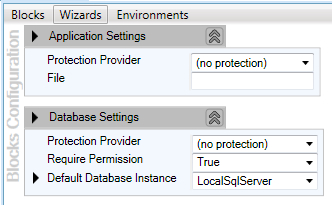
Before we can leverage the features of the Security Application Block, we have to add the initial Security Settings to the configuration. Open the Enterprise Library configuration editor either using the shortcut available in Start | All Programs | Microsoft patterns & practices | Enterprise Library 5.0 | Enterprise Library Configuration or just by right-clicking the configuration file in the Solution Explorer window of Visual Studio IDE and clicking on Edit Enterprise Library V5 Configuration. Initially, we will have a blank configuration file with default Application Settings and Database Settings.
The following screenshot shows the default configuration settings:
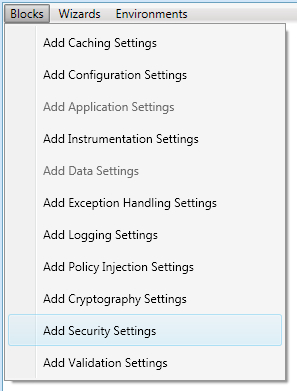
Let us go ahead and add the Security Settings in the configuration file. Select the menu option Blocks, which lists many different settings to be added to the configuration, and click on the Add Security Settings menu item to add the security configuration settings.
The following screenshot shows the available options in the Blocks menu:
Once we click on the Add Security Settings the configuration editor will display the default Security Settings as shown in the following screenshot.
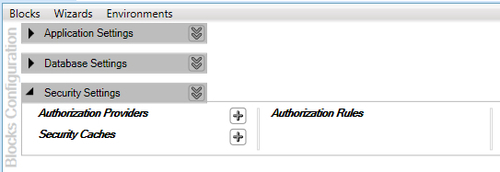
The Security Settings consist of Authorization Providers, Security Caches and Authorization Rules. Authorization Rules can be configured only while using Authorization Rule Provider. We will change the configuration further but for now, we are in good shape with regards to the initial infrastructure configuration.
We will be leveraging types from several different namespaces and so to make our life easy we can add the given namespace to the source code file to use the Security block elements without fully qualifying the references. Although we will be using EnterpriseLibraryContainer to instantiate objects (we will also add Microsoft.Practices.EnterpriseLibrary.Common.Configuration namespace to the source file), the Unity Namespace section is listed to make you aware of the availability of the alternative approach of instantiating objects.
- Core Namespace:
Microsoft.Practices.EnterpriseLibrary.Security
- Configuration Namespace (Optional): Required while using the EnterpriseLibraryContainer to instantiate objects.
Microsoft.Practices.EnterpriseLibrary.Common.Configuration
- Unity Namespace (Optional): Required while instantiating objects using UnityContainer.
System.ConfigurationMicrosoft.Practices.UnityMicrosoft.Practices.Unity.Configuration
We have several options at hand while creating objects, such as using a static factory class, using Unity service locator and using Unity container directly. A few approaches such as configuring the container through a configuration file or code are not listed here but the recommended approach is either to use the Unity Service Locator for applications with few dependencies or create objects using Unity container directly to leverage the benefits of this approach. Use of a static factory class is not recommended.
Static factory classes were the default approach for creating objects with versions prior to 5.0. This approach is no longer recommended but is still available for backward compatibility.
The following is the syntax to create deafult and named Authorization Provider instances using the static AuthorizationFactory class:
//Instantiating Using Static Factory - Default Authorization Provider
IAuthorizationProvider defaultAuthorizationProvider = AuthorizationFactory.GetAuthorizationProvider();
//Instantiating Using Static Factory - Named Authorization Provider
IAuthorizationProvider namedAuthorizationProvider = AuthorizationFactory.GetAuthorizationProvider("AuthzProvider");
The following is the syntax to create deafult and named Security Cache Provider instances using the static SecurityCacheFactory class:
//Instantiating Using Static Factory - Default Security Cache Provider
ISecurityCacheProvider defaultSecurityCacheProvider = SecurityCacheFactory.GetSecurityCacheProvider();
//Instantiating Using Static Factory - Named Security Cache Provider
ISecurityCacheProvider namedSecurityCacheProvider = SecurityCacheFactory.GetSecurityCacheProvider("SecurityCache");
This approach is recommended for applications with few dependencies. The EnterpriseLibraryContainer class exposes a static property called Current of type IServiceLocator, which resolves and gets an instance of the specified type.
The following is the syntax to create default and named Authorization Provider instances using the EnterpriseLibraryContainer class:
//Instantiating Using Unity Service Locator - Default Authorization Provider
IAuthorizationProvider defaultAuthorizationProvider = EnterpriseLibraryContainer.Current.GetInstance<IAuthorizationProvider>();
//Instantiating Using Unity Service Locator - Named Authorization Provider
IAuthorizationProvider namedAuthorizationProvider = EnterpriseLibraryContainer.Current.GetInstance<IAuthorizationProvider>("AuthzProvider");
The following is the syntax to create default and named Security Cache Provider instances using the EnterpriseLibraryContainer class:
//Instantiating Using Unity Service Locator - Default Security Cache Provider
ISecurityCacheProvider defaultSecurityCacheProvider = EnterpriseLibraryContainer.Current.GetInstance<ISecurityCacheProvider>();
//Instantiating Using Unity Service Locator - Named Security Cache Provider
ISecurityCacheProvider namedSecurityCacheProvider = EnterpriseLibraryContainer.Current.GetInstance<ISecurityCacheProvider>("SecurityCache");
Larger complex applications demand looser coupling; this approach leverages the dependency injection mechanism to create objects instead of explicitly creating instances of concrete implementations. Unity container stores the type registrations and mappings in the configuration file and instantiates the appropriate type whenever requested. This allows us to change the type in the configuration without re-compiling the code and essentially to change the behavior from outside.
The following is the syntax to create default and named Authorization Provider instances using the UnityContainer class:
var container = new UnityContainer();
container.AddNewExtension<EnterpriseLibraryCoreExtension>();
//Instantiating Using Unity Container Directly - Default Authorization Provider
IAuthorizationProvider defaultAuthorizationProvider = container.Resolve<IAuthorizationProvider>();
//Instantiating Using Unity Container Directly - Named Authorization Provider
IAuthorizationProvider namedAuthorizationProvider = container.Resolve<IAuthorizationProvider>("AuthzProvider");
The following is the syntax to create default and named Security Cache Provider instances using the UnityContainer class:
var container = new UnityContainer();
container.AddNewExtension<EnterpriseLibraryCoreExtension>();
//Instantiating Using Unity Container Directly - Default Security Cache Provider
ISecurityCacheProvider defaultSecurityCacheProvider = container.Resolve<ISecurityCacheProvider>();
//Instantiating Using Unity Container Directly - Named Security Cache Provider
ISecurityCacheProvider namedSecurityCacheProvider = container.Resolve<ISecurityCacheProvider>("SecurityCache");
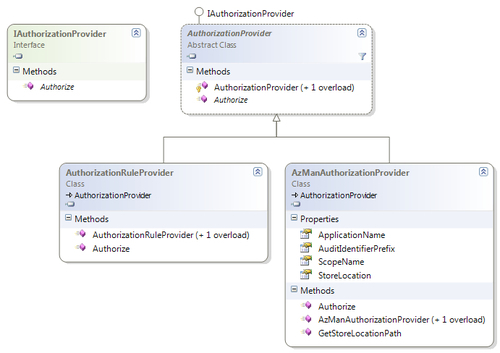
An Authorization Provider is simply a class that provides authorization logic; technically it implements either an IAuthorizationProvider interface or an abstract class named AuthorizationProvider and provides authorization logic in the Authorize method. As mentioned previously, the Security Application Block provides two Authorization Providers out of the box, AuthorizationRuleProvider and AzManAuthorizationProvider both implementing the abstract class AuthorizationProvider available in the Microsoft.Practices.EnterpriseLibrary.Security namespace. This abstract class in turn implements the IAuthorizationProvider interface, which defines the basic functionality of an Authorization Provider; it exposes a single method named Authorize, which accepts an instance of the IPrincipal object and the name of the rule to evaluate. Custom providers can be implemented either by implementing the IAuthorizationProvider interface or an abstract class named AuthorizationProvider.
Note
An IPrincipal instance (GenericPrincipal, WindowsPrincipal, PassportPrincipal, and so on) represents the security context of the user on whose behalf the code is running; it also includes the user's identity represented as an instance of IIdentity (GenericIdentity, FormsIdentity, WindowsIdentity, PassportIdentity, and so on).
The following diagram shows the members and inheritance hierarchy of the respective class and interface:
The AuthorizationRuleProvider class is an implementation that evaluates Boolean expressions to determine whether the objects are authorized; these expressions or rules are stored in the configuration file. We can create authorization rules using the Rule Expression Editor part of the Enterprise Library configuration tool and validate them using the Authorize method of the Authorization Provider. This authorization provider is part of the Microsoft.Practices.EnterpriseLibrary.Security namespace.
As discussed earlier, Authorization Rule Provider stores authorization rules in the configuration and this is one of the simplest ways to perform authorization. Basically, we need to configure to use the Authorization Rule Provider and provide authorization rules based on which the authorization will be performed.
Let us add Authorization Rule Provider as our Authorization Provider; click on the plus symbol on the right side of the Authorization Providers and navigate to the Add Authorization Rule Provider menu item.
The following screenshot shows the configuration options of the Add Authorization Rule Provider menu item:

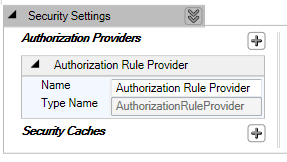
The following screenshot shows the default configuration of the newly added Authorization Provider; in this case, it is Authorization Rule Provider:
Now we have the Authorization Rule Provider added to the configuration but we still need to add the authorization rules. Imagine that we have a business scenario where:
- We have to allow only users belonging to the administrator's role to add or delete products.
- We should allow all authenticated customers to view the products.
This scenario is quite common where certain operations can be performed only by specific roles, basically role-based authorization. To fulfill this requirement, we will have to add three different rules for add, delete, and view operations. Right-click on the Authorization Rule Provider and click on the Add Authorization Rule menu item as shown on the following screenshot.
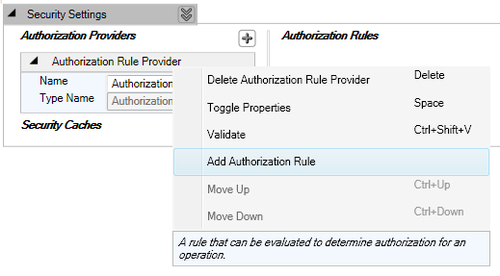
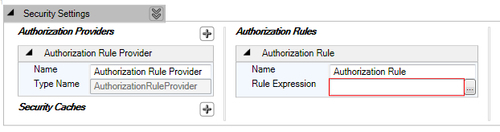
The following screenshot shows the newly added Authorization Rule:
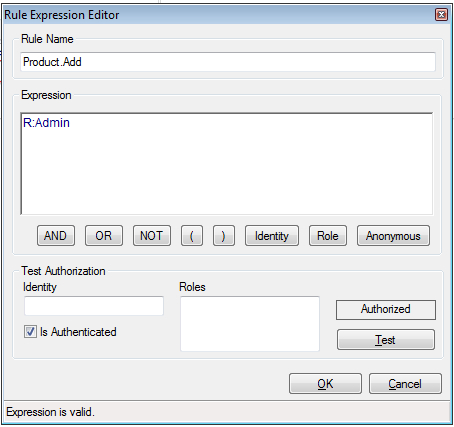
Let us update the name of the rule to "Product.Add" to represent the operation for which the rule is configured. We will provide the rule using the Rule Expression Editor; click on the right corner button to open the Rule Expression Editor. The requirement is to allow only the administrator role to perform this action. The following action needs to be performed to configure the rule:
- Click on the Role button to add the Role expression: R.
- Enter the role name next to the role expression: R:Admin.
- Select the checkbox Is Authenticated to allow only authenticated users.
The following screenshot displays the Rule Expression Editor dialog box with the expression configured to R:Admin.
The following screenshot shows the Rule Expression property set to R:Admin.

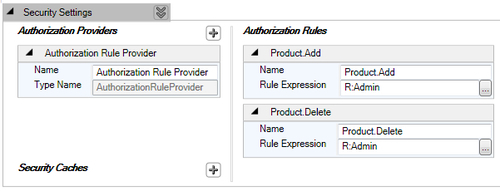
Now let us add the rule for the product delete operation. This rule is configured in a similar fashion. The resulting configuration will be similar to the configuration shown.
The following screenshot displays the added authorization rule named Product.Delete with the configured Rule Expression:
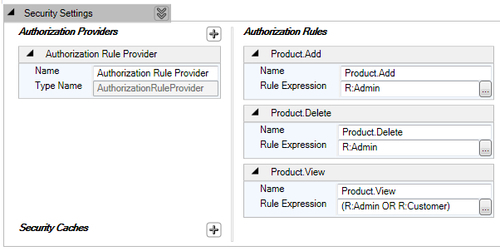
Alright, we now have to allow all authenticated customers to view the products. Basically we want the authorization to pass if the user is either of role Customer; also Admin role should have permission, only then the user will be able to view products. We will add another rule called Product.View and configure the rule expression using the Rule Expression Editor as given next. While configuring the rule, use the OR operator to specify that either Admin or Customer can perform this operation.
The following screenshot displays the added authorization rule named Product.View with the configured Rule Expression:
Now that we have the configuration ready, let us get our hands dirty with some code. Before authorizing we need to authenticate the user; based on the authentication requirement we could be using either out-of-the-box authentication mechanism or we might use custom authentication. Assuming that we are using the current Windows identity, the following steps will allow us to authorize specific operations by passing the Windows principal while invoking the Authorize method of the Authorization Provider.
- The first step is to get the
IIdentityandIPrincipalbased on the authentication mechanism. We are using current Windows identity for this sample.WindowsIdentity windowsIdentity = WindowsIdentity.GetCurrent(); WindowsPrincipal windowsPrincipal = new WindowsPrincipal(windowsIdentity);
- Create an instance of the configured Authorization Provider using the
AuthorizationFactory.GetAuthorizationProvidermethod; in our case we will get an instance of Authorization Rule Provider.IAuthorizationProvider authzProvider = AuthorizationFactory.GetAuthorizationProvider("Authorization Rule Provider"); - Now use the instance of Authorization Provider to authorize the operation by passing the
IPrincipalinstance and the rule name.bool result = authzProvider.Authorize(windowsPrincipal, "Product.Add");
AuthorizationFactory.GetAuthorizationProvider also has an overloaded alternative without any parameter, which gets the default authorization provider configured in the configuration.
The AzManAuthorizationProvider class provides us the ability to define individual operations of an application, which then can be grouped together to form a task. Each individual operation or task can then be assigned roles to perform those operations or tasks. The best part of Authorization Manager is that it provides an administration tool as a Microsoft Management Console (MMC) snap-in to manage users, roles, operations, and tasks. Policy administrators can configure an Authorization Manager Policy store in an Active Directory, Active Directory Application Mode (ADAM) store, or in an XML file. This authorization provider is part of the Microsoft.Practices.EnterpriseLibrary.Security namespace.
Security Cache Provider allows us to cache, retrieve instances of IIdentity, IPrincipal, or Profile objects (such as the ASP.NET Profile object), and additionally purge/expire the same. It also generates a token of type IToken and this token can be used to purge/expire the cache. The SecurityCacheProvider class is an abstract implementation of the ISecurityCacheProvider interface; both are part of the Microsoft.Practices.EnterpriseLibrary.Security namespace. The ISecurityCacheProvider interface consists of methods such as SaveIdentity, SavePrincipal, and SaveProfile; all three methods have their overloaded counterparts to accept an instance of IToken to group each of these objects with the same token. It also provides methods such as GetIdentity, GetPrincipal, and GetProfile to retrieve cached credentials; these methods accept instance of IToken. Apart from saving and retrieving, ISecurityCacheProvider also exposes methods to expire cached items; ExpireIdentity, ExpirePrincipal, and ExpireProfile. These methods accept an instance of IToken to expire the respective cached item.
The following diagram shows the members and inheritance relationship of the respective classes related to Security Cache Provider.
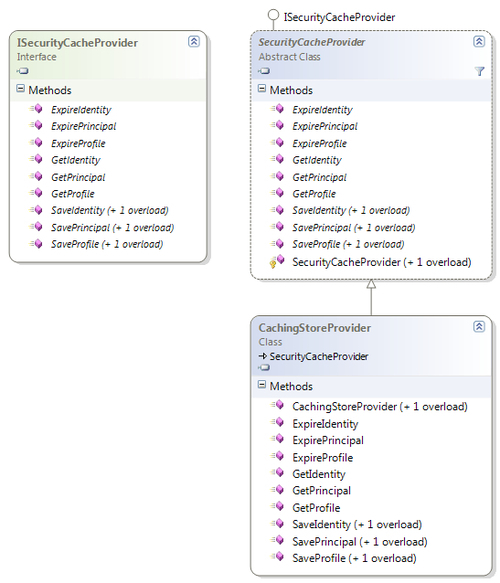
The CachingStoreProvider class is a concrete implementation of the SecurityCacheProvider class; it leverages the Caching Application Block for its caching needs. This class provides the logic to obtain a token for an authenticated user and manage caching for authenticated IIdentity, IPrincipal, or Profile objects (such as the ASP.NET Profile object). The CachingStoreProvider class is part of the Microsoft.Practices.EnterpriseLibrary.Security.Cache.CachingStore namespace.
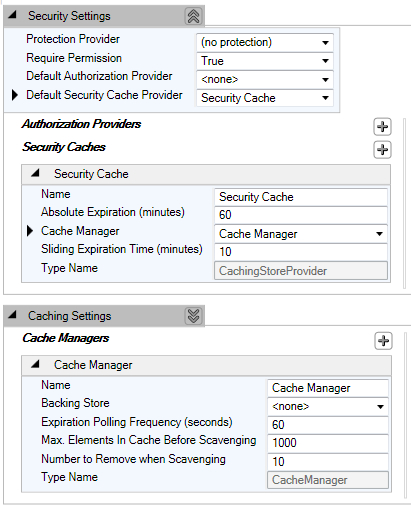
To leverage security caching related functionality, let us add the built-in CachingStoreProvider Security Cache Provider in the configuration. This provider uses the caching mechanism implemented by the Caching Application Block. In the configuration file, click on the plus symbol of the Security Caches section and navigate to the Add Security Cache menu item as shown in the following screenshot:

The following screenshot shows the default configuration of Security Cache:
We have configured the Security Cache Provider and are ready to use it in our code to perform various actions against the Security Cache Provider.
Frequent authentication of user during a single session may lead to performance degradation of the application; we can obtain a temporary token by saving a user principal or a user identity in the security cache. We can save user identity, principal and/or profile; one or more objects can be combined using the same token. Caching an IIdentity, IPrincipal, or Profile is just a two-step process; everything else is taken care of by the configuration. As mentioned earlier, Security Cache Provider uses the Caching Application Block for caching, which gives us all the flexibility of configuration to select the storage mechanism, encryption, and expiration policy. Also, the generated IToken can be used to retrieve cached items or mark them for expiration.
The following code snippet gets the current Windows identity and checks whether the identity is authenticated. Upon validation, the instance of Security Cache Provider is used to save the identity and generate the token:
//Get current Windows Identity
WindowsIdentity identity = WindowsIdentity.GetCurrent();
if (identity.IsAuthenticated)
{
ISecurityCacheProvider cacheProvider = EnterpriseLibraryContainer.Current.GetInstance<ISecurityCacheProvider>();
//Cache User Identity and generate token
IToken token = cacheProvider.SaveIdentity(identity);
}
Tip
For ASP.NET Web Applications, User Identity can be obtained by accessing the property Page.User.Identity.
ISecurityCacheProvider cacheProvider = EnterpriseLibraryContainer.Current.GetInstance <ISecurityCacheProvider>();
cacheProvider.SaveIdentity(Page.User.Identity);
The following code snippet gets the current Windows identity and for the purposes of the demonstration, creates a GenericPrincipal object with Manager role. The instance of Security Cache Provider is used to save the principal and generate the token:
//Get current Windows Identity
WindowsIdentity identity = WindowsIdentity.GetCurrent();
//Constructing dummy Principal Object for demonstration
GenericPrincipal principal = new GenericPrincipal(identity, new string[] { "Manager" });
if (identity.IsAuthenticated)
{
ISecurityCacheProvider cacheProvider = EnterpriseLibraryContainer.Current.GetInstance<ISecurityCacheProvider>();
//Cache IPrincipal and generate token
IToken token = cacheProvider.SavePrincipal(principal);
}
Tip
For ASP.NET Web Applications, the respective IPrincipal instance can be obtained by accessing the property Page.User.
The following code snippet demonstrates the Profile caching feature; the SaveProfile method of Security Cache Provider is used to save the profile object and generate the token:
ISecurityCacheProvider cacheProvider = EnterpriseLibraryContainer.Current.GetInstance<ISecurityCacheProvider>();
IToken token = cacheProvider.SaveProfile(HttpContext.Current.Profile);
We can associate an existing token while caching instead of generating a new token, which allows grouping of Identity, Principal, and Profile objects. To utilize this grouping functionality, we have to use the respective overloaded save method and pass the instance of the token as the second parameter.
The following code snippet demonstrates how to associate the generated token while saving Identity, Principal, and Profile objects:
//Constructing dummy Principal Object for demonstration
GenericPrincipal principal = new GenericPrincipal(Page.User.Identity, new string[] { "Manager" });
if (Page.User.Identity.IsAuthenticated)
{
ISecurityCacheProvider cacheProvider = EnterpriseLibraryContainer.Current.GetInstance<ISecurityCacheProvider>();
//Cache IIdentity and generate token
IToken token = cacheProvider.SaveIdentity(Page.User.Identity);
//Cache IPrincipal and group token with related items
cacheProvider.SavePrincipal(principal, token);
//Cache Profile object and group token with related items
cacheProvider.SaveProfile(HttpContext.Current.Profile, token);
}
The following code block first creates an instance of the Security Cache Provider and then saves the respective items, which generates an IToken instance, which can be used to retrieve the respective item. Currently IToken is an instance of GuidToken, which generates a Guid; this can be stored for the user's session in the appropriate location based on the application type. The token can be re-generated using the Guid and authentication information can be validated as well as authorization being performed by retrieving the IPrincipal instance from the security cache.
The following code snippet demonstrates how to retrieve the Identity object using the generated token:
//Get current Windows Identity
IIdentity identity = WindowsIdentity.GetCurrent();
ISecurityCacheProvider cacheProvider = EnterpriseLibraryContainer.Current.GetInstance<ISecurityCacheProvider>();
//Cache Identity and generate token
IToken token = cacheProvider.SaveIdentity(identity);
//Retrieve Identity using token
IIdentity cachedIdentity = cacheProvider.GetIdentity(token);
The following code snippet demonstrates how to retrieve the Principal object using the generated token:
//Constructing dummy Principal Object for demonstration
GenericPrincipal principal = new GenericPrincipal(Page.User.Identity, new string[] { "Manager" });
if (Page.User.Identity.IsAuthenticated)
{
ISecurityCacheProvider cacheProvider = EnterpriseLibraryContainer.Current.GetInstance<ISecurityCacheProvider>();
//Cache IIdentity and generate token
IToken token = cacheProvider.SaveIdentity(Page.User.Identity);
//Cache IPrincipal and group token with related items
cacheProvider.SavePrincipal(principal, token);
//Retrieve cached Principal using token
cacheProvider.GetPrincipal(token);
}
The following code snippet demonstrates how to retrieve the Profile object using the generated token:
ISecurityCacheProvider cacheProvider = EnterpriseLibraryContainer.Current.GetInstance<ISecurityCacheProvider>();
//Cache Profile object and generate token
IToken token = cacheProvider.SaveProfile(HttpContext.Current.Profile);
//Retrieve cached Profile using token
ProfileBase profile = cacheProvider.GetProfile(token) as ProfileBase;
Security Cache Provider also provides the ability to expire the cached item when the user logs out of the system or the session ends so that the token cannot be misused. This functionality is part of the ExpireIdentity, ExpirePrincipal, and ExpireProfile methods of Security Cache Provider. In the given code blocks, we are creating an instance of the Security Cache Provider and then saving the respective items, which generates an IToken instance. The same token is used to force expiration of the cached item. Please note we are deliberately performing the cache and immediately forcing expiration in the next line just to give you the full picture.
The following code snippet demonstrates how to purge/expire the saved Identity using the generated token:
ISecurityCacheProvider cacheProvider = EnterpriseLibraryContainer.Current.GetInstance<ISecurityCacheProvider>();
//Cache IIdentity and generate token
IToken token = cacheProvider.SaveIdentity(Page.User.Identity);
//Purge/Expire an existing cached Identity using token
cacheProvider.ExpireIdentity(token);
The following code snippet demonstrates how to purge/expire the saved Principal using the generated token:
//Constructing dummy Principal Object for demonstration
GenericPrincipal principal = new GenericPrincipal(Page.User.Identity, new string[] { "Manager" });
if (Page.User.Identity.IsAuthenticated)
{
ISecurityCacheProvider cacheProvider = EnterpriseLibraryContainer.Current.GetInstance<ISecurityCacheProvider>();
//Cache IIdentity and generate token
IToken token = cacheProvider.SaveIdentity(Page.User.Identity);
//Cache IPrincipal and group token with related items
cacheProvider.SavePrincipal(principal, token);
//Purge/Expire the existing cached Principal using token
cacheProvider.ExpirePrincipal(token);
}
The following code snippet demonstrates how to purge/expire the saved Profile object using the generated token:
ISecurityCacheProvider cacheProvider = EnterpriseLibraryContainer.Current.GetInstance<ISecurityCacheProvider>();
//Cache Profile object and generate token
IToken token = cacheProvider.SaveProfile(HttpContext.Current.Profile);
//Purge/Expire the cached Profile using token
cacheProvider.ExpireProfile(token);