
Chapter at a glance
Explore
Exploring the Office environment
Work

Recover
Recovering unsaved files and versions
Customize

IN THIS CHAPTER, YOU WILL LEARN HOW TO
Explore the Office environment.
Work with Office files.
Recover unsaved files and versions.
Customize the user interface.
Customize the ribbon.
Choose the right application for the task at hand.
One of the biggest advantages of using Microsoft Office Home and Student 2013 is the similarities across the applications. The most obvious is the user interface, which is the overall look and feel of the application and how you interact with it. If you’ve used previous versions of Office, you may notice that many commands and features are nearly identical to those in past releases of Office, if not exactly the same, such as the commands for copying and pasting information, formatting text, creating charts, or inserting pictures. All of these similarities greatly reduce the learning curve, which allows you to apply the functionality in one application across the entire Office suite.
As you apply that knowledge and learn more about each application, you’ll likely discover similar functionality that may not be initially obvious. For example, you can create a company newsletter by using Microsoft Word or PowerPoint. You can document company meeting notes in Microsoft OneNote or Word. And you can store lists of data in both Word and Microsoft Excel.
In this chapter, you’ll learn about the Office environment, which includes the user interface, application options, and Office settings, plus you’ll learn about Office terminology, Help options, and other functionality available in Office. This chapter also covers basic instructions for starting an Office application and working with Office files. At the end of this chapter, you’ll get an overview of each application and tips for choosing the right application for various tasks.
The first step in getting comfortable with Office Home and Student 2013 is to become familiar with your Office surroundings. In this section, you’ll explore the user interface along with application options and settings that are shared across the Office applications.
Tip
Even if you’re already comfortable with this information from working with a previous version of Office, please read this section for tips that you may have not previously discovered.
You typically start an Office application from the Windows Start screen in Windows 8 or the Start menu in Windows 7. You can also start an application and open a file at the same time by opening a file sent to you as an email attachment or by double-clicking a file from somewhere in your computer environment, such as your Windows desktop.
With the exception of OneNote, when you start an application without opening a file, the new application Start screen appears.
Tip
OneNote doesn’t have an application Start screen. When you start the application, the main window is displayed.
From the application Start screen, you can open a recently used file, open an existing file, or create a new file from a template. After you create a new file or open an existing one, the main window will be displayed.
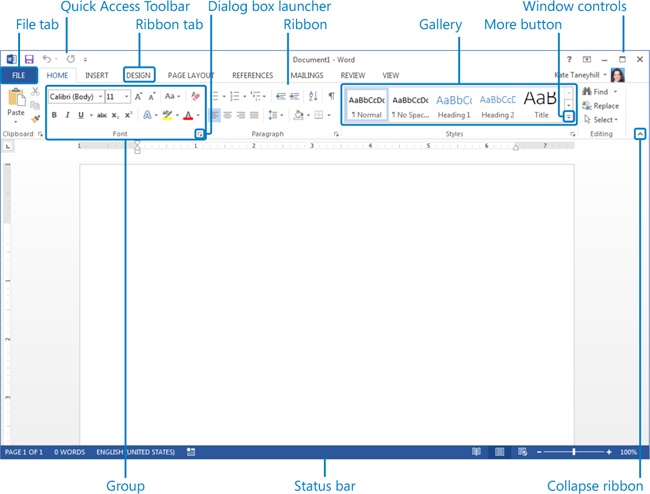
The application window has the following elements:
Ribbon. The main component of the Office user interface and where you’ll find the primary commands for working with the content of your Office files. The ribbon includes tabs that have commands associated with a specific task. For example, objects that you insert in an Office document; like a picture, chart, or shape; are located on the Insert tab. This task-oriented organization also extends to the commands themselves, which are placed in related groups. For example, frequently used commands for formatting text are all located in a group named Font in most applications.
Tip
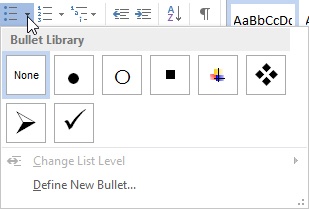
Some commands on the ribbon have what’s known as a split control, which is a combination of a button and an arrow. An example is the Bullets command, found in Word on the Home tab in the Paragraph group. If you click the button, the default option, or the last option you selected during your editing session, will automatically be applied. When you click the arrow next to the button, a list of options will display, such as a list of available bullets.
Note that for larger split controls, like the Paste button, the arrow will appear below the button instead of to the right. An easy way to determine if you’re using a split control is to point to the button. If only the button or the arrow is highlighted rather than the entire button, then it’s a split control.
Title bar. Appears at the top of the application window and displays the name of the active file and application name. In most standard Windows applications, including the Office applications, the title bar also has the program icon on the far left.
Window controls. Located on the far right of the title bar. Along with the standard Minimize, Restore Down/Maximize, and Close buttons, there are two additional buttons:
Help. Clicking this button displays help for the application.
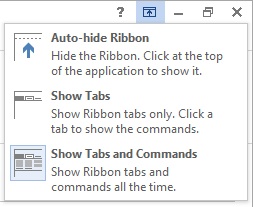
Ribbon Display Options. Clicking this button gives you a list of choices for viewing the ribbon.
The Auto-Hide Ribbon option gives you nearly a full-screen view because it also hides the status bar along with the ribbon. Show Tabs and Show Tabs And Commands toggle the ribbon between a collapsed or expanded state, displaying only the ribbon tabs or displaying both the ribbon tabs and commands.
See Also
For more information about how to hide, collapse, and expand the ribbon, see the Customizing the user interface section later in this chapter.
Quick Access Toolbar. Appears on the left end of the title bar by default. Each application has its own set of frequently used commands that are specific to the application. The most common commands are Save, Undo, and Redo.
Status bar. Located at the bottom of the application window; displays information about the application or current file. In most applications, view controls and the zoom slider are located on the right end of the status bar.
Dialog box launcher. Appears in the lower-right corner of a group when additional options for the related set of commands are available. Clicking the dialog box launcher opens a dialog box or task pane.
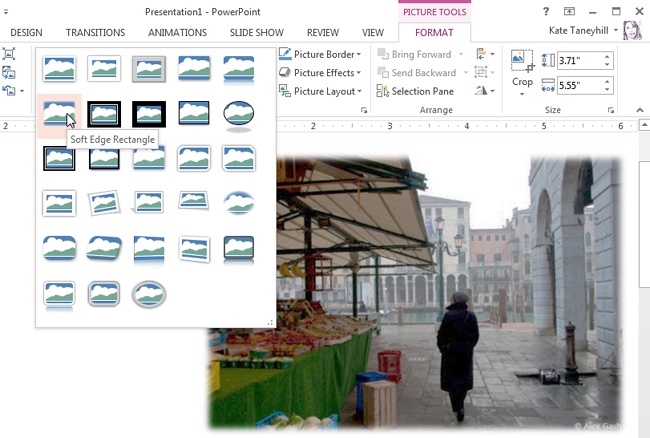
Tool tabs. Appear in the ribbon when additional commands are available for a selected object, such as a table, picture, chart, or drawing object.
Gallery. A visual list of choices, such as a collection of formats that offer multiple options. A gallery also refers to a set of related tools.
Live Preview. Enables you to view changes like pasted text or picture formatting prior to making a modification.
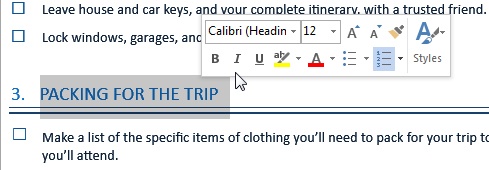
Mini toolbar. Appears on the screen in most applications when you have text or an object selected; provides quick access to the most-used formatting commands.
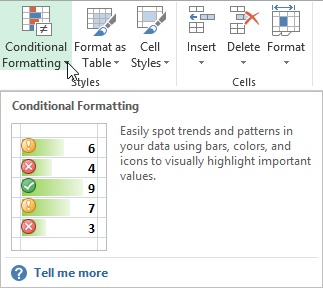
ScreenTips. ScreenTips provide descriptions of commands and are displayed when you point to a ribbon command. If the command has an associated keyboard shortcut, that shortcut will appear in parentheses next to the name of the command. Several ScreenTips also include detailed help or a feature preview. For instance, in Excel, the ScreenTip for the Conditional Formatting command on the Home tab in the Styles group includes a detailed explanation for how to use conditional formatting. It also includes a preview of how data bars and an icon set are displayed for a range of values.
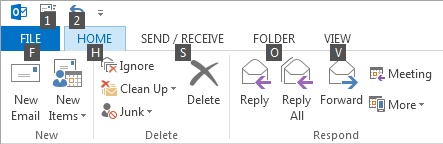
KeyTips. Enable you to navigate the ribbon by using the keyboard. To display KeyTips, press and release the Alt key. The KeyTips are the letters, numbers, or combinations of letters and numbers that appear on the ribbon. When you press only the Alt key, KeyTips for the ribbon tabs and Quick Access Toolbar are displayed. To view KeyTips for a specific ribbon tab, after you press the Alt key, press the corresponding KeyTip on the keyboard. For example, to navigate to the Home tab and view the KeyTips for that tab, press Alt+H. Or to view the KeyTips for the Backstage view, press Alt+F.


The Office environment also extends to an area called the Backstage view, which is displayed by clicking the File tab on the ribbon.
Whereas the ribbon and Quick Access Toolbar are used for working with the content inside a file, the Backstage view is used for working with the entire file and for changing application settings.
The commands in the Backstage view are separated into two groups. The first set is for file-related commands, such as Info, Open, Save As, and Print. These commands are covered in the next section of this chapter.
The last set, specifically the Account and Options commands, are related to the application and are considered part of the Office environment.
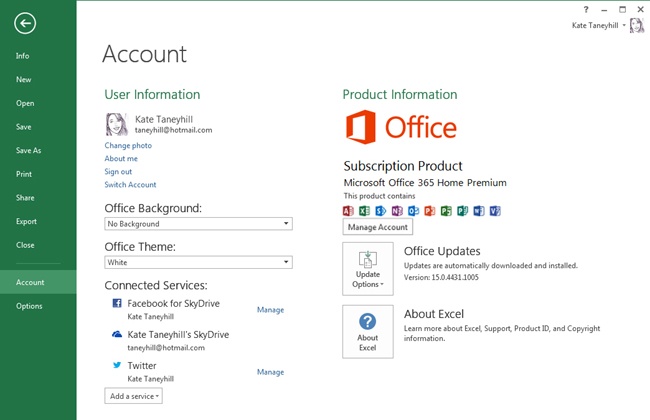
Account. This is where you manage a new feature in Office Home and Student 2013 called an Office cloud account and get information about your Office installation.
Note
The previous image is from Microsoft Office 365 Home Premium, which is a subscription based edition of Office. The Microsoft Office Home and Student 2013 edition only includes Word, Excel, PowerPoint, and OneNote.
The User Information area has information about your Office cloud account, like your user name and your photo if you’ve elected to add one. This location is also where you can set a preferred Office background, with designs such as clouds or circles that appear in title bar of your Office applications, or where you can change the Office Theme.
See Also
For more information about Office cloud accounts and connected services, see Chapter 3.
The Product Information area is where you find information about your Office installation such as the Office suite you have installed and the applications that are included. This is also where you can choose how your Office installation is updated and view your update history.
Options. This is where you can change a variety of application preferences and customize certain behaviors that are specific to the application. In some applications, such as Excel and Access, there are also options specific to the active file.
To close the Backstage view and return to the application window, click the arrow in the upper-left corner or press the Esc key.
Adjusting your ribbon display
The ribbon is dynamic and adjusts to the size of the application window, your screen resolution, and your screen magnification. If you’re using a low resolution, one that makes everything appear larger, a small application window, or a screen magnification of more than 100 percent, the appearance of groups and buttons may be affected. For example, a gallery or an entire group of commands may collapse to a single group button, or button images may appear without labels, or buttons may appear stacked vertically instead of horizontally. And when you are resizing an application window, if there isn’t enough room to display the ribbon, it could disappear completely. You may want to take a few minutes to resize an application window to become more familiar with the dynamic ribbon changes.
To modify your screen resolution in both Windows 8 and Windows 7, right-click an empty area of your desktop and then click Screen Resolution. In the Screen Resolution dialog box, click Resolution and drag the slider to adjust your resolution.

Tip
Screen resolution is expressed as pixels wide × pixels high, such as 1024×768. The greater the screen resolution, or the higher the numbers, the greater the amount of information that will fit on your screen. The greater the number of pixels wide (the first number), the greater the number of buttons that can be shown on the ribbon. Note that screen resolution options are dependent on your monitor, but they typically range from 800×600 to 2048×1152.
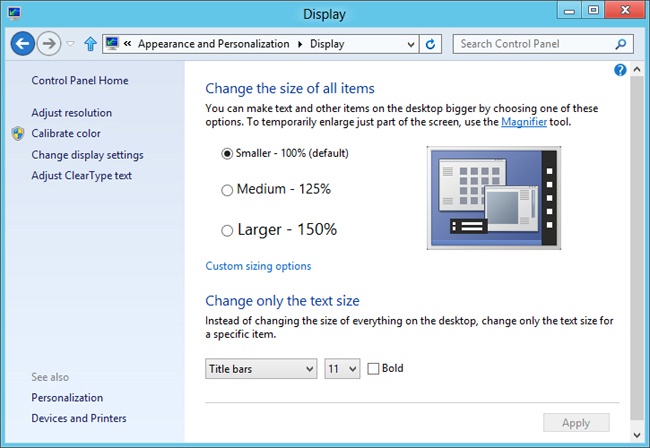
As previously noted, the ribbon also adjusts to your screen magnification. To modify your screen magnification in both Windows 8 and Windows 7, right-click an empty area of your desktop and then click Personalize. In the lower-left corner, click Display and then select your preferred screen magnification.
In the previous section you learned about the Backstage view and how this area of the application is used for file-oriented tasks. In this section, you’ll explore the primary file options that are available across the Office applications.
Important
The images and content provided in this section are from Excel. The other Office applications have similar options, and major differences between the applications are described in tips.
The pages in the Backstage view that contain commands for working with files are described in the following list:
Info. In most applications, the Info page displays information about the active file, such as the name and location of the file, the author, and the date the file was last modified. In all of the applications, you’ll find specialized file management tools that are specific to the file and application. The following list provides an overview of some of the management tools and features you’ll learn about in other chapters and sections of this book.
In Excel, PowerPoint, and Word, you’ll find tools for opening previous versions of your current document and recovering files you forgot to save.
In OneNote you use the Info page to manage your open notebooks, by using tools such as syncing and sharing options.
See Also
For more information about versions and recovering unsaved documents, see the Recovering unsaved files and versions section later in this chapter.
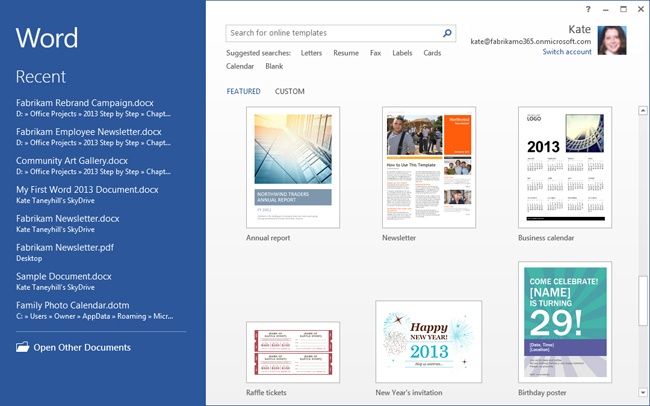
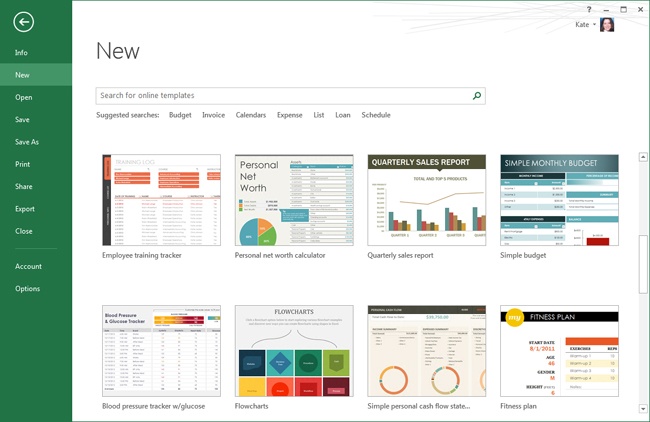
New. The New page is available in most applications and provides access to templates that enable you to create new files in the application. You can choose to start from scratch and select a blank template, or you can select one that already has content to help you get started on a specific type of task. For example, across the applications you’ll find templates that range from newsletters, budgets, and sales reports, to contact information and asset tracking.
Note
The templates shown in this book may not be the same as those that appear on your screen. New templates are added regularly, which may alter the results.
To create a new file in the applications that offer templates, simply double-click the template you want. Depending on the application and template, you may need to provide additional information before a new file is displayed in the application window. For example, in OneNote, you need to provide a location and file name and then save the file before it’s created. This is because OneNote automatically saves certain changes.
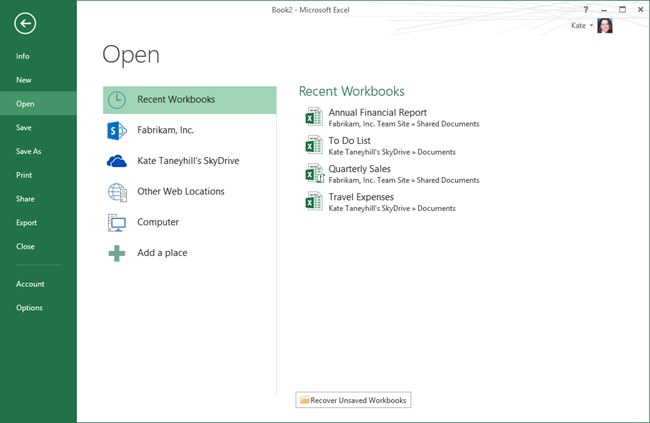
Open. The Open page lists the recent files you previously opened and displays a list of available places from which you can open files.

Pinning the files you use the most
To pin the files you use the most to the recent file list, point to the file and then click the pushpin to the right of the file name. Pinned files are placed at the top of the list.

To unpin the file, click the pushpin a second time. You can pin and unpin frequently used folders to the Recent Folders list on the Open and Save As pages as well. You can also right-click a recently used file for additional options such as the ability to remove a file from the list and clear all pinned files.
Tip
Your recent files list can also be accessed from the main list of tabs in the Backstage view. To make this change, click Options, and then click Advanced. Locate the Display options and then click Quickly Access This Number Of Recent Workbooks. Note that in other applications the option text reflects the type of Office document you use for that application. Also in the Display area are options to change the number of recent files and unpinned folders that appear on the Open and Save As pages.
See Also
For more information about opening files from Microsoft SkyDrive, Microsoft SharePoint Online, or other web locations, see Chapter 3.
To view your recent files, click the Recent option near the top of the view, such as Recent Workbooks in Excel.
To open a file, if it’s in the recent file list, you can click the file to open it in the application. If the file you need isn’t in the list, first click the location where the file is stored, such as Computer, and then to the right of the location, click a recent folder. Or, if the folder you need isn’t in the recent list, click the Browse button at the bottom. Either action displays the Open dialog box. After you select a file to open, click the Open button to open the file in the application.
Save. When you save a file for the first time and click Save, the Save As page is displayed. After a file has been saved, clicking Save in the Backstage view will update the file and return you to the application window.
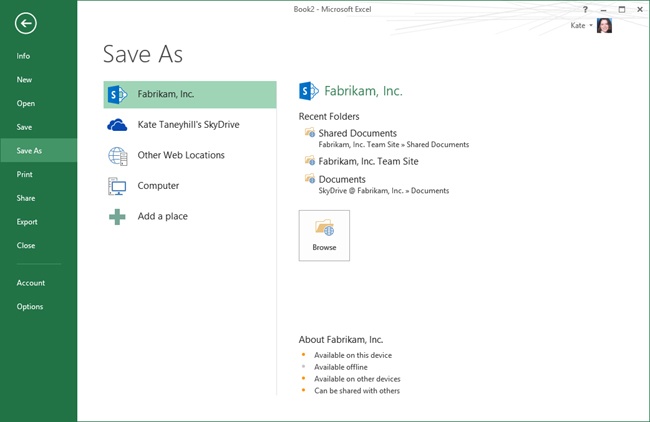
Save As. The options on the Save As page are similar to those on the Open page. The main difference is that there isn’t a recent file list.
To save a file, select the location you want, and if the folder you want isn’t in the recent folders list, click the Browse button. Either action displays the Save As dialog box. After you provide a file name, and if necessary, a different location in the Save As dialog box, click the Save button to save the file.
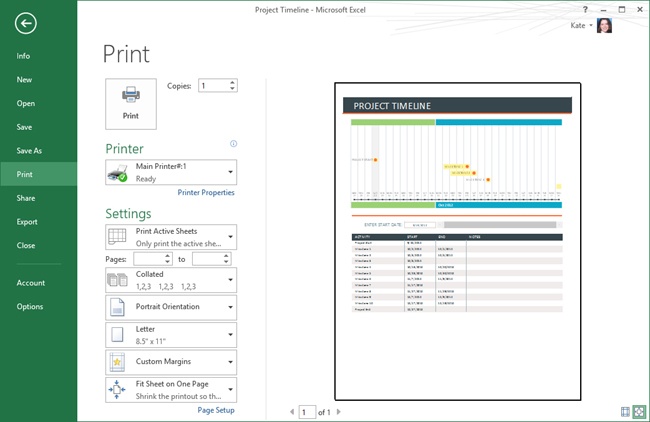
Print. In all Office applications except OneNote, the Print page provides printing and page layout options along with a preview of your file. In the Printer area, you can choose a different printer and set printer options. In the Settings section, you can specify various print and page settings prior to printing your file.
To print your file, click the Print button at the top of the view.
There are also additional file options available on the Share and Export pages. The Share page gives you ways to share your file with others, such as sending your file as an email attachment or sharing it with others online in a web location or through a web browser.
On the Export page, you’ll find the ability to save your file in a Portable Document Format (PDF) or XML Paper Specification (XPS) format. And in PowerPoint, you have options for converting your presentation to a video.
Because the majority of these options vary across Office applications or depend on additional components, you’ll learn more about them and get step-by-step instructions in other chapters.
There’s a very good chance you will accidentally close a file without saving it, if you haven’t already made such a mistake. The good news is that in Excel, PowerPoint, and Word, you may be able to recover your unsaved changes. And if you’ve spent some time working on an Office document and discover you’d like to return to a previous version of it, you may be able to do that too. File management tools for both of these situations are located in the Backstage view, on the Info page.
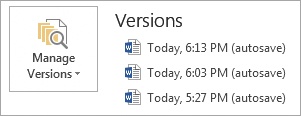
In the Versions area, a list of autosave files of your current document might be displayed.
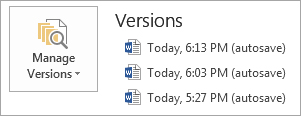
These versions are automatically created while you’re working and are deleted when you save and close your Office document. There are a couple of requirements that need to be met before an autosave version is created.
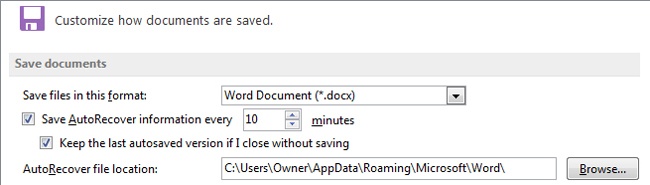
You must choose to save AutoRecover information, which is turned on on the Save page of the Options dialog box by default.
An AutoRecover save must be made. This save is based on the time interval next to the AutoRecover information option and depends on whether you’ve made changes that need to be saved.
When these conditions are met, you can recover up to your last five autosave versions of your current file.
To open a previous version, click the file you want to open in the list and the autosave version will open in a separate window. You can then choose to restore your file, save the version as a new file, or close it without saving changes.
Tip
If you only need to recover a portion of an autosave version, you don’t need to restore your file to the earlier version. Simply copy the information you need and paste it in your main document.
The Versions area is also where you can recover a file you closed without saving. There are two types of unsaved files: those you never saved and unsaved autosave versions. The latter applies to files that were previously saved. It’s the last autosave version of a file you closed without saving current changes.
Important
Files you never previously saved are automatically deleted after four days. Unsaved autosave versions are automatically deleted the next time you edit the file and save changes.
As with the autosave version requirements, in order to recover an unsaved file, you must elect to save AutoRecover information. And to recover an unsaved autosave version, you must also elect to keep the last autosaved version when you close without saving. The latter option is also found in the Options dialog box near the top of the Save options.
To recover unsaved files, click Manage Versions and then do one of the following.
In Excel, click Recover Unsaved Workbooks.
In PowerPoint, click Recover Unsaved Presentations.
In Word, click Recover Unsaved Documents.
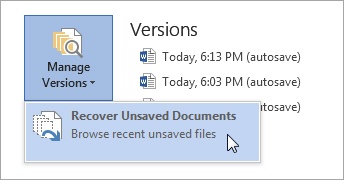
The Open dialog box appears and lists the files you can recover for the application you are using. Select the file you want and then click Open to open it in the application. And if you to want to keep that file, make sure you save your changes.
In the first section of this chapter, you explored the user interface and became familiar with terminology and product-specific functionality. The next step is to personalize your Office surroundings to help you settle in and begin making yourself at home.
Here are some of the ways you can customize your user interface:
To free up space on your screen, you can set the ribbon to auto-hide or you can toggle the ribbon between a collapsed and expanded state. A ribbon set to auto-hide is hidden from view. A collapsed state shows only the tabs, and the expanded state shows both the tabs and the commands.
Set the Quick Access Toolbar to appear above or below the ribbon.
Add additional commands to the Quick Access Toolbar or remove commands you don’t need.
Choose the information you prefer to display in the status bar, if applicable to the application.
In this exercise, you’ll customize your Office environment by collapsing and expanding the ribbon, setting it to an auto-hide state, and moving the Quick Access Toolbar below the ribbon.
On the Word Start screen, click Blank document.
Double-click the active ribbon tab to collapse it.
Click the Home tab to expand the ribbon, and in the Font group, click the Bold button.
Click in the document to return the ribbon to a collapsed state.
In the window controls at the right end of the title bar, click the Ribbon Display Options button and then from the list, click Auto-hide Ribbon.
Click the top of the application window to display the ribbon.
On the Home tab, in the Font group, click the Bold button.
Click in the document to return the ribbon to an auto-hide state.
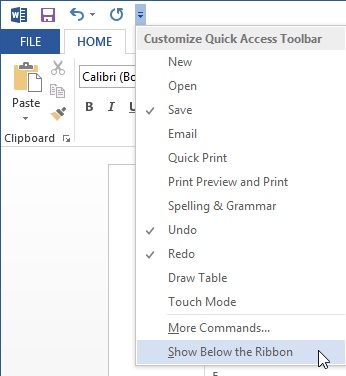
Click the arrow at the end of the Quick Access Toolbar and then near the bottom of the list, click Show Below the Ribbon.

Clean Up
Set the ribbon to your preferred auto-hide, expanded, or collapsed state. Set the position of the Quick Access Toolbar to your preference, either shown above or below the ribbon. If you’re continuing to the next exercise, leave Word and your document open. Otherwise, exit Word without saving changes to the document you created.
As noted in the introduction of this section, you can also customize the Quick Access Toolbar by adding frequently used commands, such as New or Open, or by adding commands directly from the ribbon. Here are two ways you can add additional commands:
Click the arrow at the end of the Quick Access Toolbar and then select a command from the Customize Quick Access Toolbar list.
Right-click a command on the ribbon and then click Add to Quick Access Toolbar.
To remove a command from the Quick Access Toolbar, right-click the command and then click Remove From Quick Access Toolbar.
In this exercise, you’ll customize the Quick Access Toolbar by adding and removing commands.
Set Up
You don’t need any practice files to complete this exercise. If Word and your blank document are still open from the previous exercise, follow the steps. Otherwise, start Word, create a new document, and follow the steps.
Click the arrow at the end of the Quick Access Toolbar and then in the list, click Open.
On the Home tab, in the Font group, right-click the Bold button, and then click Add to Quick Access Toolbar.
On the Quick Access Toolbar, right-click the Open button and then click Remove from Quick Access Toolbar.
Remove the Bold button from the Quick Access Toolbar.


Clean Up
If you’re continuing to the next exercise, leave Word and your document open. Otherwise, exit Word without saving changes to the document you created.
Tip
For more information about how to rearrange the commands on your Quick Access Toolbar or to add commands that don’t appear on the ribbon, see Customizing the ribbon later in this chapter.
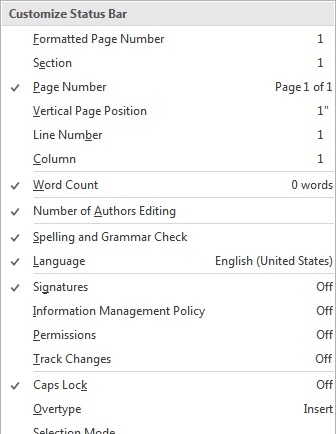
You can also customize the status bar by choosing what you prefer to display. Similar to how you customize the Quick Access Toolbar, you can right-click the status bar to customize it. The Customize Status Bar list shows the available status bar items, and a check mark will appear next to those that are currently displayed. You then select or deselect items in the list to add or remove them. Note that some items only appear in the status bar when a feature is turned on, to help reduce status bar clutter. For example, if you choose to show Caps Lock, it will only display in the status bar if you’ve turned caps lock on and are typing in all caps.
In this exercise, you’ll customize the status bar in Word.
Set Up
You don’t need any practice files to complete this exercise. If Word and your blank document are still open from the previous exercise, follow the steps. Otherwise, start Word, create a new document, and follow the steps.
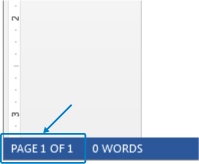
At the bottom of the Word window, note Page 1 of 1 on the left end of the status bar.
Right-click the status bar and then in the Customize Status Bar list, click Page Number to turn it off.
In the Customize Status Bar list, click Page Number again to turn it back on.
Click in the application window to close the Customize Status Bar options.
Tip
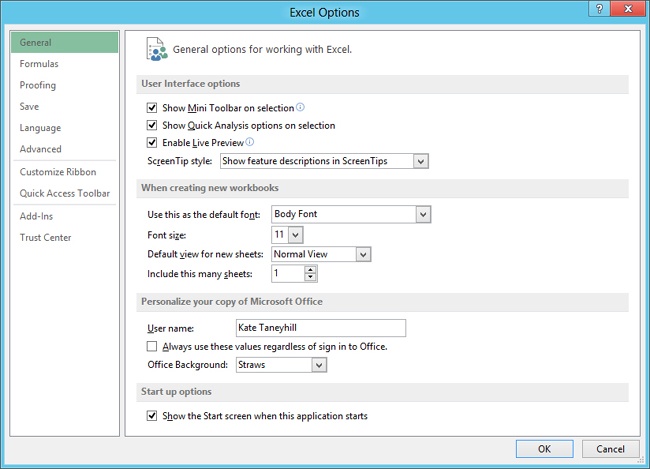
You can also customize the behavior of the mini toolbar, Live Preview, or ScreenTips. To access these settings, display the Backstage view and then click Options. These user interface options are located at the top of the General section. Note that the user interface options vary across the applications. For example, OneNote does not support Live Preview.
As noted at the beginning of this chapter, one of the biggest advantages of Office is the similarities across the applications. In this section, you’ll start applying what you learn about one feature to other components that are similar, like the Quick Access Toolbar and ribbon.
In comparison, both the Quick Access Toolbar and ribbon contain the primary commands for an application and can be customized. The main difference between them, other than appearance, is that the Quick Access Toolbar holds your most frequently used commands, whereas the ribbon provides a more standardized set of commands. However, there may be times when you want to make modifications to the ribbon. For instance, there are more advanced commands that aren’t in the ribbon by default that you may find beneficial. Or you might find you can work more efficiently by moving a command or group to another location or tab.
To customize the ribbon, you display the Backstage view, click Options, and then click Customize Ribbon.
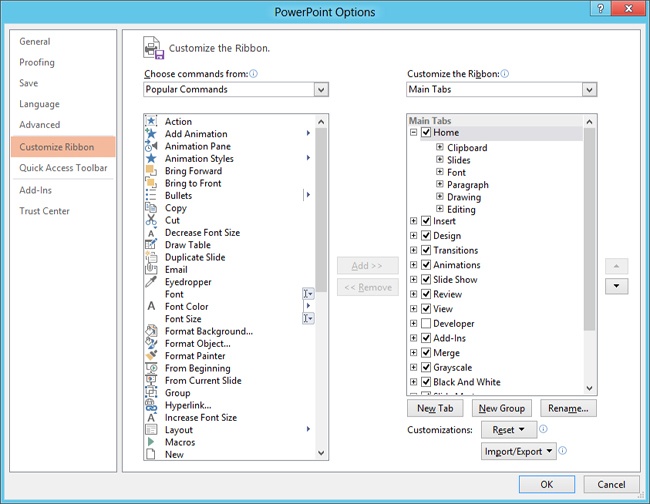
The left side of the ribbon customization settings area lists commands that can be added to the ribbon, and the right side lists the ribbon tabs. You can add commands from the list of available commands to any existing group on the ribbon, or you can create a new group and add commands to it.
You can also create a new ribbon tab and add new groups and commands or modify the tool tabs that appear when a specific object is selected, like a picture. To access all available ribbon tabs, in the Customize The Ribbon area, click the arrow next to Main Tabs and then click All Tabs.
Additionally, you can reorder built-in tabs, groups, and commands using the Move Up and Move Down arrows on the right side of the dialog box.
In this exercise, you’ll customize the ribbon by adding a new tab, group, and command to the ribbon in PowerPoint. You’ll then delete your customizations. At the end of this exercise, you’ll apply what you learned about ribbon customization to the Quick Access Toolbar.
Set Up
You don’t need any practice files to complete this exercise. Start PowerPoint, create a blank presentation, and follow the steps.
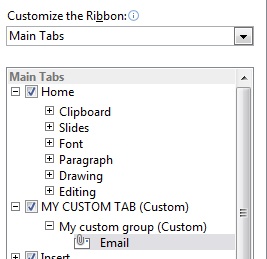
In the Backstage view, click Options, and then click Customize Ribbon. Below the ribbon tab list, click New Tab.
Click New Tab (Custom) to select it, and then click the Rename button near the bottom.
Enter MY CUSTOM TAB and then click OK.
Click New Group (Custom) and rename it to My custom group.
From the Popular Commands list, select any command. For instance, select Email. Click My custom group and then click the Add button near the middle of the Options dialog box.
To review your customizations, click OK at the bottom of the Options dialog box.
On the ribbon, click MY CUSTOM TAB and note your custom group and newly added command.
Reopen the Options dialog box and display the ribbon customization options.
If necessary, select MY CUSTOM TAB.
Near the middle of the Options dialog box, click the Remove button to delete your custom tab and custom group.
Experiment with other ribbon customizations. For example, to reorder tabs, groups, or individual commands, make a selection, and then on the right side of the dialog box, click the Move Up and Move Down buttons.
After you’re comfortable customizing the ribbon, in the Options dialog box, click Customize Quick Access Toolbar and apply what you learned in the previous steps. For example, reorder the commands or add new ones.
To reset all of your ribbon and Quick Access Toolbar customizations, click the Reset button near the bottom of the Options dialog box, and then click Reset all customizations.
Click Yes to confirm the deletion of your customizations.


As noted at the beginning of this chapter, many of the applications have similar functionality. In the next chapter, you’ll learn about shared features that are available to most of the Office applications. With so many overlapping capabilities, you may be wondering how to determine the application you need to use for your various projects.
In this section, you’ll get an overview of various tasks you can perform in each application that’s available in the Office Home and Student 2013 suite. For the applications that have similar functionalities, you’ll receive more information at the end of this section on how to choose an application to perform a specific task.
Application | Tasks |
|---|---|
Excel |
|
OneNote |
|
PowerPoint |
|
Word |
|
As previously discussed, several of the Office applications provide similar functionality. For instance, you can use Word or PowerPoint to create Office documents that include graphics, such as flyers or photo albums. You can create forms in Excel and Word. And you can use both Word and Excel for lists of information.
More often than not, you’ll likely choose the application you’re most comfortable with and forgo learning something new. Before you do, keep in mind that each application specializes in specific capabilities and can produce better results when selected for certain tasks. Think of it as going to a restaurant—if you go to one that specializes in seafood, you might find steak on the menu, but it may not be as good as a steak you get from a steak house.
Also keep in mind that what you learn in one application can be applied to another, so the learning curve may be easier than you think. Here are a few tips to help you determine the right application for specific tasks.
For files that include graphics, consider the type of content you want to include, the amount of text, and the complexity of the layout. If it’s a small amount of text and you don’t need to use cross-references, fields, or other advanced text features, then use PowerPoint. In PowerPoint, it’s easier to move your content and visually align objects. Plus, you can add vertical and horizontal guides for precision placement.
For photo albums, think about the end result you want. If you want to display the album electronically on a computer or projection screen, use PowerPoint. It also enables you to add transitions and animations for a professional-looking result. Plus, you can convert your presentation to a video that can be published on websites like YouTube.
For simple lists of data, such as an inventory or making a task, address, grocery, or birthday list, consider using Excel. It has tools for sorting, filtering, and managing your lists.
For forms, determine whether the form contains calculations. Although Word supports calculations, creating formulas in Excel is easier and more reliable. However, if your form needs to contain advanced text features or needs the page flexibility of a word processor, then create your form in Word.
This list is certainly not an exhaustive list of all of the different types of files you can create or tasks you’ll perform in your projects. This is a vast topic that could easily warrant its own book. But the information provided here should be enough to give you a good start in choosing the right application.
The ribbon and Quick Access Toolbar have commands for working with the content of a file.
The Backstage view has commands for working with the entire file or the application.
You can create new documents, workbooks, presentations, publications, notebooks, and databases on the New page in the Backstage view.
You can open, save, print, share, and export documents in the Backstage view.
You can customize the Office user interface and modify application settings to fit your workflow.
Choosing the right application for specific tasks can help you be more productive and get better results.