
Chapter at a glance
Set
Setting default document formatting for your documents

Modify
Using styles for paragraph and character formats

Use
Use styles for fast and flexible formatting, 5

Manage
Managing pagination through formatting
IN THIS CHAPTER, YOU WILL LEARN HOW TO
Format documents more efficiently.
Set default document formatting for your documents.
Apply section, paragraph, and character formatting to text.
Use styles to format documents faster and increase formatting flexibility.
Manage document pagination through formatting.
Document formatting is one of the primary tasks in Microsoft Word and has the broadest set of features. Formatting ranges from changing a font or font size, to modifying line spacing or paragraph indents, to setting page margins and pagination options, such as specifying that all lines of a paragraph should stay together on the same page.
In this chapter, you’ll learn about the four main categories of formatting and how you can format documents faster and more efficiently by using styles. At the end of this chapter, you’ll learn how to manage document pagination through manual page breaks and formatting.
Practice Files
To complete the exercises in this chapter, you need the practice files contained in the Chapter08 practice file folder. For more information, see Download the practice files in this book’s Introduction.
Formatting can be one of the most time-consuming tasks if you’re not familiar with the fundamentals. Similar to how document composition can affect editing, as covered in the previous chapter, the methods you use to format a document determine the amount of time you spend formatting, and many times, reformatting.
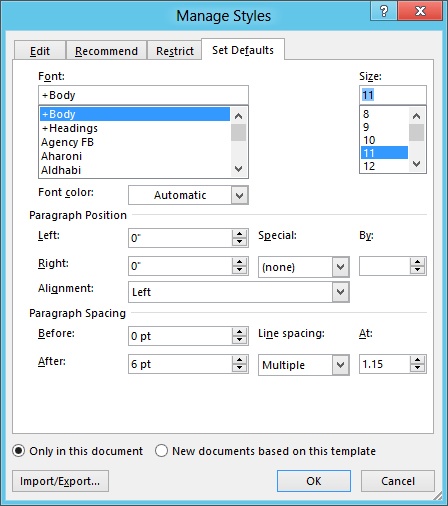
The primary document formatting fundamental to become familiar with first is the fact that, when you begin entering text into a document, the text you’re entering is already formatted. For example, when you create a new blank document, default formats are already applied. The font is Calibri and the font size is 11 points. There are other default formats as well. The space between each line of a paragraph, which is called line spacing, is by default 1.08 points, and the space after each paragraph, which is referred to as paragraph spacing, is 8 points by default.
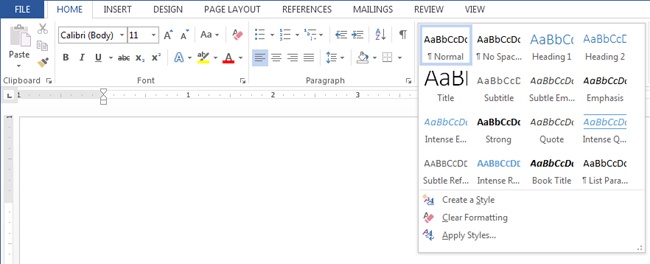
The next fundamental to understand is that all text is associated with a named set of formatting attributes called a style. Styles that are frequently used in a document are on the Home tab, in the Styles gallery.
You don’t have to implement styles in your documents, but they give you flexibility and consistent formatting. Best of all, you can apply multiple formats with a single click, which enables you to instantly change text formatting associated with a style throughout a document simply by modifying the style’s formatting attributes. You’ll learn more about styles throughout this chapter.
The last formatting fundamental is to break formatting down into separate tasks to help make it more manageable. Here are the four main formatting categories:
Document. Initial formatting attributes that are applied to the entire document, referred to as document defaults. These formats include a set of fonts for your heading and body text and the initial colors displayed in the color palettes. They also include paragraph and line spacing formats. The primary location for setting these formats is on the Design tab.
Tip
Examples of heading text are the section titles in this book, which are formatted with the Segoe Light font. Other text is considered body text, which is formatted as Segoe.
To modify document defaults, you don’t need to select any text, because these formats are applied to the entire document.
See Also
For more information on text selection, see Chapter 7.
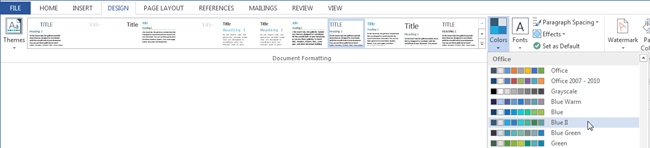
The Design tab also has sets of pre-built styles called style sets in the Document Formatting group. The formatting that appears in the preview of each style set gives you a general idea of how your document will look when it’s formatted with the available styles.
Tip
If you select a different theme or change individual theme elements, the fonts and colors that are displayed in the style set preview will be updated to match your selection.
When you select a style set, you’re changing both the document defaults and the collection of styles that are displayed on the Home tab in the Styles group. If you’re working with a document that already has styles that are named the same as those in the style set applied, such as Title and Heading 1, the formatting will be updated to match your selected style set. Keep in mind that the set you choose only provides the initial formats. You can change a style’s formatting attributes at any time.
Section. Formats that are applied to a division in a document such as a page or a group of pages. All pages within a section have the same section formats, such as page margins, orientation, and page size. These formats are located on the Page Layout tab.
To apply section formats, make sure your cursor is positioned in the section you want to modify.
See Also
For more information on how to create additional sections in a document, see Setting section formatting, later in this chapter.
Paragraph. Formats that are applied to a paragraph as a whole, such as alignment, indents, line spacing, and paragraph spacing. Other paragraph formats include page break options, such as specifying that all lines of a paragraph should stay together on the same page. The primary paragraph formats are located on the Home tab, in the Paragraph group.
To apply paragraph formatting for a single paragraph, text selection isn’t necessary. You can place your cursor in the paragraph you want to format and then make your modifications. For multiple paragraphs, select all paragraphs you want to format.
Character. Formatting that can be applied to individual characters, such as font, font size, color, or bold. Primary character formatting is located on the Home tab, in the Font group.


To apply character formatting to a single word, click in the word you want to format and then make your changes. To format a single character or multiple words, select the text you want to format. Note that commands such as bold, italic, subscript, and superscript are toggle commands. This means you perform the same action when you want to apply and remove the formatting.
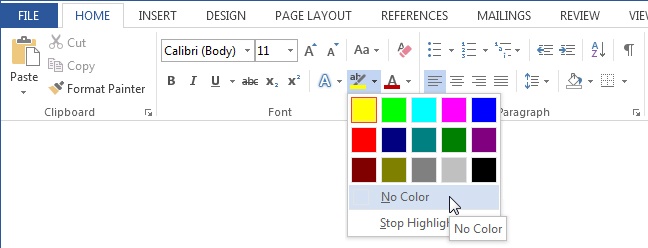
For setting other formats, such as the font type and font color, you can either apply a different format or remove it. For formats such as text effects, typography, and text highlight color, you remove applied formats by selecting the option that starts with the word No, such as No Color for Text Highlight Color.
Tip
Text Highlight Color is an example of a split control, and it’s one that works without the need to select text. You can click the Text Highlight Color button to apply the color that’s shown on the button, or you can click the arrow next to the button and select your preferred highlight color. If your text is highlighted, the color will be applied. If you don’t have text selected, your mouse pointer will change to a highlighter tool that you can drag through text to highlight it. If you use the latter method, to turn off the highlighter, click the button again or press the Esc key.
You don’t necessarily need to format your document in the same order that the formatting categories have just been described. However, a best formatting practice is to start with your document and section formats, because these can affect your paragraph and character formatting. The remaining sections of this chapter cover each formatting category in more detail, along with step-by-step exercises.
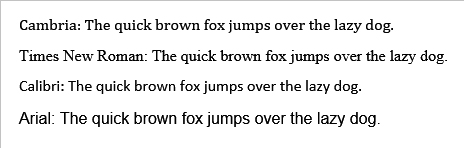
Serif and sans serif fonts
Fonts are either serif or sans serif. The way to differentiate between them is that serif fonts have “hooks,” called serifs, at the end of each stroke of the character. Sans serif fonts, however, do not have “hooks.” In French, sans means without; therefore, sans serif fonts do not have hook characters. Examples of serif fonts are Cambria and Times New Roman. Examples of sans serif fonts are Calibri and Arial.
It’s fairly common for printed content to have a sans serif font for headings and serif fonts for body text, because this combination is the easiest to read on paper. But for online documents, the combination is often reversed for easier onscreen reading; a serif font is used for headings, and a sans serif font is used for body text. The main reason for this is that serifs may appear faint or jagged on a screen due to the display itself and various display settings. When choosing fonts, you may want to keep the main output of your document in mind. If it’s to be read electronically, then choose a sans serif font for your body text to help make sure it’s easy to read on all devices.
The first set of formats you should change for a document are the document defaults, because they affect your entire document and set the base formats for your paragraph and character formatting.
In this exercise, you’ll change document defaults by modifying theme elements and by changing line and paragraph spacing. You’ll also select a style set for initial paragraph and character formats.
Set Up
You need the Fabrikam Rebrand Campaign_A document located in the Chapter08 practice file folder to complete this exercise. Open the Fabrikam Rebrand Campaign_A document. Then follow the steps.
Scroll through the document and take note of the current fonts, font color, line and paragraph spacing, and how the colors don’t match the Fabrikam logo colors on the first page.
To change the document theme, on the Design tab, in the Themes group, click Themes and then click Retrospect.
To change only the theme colors so they match the colors in the Fabrikam logo, on the Design tab, in the Document Formatting group, click Colors and then click Blue II.
To select an initial style set, on the Design tab, in the Document Formatting group, in the Style gallery, click Basic (Elegant).
To change the default paragraph and line spacing, on the Design tab, in the Document Formatting group, click Paragraph Spacing, and then click Tight.
See Also
For more information about themes, see Chapter 2.
Clean Up
Save Fabrikam Rebrand Campaign_A as My Rebrand Campaign_B. If you’re proceeding to the next exercise, leave the My Rebrand Campaign_B document open. Otherwise, close My Rebrand Campaign_B and exit Word.
When you think of page margins and page orientation, you probably think of formats that belong to a page. Though they are essentially page formats, it would be time consuming to set page formatting for every single page in a document. Instead, you can format a document section so that all pages in the section will have the same formats applied.
Every new blank document starts with a single section. To add additional sections, you insert section breaks by using the Breaks command, located on the Page Layout tab, in the Page Setup group.
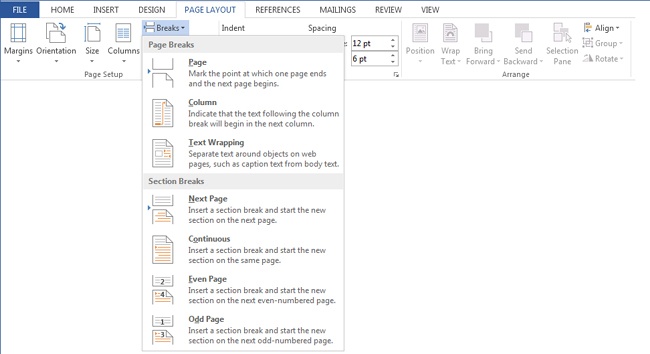
Here is a list of each type of section break, along with some examples for how they’re used:
Next Page. If your document needs pages with both portrait and landscape orientation, different page margins, or different headers and footers, you can add a Next Page section break at the beginning of each change in section formats.
Continuous. This is the only type of section break that doesn’t result in a new page. Typically, a continuous break is used to add newspaper-style columns on the same page as text that spans the entire width of the page.
Even Page or Odd Page. This type of break forces a page to start on an even-numbered or odd-numbered page and is typically used in documents with multiple chapters that are printed on both sides of the paper. The most common usage is adding an odd page section break at the beginning of a chapter to make sure the first page of the chapter is an odd-numbered page.
Tip
To view section information in your status bar, right-click the status bar, and in the Customize Status Bar options, click Section.
In this exercise, you’ll insert a section break and set different page margins starting on page 2.
Set Up
If the My Rebrand Campaign_B document you saved in the previous exercise is still open, follow the steps. If you skipped the previous exercise, open the Fabrikam Rebrand Campaign_B document located in the Chapter08 practice file folder to complete this exercise, then follow the steps.
To place the title and logo on its own page, place the cursor at the beginning of the first full paragraph that begins with Our international office.
On the Page Layout tab, in the Page Setup group, click Breaks, and then click Next Page.
To change the margins starting at the second page, on the Page Layout tab, in the Page Setup group, click Margins, and then click Normal.
Many Word tutorials consider styles to be an advanced formatting technique. Though there are some advanced style topics, styles are such an integral part of Word that you need to know style essentials and how to use them, even if you’re a beginning Word user. As noted in the Formatting documents more efficiently section earlier in this chapter, frequently used styles are located on the Home tab, in the Styles group.

Styles are document specific. This means that any changes you make to styles will be applied only to your current document. The two primary types of styles in Word are related to the paragraph and character formatting categories. A character style contains only character formats and is applied to individual words and even single characters. A paragraph style is applied to an entire paragraph and contains both character and paragraph formatting. Of the two, paragraph styles are used more frequently, because they enable you to apply more formats at the same time.
Another type of style to know about is a linked style, which is a combination of a paragraph style and a character style. A linked style has the same characteristics as a paragraph style, but if you apply it to a selected portion of a paragraph, only the character formats are applied. In contrast, if you’re using a paragraph style, the entire paragraph is formatted, even if you have only a portion of it selected.
Of all the built-in styles, those that have other features connected to them are the heading styles, which are Heading 1 through Heading 9. For example, the headings that are displayed in the Navigation pane are paragraphs that have a heading style applied. And heading styles are also used for creating a table of contents.
See Also
For more information on how to create a table of contents, see Microsoft Word 2013 Step by Step by Joan Lambert and Joyce Cox (Microsoft Press, 2013).
Each heading style has an outline level associated with it, which helps give your documents structure. Heading 1 is the highest outline level and Heading 9 is the lowest. This chapter is a good example of a structured document. Each main topic is formatted as Heading 1, and related content, or subtopics, are formatted as Heading 2.
Tip
By default, only the Heading 1 and Heading 2 styles are displayed in the Styles gallery. After you apply Heading 2, the Heading 3 style will appear, and so on.
In this exercise, you’ll modify paragraph and character formats, apply a style to a document, and modify style formatting.
Set Up
If the My Rebrand Campaign_C document that you saved in the previous exercise is still open, follow the steps. If you skipped the previous exercise, open the Fabrikam Rebrand Campaign_C document located in the Chapter08 practice file folder to complete this exercise, then follow the steps.
To make the document easier to navigate, on the View tab, in the Show group, select the Navigation Pane check box.
In the Navigation pane, click Nature Friendly Products.
Place your cursor in the paragraph with the text Sustainable products.
On the Home tab, in the Styles gallery, click Heading 2.
Apply the Heading 2 style to the following paragraphs: Other materials, Fixtures and appliances, and Miscellaneous.
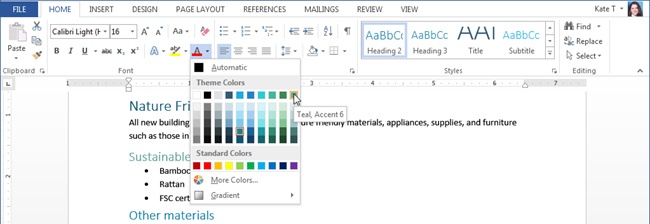
To change the font color and font size for all paragraphs with the Heading 2 style applied, select Sustainable products.
On the Home tab, in the Font group, click the arrow next to Font Color, and from the color palette, select the last color in the top row, Teal, Accent 6.
Change the font size from 16 points to 14 points.
To update all Heading 2 paragraphs to the new font color and font size, with Sustainable products still selected, on the Home tab, in the Styles gallery, right-click Heading 2, and then click Update Heading 2 to Match Selection.
To center the title, on the Home tab, in the Paragraph group, click Center.
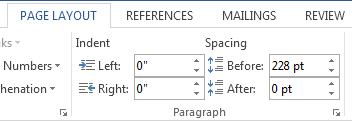
To add formatted space before the first paragraph and to position it vertically on the page, on the Page Layout tab, in the Paragraph group, change the Before spacing to 228 points.
In the Styles gallery, update the Title style to match your current selection.
Scroll through the document and view the formatting changes.


Clean Up
Save the document as My Rebrand Campaign_D. If you’re proceeding to the next exercise, leave the My Rebrand Campaign_D document open. Otherwise, close My Rebrand Campaign_D and exit Word.
You can also add additional formats to text that aren’t already included in the style. However, if you have several places that use the same style and need the same format, it’s best to modify the style or create a new style instead.
Tip
To reset all character formats to only those formats that are included in the style, press Ctrl+Spacebar. To reset paragraph formats only to those included in the style, press Ctrl+Q. If you want to reset text to the document defaults, or the Normal style, on the Home tab, in the Font group, click Clear All Formatting.
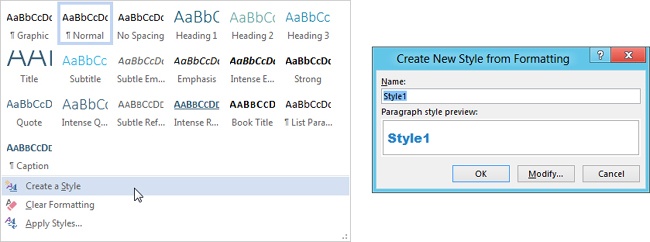
Word has over 200 built-in styles that you can use and modify to fit your formatting needs. However, there may be times when you need to create a custom style. The easiest way to do this is to create a new style based on your existing formatting. To do so, add the formatting changes you want to include in your style to your text. Then, on the Home tab, in the Styles group, click the More button in the lower-right corner of the Styles gallery, and then click Create A Style. Then in the Create New Style From Formatting dialog box, name your style and then click OK. The style you created will appear in the Styles gallery for your current document.
In addition to the basic formatting options on the Home tab in the Paragraph group, Word provides a number of other paragraph formats, which are available in the Paragraph dialog box. To display it, click the dialog box launcher in the Paragraph group.
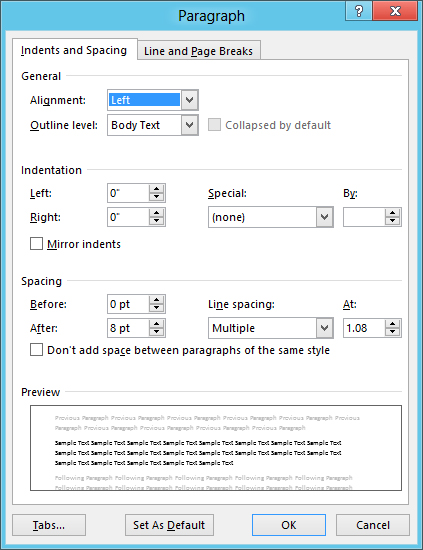
Here’s a list of the additional formats:
Outline level. This format is what triggers paragraphs to be displayed in the Navigation pane. The heading styles already have an outline level format, but you can use this format for any paragraph.
Indentation. You can use the Increase Indent and Decrease Indent commands in the Paragraph group on the Home tab for left indents only. If you want to set a right indent or a special indent, such as First Line or Hanging, you can use the Paragraph dialog box or ruler.
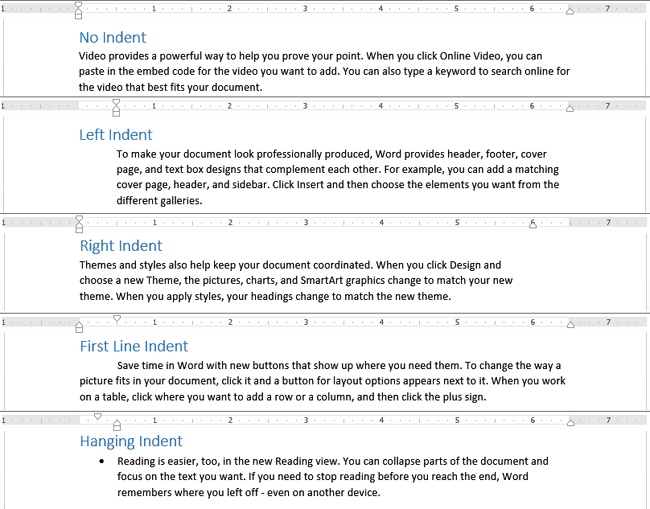
Here are the indent types:
Left Indent. Indents each line of a paragraph on the left.
Right Indent. Indents each line of a paragraph on the right.
First Line. Indents only the first line of a paragraph on the left.
Hanging. Indents every line of a paragraph on the left with the exception of the first line. This indent type is typically used for paragraphs with bullets or numbering.
Space Before and Space After. Adds formatted space before or after each paragraph. As a general rule, 12 points is around the same size as a line of text formatted with a 12-point font size for most fonts. The default setting for new blank documents is 8 points of space after each paragraph.
The Don’t Add Space Between Paragraphs Of The Same Style option will suppress formatted space both before and after paragraphs that are next to each other and have the same style applied. This option is typically used for lists of information, such as a bulleted or numbered list.
Line Spacing. Changes the space between the lines of a paragraph. The default setting for a new blank document is Multiple, 1.08 lines.
Tip
You can also set left and right indents and change before and after paragraph spacing on the Page Layout tab in the Paragraph group.
Setting indents by using the ruler
To use the ruler to modify text indents, drag the indent markers on the ruler. The indent marker on the left, which looks like an hourglass, has three indents. The top triangle sets a first line indent, the bottom triangle sets a hanging indent, and the box at the bottom sets a left indent. The indent marker on the right changes the right indent only.

Tip
When dragging indent marks on the ruler, you can display your preferred unit of measure, such as inches or centimeters, instead of tick marks. To do so, hold down the Alt key and then drag an indent marker.
Tip
To change the unit of measure on the ruler to your preferred setting, click the File tab to display the Backstage view and then click Options. On the Advanced page, in the Display section, from the Show Measurement In Units Of list, select Inches, Centimeters, Millimeters, Points, or Picas.
When a paragraph is indented, the indent markers on the ruler will reflect the indent type and size of the indent for the current paragraph.
Additional paragraph formats on the Line And Page Breaks page of the Paragraph dialog box are covered later in this chapter, in the section titled, Managing pagination through formatting.
Like paragraph formats, additional character formats can be accessed in the Font dialog box, which can be displayed by clicking the dialog box launcher in the Font group.
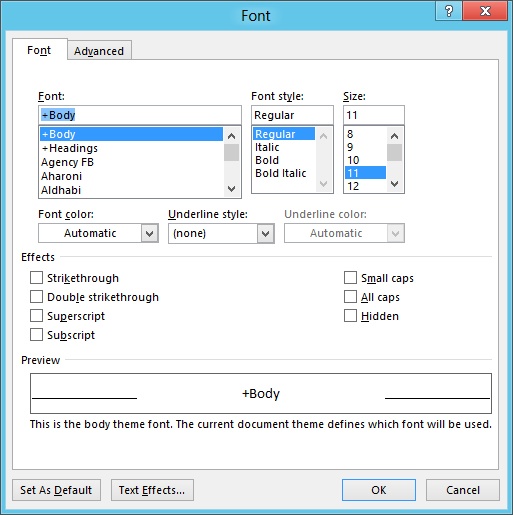
Here is a list of those additional formats:
Double Strikethrough. Similar to Strikethrough, but an additional horizontal line is added in the middle of the text.
Small Caps. Displays lowercase characters as uppercase but maintains the lowercase character height.
All Caps. All characters appear in uppercase.
Hidden. Used to exclude text from printing or appearing on the screen. Additionally, several advanced features use hidden text formatting, such as table of contents and index fields. To display hidden text, click the Show/Hide ¶ command on the Home tab in the Paragraph group. The formatting mark for hidden text is a dotted underline.
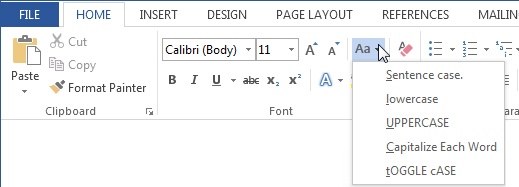
You might encounter a situation in which you want to change lowercase text to all caps, all caps to lowercase, mixed-case text to title case, and so on. Instead of making a lot of edits, you can change the case of text in Word as easily as changing the font, by using the Change Case command, located on the Home tab, in the Font group.
Tip
Even though it’s placed among other formatting commands, the Change Case feature isn’t considered formatting, because it actually converts text characters. Keep in mind that formatting only changes the appearance of your text in a document, which may not be preserved if you make other changes, or if your text is pasted into a different application. The All Caps format in the Font dialog box, however, is a format. You may have noticed that the case of the title for the practice file used in this chapter changed to uppercase in the exercise for the section titled, Setting default document formatting for your documents. This is because the All Caps format is included in the Title style, and the actual case of the text isn’t changed.
You can change the case to one of the following options:
Sentence case. Capitalizes the first letter of each sentence
Lowercase. Converts all characters to lowercase
Uppercase. Converts all characters to uppercase
Capitalize each word. Capitalizes the first letter of each word, including words that aren’t typically capitalized, such as and, the, and or
Toggle case. Converts each uppercase letter to lowercase and each lowercase letter to uppercase
Keyboard Shortcut
You can also use Shift+F3 to change the case of text. Unlike with most keyboard shortcuts, each time you press Shift+F3, it will cycle through the Change Case options, which are determined by your text selection. If you select a paragraph or sentence, provided the period or full stop is selected, Shift+F3 will cycle through uppercase, lowercase, and sentence case. If your selection doesn’t include a period or full stop, it will cycle through uppercase, lowercase, and capitalizing each word.
Pagination is how your document is divided into pages and how your content flows from one page to the next. Word sets page breaks, called automatic page breaks, based on the amount of text and other elements, like pictures and charts, that can fit on a page. If you want to change where Word ends a page, you have two options:
Manual Page Break. Sets a point where the following content will begin on a new page, similar to a Next Page section break. The best practice for using manual page breaks is to add them where you want to always start a new page. For example, you might add a manual page break after a cover page to force content that doesn’t belong on the cover page to start on a new page. If you use a manual page break to keep content together on the same page, then this can result in pages with large amounts of white space when your document is opened on another computer. The reason for this is that every printer has a different printable area. For example, some ink jet printers don’t print below 0.7 inches on a page, compared to most laser jet printers, which can print to the edge of a page. Because Word takes the printer you’re using into account when it paginates a document, where it places an automatic page break may not always be the same.
To insert a manual page break, on the Insert tab, in the Pages group, click Page Break.
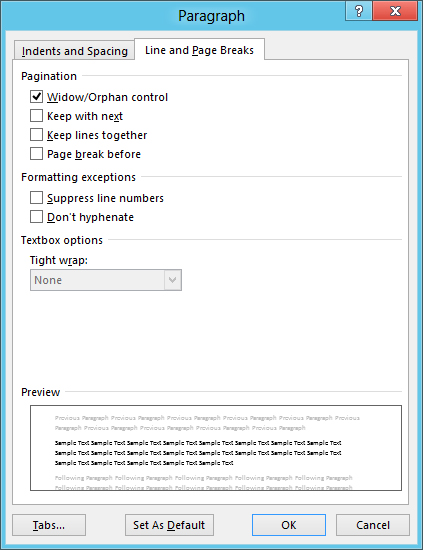
Paragraph pagination options. These pagination options give you the most control over how text flows from one page to the next and are located on the Line and Page Breaks page of the Paragraph dialog box.
Widow/Orphan Control. This option is set by default for all text. It keeps at least two lines of a paragraph on a page. It prevents the last line of a paragraph from being printed by itself at the top of a page or the first line of a paragraph from being displayed by itself at the bottom of a page.
Keep with next. Keeps text on the same page as the next paragraph. The built-in Heading styles include this option, because you typically don’t want a heading to print at the bottom of a page without accompanying text. Another example is if you have text that refers to a picture and you want to keep the picture with the descriptive text.
You can also use this option to keep table rows together. If you want to keep all rows of a table together on the same page, add this format to every row except the last one.

See Also
For more information on tables, see Chapter 9.
Page break before. This format is similar to a manual page break. It’s added as a paragraph option so it can be included in a style. For example, if each chapter of a book needs to start on a new page, you can add the page break before to the style you’re using for the chapter title. This way, each time you use the style, you’re also starting a new page.
Keep lines together. Keep all lines in a paragraph on the same page. Set this option if you don’t want a paragraph to break across two pages.
The formatting mark for all paragraph pagination options is a tiny black square to the left of the first line of the paragraph; it looks similar to a square bullet character.

In this exercise, you’ll add a pagination format to keep a paragraph on the same page as a picture.
Set Up
If the My Rebrand Campaign_D document you saved in the previous exercise is still open, follow the steps. If you skipped the previous exercise, open the Fabrikam Rebrand Campaign_D document located in the Chapter08 practice file folder to complete this exercise, and then follow the steps.
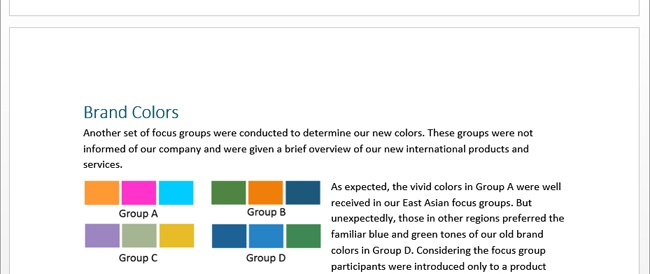
On page 3, notice how the top of the page displays a picture and text, and the previous page has the heading, Brand Colors and a short introduction paragraph.
To move the Brand Colors introduction text to the next page, place your cursor in the paragraph below the Brand Colors heading.
On the Home tab, in the Paragraph group, click the dialog box launcher to display the Paragraph dialog box.
On the Line and Page Breaks page, select the check box for Keep with next, and then click OK.
Notice how both the Brand Colors heading and introduction paragraph were moved to the next page.

The first set of formats you should change in a document is the document defaults, located on the Design tab.
Use section breaks to change page formats such as page margins, page orientation, and paper size, in a portion of a document.
Utilize styles in your documents to help save time when formatting a document, and to help maintain consistent formatting.
The Change Case command, on the Home tab, in the Font group, converts your text characters.
The All Caps format in the Font dialog box doesn’t convert your text and only makes text characters appear uppercase.
Use a manual page break only when you always want to start a new page.
Use paragraph pagination options to control how text flows from one page to the next.