
Chapter at a glance
Apply
Apply tags to notes in OneNote, Using tags

Connect
Organize
Creating and organizing tables
IN THIS CHAPTER, YOU WILL LEARN HOW TO
Tag your notes to make them easier to find and understand.
Use styles to do basic formatting of your notes.
Connect OneNote to Outlook for a power-integrated experience.
Use hyperlinks to tie your notes together.
Create and organize tables.
Search your notes to find information fast.
In Chapter 25, you learned how to create notes. In this chapter, you’ll examine some of the tools Microsoft OneNote 2013 gives you to organize your notes more effectively. Data capture is only half of the note-taking process. If you can’t find those notes later, they aren’t really very effective. Fortunately, OneNote provides a number of tools to make it easy to organize and locate those notes once you’ve taken them.
One of the powerful organizational features of OneNote is the ability to flag your notes with tags. Tags let you categorize and even prioritize your notes in certain ways. OneNote 2013 comes with a couple of dozen predefined tags, plus the ability to create as many of your own custom tags as you’d like. You can apply a tag that indicates that a particular note is a question, or a to-do item, or perhaps an action item that has been delegated to somebody else. You can tag items as contact information or a book to read. You can use tags to indicate that a particular item is important, or even critical.
You’ll find the tags for OneNote on the Home tab of the ribbon, in the Tags gallery.
In this exercise, you’ll use tags to categorize some notes.
Set Up
You don’t need any practice files to complete this exercise. Start OneNote and use existing notes or enter some practice notes on your own. Then follow the steps.
Navigate to the page where you want to tag some notes.
Click a note you’d like to tag.
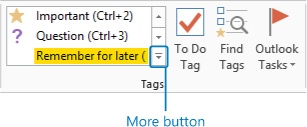
Make sure you’re on the Home tab of the ribbon, and click the More button to expand the Tags gallery.
Click the tag you would like to apply to the selected note.
You can apply several tags to the same note if you’d like. To remove a tag, right-click it and select Remove Tag.

You can customize any of the built-in tags, or you can create entirely new tags of your own.
In this exercise, you’ll customize one of the built-in OneNote tags.
Set Up
You don’t need any practice files to complete this exercise. Start OneNote and follow the steps.
Make sure you’re on the Home tab of the ribbon. Click the More button to expand the Tags gallery.
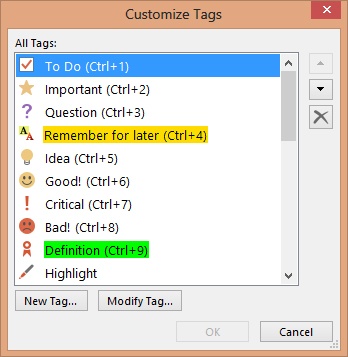
Click Customize Tags.
Select the Remember for Later tag to modify, and click it.
Click Modify Tag.
Select an alternate symbol for that tag and click it.
Click OK twice to get back to your notes page.
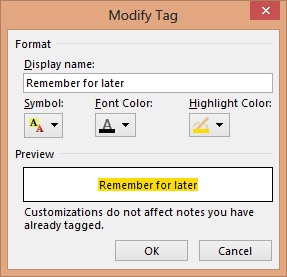

It’s just that easy to modify any existing tags that you like. Note that any modifications you make will not affect any notes that have already been tagged with that tag.
Creating your own custom tags is essentially the same procedure as the previous one. The only difference is that in Step 4 you would click New Tag instead of Modify Tag, and you would need to type a name in the Display Name field in the dialog box.
Though styles have been an important feature in Microsoft Word for years, OneNote 2010 introduced the concept of styles to OneNote. The feature has not changed much in OneNote 2013, but it remains a useful way to apply consistent formatting to your notes.
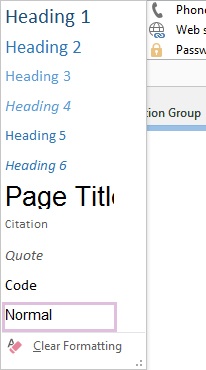
To use a style, select a piece of text that you would like to format with that style, then select the style you want to apply from the Styles gallery on the Home tab of the ribbon.
Styles in OneNote are especially useful for headings, quotes, and code samples. They help them stand out from the rest of your notes.
Tip
The styles in OneNote can’t really be customized natively, and there’s no facility for adding custom styles to the list. The exception to this is the Normal style, which can be customized, in a manner of speaking, by accessing the menu bar and clicking File, Options, General and then changing the default font. There are third-party utilities, such as OneTastic, that offer some facility for customizing styles.
Tip
If you really need to create a custom style, you can get part of the way there by creating a custom tag instead. The elements of a tag include font color and font highlighting. So although you can’t set the font typeface or size, you could at least create a style, of sorts, that changes the color and highlighting of your selected text. Revisit the previous section for instructions about how to use and create custom tags.
One of the things that makes OneNote a powerful tool for task and project management is its ability to tie into another member of the Microsoft Office Home and Student 2013 suite—Microsoft Outlook.
There are really two kinds of integration that are important for you to know: integrating Outlook to OneNote, and integrating OneNote to Outlook.
There are a number of items in Outlook that you can connect to OneNote. The first and surprisingly least useful of these types of items is the email message.
You can easily send email messages to OneNote, which leads some people to try to use OneNote as some sort of massive archive system for email messages. Unfortunately, that’s a task for which OneNote is not really well suited. It’s better if you use Outlook itself to archive your messages. Its search capabilities are better, and the messages are more useful in their native format.
That said, it can be useful to send an email message to OneNote in order to add it to an archive of research or a project plan.
To send an email message to OneNote, you can select the message in the message list (or open the email message) and click the Send To OneNote button on the Home tab of the ribbon.
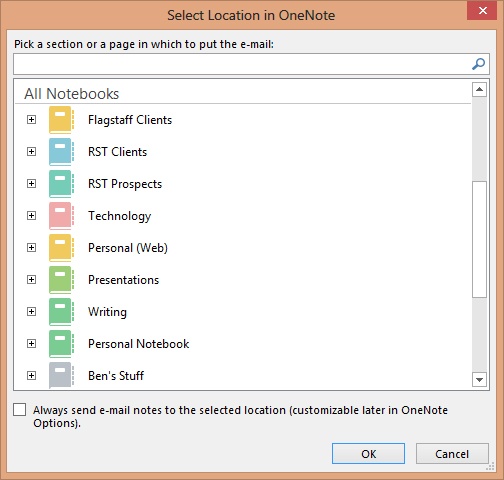
OneNote will display a dialog box that asks where you’d like to put that email message. If you select an existing page, OneNote will append the contents of that email message to that existing page. If you select a section, then OneNote will create a new page in that section, populated with the contents of the email message.
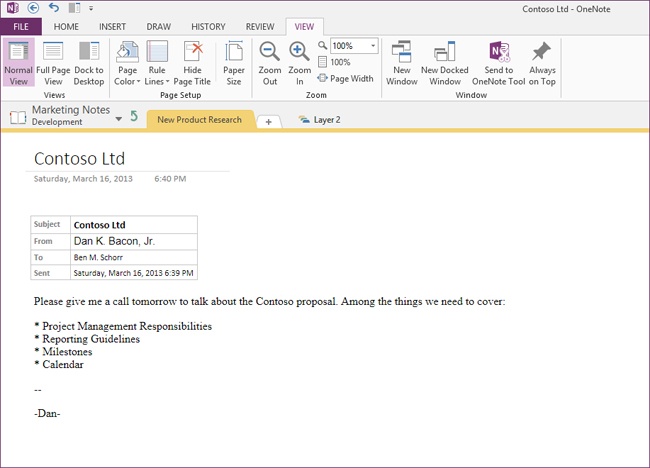
OneNote will insert your email message content into the selected location and even preface it with a header that indicates the subject, whom the message was from, to whom it was sent, and when it was sent.
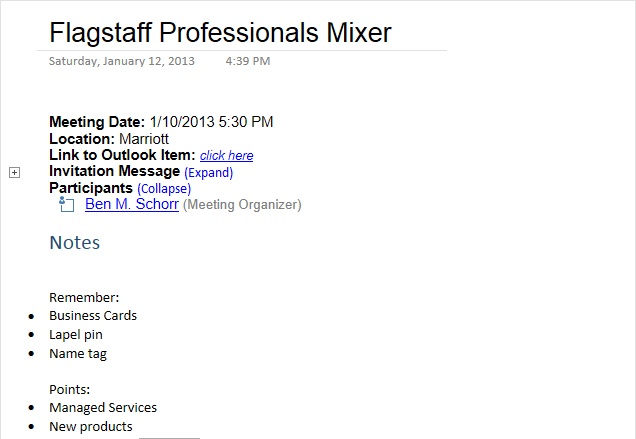
Far more useful than email messages are appointments or meeting items from the Outlook calendar. By sending these to OneNote, you create a workspace where you can take (and share) detailed notes about the meeting while retaining a two-way link between the OneNote page and the Outlook appointment item.
Sending an appointment or meeting item to OneNote is done almost exactly the same way as sending an email message (see the previous section). You select or open the item in Outlook and click the Meeting Notes button on the ribbon.
When you click Meeting Notes, a dialog box is displayed that asks if you’d like to share your notes with the meeting, or if you’re going to take notes on your own.

If you select Share Notes With This Meeting Occurrence, OneNote will prompt you for a notebook and section to locate these shared notes. You may notice that not all of your notebooks are listed as possible choices. The reason is that shared notes can only be located in notebooks that are stored in shared locations, such as SkyDrive or Microsoft SharePoint. Notebooks you have on your local hard drive won’t be listed as options here.
If you choose Take Notes On Your Own, OneNote will offer you any notebook you have, because sharing is not a consideration.
With either choice, subject to the aforementioned limits, as with the email messages, OneNote will ask where you’d like to send the appointment item and append it to an existing page or create a new page for you, whichever you choose.
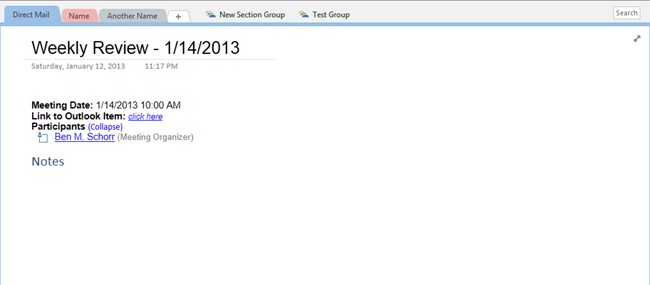
The appointment page in OneNote will include a header that tells when the meeting was scheduled for, a link back to the original Outlook item, and a list of participants (hyperlinked so that clicking on a name will initiate an email message to an individual), followed by a large area for taking extensive notes.
Tip
In Chapter 29, recording audio in your notes is mentioned. You can use that to capture an even richer version of the meeting, but first you should make sure you have permission from the other participants before you start the recording.
Perhaps what you’d like to take notes on is not a what or a when but rather a who. You can send an Outlook contact item to OneNote in order to create a rich set of notes on that contact.
To send the contact item to OneNote, simply select or open the contact item in Outlook and click the Linked Contact Notes button on the ribbon.
As with the other types of items, OneNote will ask you where in OneNote you’d like to place this contact item. If you select an existing page, OneNote will append the contact to that page. If you select a section, OneNote will create a new page for you, in that section, with the contact information.
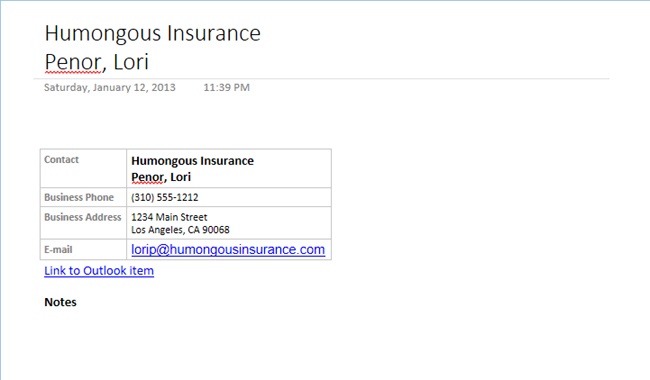
The page title will include the company name (if any) and the person’s name (if any). Below that, a table repeats the name information, displays the phone and address information, and then displays the hyperlinked email address.
Tip
Obviously, the information that can be displayed is limited by the information that’s available. If you don’t have the contact’s email address, it won’t magically appear here.
Finally, below the contact information you’ll have an extensive area to take notes.
In past versions of OneNote, there were several different kinds of content that it would attempt to connect to Outlook, especially addresses and contact information. None of that worked especially well, so in OneNote 2013, there is just one piece that integrates to Outlook.
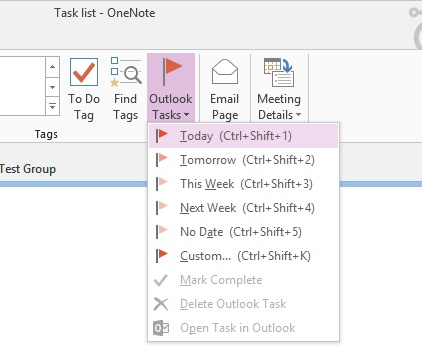
If you have an action item in OneNote, you can flag it with an Outlook task flag and the item will automatically appear on the Outlook Tasks list. Better still is that the connection is a two-way sync, which means that if you mark the task as complete in either OneNote or Outlook, it will be marked as complete in the other program, too.
Let’s try flagging a task for follow-up. In this exercise, you’ll flag a task for follow-up.
Set Up
You don’t need any practice files to complete this exercise. Start Outlook 2013 and start OneNote. Then follow the steps.
In OneNote, navigate to or create a page you can use for practice.
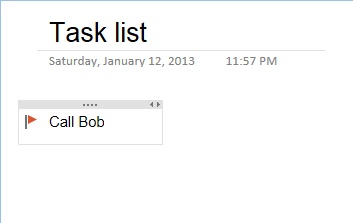
Enter a note that is a sample action item, such as Call Bob.
Click the Outlook Tasks button on the Home tab of the ribbon.
Click Today to flag the item for follow-up today.
Outlook will place a red follow-up flag in front of your item. Even more important is that a corresponding item will be automatically added to your Tasks list in Outlook.

You can take notes on the task in OneNote, and when you’ve completed the task, simply left-click the flag in either OneNote or in the Outlook Tasks list. The item will be marked as complete in both products.
Tip
The text that appears in the Outlook Task list is the exact text you flagged in OneNote. There isn’t any context to it. That means that if you have multiple identical tasks on multiple pages (for example, “Follow Up”), you will find it difficult to differentiate those items in the Outlook tasks list. Try being a little more verbose in those cases. For example, use “Follow up: Tailspin Toys Project;” “Follow up: Contoso Marketing;” or “Follow up: Wingtip Toys proposal,” and so on.
The concept of hyperlinks in information access goes back nearly 50 years, and almost nobody who uses the Internet today can remember a time when the Internet didn’t use hyperlinks to navigate from place to place. OneNote 2003 supported hyperlinks to outside content and websites, but it was OneNote 2007 that introduced the concept of internal hyperlinks—links between notes in OneNote.
Internal hyperlinks let you create a link on any page that will take you to any note, page, section, or notebook you have. There are a couple of different ways to create internal hyperlinks. Let’s take a look at the traditional way to do it first.
In this exercise, you’ll create hyperlinks that take you from one location in your notes to a different location in your notes.
Set Up
You don’t need any practice files to complete this exercise. Start OneNote, and open one page where you can create your link and another page that you want to link to. Refer to the page you’re creating the link on as Source and the page you’re linking to as Destination.
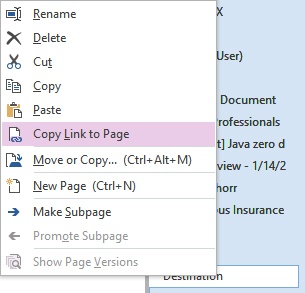
Locate the page you want to link to (Destination, in this example) in your page tabs.
Right-click the page tab of the Destination page and click Copy Link to Page.
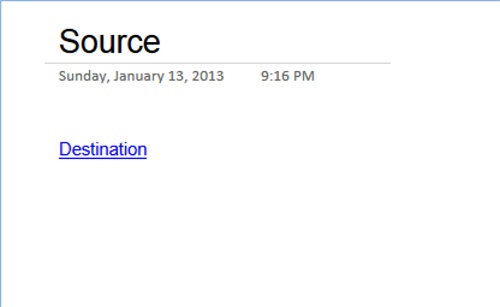
Navigate to or create a page referred to as Source.
Click the Source page and click Paste on the Home tab of the ribbon.
OneNote will paste the link you just copied.
Click the link you just created (Destination) to make sure the hyperlink takes you directly to the Destination page.
In this manner, you can easily create links from any page to any page. Some people use these techniques to build a Table of Contents page that simply contains links to the pages they use most often, even if those pages are located in totally different notebooks. It’s a quick and simple way to navigate if you have an extensive set of notebooks.
If you right-click any section or notebook in the Notebook pane at the left, you’ll find a Copy Link To item on the shortcut menu. That lets you use the same technique you just learned to create links to notebooks or sections.
One thing you’ll notice in what you’ve done with hyperlinking so far is that the link you’re creating has the same text as the name of what you’re linking to. But what if you want to have a completely different piece of text that is a link to the page?
In this exercise, you’ll create hyperlinks with custom text that take you from one place in your notes to another page in your notes.
Set Up
You don’t need any practice files to complete this exercise. Start OneNote and use the same Source and Destination pages that were created in the previous exercise.
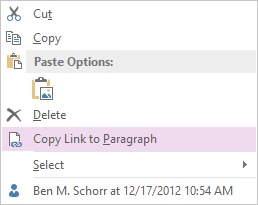
Right-click the Destination page and click Copy Link to Page.
Navigate to the Source page.
Enter Where we want to go anywhere on the page.
Click the Insert tab on the ribbon, and then click Link or press Ctrl+K to open the Link dialog box.
Click in the Address field and paste in the link you copied to the Destination page by right-clicking and selecting Paste or pressing Ctrl+V.
Click OK.
Click the Where we want to go link to confirm that it takes you to the Destination page.
The power of this technique may not be immediately obvious, but what it means is that by using the Link dialog box (via clicking Insert and then clicking Link, or pressing Ctrl+K), you can attach hyperlinks to any item in OneNote. That can be a word within a sentence or an item in a table—even a picture or piece of clip art on a page can have a hyperlink attached to it; it will take you to another notebook, section, page, or paragraph whenever you click it.
OneNote 2010 introduced a new way to create hyperlinks between pages. Capitalizing on the popular concept of a wiki, OneNote now supports what are called wiki-style links. A wiki link is traditionally created by enclosing the text you want to be the source of the link in double square brackets ([[text]]).
Tip
Try this: On your Source page, enter Let’s go to the [[Destination]]. When you press the spacebar after that last square bracket, OneNote should automatically convert the word Destination to a link to your Destination page.
When you enclose a word or phrase in double square brackets, OneNote looks in the current section to determine if a page already exists with that name. If a page by that name doesn’t exist, then OneNote will check all of the other sections in the current notebook for a page with that name. If it can’t find one, OneNote will automatically create a new, blank page in the current section with the enclosed text as its name.

Tables are a useful organizational construct in OneNote. They allow you to arrange and organize data within a familiar structure.
Creating a basic table is quite easy. In this exercise, you’ll create a basic table.
Set Up
You don’t need any practice files to complete this exercise. Start OneNote and open a blank page to create some practice tables.
Navigate to or create your practice page for tables.
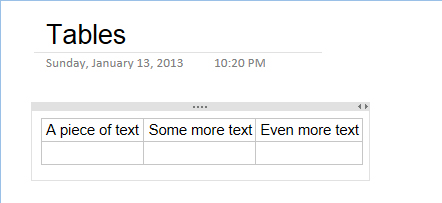
Click anywhere on the page and enter a piece of text.
Press the Tab key and enter some more text.
Press Tab again and enter some more text.
Press Enter.
Each time you press Tab on that first line, you’ll add another column onto your table. When you press Enter, you’ll create a new row. From then on, your table will have just that many columns (three in this exercise), and pressing Tab will simply move you across those three columns and then on to the next row.
Another way to create a table, if you already know the size of the table you want, is to use the Insert Table feature.
In this exercise, you’ll use the Insert Table feature to create a new table.
Set Up
You don’t need any practice files to complete this exercise. Start OneNote. If you deleted the page you created in the previous exercise, create a blank new page to use in this exercise.
Locate your practice tables page.
Click at the location on the page where you’d like to insert the table.
Click the Insert tab on the ribbon.
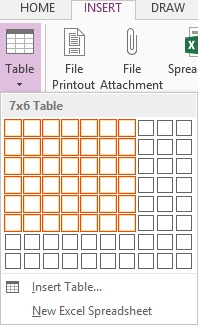
On the table tool that drops down, select a table up to a maximum of 10 columns wide by 8 columns long. Using your mouse pointer, select a table that fits your needs, and click it.
In the following example graphic, a table has been selected that is 7 columns wide by 6 columns long. A blank table is inserted into your notes that’s the size you specified.
Tip
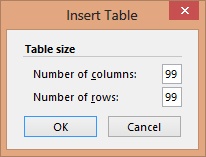
If you want to create a table larger than the 10 x 8 maximum that the Insert Table tool allows, click Insert Table at the bottom of the Insert Table gallery instead. In the dialog box that appears, you can create a table with up to 99 columns and 99 rows.
If you need to add (or delete) columns or rows from your table after it’s been created, just click in your table, click Table Tools, and then click the Layout tab that appears on the ribbon.
Here you’ll find tools for selecting particular cells, rows, or columns; deleting rows or columns (or the entire table); or inserting rows or columns. You can also hide the borders of your table, add shading, or change the alignment of your text within the cells.
Another useful setting lets you sort your data in the table according to the currently selected column, either ascending or descending.
Finally, if your table has a lot of data in it, and you’d like to do some analysis or calculations on that data, you can convert it to an Excel spreadsheet.

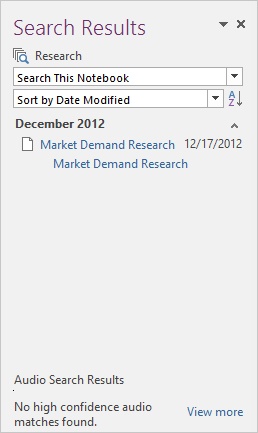
Having great notes is only half the battle. Being able to find those notes later is every bit as important. The search function in OneNote makes it easy for you to quickly find notes across pages, sections, or notebooks.
Above the page list on the right side of your notebook, you’ll find the Search box. You can click there to enter a query or you can press Ctrl+E on your keyboard.
When you’re in the Search box, enter your search term, and OneNote will search the selected scope (by default it’s All Notebooks) for the term.
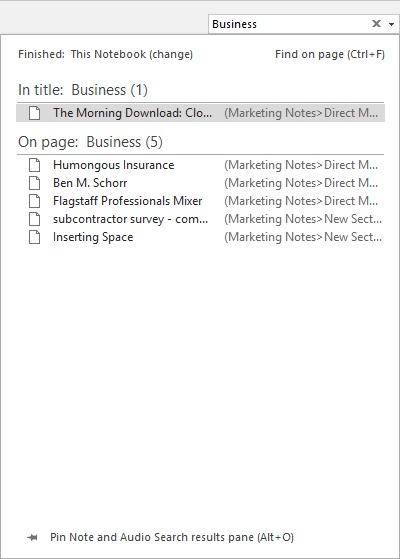
If you click any of the results, OneNote will display the page on the left side with the search term highlighted. Click any other search result and that page will be displayed in a similar manner. Note that once you click away from the Search Results pane, it will disappear, and you’ll have to click the Search box again and re-enter your search phrase before the results will be displayed again.
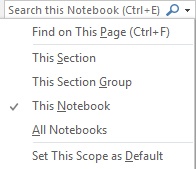
Perhaps you want to narrow (or broaden) the search scope. When you click in the Search box, the Search Results pane opens, and at the upper left OneNote indicates what your current search scope is. If you’d like to search more (or less) of your content, you can change that scope. Click that link, and OneNote will allow you to change the scope to one of the following:
This Section
This Section Group
This Notebook
All Notebooks
In this exercise, you’ll change the scope of your search to search across a larger (or smaller) selection of your notes.
Set Up
You don’t need any practice files to complete this exercise. Start OneNote, and then follow the steps.
Click in the search box at the upper right of the screen.
Click This Notebook (change).
Select the scope you want to search.
OneNote will perform your search across that scope.
Tip
To find an exact phrase in OneNote, enclose your phrase in quotation marks like this: “Key products in the eastern region.” To limit your search results to a page that contains multiple words (not necessarily together), use AND in your query like this: Sales AND Bicycles.
OneNote will find variations of words if you don’t use the quotation marks. For example, a search for serving will also find serves.
If you want to do a more leisurely examination of your search results without the Search Results pane constantly closing, click the Pin Note And Audio Search Results Pane link at the bottom of the Search Results pane. That will cause the pane to open as a task pane along the right side of the screen and stay open until you close it.
Tags let you categorize, highlight, and even prioritize notes.
Styles help you apply consistent formatting to your notes.
Integration between OneNote and Outlook makes both products better at supporting your productivity.
Hyperlinks let you connect notes with each other as well as the outside world.
Tables give you a structure for organizing certain kinds of information.
A powerful search capability makes it easy to find your notes.