
Chapter at a glance
Explore
Signing in and managing your Office account
Connect
Connecting cloud services to your Office account

Open

Sync
Syncing with SkyDrive for a Microsoft Account
IN THIS CHAPTER, YOU’LL LEARN HOW TO
Define the term cloud service.
Sign in and manage your Office account.
Connect cloud services to your Office account.
Sync files with SkyDrive for offline use.
Get started with co-authoring.
A cloud service typically refers to online file storage, resources, or applications that are accessed through the Internet. These can range from apps for your smartphone, Internet games, social networks, and web-based email to secure private networks.
These services are becoming part of our everyday lives. You may have documents and other files like pictures or videos stored on Microsoft SharePoint, Microsoft SkyDrive, Flickr, or YouTube. And you may have contact information stored on various social networks like Facebook, Twitter, or LinkedIn.
In this chapter, you’ll learn about how Microsoft Office Home and Student 2013 connects you to your various cloud services through your Office account. You’ll also learn how you can use cloud services to share and collaborate with others, such as working with a group on a school project or planning a family reunion.
These days you may work across numerous computers and devices. You may use a desktop computer while at your desk and use a laptop, Microsoft Surface, or other tablet, or smartphone when you’re on the go. And there may be times when you use a public computer, such as one in a hotel business center or Internet café. Or, if you’re a student, you may use various computers at school.
Imagine switching to another computer or device and picking up exactly where you left off, right down to the last paragraph in a document you were editing in Microsoft Word or the last slide you were working on in Microsoft PowerPoint.
You could have almost achieved this capability in past versions of Office, but it may not have been as seamless as you’d have liked it to be. Prior to Office Home and Student 2013, personal settings, such as recently used document and folder lists, were associated with the account you used to log in to Windows. That account may be limited to a specific computer, such as your home computer, or if you’re a student, you may have a roaming profile that lets you access your information when you’re connected to your school network.
Office Home and Student 2013 takes the concept of the roaming profile a step further. Instead of a profile that can be accessed only by a specific computer or while you are connected to your school network, personal settings can now be stored online in your Office account. This lets you access your information from almost anywhere. And not just from another computer, but also from devices such as Surface or a Windows Phone.
Plus, you can connect other cloud services that store contact information, documents, photos, and videos and access them right from your Office applications.
Tip
To access your Office account on another computer, it must be running Windows 7 or Windows 8 and be connected to the Internet. It also needs to either have Office Home and Student 2013 installed, or you need a Microsoft Office 365 subscription that includes Microsoft Office on Demand.
See Also
For more on connecting cloud services, see Connecting cloud services to your Office account later in this chapter; for more on Office 365 or Office on Demand, see the sidebar What is Office 365? later in this chapter.
In order to store your information in the cloud, you need an Office account. This account is associated with an email address that you use for various Microsoft services, such as those in the following account types:
Microsoft Account. This account type, previously called Windows Live ID, is typically associated with a personal email address. For example, if you use Windows Live Messenger, Windows Live Hotmail, or Microsoft Xbox LIVE, you have a Microsoft Account.
Organizational account. This account type is provided to you by an administrator for Microsoft SharePoint Online services. If your company or educational organization uses Office 365, then you have an organizational account.
Important
If you have an organizational (Office 365) account, your personal settings aren’t stored on SharePoint but are stored in your Office account.
If your email account lets you use Microsoft services, then you already have an Office account. All you need to do to start using it is sign in to Office, and you’ll learn how to do that in the next section.
As previously mentioned, in order to take advantage of the cloud integration features, you need to sign in to your Office account with an email address that gives you access to various Microsoft services.
Although the option to sign in occurs during the Office Home and Student 2013 installation or appears the first time you start Office Home and Student 2013, you may have skipped that step, or Office may have already been started on your computer.
Tip
If you’re using Windows 8 and are logged in with an account that’s connected to Microsoft services, the Office installation signs you in to your Office account.
In this exercise, you’ll sign in to your Office account.
Set Up
You don’t need an email address that lets you use Microsoft services to complete this exercise. Start Word, create a blank document, and follow the steps.
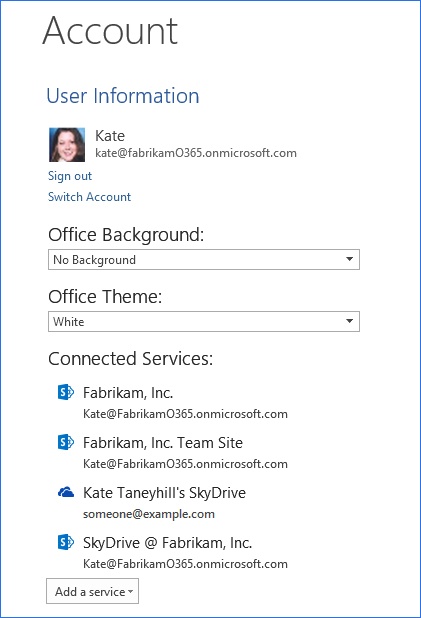
Click the File tab to display the Backstage view, and then click Account.
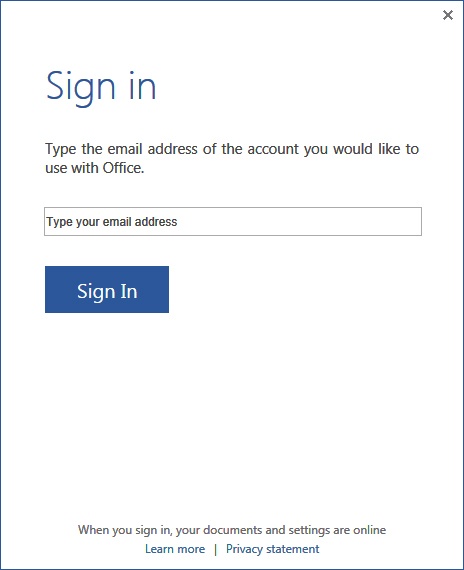
Below the User Information section, click Sign in.
On the Sign in screen, enter your email address and then click the Sign In button.
Complete one of the following actions:
If you already have email address that lets you use Microsoft services, enter your Microsoft Account password and then click Sign In.
If you don’t have an email address that lets you use Microsoft services, click Sign Up Now, and then complete the sign up form.

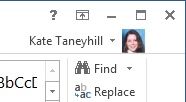
When you sign in to Office, you sign in across the Office applications. And in any application, your sign in name will appear in the upper-right corner above the ribbon.
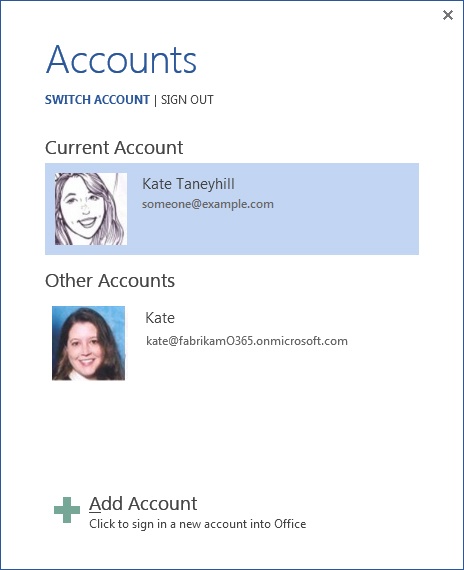
Additionally, you’re not limited to a single Office account and can have more than one. Some people have accounts for school or business and personal use. This lets them keep their recently used files and other preferences separate and easier to manage.
If you have multiple Office accounts, you can easily switch between them from any Office application.
To switch accounts, use the Account page in the Backstage view and the Switch Account option, or click your name in the right corner above the ribbon and then click Switch account, and complete the sign in process.
Note that after you sign in to Office, you stay logged in even if you have switched to another Office account. This way, after you have added at least two Office accounts, you can switch between them without the need to repeat the sign in process.
In this exercise, you’ll switch to another Office account.
Set Up
You need a second Office account to complete this exercise. Start Word if necessary, create a blank document, and follow the steps.
In the Backstage view, click Account.
Click Switch Account.
On the Sign in screen, enter your email address and then click the Sign In button.
Enter your account password, and then click Sign In to log in to your other Office account.
To view your available accounts, display the Switch Account screen again.
To switch between accounts, click an account name below Other Accounts.
As noted, after you sign in to Office, you stay signed in on that computer. This isn’t an issue if it’s your work or personal computer, but if you’re using a public computer, it’s important that you sign out of Office.
When you sign out of your Office account, you’re removing the account from the computer you are using. Part of the sign out process is to delete any personal data that an Office application may have created while you were using the computer. However, it won’t remove documents or other information you may have created. So, if you don’t want that information on the computer, you’ll need to manually delete those items. For example, if you saved a file to the computer’s local drive, then it will still be there after you sign out of your account. And even though you removed your account from the computer, you can sign back in at any time and all of your personal settings that are stored in your Office account will be redisplayed.
In this exercise, you’ll sign out of your Office account.
Set Up
You need to be signed in to Office to complete this exercise. Start Word if it’s not already running, create a blank document, and follow the steps.
In the Backstage view, click Account.
Below the User Information section, click Sign out.
In the Remove Account confirmation message box, click Yes to remove the account.
Exit Word and restart Windows to complete the sign out process.

Cloud services help us stay connected to our information and other people. However, these services can result in information that’s scattered in several different locations, depending on the number of cloud services you have. For example, you could have an organizational account, a Microsoft Account, as well as personal accounts on social networks. You might often need to sign in to various websites to locate a document or recall which social network you need to access to find contact information for someone.
As noted in the section titled Defining the term cloud service earlier in this chapter, you can connect these various online services to your Office account. Doing so gives you the ability to open and save files to your cloud locations and insert your online pictures or videos in an Office document.
See Also
For more information on Office 365, see the sidebar What is Office 365? later in this section. For more information on SkyDrive, see the sidebar What is SkyDrive? also later in this section.
You can connect to cloud services on the Account page in the Backstage view. The available connected service options for your Office account depend on the type of account you’re using for Microsoft services. For example, with either a Microsoft Account or an organizational account, both SharePoint Online and SkyDrive connections are available. But if you have a Microsoft Account type, you’ll have sharing options for personal cloud services like Facebook, LinkedIn, Twitter, and Flickr. These may not be shown if you have an organizational account, because this account type is more school oriented or business oriented.
Tip
If you have an Office 365 account, your file storage locations on SharePoint Online may be connected and available when you sign in.
In this exercise, you’ll first connect a SharePoint Online or SkyDrive cloud storage service to your Office account. Then you’ll have the option to connect a personal cloud service like LinkedIn.
Set Up
You need to be signed in to Office and be connected to the Internet. To complete the optional steps for connecting a personal cloud service, you must be signed in with a Microsoft Account and have a Facebook, LinkedIn, or Twitter account. Start Word if necessary, create a blank document, and follow the steps.
In the Backstage view, click Account.
In the account options, click Add a service, point to Storage, and then click either Office 365 SharePoint or SkyDrive.
On the Sign in screen, enter the email address for your cloud storage account and complete the sign in process.
Your connected service will be listed under the account settings in the Backstage view.
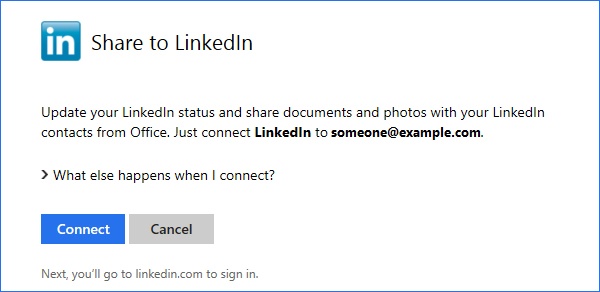
If you have a Microsoft Account type and want to connect a personal cloud service like Facebook, LinkedIn, or Twitter, then follow these optional steps.
In the Backstage view, click Account.
Click Add a service, point to Sharing, and then click the cloud service you want to add to display the options for connecting your Office account.
For example, if you have a LinkedIn account, click LinkedIn.
Complete the sign-in steps as directed by the service you selected.
Important
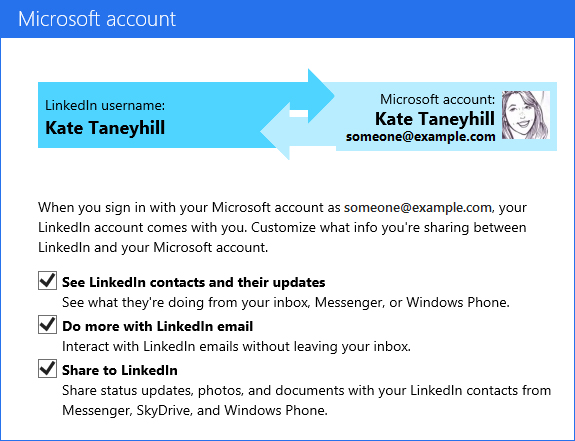
The service may require that you authorize the connection. This process is typically accomplished through an email message that is sent to the email address you used to log in to the service. If authorization is required, it must be completed before you can access the service through Office.
Tip
Some personal cloud services have additional options that let you choose the type of information you share between the service and your Microsoft Account. In the Backstage view, on the Account page, if a Manage link appears next to the service, click the link to view the options. For example, if you click the Manage link for LinkedIn, you’ll find options for viewing LinkedIn contacts, their status updates, and using LinkedIn email in Outlook. You’ll also find an option for sharing status updates and files with your LinkedIn contacts through other social services like Microsoft Messenger, SkyDrive, or your Windows phone.
Your Microsoft Account options are also where you’ll find the ability to remove the personal cloud service. Other services, such as SkyDrive, can be removed from the Backstage view.
In the previous sections, you learned how your Office cloud account lets you take your Office settings with you. You also learned how to sign in to your Office account and connect to cloud services. But, if you want to access your recently used files or other files across various computers and devices, those files need to be saved in a cloud service like SharePoint Online or SkyDrive. Now that Office has integrated cloud services for opening and saving documents, you’ll find that using these locations is just as easy as using a local or network drive.
In this exercise, you’ll create a new document in Word and save it to either SharePoint Online or SkyDrive.
Set Up
You need either a SharePoint Online location or SkyDrive added to your connected services to complete this exercise. Start Word if necessary, and follow the steps.
Tip
The steps for saving files to the cloud also apply to Excel and PowerPoint. For Microsoft OneNote, saving a notebook is part of the creation process, and the steps you use are slightly different than the following procedure.
See Also
For information about creating and saving a new OneNote notebook to a cloud location, see Chapter 25.
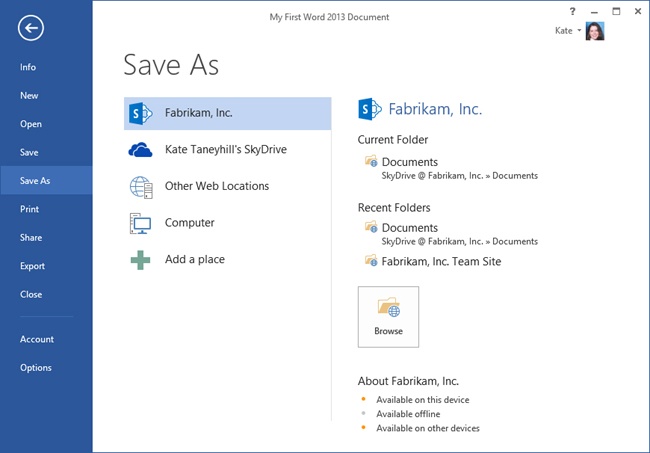
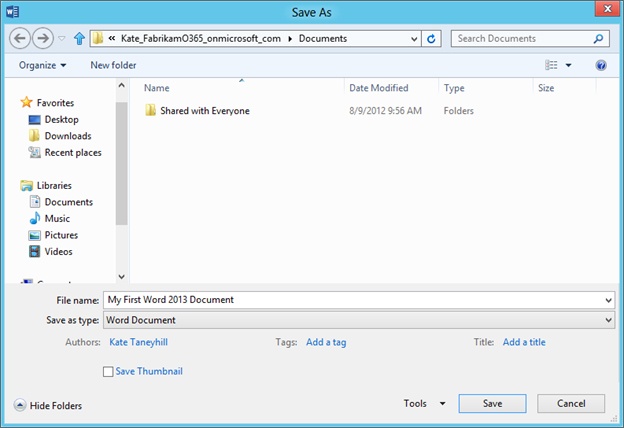
From the Word Start screen, click Blank Document.
In the blank Word document, enter some sample text.
In the Backstage view, click your SharePoint Online or SkyDrive location.
To the right of your selected location, either click a recent folder or click Browse to select an alternate folder.
In the Save As dialog box, in the File name text box, enter My First Word 2013 Document and then click Save.
To close the document, click the File tab, and then click Close.
After you save a document or notebook to SharePoint Online or to your SkyDrive location, you can share the file with others. For example, you might have a file that’s too large to send in an email message. You could be collaborating with other people on a document and everyone needs to work on it at the same time, which is referred to as co-authoring. Or, you might have a notebook with notes that you want to share with others. Office Home and Student 2013 has made sharing easier than ever before by adding sharing options for Excel, OneNote, PowerPoint, and Word files right in the Backstage view.
See Also
For more information on co-authoring, see Getting started with co-authoring later in this chapter.
When you share a file from your Office application, you can also set one of two permission types, Can Edit and Can View. As each option name implies, those with Can Edit permission can edit your file and update their changes on the cloud location. Those with Can View permission have read-only access to your file, which means any changes they may make cannot be saved to the cloud location.
You also have the option to require people to sign in with either their Microsoft Account or their organizational (Office 365) account in order to access the file. Although requiring others to sign in may seem like an extra step, it helps protect your file. When you share a file, you send a sharing link, which can potentially be sent to other people. If you require sign in, only those you’ve explicitly shared your file with will be able to access it.
In this exercise, you’ll share the document that you created in the Saving files on SharePoint Online and SkyDrive section with others.
Set Up
All of the steps in the previous exercise need to be completed. Start Word if it’s not already running, and follow the steps.
Click the File tab to display the Backstage view, and then click Open.
From the Recent Documents list, click My First Word 2013 Document to open the document in Word.
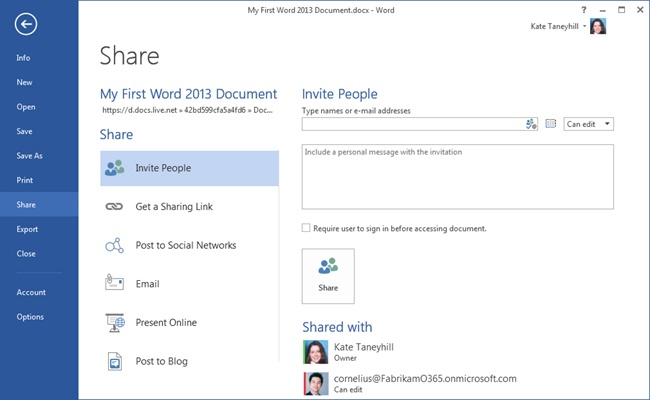
In the Backstage view, on the Share page, click Invite People.
In the Invite People section, enter the names or email addresses of the people with whom you want to share the document.
Note the Permissions drop-down box on the far right of the names and email addresses text box. You can change the permissions from Can Edit to Can View, if you want.
Enter a message in the Include a personal message text box, if you want.
Select the Require user to sign in before accessing the document option, if you want.
Click Share to share the document and send the sharing invitation.
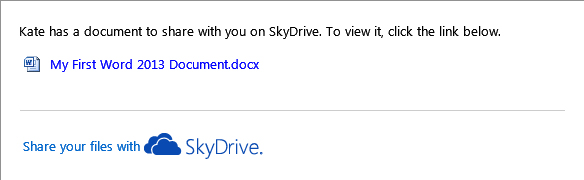
After you send your sharing invitation, each person will also receive an email message that contains a link to your file. Clicking the link will open the file in the corresponding Office Web App. For example, if the file is a Word document, it will open in Word Web App.
After you have saved files on SharePoint Online or on SkyDrive, you essentially use the same steps for opening a file from the cloud as you would for saving files to the cloud.
In the previous exercise, you opened My First Word 2013 Document from your Recent Documents list. In this exercise, you’ll open the document by using the Open dialog box.
Set Up
All of the steps in the exercise from the Saving files on SharePoint Online and SkyDrive section earlier in this chapter need to be completed. Start Word if necessary, and follow the steps.
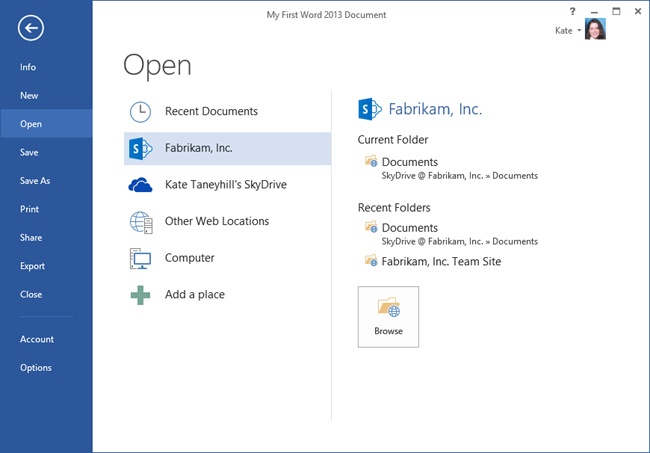
Click the File tab and then click Open.
In the Open options, click the same location in which you saved My First Word 2013 Document, such as your SkyDrive.
On the right side, below Recent Folders, click the folder where you saved My First Word 2013 Document to display the Open dialog box.
Select My First Word 2013 Document and then click Open to view your document in Word.
On the Quick Access Toolbar, note the green arrows in the lower-right corner of the Save button, which indicate that your changes will be synced with your cloud location when you save the document.
In the previous exercises, you learned how to open and save files in the cloud. You may be wondering at this point about what happens if you don’t have an Internet connection, or if you’re limited to using a web browser to manage your files. The good news is SkyDrive has an answer for both. You can create a sync location for files stored in the cloud to a network or local drive so they can be used even when an Internet connection isn’t available. The sync folder also provides the ability to access and manage your files directly from Windows 8 File Explorer or Windows Explorer on Windows 7. Best of all, after you create the location, your files will sync when you’re connected to the Internet.
Tip
In Windows 8, File Explorer has replaced Windows Explorer. Throughout this book, we refer to this browsing utility by its Windows 8 name. If your computer is running Windows 7, use Windows Explorer instead.
If you’re wondering how this works exactly, when you create a sync location, you’re essentially creating a shortcut to your cloud service that can be accessed from your computer. But unlike a shortcut that needs the location to be available in order to access it, in a sync location offline copies of your files are created in the folder. Then when an Internet connection is available, your online files are updated.
In this exercise, you’ll create a sync location for SkyDrive Pro, and then you’ll get the SkyDrive app for a Microsoft Account to sync your files. If you don’t have both SkyDrive Pro and a Microsoft Account, choose the set of instructions in this exercise that fits the type of SkyDrive you’re using.
See Also
For more information on determining the type of SkyDrive you have, see the sidebar What is SkyDrive? earlier in this chapter.
If you have an Office 365 account with SharePoint Online and want to sync your files with SkyDrive Pro, follow these steps.
Set Up
You need an Office 365 account that includes SharePoint Online for this exercise. Open a web browser and follow the steps.
In the address bar of your web browser, enter www.Office365.com and press the Enter key.
If necessary, sign in to Office 365 with your email address and password.
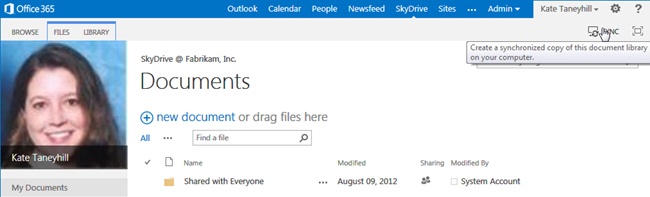
In the navigation options near the top of the page, click SkyDrive.
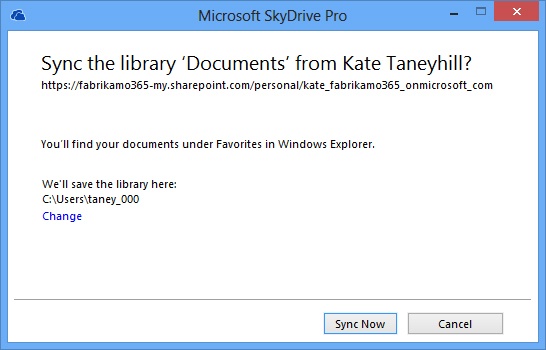
In the upper-right corner, below your sign-in name, click SYNC.
In the Microsoft SkyDrive Pro dialog box, click Sync Now to create a folder with a name similar to SkyDrive @ Fabrikam, Inc. in the location you specified.
If you have a Microsoft Account and want to sync your files with SkyDrive, follow these steps.
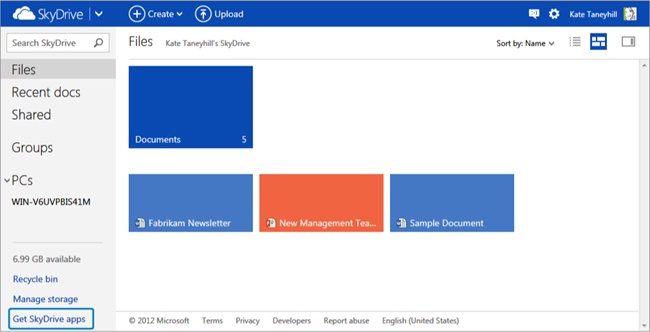
In the address bar of your web browser, enter www.SkyDrive.com and press the Enter key.
If necessary, sign in to SkyDrive with your email address and password.
In the navigation options on the left, near the bottom of the screen, click Get SkyDrive apps.
Locate the SkyDrive app for Windows Desktop, then download and install the application.
When the Introducing your SkyDrive Folder message box displays, click Next and complete the installation.
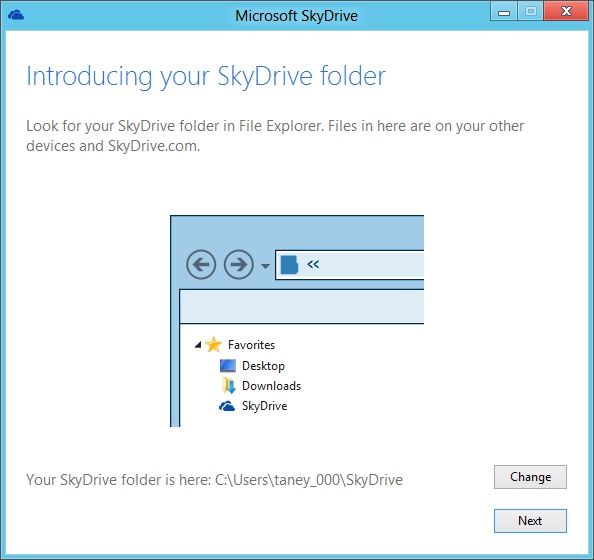
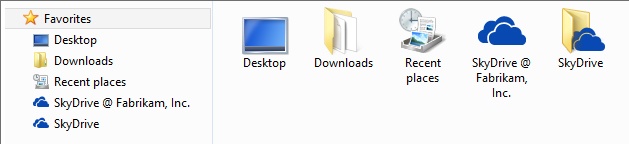
After you follow either set of steps, a shortcut to your SkyDrive folder is created and added to your Favorites list in File Explorer. Additionally, because your Favorites list appears in most Windows dialog boxes for opening and saving files or inserting file attachments in an email message, you can access your SkyDrive from almost every application.

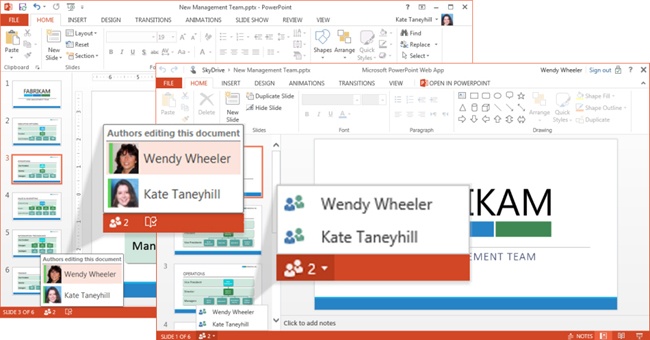
When you collaborate with others on Office documents, you may encounter a situation in which more than one person needs to work on a file at the same time. Consider the following scenarios:
Multiple people need to contribute to a school newsletter, and the deadline is in a few hours.
Several people are taking part in a last-minute presentation, and they all need to add speaker notes to their slides.
Your team’s project notes for an upcoming class project are stored in a OneNote notebook, and you need to collaborate on them during a meeting.
Several people are responsible for adding budget and cost data to a workbook for an upcoming class or family reunion.
If you’ve ever encountered any of these scenarios, you’ve likely waited for the original file to be available. With the co-authoring feature, you don’t need to wait. Multiple people can edit an Office document or a notebook at the same time.
Here’s a list of the Office applications that support co-authoring:
Excel Web App
OneNote and OneNote Web App
PowerPoint and PowerPoint Web App
Word and Word Web App
To start a co-authoring session, the following requirements must be met:
The file must be opened in a supported application.
The Office document or notebook must be stored on SharePoint, SharePoint Online, or SkyDrive.
The file needs to be shared with other co-authors.
Ideally, co-authoring is seamless, and it’s not something you necessarily plan. If the requirements are met and more than one person edits a document or notebook at the same time, co-authoring is automatic. With the exception of Excel files, one person can even be using the desktop application and another can be using the associated Office Web App.
For Excel, if multiple people need to edit a workbook at the same time, all they need to do is open it in Excel Web App. For this scenario, some coordination with others may be necessary.
When more than one person opens the same shared file, a notification appears in the status bar and reflects the total author count. When you click the count in the status bar, you’ll get a list of the people currently using the file.
A cloud service is an online file storage service, resource, or application that is accessed through the Internet.
To store your Office settings, such as recently used files and folders, in the Office cloud, you need an email account that gives you access to Microsoft services.
Examples of Microsoft services are SharePoint Online, SkyDrive, Hotmail, and Windows Live Messenger.
You can connect cloud services like SkyDrive, Facebook, Twitter, LinkedIn, and Flickr to your Office account to share information between the service and Office.
To access your Office documents from almost any computer or device, the files need to be stored in a cloud service such as SharePoint Online or SkyDrive.
Co-authoring is supported in Excel Web App, OneNote, OneNote Web App, PowerPoint, PowerPoint Web App, Word, and Word Web App.
To start a co-authoring session, the Office document or notebook must be stored in a cloud service such as SharePoint Online or SkyDrive and shared with your co-authors.