
Microsoft Vista: Update and Monitoring Services
Introduction
Regularly updating the applications, operating system (OS), and drivers on your desktop and server systems is an essential part of being a system administrator. If you have ever been in the position of having to administer a large group of desktop and server systems, you know that patch management is one of the most tedious and frustrating pieces to the security puzzle. It is also one of the most important and, unfortunately, overlooked pieces.
We need to be diligent in patching the systems we manage throughout our organization, but individual users also need to make sure they are keeping their home systems up-to-date and secure. Although it seems like we’ve got all the assets we need to worry about within the walls of our office, those home systems are an important aspect of organizational security, the security of individuals’ personal information, and the security of the Internet in general. If those systems are left open to be compromised, a great deal of personal data is at risk. Also, those in charge of the security of an enterprise risk being attacked by home systems. We give the attacker a valuable starting point toward breaking into our work environment if we leave our PC systems at risk. How many of us have a laptop that we bring home from work and plug directly into our home network, and then link back to our work network with a virtual private network (VPN)? If the system at home is compromised, and an attacker is able to start logging passwords used on that machine, the attacker will quickly build a bank of working credentials to use in attacks. We quickly begin to see the importance of keeping our systems patched and why there has been such a push toward building a better software update system.
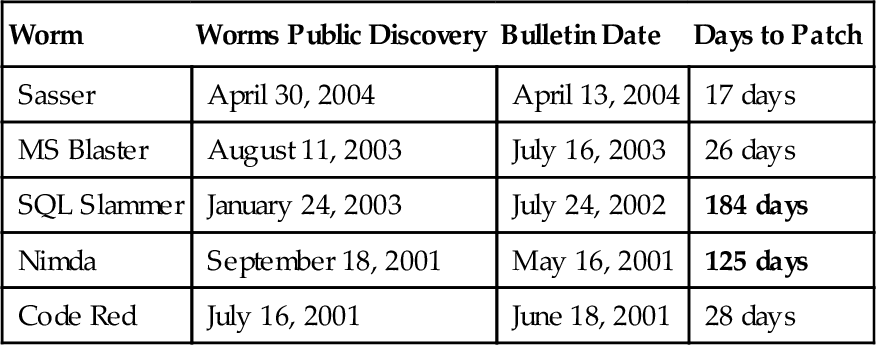
Microsoft has long held a majority of the market share for desktop OSes, and because of widespread use of its software, it finds itself under constant attack by evildoers and under constant scrutiny from users, administrators, and security research groups. Windows Update was brought into existence to provide an easy way to apply updates, but several problems with the system are now evident. The first problem lies with the home users who should be updating their systems on a regular basis, but in reality rarely check the Windows Update site for patches. The second problem lies with the system administrators who are in the awful position of either setting the system to automatic updates and hoping a patch doesn’t incapacitate their users’ systems, or spending a lot of manpower to manually update the systems under their control. It took events such as SQL Slammer to expose the flaws in enterprise patch management systems. What good is a security update for a known vulnerability if most of the population doesn’t go to the Windows Update Web site to install it?
Table 9.1
Destructive Worms
| Worm | Worms Public Discovery | Bulletin Date | Days to Patch |
| Sasser | April 30, 2004 | April 13, 2004 | 17 days |
| MS Blaster | August 11, 2003 | July 16, 2003 | 26 days |
| SQL Slammer | January 24, 2003 | July 24, 2002 | 184 days |
| Nimda | September 18, 2001 | May 16, 2001 | 125 days |
| Code Red | July 16, 2001 | June 18, 2001 | 28 days |
The landscape of the software update world looks much different from how it looked just a few years ago. We have a refined Windows Update, and now Microsoft Update, which provides automatic updates for products other than the core Windows OS. We also have the very robust Windows Server Update Services (WSUS), which provides central control over the systems in our organization and their software update needs, with the second version of the free software package. Not far off we see a very impressive WSUS 3 that will provide administrators with a very robust, easy-to-use update system that is administered through the familiar (and itself recently updated) Microsoft Management Console (MMC) 3.0. When we look at enterprise-level update and monitoring packages, we see Systems Management Server (SMS), which can provide software updates for Microsoft products and third-party software, as well as provide centralized monitoring of our networked systems. Microsoft Operations Manager (MOM) is a product that is focused on monitoring our data center and other network systems. MOM also allows us to install Management Packs (MPs) for Microsoft servers and technology as well as third-party devices. The field of third party update packages also continues to grow and mature. ScriptLogic and Altiris both provide a set of modular software products enabling administrators to manage and update their enterprise systems. Ecora also provides a patch management system to go along with their auditing and compliance focused products.
Moving forward even further we look at the System Center line of products that Microsoft is releasing, and we see that these products have become very robust management and monitoring tools for not only a homogeneous Microsoft-based network, but also the real-world, heterogeneous, diverse networks that we actually design and administer. In this chapter, we will look at three System Center offerings, all of which are currently provided as Beta or release candidate-level products. Systems Management Server (SMS) v4, otherwise known as System Center Configuration Manager (SCCM) 2007, is the evolution of SMS v3 and provides enterprises with the ability to monitor, manage, and update their systems. System Center Essentials (SCE) 2007 is provided for the mid-size business as a sort of hybrid between SMS, WSUS 3, and MOM. SCE will provide monitoring, remote management, software updates, and software installation services. MOM has evolved into System Center Operations Manager (SCOM) 2007 and will provide a robust monitoring and management infrastructure for large enterprises. Several other products in the System Center family focus on things such as data protection management and virtual server management.
We will also take a look at one of the third-party enterprise-level management solutions available, Altiris Client Management Suite. Altiris has an incredible software catalog and its products are designed to work well together as well as work in homogeneous environments. Client Management Suite can be seen as a rival to Microsoft’s SMS, and it includes very robust, yet easy-to-use software update, software installation, monitoring, and management tools.
Using Windows Update
Microsoft provides the user with a very capable OS update system that is built into the OS, through Windows Update. Using this system to apply patches is like applying kernel patches to a Linux system. The Windows Update system provides updates for the Windows kernel, as well as any number of userland applications that are considered part of the base OS: Internet Explorer, Windows Media Player (WMP), and so on. Windows Update mostly provides security and other critical updates, but new versions of WMP and Internet Explorer are pushed out through the system as well. Microsoft will also push Service Packs (SPs), Update Rollups, and Feature Packs through the Windows Update system. In addition, we can, if we are so inclined, update signed hardware drivers.
Windows Update has been around for many versions of Windows, but the earlier versions were rarely used by home users and were reserved mostly for use in the corporate world. If a home user’s computer had patches applied it was either immediately after the initial install or because an SP was released. SP2 for Windows XP was released and Microsoft began to force Windows Update on all XP users by implementing a notification system to inform users when automatic updates and other security software weren’t enabled, as well as notifying users when new updates were available for download or installation.
Windows Update Settings
The Windows Update mechanism in Vista operates very similarly to XP SP2, but with a few differences. Vista will give you a choice of three options during installation. These options not only relate to update settings, but also encompass error reporting, driver installation, and antispyware protection. Table 9.2 is a matrix of the options available, and the ultimate outcome of your choice.
Table 9.2
Security Settings during Windows Vista Installation
| Setting | Description |
| Use recommended settings | Windows will download and install important as well as recommended updates. Windows Defender Anti-Spyware will be enabled and the user will be automatically enrolled in Microsoft SpyNet. Windows will also automatically check for drivers when new hardware devices are installed and, when errors occur, will send error reports to Microsoft and check for solutions online. |
| Install important updates only | Windows will download and install security and other important updates only. |
| Ask me later | Neither of the preceding options will be set and automatic updating will be turned off. Windows will ask you what you’d like to do once installation is completed and you have logged in for the first time. |
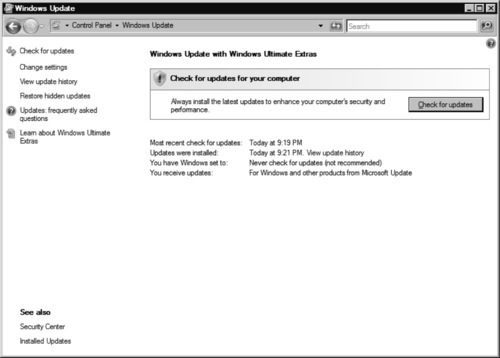
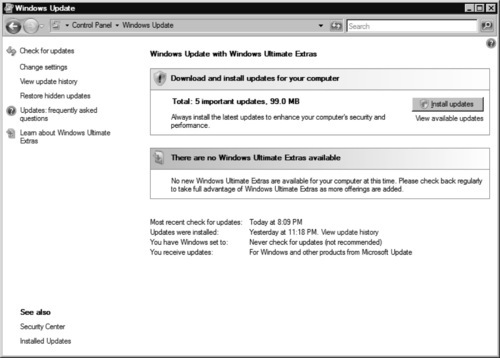
After installation, or on an existing installation, you can change these settings through the Windows Update Control Panel applet, as shown in Figure 9.1.
You can reach the Windows Update Control Panel applet by following these steps:
1. Go to Start | Control Panel.
2. Select Classic View on the right.
3. Double-click Windows Update.
Alternatively, you can reach the Windows Update Control Panel applet through the new Windows Vista Control Panel layout in the Security Center. The new layout is nice, because it groups related items together, such as the security-related items under the Security Center. But using the new layout will add an extra click when you’re trying to reach specific items, such as Windows Update. In the end, it becomes a personal choice, but we prefer a more familiar layout with fewer clicks.
You may notice that the Windows Update Control Panel applet is very different from what Windows XP offered. First, you now have access to all aspects of updating from one main screen. In previous versions, the Windows Update Control Panel applet was reserved for one task: to set whether you wanted to use automatic updating and on what schedule you wanted the service to operate. Gone are the days of visiting the Windows Update Web site and dealing with installing ActiveX controls and browser settings in order to apply updates manually. We also gain the ability to view our update history and, possibly the greatest addition of all, uninstall updates.
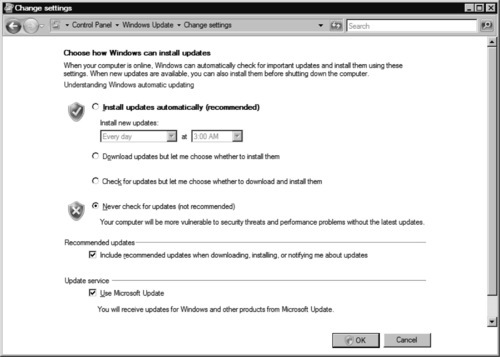
You can change Windows Update settings by selecting Change Settings from the main Windows Update screen. You will be presented with the Change Settings window (see Figure 9.2), where you’ll see familiar automatic update choices.
Installing Updates Automatically
The Install updates automatically (recommended) option will automatically check for new updates, download those updates that are pertinent to your system, and, according to the schedule you specify, install those updates. To use this option, follow these steps:
1. Select the Install updates automatically (recommended) radio button (refer to Figure 9.2). The scheduling options will no longer be grayed out.
2. Choose Every day at Specified Time (12 AM to 11 PM) to install new updates every day, or choose Every (Specific Day) to install new updates only once a week (refer to Figure 9.2).
3. Select the Include recommended updates when downloading, installing, or notifying me about updates checkbox, under the Recommended updates section, if you want recommended updates to be included (refer to Figure 9.2).
4. Click OK.
5. Click Continue on the User Account Control dialog box to save the settings and return to the main Windows Update screen.
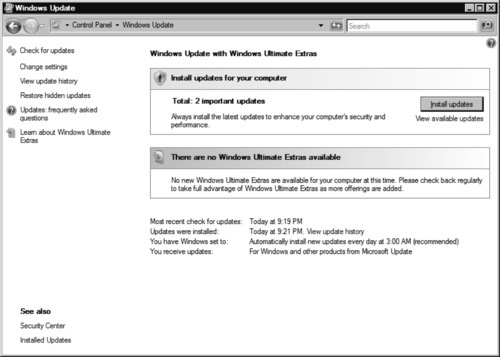
6. At this point, Windows Update will automatically check for and download new updates. You can either ignore the notification (see Figure 9.3) and Windows Update will simply install the updates during the scheduled time frame, or click Install updates to immediately install the updates.
Choosing Whether to Install Downloaded Updates
The Download updates but let me choose whether to install them option will automatically check for new updates, download those updates, and then provide a taskbar notification balloon informing you of the new updates available for installation. To use this option, follow these steps:
1. Select the Download updates but let me choose whether to install them radio button (refer to Figure 9.2).
2. Select the Include recommended updates when downloading, installing, or notifying me about updates checkbox, under the Recommended updates section, if you want recommended updates to be included (refer to Figure 9.2).
3. Click OK.
4. Click Continue on the User Account Control dialog box to save the settings and return to the main Windows Update screen.
5. At this point, Windows Update will automatically check for and download new updates. You can either ignore the notification (refer to Figure 9.3) and you will receive the taskbar notification balloon until you install the updates, or you can click Install updates to immediately install the updates.
Checking for Updates but Choosing Whether to Download and Install Them
The Check for updates but let me choose whether to download and install them option will automatically check for new updates and then provide a taskbar notification balloon informing you of the new updates available for installation. This option works in an identical manner to the preceding option, but it provides the benefit of conserving bandwidth until you determine exactly which updates to download and install. To use this option, follow these steps:
1. Select the Check for updates but let me choose whether to download and install them radio button (refer to Figure 9.2).
2. Select the Include recommended updates when downloading, installing, or notifying me about updates checkbox, under the Recommended updates section, if you want recommended updates to be included (refer to Figure 9.2).
3. Click OK.
4. Click Continue on the User Account Control dialog box to save the settings and return to the main Windows Update screen.
5. At this point, Windows Update will automatically check for new updates. You can either ignore the notification (refer to Figure 9.3) and you will receive the taskbar notification balloon until you install the updates, or you can click Install updates to immediately install the updates.
Never Checking for Updates
The Never check for updates (not recommended) option will turn off all Windows Update automatic features and allow the user to manually check, download, and install new updates. Microsoft lists this choice as “not recommended,” and it is correct in labeling it as such for the majority of users. There will always be exceptions, though, and through this option any user can choose to manually manage her updates through Windows Update, or use some other Microsoft-based or third-party update service. If you do choose this option, you will receive a rather persistent notification from the Windows Security Center. To disable the notification, follow these steps:
1. Click on the Security Center taskbar icon or go to Start | Control Panel | Classic View | Security Center.
2. Click Change the way security center alerts me.
3. Choose from one of these two options: Don’t notify me, but display the icon or Don’t notify me and don’t display the icon (not recommended).
Using Microsoft Update
Microsoft Update is the expanded software update service from Microsoft that encompasses many of its product lines and server technologies. It works identically to Windows Update and is actually just a simple update to the Windows Update mechanism. We have not been able to find a good answer as to why Microsoft is “marketing” Microsoft Update as something entirely new instead of rolling it out as an update to the Windows Update service. All in all, the Microsoft Update service is a welcome enhancement and we tend to use it on all our systems, including servers. Microsoft Update can provide updates for the following Microsoft products in addition to the Windows OS family:
■ Microsoft SQL Server 2000 and later
■ Microsoft Exchange Server 2000 and later
■ Microsoft Visual Studio
■ Microsoft Internet Security and Acceleration Server
■ Microsoft Data Protection Manager
■ Microsoft Office System XP and later
■ Windows Defender
■ MSN
Installing Microsoft Update
After installing Microsoft Update, you will be able to utilize the new features and receive updates for the previously mentioned Microsoft products, all through the Windows Update Control Panel applet. To install Microsoft Update, follow these steps:
1. Click Get updates for more products on the main Windows Update applet screen. This will open Internet Explorer, displaying the Windows Vista-specific Microsoft Update installation Web page.
2. Select I accept the Terms of Use and click Install.
3. Click Continue on the User Account Control dialog box.
4. Once the installation is complete, a Web page instructing you to “use your Start menu to check for updates” and confirming the successful installation of Microsoft Updates with a large green check is displayed.
Enabling and Disabling Microsoft Update
If you decide at some point to disable or reenable Microsoft Update features, Windows Vista greatly improves on the options you had in previous versions of Windows. Here’s how to enable and disable Microsoft Update:
1. Go to Start | Control Panel | Classic View | Windows Update.
2. Click Change Settings.
3. Under the Update service heading (refer to Figure 9.2), select or deselect the Use Microsoft Update checkbox.
4. Click OK.
5. Click Continue on the User Account Control dialog box to save the settings and return to the main Windows Update screen.
Managing Updates
Windows Update has provided us the ability to see our update history, view update details, hide and unhide certain unwanted updates, and read about methods to uninstall problematic updates. However, it has suffered from a few critical drawbacks associated with being served as a Web application from the Microsoft site. Windows Vista has all of these same functions available to the user, but as we have seen, it takes the entire Windows Update service and integrates it into the Control Panel. This seems trivial at first, but the bonuses to this are that we don’t need to rely on Internet Explorer to get updates, there is no need to install ActiveX controls, and we do not need to worry about users getting tricked into going to a spoofed Windows Update Web site.
Checking for Updates
Checking for updates is as easy as navigating to the Windows Update Control Panel applet and clicking Check for updates. You will see a status bar and the system will inform you that it is checking for available updates. Once Windows Update is done checking for updates, it will ask you to download and install the updates that are pertinent to your system (see Figure 9.4).
Installing Updates
At this time, you can simply accept that Windows Update knows best and click Install updates, or you can delve a little deeper to make choices about the updates available by clicking View available updates. The View available updates screen (see Figure 9.5) shows you what updates are currently available for your system. At the time of this writing, only three updates were available, but as time passes more and more updates will inevitably become available and new installs of Vista will begin to require quite a few updates to be patched properly.
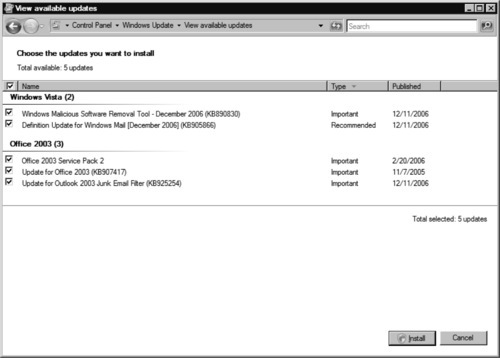
In our example, we have handy filter options that work just like any other Windows Explorer-based mechanism. Updates are initially grouped and sorted by the name of the program or system component to which the update is related. Clicking the Type heading will sort the updates according to their classification: Important, Recommended, and so on. Clicking the Published heading will sort the updates by the date that Microsoft published them. Toggling the checkbox in the header will select or deselect all the updates at once. Toggling the individual checkboxes next to each update will let the user choose which updates to install. Clicking Install at this point will return you to the main Windows Update screen and the selected updates will be downloaded and installed.
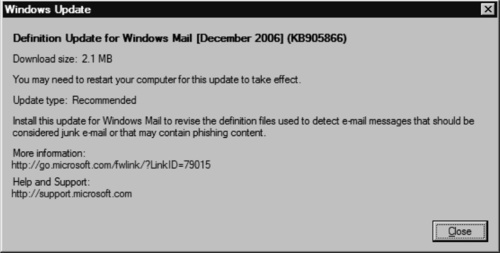
The View available updates screen also allows you to view the details of an update by right-clicking and choosing View Details. The Windows Update Details dialog box shows information about the specific update, such as size, type, description, Microsoft Knowledge Base code, a link to an informational Web page, and a link to a help and support Web page that is specific to that update (see Figure 9.6).
You can also hide unwanted updates by right-clicking on the specific update and choosing Hide update. The update will then be deselected and grayed out. The update will also no longer appear in the list of available updates when checking for updates.
Viewing the Update History
Viewing your update history may be valuable, although in the current implementation, it has limited usefulness. It is useful to see a history of what updates were installed and when they were applied, however. For instance, if your network is attacked and a system is compromised, you would want to search for other internal systems that may have been compromised if the first system was used as the staging area for further attacks. The problem is that a lot of exploits are available for an attacker to use. How do you efficiently search for evidence of an exploit?
One way to narrow your search is to check your list of known exploits against your update history to see which ones you can eliminate because the patch for that exploit was applied prior to the system compromise. This sounds great in theory, and it will work in most instances, but it seems that Vista does not update your history when an update is uninstalled from the system. The only other things you can do from this window are sort updates and view the details of an update, which you can do by following these steps:
1. Go to Start | Control Panel | Classic View | Windows Update.
2. Click View update history.
3. Click Installed Updates to uninstall an update, click Name, Status, Type, and Date Installed to sort the list of updates by attribute, or right-click on the specific update and choose View Details to access the details dialog for that update (see Figure 9.7).

4. Click OK to return to the main Windows Update screen.
Restoring Hidden Updates
If you have previously hidden certain updates for your system that you later decide to install, you will need to restore those previously hidden updates. To do so, follow these steps:
1. Go to Start | Control Panel | Classic View | Windows Update.
2. Click Restore hidden updates.
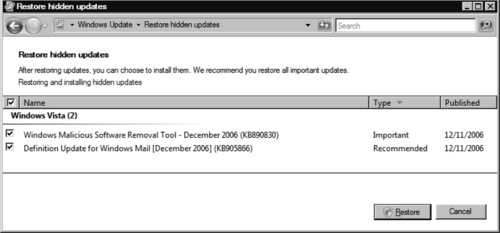
3. Select the checkboxes next to the updates you want to restore, or select the checkbox in the header to select all the updates (see Figure 9.8).
4. Click Restore and then click Continue on the User Account Control pop-up dialog box. This will return you to the main Windows Update Control Panel applet screen and automatically trigger the system to check for new updates.
Uninstalling Updates
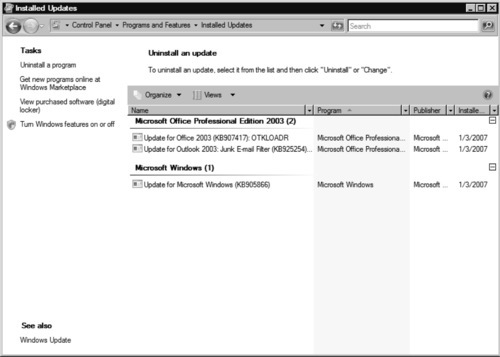
We have all been in the situation where we need to uninstall a previously installed update, and if you haven’t been in that position and you work in IT, you will most likely run into that situation at some point. In previous versions of Windows, the updates were placed under Add and Remove Programs in the Control Panel. Windows Vista separates the user-installed programs and the installed updates for easier viewing and manageability. Vista also makes the Installed Programs and Installed Updates screens part of the new Windows Explorer interface (see Figure 9.9), which means that you get familiar file-sorting and searching functionality. The Installed Updates screen also has a customized header which allows for quick sorting by name, related program, publisher, and when the update was installed. You can also customize the header to show any number of update-specific attributes, such as the update ID and update info link. To uninstall updates, follow these steps:
1. Go to Start | Control Panel | Classic View | Windows Update.
2. Click Installed updates in the bottom left-hand corner of the main Windows Update Control Panel applet, under the heading See also. This will display the Installed Updates screen, which you can also reach through Start | Control Panel | Classic View | Programs and Features | Uninstall an update.
3. At this point, you can customize the header and list additional attributes, or you can sort the list of installed updates by clicking any of the attributes listed on the header. You can also right-click in the Installed Updates window to bring up a menu allowing you to change how the items are viewed, sorted, and grouped. The default grouping for updates is to group them by program, but you can change that to a chronological grouping by right-clicking and choosing Group By | Installed On, or Group By | Publisher to group by the publisher of the update.
4. Once you have found the update that you would like to uninstall, simply select the specific update and click Uninstall above the header next to the Organize and Views menus. You may also right-click the specific update and choose Uninstall.
5. Click Yes on the Uninstall an update pop-up dialog box, and then click Continue on the User Account Control pop-up dialog box to continue with the process.
Microsoft releases scheduled patches on the second Tuesday of every month, although it has been known to skip a scheduled patch day in the past. Microsoft will also rarely release extremely critical patches on-the-fly, so to speak. The reality of patching is that most users will choose one of the initial security settings (refer to Table 9.1) during installation, or leave the setting as the factory-installed default and never think about the security of their system again. Because the default setting is usually the Microsoft recommended setting that may be sufficient for most home users. However, for some home users, and for systems in a corporate environment, this may not be the be-all and end-all of software update services. A lot of users will simply choose Install important updates only, which means they will only receive security updates and other important updates. This setting sounds like a valid choice, especially from the perspective of this book, because after all, we are talking about security and Windows Vista. Unfortunately, this fails to take into account other Microsoft products and their security updates. Microsoft Office and other Microsoft-produced applications are not included in the default update process without first installing Microsoft Update, and third-party user applications aren’t included without a completely separate update service. Windows Update, Microsoft Update, and Windows Vista go a long way toward increasing the security of work and home systems alike, but security awareness and taking control of your own security posture is something that can’t be forced. Unfortunately, there will always be home users and even system administrators that will not take control of the systems under their care.
Scripting Windows Update Settings
We have talked about using the graphical user interface (GUI) tools in Vista to control Windows Update, and although using these tools will work for home users, administrators in very small offices, and masochistic administrators in large organizations, they really won’t work for the majority of system administrators in offices with more than 10 or 15 computers, unless they are using the “set and forget” method of automatic updating. At this point, our advice is to get WSUS up and running and control your system that way. However, maybe your office is sitting on that threshold—10 to 15 computers, but no spare servers—or maybe you have outsourced all your server roles and don’t even have an old computer somewhere that you can use to run WSUS. Who knows, maybe you’re one of those administrators that just really likes scripting everything.
Tales from the Script gives a good run-down of common tasks that you, as an administrator, would want to accomplish. We will look at and expand on a few of those scripts. First, we want to take a look at changing Windows Update settings. The unfortunate reality of scripting Windows Update is that a lot of these scripts cannot be run against a machine remotely. This means that you can run a lot of the functionality that you would want to run on a machine only if you are logged onto that machine. For example, if we wanted to determine whether the Automatic Updates service was installed, we could do that remotely, but if we wanted to determine what the Automatic Updates notification level was, we would have to run the script locally. You can create the script and have it run upon logon via Group Policy, but all that does is report the notification level on the screen. These scripts can also be useful when first setting up a machine, or when you find that a user with too many privileges has gone in and changed these settings, and you would like to return to the correct settings with one command.
Enabling and Scheduling Automatic Updates
First, we want to enable automatic updates:
Set objAutoUpdate = CreateObject(“Microsoft.Update.AutoUpdate”)
Set objSettings = objAutoUpdate.Settings
objSettings.NotificationLevel = 4
objSettings.Save
The value of objSettings.NotificationLevel is set to the notification level that you want to use, and it maps directly to the settings shown on the Change Settings screen (refer to Figure 9.2). Those settings are as follows:
■ 1 Never check for Updates. Automatic Update is essentially disabled.
■ 2 Check for updates, but let me choose whether to download and install them.
■ 3 Download updates, but let me choose whether to install them.
■ 4 Install updates automatically. This installs updates per the user-defined schedule.
Using that script by itself will allow you to determine what level of automation and required user interaction you want, and it will let you set it via the command line. If you choose a notification level of 4, you can either accept the default schedule, or set a schedule that you choose using the following script:
Set objAutoUpdate = CreateObject(“Microsoft.Update.AutoUpdate”)
Set objSettings = objAutoUpdate.Settings
objSettings.ScheduledInstallationDay = 4
objSettings.ScheduledInstallationTime = 2
objSettings.Save
The value of objSettings.ScheduledInstallationDay is set to the day you want installations to occur every week, and it maps directly to the schedule settings shown on the Change Settings screen (refer to Figure 9.2). Those settings are as follows:
■ 1 Sunday.
■ 2 Monday.
■ 3 Tuesday.
■ 4 Wednesday.
■ 5 Thursday.
■ 6 Friday.
■ 7 Saturday.
The value of objSettings.ScheduledInstallationTime is set to the hour during the day that you want installations to occur, and again it maps directly to the schedule settings shown on the Change Settings screen (refer to Figure 9.2). A value of 0 represents 12:00 AM, 1 represents 1:00 AM, and 23 represents 11:00 PM.
Finally, we can combine these snippets of code into a finished script that, when run from the local machine, will set the machine to automatically download and install updates every Wednesday at 2:00 AM (see Figure 9.10). In the figure, the NOTIFICATION_SETTING constant is the NotificationLevel you want to set. You can alter the EVERY_WEDNESDAY and TWO_AM constants to suit your desired installation day and time.

Opt In to Microsoft Update
Now we want to set the computer to use Microsoft Update. If we were doing this on a Windows 2003 or Windows XP machine, we would first want to determine that the current version of the Windows Update Agent (WUA) was 5.8.0.2469 or later. Because we are doing this on Windows Vista, we don’t need to deal with determining the WUA version, as the default version of WUA already meets that requirement. To opt in to Microsoft Update we need to have muauth.cab downloaded and stored in an accessible location.
Next, we run our opt-in script:
Set ServiceManager = CreateObject(“Microsoft.Update.ServiceManager”)
Set NewUpdateService = ServiceManager.AddService(“7971f918-a847-4430-9279-4a52d1efe18d”, “C:muauth.cab”)
ServiceManager.RegisterServiceWithAU “7971f918-a847-4430-9279-4a52d1efe18d”
Again, it’s easy to integrate this last code snippet into the script in Figure 9.10, place the script and muauth.cab file on a flash drive, network share, or other accessible location, and then run it as needed.
You can do a lot more with WUA through scripting, but much of what you can do is beyond the scope of this book; searching, downloading, and installing updates, updating the WUA, uninstalling individual updates, and viewing update history are a few of the many tasks you can script through this interface.
Using Windows Server Update Services (WSUS) and Vista
Microsoft released Software Update Services (SUS) 1.0 in 2003 to the delight of many in the Windows IT world. SUS gave us the ability to have a central update server controlling the automatic update behavior of clients, and to conserve a lot of bandwidth by effectively acting as a mirror of the content on the Windows Update site. It also had many shortcomings; first, it had no reporting or inventory, and second, you needed to run the Microsoft Baseline Security Analyzer to see what updates were needed on which machines before you could approve those updates on the SUS server. SUS also lacked the capability to update anything other than the Windows OS.
Windows Server Update Services 2
In early 2005, Microsoft released the much-anticipated second version of SUS, rebranded as Windows Server Update Services (WSUS) 2. WSUS 2 made up for many of the shortcomings of SUS by adding a reporting and inventory mechanism that allows you to see what updates computers need or already have installed. It also added the ability to use Microsoft Update to integrate updating for many of the products in the Microsoft line, including Office, Exchange, and SQL Server, to name a few. Today WSUS 2 includes the ability to provide updates for the following products:
■ Exchange 2000, 2003, 2007, and 2007 Anti-Spam
■ Forefront Client Security
■ Internet Security and Acceleration Server 2004, 2006, and the Firewall Client for ISA Server
■ Microsoft Core XML Services
■ Microsoft System Center Data Protection Manager 2006
■ Office 2002/XP and 2003
■ SQL Server 2000 and 2005
■ System Management Server 2003
■ Visual Studio 2005
■ Windows Live Mail Desktop and Windows Live Toolbar
■ Windows Defender
■ Windows 2000
■ Windows Small Business Server 2003
■ Windows 2003 x64, x86, and Itanium versions of Standard, Enterprise, and Datacenter Editions
■ Windows XP x64 and x86
■ Windows Vista, Vista Dynamic Installer, Vista Ultimate Language Packs, and Ultimate Extras
SP1 for WSUS 2 was released in July 2006 and includes the ability to use SQL Server 2005 as the database backend, as well as support for Vista.
The mechanism that WSUS 2 uses for updating on the client is the Windows Automatic Update (AU) client, and although it works almost identically to Windows Update and Microsoft Update, it is a different product. AU utilizes the Background Intelligent Transfer Service (BITS) 2.0 to go up to the WSUS server to which the client has been directed, and download the updates that the administrator has approved through the WSUS administration Web site.
Bandwidth conservation is an important part of the benefits WSUS provides to an organization. WSUS acts as a concentrator for the Windows Update service; the local WSUS server synchronizes to the WSUS update servers on the Internet and retrieves the update metadata information for the products and classifications that you have set. During this synchronization, WSUS pulls only the necessary metadata for an update and then later uses that metadata to determine the status of that update on each system that has reported to it. WSUS downloads and stores only a local copy of the updates that are needed. Those updates are then offered to the systems that contact the server through the AU mechanism, and each update that has been approved for installation is then downloaded from the local repository and installed. Considering that WSUS can support thousands of clients in an organization, the bandwidth conservation benefit becomes very obvious. Do you want 1,000 client machines downloading 150 MB of updates over a slower wide area network (WAN) line, or over a 100 MB or 1,000 MB local area network (LAN) connection?
WSUS is flexible in how it can be deployed, it does not require that the Active Directory schema be extended, nor does it require Active Directory at all. Furthermore, you can manage the client settings using a local Group Policy Object, the Registry, or an Active Directory Group Policy Object. We will discuss the different possibilities for managing the client AU settings in the following sections.
WSUS 2 Stand-Alone Installation
If you are using WSUS 2 for your update service needs currently and you want to add several Windows Vista machines to your organization, you need to make sure that you have SP1 for WSUS 2 installed. If you are starting from scratch or you plan to move to WSUS 2 for your update needs, logically you should be installing WSUS 2 with SP1 from the outset. SP1 for WSUS 2 added support for Windows Vista, bundled the latest version of Microsoft SQL Server 2000 Desktop Engine: Windows (WMSDE), and added support for using SQL Server 2005.
Once your WSUS infrastructure is in place, all you need to do is use a local Group Policy Object or edit the Registry settings on the Windows Vista machine so that it will direct the machine to the WSUS server. Editing the local Group Policy Object is the preferred method for most users in this situation, but you can also edit the settings through the Registry.
Controlling WSUS Settings through Local Group Policy
We will be covering local Group Policy before delving into the Registry settings because the Registry key is created when the client machine contacts the local WSUS server for the first time and downloads and installs the AU client. The settings are located in Local Group Policy/Computer Configuration/Administrative Templates/Windows Components/Windows Update. To control WSUS settings through local Group Policy, follow these steps:
1. Go to Start | Run, enter gpedit.msc in the box, and press Enter.
2. Go to Computer Configuration | Administrative Templates | Windows Components.
3. Go to Windows Update.
4. Select the Specify intranet Microsoft update service location Properties policy setting, and specify the location of your WSUS server (e.g., http://util1:8530 for both values).
5. Next, select the Configure Automatic Updates policy setting and specify the type of automatic updating you desire. Remember to set the installation schedule if you choose 4 – Auto download and schedule the install.
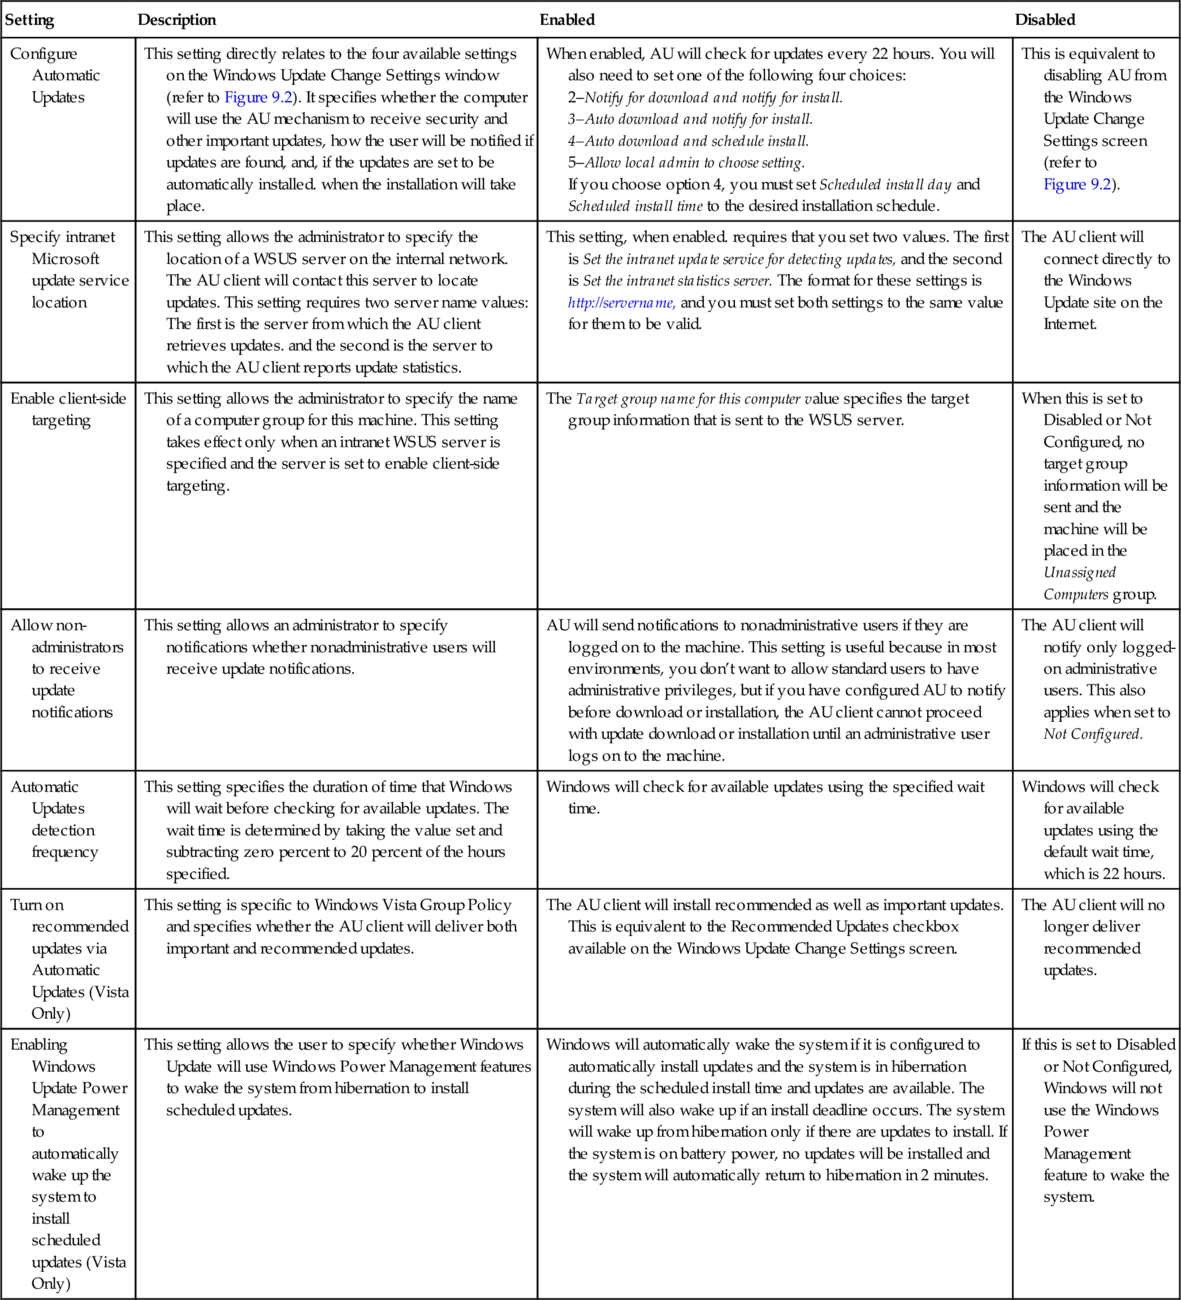
These are the only settings necessary to configure Windows Vista to operate with a WSUS server, but many other settings are available. Table 9.3 lists a few of these values and the effect they have on the AU client.
Table 9.3
Windows Update Group Policy Settings
| Setting | Description | Enabled | Disabled |
| Configure Automatic Updates | This setting directly relates to the four available settings on the Windows Update Change Settings window (refer to Figure 9.2). It specifies whether the computer will use the AU mechanism to receive security and other important updates, how the user will be notified if updates are found, and, if the updates are set to be automatically installed. when the installation will take place. | When enabled, AU will check for updates every 22 hours. You will also need to set one of the following four choices: 2–Notify for download and notify for install. 3–Auto download and notify for install. 4–Auto download and schedule install. 5–Allow local admin to choose setting. If you choose option 4, you must set Scheduled install day and Scheduled install time to the desired installation schedule. | This is equivalent to disabling AU from the Windows Update Change Settings screen (refer to Figure 9.2). |
| Specify intranet Microsoft update service location | This setting allows the administrator to specify the location of a WSUS server on the internal network. The AU client will contact this server to locate updates. This setting requires two server name values: The first is the server from which the AU client retrieves updates. and the second is the server to which the AU client reports update statistics. | This setting, when enabled. requires that you set two values. The first is Set the intranet update service for detecting updates, and the second is Set the intranet statistics server. The format for these settings is http://servername, and you must set both settings to the same value for them to be valid. | The AU client will connect directly to the Windows Update site on the Internet. |
| Enable client-side targeting | This setting allows the administrator to specify the name of a computer group for this machine. This setting takes effect only when an intranet WSUS server is specified and the server is set to enable client-side targeting. | The Target group name for this computer value specifies the target group information that is sent to the WSUS server. | When this is set to Disabled or Not Configured, no target group information will be sent and the machine will be placed in the Unassigned Computers group. |
| Allow non-administrators to receive update notifications | This setting allows an administrator to specify notifications whether nonadministrative users will receive update notifications. | AU will send notifications to nonadministrative users if they are logged on to the machine. This setting is useful because in most environments, you don’t want to allow standard users to have administrative privileges, but if you have configured AU to notify before download or installation, the AU client cannot proceed with update download or installation until an administrative user logs on to the machine. | The AU client will notify only logged-on administrative users. This also applies when set to Not Configured. |
| Automatic Updates detection frequency | This setting specifies the duration of time that Windows will wait before checking for available updates. The wait time is determined by taking the value set and subtracting zero percent to 20 percent of the hours specified. | Windows will check for available updates using the specified wait time. | Windows will check for available updates using the default wait time, which is 22 hours. |
| Turn on recommended updates via Automatic Updates (Vista Only) | This setting is specific to Windows Vista Group Policy and specifies whether the AU client will deliver both important and recommended updates. | The AU client will install recommended as well as important updates. This is equivalent to the Recommended Updates checkbox available on the Windows Update Change Settings screen. | The AU client will no longer deliver recommended updates. |
| Enabling Windows Update Power Management to automatically wake up the system to install scheduled updates (Vista Only) | This setting allows the user to specify whether Windows Update will use Windows Power Management features to wake the system from hibernation to install scheduled updates. | Windows will automatically wake the system if it is configured to automatically install updates and the system is in hibernation during the scheduled install time and updates are available. The system will also wake up if an install deadline occurs. The system will wake up from hibernation only if there are updates to install. If the system is on battery power, no updates will be installed and the system will automatically return to hibernation in 2 minutes. | If this is set to Disabled or Not Configured, Windows will not use the Windows Power Management feature to wake the system. |
Controlling WSUS Settings through the Registry
If you want to drill down as far as possible when it comes to setting up WSUS, editing the Registry is probably the most fine-grained method. Editing the registry is also the most dangerous and cryptic, so you’ll need to refer to the TechNet resources available at the link at the end of this section. These resources break down most of the keys and their values for you so that when you do mess with your Registry, you will know what you’re doing.
Once you have pointed the AU client at your WSUS server, you will find a newly created Registry key at HKEY_LOCAL_MACHINESoftwarePoliciesMicrosoftWindowsWindowsUpdate. At this point, do the following:
1. Go to Start | Run, enter regedit in the box, and press Enter.
2. Go to the WindowsUpdate Registry key.
Many settings are available, all of which match up to the Group Policy settings. You can find a full description of the Registry settings on Microsoft’s TechNet Web site, at http://technet2.microsoft.com/WindowsServer/en/library/75ee9da8-0ffd-400c-b722-aeafdb68ceb31033.mspx?pf = true.
WSUS 2 Active Directory Integration
WSUS operations are the same regardless of whether you are using WSUS in a stand-alone configuration or in an Active Directory environment. The only differences concern where the administration of the service takes place. When we operate in an Active Directory environment, the client computers can be members of either the domain or a workgroup. If the client is a member of the Active Directory domain, we begin to see the advantages that running WSUS in an Active Directory environment brings us over simply using local Group Policy or Registry settings to administer the AU client.
When we set up a Group Policy Object on the domain controller, we simply specify the same settings we specified in the local Group Policy. There is no difference in the settings; the domain Group Policy Object simply overrides the local Group Policy Object. Why, then, is a domain Group Policy Object better than a local Group Policy Object? When we use a domain Group Policy Object, the settings are applied to all the machines in the scope of that Group Policy Object, and there is no need for us to perform the repetitive task of traveling to each machine to set its local Group Policy Object.
Targeting Updates via Group Policy
We mentioned the scope of a Group Policy Object; this is an important and valuable tool when we have decided to target certain updates to specific computers or groups. An example of this would be if we put different machines in different organizational units (OUs) in our Active Directory and then applied specific Group Policy Objects to each OU. For instance, if we had a group of lab computers set up, we could put them in a separate computer group on our WSUS server by enabling Client-side targeting on the server and in the Group Policy Object. Then we would set a different value for Target group name for this computer for our lab computers than what we would set for our production computers. We can also separate our servers from our end-user machines this way.
We can even direct a certain group of computers to an entirely different WSUS server. This is helpful in larger environments where computers are geographically separated or where we have a large number of clients and want to spread out the workload among different servers.
Administering WSUS
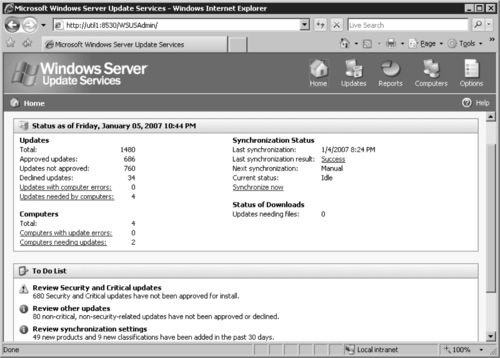
We have our WSUS server set up and our clients configured to use that server for their updating needs. Now we need to look at the WSUS Web administration interface, where we will approve and deny updates for our newly added Windows Vista clients. To reach the WSUS administration Web site, in your Web browser go to http://servername:port/WSUSAdmin. For example, in our domain we would go to http://util1:8530/WSUSAdmin to reach the administration site.
From the main administration page, we can see the status of our WSUS server, the last time it synchronized with the Microsoft Update Internet servers, the number of updates, the number of approved, not approved, and declined updates, and some basic reporting about the number of updates needed by computers. We can also initiate a manual synchronization from this page, and perform many common administrative tasks (see Figure 9.11).
Managing Updates
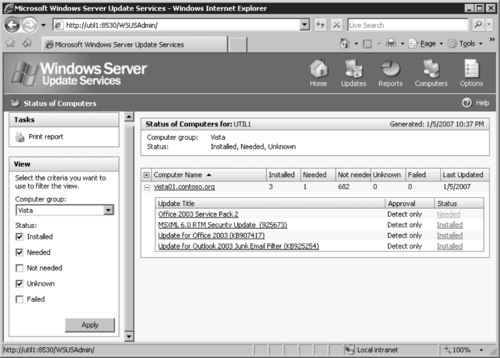
As you can see, we have two computers that need updates, one of those being the Vista machine that we just added to our domain. The Vista machines in our domain are placed in the Vista computer group under WSUS so that we can get a clearer picture of the status of those machines. To view the updates that our Vista machine needs, we followed these steps:
1. First we clicked Reports | Status of Computers.
2. On the left side of the page, under View, we chose the Vista computer group from the drop-down box.
3. Next, we selected the status that we wanted updates to match. For the purposes of this example, we chose Installed, and then Needed.
4. Then we Clicked Apply. This rendered a report showing our single Vista machine, named vista01.contoso.org.
5. We clicked the plus sign next to the VISTA01 machine to expand the list of updates that matched our criteria.
6. At this point, we saw four updates listed. Three of the updates were already installed and one update was needed, meaning that it was approved for detection but not for automatic installation (see Figure 9.12).
7. Clicking on any of the underlined update titles provided us with the Update Properties pop-up window. The Update Properties window provided us with all the pertinent update information, such as title, description, update ID, Knowledge Base article number, classification, and related products. It also provided detailed installation information, such as whether the update was removable, required user input, required a reboot, or needed to be installed exclusively.
8. Clicking the Status tab on the Update Properties dialog window showed us the status of this update on other machines.
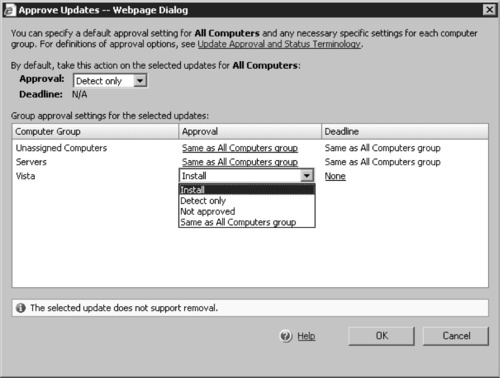
9. If we had decided that we wanted this update to move from Detect only to Install and have it installed automatically, we would need to click Change Approval and choose the appropriate approval for the various computer groups (see Figure 9.13). However, we decided to approve the Office 2003 SP2 update for installation on the machines in our Vista computer group. So, we clicked Same as All Computers group in the Approval column, which matched up with the Vista computer group, and selected Install from the drop-down box. The rest of the computer groups will continue to use the same approval as the All Computers group, which currently is set to Detect only, as you can see in the main drop-down box in Figure 9.13.
10. At this point, you can set a deadline for the installation, or you can leave it to update based on the installation schedule. To set a deadline, simply click None and the Edit Deadline Webpage Dialog will appear (see Figure 9.14).
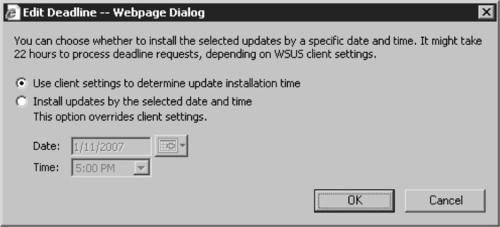
11. Choose Install updates by the selected date and time to override the client settings and set your deadline for installation. Click OK.
12. Click OK again on the Approve Updates Webpage Dialog and click Close on the Update Properties Webpage Dialog.
Synchronizing WSUS
WSUS synchronizes to the Microsoft Update Internet servers and downloads metadata information for updates and software, but WSUS doesn’t pull all the information for all the updates and software available on the Microsoft Update servers. The list of products at the beginning of this section is extensive, but rarely would one organization have all of the software products in that list in use at the same time. Thankfully, WSUS gives us the ability to choose the products and classifications for which we want to retrieve metadata. To do that, follow these steps:
1. Click Options at the top of the WSUS administration page.
2. Click Synchronization Options. On this page, you can define a synchronization schedule, proxy server settings, and the update source if you have multiple WSUS servers, and you can specify where to store downloaded files and which update languages to download.
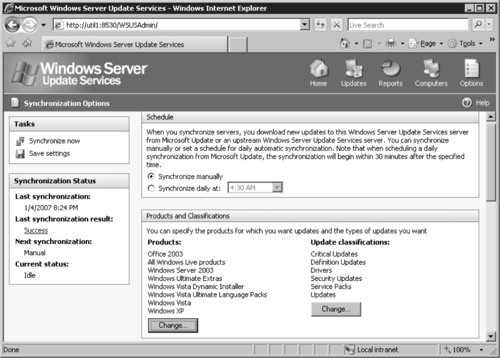
3. We are concerned with the Products and Classifications section of this page (see Figure 9.15). Under the list of products, click Change, which will open the Add/Remove Products Webpage Dialog.
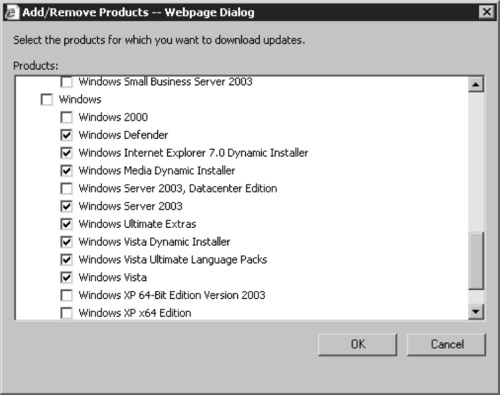
4. On the Add/Remove Products Webpage Dialog (see Figure 9.16), choose the products you use in your organization and be sure that the Windows Vista, Windows Ultimate Extras, Windows Vista Dynamic Installer, and Windows Vista Ultimate Language Packs checkboxes are selected to receive the proper updates for your Windows Vista machines. It would also be wise to check Windows Defender, Windows Internet Explorer 7.0 Dynamic Installer, and Windows Media Dynamic Installer.
5. Click OK to save your changes.
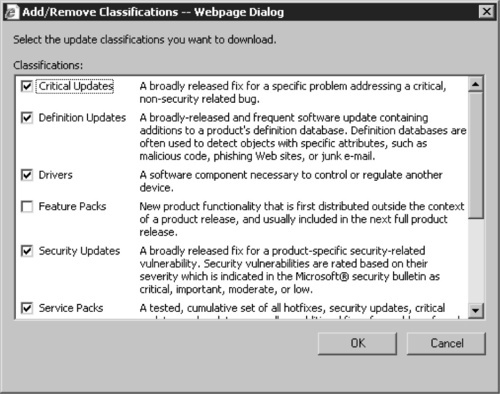
6. Under the list of classifications, click Change, which will open the Add/Remove Classification Webpage Dialog.
7. On the Add/Remove Classification Webpage Dialog (see Figure 9.17), choose the classifications of software updates that you want to synchronize from the Microsoft Update servers for each specified product. The default is to synchronize only critical and security updates.
8. Click OK to close the Add/Remove Classifications Webpage Dialog, and then click Save Settings on the left side of the Synchronization Settings Web page.
Managing Automatic Approvals
We looked at changing the approval of specific updates, but we can also choose entire classifications to automatically approve for detection or installation. This way, we can specify that all critical and security updates are automatically approved for installation for all computer groups. We can also exclude certain computer groups from the automated process—for instance, we would probably want to exclude our server group so that updates could first be tested. To choose entire classifications to automatically approve for detection or installation, follow these steps:
1. Click Options at the top of the WSUS administration page.
2. Click Automatic Approval Options. On this page, we have the ability to specify how to handle update revisions, automatically approve updates for WSUS itself, and set the automatic approval settings for update classifications.
3. We are concerned with the Updates section of the page (see Figure 9.18). We have decided to approve critical, definition, and security updates, service packs, feature packs, update rollups, and updates for automatic detection for all our computers. Click Add/Remove Classifications, which will open the familiar Add/Remove Classifications Webpage Dialog (refer to Figure 9.17), where we will select the Critical Updates, Definition Updates, Security Updates, Service Packs, Feature Packs, Update Rollups, and Updates checkboxes.
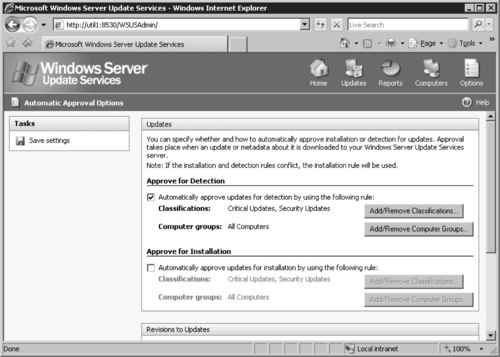
4. Click OK, and then click Save Settings to continue. You can also define which classifications to automatically approve for installation from this page.
Windows Server Update Services 3
WSUS 2 was a huge improvement over SUS 1, and SP1 for WSUS 2 added much-needed Vista and SQL Server 2005 functionality. WSUS 2 also has a very mature update catalog derived from the Microsoft Update catalog. So, why is WSUS 3 on the horizon if SP1 for WSUS 2 was released a short seven months ago, and WSUS 2 was released only two years ago, in early 2005? WSUS 3 brings several new features to the table; it includes SQL Server 2005 Embedded Edition in the install package, and it runs a setup wizard upon initial installation to set synchronization options and proxy settings, and to choose products and classifications. WSUS 3 also breaks away from the somewhat clumsy Web interface of WSUS 2 and uses the new MMC 3.0 for administration. MMC 3.0 is available for download and comes with Windows 2003 R2.
WSUS 3 Stand-Alone and Active Directory Installations
WSUS 3 uses the same methods as WSUS 2 to control the behavior of the AU client. All the local Group Policy and domain Group Policy settings operate the same and have the same effect as they do when directing clients to a WSUS 2 server. Please refer back to the WSUS 2 section for this information.
WSUS 3 MMC 3.0 Administrative Interface
The new MMC-based interface is much easier to use and much more familiar for administrators used to using MMC snap-ins for all their administration of Windows-based servers. WSUS 3 also uses the Microsoft Report Viewer 2005 for its reporting, and what a welcome change this is in comparison with the limited reporting interface in WSUS 2. You can even author your own reports and save them for later use.
Remember the somewhat confusing, approve-for-detection mechanism in WSUS 2? That mechanism has been removed and a new rule-based mechanism has been added to allow administrators to create rules to approve updates for installation and target them to specific computer groups and update classifications. Another important addition is the ability to manage multiple servers from a single MMC. In WSUS 2, having multiple servers meant administering each server from a different Web interface. Now, you can add all your servers to a single MMC and administer them from any computer that has the WSUS 3 MMC console installed.
You can install the WSUS 3 MMC on any Windows 2003 machine, or on any Windows XP machine with MMC 3.0 installed. You can download the redistributable MMC 3.0 packages for various versions of Windows from www.microsoft.com/downloads/results.aspx?pocId=&freetext=MMC%203.0&DisplayLang=en.
Once MMC 3.0 is installed, simply run the WSUS 3 Beta 2 installation package with the Console_install command-line switch:
C:>WSUSSetup-x86.exe Console_install=1
When you have the WSUS 3 console installed on your administrative machine, you can administer all the WSUS 3 servers in your organization by following these steps:
1. Go to Start | Administrative Tools | Microsoft Windows Server Update Services v3.0.
2. Right-click the Update Services node and select Connect to server. This will open the Connect to Server dialog box (see Figure 9.19).

3. Enter the Server name and Port number of the server you want to add to the console. Also be sure to select the Do not use Secure Sockets layer (SSL) to connect to this server checkbox if you are not using SSL on your WSUS 3 server.
4. Click Connect to add the server.
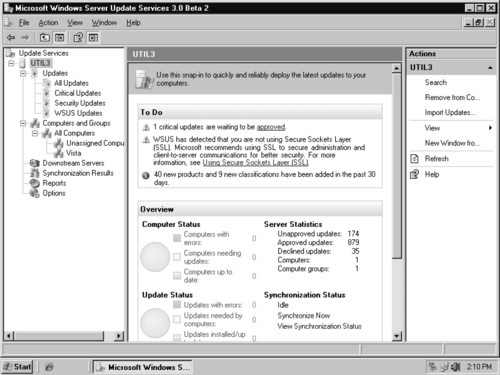
Now that you are connected to the WSUS server, you can expand the UTIL3 node to administer the server. From this view (see Figure 9.20), you can access the settings, computer groups, update views, reports, and other WSUS tasks.
Synchronizing WSUS
The process of synchronizing WSUS 3 is very similar to that of synchronizing WSUS 2, but the administration interface is entirely different. You still choose product categories and update classifications that you want to synchronize, and you still set a synchronization schedule. You can access WSUS 3 options from the Options node, and there is an initial setup wizard that runs when WSUS 3 is first installed but that you can also run at any time by clicking WSUS Server Configuration Wizard under the Options node. You also can access all the settings in the wizard and change them individually from the other links in the Options node. To change the products and classifications that will be synchronized by your server, follow these steps:
2. Click Products and Classifications (see Figure 9.21).
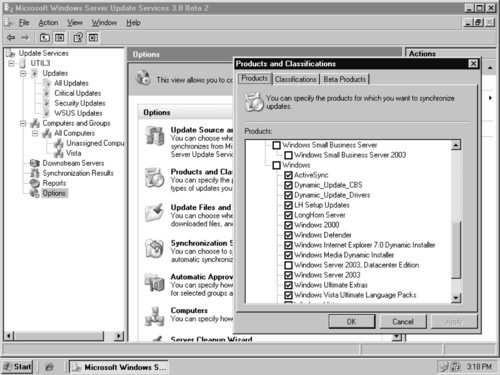
3. Choose the products you want to synchronize from the Products list. You will notice that the list of products is slightly different in WSUS 3 compared to WSUS 2. Because this is a Beta version, the product catalog is not as robust as the WSUS 2 product catalog. Once WSUS 3 moves into the RC and RTM stages, the catalog will come up to par with the WSUS 2 catalog.
4. Click the Classification tab and choose the appropriate classifications. If you want to receive updates for the Microsoft Beta products you are testing, you can click the Beta Products tab, which will ask you to enter your Beta ID.
5. Click OK to save the settings and continue.
Managing Updates
You manage updates in WSUS 3 through the Updates node. The node has several predefined filters that list certain classifications of updates. Right-clicking on the Updates node will allow you to Search for updates using the search function, Import Updates directly from the Windows Update Web site, and create a New Update View. By creating a new view of the updates on your server, you’re simply applying a filter to the updates and displaying the results of that filter. The mechanism WSUS 3 uses to build these filters is very robust, giving you much more control over the updates on your server. One of the most frustrating things about WSUS 2 was that it provided a very valuable function but lacked in key areas such as reporting and inventorying. To view and manage your updates, follow these steps:
1. Expand the Updates node and select one of the update views, such as Critical updates.
2. Change the Approval and Status options at the top of the middle panel to display the critical updates that meet the necessary criteria. We have chosen to view updates with an Approval of Any Except Declined and a Status of Any. Click Refresh to apply the new filtering options. The middle panel will now display updates that meet those criteria (see Figure 9.22).
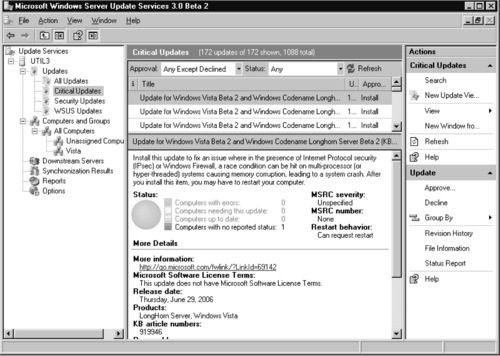
This window displays the update title, up-to-date and unknown percentage, and approval status. You can edit the header, and you can add other properties by right-clicking on the header and choosing the properties from the right-click menu. After you choose a specific update from the top section of the updates view section, the bottom section will display the various update details.
The right-hand section of the console shows the context-sensitive Actions. The top section relates to the overall Critical Updates node, and the lower Update section applies to the selected update. Right-clicking on a specific update will bring up an identical right-click menu, allowing you to Approve or Decline the update. Selecting Group By allows you to change the organization of the updates by grouping them based on Title, Classification, MSRC severity, and Approval. Clicking Revision History brings up the Revision History window, showing previous versions of the update, the date it was released, and any changes made to the update. Clicking File Information brings up the File Information window, showing the various files packaged in the update, the release date, the file size, and the filename. Clicking Status Report opens the report viewer and renders a status report for the specific update. The status report contains the same update detail information displayed in the bottom half of the Critical Updates section of the console, but provides you the added benefit of being able to print the report or export it to PDF or Excel format. To change the approval of a specific update, follow these steps:
1. Right-click a specific update and select Approve. This brings up the Approve Updates window (see Figure 9.23).
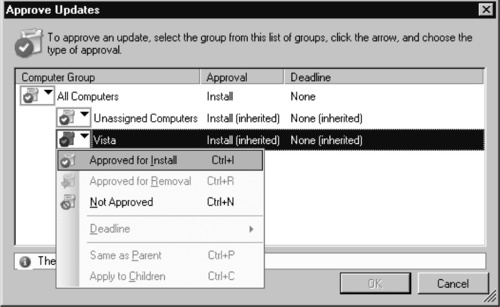
2. Clicking the icon next to the Vista computer group brings up a dropdown menu showing the approval options. Because computer groups are nested, changing the approval of this update for the Vista computer group will cause it to stop inheriting the Approval and Deadline settings from the All Computers computer group.
3. Once you have altered the approval settings to suit the needs of your organization, click OK to save the settings and close the Approve Updates dialog.
Managing Automatic Approval Rules
Another cool new feature in WSUS 3 is the way automatic approval of updates is handled. Microsoft has adopted a rule-based method for automatic approvals. This allows much more control over what classification of updates are automatically approved, and for which computer groups the approval applies. In WSUS 2, we were limited to one rule that automatically approved updates for detection, and one rule that automatically approved updates for installation. This provided administrators with very little flexibility. In WSUS 3, we can create as many rules as we need, and thankfully the somewhat odd process of approving updates for detection has been removed to simplify the process even more.
Automatic approval rules are easy to write, concise, and very clear about to which updates and computer groups they apply. To set up automatic approval rules we are going to revisit the Options node of the WSUS 3 console (refer to Figure 9.20):
1. Click the Options node of the WSUS 3 console and select Automatic Approvals from the middle pane. The Approval Rules window appears (see Figure 9.24), and we are presented with one generic automatic install rule. The rule is not enabled by default, so the checkbox is normally deselected and the Run Rule button is grayed out.

2. Selecting the Install AutoDeployment Rule checkbox and clicking Apply will enable the rule, but the rule will apply only to future updates. As is stated at the top of the window, “You can specify rules for automatically approving new updates when they are synchronized.”This means any updates that are already synchronized and in the system will not abide by the rule.
3. In order to have the rule run against existing updates, simply click Run Rule, at which point you will see a pop-up box with a status bar as the rule runs against your update catalog. Once it is done, you will also see the results of running the rule.
When setting up a new rule, you can apply three groups of criteria for the rule to match against: the update classification, product group, and computer group. Rules always apply to, at the very least, one computer group, but whether they leverage update classifications and product groups is up to you. In the following tutorial, we will create a rule that automatically approves critical updates, security updates, and service packs that belong to the Windows Vista product group for computers in the Vista computer group:
1. Begin by setting up a new rule, which you do by simply clicking New Rule. This will display the Add Rule dialog (see Figure 9.25).
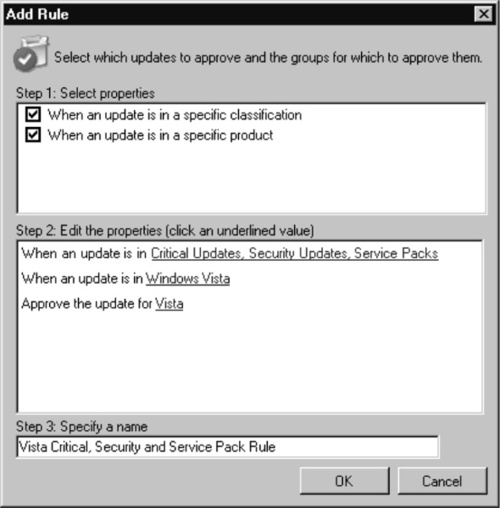
2. Select both the When an update is in a specific classification and When an update is in a specific product checkboxes. In the Step 2 portion of the window, two properties corresponding to classification and product will appear.
3. Click the blue classification text and the familiar Add/Remove Classification window dialog will appear. Choose only the Critical Updates, Security Updates, and Service Packs checkboxes. Click OK.
4. Click the blue product text and the familiar Add/Remove Product window dialog will appear. Choose only the Windows Vista checkbox. Click OK.
5. Specify a descriptive name in the Step 3 text box and click OK to save and continue.
6. Now the rule is added and the checkbox next to the new rule should already be selected. Click Apply to confirm the settings.
7. Finally, select the new rule so that it is highlighted in blue, and click Run Rule to apply the update retroactively.
8. Click OK to close the Approval Rules dialog.
All in all, WSUS 3 is shaping up to be a very robust and feature-rich product. Compared with WSUS 2, which was a huge improvement over SUS 1.0, WSUS 3 is a welcome tool in a marketplace full of costly or complicated update management systems. Microsoft seems to have listened to its user base and improved or added the features that WSUS 2 was lacking.
Currently, WSUS 2 with SP1 will fully support Vista clients and the administration of Vista and non-Vista clients is identical. WSUS 3 Beta 2, on the other hand, does not support the RTM version of Vista and supports only the RC version of Vista with an add-on pack. This, of course, will change with the soon-to-be-released WSUS 3 RC milestone. If you are trying to decide between WSUS 2 and WSUS 3 Beta 2, and you currently have Vista machines in your environment, we suggest that you go with WSUS 2 and perform an upgrade when the WSUS 3 RC is released. Once the RTM version of WSUS 3 is released, you will be able to move from the RC version easily. Microsoft, however, does not support moving from Beta versions to RC or RTM versions of its products.
Using Systems Management Server and Vista
Systems Management Server (SMS) 2003 is the current version of the Microsoft enterprise-level configuration monitoring software. SMS was designed to be the powerhouse Microsoft product for managing network clients, and it accomplishes that goal in most situations. It can easily handle many thousands of clients in each site, and it has a very flexible architecture in that it allows the site designer to spread out the different SMS server roles among a group of SMS servers. The problem with SMS is that it is almost overly complicated in design and implementation. It does have many strengths, but those strengths don’t seem to balance out the product’s extremely steep learning curve.
SMS 2003 and Vista
Microsoft has released two SPs for SMS 2003, and SP3 is on the horizon for the first or second quarter of 2007. If you would like to use SMS 2003 SP2 to manage your Vista clients, you will either have to wait for SP3 or try your luck with SP2. Unfortunately, there is no official document from Microsoft that details what works and what doesn’t, and most of the information has to be tested or extrapolated from different sources.
Shitanshu, a blogger who works as a technologist on the SMS Infrastructure team at Microsoft, talks about Vista and Longhorn support at http://blogs.msdn.com/shitanshu/archive/2006/11/27/sms-2003-sp2-compatibility-with-vista-and-longhorn-server.aspx. Once again, it is a case of pre-RTM support in the current release and full Vista RTM support in the next release. If you would like to attempt to use SP2, be forewarned that even getting the SMS client installed on your Vista machines will be quite a task. You must install it manually by connecting to the share on an SMS server and running the setup. At that point, cross your fingers and hope the installation completes successfully. We also found that even when the installation did complete successfully, the SMS site server wouldn’t recognize the system as an agent-managed resource.
If you are already invested in SMS 2003 for your client management and software deployment tasks, you should sit tight and wait for SP3 to be released before managing any Vista clients on your network. If you are thinking about using SMS 2003 or SMS version 4, we suggest you think twice and look at some of the other third-party options available to your organization.
We found that installation of SMS 2003 was wrought with difficulties. Just getting the proper prerequisites was difficult because the Microsoft documentation of SMS is vague in many areas. The difference between what is supported in SP1 and SP2 is not presented in a way that is easily decipherable. We read in one document that SP2 supported SQL Server 2005, and we already had a SQL Server 2005 machine available in our lab, so we decided to use that box to support our SMS 2003 installation. Unfortunately, we quickly found out that there was no version of SMS 2003 available with SP2. SP2 was an update that we needed to install once we had installed SP1. After setting up a version of SQL Server 2000 and patching it up to SP4, as the documentation stated, we tried the installation again. At this point, we found out that SMS doesn’t support named instances. The list of errors we encountered just during the installation phase of SMS goes on and on.
We did finally complete the installation and were able to test some of the Vista support in SMS 2003. Remote management tools that are reported to work are Resource Explorer, Windows Diagnostics, Performance Monitor, and Remote Desktop. We tested those tools and were able to get them to operate properly with our Vista machine. Event Viewer, Remote Assistance, and Hardware Inventory failed to work, however. The word is that Event Viewer in Vista underwent a complete overhaul, and this would explain why the older version of the client agent was unable to access it. Software deployment, OS deployment, and patch management worked in Vista, although the OS deployment features were troublesome with certain types of hardware, and the current version of the feature pack doesn’t include the new WinPE 2.0. As for Microsoft-based patch management, we concur with the community of SMS administrators and insist that you run WSUS alongside your SMS server.
System Center Configuration Manager 2007 Beta 1 and Vista
SMS 4, or System Center Configuration Manager 2007 (SCCM for short), is the new version of SMS and is currently in the Beta 1 release stage. A quick look at some of the SCCM release notes reveals that the new version of SMS has a lot of the same problems with Longhorn and Vista clients that SMS 2003 did. We’re not quite sure why the Microsoft team didn’t begin SMS 4 development with Vista and Longhorn in the forefront of their minds, but the reality is that we have yet another product that isn’t Vista-ready, and at the time of this writing, Vista was scheduled to ship at the end of January 2007.
SMS 4 is another product that we will need to look forward to in order to see the benefits. Some of the more interesting features Microsoft hopes to introduce in this version of SMS are Network Access Protection (NAP), built-in Operating System Deployment (OSD), and a new MMC 3.0 console.
The OSD feature isn’t necessarily new, because a feature pack is available for SMS 2003. The current iteration of OSD is still using WinPE 1.0 instead of the newer WinPE 2.0. WinPE 2.0 has many improvements over 1.0; ultimately one of the most important is the updated hardware driver support.
NAP looks like a promising addition to the features of SMS, though, with the ability to limit network access for clients that don’t meet software update requirements. NAP is built into Vista and Longhorn, and it uses Dynamic Host Configuration Protocol (DHCP) enforcement, VPN enforcement, 802.1x enforcement, Internet Protocol Security (IPSec) enforcement, or all four, depending on the needs of your network. For anyone who struggled with the old method of creating a VPN quarantine using Microsoft’s Routing and Remote Access server, this looks like a very powerful feature. Unfortunately, a quick look at the release notes for SMS 4 Beta 1 shows us that the NAP feature in SMS does not yet work with Vista and Longhorn.
Some other improvements at first glance are to the Administration Console, via MMC 3.0 and the much improved searching, filtering, and sorting features. Reporting also looks to be improved, and possibly even more so if used with Microsoft’s Report Viewer 2005, although we were unable to test this. Also, there are a lot of new wizards, for everything from initiating a client push installation to the initial installation, although this is not to say that successfully setting up an SMS site has gotten any easier. If you haven’t had the pleasure of planning an SMS deployment, thank your lucky stars, because it continues to be one of the more difficult Microsoft technologies to set up.
The long and short of it is that Microsoft is a bit behind its own curve when it comes to supporting Vista and Longhorn in its systems management, patch update, and monitoring software packages. In SMS 2003 and SMS 4, Vista and Longhorn work with the Performance Monitor, most of the System Information view, most of the Resource Explorer, and OSD—sometimes. We will be waiting for SMS 2003 SP3 and future Beta releases of SMS 4 to see how the Vista and Longhorn support comes along. It has to get better than it is now, and fast. The Vista release is right on top of us, and Longhorn should be out sometime around mid-year if we are lucky. Microsoft cannot afford to fall behind with support for its own products.
Using Microsoft Operations Manager and Vista
Microsoft Operations Manager (MOM) 2005 and its successor, System Center Operations Manager (SCOM) 2007, provide administrators with advanced network monitoring abilities. They both utilize MPs to provide support for network devices, network-aware software products, and various OSes and servers. The power of MOM comes from the capability to support a wide variety of objects that exist on the corporate network. Some of the currently available MPs support the following:
■ Microsoft Forefront Security for Exchange 10
■ Microsoft Exchange 2000 and 2003
■ Microsoft SharePoint 3
■ Microsoft Host Integration Server 2006
■ Microsoft Antigen 9
■ Microsoft ISA Server 2000, 2004, and 2006
■ Microsoft SQL Server 2000 and 2005
■ Microsoft Virtual Server 2005
■ nWorks VMware Events
■ Windows Terminal Services 2000 and 2003
■ VERITAS Storage Foundation for Windows
■ Citrix Presentation Server
■ Virtual Agent for IronPort, NetBotz, TrendMicro, and ProofPoint
This is far from a complete list of the available MPs and device connectors that you can use with MOM. For a complete list, go to www.microsoft.com/technet/prodtechnol/mom/mom2005/catalog.aspx.
System Center Operations Manager 2007 RC2
It seems that with the development of the System Center product line, Microsoft has decided to drive us mad with extremely long names and acronyms. Aside from the name, SCOM RC2 is a very nice solution for those looking to monitor the various clients, servers, and devices on their networks. Microsoft did several things right with the development of MOM from the outset. Our favorite feature of MOM, and now SCOM, is the ability for anyone to author an MP. This means that anyone, anywhere, can create an MP using the authoring tools built into the MOM console. These MPs can support any number of network clients, devices such as routers, switches, and firewalls, and anything else you can plug into your network. Another feature is transparent integration with Active Directory. SMS wanted to be able to extend your Active Directory schema to enable advanced features. MOM doesn’t require something that serious, and if you aren’t using Active Directory or you want to manage devices outside of Active Directory, that is supported as well.
SCOM is due out very soon; an exact date wasn’t available at the time of this writing, but because Microsoft is currently in the RC2 stage of the product, an RTM can’t be far behind. If you are looking at a new MOM 2005 deployment, we suggest you wait for SCOM. We also suggest you download the SCOM RC2 evaluation from www.microsoft.com/mom/evaluation/beta/opsmgroverview.mspx, install it at your organization, and begin getting familiar with the way it operates. If you are currently using MOM 2005, we suggest you do the same thing; don’t forget to put the money in your budget to upgrade when it is released.
SCOM installation was very simple, and once we had made sure our machine met the prerequisites, the installation process went off without a hitch. SCOM requires that SP1 for SQL Server 2005 is installed if you are using SQL Server 2005. It also requires .NET 3.0, which is currently still in Beta, and Windows Powershell 1.0. As you can tell from the prerequisites, SCOM 2007 uses the very latest technologies from the Microsoft catalog, and although this means that a lot of shops will be waiting until all the required products are out of Beta before deploying SCOM, it also means that SCOM leverages the latest innovations available from Microsoft.
Monitoring Clients and Servers
The name System Center Operations Manager doesn’t really give users an idea of what the product can do for their organization, and the reality of the situation is that a lot of users are turned off by this. When we went to the Microsoft site to see whether it had any good descriptions or examples of exactly what could be accomplished with SCOM (or MOM, for that matter), we were sorely disappointed. We found very technical white papers, deployment and planning guides, and documents that just contained a lot of marketing.
SCOM and MOM alike provide administrators with a platform for monitoring the health of their networked systems by watching for predefined events and incidents. SCOM then goes a step further and notifies the necessary personnel when problems do arise. Now here comes the good part: SCOM also allows for the definition of diagnosis and repair tasks that occur when the health of a system degrades. These tasks are basically commands that are run against the system to try to diagnose and repair the situation. All the pieces that go into monitoring, diagnosing, and repairing the different systems on your network are what make up MPs. An MP is a set of predefined conditions that allow the system to determine the health of the monitored client. The MP also defines what commands are run when the health of the system degrades.
After installation, we added the clients on which we wanted to install the agent, by simply running a wizard that allowed us to choose the clients from Active Directory. We then ran a network discovery task to verify the existence of the clients, after which the agent was installed. Installation of the client agent on our Vista machine went flawlessly, and immediately after the task was complete we were able to browse to the VISTA01 computer in the SCOM console, view the machine’s health, and perform some basic management tasks.
Monitoring Vista
To monitor Vista, follow these steps:
1. Open the SCOM console by going to Start | All Programs | System Center Operations Manager 2007 | Operations Console.
2. The SCOM console will launch and you will be presented with the home screen. Click Computers in the left-hand navigation pane.
3. The middle pane will give you the Computers pane with a Detail View of the selected computer object directly below the list of managed systems. Click the Vista machine to view various details about the system.
4. On the right-hand side of the console you will see the Actions pane. From here, you can perform various tasks on the selected system. Click Computer Management to launch the familiar Computer Management MMC console.
5. Click Remote Desktop to connect to the selected computer via the Remote Desktop Protocol (RDP). Clicking Remote Desktop (console) will launch an RDP connection that connects directly to the console.
System Center Essentials 2007 Beta 2
System Center Essentials (SCE) 2007 is the next big thing for small and mid-size businesses. SCE uses the SCOM framework and integrates WSUS 3 to handle software updates, and even has the capability to distribute software. The pricing information was not released for SCE at the time of this writing, but Microsoft is marketing it heavily to the little guy. The underlying structure and operation of the system will be very familiar to MOM users, and it performs the same health monitoring, diagnosis, and repair tasks as MOM. It even uses a similar MP structure to extend its features.
SCE is currently available as a beta 2 product, and the RC1 milestone should be released shortly. The client–server support numbers is one area where SCE and SCOM will differ greatly. As of January 16, 2007, Microsoft announced that SCE will support 30 servers and 500 clients, a significant rise from the previous 15-server limit. This enhanced support makes SCE a very strong competitor in the management and update market, and one must wonder where SCOM fits in the System Center family of products. Looking at the current Microsoft product lineup, we see MOM 2005 and MOM 2005 Workgroup Edition. MOM 2005 Workgroup Edition eliminated a few of the higher end reporting and integration abilities of MOM 2005 while also limiting it to 10 servers. Similarly, SCE will support a lot less servers and clients compared with the number that SCOM supports. SCE also includes built-in updates with WSUS 3 and software distribution through a software push setup similar to SMS.
Using Third-Party Tools with Vista
Network device management tools have been a hot topic in the industry for a long time. With the addition of update management to the list of features that system administrators want included in the management solutions they purchase, we imagine management solutions will continue to be a hot topic for a long time. We’ve looked at some of the tools available to manage updates from Microsoft products, and some of the tools available to manage and monitor our Vista clients. Now we will look at what the independent software vendors (ISVs) have to offer in the way of converged client management, monitoring, and update management solutions.
Altiris
Altiris develops a vast array of management, monitoring, auditing, virtualization, and update management solutions. Its catalog has an extensive list of the available products and various bundles it offers. Don’t expect to stroll right up to its Web site and purchase 50 licenses for your small business, though, Altiris seems to be squarely aimed at large enterprises. Small and midsized business IT professionals are probably better off looking for another solution. Altiris clients include the U.S. Army, General Motors, and the Dutch Ministry of Defense.
In order to test the Altiris solution, we had to get a trial version of the software. At first, we thought this was going to be troublesome because some of the larger solution providers don’t like to provide users with trial versions without first acquiring plenty of personal information so that their salespeople can call and e-mail the users in perpetuity. Altiris couldn’t have been easier, though. We simply followed the download link on the site and were directed to enter some basic information about our company and our position there. Then it let us download the installer package. We had decided to test the Client Management Suite, which is basically a bundle of the various software products Altiris develops and is aimed at managing clients and handheld devices. Some of the key features of the suite include:
■ Hardware and software inventorying
■ Web-based reporting
■ Automated patch management
■ Software license compliance
■ Active Directory integration
■ Cross-platform management support
At this point, we decided to investigate exactly what Altiris would cost to deploy at a smaller organization. We have purchased plenty of software, and we always seem to run into strange problems when dealing directly with a software vendor, especially one this size. We called the sales number for our region and expected to have to deal with the runaround for quite some time, but to our surprise we were given a per-client price within 30 seconds of being on the phone with the sales representative. The real surprise is that even though the Altiris product is used by some of the largest organizations in the world, it is still an affordable solution, especially when you consider the features it offers. The Client Management Suite has three levels: Level 1 provides the most commonly used features; level 2 and level 3 each add more features, with a small bump in price. Level 1 will be sufficient for most administrators, because it includes the patch management, hardware/software inventory, reporting, license compliance, Active Directory integration, and OS deployment and migration features.
Installing the Altiris Client Management Suite
Installing the Client Management Suite was simple enough, but the whole process took a long time. The initial download was only 5 MB, but we soon found out that the initial download simply started the full download, which was 650 MB. After the download was complete, the install process began by checking our prerequisites. The prerequisites were common to most of the other management suites available. We used SQL Server 2000 SP4 as our database backend, IIS 6.0 with .NET 1.1, although Altiris required only IIS 5.0 or higher. The database server was recognized easily and Altiris created a database.
The install then asked which management features to enable. These features were listed in plain English and related to the features listed earlier (see Figure 9.26). We chose all the available features for the sake of testing, and clicked Next, at which point we were pleasantly surprised to see that Altiris now wanted to know which devices on our network we wanted to manage with the Client Management Suite. Again, this does not seem like a killer feature for management software, but SMS 2003 and SMS 4 certainly did not offer this ability in the installation wizard, and completing the task of installing the client agent after installation in SMS was far from intuitive.
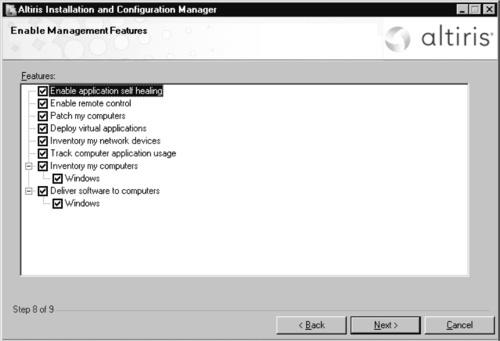
After choosing the clients on our network that we wanted to manage, the process proceeded to install 59 components. This part of the installation went through without a hitch, and at the end of the installation we were presented with a notice that the installation had completed and we should proceed with the initial configuration of the system. Altiris uses a Web-based console for administration but also includes several non-Web-based wizards for performing tasks such as software and OS deployment. We are not extremely fond of Web-based consoles for anything and everything, but the Altiris console works well, and its layout makes sense.
Managing Vista Clients
We immediately skipped the recommendation to perform the initial configuration tasks and went in search of our Vista client. When we spoke with Altiris sales, we were told that Vista support would be released in the next month or so. We were disappointed, to say the least, but we found that the client agent installed successfully on our Vista machine. Not only was it installed successfully, but it also recognized the OS and version information successfully. Again, this is something we had problems with in both versions of SMS. A little more digging and we found that most of the management features in Altiris already worked with Vista.
Using the Real-Time Consoles
Altiris does a lot of data collection about resources and stores that information in the database. You can then access this information from a variety of reports to view information about your clients. Altiris also includes something called real-time consoles, which simply means that when you access these consoles, the client is polled for the information that is displayed. To see how well these real-time consoles work with Vista, follow these steps:
1. Open the Altiris administration console and click View | Resources.
2. Expand the Collections | Computer Collections nodes and select the All Computers collection (see Figure 9.27).
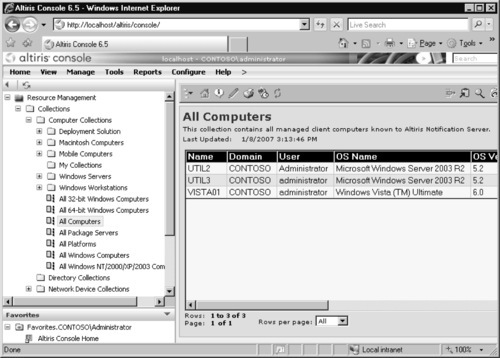
3. Right-click on the machine you want to manage (e.g., VISTA01, in this case), and select Real-time System Manager | Manage.
4. This will bring up the VISTA01 Altiris Resource Manager and will load the General Information | Summary on the Real-Time tab (see Figure 9.28). From this tab, you can access any of the various real-time consoles provided by Altiris.
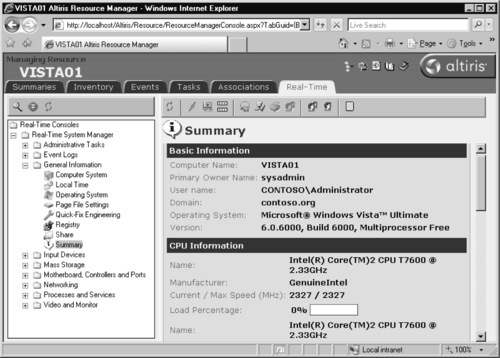
The Summary console shows basic computer information, CPU information and usage, memory usage, disk usage, network connectivity, and antivirus status. The majority of consoles here provide extensive resource information, including hardware information down to the basic input/output system (BIOS) level, running processes and services, and network settings and active connections both to and from the client. We could change some of the time zone information, the computer description, the workgroup membership, and the maximum allowed size of the Registry. We couldn’t access a few consoles at all, including the Page File Settings console.
What we could do was access running processes and kill them. We could also view the services on the system and start, stop, pause, resume, and set the services to automatically start, start as needed, or become completely disabled. Under the Networking node, we were able to modify IPv4 route information. Printer management didn’t work under the VISTA01 resource, but it worked great when we managed one of our Windows Server 2003 resources. All in all, printer management and page file settings were minor losses, and hopefully, when full Vista support is released in the next few months, these features will work as intended.
Another concern of ours was whether we would be able to view the Event Logs from the Vista machine. This feature did not work in SMS, and from everything we’ve read, it was because the underlying event reporting service in Vista is vastly different. Clicking on the Event Logs node and then on the Application, System, or Security Log brought up the appropriate log information. A quick look at the Event Viewer in Vista shows much more than the standard three logs we are all used to seeing, though, and these extra logs were not available through Altiris. Hopefully, this is something that gets added in the near future, but just having the Application, System, and Security logs is helpful and much more sensible than having absolutely no event viewing support for Vista, which is the case with the current releases of SMS.
Using Carbon Copy for Remote Control
Altiris uses a proprietary product called Carbon Copy for remote control of clients. Carbon Copy is an ActiveX-based program that allows administrators to view and interact with the remote console session of a system. It operates similarly to VNC and Microsoft’s Remote Assistance functionality. It allows you to view the current console session only, meaning that you can’t remotely control RDP or Terminal Server sessions. Carbon Copy, like any other remote session control technology, is extremely useful for servicing help desk requests and any task that requires interaction with the local computer console to complete. The bad news is that as of this writing, Carbon Copy doesn’t support Vista clients, but again, we imagine that when Altiris mentioned “full Vista support,” this is part of what the company meant.
Software Delivery Methods
Altiris can deliver software for Windows and Macintosh alike, and it uses a straightforward wizard to walk the administrator through the steps necessary to create a Software Delivery task. Once the task is created and assigned to a specific computer or collection of computers, either it is run without user intervention or, depending on the software package, the user is notified that new software is available by the Altiris Agent System Tray icon. The System Tray icon notifies the user of the available software and allows him to run the task (see Figure 9.29). You can also schedule the task to run at certain times so that users can’t just ignore the notifications.
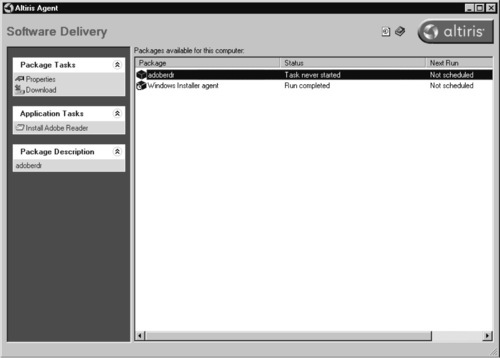
We created a task to deploy Adobe Reader 8.0 for Vista and assigned the task to our VISTA01 machine. The task immediately became available and we were able to successfully run the installation. After installation was complete, the Altiris Agent prompted us to reboot the system, which we did, and Adobe Reader installed successfully. One of the nice features of delivering software through the Altiris Agent is the ability to designate the credentials to use when the task is run. This means you can set up software delivery tasks to run and the system will notify your users when the task is launched. Even if it requires user intervention, it will run using privileges of the account you specified.
Managing Software Updates
Altiris not only allows administrators to patch and monitor Windows and other Microsoft products, but it also supports patching non-Microsoft products. Altiris uses an extensible repository to house OS, software, and hardware vendor patches. The Altiris patch management product also integrates with its recovery solution, which allows administrators to roll back machines that encounter problems with patches.
In order to start using Altiris Patch Management to roll out software updates, you need to first enable the Software Update Agent installation task. Once the task is enabled, the agent will be rolled out to computers that need the agent. To enable and begin rollout of the Software Update Agent, follow these steps:
1. From the Altiris Console, click Manage | Software.
2. Expand the Configuration | Patch Management | Windows | Software Update Agent Rollout nodes.
3. Click Software Update Agent Install and select the Enable (currently disabled) checkbox at the top of the frame on the right-hand side.
4. Click Apply.
Once you have done this, the installation should occur without user intervention. To verify that the agent has been installed, from the Software Update Agent Rollout node click All Windows Computers without Software update Agent Installed.
This is the collection of computers that should have received the agent rollout from the previous task. This collection should eventually empty as your managed client computers have the agent pushed to them. We took a quick glance at this list prior to enabling the installation task and our VISTA01 machine was listed. After we enabled the task, it was no longer on this list. Because this was the first time we attempted the installation on a Vista machine, we also physically logged onto the box and right-clicked on the Altiris Agent System Tray icon. The right-click menu showed a new option, Software Updates. Upon clicking Software Updates, the Altiris Agent window opened on the Software Updates tab and gave us the error “The Software Update Agent is not ready.” A quick reboot solved that problem, and once we were logged back onto our VISTA01 machine, we had the full Software Update interface available.
Even though we had installed the Software Update agent and it was operating properly, we were not seeing any available updates for our Vista machine. If this happens to you, you need to make sure your Altiris server has downloaded and imported the PMIimport.CAB file. When you enable software updates, this file is supposed to be downloaded and imported. Our system was having a bit of trouble showing that it had successfully completed the import, something we blame on the condition of our lab machines. Again, after a reboot, we found that the file had been downloaded and imported properly. The PMIimport.CAB file is downloaded from an Altiris server according to the default schedule. You can change this schedule, but for our purposes, we left it alone. The file itself is about 790 KB and contains the most recent Microsoft Security Bulletins. Once it is imported, you can view the available bulletins, search for specific bulletins, and view bulletin details. In order to apply bulletins, you will need to create new Software Update Tasks, which are very similar to Software Delivery Tasks.
All in all, the Altiris solution is a very powerful management tool for an organization, although we weren’t thoroughly impressed with its ability to handle Microsoft-based software updates. The good thing about the way Altiris handles software updates is that it is extensible, and you can use it to update non-Microsoft products. Considering the fact that WSUS 3 is a free product, though, if we were using Altiris for our management needs, we would still include WSUS 3 in our organization to handle Microsoft-based software updates.
Other Third-Party Tools
There are, of course, many more enterprise management solutions out there for Windows and non-Windows clients alike. The increasing size of data centers and IT resources in general makes the market for centralized management technologies one of the fastest growing in the industry right now. Also, the increased focus on security and patch management means that ISVs are offering all-inclusive solutions, allowing administrators to invest in a solution that provides all the pieces to the puzzle. Some of the other patch management and system management solutions available from ISVs include:
■ ScriptLogic, which is similar to Altiris in that it offers a vast array of technologies and then provides packages and bundles of those technologies to companies of varying sizes. For more information, visit www.scriptlogic.com.
■ Ecora, which focuses more on auditing and compliance than on full systems management, but as a part of its compliance and auditing, it does provide a very capable patch management solution. For more information, visit www.ecora.com.
Summary
Windows Update and Microsoft Update both continue to improve, and the versions available for use in Windows Vista are no exception. Microsoft has taken these tools and closely integrated them with the OS, and in doing so it has removed some of the security concerns of the Windows Update Web site. Users no longer need to navigate to a Web site in Internet Explorer in order to receive security updates that patch potential vulnerabilities in Internet Explorer. This change in the overall process also removes the negative effect on user behavior caused by the use of the Windows Update Web site. Other changes in the WUA allow users to receive recommended updates in addition to important security updates. Administrators are also given greater control over the WUA through additional Group Policy settings.
WSUS provides administrators with a centralized patch management solution for Microsoft-based products. WSUS 2 is currently the only patch management product from Microsoft that fully supports patching Vista RTM. WSUS 3, which is still in Beta 2, is an extremely strong product and will be a very valuable upgrade for any organization. Another key benefit of WSUS is its ease of use. WSUS uses Group Policy settings to control clients. These are the same Group Policy settings administrators use to control the behavior of the WUA.
SMS is a powerful systems management tool, but it requires a lot of specialized knowledge and training to successfully install and use in your environment. If you are looking for a tool with similar constructs but a much shorter learning curve, Altiris Client Management Suite or one of ScriptLogic’s products might be right for your organization.
Altiris provides a very robust systems management solution that is also flexible and relatively easy to use. The Client Management Suite includes the tools necessary to patch, monitor, and remotely manage clients and other devices on your network. It goes a step further by including OS and software deployment features as well.
Microsoft Operations Manager, and its successor, System Center Operations Manager, provide organizations with the ability to monitor, diagnose, and repair networked devices, clients, and even distributed software products. The power of MOM and SCOM is that they let you plug in MPs that provide specific support for the devices and software present on your network. Because anyone can author MPs, administrators are presented with a large community of ISVs and independent developers providing MPs for their needs. SCE, which is a hybrid of SCOM, WSUS 3, and software deployment via Group Policy, provides small to mid-size businesses with an affordable monitoring and management product.
Solutions Fast Track
Using Windows Update
☑ The Windows Update Agent in Vista is completely integrated with the Windows Update Control Panel applet and you can now accomplish all update tasks without having to go to the Windows Update Web site.
☑ Vista adds the ability to automatically download and install recommended updates, in addition to important and critical updates. This ability, combined with an expanded Microsoft Update catalog, allows users to fully automate their update services.
☑ Uninstalling Microsoft updates has always been a problematic process. Vista improves on this process by providing a better view of the updates that have been installed. Unfortunately, you cannot uninstall the majority of updates, and you need to use the System Restore feature in Windows OS instead.
Using Windows Server Update Services (WSUS) and Vista
☑ You can use client-side targeting through local or domain Group Policy to automatically place computers in specific computer groups on your WSUS server. This allows for fine-grained targeting of available updates.
☑ Bandwidth conservation is an important part of the benefits WSUS provides to an organization. WSUS acts as a concentrator for the Windows Update service; the local WSUS server synchronizes to the WSUS update servers on the Internet and retrieves the update metadata information for the products and classifications that the administrator has chosen.
☑ WSUS 3 improves upon its predecessor by utilizing the newest technologies available from Microsoft. Improved reporting, custom reports, granular control over update approval, and an MMC 3.0 administration console top the list of new features and improvements.
Using Systems Management Server (SMS) and Vista
☑ SMS is a powerful management tool, but the complexity of the initial deployment is overwhelming. If you decide to use SMS to manage your network, we suggest that you have previous experience working with the product or that you seek outside resources in the initial planning and implementation phase of the process.
☑ The next version of the OS Deployment feature pack will support WinPE 2.0, which will support a host of new hardware devices and will include full support for creating and deploying Vista images.
☑ Network Access Protection (NAP) is one of the widely anticipated features available in SMS v4. NAP gives administrators the ability to leverage the NAP features in Vista and Longhorn in order to limit network access for clients that don’t meet software update requirements.
Using Microsoft Operations Manager (MOM) and Vista
☑ System Center Operations Manager 2007 is the next version in the Microsoft Operations Manager line of software products, which provide enterprises with the ability to monitor and maintain the health of clients, servers, and devices on their networks.
☑ MOM allows administrators to not only utilize MPs from Microsoft and ISVs, but also author new MPs based on their network needs.
☑ SCOM is purely a network monitoring and management tool, and although WSUS 3 has an available MP, you cannot manage software updates with SCOM directly. System Center Essentials, on the other hand, integrates SCOM and WSUS 3 to provide small and mid-size businesses with a monitoring, management, and software update solution.
Using Third-Party Tools with Vista
☑ Altiris Client Management Suite is the combination of several Altiris software products which provide enterprises of all sizes with a comprehensive client monitoring and management, software deployment, software update, and OS deployment and migration solution.
☑ Altiris includes Carbon Copy, a software product which allows administrators to connect to a remote computer’s console, and view and interact directly with the computer and the user that is currently logged on to the machine.
☑ The Software Delivery Service in Altiris allows administrators to define a set of available products and advertise the availability of those software products to end users. The end users can then select which pieces of software are necessary for them to accomplish their tasks and install those pieces as needed without administrator intervention.
Frequently Asked Questions
The following Frequently Asked Questions, answered by the authors of this book, are designed to both measure your understanding of the concepts presented in this chapter and to assist you with real-life implementation of these concepts. To have your questions about this chapter answered by the author, browse to www.syngress.com/solutions and click on the “Ask the Author” form.
Q: What happened to the Windows Update Web site in Vista?
A: Microsoft has done away with having to use Internet Explorer to navigate to the Windows Update Web site in order to receive updates. Now the Windows Update and Microsoft Update agents are integrated into the Windows Update Control Panel applet.
Q: What can I do to keep my users from changing AU settings or ignoring installation notifications?
A: All the AU settings are available through local or domain Group Policy. Use gpedit.msc or edit the domain Group Policy Object to set the policies to your desired configurations, and your users will no longer be able to change the settings. Use the wuau2.ADM file included on the CD to update your Windows 2000/2003 Group Policy Object so that you can access the Vista-specific policy settings.
Q: How can I automatically set my new Vista installs to use Microsoft Update instead of the standard Windows Update catalog?
A: Simply script the process. Using the muauth.CAB file along with this three-line script, you can easily set your machines to automatically use the Microsoft Update catalog:
Set ServiceManager = CreateObject(“Microsoft.Update.ServiceManager”)
Set NewUpdateService = ServiceManager.AddService(“7971f918-a847-4430-9279-4a52d1efe18d”, “C:muauth.cab”)
ServiceManager.RegisterServiceWithAU “7971f918-a847-4430-9279-4a52d1efe18d”
Q: I need to centrally manage updates for Vista clients immediately. What are my choices?
A: WSUS 2 is probably the best choice, and currently it is the only Microsoft-based product that fully supports Vista. Altiris and SMS can also provide updates for Vista clients, but it is not officially supported.
Q: Where can I find the download for MMC 3.0 so that I can start using WSUS 3?
A: The download is available at www.microsoft.com/downloads/results.aspx?pocId = &freetext = MMC%203.0&DisplayLang = en.
Q: I currently run WSUS 2 for my Microsoft-based software update needs. Why should I migrate to WSUS 3 when it is released?
A: WSUS 3 offers several improvements over WSUS 2. The administration interface has moved from a Web-based solution to an MMC 3.0 console-based solution. Reporting is greatly improved, and you get more granular control over update approval and targeting.
Q: Which version of SMS currently supports Microsoft Vista or Longhorn?
A: None of them does, unfortunately. But this is due to change very soon, with the release of SP3 for SMS 2003. There is currently no word on when or how Microsoft will release support for Vista and Longhorn in the SMS v4 Beta product, but it will most likely appear in the next milestone release, Beta 2.
Q: Is it possible to test the new NAP features in Vista with System Center Configuration Manager 2007?
A: Currently the NAP features in SCCM do not support Vista or Longhorn.
Q: Do SMS 2003 and SMS 4 provide patch management for third-party software products, or only for Microsoft-based updates?
A: Both SMS 2003 and SMS 4 will support the ability to deploy patches for both Microsoft-based and non-Microsoft software products.
Q: Can I deploy software updates with MOM or SCOM?
A: No, MOM and SCOM are purely monitoring and health management products. They do, however, support monitoring SMS and WSUS 3 with the addition of the appropriate MPs. SCE, on the other hand, incorporates the powerful features of MOM with the ability to deploy software and software updates.
Q: I am using WSUS 2 to provide software updates to clients on my network and MOM 2005 to provide monitoring for my network. Is an MP available for MOM so that I can monitor my WSUS 2 server?
A: No, there is no WSUS 2 MP, but an MP is available for MOM 2005 that supports the WSUS 3 Beta.
Q: Where does System Center Essentials fit in the network management puzzle?
A: System Center Essentials is Microsoft’s new monitoring and management tool for small to mid-size businesses. It includes the monitoring capabilities of MOM and the Microsoft-based patch management capabilities of WSUS 3, with software deployment features thrown in for good measure.
Q: I can’t seem to connect to my Vista clients using the Altiris Carbon Copy agent. What am I doing wrong?
A: Carbon Copy, unfortunately, does not currently support Vista clients. There is no official word on when Carbon Copy will fully support Vista clients, but hopefully we will see an update in the next couple of months.
Q: The hardware and software inventory reports are excellent, but I want to view this information and be able to make changes to the system in question. Does Altiris give me the ability to do this?
A: The real-time consoles in Altiris give an administrator the ability to perform some management tasks, such as changing service state and startup options, rebooting or powering off a system remotely, killing processes, and running commands.
Q: Does Altiris support updating non-Microsoft software products?
A: Yes! Altiris, like Microsoft’s own SMS and many other third-party patch management tools, supports updating both Microsoft and non-Microsoft software.