5: Inserting Pictures and Multimedia
What You’ll Do
Apply a Style, Shape and Border to a Picture
Compress and Correct a Picture
Crop, Rotate and Recolor a Picture
Create and Format WordArt Text
Apply and Modify WordArt Text Effects
Insert, Edit, and Format Videos and Audio
Set Video and Audio Play Options
Introduction
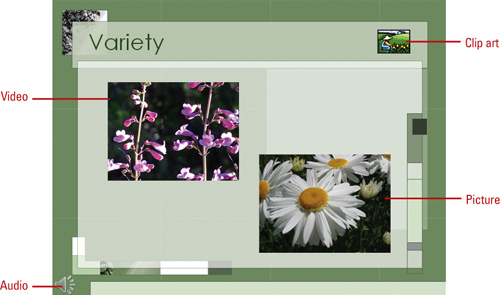
Although well-illustrated slides can’t make up for a lack of content, you can capture your audiences’ attention if your slides are vibrant and visually interesting. You can easily enhance a slide by adding a picture—one of your own or one of the hundreds that come with Microsoft PowerPoint. If you have the appropriate hardware, such as a sound card and speakers, you can also include audio files and video clips in your presentation.
Microsoft Office comes with a vast array of ClipArt, and there are endless amounts available through other software packages or on the Web. When going online to look at clips, you can categorize them so that it’s easier to find the best choice for your presentation. You can use the Microsoft Office.com Web site to search for and download additional clip art.
With all of your digital photos or scanned pictures, you can organize them in an album. Certain elements, such as adding text or oval frames, make cataloging your pictures an easier process. If you need to modify your pictures, you can resize them, compress them for storage, change their brightness or contrast, recolor them, or change their shape by cropping them.
WordArt is another feature that adds detail to your slide presentation. Available in other Office programs, WordArt can bring together your slides—you can change its color, shape, shadow, or size. Because WordArt comes with so many style choices, time spent customizing your slides is minimal.
Another element that will give your presentation a real professional look and feel is the addition of video or audio clips. Imagine watching a slide show presentation with music playing at key points or starting a slide show with a video clip that loosens up the audience.
Inserting Multimedia Clips
PowerPoint provides access to hundreds of professionally designed pieces of clip art. These clips include clip art, pictures, photographs, audio, and videos. All Microsoft Office programs includes Microsoft Clip Organizer, which organizes these objects into categories and gives you tools to help locate the clips you need quickly. You can extend the usefulness of the Clip Organizer by importing your own objects. You can store your own objects from PowerPoint or insert clip art, pictures, audio, and video files in the Clip Organizer. The Clip Art task pane helps you search for clip art and access the clip art available in the Clip Organizer and on the Web at Office.com.
Clip Art
Clip art objects (pictures and animated pictures) are images made up of geometric shapes, such as lines, curves, circles, squares, and so on. These images, known as vector images, are mathematically defined, which makes them easy to resize and manipulate. A picture in the Microsoft Windows Metafile (.wmf) file format is an example of a vector image.
Pictures
Pictures, on the other hand, are not mathematically defined. They are bitmaps, images that are made up of dots. Bitmaps do not lend themselves as easily to resizing because the dots can’t expand and contract when you enlarge or shrink your picture. You can create a picture using a bitmap graphics program such as Adobe Photoshop, Microsoft Paint, or Paint Shop Pro by drawing or scanning an image or by taking a digital photograph.

An audio is a file that makes a sound. Some sounds play on your computer’s internal speakers (such as the beep you hear when your operating system alerts you to an error), but others require a sound card and speakers. You can use the Windows accessory called Windows Media Player to listen to audio clips.
Videos
A video can be animated pictures, such as cartoons, or it can be digital video prepared with digitized video equipment. Although you can play a video clip on most monitors, if it has audio, you need a sound card and speakers to hear the clip.
Locating and Inserting Clip Art
To add a clip art image to a slide, you can use a slide layout with a content placeholder and simply click the Insert Clip Art icon. Or click the Insert Clip Art button on the Insert tab to open the Clip Art task pane. The Clip Art task pane helps you search for clip art and access the clip art available in the Clip Organizer and at Office.com. You can limit search results to a specific collection of clip art or a specific type of media file. After you find the clip art you want, you can click it to insert it, or point to it to display a list arrow. Then click an available command, such as Copy, Paste, Copy or Move to Collection, Delete from Clip Organizer, Edit Keywords, and Preview/Properties.
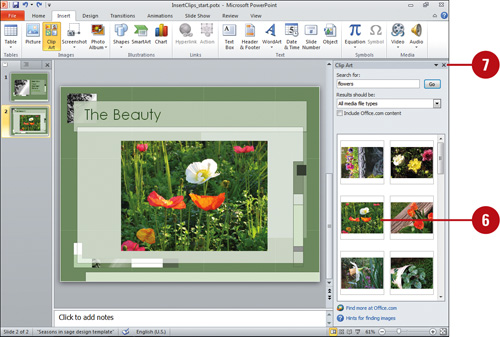
Insert a Clip Art Image Using a Slide Layout
![]() Click the Home tab.
Click the Home tab.
![]() Click the New Slide button arrow, and then click a slide layout that includes the clip art content placeholder.
Click the New Slide button arrow, and then click a slide layout that includes the clip art content placeholder.
![]() In the content placeholder, click the Insert Clip Art icon.
In the content placeholder, click the Insert Clip Art icon.
![]() In the Clip Art task pane, click the Search for box, type what you want to search for, and then click Go.
In the Clip Art task pane, click the Search for box, type what you want to search for, and then click Go.
Clips matching the keywords appear in the Results list.
![]() Click the clip you want.
Click the clip you want.
![]() Click the Close button on the task pane.
Click the Close button on the task pane.

Did You Know?
You can drag a picture. You can also drag a picture from the Clip Art task pane to your slide.
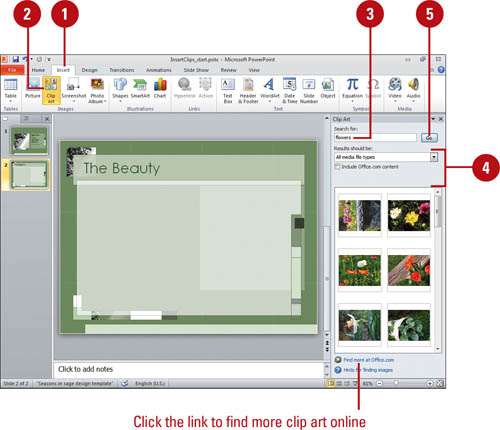
![]() Click the Insert tab.
Click the Insert tab.
![]() Click the Clip Art button.
Click the Clip Art button.
![]() Type the keyword(s) associated with the clip you are looking for.
Type the keyword(s) associated with the clip you are looking for.
![]() To modify your search, do one of the following:
To modify your search, do one of the following:
![]() To limit search results to a specific type of media file, click the Results Should Be list arrow, and then select the check box next to the types of clips you want to find.
To limit search results to a specific type of media file, click the Results Should Be list arrow, and then select the check box next to the types of clips you want to find.
![]() To display Office.com content, select the Include Office.com content check box (New!).
To display Office.com content, select the Include Office.com content check box (New!).
![]() To access clip art on Office.com, click the link at the bottom of the Clip Art task pane. Search and download images from Office.com.
To access clip art on Office.com, click the link at the bottom of the Clip Art task pane. Search and download images from Office.com.
![]() Click Go.
Click Go.
Clips matching the keywords appear in the Results list.
![]() Click the clip you want, and then resize it, if necessary.
Click the clip you want, and then resize it, if necessary.
![]() Click the Close button on the task pane.
Click the Close button on the task pane.
Accessing Clip Art on the Web
If you can’t find the image that you want in the Clip Organizer, you can search for additional images in Clip Art on Office.com, a clip gallery that Microsoft maintains on its Web site. To access Clip Art on Office.com, you can click the link at the bottom of the Clip Art task pane or click the Clips Online button on the Clip Organizer toolbar. This launches your Web browser and navigates you directly to the Office.com Web site, where you can access thousands of free clip art images.
Open Clips Online
![]() Click the Insert tab.
Click the Insert tab.
![]() Click the Clip Art button.
Click the Clip Art button.
![]() To see clips from Office.com in the Clip Art task pane, select the Include Office.com content check box.
To see clips from Office.com in the Clip Art task pane, select the Include Office.com content check box.
![]() To browse clips on Office.com, click the Find more at Office.com link.
To browse clips on Office.com, click the Find more at Office.com link.
Your Web browser displays the Microsoft Office.com Images Web page.
View Clips in a Category
![]() In the Clip Art task pane, click the Find more at Office.com link.
In the Clip Art task pane, click the Find more at Office.com link.
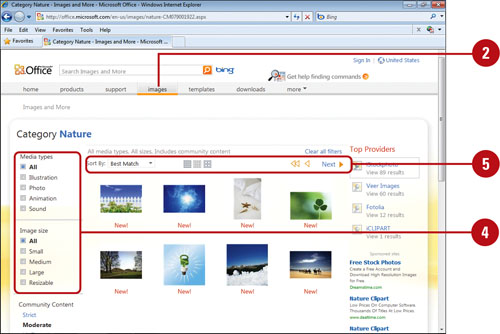
![]() On the Office.com Web page, click the images link at the top of the page, if necessary.
On the Office.com Web page, click the images link at the top of the page, if necessary.
![]() Click the All Categories link or the name of the category you want.
Click the All Categories link or the name of the category you want.
![]() Select criteria options under the category to narrow down your list of clips.
Select criteria options under the category to narrow down your list of clips.
![]() Use the Sort By and View buttons to display the clips the way you want.
Use the Sort By and View buttons to display the clips the way you want.

![]() In the Clip Art task pane, click the Find more at Office.com link.
In the Clip Art task pane, click the Find more at Office.com link.
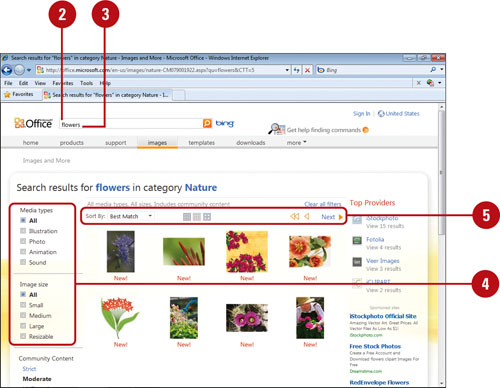
![]() On the Office.com Web page, click in the Search for box.
On the Office.com Web page, click in the Search for box.
![]() Type a keyword, and then press Enter.
Type a keyword, and then press Enter.
![]() Select criteria options under the category to narrow down your list of clips.
Select criteria options under the category to narrow down your list of clips.
![]() Use the Sort By and View buttons to display the clips the way you want.
Use the Sort By and View buttons to display the clips the way you want.
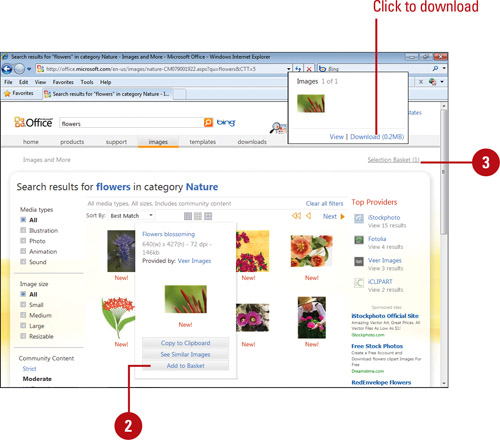
Download a Clip
![]() In the Clip Art task pane, click the Find more at Office.com link.
In the Clip Art task pane, click the Find more at Office.com link.
![]() On the Office.com Web page, display a list of clips, point to the image you want, and then click Add to Basket.
On the Office.com Web page, display a list of clips, point to the image you want, and then click Add to Basket.
![]() To copy and paste an image, click Copy to Clipboard.
To copy and paste an image, click Copy to Clipboard.
You can add as many images as you want to the basket.
![]() Point to the Selection Basket link, click the Download link, review the Terms of Use, and then click Accept.
Point to the Selection Basket link, click the Download link, review the Terms of Use, and then click Accept.
![]() If prompted, click Download, and then click Open.
If prompted, click Download, and then click Open.
The clip is stored on your hard disk and shown in your Clip Organizer where you can categorize it.
Inserting a Picture
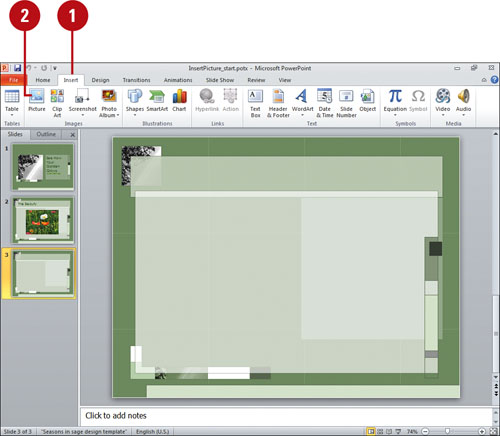
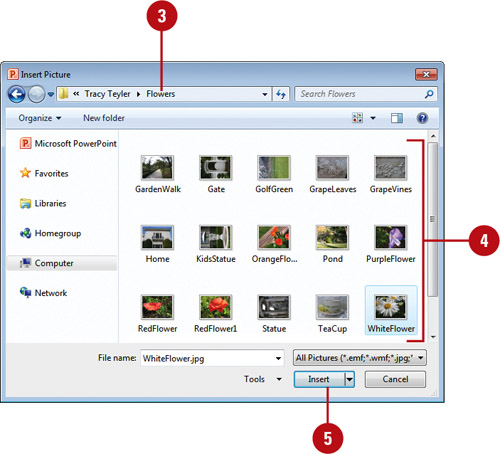
PowerPoint makes it possible for you to insert pictures, graphics, scanned photographs, art, photos, or artwork from a CD-ROM or other program into a slide. When you use the Picture button on the Insert tab, you specify the source of the picture. When you insert pictures from files on your hard disk drive, scanner, digital camera, or Web camera, PowerPoint allows you to select multiple pictures, view thumbnails of them, and insert them all at once, which speeds up the process.
Insert a Picture from a File
![]() Click the Insert tab.
Click the Insert tab.
![]() Click the Picture button.
Click the Picture button.
![]() Click the Look in list arrow, and then select the drive and folder that contain the file you want to insert.
Click the Look in list arrow, and then select the drive and folder that contain the file you want to insert.
![]() Click the file you want to insert.
Click the file you want to insert.
![]() Click Insert.
Click Insert.
![]() To link a picture file, click the Insert button arrow, and then click Link to File.
To link a picture file, click the Insert button arrow, and then click Link to File.
![]() To insert and link a picture file, click the Insert button arrow, and then click Insert and Link.
To insert and link a picture file, click the Insert button arrow, and then click Insert and Link.
TROUBLE? If you see a red “x” instead of a picture or motion clip in your presentation, then you don’t have a graphics filter installed on your computer for that clip.
Did You Know?
You can change a picture. If you no longer want to use a picture, you can change it instead of deleting it and inserting another one. Select the picture, click the Change Picture button on the Format tab, select a picture, and then click Insert.
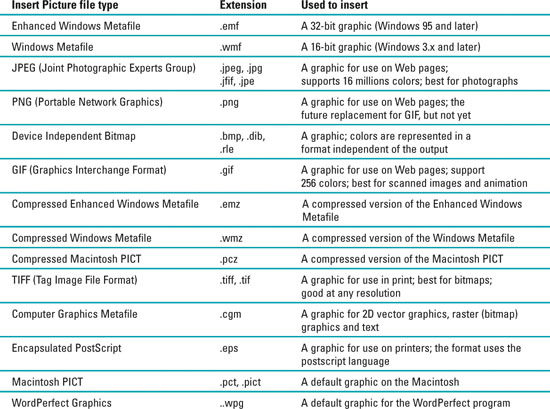
Examining Picture File Formats
The following table lists the default graphic formats available in PowerPoint. If the graphic format you need is not in the list, you can use Office Setup’s maintenance feature to install additional graphic formats using the Add or Remove Features option. See “Maintaining and Repairing Office” on page 30 for more information on using the feature.
Creating a Photo Album
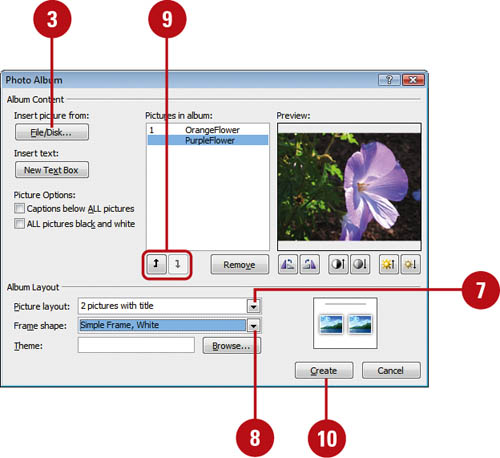
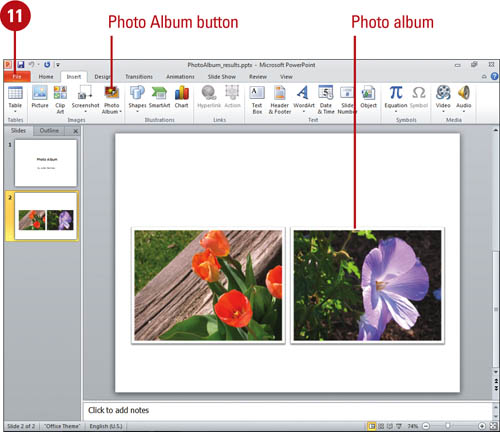
If you have a large collection of pictures, you can use PowerPoint to create a photo album. A PowerPoint photo album is a presentation that you can use to display your photographs and pictures. PowerPoint makes it easy for you to insert multiple pictures from your hard disk into your photo album. You can also customize the photo album by applying themes and using special layout options, such as oval frames and captions under each picture. When you setup captions in a photo album, PowerPoint automatically uses picture file name as caption placeholder text, which you can change later. You can also change the appearance of a picture in the photo album by adjusting rotation, contrast, and brightness.
Create a New Photo Album
![]() Click the Insert tab.
Click the Insert tab.
![]() Click the Photo Album button arrow, and then click New Photo Album.
Click the Photo Album button arrow, and then click New Photo Album.
![]() Click File/Disk.
Click File/Disk.
![]() Click the Look in list arrow, and then select the drive and folder that contain the pictures you want to insert.
Click the Look in list arrow, and then select the drive and folder that contain the pictures you want to insert.
![]() Select the pictures you wish to include in the new photo album.
Select the pictures you wish to include in the new photo album.
TIMESAVER Hold down the Ctrl key to select multiple pictures.
![]() Click Insert.
Click Insert.
![]() Click the Picture Layout list arrow, and then click a picture layout.
Click the Picture Layout list arrow, and then click a picture layout.
![]() Click the Frame Shape list arrow, and then click a frame shape.
Click the Frame Shape list arrow, and then click a frame shape.
![]() If you want to change the picture order or remove one, click a picture, and then use the Up, Down, or Remove buttons.
If you want to change the picture order or remove one, click a picture, and then use the Up, Down, or Remove buttons.
![]() Click Create.
Click Create.
![]() Click the File tab, click Save As, type a file name, and then click Save.
Click the File tab, click Save As, type a file name, and then click Save.
![]() Open the photo album presentation.
Open the photo album presentation.
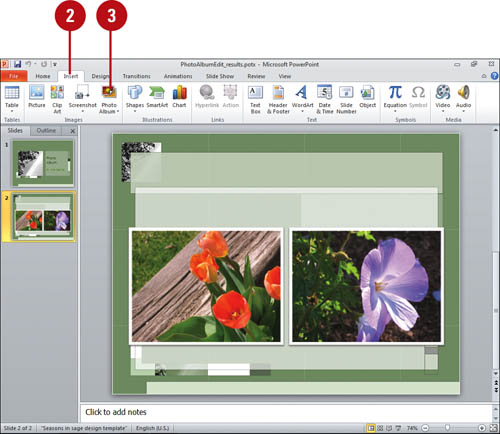
![]() Click the Insert tab.
Click the Insert tab.
![]() Click the Photo Album button arrow, and then click Edit Photo Album.
Click the Photo Album button arrow, and then click Edit Photo Album.
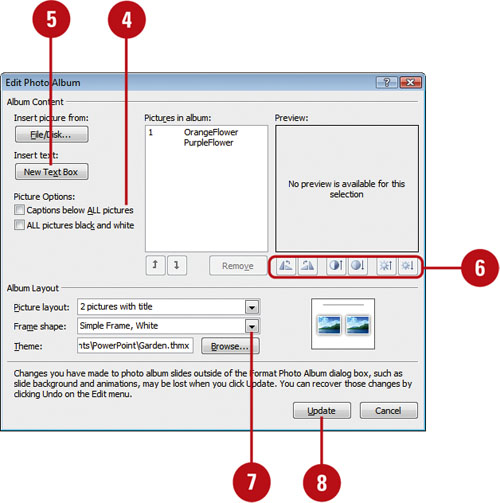
![]() To add captions, select the Captions below ALL pictures check box.
To add captions, select the Captions below ALL pictures check box.
TROUBLE? If the check box is not available, you need to select another picture layout.
![]() To add a text box for spacing purposes, select the picture you want to use, and then click New Text Box.
To add a text box for spacing purposes, select the picture you want to use, and then click New Text Box.
![]() To change the appearance of a picture, do one of the following:
To change the appearance of a picture, do one of the following:
![]() Rotate. Click these buttons to rotate the picture.
Rotate. Click these buttons to rotate the picture.
![]() Contrast. Click these buttons to increase or decrease contrast.
Contrast. Click these buttons to increase or decrease contrast.
![]() Brightness. Click these buttons to increase or decrease brightness.
Brightness. Click these buttons to increase or decrease brightness.
![]() To apply a theme, click Browse, locate and select a theme file, and then click Select.
To apply a theme, click Browse, locate and select a theme file, and then click Select.
![]() Click Update.
Click Update.
Did You Know?
You can share your photo album with others. You can print it, publish it to the Web, or send it as an attachment in an e-mail.
Inserting a Picture Screen Shot
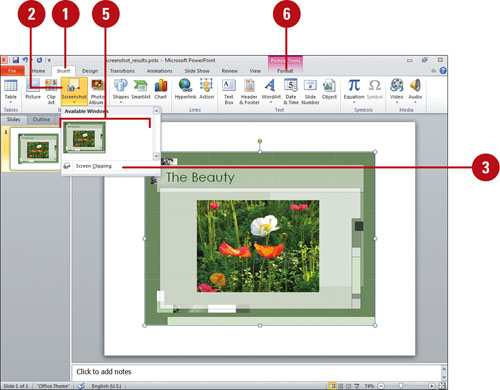
If you’re working on a training manual, presentation, or document that requires a picture of your computer screen, then the Screenshot button (New!) on the Insert tab just made your life a lot easier. You use the Screen Clipping tool to drag a selection around the screen area that you want to capture, and then select the picture from the Screenshot gallery. The Screenshot gallery holds multiple screen shots, so you can capture several screens before you insert them into your document. After you insert the screen shot into a document, you can use the tools on the Picture Tools tab to edit and improve it.
Insert a Picture Screen Shot
![]() Click the Insert tab.
Click the Insert tab.
![]() Click the Screenshot button.
Click the Screenshot button.
![]() Click Screen Clipping.
Click Screen Clipping.
![]() Display the screen you want to capture, and then drag the large plus cursor to select the screen area to capture.
Display the screen you want to capture, and then drag the large plus cursor to select the screen area to capture.
![]() Click the Screenshot button, and then click the thumbnail of the screen shot you want to insert.
Click the Screenshot button, and then click the thumbnail of the screen shot you want to insert.
![]() Use the tools on the Format tab under Picture Tools to edit and improve the screen shot.
Use the tools on the Format tab under Picture Tools to edit and improve the screen shot.
Did You Know?
You can copy the window or screen contents. To make a copy of the active window, press Alt+Print Scrn. To copy the entire screen as it appears on your monitor, press Print Scrn.
See Also
See “Cropping and Rotating a Picture” on page 180 for more information on cropping out part of a screen shot picture you don’t want.
Adding an Artistic Style to a Picture
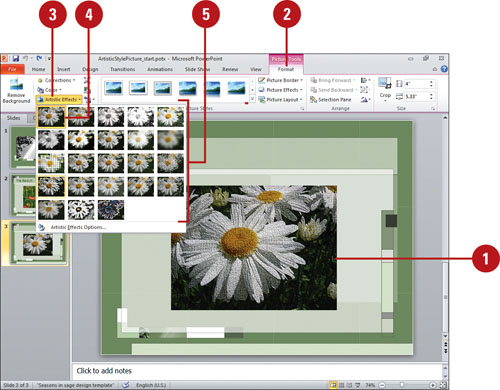
With the Artistic Quick Style gallery (New!), you can transform a picture into a piece of artwork. The Artistic Quick Style gallery makes it easy to change the look of a picture to a sketch, drawing, or painting. The Picture Quick Style gallery provides a variety of different formatting options—such as Pencil Sketch, Line Drawing, Watercolor Sponge, Mosaic Bubble, Glass, Pastels Smooth, Plastic Wrap, Photocopy, and Paint Strokes—to create a professional look. To quickly see if you like an Artistic Quick Style, point to a thumbnail in the gallery to display a live preview of it in the selected shape. If you like it, you can apply it.
Add an Artistic Style to a Picture
![]() Click the picture you want to change.
Click the picture you want to change.
![]() Click the Format tab under Picture Tools.
Click the Format tab under Picture Tools.
![]() Click the Artistic Effects button.
Click the Artistic Effects button.
The current style appears highlighted in the gallery.
![]() Point to a style.
Point to a style.
A live preview of the style appears in the picture.
![]() Click the style you want from the gallery to apply it to the selected picture.
Click the style you want from the gallery to apply it to the selected picture.
Adding a Quick Style to a Picture
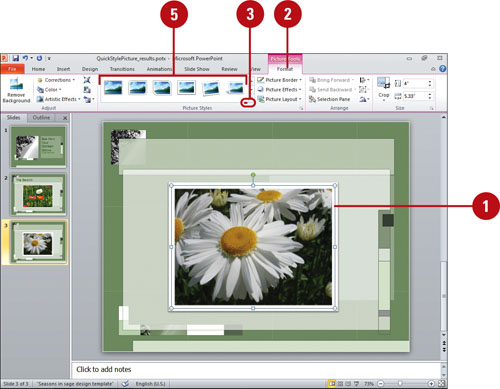
Instead of changing individual attributes of a picture—such as shape, border, and effects—you can quickly add them all at once with the Picture Quick Style gallery. The Picture Quick Style gallery provides a variety of different formatting combinations. To quickly see if you like a Picture Quick Style, point to a thumbnail in the gallery to display a live preview of it in the selected shape. If you like it, you can apply it.
Add a Quick Style to a Picture
![]() Click the picture you want to change.
Click the picture you want to change.
![]() Click the Format tab under Picture Tools.
Click the Format tab under Picture Tools.
![]() Click the scroll up or down arrow, or click the More list arrow in the Picture Styles group to see additional styles.
Click the scroll up or down arrow, or click the More list arrow in the Picture Styles group to see additional styles.
The current style appears highlighted in the gallery.
![]() Point to a style.
Point to a style.
A live preview of the style appears in the current shape.
![]() Click the style you want from the gallery to apply it to the selected picture.
Click the style you want from the gallery to apply it to the selected picture.

Did You Know?
You can save a shape as a picture in the PNG format. Right-click the shape, click Save As Picture, type a name, and then click Save.
Applying a Shape to a Picture
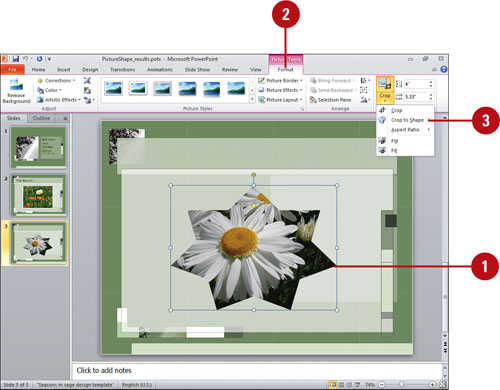
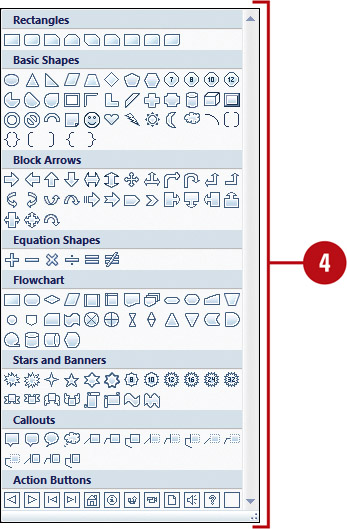
After you insert a picture into your document, you can select it and apply one of Office’s shapes to it. The picture appears in the shape just like it has been cropped. The Crop to Shape gallery (New!) makes it easy to choose the shape you want to use. Live preview is not available with the Crop to Shape gallery. You can try different shapes to find the one you want. If you don’t find the one you want, you can use the Reset Picture button to return the picture back to its original state.
Apply a Shape to a Picture
![]() Click the picture you want to change.
Click the picture you want to change.
![]() Click the Format tab under Picture Tools.
Click the Format tab under Picture Tools.
![]() Click the Crop button arrow, and then point to Crop to Shape.
Click the Crop button arrow, and then point to Crop to Shape.
![]() Select the shape you want to apply to the selected picture.
Select the shape you want to apply to the selected picture.
Did You Know?
You can quickly return a picture back to its original form. Select the picture, click the Format tab, and then click the Reset Picture button.
Applying a Border to a Picture
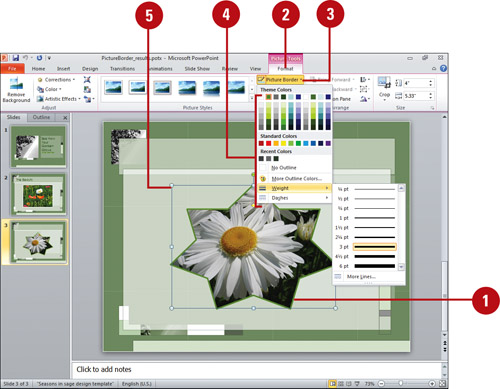
After you insert a picture, you can add and modify the picture border by changing individual outline formatting using the Picture Border button on the Format tab under Picture Tools. The Picture Border button works just like the Shape Outline button, and provides similar options to add a border, select a border color, and change border width and style. You can try different border combinations to find the one you want. If you don’t find one that works for you, you can use the No Outline command on the Picture Border gallery to remove it.
Apply a Border to a Picture
![]() Click the picture you want to change.
Click the picture you want to change.
![]() Click the Format tab under Picture Tools.
Click the Format tab under Picture Tools.
![]() Click the Picture Border button.
Click the Picture Border button.
![]() Click a color, or point to Weight, or Dashes, and then select a style, or click More Lines to select multiple options.
Click a color, or point to Weight, or Dashes, and then select a style, or click More Lines to select multiple options.
![]() Drag a sizing handle to change the size or angle of the line or arrow.
Drag a sizing handle to change the size or angle of the line or arrow.
Did You Know?
You can remove a border. Select the picture, click the Format tab, click the Picture Border button, and then click No Outline.
Applying Picture Effects
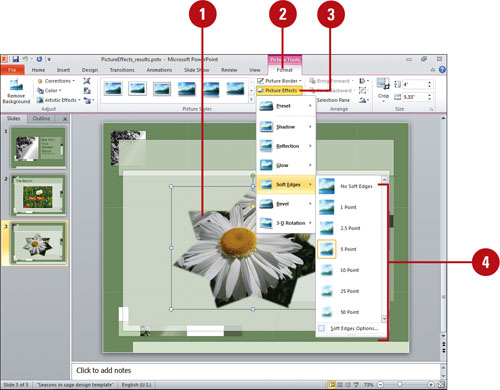
You can change the look of a picture by applying effects, such as shadows, reflections, glow, soft edges, and 3-D rotations. You can also apply effects to a shape by using the Picture Effects gallery for quick results, or by using the Format Shape dialog box for custom results. From the Picture Effects gallery you can apply a built-in combination of 3-D effects or individual effects to a picture. To quickly see if you like a picture effect, point to a thumbnail in the Picture Effects gallery to display a live preview of it. If you like it, you can apply it. If you no longer want to apply a picture effect to an object, you can remove it. Simply, select the picture, point to the effect type on the Picture Effects gallery, and then select the No effect type option.
Add an Effect to a Picture
![]() Click the picture you want to change.
Click the picture you want to change.
![]() Click the Format tab under Picture Tools.
Click the Format tab under Picture Tools.
![]() Click the Picture Effects button, and then point to one of the following:
Click the Picture Effects button, and then point to one of the following:
![]() Preset to select No 3-D, one of the preset types, or 3-D Options.
Preset to select No 3-D, one of the preset types, or 3-D Options.
![]() Shadow to select No Shadow, one of the shadow types, or Shadows Options.
Shadow to select No Shadow, one of the shadow types, or Shadows Options.
![]() Reflection to select No Reflection, one of the Reflection Variations, or Reflection Options (New!).
Reflection to select No Reflection, one of the Reflection Variations, or Reflection Options (New!).
![]() Glow to select No Glow, one of the Glow Variations, More Glow Colors, or Glow Options (New!).
Glow to select No Glow, one of the Glow Variations, More Glow Colors, or Glow Options (New!).
![]() Soft Edges to select No Soft Edges or a point size to determine the soft edge amount, or Soft Edges Options (New!).
Soft Edges to select No Soft Edges or a point size to determine the soft edge amount, or Soft Edges Options (New!).
![]() 3-D Rotation to select No Rotation, one of the rotation types, or 3-D Options.
3-D Rotation to select No Rotation, one of the rotation types, or 3-D Options.
When you point to an effect, a live preview of the style appears in the current shape.
![]() Click the effect you want from the gallery to apply it to the selected shape.
Click the effect you want from the gallery to apply it to the selected shape.
Modifying Picture Size
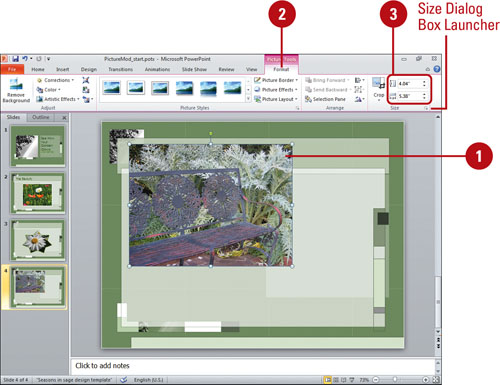
Once you have inserted a picture, clip art and other objects into your presentation, you can adapt them to meet your needs. Perhaps the clip is too small to be effective, or you don’t quite like the colors it uses. Like any object, you can resize or move the picture. You can use the sizing handles to quickly resize a picture or use height and width option in the Size group on the Format tab to resize a picture more precisely. If you want to set multiple options at the same time, you can use the Size and Position dialog box. You can make sure your pictures keep the same relative proportions as the original and provide the best scaling size for a slide show on a specific monitor size.
Resize a Picture
![]() Click the object you want to resize.
Click the object you want to resize.
![]() Drag one of the sizing handles to increase or decrease the object’s size.
Drag one of the sizing handles to increase or decrease the object’s size.
![]() Drag a middle handle to resize the object up, down, left, or right.
Drag a middle handle to resize the object up, down, left, or right.
![]() Drag a corner handle to resize the object proportionally.
Drag a corner handle to resize the object proportionally.
Resize a Picture Precisely
![]() Click the object you want to resize.
Click the object you want to resize.
![]() Click the Format tab under Picture Tools.
Click the Format tab under Picture Tools.
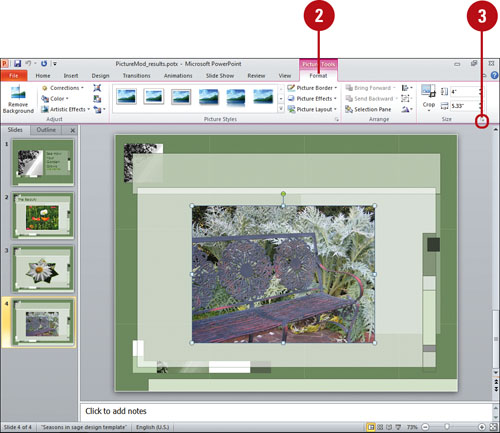
![]() Click the up and down arrows or enter a number (in inches) in the Height and Width boxes on the Ribbon and press Enter.
Click the up and down arrows or enter a number (in inches) in the Height and Width boxes on the Ribbon and press Enter.
If the Lock aspect ratio check box is selected in the Format Picture dialog box (under Size), height or width automatically changes when you change one of them. Click the Size Dialog Box Launcher to change the option.
![]() Click the object you want to resize.
Click the object you want to resize.
![]() Click the Format tab under Picture Tools.
Click the Format tab under Picture Tools.
![]() Click the Size Dialog Box Launcher.
Click the Size Dialog Box Launcher.
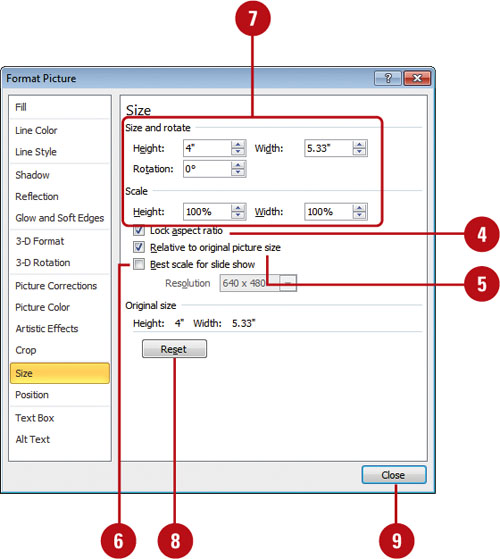
![]() To keep the picture proportional, select the Lock aspect ratio check box.
To keep the picture proportional, select the Lock aspect ratio check box.
![]() To keep the picture the same relative size, select the Relative to original picture size check box.
To keep the picture the same relative size, select the Relative to original picture size check box.
![]() To scale a picture for the best slide show look on a specific slide monitor, select the Best scale for slide show check box, and then select a resolution size.
To scale a picture for the best slide show look on a specific slide monitor, select the Best scale for slide show check box, and then select a resolution size.
![]() Click the up and down arrows or enter a number in the Height and Width boxes in one of the following:
Click the up and down arrows or enter a number in the Height and Width boxes in one of the following:
![]() Size. Enter a size in inches.
Size. Enter a size in inches.
![]() Scale. Enter a percentage size.
Scale. Enter a percentage size.
If the Lock aspect ratio check box is selected, height or width automatically changes when you change one of them.
![]() If you want to remove your changes, click Reset.
If you want to remove your changes, click Reset.
![]() Click Close.
Click Close.
Compressing a Picture
PowerPoint allows you to compress pictures in order to minimize the file size of the image. In doing so, however, you may lose some visual quality, depending on the compression setting (New!). You can pick the resolution that you want for the pictures in a document based on where or how they’ll be viewed (for example, on the Web or printed). You can also set other options, such as Delete cropped areas of picture, to get the best balance between picture quality and file size or automatically compress pictures when you save your document.
Compress a Picture
![]() Click to select the pictures you want to compress.
Click to select the pictures you want to compress.
![]() Click the Format tab under Picture Tools.
Click the Format tab under Picture Tools.
![]() Click the Compress Pictures button.
Click the Compress Pictures button.
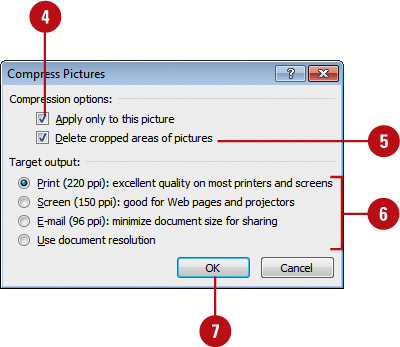
![]() Select the Apply only to this picture check box to apply compression setting to only the selected picture. Otherwise, clear the check box to compress all pictures in your document.
Select the Apply only to this picture check box to apply compression setting to only the selected picture. Otherwise, clear the check box to compress all pictures in your document.
![]() Select or clear the Delete cropped areas of pictures check box to reduce file.
Select or clear the Delete cropped areas of pictures check box to reduce file.
![]() Click the Print, Screen, E-mail, or Document (New!) option to specify a target output.
Click the Print, Screen, E-mail, or Document (New!) option to specify a target output.
![]() Click OK.
Click OK.

Correcting a Picture
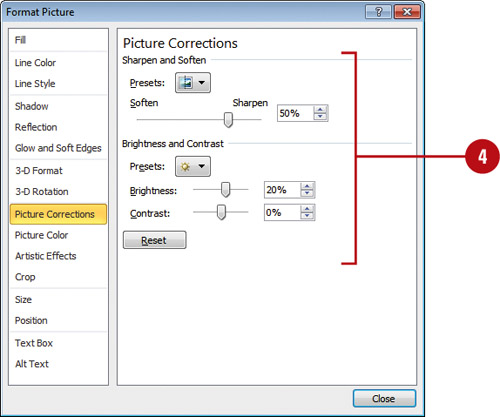
Once you have inserted a picture, you can control the image’s colors, brightness, and contrast using Picture tools. The brightness and contrast controls let you make simple adjustments to the tonal range of a picture. The brightness and contrast controls change a picture by an overall lightening or darkening of the image pixels. In addition, you can sharpen and soften pictures by a specified percentage (New!). You can experiment with the settings to get the look you want. If you don’t like the look, you can use the Reset Picture button to return the picture back to its original starting point.
Change Brightness and Contrast or Sharpen and Soften
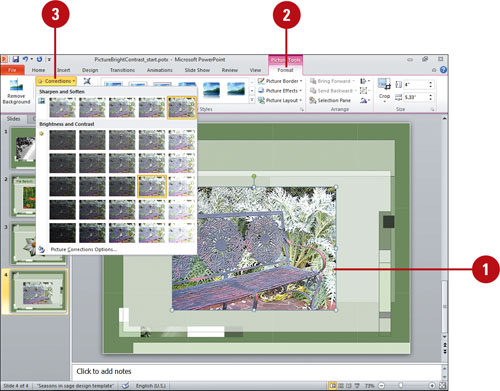
![]() Click the picture you want to change.
Click the picture you want to change.
![]() Click the Format tab under Picture Tools.
Click the Format tab under Picture Tools.
![]() Click the Corrections button, and then do one of the following:
Click the Corrections button, and then do one of the following:
![]() Brightness and Contrast. Click a brightness and contrast option.
Brightness and Contrast. Click a brightness and contrast option.
A positive brightness lightens the object colors by adding more white, while a negative brightness darkens the object colors by adding more black. A positive contrast increases intensity, resulting in less gray, while a negative contrast to decrease intensity, resulting in more gray.
![]() Sharpen and Soften. Click a sharpen and soften option.
Sharpen and Soften. Click a sharpen and soften option.
![]() To set custom correction percentages, click the Corrections button, click Picture Corrections Options, specify the options you want, and then click Close.
To set custom correction percentages, click the Corrections button, click Picture Corrections Options, specify the options you want, and then click Close.
Recoloring a Picture
You can recolor clip art and other objects to match the color scheme of your document. For example, if you use a flower clip art as your business logo, you can change shades of pink in the spring to shades of orange in the autumn. The Color Picture Quick Style gallery (New!) provides a variety of different recolor formatting combinations. To quickly see if you like a Color Picture Quick Style, point to a thumbnail in the gallery to display a live preview of it in the selected shape. If you like it, you can apply it. You can also use a transparent background in your picture to avoid conflict between its background color and your document’s background. With a transparent background, the picture takes on the same background as your document.
Recolor a Picture
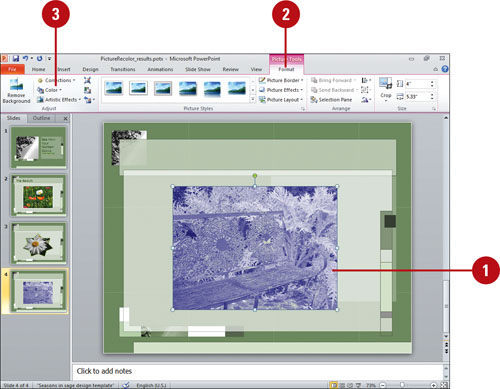
![]() Click the picture whose color you want to change.
Click the picture whose color you want to change.
![]() Click the Format tab under Picture Tools.
Click the Format tab under Picture Tools.
![]() Click the Color button.
Click the Color button.
![]() Click one of the Color options.
Click one of the Color options.
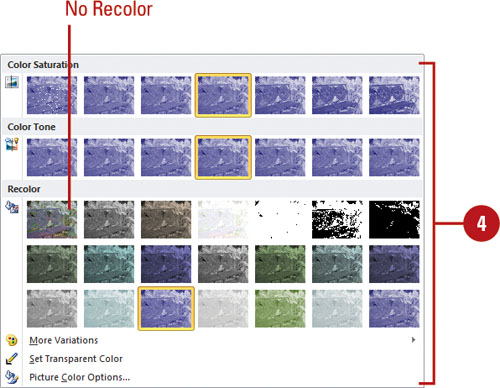
![]() Recolor. Click an option to apply a color type:
Recolor. Click an option to apply a color type:
No Recolor. Click this option to remove a previous recolor.
Grayscale. Converts colors into whites, blacks and shades of gray between black and white.
Sepia. Converts colors into very light gold and yellow colors like a picture from the old west.
Washout. Converts colors into whites and very light colors.
Black and White. Converts colors into only white and black.
![]() Color Saturation or Color Tone. Click an option to apply a color saturation or tone based on the recolor selection.
Color Saturation or Color Tone. Click an option to apply a color saturation or tone based on the recolor selection.
![]() More Variations. Point to this option to select a specific color.
More Variations. Point to this option to select a specific color.
![]() Picture Color Options. Click this option to set custom recolor options by percentage.
Picture Color Options. Click this option to set custom recolor options by percentage.
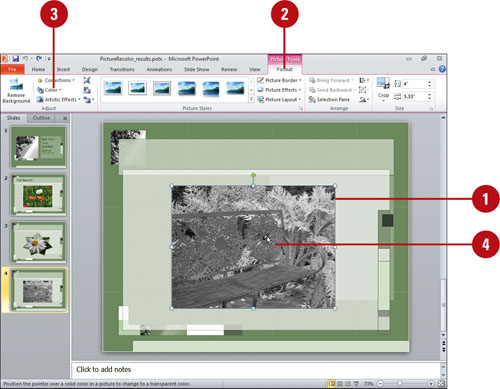
![]() Click the picture you want to change.
Click the picture you want to change.
![]() Click the Format tab under Picture Tools.
Click the Format tab under Picture Tools.
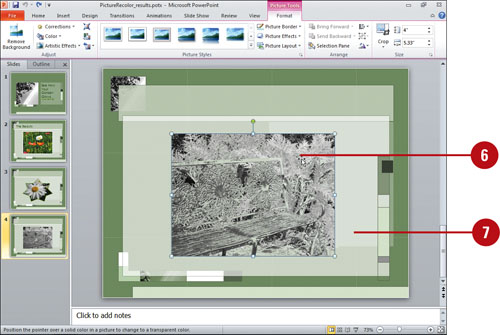
![]() Click the Recolor button, and then click Set Transparent Color.
Click the Recolor button, and then click Set Transparent Color.
![]() Move the pointer over the object until the pointer changes shape.
Move the pointer over the object until the pointer changes shape.
![]() Click the color you want to set as transparent.
Click the color you want to set as transparent.
![]() Move the pointer over the picture where you want to apply the transparent color, and then click to apply it.
Move the pointer over the picture where you want to apply the transparent color, and then click to apply it.
![]() When you’re done, click outside the image.
When you’re done, click outside the image.
Did You Know?
Why is the Set Transparent Color command dimmed? Setting a color as transparent works only with bitmaps. If you are working with an object that is not a bitmap, you will not be able to use this feature.
You can’t modify some pictures in PowerPoint. If the picture is a bitmap (.BMP, .JPG, .GIF, or .PNG), you need to edit its colors in an image editing program, such as Adobe Photoshop, Microsoft Paint, or Paint Shop Pro.
You can reset a picture back to its original state. Click the picture you want to reset, click the Format tab under Picture Tools, and then click the Reset Picture button.
Cropping and Rotating a Picture
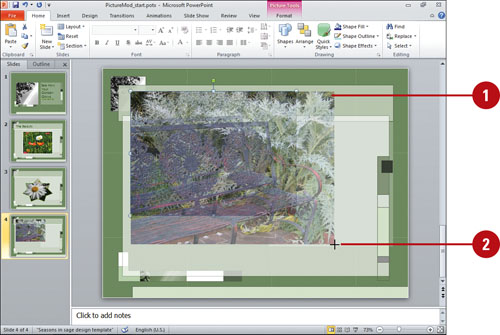
You can crop clip art to isolate just one portion of the picture. Because clip art uses vector image technology, you can crop even the smallest part of it and then enlarge it, and the clip art will still be recognizable. You can also crop bitmapped pictures, but if you enlarge the area you cropped, you lose picture detail. Use the Crop button to crop an image by hand. In addition, you can crop a picture while maintaining a selected resize aspect ratio (New!) or crop a picture based on a fill or fit (New!). You can also rotate a picture by increments or freehand.
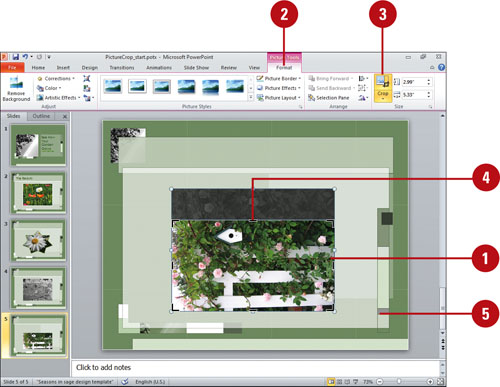
Crop a Picture Quickly
![]() Click the picture you want to crop.
Click the picture you want to crop.
![]() Click the Format tab under Picture Tools.
Click the Format tab under Picture Tools.
![]() Click the Crop button.
Click the Crop button.
![]() Drag the sizing handles until the borders surround the area you want to crop.
Drag the sizing handles until the borders surround the area you want to crop.
![]() Click outside the image when you are finished.
Click outside the image when you are finished.
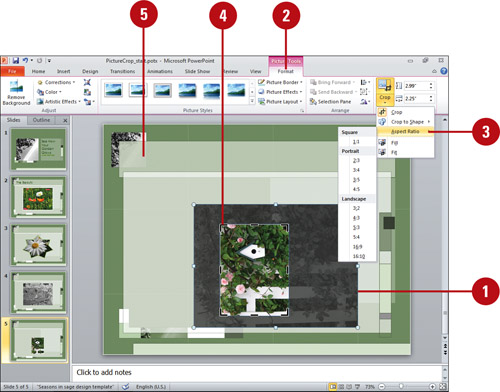
Crop a Picture with an Aspect Ratio
![]() Click the picture you want to crop.
Click the picture you want to crop.
![]() Click the Format tab under Picture Tools.
Click the Format tab under Picture Tools.
![]() Click the Crop button arrow, point to Aspect Ratio, and then select an aspect ratio.
Click the Crop button arrow, point to Aspect Ratio, and then select an aspect ratio.
![]() Drag the sizing handles until the borders surround the area you want to crop.
Drag the sizing handles until the borders surround the area you want to crop.
![]() Click outside the image when you are finished.
Click outside the image when you are finished.
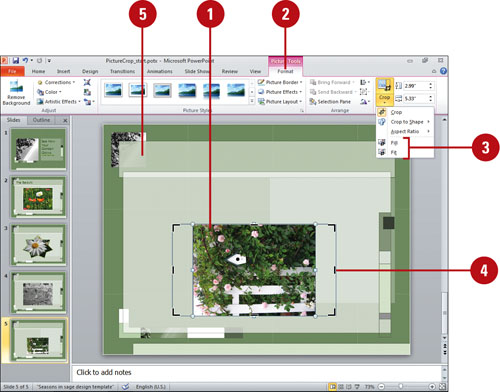
Crop a Picture with a Fill or Fit
![]() Click the picture you want to crop.
Click the picture you want to crop.
![]() Click the Format tab under Picture Tools.
Click the Format tab under Picture Tools.
![]() Click the Crop button arrow, and then select an option:
Click the Crop button arrow, and then select an option:
![]() Fill. Resizes the picture so the entire picture area is filled while maintaining the aspect ratio. Any area outside of the picture area is cropped.
Fill. Resizes the picture so the entire picture area is filled while maintaining the aspect ratio. Any area outside of the picture area is cropped.
![]() Fit. Resizes the picture so the entire picture displays inside the picture area while maintaining the aspect ratio.
Fit. Resizes the picture so the entire picture displays inside the picture area while maintaining the aspect ratio.
![]() Drag the sizing handles until the borders surround the area you want to crop.
Drag the sizing handles until the borders surround the area you want to crop.
![]() Click outside the image when you are finished.
Click outside the image when you are finished.
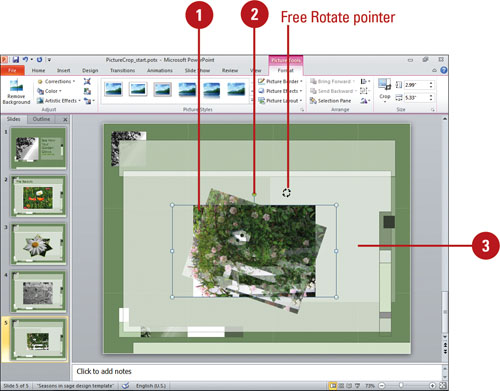
Rotate a Picture
![]() Click the object you want to rotate.
Click the object you want to rotate.
![]() Position the pointer (which changes to the Free Rotate pointer) over the green rotate lever at the top of the object, and then drag to rotate the object.
Position the pointer (which changes to the Free Rotate pointer) over the green rotate lever at the top of the object, and then drag to rotate the object.
![]() Click outside the object to set the rotation.
Click outside the object to set the rotation.
Removing a Picture Background
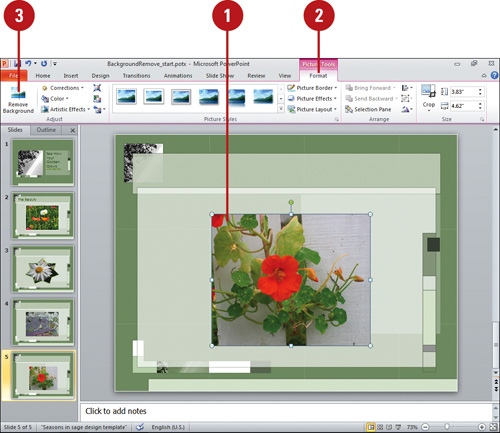
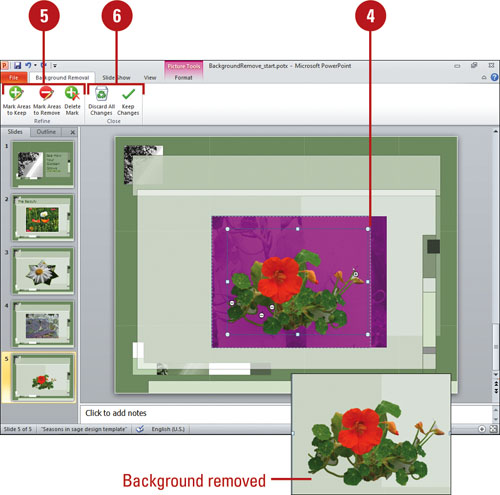
Sometimes you want to use an element from a picture instead of the entire picture. With the Remove Background command (New!), you can specify the element you want in a picture, and then remove the background. You can use automatic background removal or you can manually draw lines to specify which parts of the picture background you want to keep and which to remove.
Remove a Picture Background
![]() Click the picture you want to change.
Click the picture you want to change.
![]() Click the Format tab under Picture Tools.
Click the Format tab under Picture Tools.
![]() Click the Remove Background button.
Click the Remove Background button.
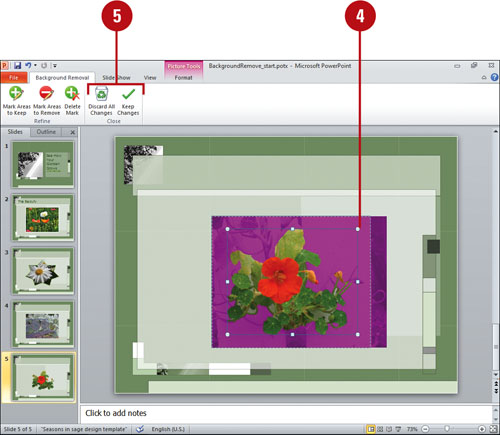
![]() Drag the handles on the marquee lines to specify the part of the picture you want to keep. The area outside the marquee gets removed.
Drag the handles on the marquee lines to specify the part of the picture you want to keep. The area outside the marquee gets removed.
![]() Click the Keep Changes button to close and keep the removal or click the Discard All Changes button to close and cancel the automatic removal.
Click the Keep Changes button to close and keep the removal or click the Discard All Changes button to close and cancel the automatic removal.
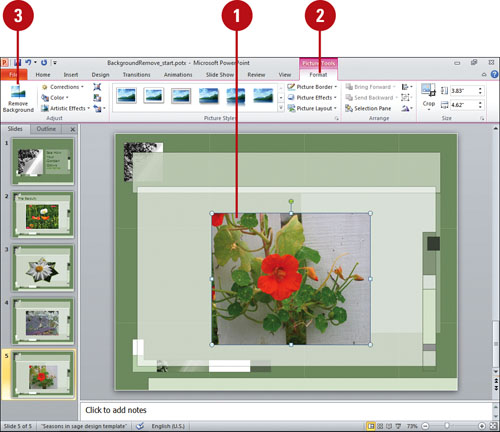
Remove a Picture Background Manually
![]() Click the picture you want to change.
Click the picture you want to change.
![]() Click the Format tab under Picture Tools.
Click the Format tab under Picture Tools.
![]() Click the Remove Background button.
Click the Remove Background button.
![]() Drag the handles on the marquee lines to specify the part of the picture you want to keep. The area outside the marquee gets removed.
Drag the handles on the marquee lines to specify the part of the picture you want to keep. The area outside the marquee gets removed.
![]() To manually specify which areas to keep and which areas to remove, do the following:
To manually specify which areas to keep and which areas to remove, do the following:
![]() Mark Areas to Keep. Click the button, and then draw lines to specify which parts of the picture you do not want automatically removed.
Mark Areas to Keep. Click the button, and then draw lines to specify which parts of the picture you do not want automatically removed.
![]() Mark Areas to Remove. Click the button, and then draw lines to specify which parts of the picture you do want removed in addition to those automatically marked.
Mark Areas to Remove. Click the button, and then draw lines to specify which parts of the picture you do want removed in addition to those automatically marked.
![]() Delete Mark. Click the button, and then click marked lines to remove them.
Delete Mark. Click the button, and then click marked lines to remove them.
![]() Click the Keep Changes button to close and keep the removal or click the Discard All Changes button to close and cancel the automatic removal.
Click the Keep Changes button to close and keep the removal or click the Discard All Changes button to close and cancel the automatic removal.
Creating WordArt Text
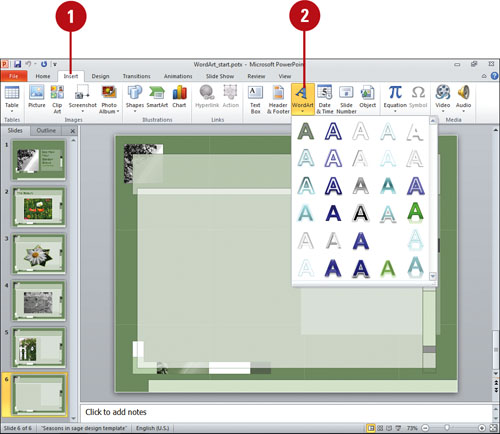
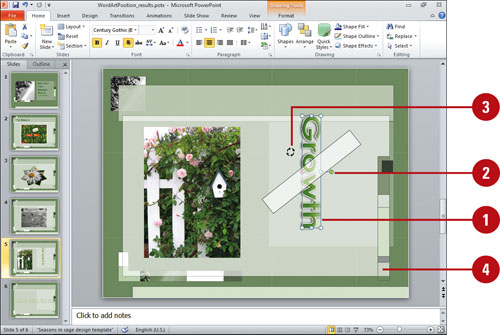
The WordArt feature lets you create stylized text to draw attention to your most important words. Most users apply WordArt to short phrases or even just a word, such as GROWING A GARDEN. You should apply WordArt to a slide sparingly. Its visual appeal and unique look require uncluttered space. When you use WordArt, you can choose from a variety of text styles that come with the WordArt Quick Style gallery, or you can create your own using tools in the WordArt Styles group. To quickly see if you like a WordArt Quick Style, point to a thumbnail in the gallery to display a live preview of it in the selected text. If you like it, you can apply it. You can also use the free angle handle (pink diamond) inside the selected text box to adjust your WordArt text angle.
Insert WordArt Text
![]() Click the Insert tab.
Click the Insert tab.
![]() Click the WordArt button, and then click one of the WordArt styles.
Click the WordArt button, and then click one of the WordArt styles.
A WordArt text box appears on the slide with selected placeholder text.
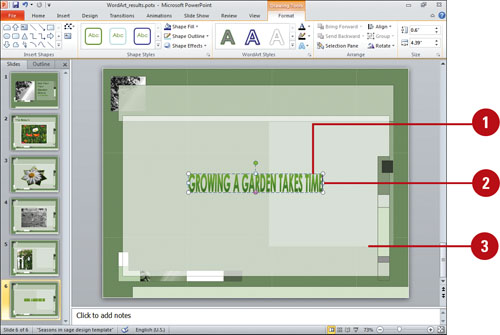
![]() Type the text you want WordArt to use.
Type the text you want WordArt to use.
![]() If applicable, use the Font and Paragraph options on the Home tab to modify the text you entered.
If applicable, use the Font and Paragraph options on the Home tab to modify the text you entered.
Did You Know?
You can convert text to WordArt. Select the text, click the Home tab, and then click the WordArt text style you want from the Ribbon.
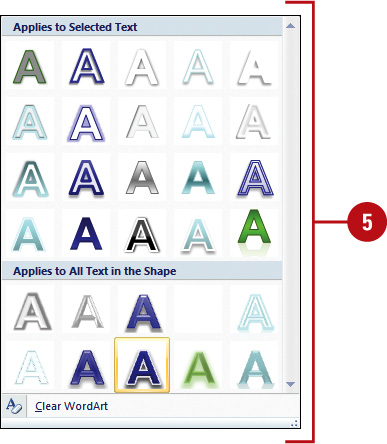
You can remove WordArt text. Select the WordArt text you want to remove, click the Format tab, click the Quick Styles button, and then click Clear WordArt.
![]() Click the WordArt object you want to edit.
Click the WordArt object you want to edit.
![]() Click to place the insertion point where you want to edit, and then edit the text.
Click to place the insertion point where you want to edit, and then edit the text.
![]() Click outside the object to deselect it.
Click outside the object to deselect it.
Adjust WordArt Text Angle
![]() Click the WordArt object you want to change.
Click the WordArt object you want to change.
![]() Drag the free angle handle (pink diamond) to adjust text angle in the direction you want.
Drag the free angle handle (pink diamond) to adjust text angle in the direction you want.
![]() When you’re done, release the mouse button.
When you’re done, release the mouse button.
![]() Click outside the object to deselect it.
Click outside the object to deselect it.

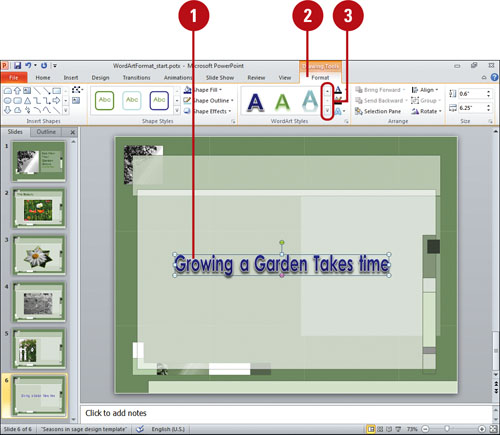
Formatting WordArt Text
In addition to applying one of the preformatted WordArt styles, you can also create your own style by shaping your text into a variety of shapes, curves, styles, and color patterns. The WordArt Styles group gives you tools for changing the fill and outline of your WordArt text. To quickly see if you like a WordArt Style, point to a thumbnail in the gallery to display a live preview of it in the selected text. If you like it, you can apply it.
Apply a Different WordArt Style to Existing WordArt Text
![]() Click the WordArt object whose style you want to change.
Click the WordArt object whose style you want to change.
![]() Click the Format tab under Drawing Tools.
Click the Format tab under Drawing Tools.
![]() Click the scroll up or down arrow, or click the More list arrow in the WordArt Styles group to see additional styles.
Click the scroll up or down arrow, or click the More list arrow in the WordArt Styles group to see additional styles.
The current style appears highlighted in the gallery.
![]() Point to a style.
Point to a style.
A live preview of the style appears in the current shape text.
![]() Click the style you want from the gallery to apply it to the selected shape.
Click the style you want from the gallery to apply it to the selected shape.
Did You Know?
You can add more formatting to WordArt text. Select the WordArt object, click the Home tab, and then use the formatting button in the Font and Paragraph groups.
You can change the WordArt fill color to match the background. Click the WordArt object, right-click the object, click Format Shape, click the Background option, and then click Close.
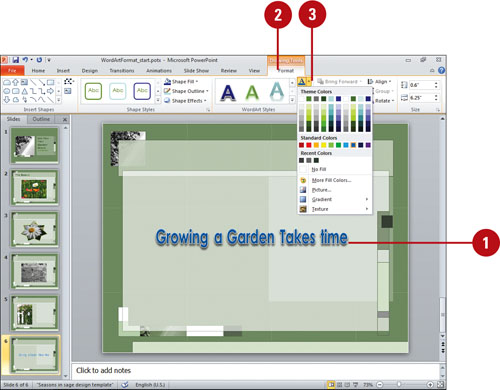
![]() Click the WordArt object you want to change.
Click the WordArt object you want to change.
![]() Click the Format tab under Drawing Tools.
Click the Format tab under Drawing Tools.
![]() Click the Text Fill button, and then click or point to one of the following:
Click the Text Fill button, and then click or point to one of the following:
![]() Color to select a theme or standard color.
Color to select a theme or standard color.
![]() Picture to select a picture file.
Picture to select a picture file.
![]() Gradient to select No Gradient, one of the shadow types, or More Gradients.
Gradient to select No Gradient, one of the shadow types, or More Gradients.
![]() Texture to select one of the of the texture types, or More Textures.
Texture to select one of the of the texture types, or More Textures.
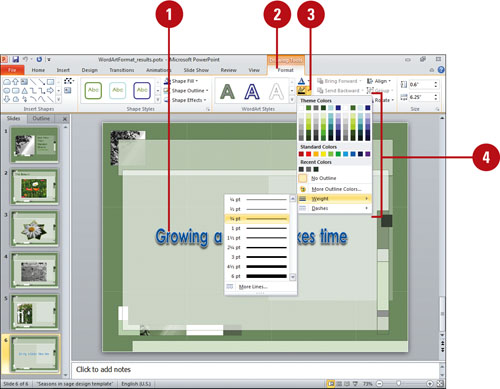
Apply an Outline to WordArt Text
![]() Click the WordArt object you want to change.
Click the WordArt object you want to change.
![]() Click the Format tab under Drawing Tools.
Click the Format tab under Drawing Tools.
![]() Click the Text Outline button.
Click the Text Outline button.
![]() Click a color, or point to Weight or Dashes, and then select a style.
Click a color, or point to Weight or Dashes, and then select a style.
Applying WordArt Text Effects
You can change the look of WordArt text by applying effects, such as shadows, reflections, glow, soft edges, 3-D rotations, and transformations. You can apply effects to a shape by using the Text Effects gallery for quick results. From the Text Effects gallery you can apply a built-in combination of 3-D effects or individual effects to WordArt text. To quickly see if you like the effect, point to a thumbnail in the Text Effects gallery to display a live preview of it. If you like it, you can apply it. If you no longer want to apply the effect, you can remove it. Simply, select the WordArt text, point to the effect type on the Text Effects gallery, and then select the No effect type option.
Apply an Effect to WordArt Text
![]() Click the WordArt object you want to change.
Click the WordArt object you want to change.
![]() Click the Format tab under Drawing Tools.
Click the Format tab under Drawing Tools.
![]() Click the Text Effects button, and then point to one of the following:
Click the Text Effects button, and then point to one of the following:
![]() Shadow to select No Shadow, one of the shadow types, or Shadows Options.
Shadow to select No Shadow, one of the shadow types, or Shadows Options.
![]() Reflection to select No Reflection, one of the Reflection Variations, or Reflection Options (New!).
Reflection to select No Reflection, one of the Reflection Variations, or Reflection Options (New!).
![]() Glow to select No Glow, one of the Glow Variations, More Glow Colors, or Glow Options (New!).
Glow to select No Glow, one of the Glow Variations, More Glow Colors, or Glow Options (New!).
![]() Bevel to select No Bevel, one of the bevel variations, or 3-D Options.
Bevel to select No Bevel, one of the bevel variations, or 3-D Options.
![]() 3-D Rotation to select No Rotation, one of the rotation types, or 3-D Rotation Options (New!).
3-D Rotation to select No Rotation, one of the rotation types, or 3-D Rotation Options (New!).
![]() Transform to select No Transform, or one of the transform types (Follow Path or Warp).
Transform to select No Transform, or one of the transform types (Follow Path or Warp).
When you point to an effect, a live preview of the style appears in the current shape.
![]() Click the effect you want from the gallery to apply it to the selected shape.
Click the effect you want from the gallery to apply it to the selected shape.

Modifying WordArt Text Position
You can apply a number of text effects to your WordArt objects that determine alignment and direction. The effects of some of the adjustments you make are more pronounced for certain WordArt styles than others. Some of these effects make the text unreadable for certain styles, so apply these effects carefully. You can apply effects to a shape by using the Format Shape dialog box for custom results. You can also use the free rotate handle (green circle) at the top of the selected text box to rotate your WordArt text.
Change WordArt Text Direction
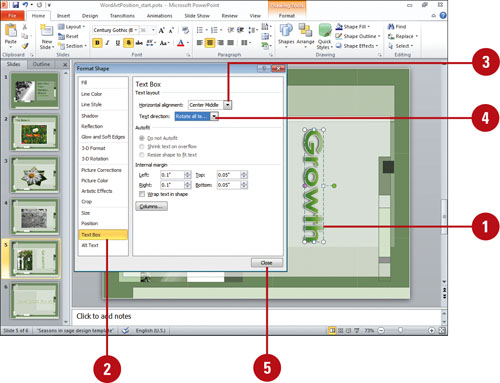
![]() Right-click the WordArt object you want to change, and then click Format Shape.
Right-click the WordArt object you want to change, and then click Format Shape.
![]() If necessary, click Text Box.
If necessary, click Text Box.
![]() Click the Vertical alignment or Horizontal alignment list arrow, and then select an option: Top, Middle, Bottom, Top Center, Middle Center, or Bottom Center.
Click the Vertical alignment or Horizontal alignment list arrow, and then select an option: Top, Middle, Bottom, Top Center, Middle Center, or Bottom Center.
![]() Click the Text Direction list arrow, and then select an option: Horizontal, Rotate all text 90°, Rotate all text 270°, or Stacked.
Click the Text Direction list arrow, and then select an option: Horizontal, Rotate all text 90°, Rotate all text 270°, or Stacked.
![]() Click Close.
Click Close.
Rotate WordArt Text
![]() Click the WordArt object you want to change.
Click the WordArt object you want to change.
![]() Drag the free rotate handle (green circle) to rotate the object in any direction you want.
Drag the free rotate handle (green circle) to rotate the object in any direction you want.
![]() When you’re done, release the mouse button.
When you’re done, release the mouse button.
![]() Click outside the object to deselect it.
Click outside the object to deselect it.
Inserting Videos and Audio
You can insert videos or audio into a presentation by inserting them from the Clip Art task pane, a file, or a social media Web site (New!), such as YouTube or hulu, using an embed code. Videos can be either animated pictures—also known as animated GIFs, such as cartoons—or they can be digital videos. Videos and audio are inserted as objects. When you insert a video, it becomes part of the presentation (New!), and not a linked file. When you insert an audio, a small icon appears representing the sound. PowerPoint supports the following audio file formats—ADTS (New!), AIFF, AU, MP3, MP4 (New!), WAV, WMA, QuickTime Audio (New!)—and video file formats—ASF, AVI, MP4 (New!), MPEG-2 TS (New!), MPG or MPEG, WMV, MOV or QT (QuickTime movie or video) (New!), SWF (Flash) (New!). After you insert a video or audio, you can play it back using the playback bar (New!) or the Playback tab under Video or Audio Tools.
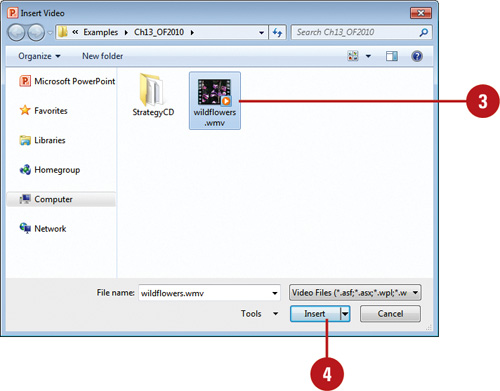
Insert a Video or Audio from a File
![]() Click the Insert tab.
Click the Insert tab.
![]() Click the Video or Audio button arrow, and then click Video from File or Audio from File.
Click the Video or Audio button arrow, and then click Video from File or Audio from File.
![]() Locate and select a video or audio file.
Locate and select a video or audio file.
![]() Click Insert.
Click Insert.
![]() To link a video to a presentation, click the Insert button arrow, and then click Link to File.
To link a video to a presentation, click the Insert button arrow, and then click Link to File.
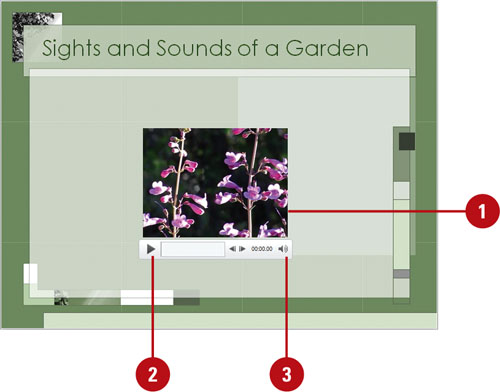
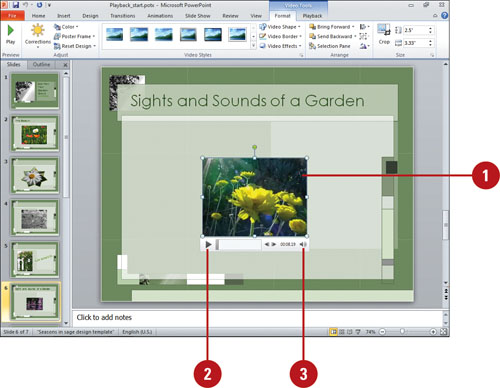
Play a Video or Audio
![]() Select the video or audio icon.
Select the video or audio icon.
![]() Click the Play/Pause button on the playback bar or on the Playback tab under Video Tools.
Click the Play/Pause button on the playback bar or on the Playback tab under Video Tools.
![]() To move 0.25 seconds, click the Move Forward or Move Backwards button on the playback bar.
To move 0.25 seconds, click the Move Forward or Move Backwards button on the playback bar.
![]() To change the volume, click the Mute/Unmute button or point to it, and then adjust the volume slider.
To change the volume, click the Mute/Unmute button or point to it, and then adjust the volume slider.
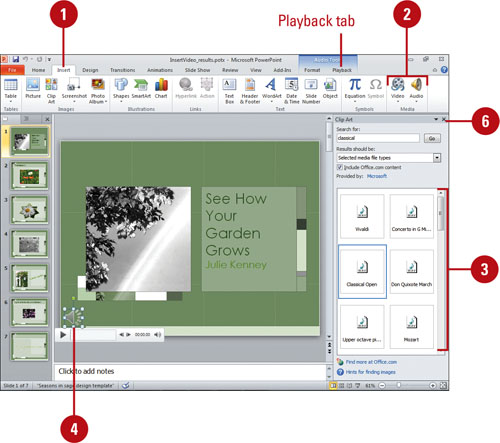
Insert a Clip Organizer Video or Audio
![]() Click the Insert tab.
Click the Insert tab.
![]() Click the Video or Audio button arrow, and then click Clip Art Video or Clip Art Audio.
Click the Video or Audio button arrow, and then click Clip Art Video or Clip Art Audio.
![]() Search for and click the media clip you want to insert.
Search for and click the media clip you want to insert.
![]() Select the clip, and then click the Playback tab under Video or Audio Tools.
Select the clip, and then click the Playback tab under Video or Audio Tools.
![]() Click the Start list arrow, and then select an option:
Click the Start list arrow, and then select an option:
![]() Automatically. Plays the media clip automatically when you go to the slide.
Automatically. Plays the media clip automatically when you go to the slide.
![]() On Clicked. Plays the media clip only when you click it.
On Clicked. Plays the media clip only when you click it.
![]() Play Across Slides. Plays the media clip across slides.
Play Across Slides. Plays the media clip across slides.
![]() When you’re done, click the Close button on the task pane.
When you’re done, click the Close button on the task pane.
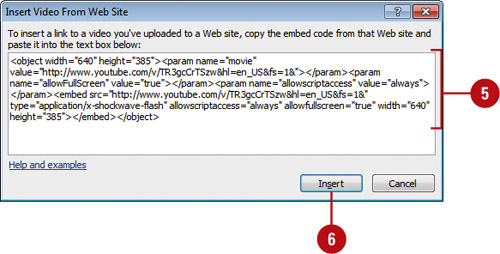
Insert a Video from a Web Site
![]() Open your browser, and go to the social Web site with the embed code you want to use.
Open your browser, and go to the social Web site with the embed code you want to use.
![]() Go to the page with the video you want to use, select the embed code, and then press Ctrl+C to copy it.
Go to the page with the video you want to use, select the embed code, and then press Ctrl+C to copy it.
![]() Click the Insert tab.
Click the Insert tab.
![]() Click the Video button arrow, and then click Video from Web Site.
Click the Video button arrow, and then click Video from Web Site.
![]() Press Ctrl+V to paste the embed code.
Press Ctrl+V to paste the embed code.
![]() Click Insert.
Click Insert.
Editing Videos and Audio
After you insert a video or audio, you can trim (New!) the start or end to remove the parts you don’t want and make it shorter. In the Trim Video or Trim Audio dialog box, you can drag the marker for the start point (green) or end point (red) or specify exact times to adjust the start and end time you want for the video or audio. You cannot trim sections within a video or audio. In addition to trimming, you can also add a fade effect to a video or audio and add text to a video (New!). Adding text to a video is useful for creating titles, captions, and credits.
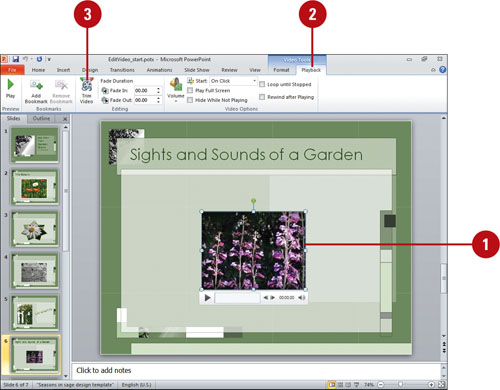
Trim a Video or Audio
![]() Click the video or audio object you want to change.
Click the video or audio object you want to change.
![]() Click the Playback tab under Video or Audio Tools.
Click the Playback tab under Video or Audio Tools.
![]() Click the Trim Video or Trim Audio button.
Click the Trim Video or Trim Audio button.
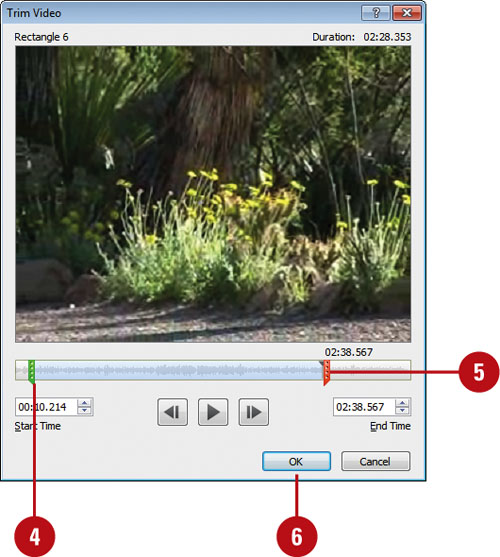
![]() Point to the start point (green marker), and then drag it to a new starting point, or specify an exact Start Time.
Point to the start point (green marker), and then drag it to a new starting point, or specify an exact Start Time.
![]() You can click a marker, and then click the Previous Frame and Next Frame buttons to locate an exact time.
You can click a marker, and then click the Previous Frame and Next Frame buttons to locate an exact time.
![]() You can click the Play/Pause button to advance the video or audio.
You can click the Play/Pause button to advance the video or audio.
![]() Point to the end point (red marker), and then drag it to a new end point, or specify an exact End Time.
Point to the end point (red marker), and then drag it to a new end point, or specify an exact End Time.
![]() Click OK.
Click OK.
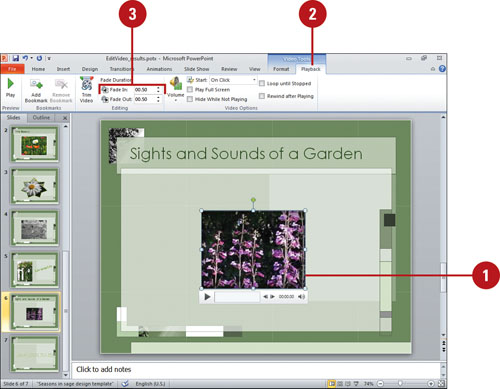
![]() Click the video or audio object you want to change.
Click the video or audio object you want to change.
![]() Click the Playback tab under Video or Audio Tools.
Click the Playback tab under Video or Audio Tools.
![]() Specify the number of seconds you want to play a fade effect in the Fade In or Fade Out box.
Specify the number of seconds you want to play a fade effect in the Fade In or Fade Out box.
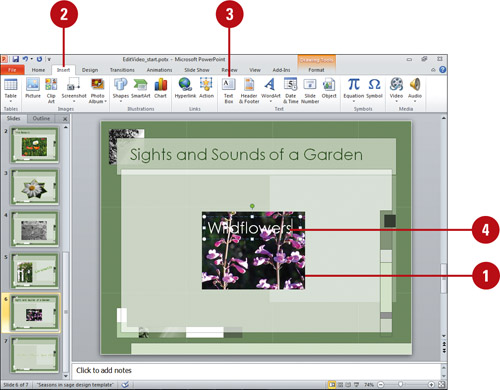
Add Text to a Video
![]() Click the video object you want to change.
Click the video object you want to change.
![]() Click the Insert tab.
Click the Insert tab.
![]() Click the Text Box button.
Click the Text Box button.
![]() Point to where you want the text box, drag to draw a text box, and then enter text.
Point to where you want the text box, drag to draw a text box, and then enter text.
Adding Bookmarks to Videos and Audio
After you insert a video or audio, you can add bookmarks (New!) to indicate time points in a video or audio clip. Bookmarks are useful as a way to trigger animations or jump to a specific location in a video. When you add a bookmark, a small bookmark dot appears on the time-line. The bookmark dot provides a visual marker on the timeline, which you can use to select it. The bookmarks are named Bookmark 1, Bookmark 2, etc. for reference in animations.
Add or Remove Video or Audio Bookmarks
![]() Click the video or audio object you want to change.
Click the video or audio object you want to change.
![]() Click the Playback tab under Video or Audio Tools.
Click the Playback tab under Video or Audio Tools.
![]() Play and pause the video or audio where you want to insert a bookmark.
Play and pause the video or audio where you want to insert a bookmark.
![]() Click the Add Bookmark button.
Click the Add Bookmark button.
A dot appears on the timeline. The bookmarks are named Bookmark 1, Bookmark 2, etc.
![]() To remove a bookmark, click the bookmark (dot), and then click the Remove Bookmark button.
To remove a bookmark, click the bookmark (dot), and then click the Remove Bookmark button.

Formatting Videos
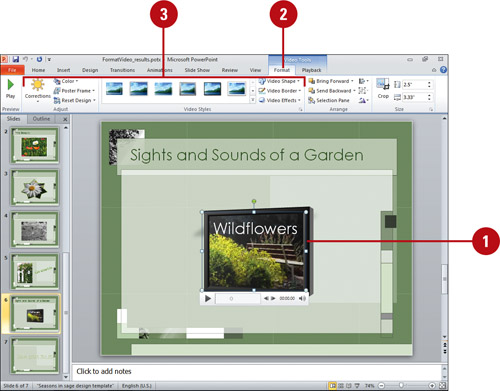
In addition to editing videos, you can also use the Format tab under Video Tools to apply formatting (New!)—such as image correction, video styles, effects, and borders—to the video, which are similar to Picture Tools. The poster frame (New!) is a preview image used when a video is not being played. You can create a poster frame from the current frame or an image from a file. If you don’t like the changes you have made to a video, you can use the Reset Design button (New!) to restore it.
Format a Video
![]() Click the video object you want to format; options are limited for a Flash object.
Click the video object you want to format; options are limited for a Flash object.
![]() Click the Format tab under Video or Audio Tools.
Click the Format tab under Video or Audio Tools.
![]() Select from the available buttons:
Select from the available buttons:
![]() Corrections. Select a brightness and contrast option.
Corrections. Select a brightness and contrast option.
![]() Color. Select a recolor variation.
Color. Select a recolor variation.
![]() Poster Frame. Creates a preview image for the video. Display a frame, and then select Current Frame, or Image from File to use a existing image.
Poster Frame. Creates a preview image for the video. Display a frame, and then select Current Frame, or Image from File to use a existing image.
![]() Reset Design. Resets the video back to the original. Click the Reset Design button arrow, and then click Reset Design or Reset Design & Size.
Reset Design. Resets the video back to the original. Click the Reset Design button arrow, and then click Reset Design or Reset Design & Size.
![]() Video Styles, Video Shape, Video Border, or Video Effects. Click to apply a pre-defined style, change the video to a shape, add a border, or apply an effect, such as shadow, glow, reflection, or 3-D rotation.
Video Styles, Video Shape, Video Border, or Video Effects. Click to apply a pre-defined style, change the video to a shape, add a border, or apply an effect, such as shadow, glow, reflection, or 3-D rotation.
Setting Video and Audio Play Options
After you insert video and audio objects, you can set play options to determine how they will play back. You can change settings so they play continuously or just one time. Videos and audio can play in either Normal view or Slide Show view. You can also view and play videos using the full screen. To play audio and videos, you need to have Microsoft DirectShow or Microsoft Windows Media Player installed on your computer (comes by default with Windows Vista or later), which you can download from the Microsoft Web site.
Change Video Play Options
![]() Click the video object you want to change options.
Click the video object you want to change options.
![]() Click the Playback tab under Video Tools.
Click the Playback tab under Video Tools.
![]() To adjust slide show volume, click the Volume button, and then click an option: Low, Medium, High, or Mute (no audio).
To adjust slide show volume, click the Volume button, and then click an option: Low, Medium, High, or Mute (no audio).
![]() Change the available video settings.
Change the available video settings.
![]() To change the way a video plays, click the Start list arrow, and then select an option: Automatically, On Clicked, or Play across slides.
To change the way a video plays, click the Start list arrow, and then select an option: Automatically, On Clicked, or Play across slides.
![]() To hide video, select the Hide While Not Playing check box.
To hide video, select the Hide While Not Playing check box.
![]() To play continuously, select the Loop Until Stopped check box.
To play continuously, select the Loop Until Stopped check box.
![]() To resize the video to fit the screen, select the Play Full Screen check box.
To resize the video to fit the screen, select the Play Full Screen check box.
![]() To automatically rewind the video, select the Rewind After Playing check box.
To automatically rewind the video, select the Rewind After Playing check box.
![]() To add a fade in or out to a video or audio, specify the number of seconds you want to play a fade effect in the Fade In or Fade Out box.
To add a fade in or out to a video or audio, specify the number of seconds you want to play a fade effect in the Fade In or Fade Out box.

![]() Click the audio object you want to change options.
Click the audio object you want to change options.
![]() Click the Playback tab under Audio Tools.
Click the Playback tab under Audio Tools.
![]() To adjust slide show volume, click the Volume button, and then click an option: Low, Medium, High, or Mute (no audio).
To adjust slide show volume, click the Volume button, and then click an option: Low, Medium, High, or Mute (no audio).
![]() Change the available video or audio settings.
Change the available video or audio settings.
![]() To change the way a video plays, click the Start list arrow, and then select an option: Automatically, On Clicked, or Play across slides.
To change the way a video plays, click the Start list arrow, and then select an option: Automatically, On Clicked, or Play across slides.
![]() To hide an audio, select the Hide While Not Playing check box.
To hide an audio, select the Hide While Not Playing check box.
![]() To play continuously, select the Loop Until Stopped check box.
To play continuously, select the Loop Until Stopped check box.
![]() To automatically rewind the audio, select the Rewind After Playing check box.
To automatically rewind the audio, select the Rewind After Playing check box.
![]() To add a fade in or out to an audio, specify the number of seconds you want to play a fade effect in the Fade In or Fade Out box.
To add a fade in or out to an audio, specify the number of seconds you want to play a fade effect in the Fade In or Fade Out box.

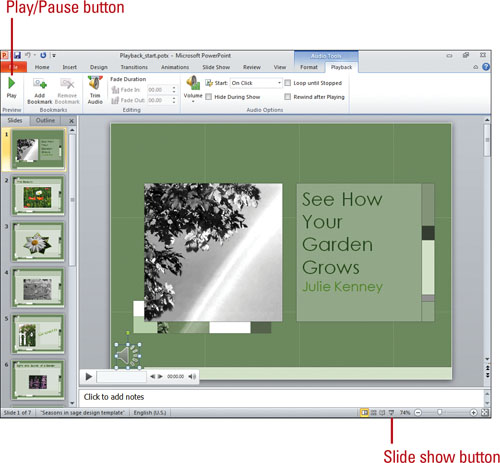
Playing Videos and Audio
After you insert video or audio objects, you can play them several different ways. You can play it back using the playback bar (New!) or the Playback tab under Video or Audio Tools. Videos and audio can play in either Normal view or Slide Show view during a slide show. You can modify them so they play continuously or just one time. Before you can play audio, or audio from video, you need a sound card and speakers installed on your computer.
Play a Video or Audio Using the Playback Bar
![]() Select the video or audio icon.
Select the video or audio icon.
![]() Click the Play/Pause button on the playback bar.
Click the Play/Pause button on the playback bar.
TIMESAVER Press Alt+P to play/pause the video or audio.
![]() To move 0.25 seconds, click the Move Forward or Move Backwards button on the playback bar.
To move 0.25 seconds, click the Move Forward or Move Backwards button on the playback bar.
![]() To change the volume, click the Mute/Unmute button or point to it, and then adjust the volume slider.
To change the volume, click the Mute/Unmute button or point to it, and then adjust the volume slider.
Did You Know?
Having problems playing a video. If your video doesn’t play, check the list of compatible video file formats (see the Insert Video dialog box). If a video plays white, the path exceeds 128 characters. If a video plays black, your hardware accelerator is incompatible.
Other Ways to Play a Video or Audio
![]() To play a video or audio in Normal view, select the video object or audio icon, click the Playback tab, and then click the Play/Pause button.
To play a video or audio in Normal view, select the video object or audio icon, click the Playback tab, and then click the Play/Pause button.
![]() To play a video, audio, or animated picture in Slide Show view, click the Slide Show button, and then display the slide with the media you want to play.
To play a video, audio, or animated picture in Slide Show view, click the Slide Show button, and then display the slide with the media you want to play.
Depending on your play options, you may need to click the video object or audio icon to play it.
Did You Know?
You cannot insert a digital video from a video DVD. PowerPoint is unable to add a video from a video DVD. However, some third-party add-ins, such as PFCMedia, let you play a video DVD in a presentation.
You can delay the start of a video. Click the video, click the Animation tab, and then click the Custom Animation button. In the task pane, click the arrow next to the video, and then click Effects Options. Click the Effect tab, click From Time (under Start Playing), and then enter the total number of seconds for the delay.
Recording Audio
You can add voice narration or audio in a slide show when you are either creating a slide show for individuals who can’t attend a presentation or archiving a meeting for presenters to review later and hear comments made during the presentation. If you want to add voice narration or audio to a slide, you can record an audio clip directly into PowerPoint. Before you can record audio, you need a microphone, sound card, and speakers installed on your computer.
Record Audio on a Slide
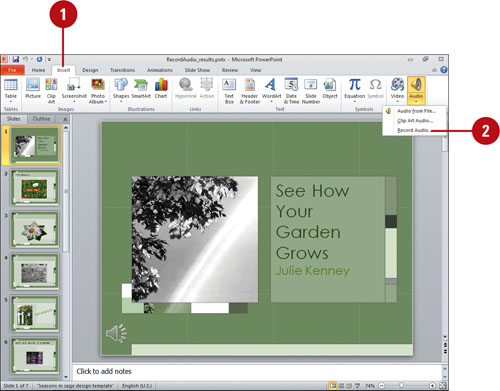
![]() Click the Insert tab.
Click the Insert tab.
![]() Click the Audio button arrow, and then click Record Audio.
Click the Audio button arrow, and then click Record Audio.
![]() Type a name for the audio.
Type a name for the audio.
![]() Click the Record button (red dot).
Click the Record button (red dot).
![]() Click the Stop button when you are finished.
Click the Stop button when you are finished.
![]() Click OK.
Click OK.
An audio icon appears on the slide.

Did You Know?
You can delete an audio. Click the audio icon, and then press Delete.
You can turn off audio narration. Click the Slide Show tab, click the Set Up Slide Show button, select the Show Without Narration check box, and then click OK.
See Also
See “Recording a Narration” on page 328-329 for more information and additional ways to record sound.
Compressing Media
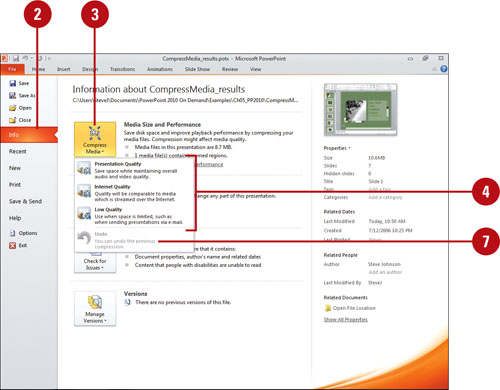
When you create a presentation with audio and video, the file size of the presentation can become quite large, which creates problems when you want to send it in an e-mail or view it over the Internet. With the Compress Media button (New!)—which only shows when you have audio or video media in the presentation—on the Info screen, you can compress the media in a presentation to reduce the overall size of the file. You can select from three quality options: Presentation, Internet, and Low.
Compress Media in a Presentation
![]() Open the presentation with the media you want to compress.
Open the presentation with the media you want to compress.
![]() Click the File tab, and then click Info.
Click the File tab, and then click Info.
![]() Click the Compress Media button.
Click the Compress Media button.
![]() Click any of the following quality options:
Click any of the following quality options:
![]() Presentation Quality. Compresses the presentation to save space while maintaining audio and video quality.
Presentation Quality. Compresses the presentation to save space while maintaining audio and video quality.
![]() Internet Quality. Compresses the presentation for optimal use when streaming over the Internet.
Internet Quality. Compresses the presentation for optimal use when streaming over the Internet.
![]() Low Quality. Compresses the presentation with the highest compression to create the smallest file size.
Low Quality. Compresses the presentation with the highest compression to create the smallest file size.
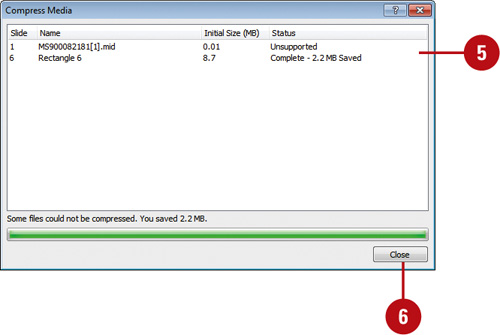
![]() Review the compression results.
Review the compression results.
![]() Click Close.
Click Close.
![]() To undo the previous compress, click the Compress Media button, and then click Undo.
To undo the previous compress, click the Compress Media button, and then click Undo.