8: Finalizing a Presentation and Its Supplements
What You’ll Do
Prepare Handouts and Speaker Notes
Change Proofing Options and Set Languages for Proofing
Check Spelling and Use Custom Dictionaries
Translate Text to Another Language and Use Multiple Languages
Export Notes and Slides to Word
Document Presentation Properties
Check Compatibility and Accessibility
Save Slides in Different Formats
Save Outline Text as a Document
Create a PDF and an XPS Document
Print a Presentation and Outline
Introduction
As you finish developing your presentation in PowerPoint, you can add some last-minute enhancements that will help with your delivery of the slide show. By creating a summary slide in the beginning of your presentation, your audience will know the scope of your presentation. Before finalizing your presentation, you should make sure that you embed truetype fonts into your presentation. This will ensure that your slide show appears correctly, regardless of the fonts installed on the various computers that you might be using.
Handouts are printed materials that you supply to your audience. Typically, handouts include an outline for the audience to follow as you speak, a copy of the slides in your presentation (printed one or more slides to a page), or a set of pages with blank lines next to reduced images of the slides for note taking. PowerPoint gives you many options for printing handouts, including editing and formatting them with the Handout Master. Most speakers feel more comfortable giving a presentation with a script in front of them, and you can easily create one in Notes Page view. With speaker notes, you can control the success of your presentation delivery.
As you take your presentation to various clients, it may be necessary to translate your slide show into another language. You might also want to export your notes to Microsoft Word to further customize them. You can save your slides in different formats—you might want to save them as part of a Web page, or maybe a different version of PowerPoint for other clients. PowerPoint allows you to save a presentation as an XPS or PDF file, which are secure fixed-layout formats you can send to others. You can also preview your presentation before printing or print as black and white or color to review your presentation in different print formats.
Changing Page Setup Options
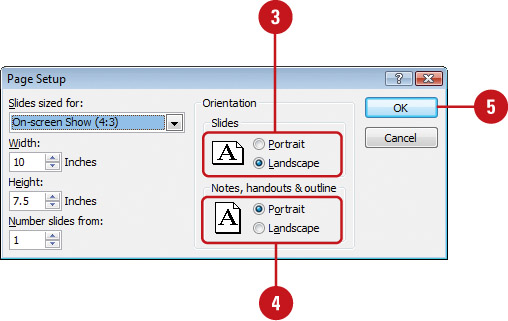
Before you print a presentation, you can use the Page Setup dialog box to set the proportions of your presentation slides—standard and wide screen—and their orientation on the page. You can also control slide numbering in the Number Slides From box. For a new presentation, PowerPoint opens with default slide page settings: on-screen slide show, landscape orientation, and slides starting at number one. Notes, handouts, and outlines are printed in portrait orientation.
Control Slide Size
![]() Click the Design tab.
Click the Design tab.
![]() Click the Page Setup button.
Click the Page Setup button.
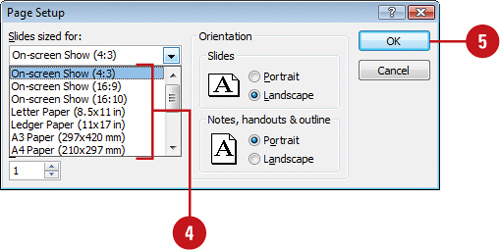
![]() Click the Slides sized for list arrow.
Click the Slides sized for list arrow.
![]() Click the size you want.
Click the size you want.
![]() On-Screen Show for slides that fit computer monitor with ratios of 4:3 (standard), 16:9 (wide screen HDTV’s), or 16:10 (wide screen laptops).
On-Screen Show for slides that fit computer monitor with ratios of 4:3 (standard), 16:9 (wide screen HDTV’s), or 16:10 (wide screen laptops).
![]() Letter Paper for slides that fit on 8.5-by-11-inch paper.
Letter Paper for slides that fit on 8.5-by-11-inch paper.
![]() Ledger Paper for slides that fit on 11-by-17-inch paper.
Ledger Paper for slides that fit on 11-by-17-inch paper.
![]() A3 Paper, A4 Paper, B4 (ISO) Paper, or B5 (ISO) Paper for slides that fit on international paper.
A3 Paper, A4 Paper, B4 (ISO) Paper, or B5 (ISO) Paper for slides that fit on international paper.
![]() 35mm Slides for 11.25-by-7.5-inch slides.
35mm Slides for 11.25-by-7.5-inch slides.
![]() Overhead for 10-by-7.5-inch slides that fit transparencies.
Overhead for 10-by-7.5-inch slides that fit transparencies.
![]() Banner for 8-by-1-inch slides that are typically used as advertisements on a Web page.
Banner for 8-by-1-inch slides that are typically used as advertisements on a Web page.
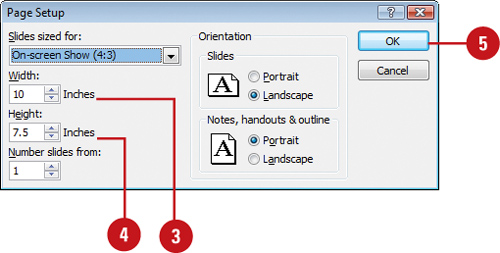
![]() Custom to enter the measurements you want in the width and height boxes.
Custom to enter the measurements you want in the width and height boxes.
![]() Click OK.
Click OK.

For Your Information
Using Portrait and Landscape Together
In PowerPoint, you can have only one slide orientation in a presentation. However, if you want to use portrait and landscape slide orientation in the same presentation, you can do it by creating a link between two presentations. For best results, place both presentations in the same folder on your computer. First, you create a link from the first presentation to the second presentation, and then create a link from the second presentation back. See “Creating Hyperlinks to External Objects” on page 262 for instructions on creating a link to another presentation.
![]() Click the Design tab.
Click the Design tab.
![]() Click the Page Setup button.
Click the Page Setup button.
![]() Enter a specific width in inches.
Enter a specific width in inches.
![]() Enter a specific height in inches.
Enter a specific height in inches.
![]() Click OK.
Click OK.
Change Slide Orientation
![]() Click the Design tab.
Click the Design tab.
![]() Click the Page Setup button.
Click the Page Setup button.
TIMESAVER Click the Design tab, click the Slide Orientation button, and then click Portrait or Landscape.
![]() To orient your slides, click the Portrait or Landscape option.
To orient your slides, click the Portrait or Landscape option.
![]() To orient your notes, handouts, and outline, click the Portrait or Landscape option in the Notes, Handouts & Outline area.
To orient your notes, handouts, and outline, click the Portrait or Landscape option in the Notes, Handouts & Outline area.
![]() Click OK.
Click OK.
Preparing Handouts
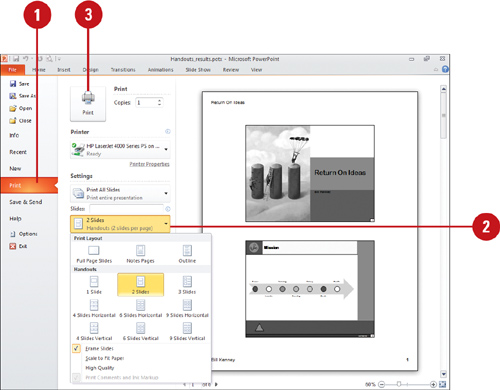
Prepare your handouts in the Print screen, where you can specify what to print. You can customize your handouts by formatting them in the handout master first, using the formatting and drawing tools. You can also add a header and footer to include the date, slide number, and page number, for example. In the Print screen (New!), you can choose to print one, two, three, four, six, or nine slides per page.
Format the Handout Master
![]() Click the View tab.
Click the View tab.
![]() Click the Handout Master button.
Click the Handout Master button.
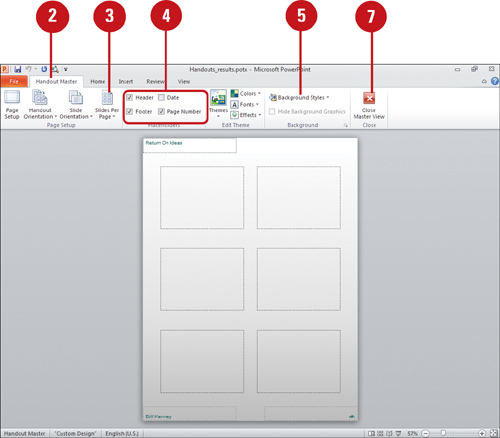
![]() Click the Slides Per Page button, and then select an option with how many slides you want per page.
Click the Slides Per Page button, and then select an option with how many slides you want per page.
![]() Select or clear the Header, Date, Footer, or Page Number check boxes to show or hide handout master placeholders.
Select or clear the Header, Date, Footer, or Page Number check boxes to show or hide handout master placeholders.
![]() To add a background style, click the Background Styles button, and then click a style.
To add a background style, click the Background Styles button, and then click a style.
![]() Use the formatting tools on the Home tab or drawing tools on the Format tab to format the handout master placeholders.
Use the formatting tools on the Home tab or drawing tools on the Format tab to format the handout master placeholders.
![]() Click the Close Master View button.
Click the Close Master View button.
Did You Know?
What are the dotted rectangles in the handout master? The dotted rectangles are placeholders for slides and for header and footer information.
You can add headers and footers to create consistent handouts. Headers and footers you add to the handout master are also added to notes pages and the printed outline.
Add Headers and Footers to Handouts
![]() Click the Insert tab.
Click the Insert tab.
![]() Click the Header & Footer button.
Click the Header & Footer button.
![]() Click the Notes and Handouts tab.
Click the Notes and Handouts tab.
![]() Enter the information you want to appear on your handouts.
Enter the information you want to appear on your handouts.
![]() Click Apply To All.
Click Apply To All.

Print Handouts
![]() Click the File tab, and then click Print.
Click the File tab, and then click Print.
![]() Click the Print What list arrow, and then select one of the nine options:
Click the Print What list arrow, and then select one of the nine options:
![]() 1,2, or 3 Slides.
1,2, or 3 Slides.
![]() 4,6, or 9 Slides Horizontal.
4,6, or 9 Slides Horizontal.
![]() 4, 6, or 9 Slides Vertical.
4, 6, or 9 Slides Vertical.
![]() Click Print.
Click Print.
Did You Know?
You can add a frame around printed slides. Click the File tab, click Print, click the Print What list arrow, select Frame Slides, and then click Print.
Preparing Speaker Notes
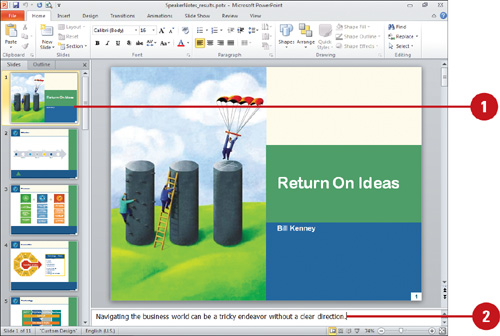
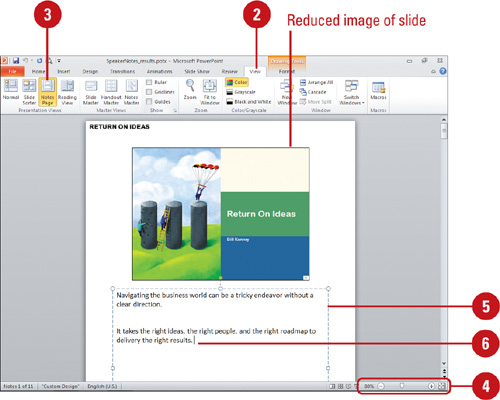
You can add speaker notes to a slide in Normal view using the Notes pane. Also, every slide has a corresponding notes page that displays a reduced image of the slide and a text placeholder where you can enter speaker’s notes. Once you have created speaker’s notes, you can reference them as you give your presentation, either from a printed copy or from your computer. You can enhance your notes by including objects on the notes master.
Enter Notes in Normal View
![]() Click on the slide for which you want to enter notes.
Click on the slide for which you want to enter notes.
![]() Click to place the insertion point in the Notes pane, and then type your notes.
Click to place the insertion point in the Notes pane, and then type your notes.
Did You Know?
You can view more of the Notes pane. To see more of the Notes pane in Normal view, point to the top border of the Notes pane until the pointer changes to a double-headed arrow, and then drag the border until the pane is the size you want.
Enter Notes in Notes Page View
![]() Switch to the slide for which you want to enter notes.
Switch to the slide for which you want to enter notes.
![]() Click the View tab.
Click the View tab.
![]() Click the Notes Pages button.
Click the Notes Pages button.
![]() If necessary, click the Zoom list arrow, and then increase the zoom percentage to better see the text you type.
If necessary, click the Zoom list arrow, and then increase the zoom percentage to better see the text you type.
![]() Click the text placeholder.
Click the text placeholder.
![]() Type your notes.
Type your notes.
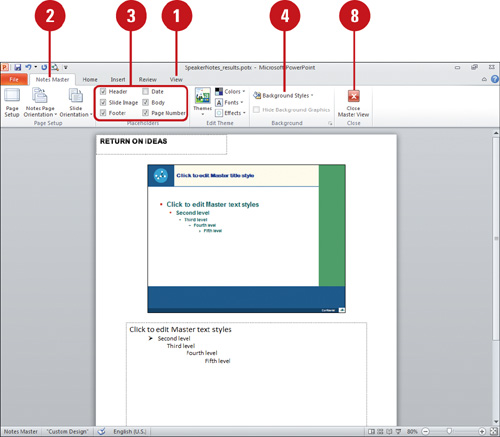
![]() Click the View tab.
Click the View tab.
![]() Click the Notes Master button.
Click the Notes Master button.
![]() Select or clear the Header, Slide Image, Footer, Date, Body or Page Number check boxes to show or hide notes master placeholders.
Select or clear the Header, Slide Image, Footer, Date, Body or Page Number check boxes to show or hide notes master placeholders.
![]() To add a background style, click the Background Styles button, and then click a style.
To add a background style, click the Background Styles button, and then click a style.
![]() If you want, add objects to the notes master that you want to appear on every page, such as a picture or a text object.
If you want, add objects to the notes master that you want to appear on every page, such as a picture or a text object.
![]() Use the formatting tools on the Home tab or drawing tools on the Format tab to format the handout master text placeholders.
Use the formatting tools on the Home tab or drawing tools on the Format tab to format the handout master text placeholders.
![]() To add a header and footer, click the Insert tab, and then click the Header & Footer button.
To add a header and footer, click the Insert tab, and then click the Header & Footer button.
![]() Click the Close Master View button.
Click the Close Master View button.
Did You Know?
Why don’t the objects on the Notes master appear in the Notes pane in Normal view? The objects that you add to the Notes master will appear when you print the notes pages. They do not appear in the Notes pane of Normal view or when you save your presentation as a Web page.
You export notes and slides to Microsoft Word. Click the Send To Microsoft Word button on the Quick Access Toolbar (add it if necessary), click the page layout option you want for handouts, click the Paste Link option if you want to create a link, and then click OK.

Customizing Notes Pages
You can add dates, numbering, and header and footer text to your notes pages just as you do to your slides. If you have removed objects from the master and decide you want to restore them, you can reapply any of the master placeholders (the slide image, the date, header, and so on) without affecting objects and text outside the placeholders. Moreover, if you delete the slide placeholder or text placeholder from a notes page, you can easily reinsert it.
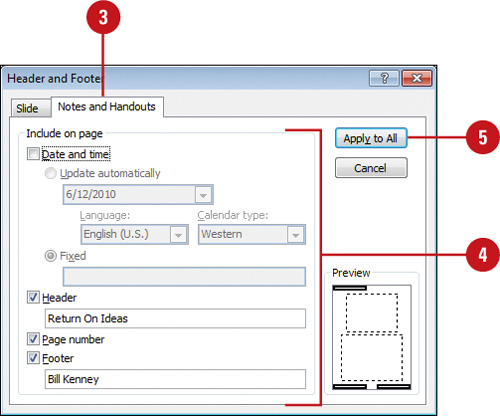
Add a Header and Footer to Notes Pages
![]() Click the Insert tab.
Click the Insert tab.
![]() Click the Header & Footer button.
Click the Header & Footer button.
![]() Click the Notes and Handouts tab.
Click the Notes and Handouts tab.
![]() Add the header and footer information you want.
Add the header and footer information you want.
![]() Click Apply To All.
Click Apply To All.
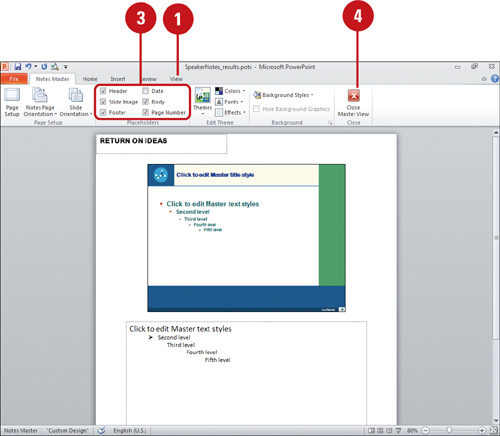
Reinsert Notes Placeholders on the Notes Master
![]() Click the View tab.
Click the View tab.
![]() Click the Notes Master button.
Click the Notes Master button.
![]() Select the Header, Slide Image, Footer, Date, Body or Page Number check boxes in the Placeholder group corresponding to the placeholders you want to reinsert.
Select the Header, Slide Image, Footer, Date, Body or Page Number check boxes in the Placeholder group corresponding to the placeholders you want to reinsert.
![]() Click the Close Master View button.
Click the Close Master View button.
Changing Proofing Options
You can customize the way PowerPoint and Microsoft Office spell check a presentation by selecting proofing settings in PowerPoint Options. Some spelling options apply to PowerPoint, such as Check Spelling as you Type, while other options apply to all Microsoft Office programs, such as Ignore Internet and File Addresses, and Flag Repeated Words. If you have ever mistakenly used their instead of there, you can use contextual spelling to fix it. While you work in a presentation, you can can set options to have the spelling check search for mistakes in the background.
Change Proofing Options
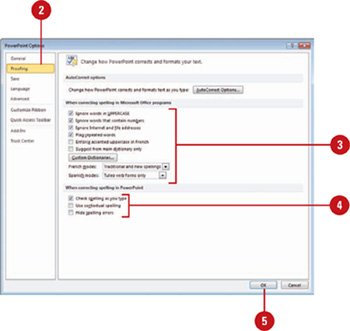
![]() Click the File tab, and then click Options.
Click the File tab, and then click Options.
![]() In the left pane, click Proofing.
In the left pane, click Proofing.
![]() Select or clear the spelling options you want.
Select or clear the spelling options you want.
![]() Ignore words in UPPERCASE.
Ignore words in UPPERCASE.
![]() Ignore words that contain numbers.
Ignore words that contain numbers.
![]() Ignore Internet and file addresses.
Ignore Internet and file addresses.
![]() Flag repeated words.
Flag repeated words.
![]() Enforce accented uppercase in French.
Enforce accented uppercase in French.
![]() Suggest from main dictionary only. Select to exclude your custom dictionary.
Suggest from main dictionary only. Select to exclude your custom dictionary.
![]() French or Spanish modes. Select an option for working with French or Spanish (New!).
French or Spanish modes. Select an option for working with French or Spanish (New!).
![]() Select or clear the PowerPoint spelling options you want.
Select or clear the PowerPoint spelling options you want.
![]() Check spelling as you type.
Check spelling as you type.
![]() Use contextual spelling. Select to correct the usage errors like the use of their vs there.
Use contextual spelling. Select to correct the usage errors like the use of their vs there.
![]() Hide spelling errors. Clear to displays errors with a red wavy line. If you select this, you must also select Check spelling as you type (above).
Hide spelling errors. Clear to displays errors with a red wavy line. If you select this, you must also select Check spelling as you type (above).
![]() Click OK.
Click OK.
Setting Languages for Proofing
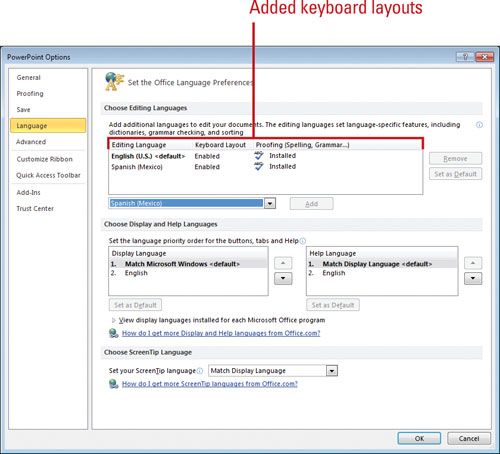
If your text is written in more than one language, you can designate the language of selected text so spell check uses the right dictionary. For international Microsoft Office users, you can change the language that appears on their screens by enabling different languages. Users around the world can enter, display, and edit text in all supported languages. When you’re working with more than one language at a time in a presentation, you can enable a language option to make it easier to switch between languages when typing and editing text. You can also select the Automatically switch keyboard to match language of surround text option in the Advanced pane of the PowerPoint Options dialog box to work more efficiently with multiple languages.
Set a Language for Proofing
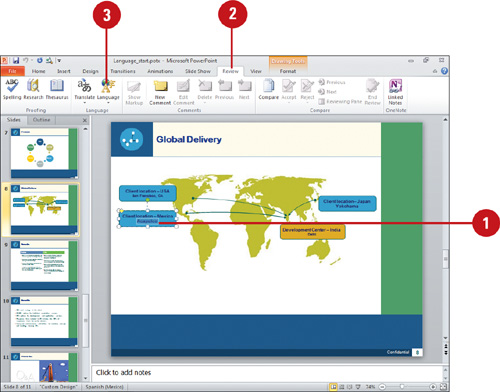
![]() Select the text you want to mark.
Select the text you want to mark.
![]() Click the Review tab.
Click the Review tab.
![]() Click the Language button, and then click Set Proofing Language.
Click the Language button, and then click Set Proofing Language.
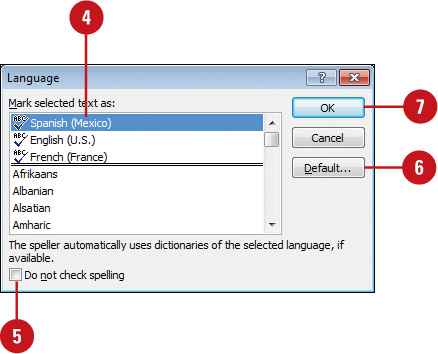
![]() Click the language you want to assign to the selected text.
Click the language you want to assign to the selected text.
![]() To skip this text during spell checking, select the Do not check spelling check box.
To skip this text during spell checking, select the Do not check spelling check box.
![]() To set a language as the default, select the language, and then click Default.
To set a language as the default, select the language, and then click Default.
![]() Click OK.
Click OK.
Did You Know?
There is a Multilingual AutoCorrect. Office supports an AutoCorrect list for each language. For example, the English AutoCorrect list capitalizes all cases of the single letter “i;” in Swedish however, “i” is a preposition and is not capitalized.
Set an Option to Automatically Switch Keyboard Language
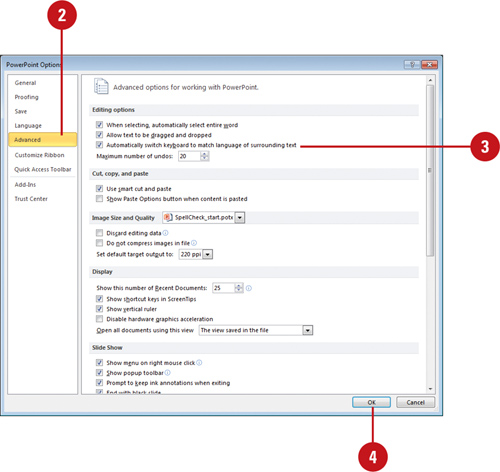
![]() Click the File tab, and then click Options.
Click the File tab, and then click Options.
![]() In the left pane, click Advanced.
In the left pane, click Advanced.
![]() Select the Automatically switch keyboard to match language of surrounding text check box.
Select the Automatically switch keyboard to match language of surrounding text check box.
![]() If the option is not available, you need to enable a keyboard layout for a language in the Language pane of the PowerPoint Options dialog box.
If the option is not available, you need to enable a keyboard layout for a language in the Language pane of the PowerPoint Options dialog box.
![]() Click OK.
Click OK.
See Also
See “Using Multiple Languages” on page 296 for information on enabling a keyboard layout to use with Microsoft Office programs.
Checking Spelling
As you type, a red wavy line appears under words not listed in PowerPoint’s dictionary (such as misspellings, names, technical terms, or acronyms) or duplicate words (such as the the). You can correct these errors as they arise or after you finish the entire presentation. PowerPoint’s spelling checker checks the spelling of the entire presentation, including all slides, outlines, notes pages, and handout pages. You can use the Spelling button on the Review tab to check the entire presentation using the Spelling dialog box, or when you encounter a wavy red line under a word, you can right-click the word and choose the correct spelling or add it to your custom dictionary from the list on the shortcut menu.
Check Spelling All at Once
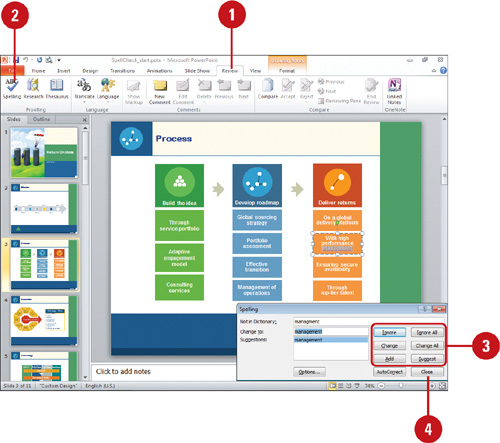
![]() Click the Review tab.
Click the Review tab.
![]() Click the Spelling button.
Click the Spelling button.
TIMESAVER To open the Spelling dialog box, right-click a misspelled word, and then click Spelling.
![]() If the Spelling dialog box opens, choose an option:
If the Spelling dialog box opens, choose an option:
![]() Click Ignore to skip the word, or click Ignore All to skip every instance of the word.
Click Ignore to skip the word, or click Ignore All to skip every instance of the word.
![]() Click a suggestion, and then click Change or Change All.
Click a suggestion, and then click Change or Change All.
![]() Select the correct word, and then click AutoCorrect to add it to the AutoCorrect list.
Select the correct word, and then click AutoCorrect to add it to the AutoCorrect list.
![]() Click Add to add a word to your dictionary, so it doesn’t show up as a misspelled word in the future.
Click Add to add a word to your dictionary, so it doesn’t show up as a misspelled word in the future.
![]() If no suggestion is appropriate, click in the presentation and edit the text yourself. Click Resume to continue.
If no suggestion is appropriate, click in the presentation and edit the text yourself. Click Resume to continue.
![]() PowerPoint will prompt you when the spelling check is complete, or you can click Close to end the spelling check.
PowerPoint will prompt you when the spelling check is complete, or you can click Close to end the spelling check.
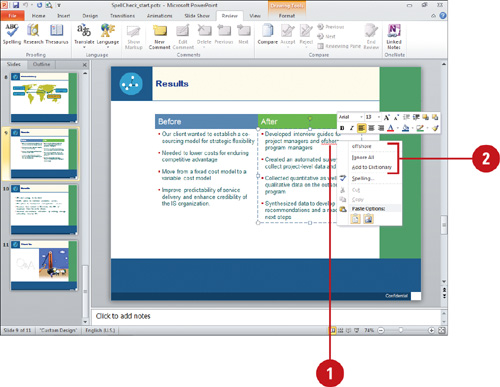
![]() Right-click a word with a red wavy underline.
Right-click a word with a red wavy underline.
TIMESAVER In the Spelling dialog box, click Options.
![]() Choose an option:
Choose an option:
![]() Click the correct spelling.
Click the correct spelling.
![]() Click Ignore All to skip any other instances of the word
Click Ignore All to skip any other instances of the word
![]() Click Add to Dictionary to include it in your custom dictionary.
Click Add to Dictionary to include it in your custom dictionary.
Did You Know?
You can make spell check ignore text or an entire style. Select the word or phrase that you want to mark. Click the Review tab, click the Language button, click Set Proofing Language, select the Do Not Check Spelling check box, and then click OK.
See Also
See “Changing Proofing Options” on page 285 for information on setting options to correct spelling as you type.
Using Custom Dictionaries
Before you can use a custom dictionary, you need to enable it first. You can enable and manage custom dictionaries by using the Custom Dictionaries dialog box. In the dialog box, you can change the language associated with a custom dictionary, create a new custom dictionary, or add or remove existing custom dictionary. If you need to manage dictionary content, you can also change the default custom dictionary to which the spelling checker adds words, as well as add, delete, or edit words. All the modifications you make to your custom dictionaries are shared with all your Microsoft Office programs, so you only need to make changes once. If you mistakenly type an obscene or embarrassing word, such as ass instead of ask, spell check will not catch it because both words are spelled correctly. You can avoid this problem by using an exclusion dictionary. When you use a language for the first time, Office automatically creates an exclusion dictionary. This dictionary forces the spelling checker to flag words you don’t want to use.
Use a Custom Dictionary
![]() Click the File tab, and then click Options.
Click the File tab, and then click Options.
![]() In the left pane, click Proofing.
In the left pane, click Proofing.
![]() Click Custom Dictionaries.
Click Custom Dictionaries.
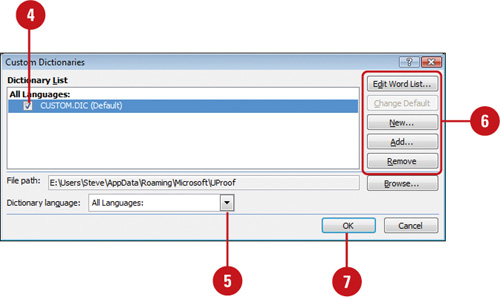
![]() Select the check box next to CUSTOM.DIC (Default).
Select the check box next to CUSTOM.DIC (Default).
![]() Click the Dictionary language list arrow, and then select a language for a dictionary.
Click the Dictionary language list arrow, and then select a language for a dictionary.
![]() Click the options you want:
Click the options you want:
![]() Click Edit Word List to add, delete, or edit words.
Click Edit Word List to add, delete, or edit words.
![]() Click Change Default to select a new default dictionary.
Click Change Default to select a new default dictionary.
![]() Click New to create a new dictionary.
Click New to create a new dictionary.
![]() Click Add to insert an existing dictionary.
Click Add to insert an existing dictionary.
![]() Click Remove to delete a dictionary.
Click Remove to delete a dictionary.
![]() Click OK to close the Custom Dictionaries dialog box.
Click OK to close the Custom Dictionaries dialog box.
![]() Click OK.
Click OK.
Find and Modify the Exclusion Dictionary
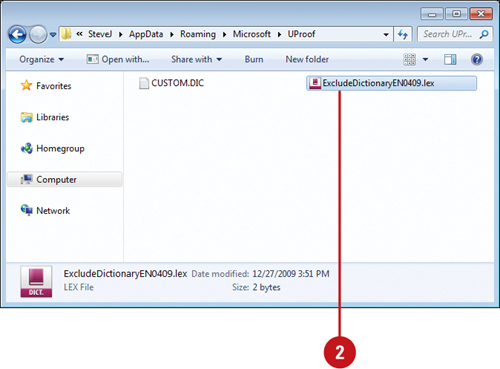
![]() In Windows Explorer, go to the folder location where the custom dictionaries are stored.
In Windows Explorer, go to the folder location where the custom dictionaries are stored.
![]() Windows 7 or Vista. C:Usersuser nameAppDataRoamingMicrosoftUProof
Windows 7 or Vista. C:Usersuser nameAppDataRoamingMicrosoftUProof
![]() Windows XP. C:Documents and Settingsuser nameApplication DataMicrosoftUProof
Windows XP. C:Documents and Settingsuser nameApplication DataMicrosoftUProof
TROUBLE? If you can’t find the folder, change folder settings to show hidden files and folders.
![]() Locate the exclusion dictionary for the language you want to change.
Locate the exclusion dictionary for the language you want to change.
![]() The file name you want is ExcludeDictionary Language CodeLanguage LCID.lex.
The file name you want is ExcludeDictionary Language CodeLanguage LCID.lex.
For example, ExcludeDictionary EN0409.lex, where EN is for English.
Check Word Help for an updated list of LCID (Local Identification Number) numbers for each language.
![]() Open the file using Microsoft Notepad or WordPad.
Open the file using Microsoft Notepad or WordPad.
![]() Add each word you want the spelling check to flag as misspelled. Type the words in all lowercase and then press Enter after each word.
Add each word you want the spelling check to flag as misspelled. Type the words in all lowercase and then press Enter after each word.
![]() Save and close the file.
Save and close the file.
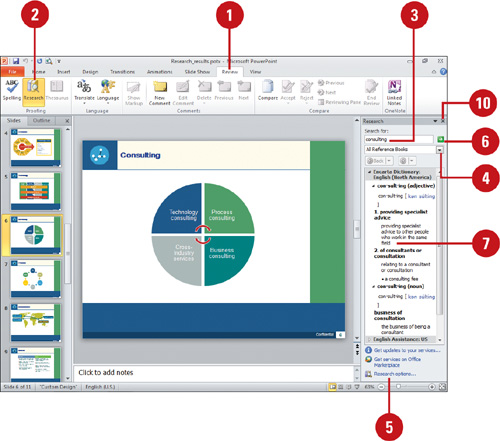
Inserting Research Material
With the Research task pane, you can access data sources and insert research material right into your text without leaving your PowerPoint presentation. The Research task pane can help you to access electronic dictionaries, thesauruses, research sites, and proprietary company information. You can select one reference source or search in all reference books. This research pane allows you to quickly and easily find information and incorporate it into your work.
Research a topic
![]() Click the Review tab.
Click the Review tab.
![]() Click the Research button.
Click the Research button.
![]() Type the topic you would like to research.
Type the topic you would like to research.
![]() Click the list arrow, and then select a reference source, or click All Reference Books.
Click the list arrow, and then select a reference source, or click All Reference Books.
![]() To customize which resources are used for translation, click Research options, select the reference books and research sites you want, and then click OK.
To customize which resources are used for translation, click Research options, select the reference books and research sites you want, and then click OK.
![]() Click the Start Searching button (green arrow).
Click the Start Searching button (green arrow).
![]() Point to the information in the Research task pane that you want to copy.
Point to the information in the Research task pane that you want to copy.
![]() Click the list arrow, and then click Copy.
Click the list arrow, and then click Copy.
![]() Paste the information into your presentation.
Paste the information into your presentation.
![]() When you’re done, click the Close button on the task pane.
When you’re done, click the Close button on the task pane.
Did You Know?
You can search for more related words. In the Research task pane, click one of the words in the list of results.
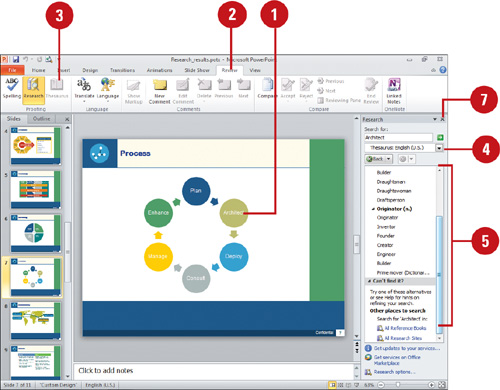
Finding the Right Words
Repeating the same word in a presentation can reduce a message’s effectiveness. Instead, replace some words with synonyms or find antonyms. If you need help finding exactly the right words, use the shortcut menu to quickly look up synonyms or search a Thesaurus for more options. This feature can save you time and improve the quality and readability of your presentation. You can also install a Thesaurus for another language. Foreign language thesauruses can be accessed under Research Options on the Research task pane.
Use the Thesaurus
![]() Select the text you want to translate.
Select the text you want to translate.
![]() Click the Review tab.
Click the Review tab.
![]() Click the Thesaurus button.
Click the Thesaurus button.
![]() In the Search For list, select a Thesaurus, if necessary.
In the Search For list, select a Thesaurus, if necessary.
TIMESAVER Right-click the word you want to look up, point to Synonyms, and then click a synonyms word or Thesaurus.
![]() Point to the word in the Research task pane.
Point to the word in the Research task pane.
![]() Click the list arrow, and then click one of the following:
Click the list arrow, and then click one of the following:
![]() Insert to replace the word you looked up with the new word.
Insert to replace the word you looked up with the new word.
![]() Copy to copy the new word and then paste it within the presentation.
Copy to copy the new word and then paste it within the presentation.
![]() When you’re done, click the Close button on the task pane.
When you’re done, click the Close button on the task pane.
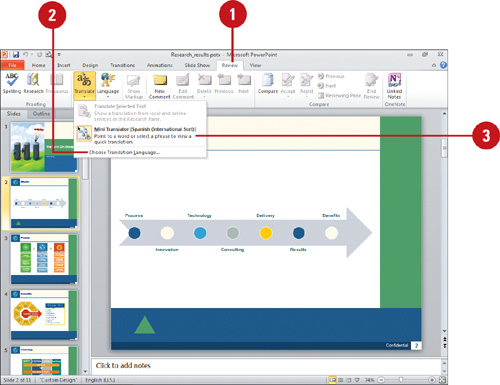
Translating Text to Another Language
If you need to quickly translate a word into another language, you can enable the Mini Translator (New!) that translates words when you point to them. The Mini Translator also includes a toolbar, which provides options to copy the translation to the Clipboard or play the word audibly. Before you get started, you need to choose the translation language you want to use. If you don’t get the results you want, you can also use the Research task pane to translate text. With the Research task pane, you can translate single words or short phrases into different languages by using bilingual dictionaries and incorporate it into your work.
Translate Text Using the Mini Translator
![]() Click the Review tab.
Click the Review tab.
![]() Click the Translate button, click Choose Translation Language, specify a language for the Mini Translator, and then click OK.
Click the Translate button, click Choose Translation Language, specify a language for the Mini Translator, and then click OK.
![]() Click the Translate button, and then click the Mini Translator language you set for translation to highlight the icon next to the command.
Click the Translate button, and then click the Mini Translator language you set for translation to highlight the icon next to the command.
![]() Point to the word you want to display the Mini Translator with the translated word. You can also use the toolbar to perform the following options:
Point to the word you want to display the Mini Translator with the translated word. You can also use the toolbar to perform the following options:
![]() Expand. Opens the Research pane with more options.
Expand. Opens the Research pane with more options.
![]() Copy. Copies the translation to the Clipboard.
Copy. Copies the translation to the Clipboard.
![]() Play and Stop. Plays or stops the word audibly.
Play and Stop. Plays or stops the word audibly.
![]() Help. Opens Help.
Help. Opens Help.
![]() To turn off the Mini Translator, click the Translate button, and then click the Mini Translator language to clear the highlighted icon next to the command.
To turn off the Mini Translator, click the Translate button, and then click the Mini Translator language to clear the highlighted icon next to the command.
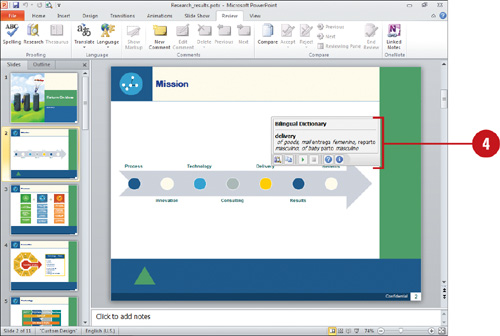
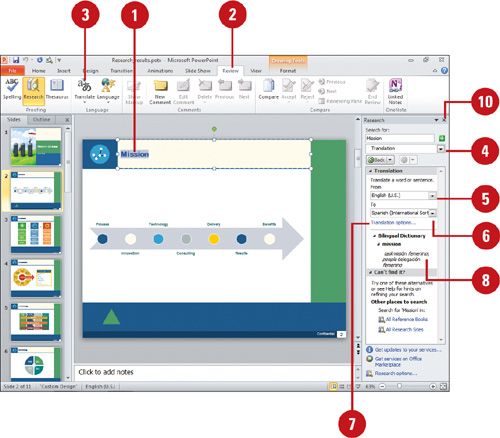
Translate Text Using the Research Pane
![]() Select the text you want to translate.
Select the text you want to translate.
![]() Click the Review tab.
Click the Review tab.
![]() Click the Translate button, and then click Translate Selected Text.
Click the Translate button, and then click Translate Selected Text.
If this is the first you have used translation services, click OK to install the bilingual dictionaries and enable the service.
![]() If necessary, click the list arrow, and then click Translation.
If necessary, click the list arrow, and then click Translation.
![]() Click the From list arrow, and then select the language of the selected text.
Click the From list arrow, and then select the language of the selected text.
![]() Click the To list arrow, and then select the language you want to translate into.
Click the To list arrow, and then select the language you want to translate into.
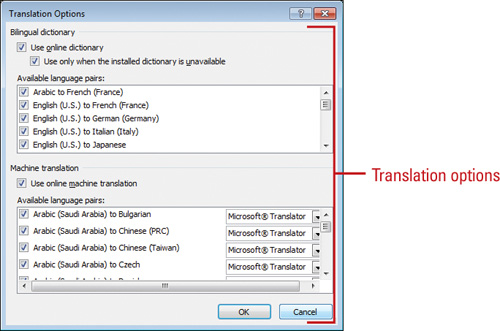
![]() To customize which resources are used for translation, click Translation options, select the look-up options you want, and then click OK.
To customize which resources are used for translation, click Translation options, select the look-up options you want, and then click OK.
![]() Right-click the translated text in the Research task pane that you want to copy, and then click Copy.
Right-click the translated text in the Research task pane that you want to copy, and then click Copy.
![]() Paste the information into your document.
Paste the information into your document.
![]() When you’re done, click the Close button on the task pane.
When you’re done, click the Close button on the task pane.
See Also
See “Using Multiple Languages” on page 296 for information on adding languages to use with Microsoft Office programs.
Using Multiple Languages
International Microsoft Office users can change the language that appears on their screens by changing the default language settings. Users around the world can enter, display, and edit text in all supported languages—including European languages, Japanese, Chinese, Korean, Hebrew, and Arabic—to name a few. You’ll probably be able to use Office programs in your native language. If the text in your document is written in more than one language, you can automatically detect languages or designate the language of selected text so the spelling checker uses the right dictionary. You can set preferences (New!) for editing, display, ScreenTip, and Help languages. If you don’t have the keyboard layout or related software installed, you can click links to add or enable them (New!).
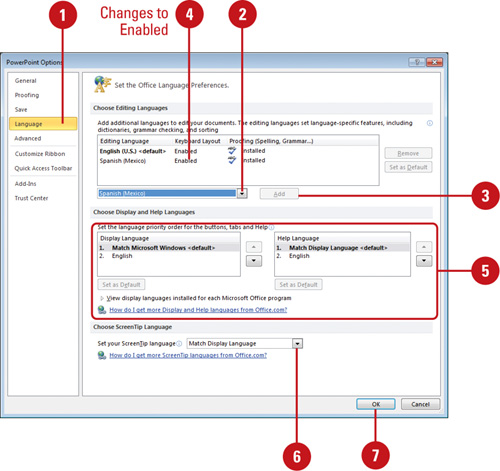
Add a Language to Office Programs
![]() Click the File tab, click Options, and then click Language.
Click the File tab, click Options, and then click Language.
![]() You can also click Start on the taskbar, point to All Programs, click Microsoft Office, click Microsoft Office Tools, and then click Microsoft Office 2010 Language Preferences.
You can also click Start on the taskbar, point to All Programs, click Microsoft Office, click Microsoft Office Tools, and then click Microsoft Office 2010 Language Preferences.
![]() Click the Language list arrow, and then select the language you want to enable.
Click the Language list arrow, and then select the language you want to enable.
![]() Click Add.
Click Add.
![]() To enable the correct keyboard layout for the installed language, click the Not enabled link to open the Text Services and Input Language dialog box, where you can select a keyboard layout, and then click OK.
To enable the correct keyboard layout for the installed language, click the Not enabled link to open the Text Services and Input Language dialog box, where you can select a keyboard layout, and then click OK.
![]() Set the language priority order for the buttons, tabs, and Help for the Display and Help languages.
Set the language priority order for the buttons, tabs, and Help for the Display and Help languages.
![]() Set your ScreenTip language to Match Display Language or a specific language.
Set your ScreenTip language to Match Display Language or a specific language.
![]() Click OK, and then click Yes (if necessary) to quit and restart PowerPoint.
Click OK, and then click Yes (if necessary) to quit and restart PowerPoint.
Exporting Notes and Slides to Word
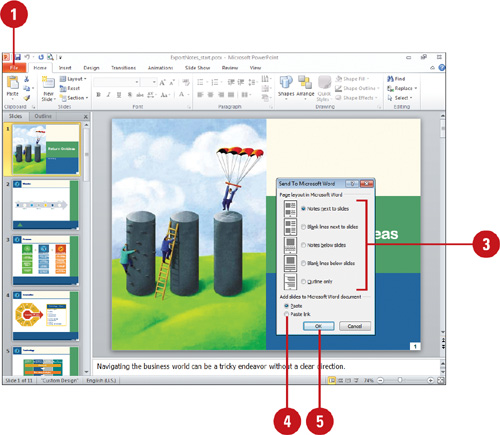
You can send both your notes and slides to Word so that you can use a full array of word processing tools. This is especially handy when you are developing more detailed materials, such as training presentations and manuals. By default, PowerPoint pastes your presentation into a Word document. If you change the presentation after sending it to Word, the changes you make to the presentation are not reflected in the Word document. If you click the Paste Link option in the Send to Microsoft Word dialog box, however, you create a link between the Word document and the presentation, and changes you make in one are reflected in the other.
Create Handouts in Word
![]() Click the File tab, and then click Save & Send.
Click the File tab, and then click Save & Send.
![]() Click Create Handouts, and then click the Create Handouts button.
Click Create Handouts, and then click the Create Handouts button.
![]() Click the page layout option you want for handouts.
Click the page layout option you want for handouts.
![]() To create a link to the presentation, click the Paste Link option.
To create a link to the presentation, click the Paste Link option.
![]() Click OK.
Click OK.
Word starts, creates a new document, and inserts your presentation slides with the page layout you selected.
![]() Print the document in Word, editing and saving it as necessary.
Print the document in Word, editing and saving it as necessary.
![]() When you’re done, click the Close button to quit Word.
When you’re done, click the Close button to quit Word.
Documenting Presentation Properties
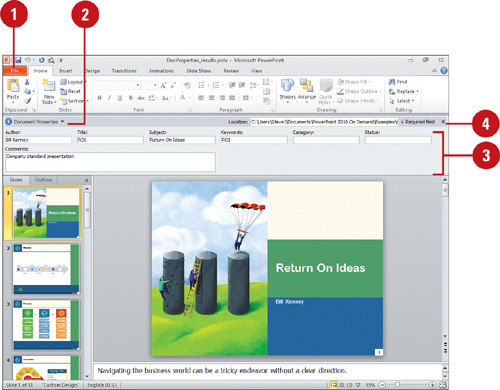
PowerPoint automatically documents presentation properties while you work—such as file size, save dates, and various statistics—and allows you to document other properties, such as title, author, subject, keywords, category, and status. You can view or edit standard document properties or create advanced custom properties by using the Document Properties Panel, which is actually an XML-based Microsoft InfoPath form hosted in PowerPoint. You can use document properties—also known as metadata—to help you manage and track files; search tools can use the metadata to find a presentation based-on your search criteria. If you associate a document property to an item in the document, the document property updates when you change the item.
View and Edit Standard Presentation Properties
![]() Click the File tab, and then click Info.
Click the File tab, and then click Info.
![]() Click the Properties button, and then click Show Document Properties.
Click the Properties button, and then click Show Document Properties.
![]() Enter the standard properties, such as author, title, subject, keywords, category, status, and comments, in the Document Properties Panel.
Enter the standard properties, such as author, title, subject, keywords, category, status, and comments, in the Document Properties Panel.
![]() Click the Close button on the Document Properties Panel.
Click the Close button on the Document Properties Panel.
Did You Know?
Your Document Properties Panel might look different. If you save your document to a SharePoint library or a document management server, your Document Properties Panel might have additional properties.
You can view document properties when you open or save a file.
In the Open or Save As dialog box, select the document you want, click the arrow next to the Views, and then click Details to view file size and last changed date, or click Properties to view all information.
![]() Click the File tab, and then click Info.
Click the File tab, and then click Info.
![]() Click the Properties button, and then click Advanced Properties.
Click the Properties button, and then click Advanced Properties.
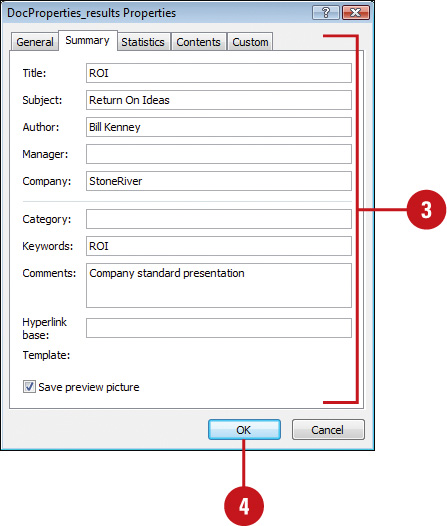
![]() Click the tabs to view and add information:
Click the tabs to view and add information:
![]() General. To find out file location or size.
General. To find out file location or size.
![]() Summary. To add title and author information for the presentation.
Summary. To add title and author information for the presentation.
![]() Statistics. To display the number of slides, paragraphs, words and other details about the presentation.
Statistics. To display the number of slides, paragraphs, words and other details about the presentation.
![]() Contents. To display slide titles and information about fonts and design templates used in the presentation.
Contents. To display slide titles and information about fonts and design templates used in the presentation.
![]() Click OK.
Click OK.
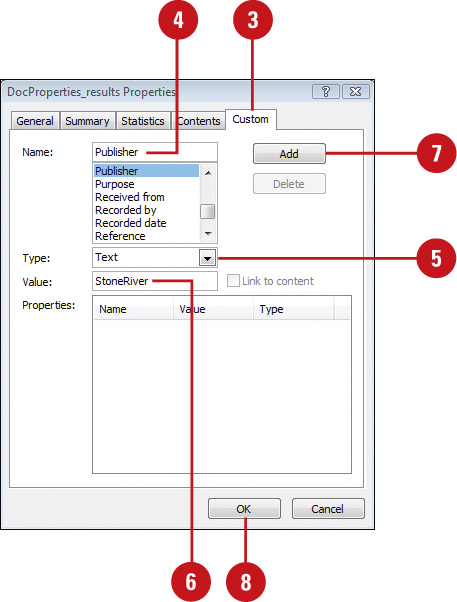
Customize Properties
![]() Click the File tab, and then click Info.
Click the File tab, and then click Info.
![]() Click the Properties button, and then click Advanced Properties.
Click the Properties button, and then click Advanced Properties.
![]() Click the Custom tab.
Click the Custom tab.
![]() Type the name for the custom property or select a name from the list.
Type the name for the custom property or select a name from the list.
![]() Select the data type for the property you want to add.
Select the data type for the property you want to add.
![]() Type a value for the property.
Type a value for the property.
![]() Click Add.
Click Add.
![]() Click OK.
Click OK.
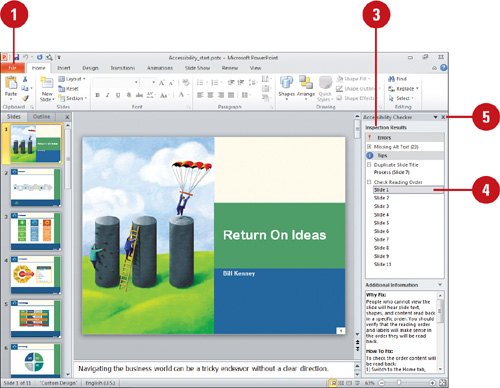
Checking Accessibility
The Accessibility Checker (New!) identifies potential difficulties that people with disabilities might have reading or interactive with an Office document. The Accessibility Checker generates a list of errors and warning and possible fixes in the Accessibility Checker panel. Use the information to determine what caused each issue and for suggestions on how to fix it. In addition to the Accessibility Checker, you can also add alternative text (also known as alt text) (New!) to objects and other items to provide information for people with visual impairments who may be unable to easily or fully see it. Alternative text also helps people with screen readers understand the content in a presentation. You can create alternative text for shapes, pictures, charts, tables, SmartArt graphics, or other objects. When you point to an object with alternative text in a screen reader or DAISY (digital Accessible Information System) or in most browsers, the alternative text appears.
Check Accessibility
![]() Click the File tab, and then click Info.
Click the File tab, and then click Info.
![]() Click the Check For Issues button, and then click Check Accessibility.
Click the Check For Issues button, and then click Check Accessibility.
PowerPoint checks compatibility for content that people with disabilities might find difficult to read.
![]() View the compatibility summary information of errors and warnings in the Accessibility Checker panel.
View the compatibility summary information of errors and warnings in the Accessibility Checker panel.
![]() Select an issue under Inspection Results to find out how to fix it under Additional Information.
Select an issue under Inspection Results to find out how to fix it under Additional Information.
![]() When you’re done with the Accessibility Checker panel, click the Close button on the panel.
When you’re done with the Accessibility Checker panel, click the Close button on the panel.
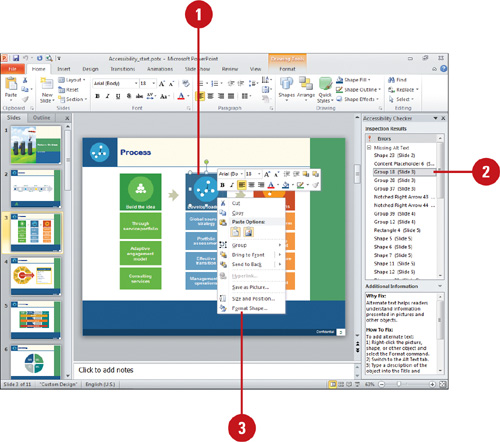
![]() Select the text or object you want to add alternative text.
Select the text or object you want to add alternative text.
![]() If you want to find the objects that don’t have alternative text, check accessibility (previous page), click the plus sign (+) next to Missing Alt Text, and then select an object from the list to display it.
If you want to find the objects that don’t have alternative text, check accessibility (previous page), click the plus sign (+) next to Missing Alt Text, and then select an object from the list to display it.
![]() Right-click the object or item, point to and/or click a command (varies depending on the object or item), such as Format Shape, Alternative Text or Alt Text.
Right-click the object or item, point to and/or click a command (varies depending on the object or item), such as Format Shape, Alternative Text or Alt Text.
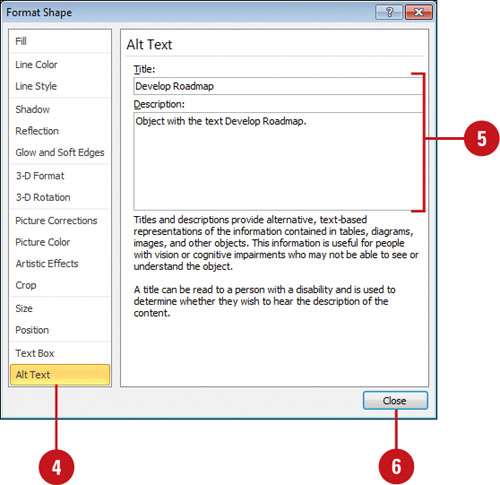
![]() In the left pane, click Alt Text, if necessary.
In the left pane, click Alt Text, if necessary.
![]() Type a title and description.
Type a title and description.
![]() Click Close.
Click Close.
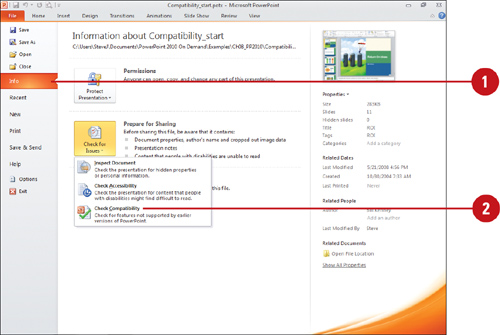
Checking Compatibility
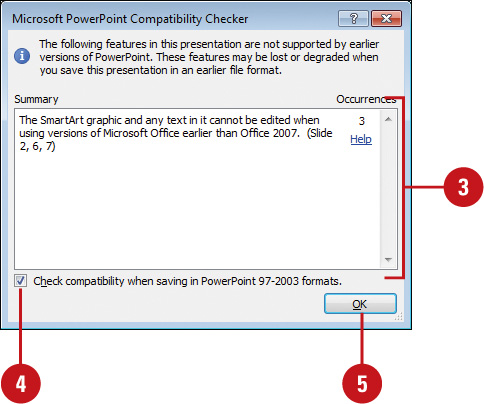
The Compatibility Checker identifies the potential loss of functionality when you save a PowerPoint 2010 presentation in the PowerPoint 97-2003 Presentation file format. The Compatibility Checker generates a report that provides a summary of the potential losses and the number of occurrences in the presentation. Use the report information to determine what caused each message and for suggestions on how to change it. If the loss is due to a new feature in PowerPoint 2010—such as custom layouts or Artistic and Quick Styles applied to shapes, pictures, and WordArt—you might be able to simply remove the effect or feature. In other cases, you might not be able to do anything about it. To maintain a visual appearance, SmartArt graphics and other objects with new effects are converted to bitmaps to preserve their overall look and cannot be edited.
Check Compatibility
![]() Click the File tab, and then click Info.
Click the File tab, and then click Info.
![]() Click the Check For Issues button, and then click Check Compatibility.
Click the Check For Issues button, and then click Check Compatibility.
PowerPoint checks compatibility of the document for non supported features in earlier versions of the PowerPoint program.
![]() View the compatibility summary information, so you can make changes, as necessary.
View the compatibility summary information, so you can make changes, as necessary.
![]() To have the compatibility checker review the presentation when the PowerPoint saves the file in 97-2003 file format, select the Check compatibility when saving in PowerPoint 97-2003 formats check box.
To have the compatibility checker review the presentation when the PowerPoint saves the file in 97-2003 file format, select the Check compatibility when saving in PowerPoint 97-2003 formats check box.
![]() Click OK.
Click OK.
Saving Slides in Different Formats
You can save PowerPoint presentations in a number of formats so that many different programs can access them. For example, you might want to save a presentation slide as a Web graphic image in the .jpg or.gif format to use in a Web page that you can view in a Web browser. Or you can save a presentation slide as a graphic image that you can open in a graphics editor. When you’re saving presentation slides, PowerPoint asks if you want to save the current slide only or all the slides in your presentation, which can be a big timesaver.
Save a Slide as a Graphic Image
![]() In Normal view, display the slide you want to save.
In Normal view, display the slide you want to save.
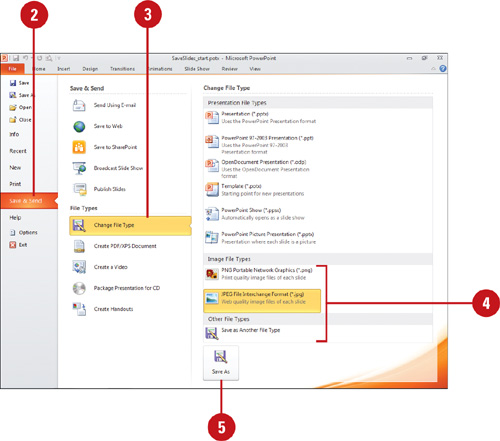
![]() Click the File tab, and then click Save & Send.
Click the File tab, and then click Save & Send.
![]() Click Change File Type.
Click Change File Type.
![]() Select the graphics format you want to use, either PNG or JPEG, or Save as Another File Type.
Select the graphics format you want to use, either PNG or JPEG, or Save as Another File Type.
![]() Click the Save As button.
Click the Save As button.
![]() Click the Save as type list arrow, and then select a graphics format, if necessary.
Click the Save as type list arrow, and then select a graphics format, if necessary.
![]() Click the Save in list arrow, and then click the drive or folder where you want to save the file.
Click the Save in list arrow, and then click the drive or folder where you want to save the file.
![]() Type a file name.
Type a file name.
![]() Click Save.
Click Save.
![]() Click Every Slide to save all slides as separate graphic image files, or click Current Slide Only to save just the current slide. If necessary, click OK.
Click Every Slide to save all slides as separate graphic image files, or click Current Slide Only to save just the current slide. If necessary, click OK.
See Also
See “Examining Picture File Formats” on page 165 for information on the different graphic file formats.
Saving Outline Text as a Document
When you need the text portion of a presentation for use in another program, you can save the presentation text in a format called Rich Text Format (RTF). Saving an outline in RTF allows you to save any formatting that you made to the presentation text in a common file format that you can open in other programs. As long as Microsoft Word is installed on your computer, you can export a presentation outline directly from PowerPoint into a report in Word with the Send to Microsoft Word feature. PowerPoint launches Word and sends or copies the outline in the presentation to a blank Word document.
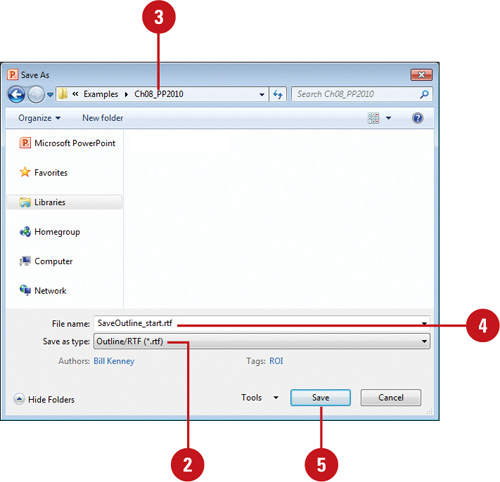
Save a Presentation as an Outline
![]() Click the File tab, and then click Save As.
Click the File tab, and then click Save As.
![]() Click the Save as type list arrow, and then click Outline/RTF.
Click the Save as type list arrow, and then click Outline/RTF.
![]() Click the Save in list arrow, and then click the drive or folder where you want to save the file.
Click the Save in list arrow, and then click the drive or folder where you want to save the file.
![]() Type the file name.
Type the file name.
![]() Click Save.
Click Save.
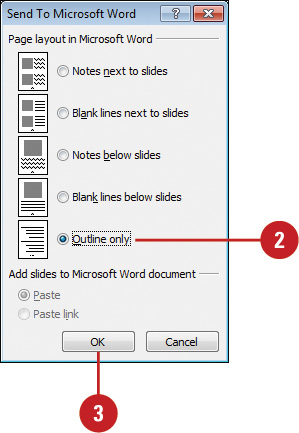
Send an Outline to Word
![]() Click the File tab, click Save & Send, click Create Handouts, and then click the Create Handouts button.
Click the File tab, click Save & Send, click Create Handouts, and then click the Create Handouts button.
![]() Click the Outline Only option.
Click the Outline Only option.
![]() Click OK.
Click OK.
Microsoft Word starts, creating a new document, and inserts the presentation slide information you selected.
Creating a PDF Document
Portable Document Format (PDF) is a fixed-layout format developed by Adobe Systems that retains the form you intended on a computer monitor or printer. A PDF is useful when you want to create a document primarily intended to be read and printed, not modified. PowerPoint allows you to save a document as a PDF file, which you can send to others for review in an e-mail. To view a PDF file, you need to have Acrobat Reader—free downloadable software from Adobe Systems—installed on your computer.
Save a Document as a PDF Document
![]() Click the File tab, click Save & Send, and then click Create PDF/XPS Document.
Click the File tab, click Save & Send, and then click Create PDF/XPS Document.
![]() Click the Create PDF/XPS button.
Click the Create PDF/XPS button.
![]() Click the Save as type list arrow, and then click PDF.
Click the Save as type list arrow, and then click PDF.
![]() Click the Save in list arrow, and then click the folder where you want to save the file.
Click the Save in list arrow, and then click the folder where you want to save the file.
![]() Type a PDF file name.
Type a PDF file name.
![]() To open the file in Adobe Reader after saving, select the Open file after publishing check box.
To open the file in Adobe Reader after saving, select the Open file after publishing check box.
![]() Click the Standard or Minimum size option to specify how you want to optimize the file.
Click the Standard or Minimum size option to specify how you want to optimize the file.
![]() Click Options.
Click Options.
![]() Select the publishing options you want, such as what to publish, range to publish, whether to include non-printing information, or PDF options.
Select the publishing options you want, such as what to publish, range to publish, whether to include non-printing information, or PDF options.
![]() Click OK.
Click OK.
![]() Click Publish.
Click Publish.
![]() If necessary, install Adobe Acrobat Reader and related software as directed.
If necessary, install Adobe Acrobat Reader and related software as directed.
Creating an XPS Document
XML Paper Specification (XPS) is a secure fixed-layout format developed by Microsoft that retains the form you intended on a monitor or printer. An XPS is useful when you want to create a document primarily intended to be read and printed, not modified. PowerPoint allows you to save a document as an XPS file, which you can send to others for review in an e-mail. XPS includes support for digital signatures and is compatible with Windows Rights Management for additional protection. The XPS format also preserves live links with documents, making files fully functional. To view an XPS file, you need to have a viewer—free downloadable software from Microsoft Office.com—installed on your computer.
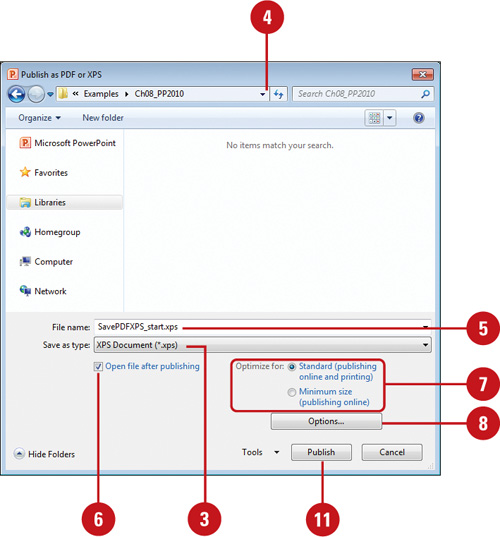
Save a Document as an XPS Document
![]() Click the File tab, click Save & Send, and then click Create PDF/XPS Document.
Click the File tab, click Save & Send, and then click Create PDF/XPS Document.
![]() Click the Create PDF/XPS button.
Click the Create PDF/XPS button.
![]() Click the Save as type list arrow, and then click XPS Document.
Click the Save as type list arrow, and then click XPS Document.
![]() Click the Save in list arrow, and then click the folder where you want to save the file.
Click the Save in list arrow, and then click the folder where you want to save the file.
![]() Type an XPS file name.
Type an XPS file name.
![]() To open the file in viewer after saving, select the Open file after publishing check box.
To open the file in viewer after saving, select the Open file after publishing check box.
![]() Click the Standard or Minimum size option to specify how you want to optimize the file.
Click the Standard or Minimum size option to specify how you want to optimize the file.
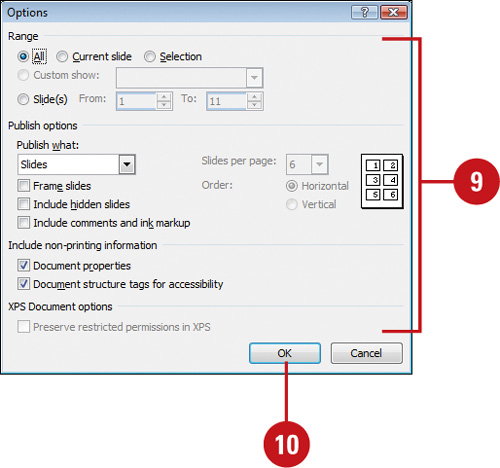
![]() Click Options.
Click Options.
![]() Select the publishing options you want, such as what to publish, range to publish, whether to include non-printing information, or XPS options.
Select the publishing options you want, such as what to publish, range to publish, whether to include non-printing information, or XPS options.
![]() Click OK.
Click OK.
![]() Click Publish.
Click Publish.
Selecting Printing Options
You can customize the way PowerPoint prints presentations and supplements by selecting printing settings in PowerPoint Options. These PowerPoint preferences determine the internal process of printing a presentation. You can set options that allow you to print a presentation while you continue to work and provide you with the best quality print out. If you use the same print options most of the time, you can set print preferences in PowerPoint Options to save you some time.
Change Printing Options
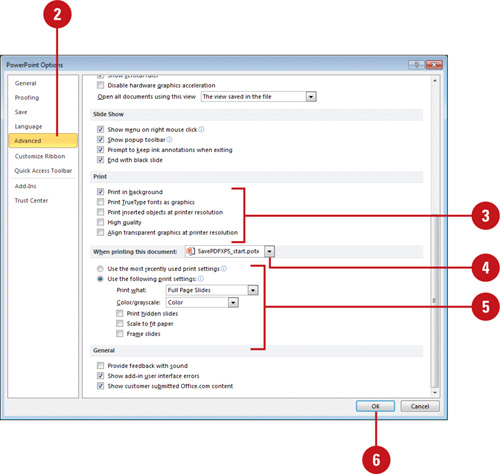
![]() Click the File tab, and then click Options.
Click the File tab, and then click Options.
![]() In the left pane, click Advanced.
In the left pane, click Advanced.
![]() Select or clear the printing options you do or don’t want.
Select or clear the printing options you do or don’t want.
![]() Print in background. Select to print as you continue to work.
Print in background. Select to print as you continue to work.
![]() Print TrueType fonts as graphics. Select to print fonts as vector graphic for better print quality.
Print TrueType fonts as graphics. Select to print fonts as vector graphic for better print quality.
![]() Print inserted objects at printer resolution. Select to print charts and tables with the best print quality.
Print inserted objects at printer resolution. Select to print charts and tables with the best print quality.
![]() High Quality. Select to print with the highest color and resolution settings available.
High Quality. Select to print with the highest color and resolution settings available.
![]() Align transparent graphics at printer resolution. Select to print transparent graphics at the printer set resolution.
Align transparent graphics at printer resolution. Select to print transparent graphics at the printer set resolution.
![]() Click the When printing this document list arrow, and then click the presentation in which you want to set print options.
Click the When printing this document list arrow, and then click the presentation in which you want to set print options.
![]() Click the option you want for the specified presentation:
Click the option you want for the specified presentation:
![]() Use the most recent used print settings.
Use the most recent used print settings.
![]() Use the following print settings. Similar to the Print screen.
Use the following print settings. Similar to the Print screen.
![]() Click OK.
Click OK.
Previewing a Presentation
Before printing, you should verify that the page looks the way you want. You save time, money, and paper by avoiding duplicate printing. Print Preview (New!) shows you the exact placement of your data on each printed page. You can view all or part of your presentation as it will appear when you print it. You have the option of switching between various views, such as notes, slides, outlines, and handouts. Print Preview shows you the pages based on the properties of the selected printer. For example, if the selected printer is setup to print color, Print Preview displays in color. If you are using a black and white printer, you can preview your color slides in pure black and white or grayscale in print preview to verify that they will be legible when you print them. The Print screen (New!) on the File tab makes it easy to zoom in and out to view a document more comfortably, switch between pages, preview page breaks, set print options, and print all from the same place.
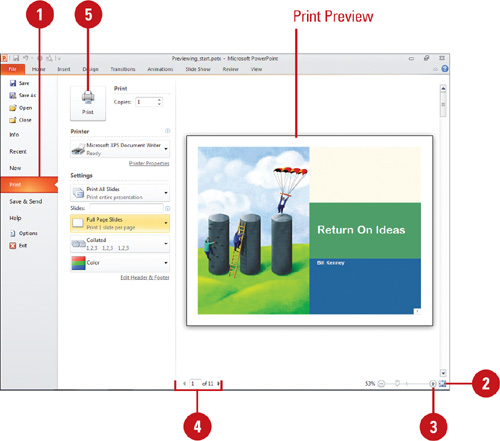
Preview a Presentation
![]() Click the File tab, and then click Print.
Click the File tab, and then click Print.
![]() Click the Zoom to Page button to toggle the zoom in and out to the page.
Click the Zoom to Page button to toggle the zoom in and out to the page.
![]() To adjust the zoom, drag the Zoom slider or click the Zoom In or Zoom Out buttons.
To adjust the zoom, drag the Zoom slider or click the Zoom In or Zoom Out buttons.
![]() To switch pages, click the Next Page or Previous Page button, or enter a specific page in the Current Page box.
To switch pages, click the Next Page or Previous Page button, or enter a specific page in the Current Page box.
![]() If you want to print, click the Print button.
If you want to print, click the Print button.
See Also
See “Printing a Presentation” on page 310 for information on printing a presentation.
![]() Click the File tab, and then click Print.
Click the File tab, and then click Print.
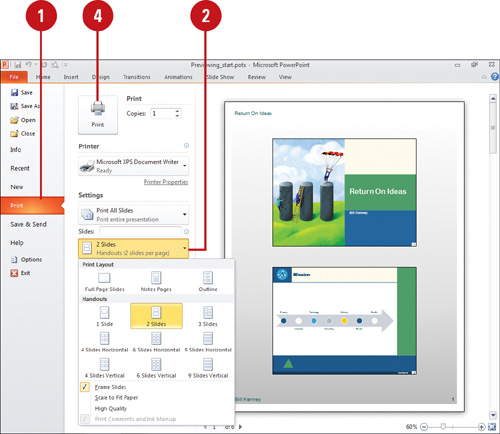
![]() Click the Print What list arrow, and then choose any of the following:
Click the Print What list arrow, and then choose any of the following:
![]() Print Layout or Handouts. Click an icon to select what to print (slides, notes pages, outline, or handouts).
Print Layout or Handouts. Click an icon to select what to print (slides, notes pages, outline, or handouts).
![]() Frame Slides. Click to add a frame to slides.
Frame Slides. Click to add a frame to slides.
![]() Scale to Fit Paper. Click to scale slide to fit paper.
Scale to Fit Paper. Click to scale slide to fit paper.
![]() High Quality. Click to print with high quality settings.
High Quality. Click to print with high quality settings.
![]() Print Comments and Ink Markup. Click to print review comments and mark ups.
Print Comments and Ink Markup. Click to print review comments and mark ups.
![]() To change the preview color, click the Color/Grayscale list arrow, and then click Color, Grayscale, or Pure Black and White.
To change the preview color, click the Color/Grayscale list arrow, and then click Color, Grayscale, or Pure Black and White.
![]() If you want to print, click the Print button.
If you want to print, click the Print button.
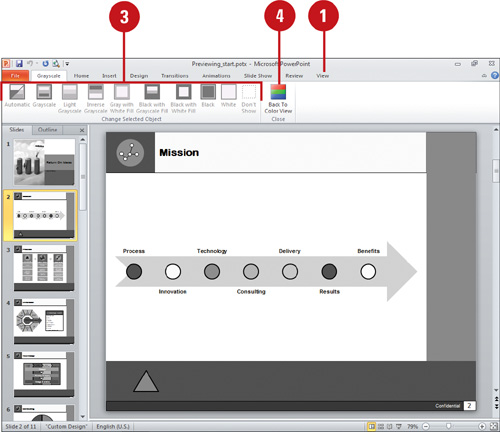
Preview Slides in Pure Black and White or Grayscale
![]() Click the View tab.
Click the View tab.
![]() Or, if in Print Preview, click the Color/Grayscale list arrow.
Or, if in Print Preview, click the Color/Grayscale list arrow.
![]() Click the Black and White or Grayscale button.
Click the Black and White or Grayscale button.
![]() On the Black and White or Grayscale tab, click the button with the specific color method you want to use.
On the Black and White or Grayscale tab, click the button with the specific color method you want to use.
![]() When you’re done, click the Back To Color View button.
When you’re done, click the Back To Color View button.
Printing a Presentation
You can print all the elements of your presentation—the slides, outline, notes, and handouts—in either color or black and white. PowerPoint makes it easy to print your presentation; it detects the type of printer that you choose—either color or black and white—and then prints the appropriate version of the presentation. When you’re ready to print your presentation, you can choose several printing options on the Print screen (New!) on the File tab, such as choosing a printer, selecting the number of slides, notes, or handouts you want printed and the number of copies, and specifying whether to print in color or grayscale. You can also use the Header and Footer dialog box to control the appearance of headers and footers on the pages. You can quickly print a copy of your document without using the Print screen by clicking the Quick Print button on the Quick Access Toolbar.
Print All or Part of a Presentation
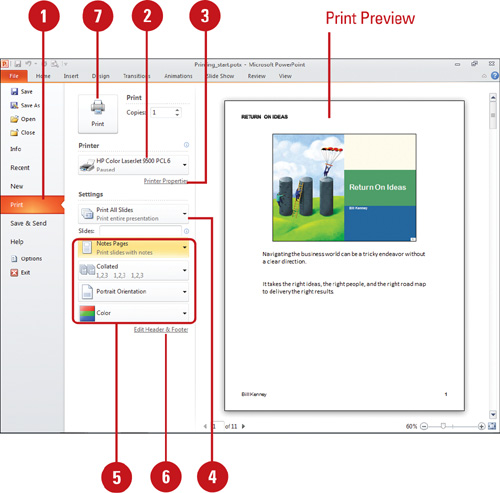
![]() Click the File tab, and then click Print.
Click the File tab, and then click Print.
TIMESAVER To print without the Print screen, press Ctrl+P, or click the Quick Print button on the Quick Access Toolbar.
![]() Click the Printer list arrow, and then click the printer you want to use.
Click the Printer list arrow, and then click the printer you want to use.
![]() To change printer properties, click the Printer Properties link, select the options you want, and then click OK.
To change printer properties, click the Printer Properties link, select the options you want, and then click OK.
![]() Select whether you want to print the entire presentation or only the slides you specify.
Select whether you want to print the entire presentation or only the slides you specify.
![]() Select the other print options you want to use, such as what to print, collated, orientation, or color/ grayscale.
Select the other print options you want to use, such as what to print, collated, orientation, or color/ grayscale.
![]() To change the header and footer, click the Edit Header & Footer link, select the options you want, and then click Apply to All.
To change the header and footer, click the Edit Header & Footer link, select the options you want, and then click Apply to All.
![]() Click Print.
Click Print.
![]() Click the File tab, and then click Print.
Click the File tab, and then click Print.
![]() Click the Print Range list arrow, and then click the custom show you want to print.
Click the Print Range list arrow, and then click the custom show you want to print.
![]() Change settings in the Print screen as necessary.
Change settings in the Print screen as necessary.
![]() Click Print.
Click Print.

Print a Single Slide or a Range of Slides
![]() To print selected slides, select the slide you want to print in the Slides pane or Slide Sorter view.
To print selected slides, select the slide you want to print in the Slides pane or Slide Sorter view.
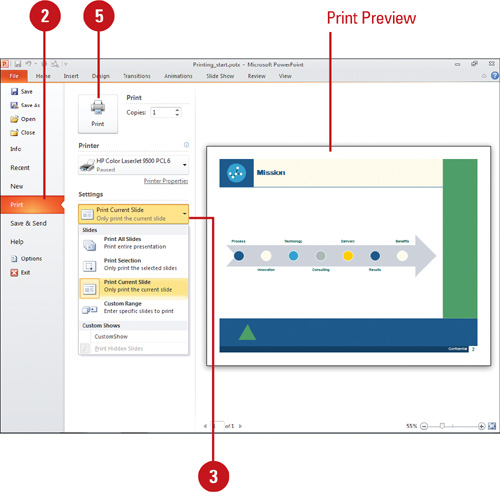
![]() Click the File tab, and then click Print.
Click the File tab, and then click Print.
![]() If necessary, click the Print Range list arrow, and then click Print Current Slide, Print Selection, or Custom Range.
If necessary, click the Print Range list arrow, and then click Print Current Slide, Print Selection, or Custom Range.
![]() For a custom range, specify the range of slides you want to print.
For a custom range, specify the range of slides you want to print.
![]() Click Print.
Click Print.
Printing an Outline
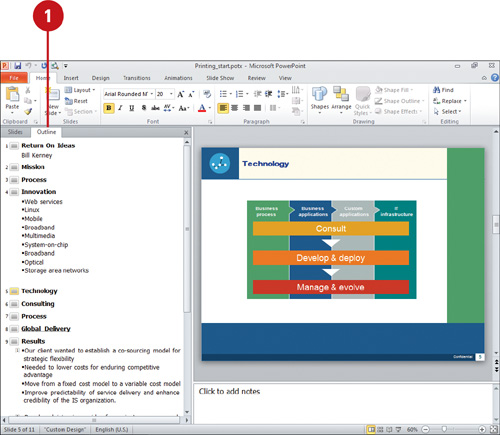
When you print an outline, PowerPoint prints the presentation outline as shown in Outline view. What you see in the Outline pane is what you get on the printout. PowerPoint prints an outline with formatting according to the current view setting. Set your formatting to display only slide titles or all of the text levels, and choose to display the outline with or without formatting. From the Print screen you can choose to preview your outline before printing.
Print an Outline
![]() In Outline pane, format your outline the way you want it to be printed.
In Outline pane, format your outline the way you want it to be printed.
![]() Display only slide titles or all text levels.
Display only slide titles or all text levels.
![]() Display with or without formatting. Right-click the outline, and then click Show Text Formatting.
Display with or without formatting. Right-click the outline, and then click Show Text Formatting.
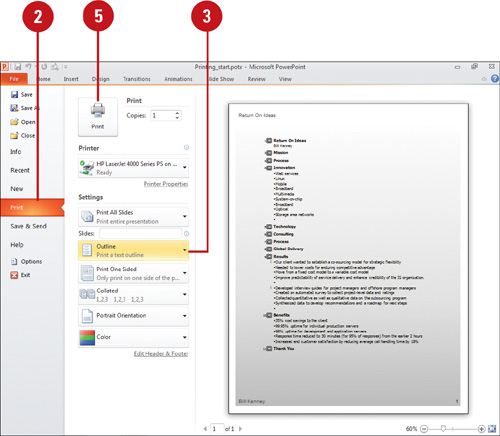
![]() Click the File tab, and then click Print.
Click the File tab, and then click Print.
![]() Click the Print What list arrow, and then click Outline.
Click the Print What list arrow, and then click Outline.
![]() Change settings in the Print screen as necessary.
Change settings in the Print screen as necessary.
![]() Click Print.
Click Print.
Did You Know?
You can scale slides to fit your paper when you print. Click the File tab, click Print, click the Print What list arrow, select the Scale To Fit Paper, and then click Print.
See Also
See “Inserting and Developing an Outline” on page 52 for more information on saving a presentation as an outline.