
9: Preparing a Slide Show
What You’ll Do
Coordinate Multiple Animations
Create a Self-Running Presentation
Introduction
Microsoft PowerPoint provides many tools to help you coordinate your slide show as a complete multimedia production. After all your effort to create your presentation, the final details could be the lasting memory of your slide show.
Before you can deliver a slide show, you need to select the type of show you want. Will your show be presented by a speaker, or be self running? Will your show include narration or animation? These are some of the details you will need to set up for your slide show. Some presentations include slides that are appropriate for one audience but not for another. PowerPoint lets you create custom slide shows that include only a selection of slides, in whatever order you want, intended for a given audience.
After setting up your slide show requirements, you can add other special features to customize your show. Elements such as creating transitions between slides, adding special visual, sound, and animation effects. Using animations—effects that animate your slide elements, such as text flying in from the right or fading text after it’s been shown, can increase the interest in your slide show.
PowerPoint includes tools that let you time your presentation to make sure that it is neither too long nor too short. You can set the timing of your slides as you rehearse your slide show. To make sure each slide has enough time on the screen. You might want to add a narration to your slide show or a music clip to play during a planned coffee break in your presentation. You can also create a self-running presentation to package for off-site clients or to run at a trade show.
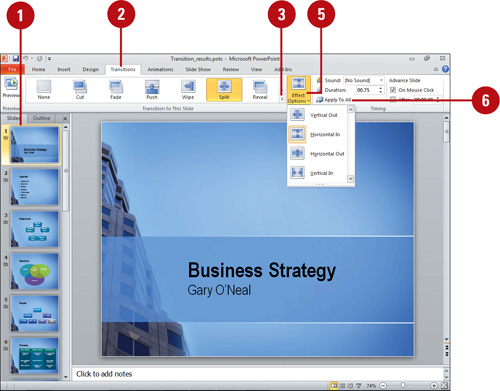
Creating Slide Transitions
If you want to give your presentation more visual interest, you can add transitions between slides. For example, you can create a fading out effect so that one slide fades out as it is replaced by a new slide, or you can have one slide appear to push another slide out of the way. If you like a more excite or dynamic effect, you can use transitions with 3-D motion effects, such as 3D rotation or orbit (New!). You can also add sound effects to your transitions, though you need a sound card and speakers to play them. To quickly see if you like a transition, point to one in the Transition Quick Style gallery to display a live preview of it. When you add a transition effect to a slide, the effect takes place between the previous slide and the selected slide.
Apply a Transition to an Individual or All Slides
![]() Click the slide(s) to which you want to add a transition effect.
Click the slide(s) to which you want to add a transition effect.
![]() Click the Transitions tab.
Click the Transitions tab.
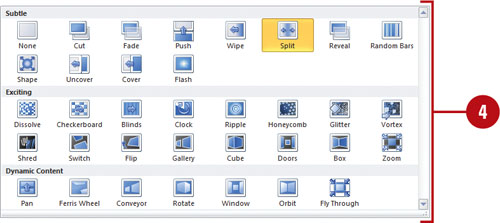
![]() Click the scroll up or down arrow, or click the More list arrow in the Transition To This Slide group.
Click the scroll up or down arrow, or click the More list arrow in the Transition To This Slide group.
![]() Point to a transition to view a live preview, and then click the transition effect you want.
Point to a transition to view a live preview, and then click the transition effect you want.
![]() To remove a slide transition, click None.
To remove a slide transition, click None.
![]() Click the Effects Options button, and then an option for the selected effect, such as direction.
Click the Effects Options button, and then an option for the selected effect, such as direction.
![]() To apply the current transition to all slides in the presentation, click the Apply To All button.
To apply the current transition to all slides in the presentation, click the Apply To All button.
Did You Know?
You can quickly view a slide’s transition quickly in Slide Sorter view. In Slide Sorter view, click a slide’s transition icon to view the transition effect.
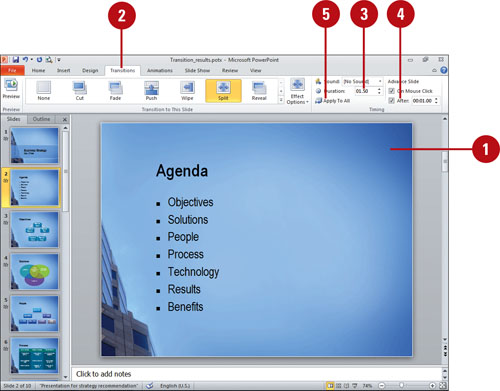
![]() In Normal or Slide Sorter view, click or display the slide whose transition effect you want to edit.
In Normal or Slide Sorter view, click or display the slide whose transition effect you want to edit.
![]() Click the Transitions tab.
Click the Transitions tab.
![]() Specify a duration for the selected transition.
Specify a duration for the selected transition.
![]() To have the slide advance in a slide show after a certain time, select the After check box, and then specify a duration.
To have the slide advance in a slide show after a certain time, select the After check box, and then specify a duration.
![]() To apply the settings to all slides, click the Apply To All button.
To apply the settings to all slides, click the Apply To All button.
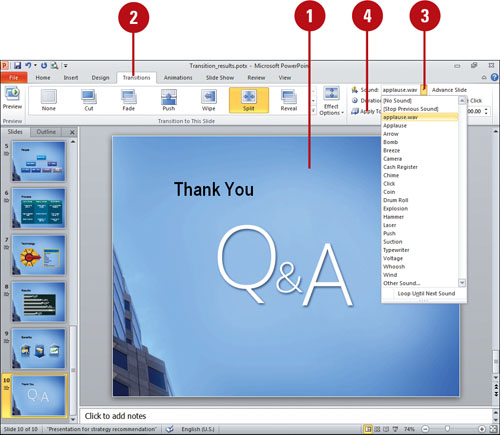
Add Sound to a Transition
![]() In Normal or Slide Sorter view, click or display the slide to which you want to add a transition sound.
In Normal or Slide Sorter view, click or display the slide to which you want to add a transition sound.
![]() Click the Transitions tab.
Click the Transitions tab.
![]() Click the Transition Sound list arrow, and then click a sound you want, or choose an option:
Click the Transition Sound list arrow, and then click a sound you want, or choose an option:
![]() Click [No Sound] or [Stop Previous Sound] to specify the command.
Click [No Sound] or [Stop Previous Sound] to specify the command.
![]() Click Other Sound to select a sound file.
Click Other Sound to select a sound file.
![]() Click Loop Until Next Sound to toggle the sound loop option.
Click Loop Until Next Sound to toggle the sound loop option.
![]() To apply the settings to all slides, click the Apply To All button.
To apply the settings to all slides, click the Apply To All button.
Adding and Removing Animation
You can use animation to introduce objects onto a slide one at a time or with special animation effects. For example, a bulleted list can appear one bulleted item at a time, or a picture or chart can fade in gradually. There are four types of animations (New!): Entrance, Exit, Emphasis and Motion Path (animations along a line). You can apply one or more animations to the same object. To quickly see if you like an animation, point to a name in the Animation list to display a live preview of it. If you like it, you can apply it. You can also design your own customized animations, including those with your own effects and sound elements. If you no longer want to use an animation, you can remove it.
Apply and Preview a Animation Effect to Text or an Object
![]() Select the text or object you want to animate.
Select the text or object you want to animate.
![]() Click the Animations tab.
Click the Animations tab.
![]() Click the Animation list arrow, and then point to an animation.
Click the Animation list arrow, and then point to an animation.
A live preview of the style appears in the current shape.
![]() Click the animation you want.
Click the animation you want.
![]() To add multiple animations, click the Add Animation button, and then click the animation you want.
To add multiple animations, click the Add Animation button, and then click the animation you want.
To preview an animation, click the Preview button.
![]() To stop an animation, click the Preview button again.
To stop an animation, click the Preview button again.
![]() To automatically preview an animation after adding or changing one, click the Preview button arrow, and then click AutoPreview to select it.
To automatically preview an animation after adding or changing one, click the Preview button arrow, and then click AutoPreview to select it.

![]() In Normal view, select the object you want to animate.
In Normal view, select the object you want to animate.
![]() Click the Animations tab.
Click the Animations tab.
![]() Click the Animations list arrow, and then click None.
Click the Animations list arrow, and then click None.

Did You Know?
You can view a slide’s animation quickly in Slide Sorter view. In Slide Sorter view, click a slide’s animation icon to view the animation.
Add Sound to an Animation
![]() In Normal view, select the object you want to animate.
In Normal view, select the object you want to animate.
![]() Click the Animations tab.
Click the Animations tab.
![]() Click the Animations Pane button.
Click the Animations Pane button.
![]() In the Animation Order list, click the list arrow of the animation to which you want to add a sound, and then click Effect Options.
In the Animation Order list, click the list arrow of the animation to which you want to add a sound, and then click Effect Options.
![]() Click the Sound list arrow, and then click the sound effect you want.
Click the Sound list arrow, and then click the sound effect you want.
![]() To add your own sound, click Other Sound from the list, select the sound you want, and then click OK.
To add your own sound, click Other Sound from the list, select the sound you want, and then click OK.
![]() Click OK.
Click OK.
![]() Click the Play button to hear the animation effect.
Click the Play button to hear the animation effect.
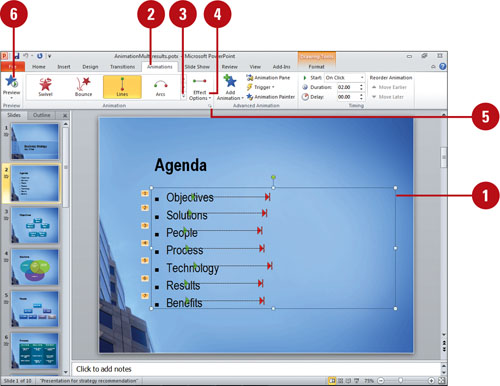
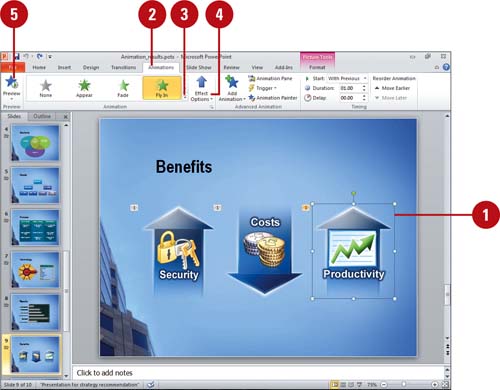
Using Specialized Animations
Using specialized animations, you can quickly apply animations specific to certain objects using the Animations tab (New!). For example, for a text object, you can introduce the text on your slide all at once or by word or letter. Similarly, you can introduce bulleted lists one bullet item at a time and apply different effects to older items, such as graying the items out as they are replaced by new ones. You can animate charts by introducing chart series or chart categories one at a time.
Animate Text or Bulleted Lists
![]() In Normal view, select the text object you want to animate.
In Normal view, select the text object you want to animate.
![]() Click the Animations tab.
Click the Animations tab.
![]() Click the Animation list arrow, and then click an animation (Entrance, Emphasis, Exit, or Motion Paths).
Click the Animation list arrow, and then click an animation (Entrance, Emphasis, Exit, or Motion Paths).
![]() For some motion paths, click points to create a path.
For some motion paths, click points to create a path.
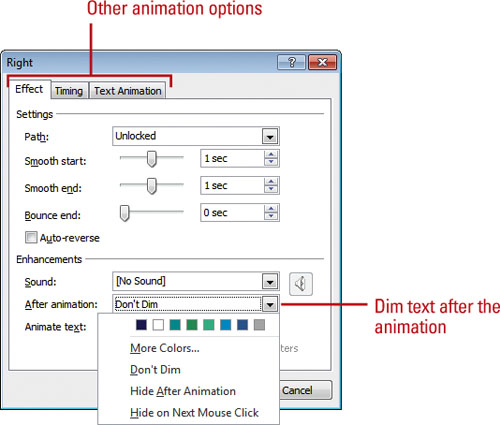
![]() Click the Effect Options button, and then specify any of the following:
Click the Effect Options button, and then specify any of the following:
![]() Direction. Select a direction for the animation: Down, Left, Right, or Up.
Direction. Select a direction for the animation: Down, Left, Right, or Up.
![]() Sequence. Select a grouping for the animation: As One Object, All At Once, or By Paragraph.
Sequence. Select a grouping for the animation: As One Object, All At Once, or By Paragraph.
![]() Origin. Select Locked or Unlocked.
Origin. Select Locked or Unlocked.
![]() Path. Select Edit Points to change the animation path, or Reverse Path Direction.
Path. Select Edit Points to change the animation path, or Reverse Path Direction.
![]() To dim text after the animation, click the Animation Dialog Box Launcher, click the After Animation list arrow, click the dim text color or option you want, and then click OK.
To dim text after the animation, click the Animation Dialog Box Launcher, click the After Animation list arrow, click the dim text color or option you want, and then click OK.
![]() To see the animation effect, click the Preview button.
To see the animation effect, click the Preview button.
![]() In Normal view, select the shape you want to animate.
In Normal view, select the shape you want to animate.
![]() Click the Animations tab.
Click the Animations tab.
![]() Click the Animation list arrow, and then click an animation (Entrance, Emphasis, Exit, or Motion Paths).
Click the Animation list arrow, and then click an animation (Entrance, Emphasis, Exit, or Motion Paths).
![]() For some motion paths, click points to create a path.
For some motion paths, click points to create a path.
![]() Click the Effect Options button, and then select a direction.
Click the Effect Options button, and then select a direction.
![]() To see the animation effect, click the Preview button.
To see the animation effect, click the Preview button.
Did You Know?
You can view a slide’s animation quickly in Slide Sorter view. In Slide Sorter view, click a slide’s animation icon to view the animation.
Animate Chart Elements
![]() In Normal view, select the chart you want to animate.
In Normal view, select the chart you want to animate.
![]() Click the Animations tab.
Click the Animations tab.
![]() Click the Animation list arrow, and then click an animation (Entrance, Emphasis, Exit, or Motion Paths).
Click the Animation list arrow, and then click an animation (Entrance, Emphasis, Exit, or Motion Paths).
![]() For some motion paths, click points to create a path.
For some motion paths, click points to create a path.
![]() Click the Effect Options button, and then select a grouping sequence (As One Object, By Series, By Category, By Element in Series, or By Element in Category).
Click the Effect Options button, and then select a grouping sequence (As One Object, By Series, By Category, By Element in Series, or By Element in Category).
![]() To see the animation effect, click the Preview button.
To see the animation effect, click the Preview button.
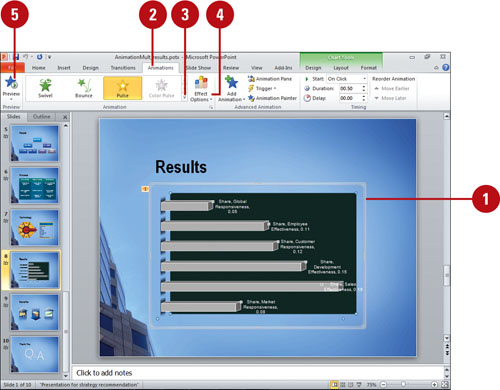
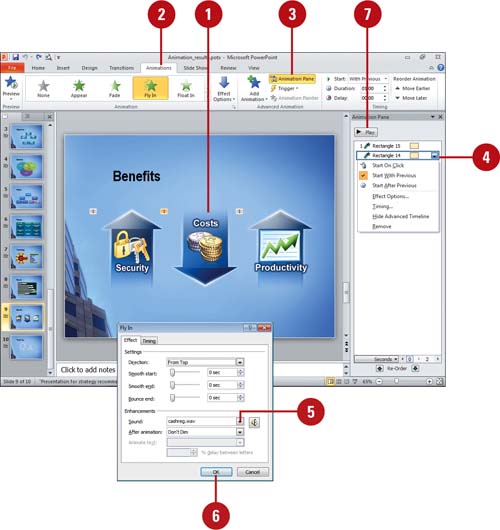
Coordinating Multiple Animations
The Animation task pane helps you keep track of your animations by listing all animated objects in a single location. Use these lists if your slides contain more than one animation, because they help you determine how the animations will work together. You can control the animation of each object, the order each object appears, the time between animation effects, when an animation takes place and even adjust how the animation works.
Work with Multiple Animations
![]() In Normal view, select the slide objects you want to change.
In Normal view, select the slide objects you want to change.
![]() Click the Animations tab.
Click the Animations tab.
![]() Click the Animation Pane button.
Click the Animation Pane button.
![]() Click an animated object in the Animation pane to select it.
Click an animated object in the Animation pane to select it.
![]() To select animation options, click the list arrow, and then select an option. To remove an animation, click Remove.
To select animation options, click the list arrow, and then select an option. To remove an animation, click Remove.
![]() To play the animations and display a timing line, click the Play button.
To play the animations and display a timing line, click the Play button.
![]() To zoom the pane in or out, click the Seconds button, and then click Zoom In or Zoom Out.
To zoom the pane in or out, click the Seconds button, and then click Zoom In or Zoom Out.

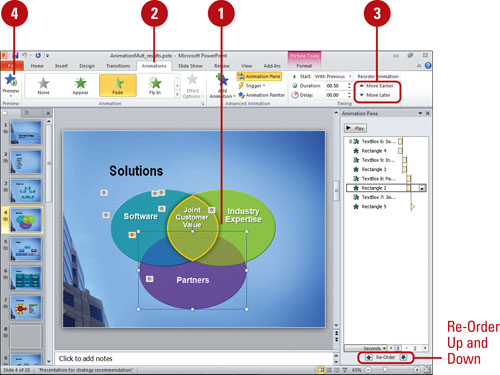
Modify the Animation Order
![]() In Normal view, select the slide object you want to re-order.
In Normal view, select the slide object you want to re-order.
Animation sequence numbers appear next to animated objects indicating the animation order.
![]() Click the Animations tab.
Click the Animations tab.
![]() Click the Move Earlier or Move Later button.
Click the Move Earlier or Move Later button.
![]() In the Animation pane, you can select an animation, and then click the Re-Order Up or Down arrow button.
In the Animation pane, you can select an animation, and then click the Re-Order Up or Down arrow button.
![]() To see the animation effect, click the Preview button.
To see the animation effect, click the Preview button.
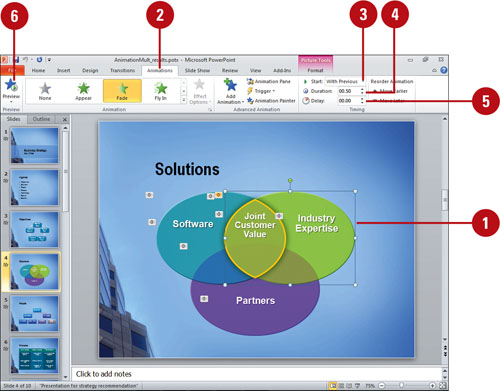
![]() In Normal view, select the slide object you want to animate.
In Normal view, select the slide object you want to animate.
![]() Click the Animations tab.
Click the Animations tab.
![]() Click the Start list arrow, and then click After Previous, With Previous, or On Click.
Click the Start list arrow, and then click After Previous, With Previous, or On Click.
![]() Use the Duration arrows to select the number of seconds to play this animation.
Use the Duration arrows to select the number of seconds to play this animation.
![]() Use the Delay arrows to select the number of seconds to wait before playing this animation.
Use the Delay arrows to select the number of seconds to wait before playing this animation.
![]() To see the animation effect, click the Preview button.
To see the animation effect, click the Preview button.
Modify an Animation
![]() In Normal view, select the object with the animation you want to change.
In Normal view, select the object with the animation you want to change.
![]() Click the Animations tab.
Click the Animations tab.
![]() Click the Animations Pane button.
Click the Animations Pane button.
![]() In the Animation Order list, click the list arrow of the animation to which you want to add a sound, and then click Effect Options.
In the Animation Order list, click the list arrow of the animation to which you want to add a sound, and then click Effect Options.
![]() Adjust the options for the selected animations.
Adjust the options for the selected animations.
![]() Click OK.
Click OK.
![]() Click the Play button to hear the animation effect.
Click the Play button to hear the animation effect.

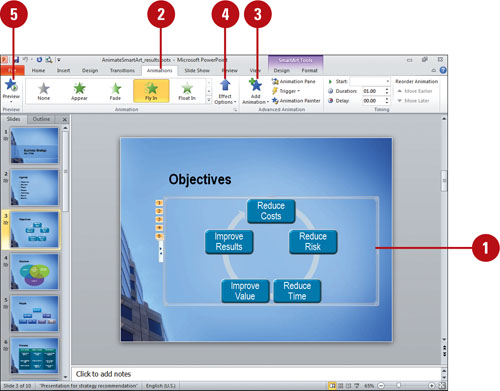
Animating a SmartArt Graphic
SmartArt graphics allow you to create diagrams that convey processes or relationships. You can add animation to a SmartArt graphic to show information in phases on a slide one at a time or with special animation effects. The easiest way to apply animation effects to a slide show is to use animation commands on the Animations tab. To quickly see if you like an animation, point to a name in the Animation list to display a live preview of it. If you like it, you can apply it. You can also design your own customized animations, including those with your own special effects and sound elements.
Animate a SmartArt Graphic
![]() Select the SmartArt graphic you want to animate.
Select the SmartArt graphic you want to animate.
![]() Click the Animations tab.
Click the Animations tab.
![]() Click the Animation list arrow, and then point to an animation.
Click the Animation list arrow, and then point to an animation.
A live preview of the style appears in the current shape.
![]() Click the animation you want.
Click the animation you want.
![]() None. Removes the animation effect.
None. Removes the animation effect.
![]() Click the Effect Options button, and then an option for the selected effect (options vary depending on the SmartArt graphic):
Click the Effect Options button, and then an option for the selected effect (options vary depending on the SmartArt graphic):
![]() As One Object. Animates the SmartArt object as a whole.
As One Object. Animates the SmartArt object as a whole.
![]() All at Once. Animates all shapes at the same time.
All at Once. Animates all shapes at the same time.
![]() One by One. Animates each shape individually one at a time.
One by One. Animates each shape individually one at a time.
![]() To see the animation effect, click the Preview button.
To see the animation effect, click the Preview button.

For Your Information
Animating with SmartArt Graphics Differences
Animations you apply to a SmartArt graphic are different from the ones you apply to text, shapes, or WordArt. Connecting lines between shapes are associated with the second shape and not animated individually. Shapes in a SmartArt graphic animate in the order the shapes appear. When you convert a diagram created in an earlier version of PowerPoint to a SmartArt graphic, you might loose some animation settings.
Apply a Customized Animation to a SmartArt Graphic
![]() Select the SmartArt graphic or individual shape you want to animate.
Select the SmartArt graphic or individual shape you want to animate.
![]() Click the Animations tab.
Click the Animations tab.
![]() Click the Add Animations button, and then click the animation you want, or one of the More commands to display additional effects.
Click the Add Animations button, and then click the animation you want, or one of the More commands to display additional effects.
![]() Click the Effect Options button, and then click a direction.
Click the Effect Options button, and then click a direction.
![]() To see the animation effect, click the Preview button.
To see the animation effect, click the Preview button.
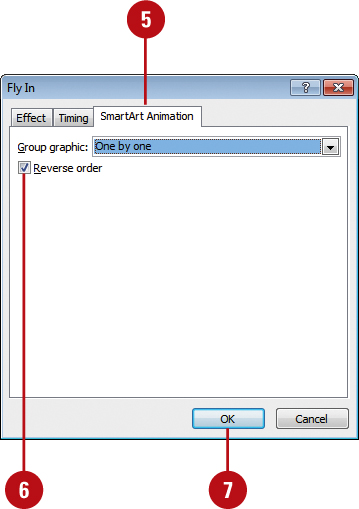
Reverse the Order of a SmartArt Graphic Animation
![]() Select the SmartArt graphic you want to reverse.
Select the SmartArt graphic you want to reverse.
![]() Click the Animations tab.
Click the Animations tab.
![]() Click the Animation Pane button.
Click the Animation Pane button.
![]() In the Animation Order list, click the list arrow of the animation to which you want to reverse, and then click Effect Options.
In the Animation Order list, click the list arrow of the animation to which you want to reverse, and then click Effect Options.
![]() Click the SmartArt Animation tab.
Click the SmartArt Animation tab.
![]() Select the Reverse order check box.
Select the Reverse order check box.
![]() Click OK, and then click Play to see the animation effect.
Click OK, and then click Play to see the animation effect.
Triggering Animations
You can control when an animation takes place by using an animation timing, clicking an object, or specifying a bookmark in a video (New!). The Trigger button on the Animations tab allows you to select an On Click of or On Bookmark item. Before you can use a bookmark to trigger an animation, you need to add a bookmark to a video in your presentation using the Playback tab under Video Tools when you select a video.
Trigger an Animation
![]() In Normal view, select the slide object that has the animation you want to trigger.
In Normal view, select the slide object that has the animation you want to trigger.
![]() Click the Animations tab.
Click the Animations tab.
![]() Click the Trigger button, and then point to:
Click the Trigger button, and then point to:
![]() On Click of. Select the object you want to trigger the animation.
On Click of. Select the object you want to trigger the animation.
![]() On Bookmark. Select the video bookmark you want to trigger the animation.
On Bookmark. Select the video bookmark you want to trigger the animation.
![]() To see the animation effect, click the Slide Show button, and then click the object to trigger it.
To see the animation effect, click the Slide Show button, and then click the object to trigger it.
![]() To remove a trigger, click the Trigger button, point to On Click of or On Bookmark, and then select the trigger to deselect it.
To remove a trigger, click the Trigger button, point to On Click of or On Bookmark, and then select the trigger to deselect it.


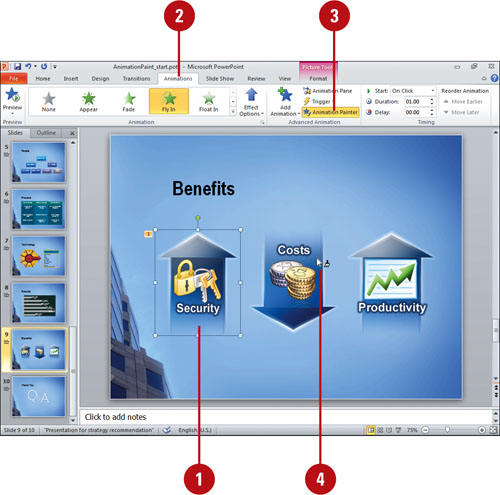
Using the Animation Painter
After you create an animation, you might want to apply those same animation changes to another object in your presentation. You can use the Animation Painter (New!) to quickly copy it to another object, just like the Format Painter. The Animation Painter lets you “pick up” the animation of one selection and apply, or “paint,” it to another. To apply an animation style to more than one item, double-click the Animation Painter button on the Animations tab instead of a single-click. The double-click keeps the Animation Painter active until you want to press Esc to disable it, so you can apply animations to any text or object you want in your presentation.
Apply an Animation to Another Object
![]() Select the text or object with the animation you want to use.
Select the text or object with the animation you want to use.
![]() Click the Animations tab.
Click the Animations tab.
![]() Click the Animation Painter button.
Click the Animation Painter button.
![]() Click the object you want to apply the animation.
Click the object you want to apply the animation.
![]() To apply the animation to multiple objects, double-click the Animation Painter button; press Esc to exit.
To apply the animation to multiple objects, double-click the Animation Painter button; press Esc to exit.
Did You Know?
You can quickly remove animations from objects. Select the objects, click the Animations tab, click the Animation list arrow, and then click None.
Adding Slide Timings
Use slide timing features to make sure that your presentation is not too long or too fast. You can specify the amount of time given to each slide or use Rehearse Timings. By rehearsing timings, you can vary the amount of time each slide appears on the screen. If you want the timings to take effect, make sure the show is set to use timings in the Set Up Show dialog box. In Slide Show View, a mouse click always advances a slide, even if the set timing has not elapsed, and holding down the mouse button prevents a timed transition until you release it.
Set or Edit Timings Between Slides
![]() Click the slide(s) to which you want to set or change slide timings.
Click the slide(s) to which you want to set or change slide timings.
![]() Click the Transitions tab.
Click the Transitions tab.
![]() Select the After check box.
Select the After check box.
![]() Enter the time (in seconds) before the presentation automatically advances to the next slide after displaying the entire slide.
Enter the time (in seconds) before the presentation automatically advances to the next slide after displaying the entire slide.
![]() To apply the settings to all slides, click the Apply To All button.
To apply the settings to all slides, click the Apply To All button.

Did You Know?
You can use the mouse to control slide timings. In Slide Show View, a mouse click always advances a slide, even if the set timing has not elapsed, and holding down the mouse button prevents a timed transition from occurring until you release the mouse button.
Create Timings Through Rehearsal
![]() Click the Slide Show tab.
Click the Slide Show tab.
![]() Click the Rehearse Timings button.
Click the Rehearse Timings button.
![]() As the slide show runs, rehearse your presentation by clicking or pressing Enter to go to the next transition or slide.
As the slide show runs, rehearse your presentation by clicking or pressing Enter to go to the next transition or slide.
![]() When you’re done, click Yes to accept the timings.
When you’re done, click Yes to accept the timings.
![]() To test timings, start the slide show and note when the slides advance too quickly or too slowly.
To test timings, start the slide show and note when the slides advance too quickly or too slowly.
![]() Review and edit individual timings in Slide Sorter view.
Review and edit individual timings in Slide Sorter view.

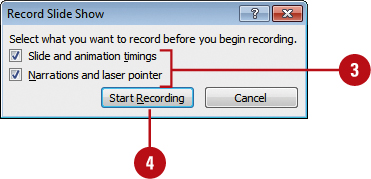
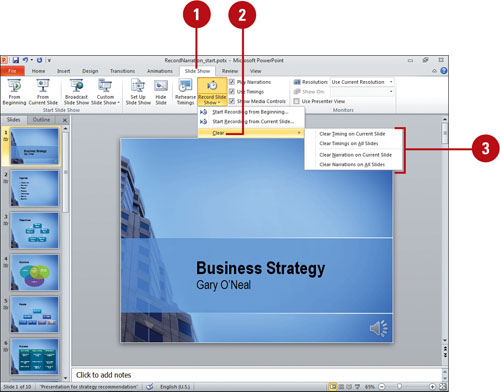
Recording a Narration
If you are creating a self-running presentation, you might want to add a narration to emphasize the points you make. PowerPoint lets you record your own narration as you rehearse your slide show (New!). You can record a narration before you run a slide show, or you can record it during the presentation and include audience comments. As you record the narration, you can pause or stop the narration at any time. When you play back a narration, the recording is synchronized with the presentation, including all slide transitions and animations. You can also delete a voice narration, as with any other PowerPoint object. You will need to set up a microphone and a sound card before recording a slide show.
Record a Narration and Slide Show
![]() Click the Slide Show tab.
Click the Slide Show tab.
![]() Click the Record Slide Show button arrow, and then click Start Recording from Beginning or Start Recording from Current Slide.
Click the Record Slide Show button arrow, and then click Start Recording from Beginning or Start Recording from Current Slide.
![]() Select the Narrations and laser pointer check box, and then select or clear the Slide and animation timings check box.
Select the Narrations and laser pointer check box, and then select or clear the Slide and animation timings check box.
![]() Click Start Recording.
Click Start Recording.
![]() Speak clearly into the microphone and record your narration for each slide.
Speak clearly into the microphone and record your narration for each slide.
![]() To pause or resume the narration, right-click anywhere on the screen, and then click Pause Narration, or Resume Narration.
To pause or resume the narration, right-click anywhere on the screen, and then click Pause Narration, or Resume Narration.
![]() To end the narration, right-click anywhere on the screen, and then click End Show.
To end the narration, right-click anywhere on the screen, and then click End Show.
The recorded slide show timings are automatically saved and the slide show appears in Slide Show view.

![]() Click the Slide Show tab.
Click the Slide Show tab.
![]() Click the Record Slide Show button arrow, and then point to Clear.
Click the Record Slide Show button arrow, and then point to Clear.
![]() Click any of the following options:
Click any of the following options:
![]() Clear Timing on Current Slide.
Clear Timing on Current Slide.
![]() Clear Timing on All Slides.
Clear Timing on All Slides.
![]() Clear Narration on Current Slide.
Clear Narration on Current Slide.
![]() Clear Narration on All Slides.
Clear Narration on All Slides.
Did You Know?
You can show a presentation without narration. To show a presentation with narration on a computer without sound hardware installed, click the Slide Show tab, click the Set Up Show button, select the Show Without Narration check box to avoid problems running the presentation, and then click OK.
See Also
See “Recording Audio” on page 200 for more information and additional ways to record sound.
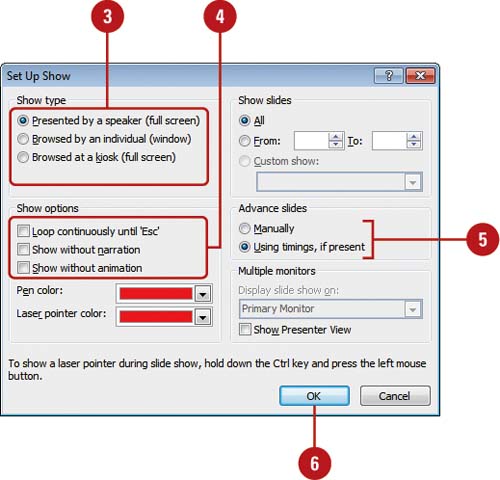
Setting Up a Slide Show
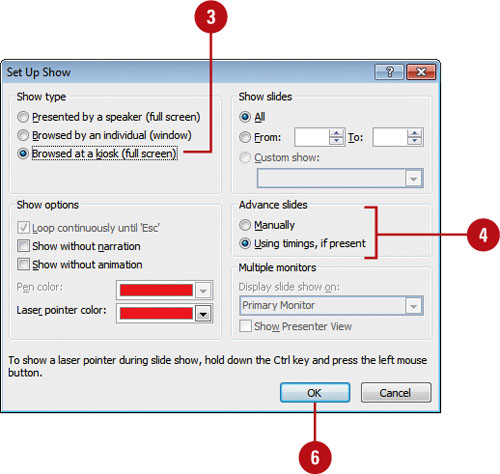
PowerPoint offers several types of slide shows appropriate for a variety of presentation situations, from a traditional big-screen slide show to a show that runs automatically on a computer screen at a conference kiosk. When you don’t want to show all of the slides in a PowerPoint presentation to a particular audience, you can specify a custom show or only a range of slides to show. You can also set show options to run continuously or without narration or animation, and change the pen or laser pointer (New!) color.
Set Up a Show
![]() Click the Slide Show tab.
Click the Slide Show tab.
![]() Click the Set Up Slide Show button.
Click the Set Up Slide Show button.
![]() Choose the show type you want.
Choose the show type you want.
![]() Click the Presented by a speaker option to run a full screen slide show.
Click the Presented by a speaker option to run a full screen slide show.
![]() Click the Browsed by an individual option to run a slide show in a window and allow access to some commands.
Click the Browsed by an individual option to run a slide show in a window and allow access to some commands.
![]() Click the Browsed at a kiosk option to create a self-running, unattended slide show.
Click the Browsed at a kiosk option to create a self-running, unattended slide show.
![]() Select or clear the following show options check boxes:
Select or clear the following show options check boxes:
![]() Loop continuously until ‘Esc’ Select to replay the slide show again until you stop it.
Loop continuously until ‘Esc’ Select to replay the slide show again until you stop it.
![]() Show without narration. Select to not play narration.
Show without narration. Select to not play narration.
![]() Show without animation. Select to not play animation.
Show without animation. Select to not play animation.
![]() Select the Manually or Using timings, if present option.
Select the Manually or Using timings, if present option.
![]() Click OK.
Click OK.
![]() Click the Resolution list arrow, and then click Use Current Resolution, or select a resolution.
Click the Resolution list arrow, and then click Use Current Resolution, or select a resolution.
![]() If you have multiple monitors, click the Show Presentation On list arrow, and then select a monitor.
If you have multiple monitors, click the Show Presentation On list arrow, and then select a monitor.
For Your Information
How Do You Choose a Screen Resolution?
The quality of a display system depends on its screen resolution, how many pixels it can display, and how many bits are used to represent each pixel. The screen resolution signifies the number of dots (pixels) on the entire screen. A higher screen resolution, such as 1024 by 768, makes items appear smaller, while a lower screen resolution, such as 640 by 480, makes items appear larger, which can help make a slide show easier to view.
Show a Custom Show or Range of Slides
![]() Click the Slide Show tab.
Click the Slide Show tab.
![]() Click the Set Up Show button.
Click the Set Up Show button.
![]() To show a range of slides, click the From option, and then enter the first and last slide numbers of the range you want to show.
To show a range of slides, click the From option, and then enter the first and last slide numbers of the range you want to show.
![]() To show a custom show, click the Custom Show option, and then select a custom show.
To show a custom show, click the Custom Show option, and then select a custom show.
![]() Click OK.
Click OK.
Set Pen and Laser Pointer Color
![]() Click the Slide Show tab.
Click the Slide Show tab.
![]() Click the Set Up Show button.
Click the Set Up Show button.
![]() Click the Pen or Laster pointer color list arrow, and then select a color.
Click the Pen or Laster pointer color list arrow, and then select a color.
![]() Click OK.
Click OK.
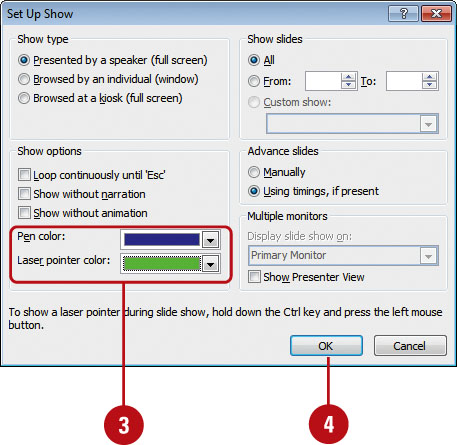
Did You Know?
You can turn your mouse into a laser pointer. In Slide Show view, hold down Ctrl, click the left mouse button, and then begin pointing (New!).
Creating a Custom Slide Show
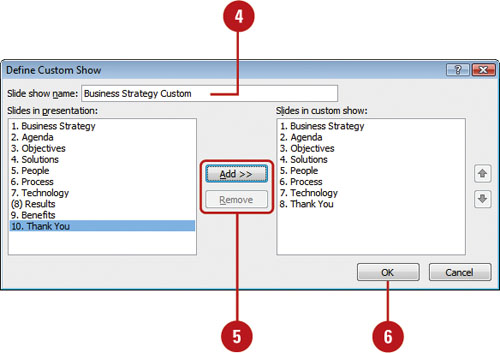
If you plan to present a slide show to more than one audience, you don’t have to create a separate slide show for each audience. Instead, you can create a custom slide show that allows you to specify which slides from the presentation you will use and the order in which they will appear. You can also edit a custom show which you’ve already created. Add, remove, and rearrange slides in a custom show to fit your various needs.
Create a Custom Slide Show
![]() Click the Slide Show tab.
Click the Slide Show tab.
![]() Click the Custom Slide Show button, and then click Custom Shows.
Click the Custom Slide Show button, and then click Custom Shows.
![]() Click New.
Click New.
![]() Type a name for the show.
Type a name for the show.
![]() Click the slide(s) you want, and then click Add. To remove a slide, select it in the Slides In Custom Show list, and then click Remove.
Click the slide(s) you want, and then click Add. To remove a slide, select it in the Slides In Custom Show list, and then click Remove.
![]() Click OK.
Click OK.
![]() Click Close.
Click Close.
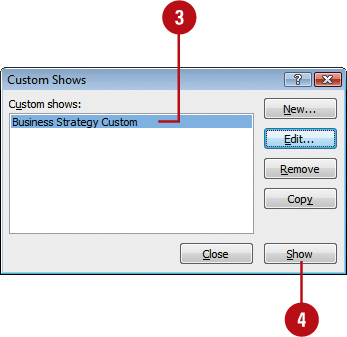
Show a Custom Slide Show
![]() Click the Slide Show tab.
Click the Slide Show tab.
![]() Click the Custom Slide Show button, and then click Custom Shows.
Click the Custom Slide Show button, and then click Custom Shows.
![]() Click the custom slide show you want to run.
Click the custom slide show you want to run.
![]() Click Show.
Click Show.
Did You Know?
You can print a custom show. Click the File tab, click Print, click the Print Range list arrow, select a custom show, and then click Print.
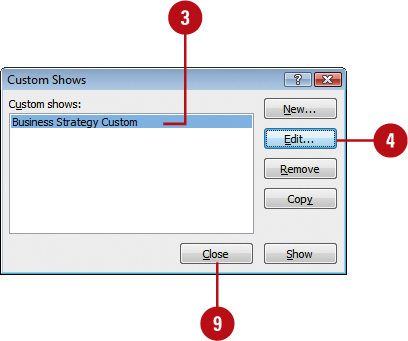
![]() Click the Slide Show tab.
Click the Slide Show tab.
![]() Click the Custom Slide Show button, and then click Custom Shows.
Click the Custom Slide Show button, and then click Custom Shows.
![]() Click the show you want to edit.
Click the show you want to edit.
![]() Click Edit.
Click Edit.
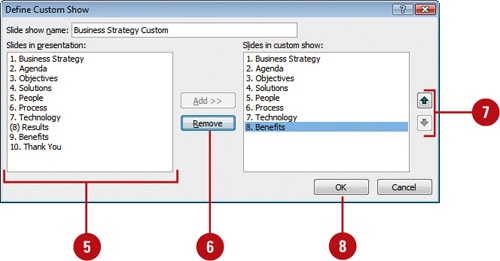
![]() To add a slide, click the slide in the Slides In Presentation list and then click the Add button. The slide appears at the end of the Slides In Custom Show list.
To add a slide, click the slide in the Slides In Presentation list and then click the Add button. The slide appears at the end of the Slides In Custom Show list.
![]() To remove a slide from the show, click the slide in the Slides In Custom Show list, and then click Remove.
To remove a slide from the show, click the slide in the Slides In Custom Show list, and then click Remove.
![]() To move a slide up or down in the show, click the slide in the Slides In Custom Show list, and then click the Up Arrow or Down Arrow button.
To move a slide up or down in the show, click the slide in the Slides In Custom Show list, and then click the Up Arrow or Down Arrow button.
![]() Click OK.
Click OK.
![]() Click Close.
Click Close.
Did You Know?
You can delete a custom slide show.
Click the Slide Show tab, click the Custom Slide Show button, click Custom Shows, click the show you want to delete, click Remove, and then click Close.
You can use the Set Up Show command to display a custom slide show. Click the Slide Show tab, click the Set Up Show button, click the Custom Show option, click the Custom Show list arrow, select the custom slide show, and then click OK.
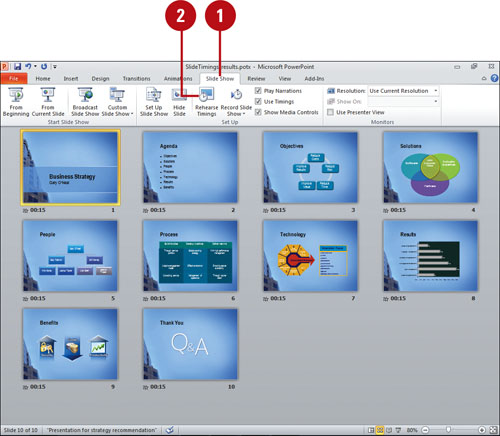
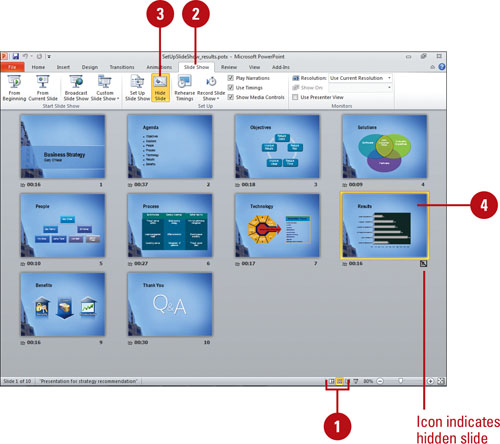
Hiding Slides
Instead of creating a custom show for a slide show, you can also hide slides in your presentation. This is useful if you have a few slides that you don’t want to show. You can quickly hide one or more selected slides by using the Hide Slide button. When you hide a slide, a circle with a line through it appears over the slide number in the Slide pane or Slide Sorter view. If you have hidden slides in a presentation, you can still print them by using the Print Slides option in the Print Range on the Print Screen. If you want to show a hidden slide, you can select it and then use the Hide Slide button again.
Hide Slides
![]() In Slide Sorter view or Normal view, select or display the slide you want to hide.
In Slide Sorter view or Normal view, select or display the slide you want to hide.
![]() Click the Slide Show tab.
Click the Slide Show tab.
![]() Click the Hide Slide button.
Click the Hide Slide button.
The slide number in the Slide pane or Slide Sorter view appears with a circle and a line through it.
![]() To show a hidden slide, click it, and then click the Hide Slide button again.
To show a hidden slide, click it, and then click the Hide Slide button again.
Creating a Self-Running Presentation
Self-running slide shows are a great way to communicate information without needing someone to run the show. You might want to set up a presentation to run unattended in a kiosk at a trade show or place it on your company’s Intranet to run at the user’s convenience. The slides will advance automatically, or a user can advance the slides or activate hyperlinks. You can use the Set Up Show dialog box to select the Browsed at a Kiosk (Full Screen) and other related options to create a self-running slide show.
Set Up a Self-Running Slide Show
![]() Click the Slide Show tab.
Click the Slide Show tab.
![]() Click the Set Up Slide Show button.
Click the Set Up Slide Show button.
![]() Click the Browsed at a kiosk (full screen) option.
Click the Browsed at a kiosk (full screen) option.
The Loop continuously until ‘Esc’ option is selected and grayed out.
![]() Select the Manually or Using timings, if present option, where you can advance the slides manually or automatically.
Select the Manually or Using timings, if present option, where you can advance the slides manually or automatically.
![]() Select additional show options check boxes as appropriate.
Select additional show options check boxes as appropriate.
![]() Click OK.
Click OK.
Did You Know?
Certain tools are active in a self-navigating show. A self-navigating show turns off all navigation tools except action buttons and other action settings available to the user.
You can run a slide show continuously. Open the presentation you want to run, click the Slide Show tab, click the Set Up Show button, select the Loop Continuously Until ‘Esc’ check box, and then click OK.
Working with Fonts
PowerPoint offers an assortment of tools for working with the fonts in your presentation. If you are using nonstandard fonts, you can embed the fonts you use so they “travel” with your presentation. Then, if the computer you use to show your presentation does not have all your fonts installed, the presentation quality will not suffer.
Embed TrueType Fonts in a Presentation
![]() Click the File tab, and then click Options.
Click the File tab, and then click Options.
TIMESAVER If you’re in the Save As dialog box, click the Tools button arrow, and then click Save Options.
![]() In the left pane, click Save.
In the left pane, click Save.
![]() Click the list arrow next to Preserve fidelity when sharing this presentation, and then select the presentation you want to embed fonts.
Click the list arrow next to Preserve fidelity when sharing this presentation, and then select the presentation you want to embed fonts.
![]() Select the Embed fonts in the file check box.
Select the Embed fonts in the file check box.
![]() Click the option you want.
Click the option you want.
![]() Embed only the characters used in the presentation (best for reducing file size).
Embed only the characters used in the presentation (best for reducing file size).
![]() Embed all characters (best for editing by other people).
Embed all characters (best for editing by other people).
![]() Click OK.
Click OK.
Frequently Asked Questions
What’s the Difference Between the Fonts?
There are two basic types of fonts: scalable and bitmapped. A scalable font(also known as outline font) is based on a mathematical equation that creates character outlines to form letters and numbers of any size. The two major scalable fonts are Adobe’s Type 1 PostScript and Apple/Microsoft’s TrueType or OpenType. Scalable fonts are generated in any point size on the fly and require only four variations for each typeface. A bitmapped font consists of a set of dot patterns for each letter and number in a typeface for a specified type size. Bitmapped fonts are created or prepackaged ahead of time and require four variations for each point size used in each typeface. Although a bitmapped font designed for a particular font size will always look the best, scalable fonts eliminate storing hundreds of different sizes of fonts on disk.
Did You Know?
Embedding fonts increase the presentation size. When you embed all characters in a presentation, you embed all the characters in the font set, and then increases file size.