
10: Presenting a Slide Show
What You’ll Do
Deliver a Show on Multiple Monitors
Save a Presentation as a Slide Show
Save a Presentation as a Video
Show a Presentation with the PowerPoint Viewer
Customize the PowerPoint Viewer
Introduction
When you’re done preparing your slide show, it’s time to consider how to show it to your audience. Microsoft PowerPoint gives you several ways to give and share your presentations. When you are presenting the show in person, you can use PowerPoint’s slide navigation tools to move around your presentation. You can move forward and backward or move to a specific slide by using various navigation keys on the keyboard and on-screen Slide Show tools.
As you’re presenting your slide show, you can highlight key ideas by using the mouse as a pointer or pen/highlighter. By annotating your slide show, you can give extra emphasis on a topic or goal for your audience. Annotations can be saved as enhancements to your presentation for later. If you are presenting a slide show using a second monitor or projection screen, PowerPoint includes the tools you need to properly navigate the display equipment.
If you are taking your presentation to another site, you might not need the entire PowerPoint package. Rather than installing PowerPoint on the sites’ computer, you can pack your presentation into one compressed file, storing it on a CD. Once you reach your destination, you can expand the compressed file onto your client’s computer and play it, regardless of whether that computer has PowerPoint installed.
Starting a Slide Show
Once you have set up your slide show, you can start the show at any time. As you run your slide show, you can use the Slide Show toolbar, or Pop-up toolbar, to access certain PowerPoint commands without leaving Slide Show view. If your show is running at a kiosk, you might want to disable this feature.
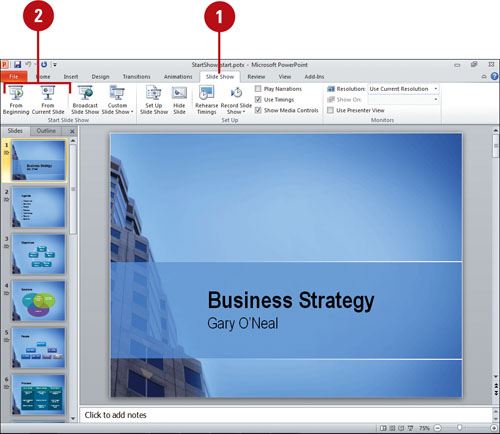
Start a Slide Show and Display the Slide Show Toolbar
![]() Click the Slide Show tab.
Click the Slide Show tab.
TIMESAVER Click the Slide Show View button on the Status bar to start a slide show quickly from the current slide.
![]() Click the From Beginning or From Current Slide button.
Click the From Beginning or From Current Slide button.
![]() Move the mouse pointer to display the Slide Show toolbar.
Move the mouse pointer to display the Slide Show toolbar.
![]() Click a button on the Slide Show toolbar to move to the next or previous slide, or navigate the slide show, or end the show.
Click a button on the Slide Show toolbar to move to the next or previous slide, or navigate the slide show, or end the show.
TIMESAVER Press Esc to stop a slide show.

Did You Know?
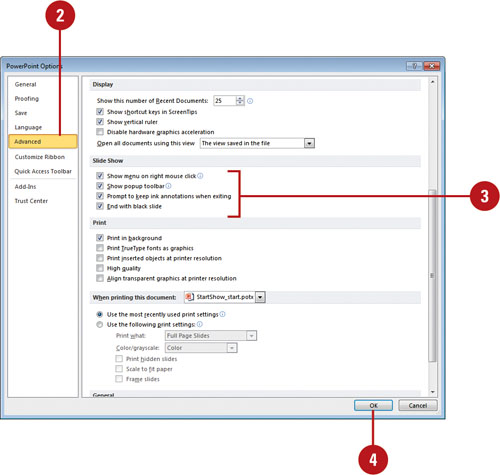
You can set Slide Show options. Click the File tab, click Options, click Advanced, select the slide show and pop-up toolbar check box options you want (Show Menu On Right Click, Show Popup Toolbar, Prompt To Keep Ink Annotations When Exiting, or End With Black Slide), and then click OK.
![]() Click the File tab, and then click Options.
Click the File tab, and then click Options.
![]() In the left pane, click Advanced.
In the left pane, click Advanced.
![]() Select the slide show and pop-up toolbar check box options you want.
Select the slide show and pop-up toolbar check box options you want.
![]() Show menu on right mouse click. Select to show a shortcut menu when you right-click a slide during a slide show.
Show menu on right mouse click. Select to show a shortcut menu when you right-click a slide during a slide show.
![]() Show popup toolbar. Select to show the popup toolbar at the bottom of a full screen presentation.
Show popup toolbar. Select to show the popup toolbar at the bottom of a full screen presentation.
![]() Prompt to keep ink annotations when exiting. Select to be prompted to save your changes when you write on slides during a slide show.
Prompt to keep ink annotations when exiting. Select to be prompted to save your changes when you write on slides during a slide show.
![]() End with black slide. Select to insert a black slide at the end of the presentation.
End with black slide. Select to insert a black slide at the end of the presentation.
![]() Click OK.
Click OK.
Navigating a Slide Show
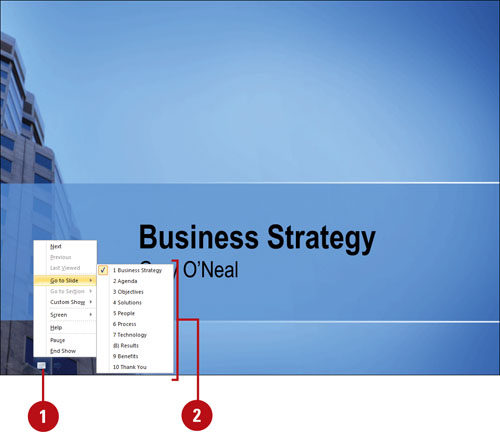
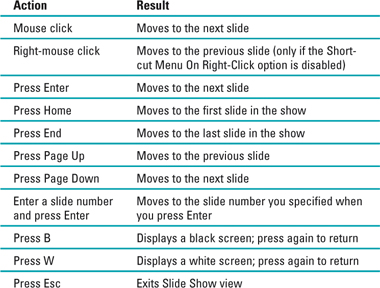
In Slide Show view, you advance to the next slide by clicking the mouse button, pressing the Spacebar, or pressing Enter. In addition to those basic navigational techniques, PowerPoint provides keyboard shortcuts that can take you to the beginning, the end, or any particular slide in your presentation. You can also use the navigation commands on the shortcut menu to access slides in custom slide shows and sections (New!). After a period of inactivity during a normal full-screen slide show, PowerPoint hides the pointer and Slide Show toolbar.
Go to a Specific Slide or Section
![]() In Slide Show view, move the mouse to display the Slide Show toolbar, and then click the Slide button.
In Slide Show view, move the mouse to display the Slide Show toolbar, and then click the Slide button.
TIMESAVER Right-click a slide to display a shortcut menu.
![]() Point to Go to Slide or Go to Section, and then click the slide title or section to which you want to go.
Point to Go to Slide or Go to Section, and then click the slide title or section to which you want to go.
Did You Know?
You can turn your mouse into a laser pointer. In Slide Show view, hold down Ctrl, click the left mouse button, and the begin pointing (New!). To change the laser pointer color, click the Slide Show tab, click the Set Up Show button, click the Laser Pointer Color list arrow, select a color, and then click OK (New!).
You can add speaker notes in Slide Show. In Slide Show view, right-click a blank area on the slide, point to Screen, click Speaker Notes, type your notes, and then click Close.
You can switch to another program in Slide Show. In Slide Show view, right-click a blank area on the slide, point to Screen, and then click Switch Programs. Use the taskbar to switch between programs.
Use Slide Show View Navigation Shortcuts
![]() Refer to the adjacent table for information on Slide Show view navigation shortcuts.
Refer to the adjacent table for information on Slide Show view navigation shortcuts.
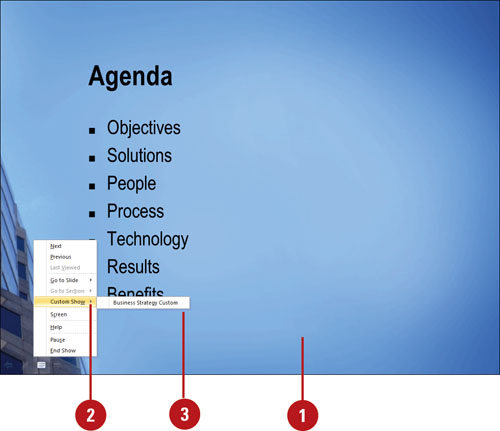
Go to a Custom Slide Show or Section
![]() In Slide Show view, right-click a slide.
In Slide Show view, right-click a slide.
![]() Point to Custom Show.
Point to Custom Show.
![]() Click the custom slide show that you want to go to.
Click the custom slide show that you want to go to.
See Also
See “Creating a Custom Slide Show” on page 332 for information on creating a custom slide show.
Annotating a Slide Show
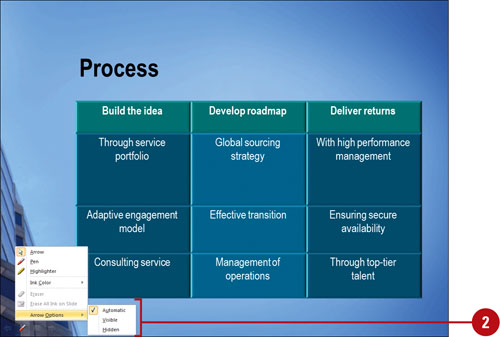
When you are presenting your slide show, you can turn your mouse pointer into a pen tool to highlight and circle your key points. If you decide to use a pen tool, you might want to set its color to match the colors in your presentation. When you are finished, you can turn the pen back to the normal mouse pointer. Mark ups you make on a slide with the pen tool during a slide show can be saved with the presentation, and then turned on or off when you re-open the presentation for editing.
Change Pointer Options
![]() In Slide Show view, move the mouse to display the Slide Show toolbar.
In Slide Show view, move the mouse to display the Slide Show toolbar.
![]() Click the Pen button, point to Arrow Options, and then click a pointer option.
Click the Pen button, point to Arrow Options, and then click a pointer option.
![]() Automatic hides the pointer until you move the mouse.
Automatic hides the pointer until you move the mouse.
![]() Visible makes the pointer visible.
Visible makes the pointer visible.
![]() Hidden makes the pointer invisible throughout the presentation.
Hidden makes the pointer invisible throughout the presentation.
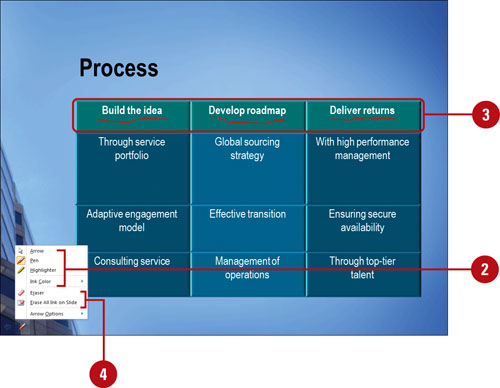
Use a Pen During the Slide Show
![]() In Slide Show view, move the mouse to display the Slide Show toolbar.
In Slide Show view, move the mouse to display the Slide Show toolbar.
![]() Click the Pen button, and then click or point to an option.
Click the Pen button, and then click or point to an option.
![]() A writing tool (Pen, or Highlighter).
A writing tool (Pen, or Highlighter).
![]() Ink Color to select an ink color.
Ink Color to select an ink color.
![]() Drag the mouse pointer to draw on your slide presentation with the pen or highlighter.
Drag the mouse pointer to draw on your slide presentation with the pen or highlighter.
![]() To remove ink, click the Pen button, and then click Eraser for individual ink, or click Erase All Ink on Slide for all ink.
To remove ink, click the Pen button, and then click Eraser for individual ink, or click Erase All Ink on Slide for all ink.
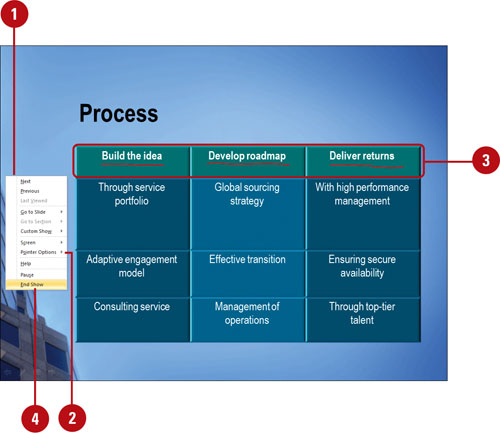
Save Annotations and Turn Them On and Off
![]() In Slide Show view, right-click a slide.
In Slide Show view, right-click a slide.
![]() Point to Pointer Options.
Point to Pointer Options.
![]() Click a pen or highlighter, and then make an annotation on a slide.
Click a pen or highlighter, and then make an annotation on a slide.
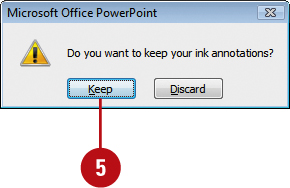
![]() Right-click the slide, and then click End Show.
Right-click the slide, and then click End Show.
![]() Click Keep when asked if you want to keep your ink annotations for editing.
Click Keep when asked if you want to keep your ink annotations for editing.
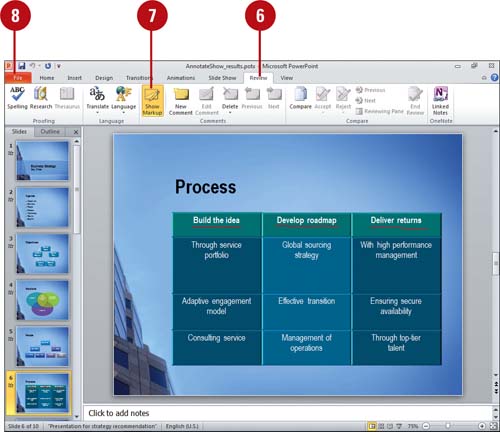
![]() In Normal view, click the Review tab.
In Normal view, click the Review tab.
![]() Click the Show Markup button.
Click the Show Markup button.
The annotations disappear from the slide.
![]() Click the File tab, click Close, and then click Save to save the changes.
Click the File tab, click Close, and then click Save to save the changes.
When you re-open this presentation, you can view the Mark ups in Normal or Slide Sorter view, and then turn them off or on.
Did You Know?
You can quickly turn the pen back to the mouse pointer. To turn the pen back to the normal mouse pointer, right-click a slide in Slide Show view, point to Pointer Options, and then click Arrow.
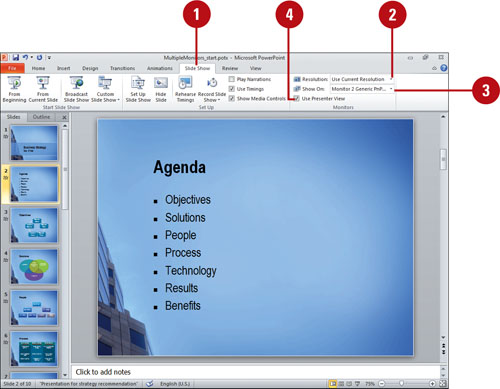
Delivering a Show on Multiple Monitors
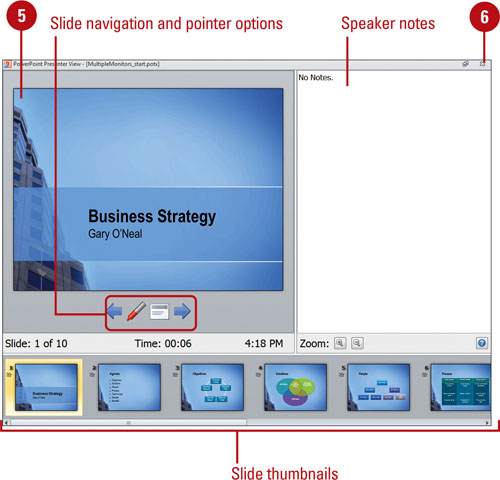
If your computer is connected to two monitors, you can view a slide show on one monitor while you control it from another. This is useful when you want to control a slide show and run other programs that you don’t want the audience to see. When you display your slide show on multiple monitors, you can present it using PowerPoint’s Presenter Tools in the Presenter view, which allows presenters to have their own view that is not visible to the audience. In addition to including details about what bullet or slide is coming next, this view also enables you to see your speaker notes and lets you jump directly to any slide. You can only use Presenter view and run the presentation from one monitor.
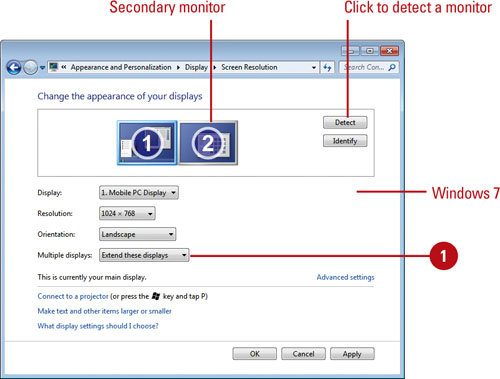
Turn on Multiple Monitor Support
![]() In Display Settings in your Windows Control Panel, turn on multiple monitor support.
In Display Settings in your Windows Control Panel, turn on multiple monitor support.
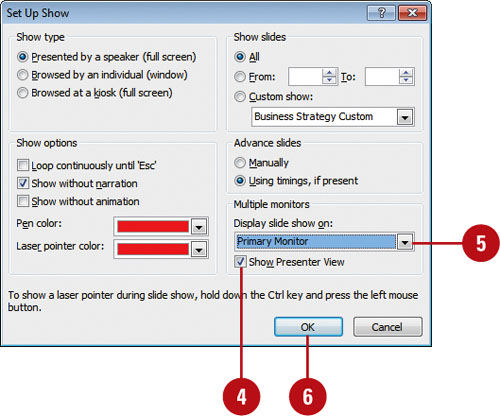
![]() In PowerPoint, click the Slide Show tab.
In PowerPoint, click the Slide Show tab.
![]() Click the Set Up Slide Sho w button.
Click the Set Up Slide Sho w button.
![]() Select the Show Presenter View check box.
Select the Show Presenter View check box.
![]() Click the Display slide show on list arrow, and then select the monitor where you want to display the slide show.
Click the Display slide show on list arrow, and then select the monitor where you want to display the slide show.
![]() Click OK.
Click OK.
Did You Know?
There are requirements to run two monitors? You must have dual-monitor hardware installed (either two video cards, or multiple monitor capabilities, like a laptop) and be using Windows XP with SP3 (or later; recommended for Windows Vista with SP1, or 7). PowerPoint only supports the use of two monitors.
Present a Slide Show On Two Monitors in Presenter View
![]() Click the Slide Show tab.
Click the Slide Show tab.
![]() Click the Resolution list arrow, and then click the screen size you want to project the slide show.
Click the Resolution list arrow, and then click the screen size you want to project the slide show.
![]() Click the Show Presentation On list arrow, and then click the name of the monitor on which you want to project the slide show.
Click the Show Presentation On list arrow, and then click the name of the monitor on which you want to project the slide show.
![]() Select the Use Presenter View check box.
Select the Use Presenter View check box.
![]() Click the Slide Show button, and then use the navigation tools in Presenter view to deliver the presentation on multiple monitors:
Click the Slide Show button, and then use the navigation tools in Presenter view to deliver the presentation on multiple monitors:
![]() Slide thumbnails. Click to select slides out of sequence and create a customized presentation.
Slide thumbnails. Click to select slides out of sequence and create a customized presentation.
![]() Preview text. Shows you what your next click will add to the screen, such as a new slide or the next bullet in a list.
Preview text. Shows you what your next click will add to the screen, such as a new slide or the next bullet in a list.
![]() Slide number and elapsed time. Shows you the current slide number and elapsed show time.
Slide number and elapsed time. Shows you the current slide number and elapsed show time.
![]() Speaker notes. Read speaker’s notes shown in large, clear type as a script.
Speaker notes. Read speaker’s notes shown in large, clear type as a script.
![]() Pointer Options. Click to select pen type, ink color, erase and arrow options.
Pointer Options. Click to select pen type, ink color, erase and arrow options.
![]() Slide Show. Click to navigate to other locations in the presentation.
Slide Show. Click to navigate to other locations in the presentation.
![]() If necessary, press Esc or click the Close button to exit Presenter View.
If necessary, press Esc or click the Close button to exit Presenter View.
Saving a Presentation as a Slide Show
When you’re giving a professional slide show presentation, you might not want your audience to see you start it from PowerPoint. Instead, you can save a presentation as a PowerPoint Show to open directly into Slide Show view. You can use the Save As dialog box to save a presentation as a PowerPoint Show (.ppsx) or PowerPoint Macro-Enabled (.ppsm). After you save a presentation as a PowerPoint Show file, you can create a shortcut to it on your desktop and then simply double-click the PowerPoint Show file to start it directly in Slide Show view. You need the Microsoft PowerPoint Viewer—available free online at www.microsoft.com—or PowerPoint software installed on your computer to display the slide show.
Save a Presentation as a PowerPoint Show
![]() Click the File tab, and then click Save As.
Click the File tab, and then click Save As.
![]() You can also click the File tab, click Save & Send, click Change File Type, and then click PowerPoint Show(*.ppsx).
You can also click the File tab, click Save & Send, click Change File Type, and then click PowerPoint Show(*.ppsx).
![]() Click the Save in list arrow, and then click the drive or folder where you want to save the file.
Click the Save in list arrow, and then click the drive or folder where you want to save the file.
![]() Type a presentation show file name.
Type a presentation show file name.
![]() Click the Save as type list arrow, and then click PowerPoint Show(*.ppsx) or PowerPoint Macro-Enabled Show (*.ppsm).
Click the Save as type list arrow, and then click PowerPoint Show(*.ppsx) or PowerPoint Macro-Enabled Show (*.ppsm).
![]() Click Save.
Click Save.

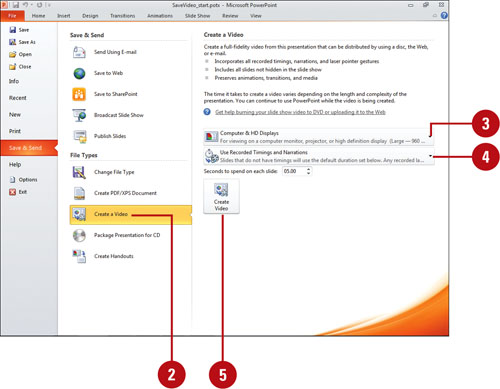
Saving a Presentation as a Video
Sometimes sharing a presentation as a video is the best approach. In PowerPoint, you can save a complete presentation, including slide timings and narration, as a Windows Media Video (.wmv). After you save a presentation as a video file, you can share it with others on a Web site, DVD, or network. It’s a single file that you can run on most computers. If you need the video in a different video format, you need to use a third-party conversation software to convert the Windows Media Video file into another video format, such as MP4 or QuickTime.
Save a Presentation as a Video
![]() Click the File tab, and then click Save & Send.
Click the File tab, and then click Save & Send.
![]() Click Create a Video.
Click Create a Video.
![]() Click the Resolution list arrow, and then select any of the following:
Click the Resolution list arrow, and then select any of the following:
![]() Computer & HD Displays. Creates for large screen (960 × 720).
Computer & HD Displays. Creates for large screen (960 × 720).
![]() Internet & DVD. Creates for medium screen (640 × 480).
Internet & DVD. Creates for medium screen (640 × 480).
![]() Portable Devices. Creates for small screen (320 × 240).
Portable Devices. Creates for small screen (320 × 240).
![]() Click the Timing list arrow, and then click Don’t Use Recorded Timings and Narrations or Use Recorded Timings and Narrations, and then specify a time.
Click the Timing list arrow, and then click Don’t Use Recorded Timings and Narrations or Use Recorded Timings and Narrations, and then specify a time.
![]() Click the Create Video button.
Click the Create Video button.
![]() Specify a name and location for the video.
Specify a name and location for the video.
![]() Click Save.
Click Save.
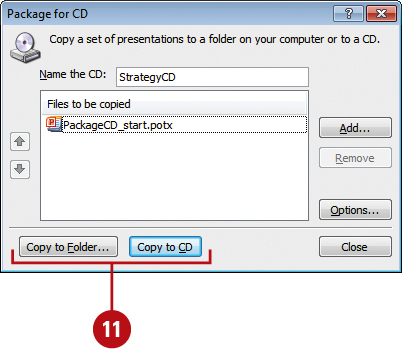
Packaging a Presentation on CD
The Package for CD feature allows you to copy one or more presentations and all of the supporting files, including linked files, on CD. You can choose packaging options to automatically or manually run your presentations. The PowerPoint Viewer is a program included on the packaged CD used to run presentations on computers that don’t have PowerPoint installed. If you are packaging your presentation for use on your laptop, a DVD, or a network, you can use Package for CD to package your presentation to a folder or a network. PowerPoint doesn’t support direct burning to DVDs, so you need to use DVD burning software to import the presentation files and create a DVD. Before you package your presentation, you can inspect it for hidden data and personal information.
Package a Presentation on CD or to a Folder
![]() Click the File tab, click Save & Send, and then click Package Presentation for CD.
Click the File tab, click Save & Send, and then click Package Presentation for CD.
![]() Click the Package for CD button.
Click the Package for CD button.
![]() Type a name for the CD.
Type a name for the CD.
![]() To add additional files to the CD, click Add, select the files you want, and then click Open.
To add additional files to the CD, click Add, select the files you want, and then click Open.
![]() To reorder presentations, click Move Up or Move Down.
To reorder presentations, click Move Up or Move Down.
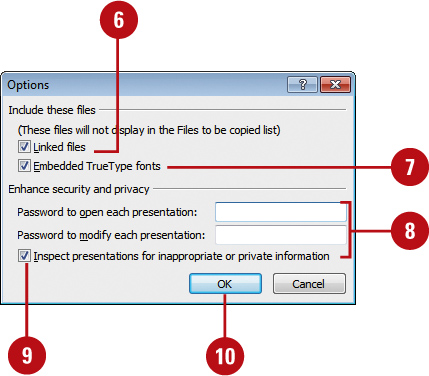
![]() Click Options.
Click Options.

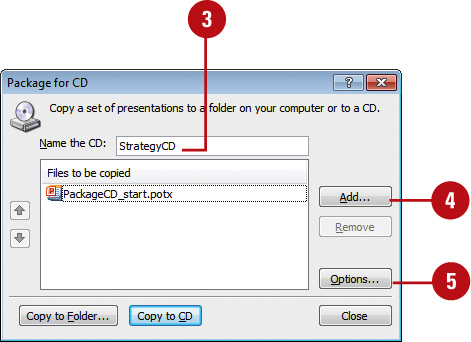
![]() To link any external files, select the Linked files check box.
To link any external files, select the Linked files check box.
![]() To ensure fonts are available on the play back computer, select the Embedded TrueType fonts check box.
To ensure fonts are available on the play back computer, select the Embedded TrueType fonts check box.
![]() If you want, type a password to open or modify the presentation.
If you want, type a password to open or modify the presentation.
![]() To remove data, select the Inspect presentations for inappropriate or private information check box.
To remove data, select the Inspect presentations for inappropriate or private information check box.
![]() Click OK.
Click OK.
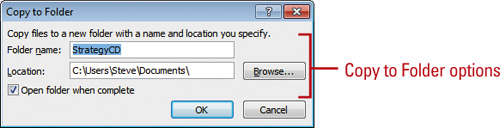
![]() Click Copy to CD, and then follow the CD writer instructions, or click Copy to Folder, specify a folder location, and then click OK.
Click Copy to CD, and then follow the CD writer instructions, or click Copy to Folder, specify a folder location, and then click OK.
If a message alert appears, click the buttons you want to complete the process.
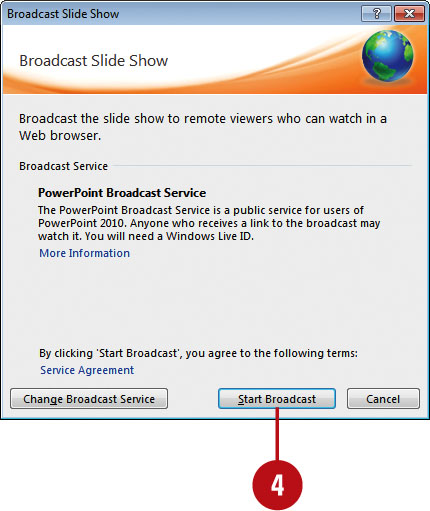
Broadcasting a Presentation
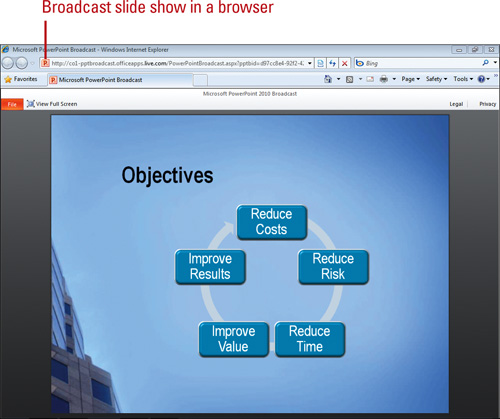
If you want to share your presentation with others at different locations, the Broadcast Slide Show command (New!) allows you to display a slide show over the Internet. Before you start the broadcast, you send a URL link to your remote audience via an e-mail or copied link that they can use to access and watch your slide show in their browser, which supports Internet Explorer, Firefox, and Safari for Mac. To use the Broadcast Slide Show command, you need to use the PowerPoint Broadcast Service provided by Microsoft at no charge along with a Windows Live ID or use a broadcast service provided by your organization on a server that has the Microsoft Office Web Apps installed. In the browser delivery of your slide show, some features are changed, including transitions shown as fades, no audio or video, no ink annotations, can’t follow a hyperlink, and screensavers and e-mail popup can disrupt the view.
Broadcast a Presentation
![]() Open the presentation you want to broadcast.
Open the presentation you want to broadcast.
![]() Click the Slide Show tab.
Click the Slide Show tab.
![]() Click the Broadcast Slide Show button.
Click the Broadcast Slide Show button.
![]() Click Start Broadcast.
Click Start Broadcast.
![]() Enter your Windows Live ID e-mail address and password, and then click OK.
Enter your Windows Live ID e-mail address and password, and then click OK.
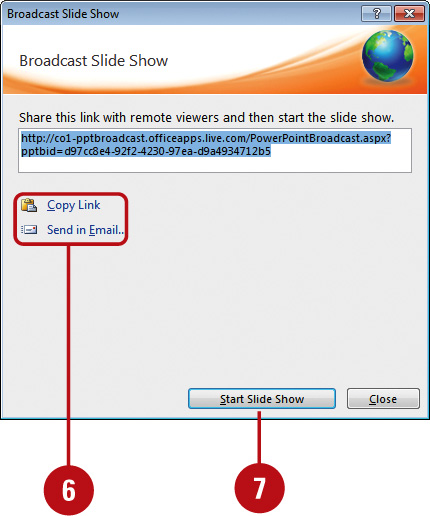
![]() Click the Copy Link or Send in Email link to share the link to access the broadcast.
Click the Copy Link or Send in Email link to share the link to access the broadcast.
![]() Click Start Slide Show.
Click Start Slide Show.
Your audience can open the link in their browser to follow along with your slide show as you display it in PowerPoint.
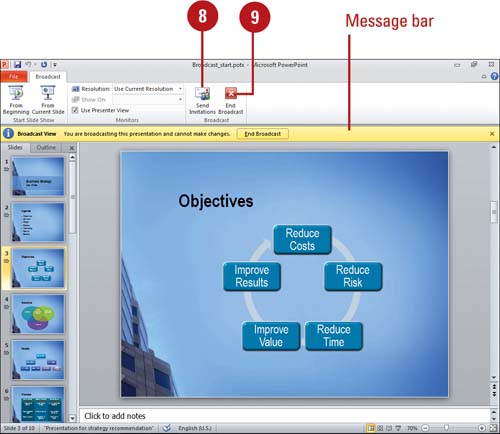
![]() To invite more people to the slide show, switch to Normal view, and then click the Send Invitations button.
To invite more people to the slide show, switch to Normal view, and then click the Send Invitations button.
![]() To end the broadcast, click the End Broadcast button on the Message bar or on the Broadcast tab.
To end the broadcast, click the End Broadcast button on the Message bar or on the Broadcast tab.
![]() Click End Broadcast to confirm it.
Click End Broadcast to confirm it.

Showing a Presentation with the PowerPoint Viewer
The PowerPoint Viewer is a program used to run presentations on computers that don’t have Microsoft PowerPoint installed. This Viewer is used as part of the Package for CD feature, but you can also use the Viewer independently. You can download the PowerPoint Viewer from the Microsoft Office.com Web site in the downloads section if you need it on the road. You can start the PowerPoint Viewer from the Start menu under All Programs or use the Search box if unavailable. You open your presentation from the PowerPoint Viewer just like you open them from the Open dialog box. If a presentation contains password protection, the PowerPoint Viewer prompts you for a password.
Show a Presentation with the PowerPoint Viewer
![]() Click the Start button, point to All Programs, click Microsoft Office, and then click Microsoft PowerPoint Viewer 2010.
Click the Start button, point to All Programs, click Microsoft Office, and then click Microsoft PowerPoint Viewer 2010.
TROUBLE? If the viewer is not available on the Start menu, open Windows Explorer, and then search for the pptview.exe file, which you can double-click to start the program.
![]() If necessary on first run, click Accept for the license agreement.
If necessary on first run, click Accept for the license agreement.
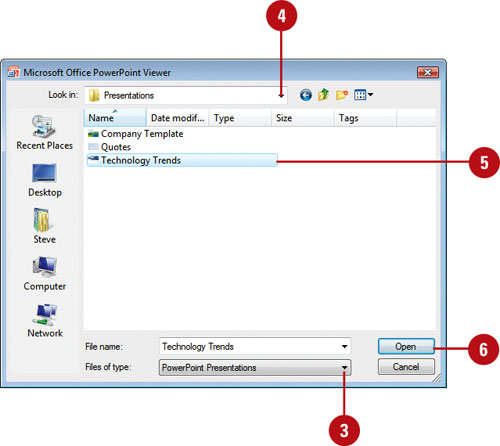
![]() If you want to open a specific file type, click the Files of type list arrow, and then click a file type.
If you want to open a specific file type, click the Files of type list arrow, and then click a file type.
![]() If the file is located in another folder, click the Look in list arrow, and then navigate to the file.
If the file is located in another folder, click the Look in list arrow, and then navigate to the file.
![]() Select the presentation you want to show.
Select the presentation you want to show.
![]() Click Open.
Click Open.
![]() Navigate the slide show.
Navigate the slide show.
![]() To stop the show, press Esc at any time or click Cancel at the end to close the PowerPoint Viewer.
To stop the show, press Esc at any time or click Cancel at the end to close the PowerPoint Viewer.
Customizing the PowerPoint Viewer
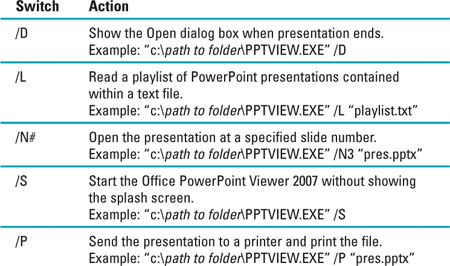
You can use the Run command within Microsoft Windows to customize the way the PowerPoint Viewer starts and functions. In the Run dialog box, you can enter a command to start the PowerPoint Viewer without the startup splash screen, at a specific slide, and using a playlist (showing consecutive presentations). You can also show the Open dialog box at the end of the show and print a presentation. The command you enter uses switches and parameters to perform the functions you want. A switch determines the function you want to perform. In the command-line, the switch appears after the program name (PPTVIEW.EXE) with a a space, followed by a slash (/) and the name of the switch. The switch is followed in some cases by a space and a parameter, which gives direction. A parameter is typically a file name. For example, “c:path to folderPPTVIEW.EXE /N3 “pres.pptx”, where “c:path to folderPPTVIEW.EXE” is the command, /N3 is the switch, and “pres.pptx” is the parameter. The path to folder is the location where the PPTVIEW.EXE file is stored. It’s typically located in “c:programs filesmicrosoft officeoffice 12PPTVIEW.EXE”
Use the Run Command to Start the PowerPoint Viewer
![]() Click the Start button, and then click Run (XP), or point to All Programs, point to Accessories, and then click Run (7 or Vista).
Click the Start button, and then click Run (XP), or point to All Programs, point to Accessories, and then click Run (7 or Vista).
![]() Refer to the adjacent table for commands to enter.
Refer to the adjacent table for commands to enter.
You can use only one switch at a time. Quotation marks are required if there are spaces in the path or file name; they are optional when there are no spaces.
![]() Click OK.
Click OK.
Did You Know?
You can create a shortcut to reuse a command-line switch. Right-click the Windows desktop, point to New, and then click Shortcut. In the wizard, type the full path to the Viewer or click Browse to find it, add a switch and parameter to the path command-line, click Next, type a shortcut name, and then click Finish.
Showing Multiple Presentations
If you want to deliver more than one slide show at a time, you can create and use a playlist. A playlist is a simple text file than contains a list of presentation file names in the order that you want to deliver them. File names in a playlist file need to include the full path to the presentation unless they are located in the same location as the PowerPoint Viewer. It is not possible to add command-line switches to the presentation file name in the playlist.
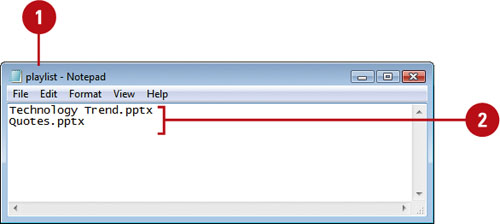
Create and Show a Playlist
![]() Open a text editor, such as Notepad or WordPad.
Open a text editor, such as Notepad or WordPad.
![]() Type the presentations files you want to use on separate lines.
Type the presentations files you want to use on separate lines.
If the presentation files are not in the same location as the Viewer, be sure to include full paths.
![]() Save the text file with the name you want, such as playlistpres.txt, and then exit the program.
Save the text file with the name you want, such as playlistpres.txt, and then exit the program.
To avoid problems, place the text file, and presentation files in the same folder as the PowerPoint Viewer.
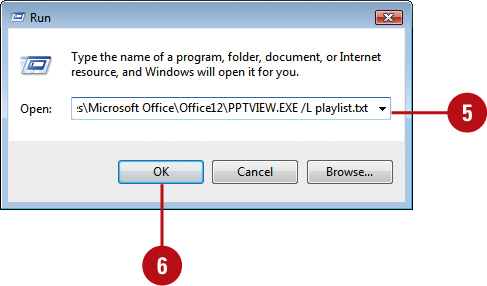
![]() Click the Start button, and then click Run (XP), or point to All Programs, point to Accessories, and then click Run (7 or Vista).
Click the Start button, and then click Run (XP), or point to All Programs, point to Accessories, and then click Run (7 or Vista).
![]() Type “c:path to folderPPTVIEW.EXE” /L “playlistpres.txt”
Type “c:path to folderPPTVIEW.EXE” /L “playlistpres.txt”
Quotation marks are required if there are spaces in the path or file name; they are optional when there are no spaces.
![]() Click OK.
Click OK.
See Also
See “Customizing the PowerPoint Viewer” on page 353 for information on using the Run command, command-line switches, and parameters.